
When I sat down to design this set, I had a very specific vision in mind. I wanted something romantic and feminine that would actually work for real summer wear. Something with structure but also breathability. A piece that looked intricate but used familiar techniques arranged in clever ways. After countless swatches and a few late nights, I finally landed on this lavender lace combination, and I am SO pleased with how it turned out!
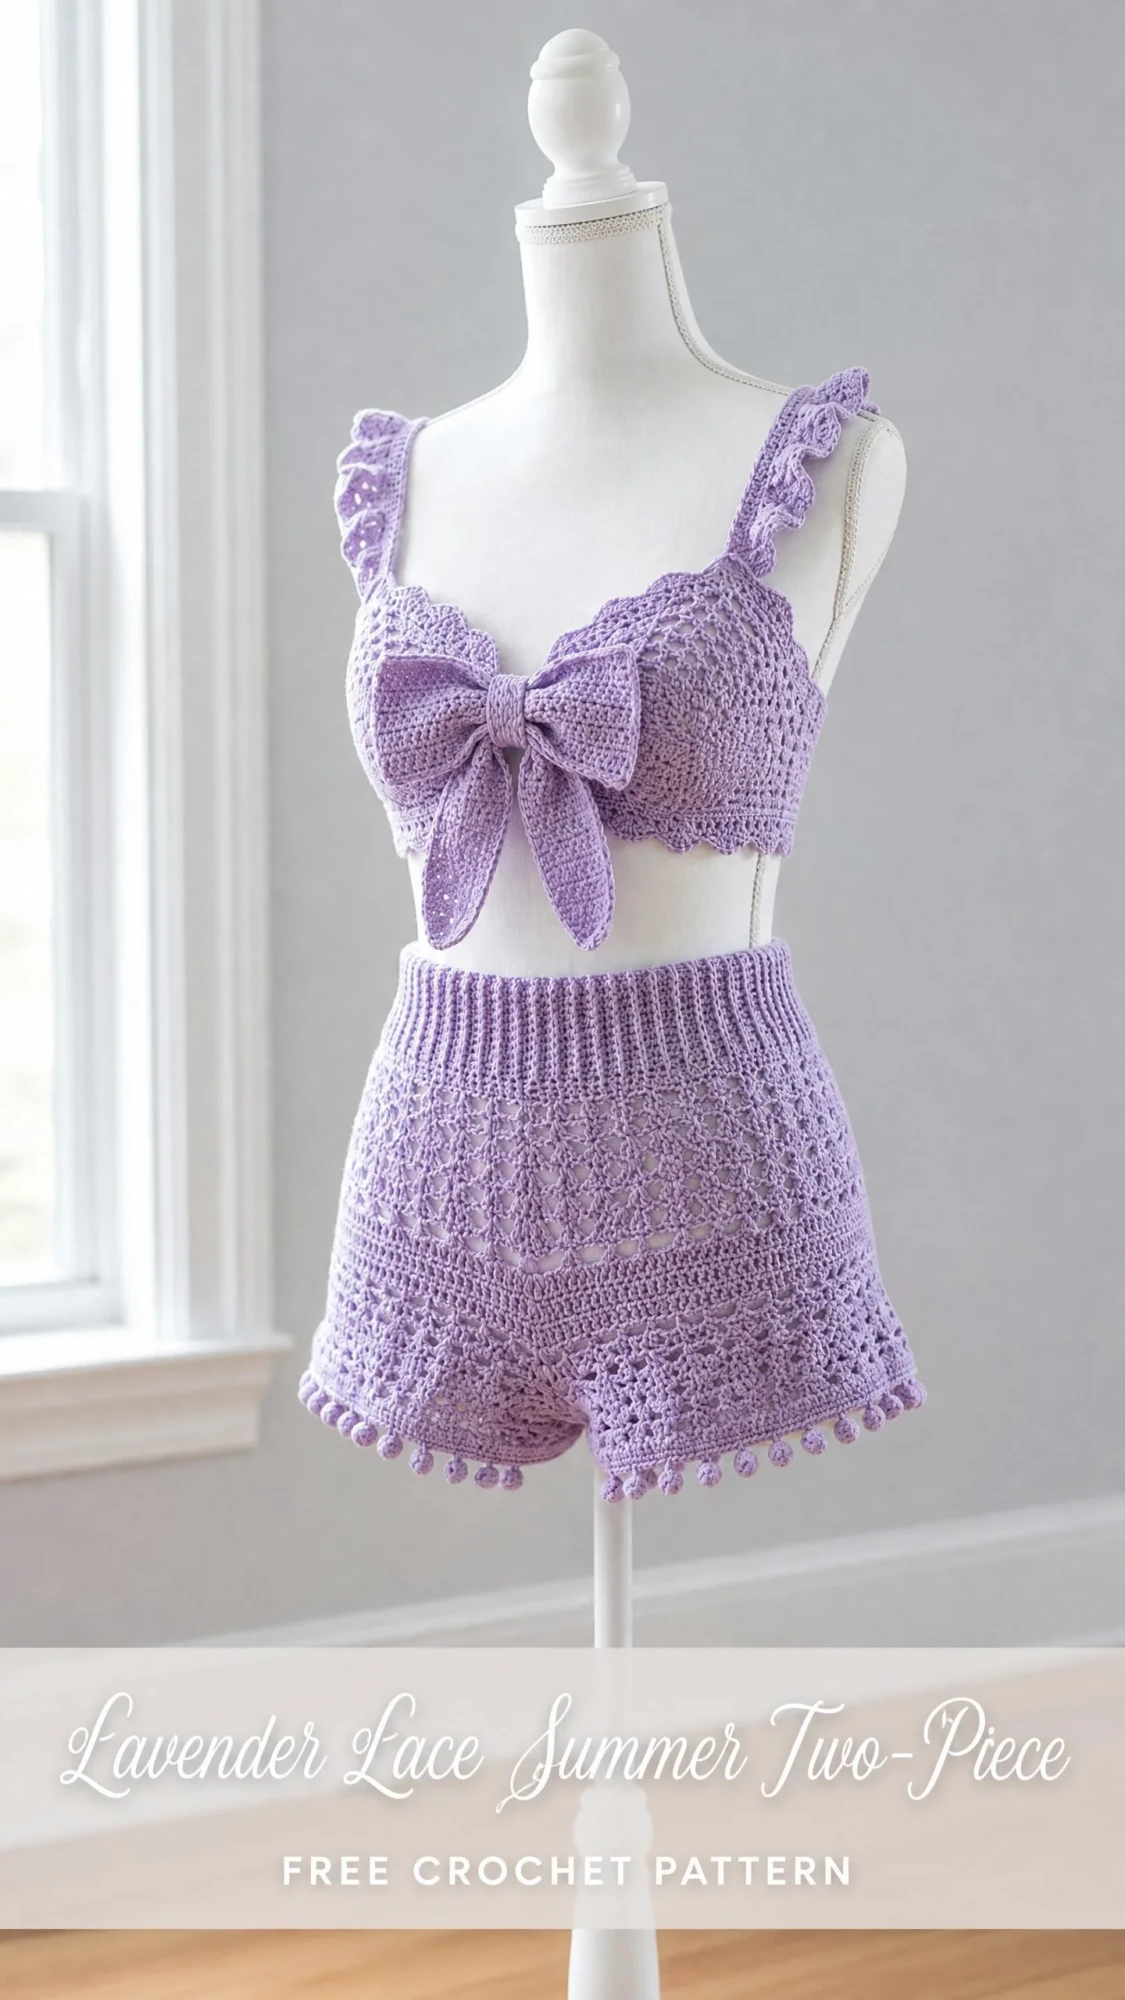
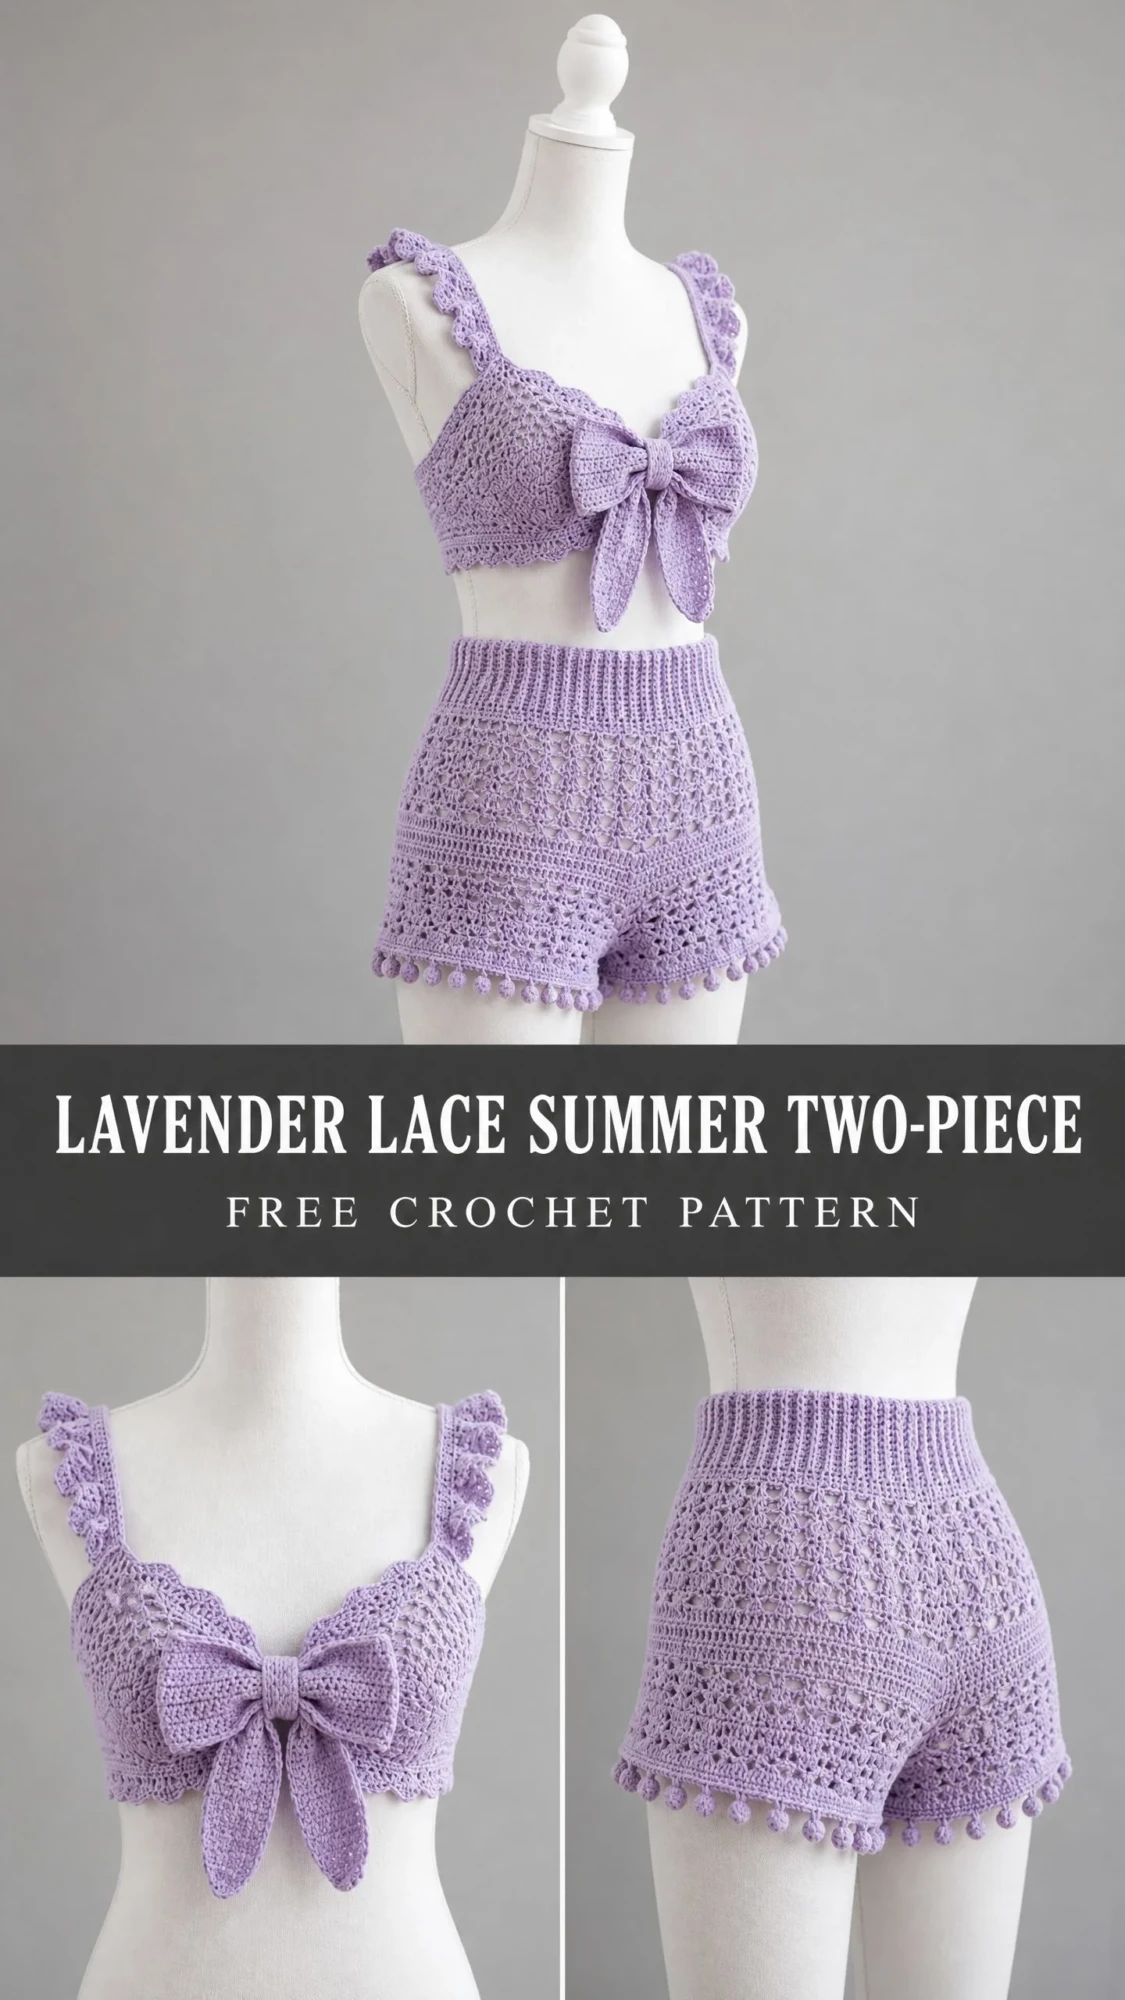
The bralette features these sweet ruffled straps and a center bow that ties everything together, literally and figuratively. The high-waisted shorts have that dreamy lace body panel with the cutest pom-pom trim along the hem. Both pieces complement each other beautifully while still being wearable on their own.
I know this looks like an ambitious project, and honestly, it does require some experience. But if you have made a couple of garments before and feel comfortable with lace stitch patterns, you can absolutely make this happen. Let me walk you through every single step.
About This Crochet Pattern
This two-piece summer set consists of a crop top bralette with a decorative bow and ruffle straps, paired with high-waisted lace shorts featuring a pom-pom trim border. Both pieces are worked flat and then seamed together. The top has a center-front bow tie closure, ruffled shoulder straps, and a scalloped bust edge. The shorts feature a ribbed waistband, a gorgeous lace body panel, and that playful pom-pom hem that gives the whole set its personality.
Skill Level: Intermediate to Advanced. You should be comfortable with working lace stitch repeats, shaping a fitted bodice, working ribbing, constructing three-dimensional bow pieces, and assembling multiple components cleanly. If you have completed at least two or three garment projects, you will find this manageable.
Time Estimate: Approximately 18 to 25 hours total for both pieces, depending on your working speed.
Finished Measurements
This pattern is written for a size Small. Here are the finished measurements:
Top:
Shorts:
Materials You Will Need
Yarn: Approximately 700 to 800 yards (640 to 730 meters) of DK weight (CYCA 3) yarn in lavender. A smooth, mercerized cotton or cotton-blend will produce the best stitch definition and drape for the lace panels.
Here are my specific yarn suggestions:
1. Lion Brand 24/7 Cotton in Lavender: 186 yards (170 meters) per skein, 100% mercerized cotton. You will need 4 to 5 skeins. This yarn has excellent stitch definition and launders beautifully.
2. Paintbox Yarns Simply DK in Wisteria Purple: 137 yards (125 meters) per skein, 100% premium acrylic. You will need 6 skeins. This option is machine washable and budget-friendly with a soft drape.
3. Scheepjes Catona in Lavender: 50g or approximately 125 meters per ball, 100% mercerized cotton. You will need 6 balls. This gives you premium stitch clarity and color vibrancy.
Substitution note: Choose any DK weight yarn that meets gauge. Avoid fuzzy or textured yarns as they will obscure the lace pattern. Cotton or cotton blends are strongly recommended for summer wear and to help the lace pattern lie flat after blocking.
Hooks:
Notions:
Gauge Information
Getting your gauge right is critical for garment fit, so please take time to swatch before diving in.
With primary E-4 (3.5 mm) hook and DK weight cotton yarn, in single crochet (sc): 18 stitches x 22 rows = 4 inches (10 cm) square, blocked.
In the lace pattern: One 12-stitch lace repeat = approximately 2.5 inches (6.5 cm) wide and 2 rows = approximately 1 inch (2.5 cm) tall, blocked.
Adjust hook size as needed to match gauge before beginning.
Abbreviations and Stitch Definitions
Let me walk you through every abbreviation you will encounter. I am defining them in plain English so nothing catches you off guard.
Brackets [ ] mean work the instructions inside the number of times indicated. Asterisks mean repeat the instructions between them as directed.
Special Stitches for This Crochet Tutorial
These are the techniques that give this set its beautiful texture and detail.
Picot: Chain 3, slip stitch in the third chain from the hook. This creates a small decorative loop used on the ruffle edges.
Shell Stitch: Work 5 double crochets all into the same stitch or space. This creates a lovely fan-shaped cluster.
V-Stitch: Work (dc, ch 2, dc) all into the same stitch or space.
Puff Stitch: [Yarn over, insert hook into stitch, yarn over and draw up a loop to approximately 1/2 inch (1.25 cm) height] 3 times in the same stitch (7 loops on hook), yarn over and draw through all 7 loops, chain 1 to close. This creates the rounded raised bobbles for the pom-pom border.
Ruffle Increase Row: Work 2 double crochets in each stitch across. This doubles the stitch count and creates that beautiful ruffled edge.
Ribbing Stitch: Alternate FPdc and BPdc across. On subsequent rows, work FPdc over BPdc and BPdc over FPdc to maintain the rib columns.
Lace Panel Repeat (12-stitch repeat): Row 1: (Skip 2 stitches, Shell in next stitch, chain 2, skip 2 stitches, sc in next stitch, chain 2, skip 2 stitches, Shell in next stitch, skip 2 stitches) over each 12-stitch group. Row 2: Sc in top of first Shell, chain 5, sc in next sc, chain 5, sc in top of next Shell. These two rows form one complete lace repeat unit.
Important Pattern Notes
Before you begin, here are some things that will help your project go smoothly:
1. The top is worked in two flat panels (front and back) then seamed at the sides. The straps are picked up and worked from the top edges.
2. The shorts are worked in the round for the waistband, then the body is worked flat in two panels (front and back) joined at the sides, then rejoined at the crotch.
3. All lace rows are worked on the RS. If you need to adjust for your row parity, always begin lace rows with the RS facing.
4. The pom-pom border on the shorts hem is achieved with Puff Stitches spaced evenly along the final round.
5. Chain-2 spaces at the beginning of double crochet rows do not count as a stitch in this pattern. Work the first dc into the first stitch at the base of the turning chain.
6. Block both pieces before final assembly for best results.
7. The top requires a lining or bra cups if worn as outerwear. A cotton jersey lining is recommended for comfort.
Step-by-Step Instructions: Top (Bralette)
Front Panel
Foundation Chain: Chain 79.
Row 1 (WS): Sc in second chain from hook, sc in each chain across. Chain 1, turn. (78 sc)
Row 2 (RS): Sc in each stitch across. Chain 1, turn. (78 sc)
Row 3 (WS): Sc in each stitch across. Chain 1, turn. (78 sc)
These three rows establish the bottom band. The band should measure approximately 17.5 inches (44.5 cm) wide and 0.5 inches (1.25 cm) tall.
Begin Lace Body:
Row 4 (RS, decrease row): Sc in first stitch, [sc in next 12 stitches, sc2tog] 6 times. Chain 2, turn. (72 sc)
Row 5 (RS, Lace Row A): Chain 2 (does not count as stitch), [skip 2 stitches, Shell in next stitch, chain 2, skip 2 stitches, sc in next stitch, chain 2, skip 2 stitches, Shell in next stitch, skip 2 stitches] 6 times, ending with slip stitch in last stitch. Chain 1, turn.
Row 6 (WS, Lace Row B): Chain 1, sc in top of first Shell (the 3rd dc of the Shell), [chain 5, sc in next sc, chain 5, sc in top of next Shell] 6 times. Chain 2, turn. (13 sc, 12 ch-5 arches)
Row 7 (RS, Lace Row A): Chain 2, [Shell in sc, chain 2, sc in ch-5 arch, chain 2, Shell in next sc, skip ch-5 arch] 6 times, slip stitch in last sc. Chain 1, turn.
Row 8 (WS, Lace Row B): Repeat Row 6. (13 sc, 12 ch-5 arches)
Row 9 (RS, Lace Row A): Repeat Row 7.
Row 10 (WS, Lace Row B): Repeat Row 6. (13 sc, 12 ch-5 arches)
Row 11 (RS, Lace Row A): Repeat Row 7.
Row 12 (WS, Lace Row B): Repeat Row 6. (13 sc, 12 ch-5 arches)
You have completed 4 full lace repeats. The lace body should measure approximately 4 inches (10 cm) tall.
Bust Shaping
Row 13 (RS, transition): Chain 1, work sc across as follows: sc in the first sc, [2 sc in next ch-5 arch, sc in next sc] 12 times, sc in last 2 foundation selvedge stitches as needed to total 72 sc across. Chain 1, turn. (72 sc)
Row 14 (WS, divide for cups): Work left cup only. Sc in each of first 36 stitches. Chain 1, turn. (36 sc)
Left Cup Shaping
Row 15 (RS): Sc2tog at beginning, sc to last 2 stitches, sc2tog. Chain 1, turn. (34 sc)
Row 16 (WS): Sc2tog, sc to last 2 stitches, sc2tog. Chain 1, turn. (32 sc)
Row 17 (RS): Sc2tog, sc to last 2 stitches, sc2tog. Chain 1, turn. (30 sc)
Row 18 (WS): Sc2tog, sc to last 2 stitches, sc2tog. Chain 1, turn. (28 sc)
Row 19 (RS): Sc across with no shaping. Chain 1, turn. (28 sc)
Row 20 (WS): Sc across with no shaping. Chain 1, turn. (28 sc)
Row 21 (RS, top edge scallop): Chain 1, [skip 1 stitch, Shell in next stitch, skip 1 stitch, sc in next stitch] 7 times. Fasten off. (7 Shells, 7 sc)
Reattach yarn at center front (stitch 37) for right cup.
Right Cup Shaping
Row 14R (WS): Sc in each of stitches 37 to 72 from Row 13. Chain 1, turn. (36 sc)
Rows 15R through 21R: Work exactly as left cup Rows 15 through 21. Fasten off. (7 Shells, 7 sc)
Checkpoint: The front panel from the bottom band to the top scallop edge should measure approximately 6 inches (15 cm) tall.
Back Panel
Foundation Chain: Chain 79.
Row 1 (WS): Sc in second chain from hook, sc in each chain across. Chain 1, turn. (78 sc)
Row 2 (RS): Sc across. Chain 1, turn. (78 sc)
Row 3 (WS): Sc across. Chain 1, turn. (78 sc)
Row 4 (RS, decrease): Same as Front Panel Row 4. (72 sc)
Rows 5 through 12: Work Lace Rows A and B same as Front Panel.
Row 13 (RS, transition): Same as Front Panel Row 13. (72 sc)
The back is worked as one full panel with no cup division:
Row 14 (WS): Sc across all 72 stitches. Chain 1, turn. (72 sc)
Row 15 (RS): Sc2tog, sc to last 2 stitches, sc2tog. Chain 1, turn. (70 sc)
Row 16 (WS): Sc2tog, sc to last 2 stitches, sc2tog. Chain 1, turn. (68 sc)
Row 17 (RS): Sc2tog, sc to last 2 stitches, sc2tog. Chain 1, turn. (66 sc)
Row 18 (WS): Sc2tog, sc to last 2 stitches, sc2tog. Chain 1, turn. (64 sc)
Row 19 (RS): Sc across. Chain 1, turn. (64 sc)
Row 20 (WS): Sc across. Chain 1, turn. (64 sc)
Row 21 (RS, top edge scallop): Chain 1, [skip 1 stitch, Shell in next stitch, skip 1 stitch, sc in next stitch] 16 times. Fasten off. (16 Shells, 16 sc)
Straps (Make 2 Identical)
Foundation Chain: Chain 56.
Row 1: Sc in second chain from hook, sc in each chain across. Chain 1, turn. (55 sc)
Row 2: Sc across. Chain 1, turn. (55 sc)
Row 3: Sc across. Do not turn. Do not fasten off. (55 sc)
Ruffle along long edge: Working along the side edge of the strap, chain 1, work 3 dc in each row-end stitch along the long edge, then rotate and work 3 dc in each row-end stitch along the opposite long edge. Slip stitch to join. Fasten off.
Picot Edging on Strap Ruffle: Reattach yarn at any ruffle dc. [Sc in next dc, Picot] across all ruffle dc. Fasten off.
The strap should measure approximately 12 inches (30.5 cm) long.
Bow Construction
Main Bow Piece: Chain 25. Row 1: Sc in second chain from hook, sc in each chain across. (24 sc). Rows 2 through 10: Chain 1, turn, sc in each stitch across. (24 sc). Fasten off. Pinch the rectangle at its center and wrap yarn tightly around the middle 8 to 10 times to cinch. Knot securely on the back.
Bow Center Knot: Chain 8, sc in second chain from hook, sc in each chain across. (7 sc). Rows 2 through 4: Chain 1, turn, sc across. (7 sc). Fasten off and wrap around the cinch point of the bow. Seam the ends of the knot piece together at the back.
Completed bow should measure approximately 6 inches (15 cm) wide and 3 inches (7.5 cm) tall.
Top Assembly
1. Block all panels and straps before assembly.
2. With RS together, seam the Front Panel to the Back Panel along the side edges using mattress stitch or whipstitch. Side seam length = approximately 3 inches (7.5 cm) from the bottom.
3. Position the straps from the top left scallop edge of the front cup to the corresponding position on the back scallop edge. Sew securely with whipstitch. Repeat for the second strap.
4. Center the completed bow on the front panel where the two cups meet. Sew the bow to the front panel at the center back of the bow knot.
5. Weave in all ends and block assembled top if needed.
Step-by-Step Instructions: Shorts
Waistband
Use the smaller D-3 (3.25 mm) hook for firmness.
Foundation: Chain 120, slip stitch to join into a ring, being careful not to twist.
Round 1: Chain 2 (does not count as stitch), dc in each chain around, slip stitch to join. (120 dc)
Round 2: Chain 2, [FPdc in next stitch, BPdc in next stitch] around, slip stitch to join. (120 sts)
Rounds 3 through 12: Repeat Round 2 ten times, maintaining rib pattern. (120 sts each round)
The waistband should measure approximately 2.5 inches (6.5 cm) tall.
Switch to primary E-4 (3.5 mm) hook for all remaining shorts sections.
Front Hip Panel
With RS facing, join yarn to the front center stitch of the top waistband edge.
Row 1 (RS): Chain 1, sc in each of next 60 stitches along waistband top edge. Chain 1, turn. (60 sc)
Row 2 (WS): Sc across. Chain 1, turn. (60 sc)
Row 3 (RS, increase row): [Sc in next 9 stitches, 2 sc in next stitch] 6 times. Chain 1, turn. (66 sc)
Row 4 (WS): Sc across. Chain 1, turn. (66 sc)
Row 5 (RS, increase row): [Sc in next 10 stitches, 2 sc in next stitch] 6 times. Chain 1, turn. (72 sc)
Row 6 (WS): Sc across. Chain 1, turn. (72 sc)
Row 7 (RS, Lace Row A): Chain 2, [skip 2 stitches, Shell in next stitch, chain 2, skip 2 stitches, sc in next stitch, chain 2, skip 2 stitches, Shell in next stitch, skip 2 stitches] 6 times, slip stitch in last stitch. Chain 1, turn.
Row 8 (WS, Lace Row B): Chain 1, sc in top of first Shell, [chain 5, sc in next sc, chain 5, sc in top of next Shell] 6 times. Chain 2, turn. (13 sc, 12 ch-5 arches)
Rows 9 through 16: Continue alternating Lace Rows A and B.
Row 17 (RS, transition): Chain 1, work sc in each sc (13 sc) and 4 sc in each of 12 arches (48 sc), sc2tog once to reduce by 1. Total = 60 sc. Chain 1, turn.
Row 18 (WS): Sc across. Chain 1, turn. (60 sc)
Crotch Shaping
Row 19 (RS): Sc2tog, sc to last 2 stitches, sc2tog. Chain 1, turn. (58 sc)
Row 20 (WS): Sc2tog, sc to last 2 stitches, sc2tog. Chain 1, turn. (56 sc)
Row 21 (RS): Sc2tog, sc to last 2 stitches, sc2tog. Chain 1, turn. (54 sc)
Row 22 (WS): Sc2tog, sc to last 2 stitches, sc2tog. Chain 1, turn. (52 sc)
Row 23 (RS): Sc2tog, sc to last 2 stitches, sc2tog. Chain 1, turn. (50 sc)
Row 24 (WS): Sc2tog, sc to last 2 stitches, sc2tog. Chain 1, turn. (48 sc)
Row 25 (RS): Sc2tog, sc to last 2 stitches, sc2tog. Chain 1, turn. (46 sc)
Row 26 (WS): Sc2tog, sc to last 2 stitches, sc2tog. Chain 1, turn. (44 sc)
Row 27 (RS): Sc across. Fasten off. (44 sc)
Back Hip Panel
Work Rows 1 through 27 exactly as the Front Hip Panel. Fasten off.
Crotch Seam and Leg Openings
With RS together, align the Front and Back Hip Panels at Row 27. Whipstitch the two Row 27 edges together for the crotch seam.
Seam the side edges from Row 1 downward for approximately 3 inches (7.5 cm), leaving the remaining lower portion open for the leg opening.
Hem and Pom-Pom Border
Reattach yarn at the lower edge of the lace section on the front panel.
Hem Round 1 (RS): Chain 1, sc evenly around the entire lower hem edge of both front and back panels, working sc in each sc and 2 sc in each arch. Target count = 144 sc total. Join with slip stitch. (144 sc)
Hem Round 2 (RS, pom-pom border): Chain 1, [sc in next 2 stitches, Puff stitch in next stitch] 48 times, slip stitch to join. Fasten off. (48 Puffs, 96 sc)
Optional Picot Edging: Reattach yarn, [sc in top of Puff, Picot, sc in next sc, sc in next sc] 48 times, slip stitch to join. Fasten off.
Finishing Your Summer Set
Weave in all ends on both pieces using a tapestry needle, working the tail through several adjacent stitches on the WS in different directions to secure.
Elastic Option for Waistband: Thread a 1/4-inch (6 mm) elastic through the interior of the ribbed waistband using a safety pin as a guide. Adjust to your waist measurement plus 0.5 inch (1.25 cm) overlap, then sew the elastic ends together.
Blocking Instructions
Wet blocking is strongly recommended for both pieces.
Soak each piece in cool water with a small amount of wool wash for 15 to 20 minutes. Gently press out excess water. Do not wring. Lay pieces flat on blocking mats. Pin to finished measurements, being particularly careful to open up the lace sections so the shell and arch pattern is clearly visible. Allow to dry completely before unpinning.
Care Instructions
For mercerized cotton: Hand wash in cool water with gentle soap. Lay flat to dry. Do not tumble dry.
For machine-washable acrylic or cotton-blend: Machine wash on the gentle cycle in a mesh laundry bag. Lay flat to dry.
Store folded rather than hung to prevent the lace panels from stretching.
Final Thoughts
Thank you so much for choosing this crochet pattern! I genuinely hope you love making this lavender lace summer set as much as I loved designing it. The combination of the delicate lace work with those playful pom-pom details creates something truly special for warm weather wear.
If you make this set, I would absolutely love to see it! Tag me on Instagram or share your finished project on Facebook. Seeing your creations always makes my day.
Go ahead and save this pattern to your Pinterest boards so you can find it easily when you are ready to start. And please drop a comment below if you give it a try. I would love to hear how it works up for you and see what colors you choose!
You Might Also Like
- Sage Green Botanical Lace Sundress Free Pattern
- Sunshine Yellow Dahlia Crochet Dress Free Crochet Pattern
- Mint Green Zigzag Baby Dress Free Crochet Pattern
- Ocean Breeze Coastal Square Poncho Free Crochet Pattern
