
I call this one the Coral Sunset Top, and it has a story. A few summers ago, I sketched out a design in my notebook after a trip to a botanical garden. The hibiscus flowers were in full bloom, and I kept thinking about how gorgeous they would look crocheted in that warm coral shade. The sketch sat in my notebook for almost two years before I finally worked out the construction.
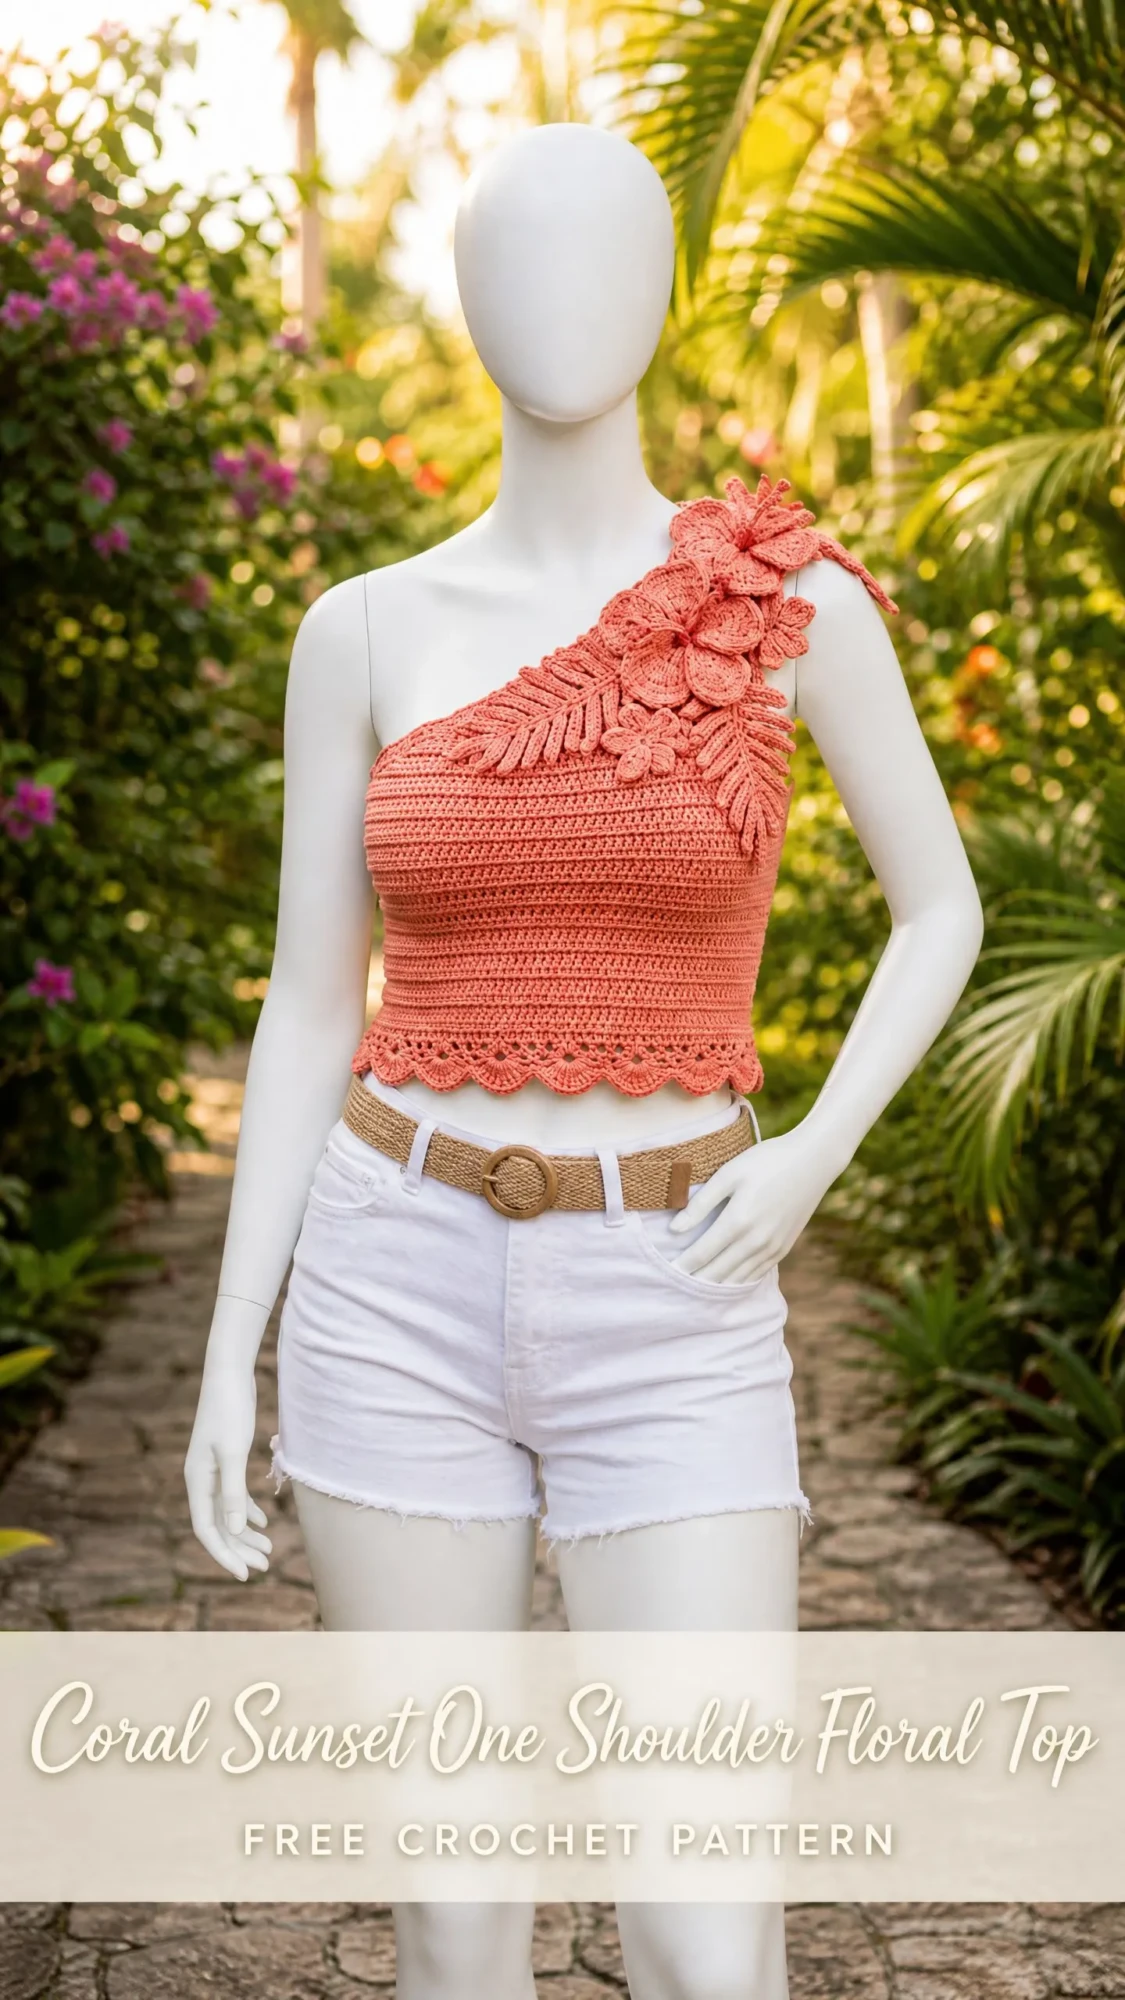
This past spring, I pulled out that old drawing and got to work. I wanted a fitted crop top with a single shoulder strap, dimensional flowers, and a tropical fern leaf cascading across the front. Something that looked like it belonged in a resort boutique but was actually handmade with a simple hook and yarn.
After a lot of swatching and several test versions, I am thrilled to share the finished pattern with you. It is an intermediate to advanced project, but if you are comfortable working in the round and enjoy making appliques, you will love this one.
About This Crochet Pattern
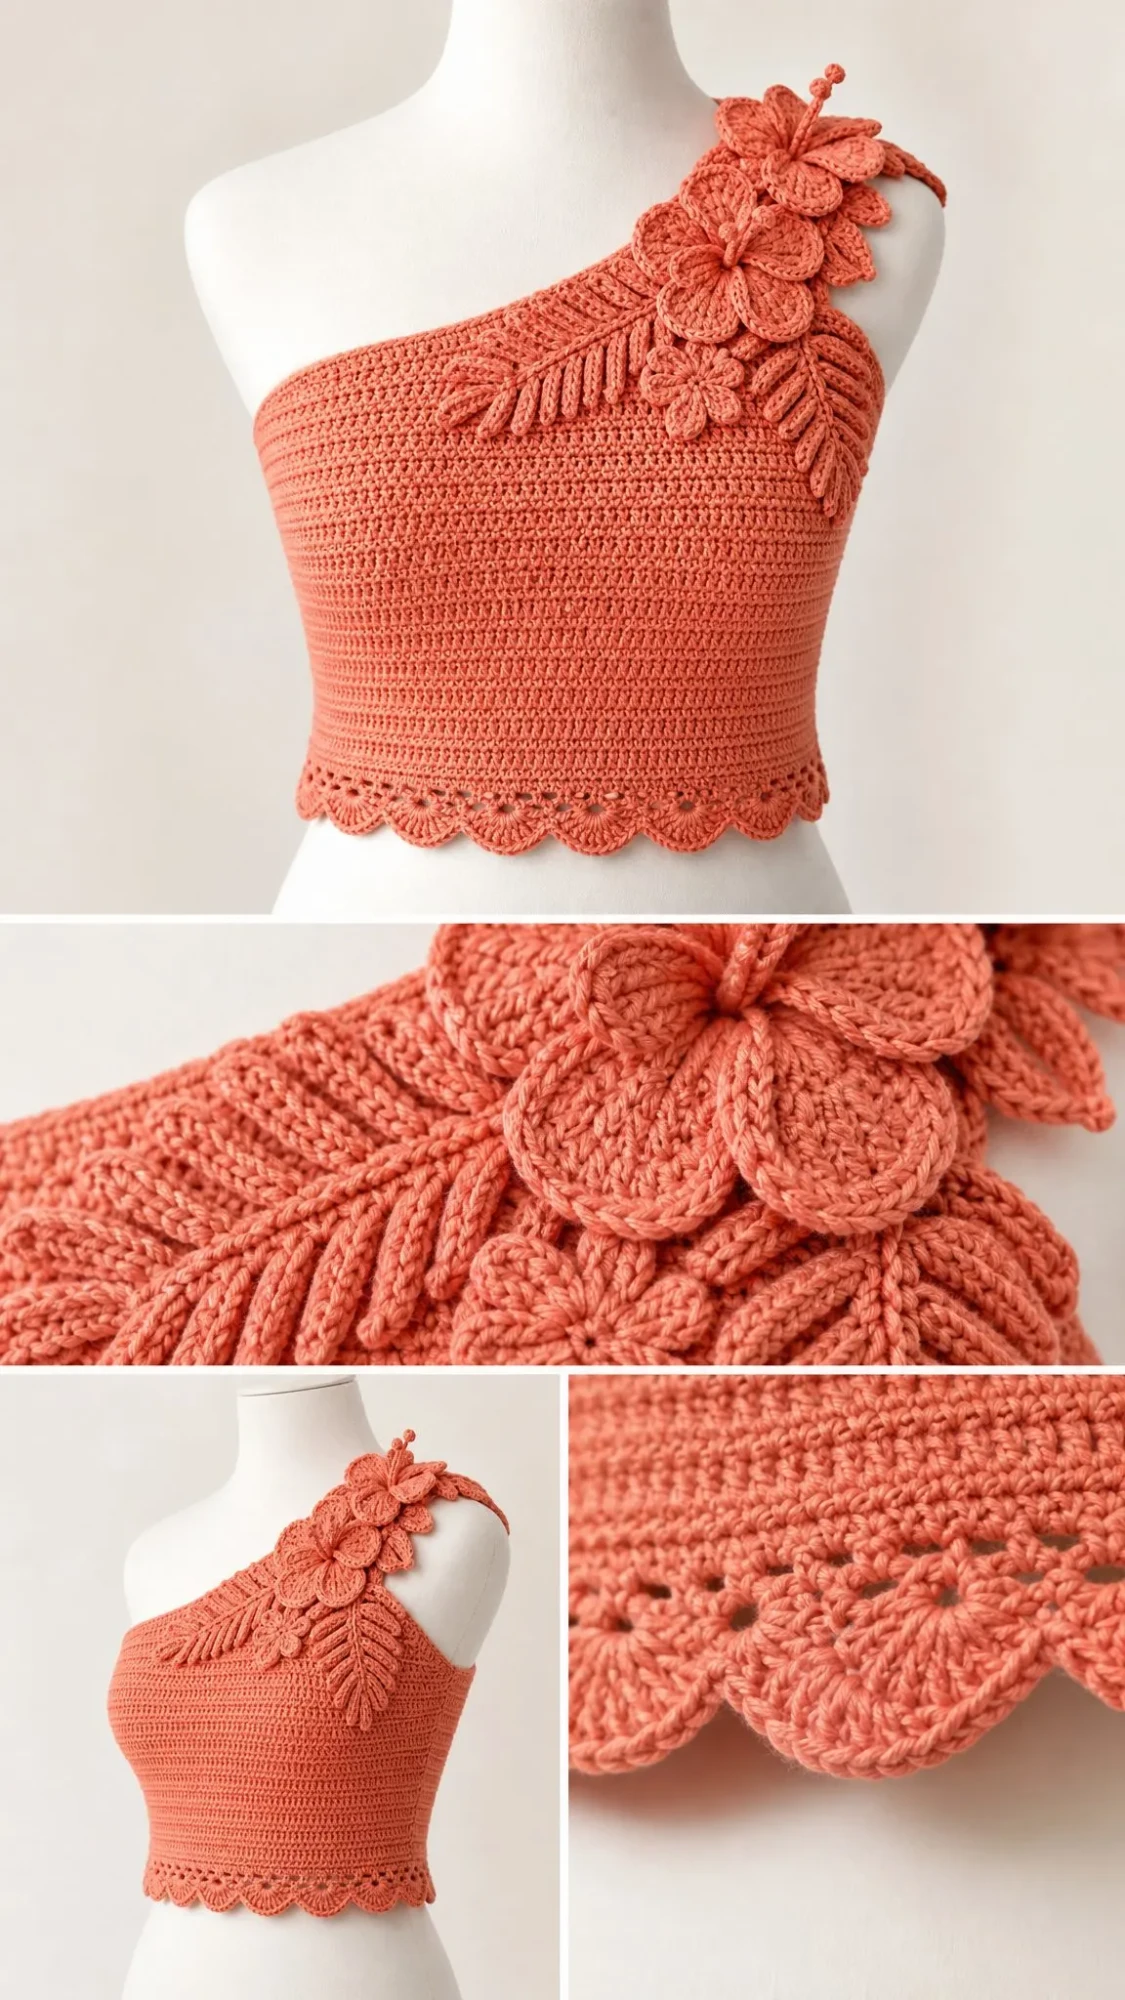
The Coral Sunset One Shoulder Floral Top is a fitted cropped garment worked primarily in single crochet (sc) from the bottom hem upward. The body is constructed seamlessly in the round, which means no side seams to sew up later. After reaching the underarm, you separate the front and back panels and work them in rows.
The asymmetrical one shoulder design gives this top its distinctive look. The left shoulder features a wide strap that extends from the bust over the shoulder to the back. The right side remains open at the top with a clean finished edge.
The real showstopper is the applique work. You will crochet a textured fern leaf and two layered hibiscus flowers, plus a small bud. These dimensional pieces get pinned and sewn onto the front of the finished top, creating that tropical floral cascade you see at the shoulder.
A decorative scallop edging finishes the bottom hem with a feminine shell border.
Skill Level
This pattern is rated intermediate to advanced. You should be comfortable with:
If you have made fitted garments before and enjoy detailed embellishment work, this is a satisfying challenge.
Time Estimate
Plan for approximately 20 to 30 hours of work, depending on your pace and experience with applique techniques.
Finished Measurements
The pattern includes three sizes with built in negative ease for a snug, fitted silhouette:
Size S: 32 to 34 inches (81 to 86 cm) bust, 12.5 inches (32 cm) length from top of strap to bottom hem
Size M: 34 to 36 inches (86 to 91 cm) bust, 13 inches (33 cm) length
Size L: 36 to 38 inches (91 to 97 cm) bust, 13.5 inches (34 cm) length
Instructions are written for Size S with Size M and Size L adjustments noted in parentheses throughout in the format S (M, L).
The top is designed with approximately 1 to 2 inches (2.5 to 5 cm) of negative ease at the bust for that snug, body hugging fit.
Materials
Yarn: DK weight (CYCA 3), approximately 550 (620, 700) yards or 503 (567, 640) meters in coral or terracotta
Hook: US size E-4 (3.5 mm) for body; US size D-3 (3.25 mm) for applique motifs
Notions: Tapestry needle, scissors, stitch markers (4), rust proof pins for blocking, sewing pins for applique placement
Yarn Suggestions
Lion Brand Comfy Cotton Blend (52% cotton, 46% polyester, 2% other): DK weight, 351 yards per skein, color suggestion Coral. Purchase 2 skeins for all sizes. This yarn has excellent stitch definition and gentle stretch, ideal for a fitted top.
Paintbox Yarns Simply DK (100% premium acrylic): DK weight, 137 yards per skein. Purchase 4 (5, 6) skeins in color Coral Blush or Vintage Pink. Very affordable and widely available with consistent tension.
Cascade Yarns Ultra Pima (100% pima cotton): DK weight, 220 yards per skein. Purchase 3 skeins for all sizes. This is highly recommended for a garment worn close to the skin. It has beautiful drape and a subtle sheen.
Substitution Note: Choose a DK weight yarn with a smooth, plied construction for best stitch definition. Avoid fuzzy or hairy yarns, which will obscure the dimensional detail of the flowers and leaf. A yarn with natural fiber content like cotton or linen is recommended for warm weather wearability.
Gauge
20 sc x 24 rows = 4 inches (10 cm), worked in the round in single crochet with US E-4 (3.5 mm) hook, after blocking.
Check your gauge. This is a fitted garment. Even a small gauge difference will significantly affect the fit. Adjust your hook size up or down as needed before beginning.
Abbreviations
Here are the terms used throughout this pattern. I am writing them out in full the first time so you know exactly what each one means.
beg = beginning
ch = chain (wrap yarn over hook and pull through the loop on your hook)
ch-sp = chain space (the gap created by a chain stitch)
cont = continue
dc = double crochet (yarn over, insert hook, pull up loop, yarn over and pull through 2 loops twice)
dec = decrease
hdc = half double crochet (yarn over, insert hook, pull up loop, yarn over and pull through all 3 loops)
inc = increase (work 2 sc in the same stitch)
lp(s) = loop(s)
MR = magic ring
rem = remaining
rep = repeat
rnd = round
RS = right side
sc = single crochet (insert hook, pull up loop, yarn over and pull through both loops)
sc2tog = single crochet two stitches together, which is a decrease
sk = skip
sl st = slip stitch (insert hook, yarn over and pull through both the stitch and the loop on your hook)
sp(s) = space(s)
st(s) = stitch(es)
tr = treble crochet (yarn over twice, insert hook, pull up loop, yarn over and pull through 2 loops three times)
WS = wrong side
yo = yarn over
Special Stitches and Techniques
Before you begin, let me walk you through the special techniques used in this pattern.
Scallop Edging Stitch
This creates the pretty shell border at the hem. Skip 2 stitches, work 5 dc in the next stitch, skip 2 stitches, sl st in the next stitch. That sequence forms one scallop shell. The stitch count must be divisible by 6 for the scallop to divide evenly.
SC2TOG (Single Crochet Decrease)
Insert hook into next stitch, yo, pull up a loop (2 loops on hook). Without completing the stitch, insert hook into the following stitch, yo, pull up a loop (3 loops on hook). Yo and pull through all 3 loops. This creates one stitch from two, reducing your stitch count by 1.
Surface Slip Stitch
Used for the fern leaf veins. With right side facing and working yarn held behind the work, insert hook from front to back through the fabric at the starting point. Draw up a loop, then insert hook through fabric at the next point along the vein line, draw up a loop and pull it through the loop on the hook. Continue to create a visible slip stitch ridge on the surface.
5-Petal Hibiscus Flower (Worked in Two Layers)
Layer 1 (Back petals): Make a magic ring. Ch 1, work 10 sc in ring, sl st to first sc to join. (10 sc)
Round 2: (Ch 3, work 2 dc in first ch-sp, ch 3, sl st in next sc) 5 times. 5 petals made.
Layer 2 (Front petals): Make a magic ring. Ch 1, work 10 sc in ring, sl st to first sc to join. (10 sc)
Round 2: (Ch 4, work 3 tr in first ch-sp, ch 4, sl st in next sc) 5 times. 5 petals made.
Stamen: Ch 10, work 3 sl st back along chain to form a small coil. Fasten off. Place stamen at center, layer the two flower pieces together with back petal layer beneath, and tack together at center with tapestry needle and yarn tail.
Fern Leaf Applique
The fern leaf is worked as a central spine with individual leaflets worked off each side.
Foundation: Ch 26. This forms the central spine.
Row 1: Sl st in 2nd ch from hook, (ch 6, work 1 sc in 2nd ch from hook, 1 hdc, 1 dc, 1 hdc, 1 sc, sl st back to spine st, sl st in next spine ch) 12 times. 12 leaflets worked.
Turn work and repeat the same process down the other side of the foundation chain to create mirrored leaflets. Fasten off, leaving a long tail for sewing.
Pattern Notes
The body is worked seamlessly in the round from the bottom hem to the underarm. After the underarm, the front and back panels are worked separately in rows, then joined at the shoulder.
The one shoulder design means the left side (as worn) has a strap that extends over the shoulder, while the right side has no strap and is finished with a bound off edge at the top of the bust.
All stitch counts at the end of each round include every working stitch. Turning chains in row work do NOT count as stitches unless explicitly stated.
Place stitch markers at the beginning of each round and at the side seam points to help track shaping. Move markers up as you work.
The scallop hem is worked after the body is completed by picking up stitches along the foundation chain edge.
The applique motifs are completed separately and pinned in place before sewing, so you can adjust placement to your preference.
Instructions
Section 1: Body (Worked in the Round, Bottom Up)
The body begins at the hem and is worked upward to the underarm. The hem scallop is added after.
Foundation Chain:
Chain 162 (168, 180). Being careful not to twist, sl st to first ch to form a ring.
Round 1 (Setup): Ch 1 (does not count as st), sc in each ch around, sl st to first sc to join. (162 (168, 180) sc)
Place stitch markers at st 1 (beg of round, right side seam) and st 82 (85, 91) (left side seam). These markers divide the round into front (81, 84, 90 sts) and back (81, 84, 90 sts).
Rounds 2 through 6: Ch 1, sc in each sc around, sl st to join. (162 (168, 180) sc each round)
Checkpoint: After Round 6, your tube should measure approximately 1 inch (2.5 cm) tall.
Waist Shaping (Decrease Rounds)
Round 7 (Dec Round): Ch 1, sc in first 19 (20, 22) sc, sc2tog, sc in next 40 (41, 44) sc, sc2tog, sc in next 38 (40, 42) sc, sc2tog, sc in next 40 (41, 44) sc, sc2tog, sc in rem 19 (20, 22) sc, sl st to join. (158 (164, 176) sc)
Round 8: Ch 1, sc in each sc around, sl st to join. (158 (164, 176) sc)
Round 9 (Dec Round): Ch 1, sc in first 18 (19, 21) sc, sc2tog, sc in next 39 (40, 43) sc, sc2tog, sc in next 37 (39, 41) sc, sc2tog, sc in next 39 (40, 43) sc, sc2tog, sc in rem 18 (19, 21) sc, sl st to join. (154 (160, 172) sc)
Round 10: Ch 1, sc in each sc around, sl st to join. (154 (160, 172) sc)
Round 11 (Dec Round): Ch 1, sc in first 17 (18, 20) sc, sc2tog, sc in next 38 (39, 42) sc, sc2tog, sc in next 36 (38, 40) sc, sc2tog, sc in next 38 (39, 42) sc, sc2tog, sc in rem 17 (18, 20) sc, sl st to join. (150 (156, 168) sc)
Round 12: Ch 1, sc in each sc around, sl st to join. (150 (156, 168) sc)
Checkpoint: After Round 12, your piece should measure approximately 2.5 inches (6.5 cm) from the foundation chain.
Waist (Even Rounds)
Rounds 13 through 16: Ch 1, sc in each sc around, sl st to join. (150 (156, 168) sc each round)
Bust Shaping (Increase Rounds)
Round 17 (Inc Round): Ch 1, sc in first 18 (19, 21) sc, 2 sc in next sc, sc in next 37 (38, 41) sc, 2 sc in next sc, sc in next 36 (38, 40) sc, 2 sc in next sc, sc in next 37 (38, 41) sc, 2 sc in next sc, sc in rem 18 (19, 21) sc, sl st to join. (154 (160, 172) sc)
Round 18: Ch 1, sc in each sc around, sl st to join. (154 (160, 172) sc)
Round 19 (Inc Round): Ch 1, sc in first 19 (20, 22) sc, 2 sc in next sc, sc in next 38 (39, 42) sc, 2 sc in next sc, sc in next 37 (39, 41) sc, 2 sc in next sc, sc in next 38 (39, 42) sc, 2 sc in next sc, sc in rem 19 (20, 22) sc, sl st to join. (158 (164, 176) sc)
Round 20: Ch 1, sc in each sc around, sl st to join. (158 (164, 176) sc)
Round 21 (Inc Round): Ch 1, sc in first 20 (21, 23) sc, 2 sc in next sc, sc in next 39 (40, 43) sc, 2 sc in next sc, sc in next 38 (40, 42) sc, 2 sc in next sc, sc in next 39 (40, 43) sc, 2 sc in next sc, sc in rem 20 (21, 23) sc, sl st to join. (162 (168, 180) sc)
Rounds 22 through 24: Ch 1, sc in each sc around, sl st to join. (162 (168, 180) sc each round)
Checkpoint: After Round 24, your piece should measure approximately 6 inches (15 cm) from the foundation chain.
Section 2: Separating Front and Back Panels
After Round 24, divide the work at the side seam markers into front and back halves. Each half is worked separately in rows.
Front panel = sts 1 through 81 (84, 90). Back panel = sts 82 through 162 (85 through 168, 91 through 180).
Back Panel
Attach yarn at first stitch of back panel. Work back and forth in rows.
Row 1 (RS): Ch 1, sc in each of next 81 (84, 90) sc across back. Turn. (81 (84, 90) sc)
Rows 2 through 10 (9, 8): Ch 1, sc in each sc across. Turn. (81 (84, 90) sc each row)
Checkpoint: After Row 10 of back panel, the back should measure approximately 3.5 inches (9 cm) above the underarm split.
Back Top Edge Finishing:
After the final even row, fasten off. For a clean finish, attach yarn at right end of final back row. Ch 1, sl st in each sc across. Fasten off.
Front Panel
The front panel is shaped asymmetrically. The right front (as worn) is higher than the left front. The single shoulder strap extends from the left front over the left shoulder.
Attach yarn at first stitch of front panel.
Row 1 (RS): Ch 1, sc in each of next 81 (84, 90) sc across front. Turn. (81 (84, 90) sc)
Rows 2 through 6: Ch 1, sc in each sc across. Turn. (81 (84, 90) sc each row)
Right Front Shaping
On Row 7, you begin decreasing on the right edge to create the diagonal neckline.
Row 7: Ch 1, sc in first 78 (81, 87) sc, sc2tog, sc in last sc. Turn. (80 (83, 89) sc)
Row 8: Ch 1, sc in each sc across. Turn. (80 (83, 89) sc)
Row 9: Ch 1, sc in first 77 (80, 86) sc, sc2tog, sc in last sc. Turn. (79 (82, 88) sc)
Row 10: Ch 1, sc in each sc across. Turn. (79 (82, 88) sc)
Row 11: Ch 1, sc in first 76 (79, 85) sc, sc2tog, sc in last sc. Turn. (78 (81, 87) sc)
Row 12: Ch 1, sc in each sc across. Turn. (78 (81, 87) sc)
Row 13: Ch 1, sc in first 75 (78, 84) sc, sc2tog, sc in last sc. Turn. (77 (80, 86) sc)
Row 14: Ch 1, sc in each sc across. Turn. (77 (80, 86) sc)
Row 15: Ch 1, sc in first 74 (77, 83) sc, sc2tog, sc in last sc. Turn. (76 (79, 85) sc)
Row 16: Ch 1, sc in each sc across. Turn. (76 (79, 85) sc)
Fasten off the right front section here.
Left Front and Strap
The strap is worked from the remaining left front stitches.
After Row 16, with RS facing, rejoin yarn at the leftmost 14 (14, 16) stitches of the front panel.
Row 17 (strap foundation): Ch 1, sc in each of 14 (14, 16) sc. Turn. (14 (14, 16) sc)
Rows 18 through 40 (approximately): Ch 1, sc in each sc across. Turn. (14 (14, 16) sc each row)
Work even on these stitches for a total strap length of approximately 9 inches (23 cm) measured from the top of the bust, or until the strap reaches comfortably over the shoulder when held up to your body.
Tip: Try the top on or use a flexible measuring tape along your shoulder to customize strap length before fastening off.
Fasten off and leave a long tail for seaming.
Joining the Strap to the Back
With right sides facing, align the strap end with the left corner of the back panel (as worn). Using the tapestry needle and yarn tail, whipstitch the strap end to the top left back edge. Weave in ends.
Finish the right side top edge (no strap) with a sl st edging row for a clean finish.
Section 3: Scallop Hem Edging
The scallop edging is worked along the foundation chain edge at the bottom of the garment.
With RS facing, join yarn at any foundation chain stitch along the bottom hem.
Round 1 (prep): Ch 1, sc in each foundation ch around, sl st to join. (162 (168, 180) sc)
Round 2 (scallop): Ch 1, sl st in first sc, (sk next 2 sc, 5 dc in next sc, sk next 2 sc, sl st in next sc) across, sl st to join. This creates 27 (28, 30) scallops. Fasten off.
Checkpoint: The bottom hem should have a neat shell border approximately 0.75 inches (2 cm) deep.
Section 4: Strap and Neckline Edging
With RS facing, join yarn at the inner right front top edge. Work a single row of sc evenly along the diagonal neckline edge, up and over the strap, and down the back armhole edge on the left side. Work approximately 1 sc per row end along edges. Fasten off at the end.
Section 5: Fern Leaf Applique
Work the fern leaf according to the Special Stitches section.
Make 1 fern leaf.
Block the fern leaf flat before attaching. Pin it to the front of the top, centered diagonally across the chest from lower center toward the left shoulder, with the tip of the leaf pointing toward the shoulder strap.
Sew the leaf in place using a tapestry needle, tacking down the central spine and the base of each leaflet. Do not tack every individual leaflet tightly. Allow the leaflet tips to remain slightly raised for dimension.
Section 6: Hibiscus Flower Appliques
Work the hibiscus flowers according to the Special Stitches section.
Make 2 large flowers and 1 small bud. For the small bud, work only Layer 1 of the flower pattern and gather the center slightly tighter before fastening off.
Block the flowers lightly, shaping the petals to curve slightly outward.
Pin the flowers at the top of the fern leaf, at the shoulder strap junction. Place the largest flower at the strap base, the second flower slightly behind and below it, and the bud at the very top near the strap tip. Sew each flower firmly in place through its center and at two or three petal bases.
Size Customization Tips
To size up or down beyond the three sizes given, add or subtract 6 stitches per size step from the foundation chain (one scallop unit). This changes the bust circumference by approximately 1.2 inches (3 cm) per adjustment.
To add length to the body, work additional even rounds between the waist shaping and bust shaping sections. Two extra rounds add approximately 0.33 inches (0.85 cm).
To lengthen the strap, add additional rows to the strap section. Work a test fit on your body before fastening off.
For a looser fit, increase the foundation chain by 12 stitches (two scallop units) and adjust side marker placement accordingly.
Finishing and Blocking
Weave in all ends using a tapestry needle, working ends into the backs of stitches in multiple directions to prevent unraveling.
Wet blocking is strongly recommended. Submerge the finished top in cool water and gently squeeze out excess moisture without wringing. Lay flat on a clean dry towel and roll the towel to remove more moisture.
Shape the top to the desired finished measurements, pinning the scallop hem to form neat shells. Pin the strap straight and pin the diagonal neckline to lie flat.
Allow to dry completely, which may take 12 to 24 hours depending on yarn fiber and room conditions.
Care Instructions
Hand wash in cool water with a gentle detergent or wool wash. Do not wring or twist. Lay flat to dry away from direct sunlight and heat sources.
If using an acrylic yarn, machine wash on a gentle cycle in a mesh laundry bag with cold water only, and lay flat to dry. Do not tumble dry.
Store folded flat, not on a hanger, to prevent the shoulder strap from stretching over time.
Final Thoughts on the Coral Sunset Top Crochet Pattern
This one shoulder floral top is the kind of project that reminds me why I love crochet. It combines simple stitches with thoughtful shaping and beautiful dimensional embellishments. The tropical fern leaf and hibiscus flowers transform a basic crop top into something truly special.
Take your time with the applique work. Those layered flowers are the heart of this design, and they deserve attention to detail. When you finish and try it on for the first time, I think you will feel like you made something magical.
Thank you so much for choosing this pattern. I hope you love making it as much as I loved designing it. If you complete your own Coral Sunset Top, I would absolutely love to see it. Tag me on Instagram or share in my Facebook group so I can cheer you on.
If this pattern caught your eye, go ahead and save it to your Pinterest boards so you can find it when you are ready to start. And if you make one, please drop a comment below. I read every single one, and hearing about your projects genuinely makes my day.
You Might Also Like
- Terracotta Sunset Crochet Sneaker Boots Free Pattern
- Desert Rose Geometric Tote Free Crochet Pattern
- Sage Green Bohemian Lace Dress Free Crochet Pattern
- Sunset Ombre Rose Bracelet Free Crochet Pattern
