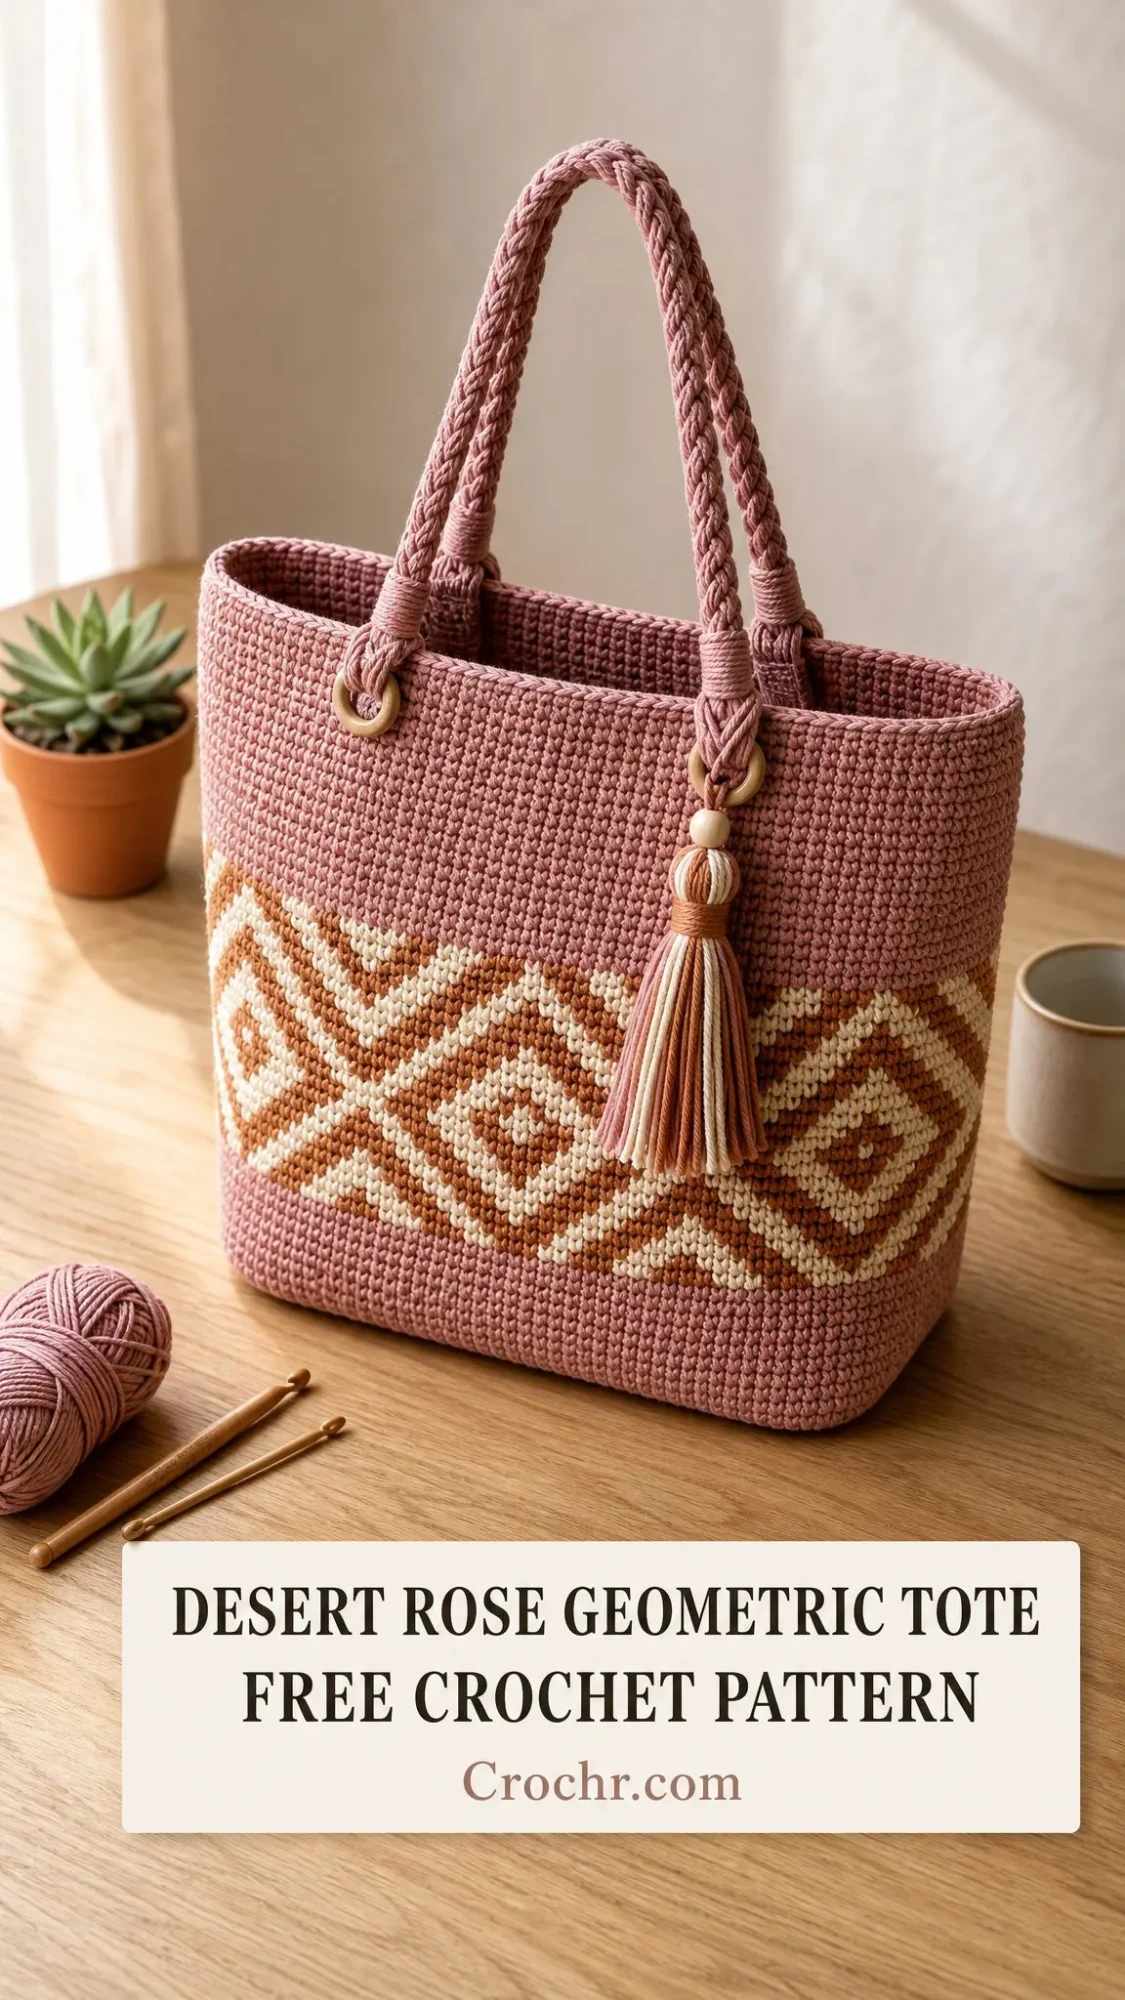
This is a structured tote bag with bold southwestern-style colorwork. It uses single crochet throughout and tapestry crochet technique for the geometric diamond motif. The bag works up from a flat rectangular base, then joins in the round for the sides.
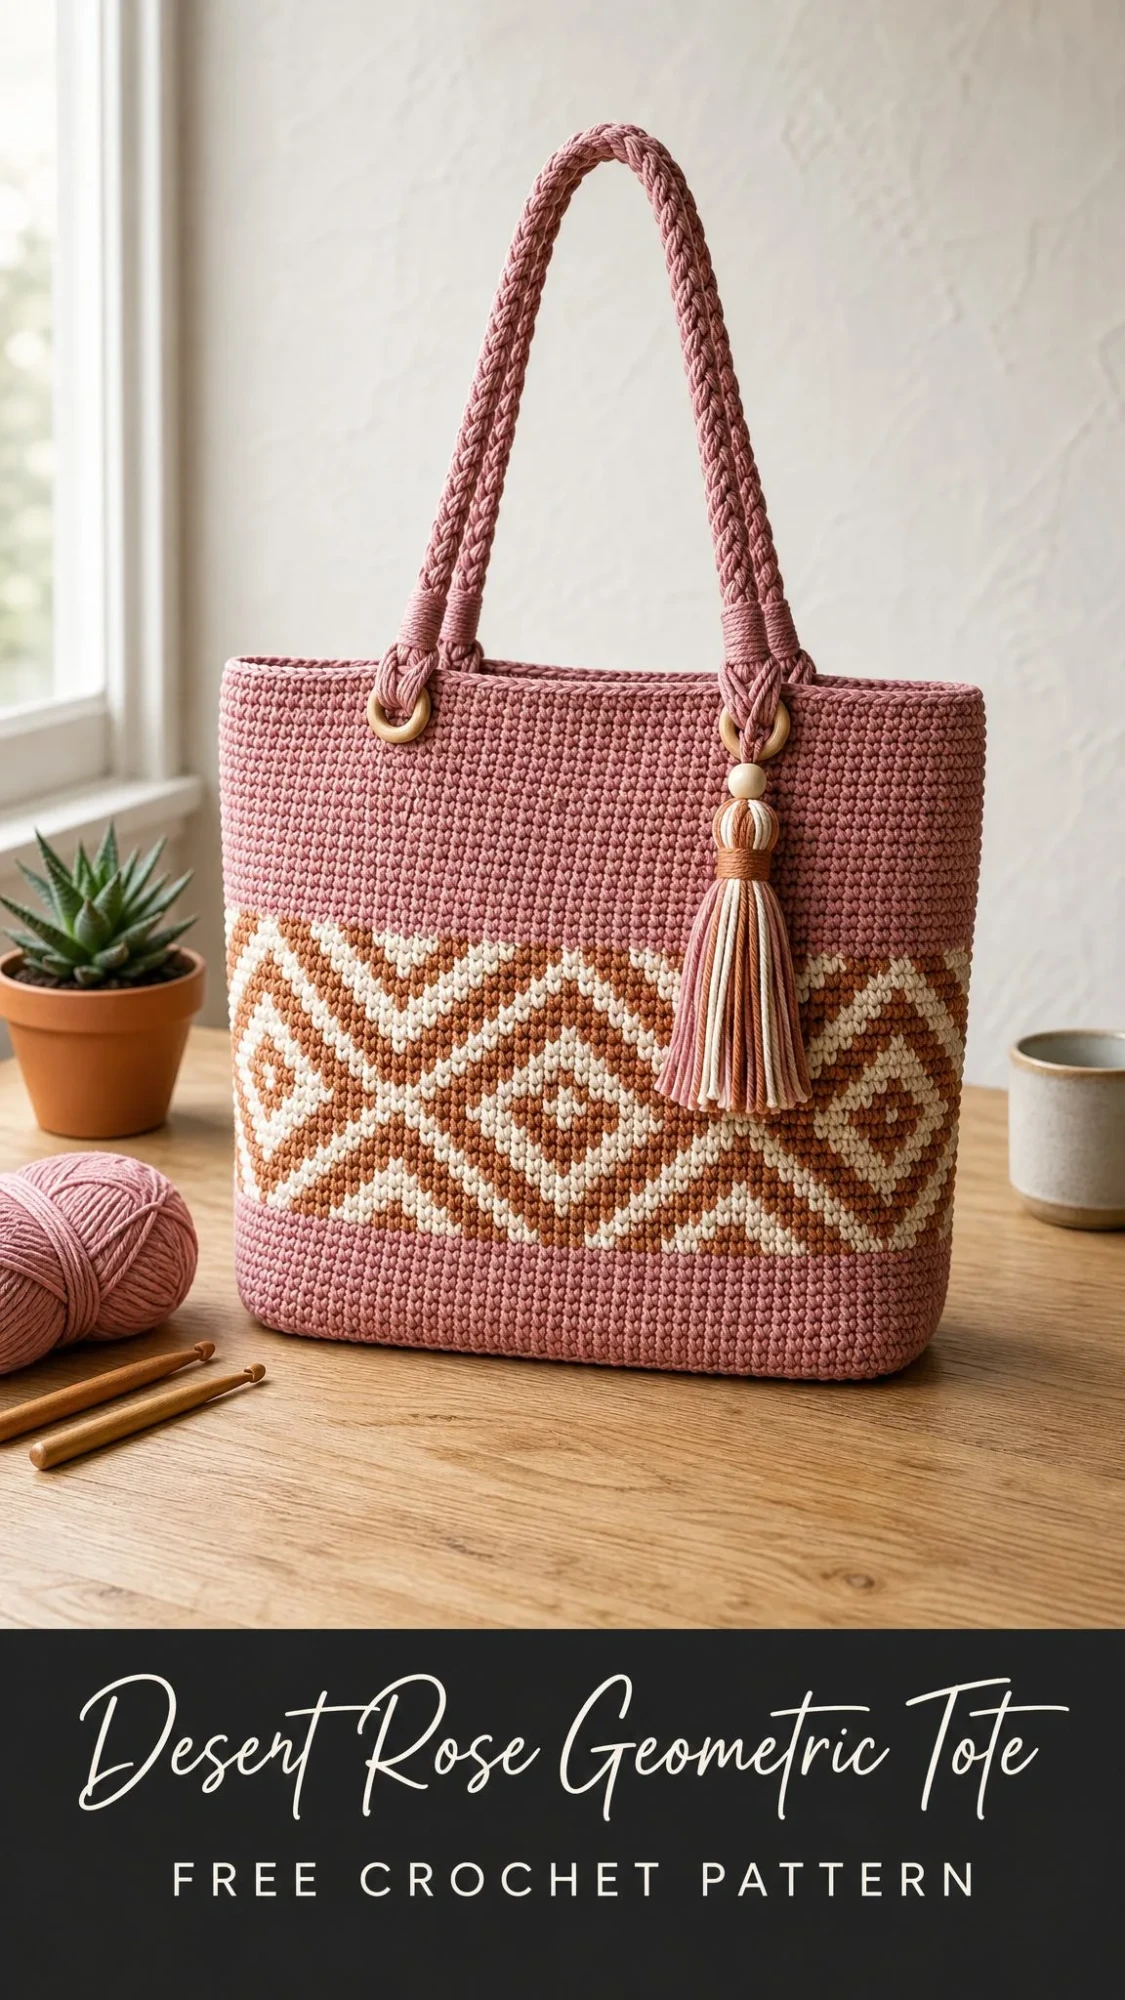
If you have been wanting to try tapestry crochet, this project is an excellent introduction to the technique. The diamond pattern looks complex but follows a logical sequence that becomes intuitive after a few rounds. You will learn to carry multiple yarn colors inside your stitches while creating a dense, sturdy fabric perfect for an everyday bag.
The finished tote features braided handles that loop through wooden rings, plus a decorative tassel charm. The dusty rose, terracotta, and cream color combination gives it that modern boho vibe I love so much.
About This Crochet Pattern
The Desert Rose Geometric Tote is worked using tapestry crochet, sometimes called mosaic intarsia or colorwork single crochet. This technique involves carrying unused yarn colors inside your stitches while working with the active color. The result is a thick, structured fabric that completely hides the carried yarns.
This pattern is rated intermediate to advanced. You should be comfortable with working in the round, reading colorwork instructions, and managing multiple yarn colors simultaneously. The braided handle construction also requires some attention. I would not recommend this as your first colorwork project, but if you have tried basic color changes before, you are ready.
Expect to spend approximately 20 to 30 hours on this tote, depending on your familiarity with tapestry crochet.
Finished Size
Your completed tote will measure approximately 14 inches wide by 13 inches tall, not including handles. The base measures 14 inches by 4.5 inches. In metric, that is roughly 35.5 cm wide by 33 cm tall, with a base of 35.5 cm by 11.5 cm.
The handle drop is approximately 10 inches (25.5 cm), giving you comfortable room to carry the bag over your shoulder.
Materials Needed
Yarn
You will need worsted weight yarn in three colors:
Recommended Yarn Brands
Lion Brand Vanna’s Choice works beautifully for this project. Try Dusty Pink for Color A, Terracotta for Color B, and Linen for Color C. This yarn holds the tapestry texture well and is machine washable.
WeCrochet Swish Worsted offers excellent stitch definition if you prefer a softer hand. Use Blush for Color A, Amber for Color B, and Cream for Color C.
Paintbox Yarns Simply DK held double creates a worsted weight equivalent and is budget friendly. Try Blush Pink, Pale Terracotta, and Champagne White.
Substitution tip: Choose a smooth, tightly twisted worsted weight yarn. Fuzzy or loosely spun yarns will obscure your beautiful colorwork motif. Avoid chenille and bouclé textures. Cotton and cotton blends also work well and add natural structure.
Hook and Notions
Gauge
Getting gauge is critical for this pattern. The geometric motif needs the correct proportions to look right.
18 single crochet by 20 rows = 4 inches / 10 cm in tapestry colorwork, worked in the round.
That breaks down to approximately 4.5 sc by 5 rows = 1 inch / 2.5 cm.
How to Make a Gauge Swatch
Chain 22 with Color A. Work a single crochet (sc) in the second chain from hook and each chain across. You should have 21 sc. Turn your work.
Continue working rows of single crochet for 22 rows total, practicing the tapestry carry technique by carrying Color B inside your stitches even without switching colors. Block your swatch lightly, then measure the center 4 inches by 4 inches.
If your swatch is too large, try a smaller hook. If it is too small, go up a hook size.
Abbreviations
Let me define all the abbreviations you will encounter:
Special Techniques
Tapestry Single Crochet (TSC)
This is the heart of your colorwork. Here is how it works:
Step 1: Hold your working (active) color yarn in your right hand as normal.
Step 2: Lay the unused color(s) along the top of the row you just worked. They should drape horizontally across the stitches below.
Step 3: Insert your hook into the next stitch as you normally would.
Step 4: Draw up a loop with the active color. As you complete the single crochet, the carried yarn(s) will be enclosed inside the stitch.
Step 5: To switch colors mid-row, work the last sc before the color change until two loops remain on your hook. Drop the current color and pull the new color through both loops to complete the stitch. The new color is now active.
Step 6: Lay the old color along the top of the work and continue carrying it inside subsequent stitches until you need it again.
Important: Keep consistent, even tension on your carried yarns. Pulling too tight causes puckering. Leaving them too loose creates visible loops. Practice with your gauge swatch before starting the bag.
Pattern Notes Before You Begin
Read these notes carefully. They will save you confusion later.
1. The bag is constructed in three stages: flat rectangle base, body sides worked in the round, and handles.
2. When working the body in the round, the right side always faces you. Do not turn at the end of rounds unless specifically instructed.
3. Place a locking stitch marker at the beginning of each round and move it up as you work.
4. The colorwork instructions are written row by row with stitch counts. You do not need a chart.
5. Colors B and C are only used in the colorwork section (Rounds 7 through 46 of the body). Color A is used throughout.
6. Start carrying both Colors B and C inside your stitches at Round 7, even before both are introduced. This avoids joining mid-round.
7. The finished fabric will be very dense. This is intentional and gives the bag its structure.
8. The colorwork section spans approximately 8.5 inches / 21.5 cm of the bag height. The solid rose section above spans approximately 4.5 inches / 11.5 cm.
Pattern Instructions
Section 1: Bag Base
The base is worked flat in Color A with standard single crochet.
Foundation Chain: With Color A, ch 65.
Row 1 (RS): Sc in second ch from hook and in each ch across. Turn. (64 sc)
Rows 2 through 20: Ch 1, sc in each st across. Turn. (64 sc)
Do NOT turn after Row 20.
Checkpoint: Your base rectangle should measure approximately 14 inches by 4.5 inches. The long sides have 20 rows each, and the short ends have 64 stitches each.
Section 2: Joining in the Round
You will now work around the entire perimeter of the base to establish the working round for the body.
Join Round: Working along the edge of Row 20 (top long edge), sc in each of the 64 sts across. At the short end corner, work 2 sc into the corner stitch. Working down the row ends along the side edge, sc evenly, placing 1 sc per row end for 20 sc. At the next corner, work 2 sc. Working along the foundation chain edge (bottom long edge), sc in each of the 64 sts. At the next corner, 2 sc. Working up the remaining row ends (other side edge), sc evenly for 20 sc. At the final corner, 2 sc. Sl st to first sc to join. Place marker. (176 sc total)
Adjustment Round: Sc around entire circumference, placing sc2tog twice evenly across each side panel. Work each 22-stitch side panel as follows: sc 4, sc2tog, sc 10, sc2tog, sc 4. This equals 20 sc per side panel. The two long panels remain 64 sts each. (168 sc total)
Place markers at each of the four corners.
Checkpoint: You should have 168 stitches total. Each long panel = 64 sts, each side panel = 20 sts.
Section 3: Lower Body (Solid Base Rounds)
Work in Color A only.
Rnds 1 through 6: Sc in each st around. (168 sc)
After Round 6, join Colors B and C but do not switch yet. Carry them inside subsequent stitches from now on.
Section 4: Colorwork Body
The colorwork section spans Rounds 7 through 46. All rounds are 168 stitches.
The side panel formula remains consistent for all colorwork rounds: 2A, 2B, 2A, 2B, 2A, 2B, 2A, 2B, 2A, 2B (20 sts)
For the front and back panels, the notation [3x: stitch sequence] means repeat the sequence three times within that panel.
Body Round 7:
Front Panel: 2A, [3x: 9A 1B], 2A (64 sts)
Right Side Panel: 2A 2B 2A 2B 2A 2B 2A 2B 2A 2B (20 sts)
Back Panel: 2A, [3x: 9A 1B], 2A (64 sts)
Left Side Panel: 2A 2B 2A 2B 2A 2B 2A 2B 2A 2B (20 sts)
Total: (168 sc)
Body Round 8:
Front Panel: 2A, [3x: 8A 1B 1C 1B], 2A (64 sts)
Side Panels: 2A 2B 2A 2B 2A 2B 2A 2B 2A 2B (20 sts each)
Back Panel: 2A, [3x: 8A 1B 1C 1B], 2A (64 sts)
Total: (168 sc)
Body Round 9:
Front/Back Panels: 2A, [3x: 7A 1B 3C 1B], 2A (64 sts each)
Side Panels: standard stripe sequence (20 sts each)
Total: (168 sc)
Body Round 10:
Front/Back Panels: 2A, [3x: 6A 1B 5C 1B], 2A (64 sts each)
Side Panels: standard stripe sequence (20 sts each)
Total: (168 sc)
Body Round 11:
Front/Back Panels: 2A, [3x: 5A 1B 7C 1B], 2A (64 sts each)
Side Panels: standard stripe sequence (20 sts each)
Total: (168 sc)
Body Round 12:
Front/Back Panels: 2A, [3x: 4A 1B 9C 1B], 2A (64 sts each)
Side Panels: standard stripe sequence (20 sts each)
Total: (168 sc)
Body Round 13:
Front/Back Panels: 2A, [3x: 3A 1B 4C 1A 4C 1B], 2A (64 sts each)
Side Panels: standard stripe sequence (20 sts each)
Total: (168 sc)
Body Round 14:
Front/Back Panels: 2A, [3x: 2A 1B 4C 3A 4C 1B], 2A (64 sts each)
Side Panels: standard stripe sequence (20 sts each)
Total: (168 sc)
Body Round 15:
Front/Back Panels: 2A, [3x: 1A 1B 4C 5A 4C 1B], 2A (64 sts each)
Side Panels: standard stripe sequence (20 sts each)
Total: (168 sc)
Body Round 16:
Front/Back Panels: 2A, [3x: 1B 4C 7A 4C 1B], 2A (64 sts each)
Side Panels: standard stripe sequence (20 sts each)
Total: (168 sc)
Body Round 17:
Front/Back Panels: 2A, [3x: 1B 3C 9A 3C 1B], 2A (64 sts each)
Side Panels: standard stripe sequence (20 sts each)
Total: (168 sc)
Body Round 18:
Front/Back Panels: 2A, [3x: 1B 2C 11A 2C 1B], 2A (64 sts each)
Side Panels: standard stripe sequence (20 sts each)
Total: (168 sc)
Body Round 19 (widest point of diamond):
Front/Back Panels: 2A, [3x: 1B 1C 13A 1C 1B], 2A (64 sts each)
Side Panels: standard stripe sequence (20 sts each)
Total: (168 sc)
Body Round 20:
Front/Back Panels: 2A, [3x: 1B 2C 11A 2C 1B], 2A (64 sts each)
Side Panels: standard stripe sequence (20 sts each)
Total: (168 sc)
Body Round 21:
Front/Back Panels: 2A, [3x: 1B 3C 9A 3C 1B], 2A (64 sts each)
Side Panels: standard stripe sequence (20 sts each)
Total: (168 sc)
Body Round 22:
Front/Back Panels: 2A, [3x: 1B 4C 7A 4C 1B], 2A (64 sts each)
Side Panels: standard stripe sequence (20 sts each)
Total: (168 sc)
Body Round 23:
Front/Back Panels: 2A, [3x: 1A 1B 4C 5A 4C 1B], 2A (64 sts each)
Side Panels: standard stripe sequence (20 sts each)
Total: (168 sc)
Continue working the remaining colorwork rounds following the same diamond pattern in reverse, mirroring Rounds 14 through 7 to close the diamond shapes. Then repeat the entire diamond sequence for the second vertical repeat of the motif through Round 46.
Section 5: Upper Body (Solid Rounds)
After completing the colorwork section, fasten off Colors B and C. Continue with Color A only.
Work even in single crochet for approximately 18 more rounds, or until the upper section measures about 4.5 inches from where the colorwork ended. (168 sc per round)
Fasten off and weave in ends.
Section 6: Braided Handles (Make 2)
Step 1: With Color A, make three separate chains, each approximately 45 inches long.
Step 2: Lay all three chains flat and secure one end.
Step 3: Braid the three chains together evenly.
Step 4: Thread each braided handle through a wooden ring at one end, fold over, and secure by whip stitching the end in place.
Step 5: Attach the wooden rings to the top edge of the bag at the desired handle positions, approximately 4 to 5 inches from each side seam.
Section 7: Tassel Charm
Step 1: Wrap Color A and Color C around a piece of cardboard approximately 4 inches tall, about 30 times.
Step 2: Tie one end tightly and cut the opposite end.
Step 3: Thread the wooden beads onto a strand of yarn and attach to the top of the tassel.
Step 4: Wrap yarn around the tassel about 1 inch below the top to create the tassel head.
Step 5: Attach the finished tassel to one of the wooden rings.
Finishing Tips
Weave in all ends thoroughly on the wrong side of the work. The tapestry fabric is dense, so ends stay secure once woven.
If you made a base insert, slip it into the bottom of the bag before using. This helps the tote keep its rectangular shape.
Block the finished bag lightly by misting with water and shaping with your hands. Let it dry flat.
Troubleshooting Common Issues
Puckering fabric: Your carried yarns are too tight. Loosen your tension on the inactive colors.
Visible carried yarn: Your carried yarns are too loose. Tighten slightly and ensure they sit directly on top of the previous round.
Uneven colorwork: Count your stitches at the end of every round. Place additional markers at the motif repeats if needed.
Bag sides pulling in: Your tension may be tightening as you work. Try using a slightly larger hook for the body rounds.
I hope you enjoy making this Desert Rose Geometric Tote as much as I enjoyed designing it. Tapestry crochet creates such stunning results, and this bag is the perfect way to show off your new skills. If you make one, I would absolutely love to see it! Tag me on Instagram or share a photo in my Facebook group.
Save this pattern to your Pinterest boards so you can find it when you are ready to start. And please drop a comment below if you make this tote. I read every single one and love seeing your color combinations!
