This bag is SUPER QUICK to fall in love with and honestly one of the most satisfying tote projects I have ever made! If you have been wanting to try granny squares but felt intimidated, this is your sign. The whole thing comes together in about 18 to 25 hours, which sounds like a lot until you realize you are making it one little square at a time while watching your favorite shows.

The best part? You only need to know chains and double crochet. That is it. If you can make a basic granny square and seam two pieces together, you can absolutely make this bag. The sea glass color palette gives it such a calm, beachy vibe that goes with everything. I cannot stop reaching for mine.
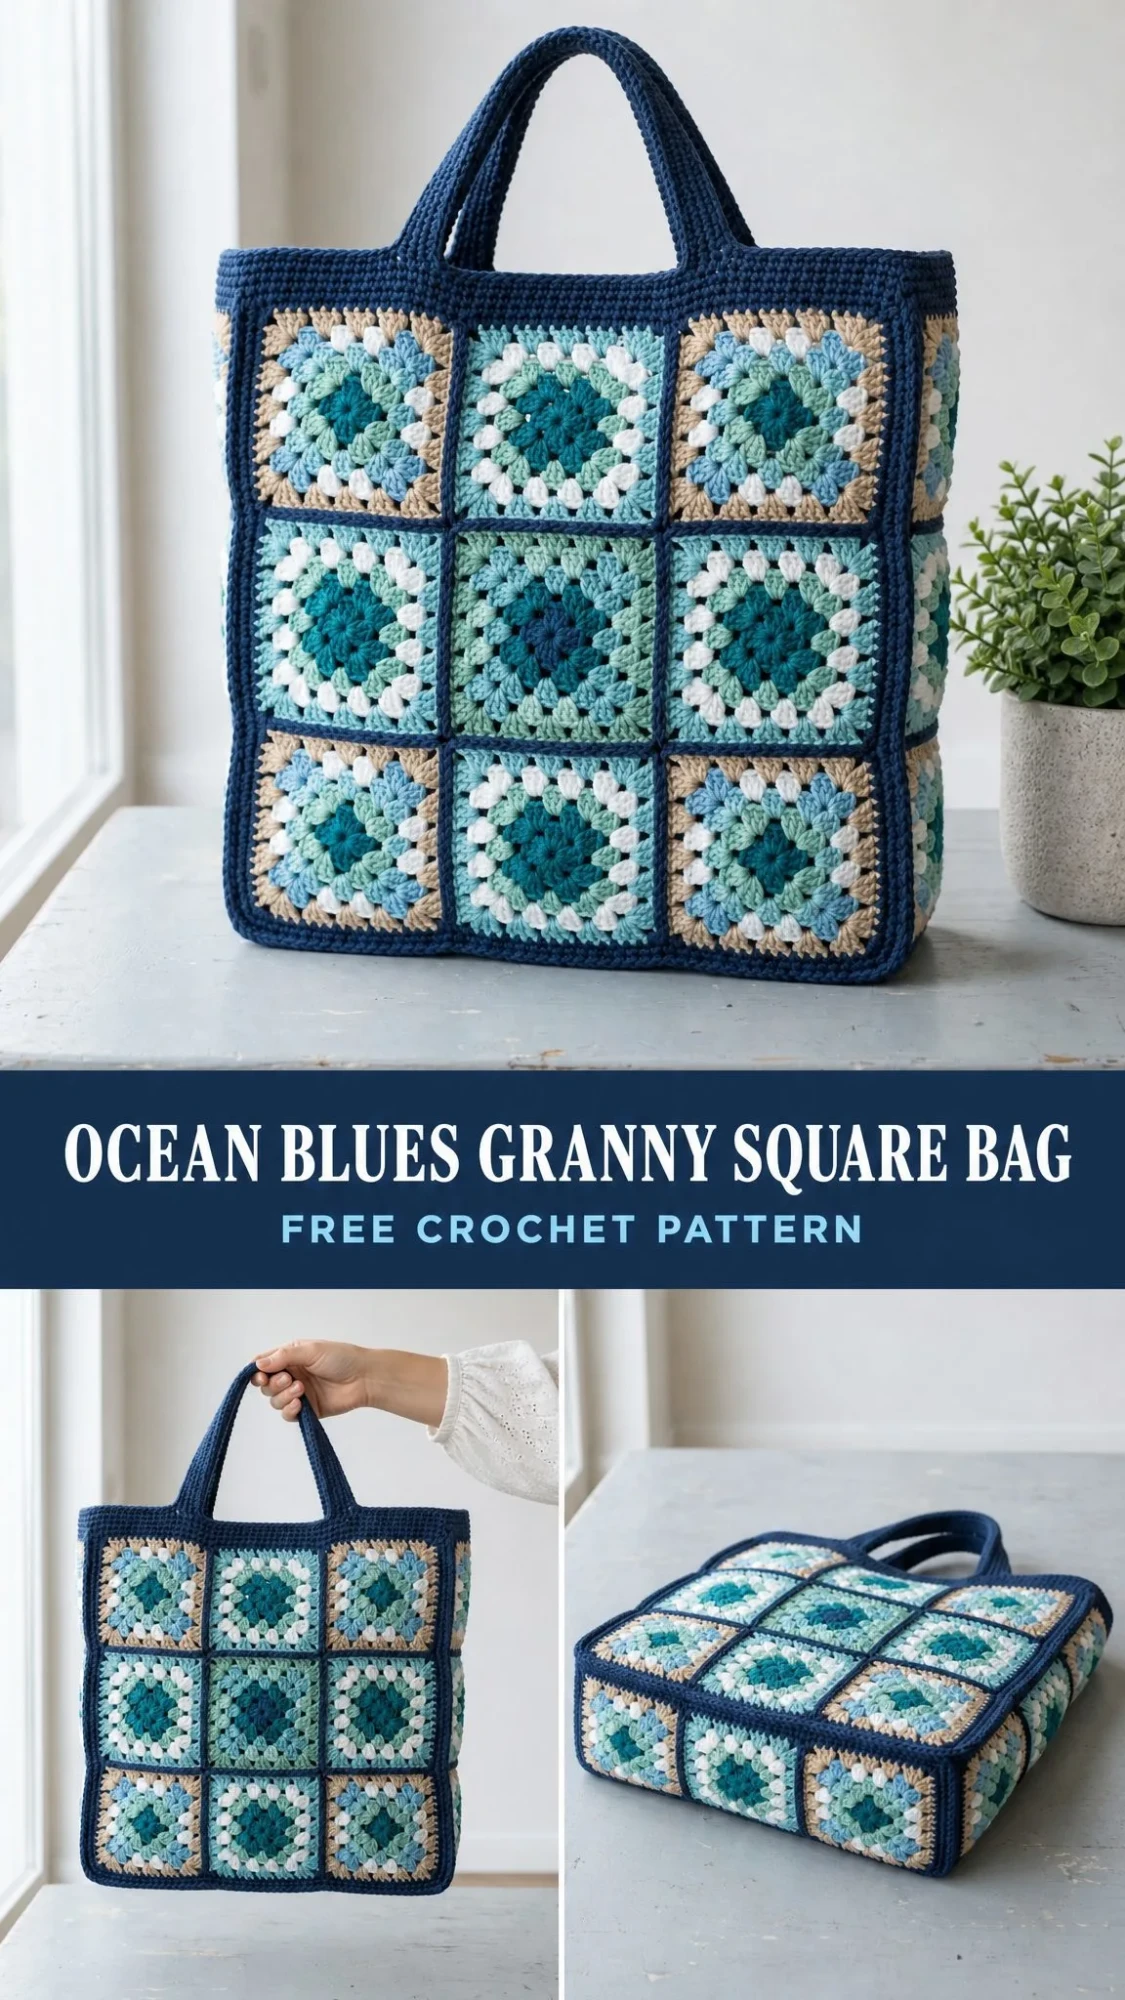
Whether you are making this for yourself or as a gift, it is going to impress. The navy framing makes each square pop, and the sturdy construction means it actually holds its shape when you load it up with groceries or yarn. Let me walk you through every single step.
Why You Will Love This Granny Square Tote
This Ocean Blues Granny Square Bag is built from twenty seven classic four round granny squares in a calm palette of teal, sea glass, white, and sky blue. The squares are then framed and joined in a confident navy. The decorative work happens in the colorful squares while the navy provides all the structure. The result is a sturdy, generous bag that holds its shape and truly goes with everything.
Everything is worked in simple chains and double crochet (dc), so the skill level sits at Advanced Beginner. If you are comfortable with those basic stitches and can handle some seaming, you have got this. Take it one square at a time and before you know it, you will have a beautiful handmade tote.
Finished Size
The completed bag measures approximately 12½ inches wide by 13 inches tall by 4 inches deep (32 × 33 × 10 cm), excluding handles. The handle drop is about 7 inches (18 cm). Each individual granny square measures 4 inches (10 cm) after blocking.
Materials You Will Need
Here is everything you need to gather before you start this crochet pattern:
Yarn: Worsted weight (Aran / 10 ply / Category 4) cotton or cotton blend. The amounts below are approximate, and a scrappy approach works beautifully here:
Suggested Yarns: Lily Sugar’n Cream (worsted cotton), Paintbox Yarns Cotton Aran, or Hobbii Rainbow Cotton 8/8. Any sturdy worsted cotton that meets gauge will work perfectly.
Hook: US H/8 (5.0 mm) crochet hook
Notions: Tapestry needle, stitch markers, scissors, blocking mat and pins. Optional: fabric for a lining if you want to add one.
Gauge
One completed granny square (Rounds 1 through 4) measures 4 inches × 4 inches (10 × 10 cm) on a US H/8 (5.0 mm) hook, after light blocking.
Gauge is not critical for fit here, but matching it keeps the finished measurements close to those shown. If your squares are running small, go up a hook size to a US I/9 (5.5 mm).
Abbreviations
Here are all the abbreviations used in this crochet tutorial, written in US terms:
UK Crocheters: The terms here are US. Convert as follows: US sc equals UK double crochet (dc), and US dc equals UK treble (tr). Hook and gauge stay the same.
Special Stitch
Granny cluster = 3 dc worked together into one chain space. The whole bag is built from these clusters separated by ch 1 spaces, with (3 dc, ch 2, 3 dc) at every corner.
Pattern Notes Before You Begin
Read through these tips before you pick up your hook:
How to Crochet the Granny Square
Make 27 squares total. You will make 14 squares with Sky Blue as Round 4 and 13 squares with Sand as Round 4. Fasten off after every round for clean color changes.
Round 1 (Teal)
Make a magic ring. Ch 3 (this counts as your first dc), 2 dc in ring, ch 2, 3 dc in ring, ch 2; rep from twice more. Join with sl st to top of beginning ch 3. Fasten off.
(12 dc, 4 corner ch 2 spaces)
Round 2 (Sea Glass)
Join Sea Glass in any corner ch 2 space. Ch 3, (2 dc, ch 2, 3 dc) in same space, ch 1, (3 dc, ch 2, 3 dc) in next corner space; rep from twice more, ch 1, join to top of ch 3. Fasten off.
(24 dc, 4 corner spaces, 4 ch 1 spaces)
Round 3 (White)
Join White in any corner ch 2 space. Ch 3, (2 dc, ch 2, 3 dc) in same space, ch 1, 3 dc in next ch 1 space, ch 1, (3 dc, ch 2, 3 dc) in next corner space; rep from twice more, ch 1, 3 dc in next ch 1 space, ch 1, join. Fasten off.
(36 dc)
Round 4 (Sky Blue or Sand)
Join Sky Blue or Sand in any corner ch 2 space. Ch 3, (2 dc, ch 2, 3 dc) in same space, [ch 1, 3 dc in next ch 1 space] twice, ch 1, (3 dc, ch 2, 3 dc) in next corner space; rep from twice more, [ch 1, 3 dc in next ch 1 space] twice, ch 1, join. Fasten off.
(48 dc total, which is 12 dc per side)
Each round adds 12 dc (four clusters). When all 27 squares are done, weave in the center tails and block each square to a tidy 4 inches (10 cm).
How Many Squares and Layout
The bag is made of six flat panels joined into a box shape: a front, a back, two narrow sides, and a base. Lay your finished squares out in this arrangement before joining so the colors are pleasantly mixed.
Front Panel: 9 squares arranged 3 wide by 3 tall
Back Panel: 9 squares arranged 3 wide by 3 tall
Each Side Panel: 3 squares arranged 1 wide by 3 tall (make 2)
Base Panel: 3 squares in a single row, running front to back
Total Square Count: Front 9 + Back 9 + Left side 3 + Right side 3 + Base 3 = 27 squares
Once joined, these panels fold up into the finished tote shape.
Joining the Squares Step by Step
All squares are joined with Navy yarn for that beautiful framed look. Choose whichever method you prefer. Both give clean grid lines.
Method A: Whip Stitch (Simplest)
Hold two squares with right sides together, edges aligned. With Navy and a tapestry needle, whip stitch through the back loops only across the edge. Work one stitch per dc and one stitch per ch 1 space.
(about 14 stitches per seam)
Keep your tension even and match it at corners.
Method B: Single Crochet Join (Raised Ridge)
Hold two squares with wrong sides together. With Navy yarn, sc through both squares across the edge, working 1 sc in each pair of corresponding stitches and ch 1 spaces.
(about 14 sc per seam)
This method leaves a slightly raised navy ridge on the right side, which is the look pictured in the photos.
Join Your Panels
1. Join the 9 front squares into a 3×3 panel by seaming each row of 3, then seaming the three rows together.
2. Repeat for the 9 back squares.
3. Join each side panel by connecting 3 squares into a single 1×3 strip (make 2).
4. Join the base by connecting 3 squares into a single 1×3 strip.
Tip: Weave in your seam tails as you go so the inside stays tidy and the panels lie flat.
Assembling the Bag
Now you will seam the five finished panels into the tote, using Navy yarn and the same join method throughout. Work with the right sides facing out so every seam shows as a crisp navy line.
Step 1: Attach the Base
Seam the bottom edge of the front panel to one long edge of the base strip. Seam the bottom edge of the back panel to the opposite long edge of the base. The bag now opens out flat like a long plank.
Step 2: Add the Sides
Stand the front and back up. Seam one side strip to the matching side edges of the front and back panels, closing one end of the bag. Seam the short bottom end of that side strip to the end of the base. Repeat with the second side strip on the other end.
Step 3: Square the Corners
At each bottom corner, make sure the base end, side panel, and front/back all meet cleanly. Add a few extra Navy stitches if a corner gapes. The bag should now stand on its own.
Top Band and Handles
A few rounds of Navy single crochet firm up the opening, then two flat straps become the handles.
Top Band (Navy)
Rnd 1: Join Navy at a top back corner. Sc evenly around the entire opening, working about 1 sc in each st and 1 sc in each ch 1 space around. Join with sl st. (96 sc)
Rnds 2 through 5: Ch 1, sc in each st around, join. (96 sc)
Adjust Round 1 to a stitch count close to 96 if your squares differ slightly. The band only needs to be even.
Handles (Make 2 in Navy)
Row 1: Ch 8. Sc in 2nd ch from hook and in each ch across, turn. (7 sc)
Rows 2 to end: Ch 1, sc in BLO of each st across, turn. (7 sc)
Repeat until the strap measures about 20 inches (51 cm), which is roughly 90 rows. Fasten off, leaving a long tail for sewing.
Attach the Handles
Center a handle on the front, positioning the ends over the two seam lines between squares (about 4 inches / 10 cm apart). Pin in place, then sew each end firmly to the inside of the top band. Stitch through several times for strength.
Repeat with the second handle on the back, matching the placement.
Finishing Your Granny Square Bag
Weave in all remaining ends on the wrong side and trim them close.
Give the whole bag a gentle steam or wet block to even out the squares and set the shape.
For a more structured tote that holds more weight, cut a piece of plastic canvas or stiff fabric to the base size and tack it inside.
Optional lining: Cut fabric to the inside dimensions plus ½ inch seam allowance, sew into a pouch, and hand stitch it to the top band just below the handles.
Care Instructions
Sizing and Customization Ideas
Because this bag is modular, resizing is mostly a matter of adding or removing squares. Each square adds about 4 inches (10 cm) in that direction.
Bigger Tote: Work the front and back as 4×4 panels (16 squares each), sides as 1×4, and a base of 4. This raises the bag to about 16 inches (40 cm) tall and wide. You will need roughly 1.5 times the yarn.
Deeper / Boxier Bag: Make the side panels and base 2 squares wide instead of 1 for an 8 inch (20 cm) depth. This is ideal as a project bag or beach bag.
Shoulder or Crossbody: Lengthen the handle straps. For a comfortable shoulder carry, work to about 28 inches (71 cm). For crossbody, work about 45 inches (114 cm) as a single long strap attached at the side panels.
Quick Adjustments:
You Did It!
I really hope you enjoy making this Ocean Blues Granny Square Bag crochet pattern as much as I enjoyed designing it. There is something so satisfying about watching those little squares stack up and then come together into a real, functional, beautiful bag. Every time I grab mine for a trip to the farmers market, it makes me smile.
Thank you so much for choosing this pattern for your next project. I would absolutely love to see your finished totes! Tag me on Instagram or share a photo in our Facebook group so I can cheer you on.
If you loved this pattern, make sure to save it to your Pinterest boards so you can find it easily later. And please drop a comment below if you make one. I love hearing which color combinations you choose and seeing how you make this pattern your own. Happy stitching!
