I know what you’re thinking. A crocheted sweater with an appliqué cat motif? That sounds way too advanced. Here’s the truth. If you can single crochet and half double crochet, you can absolutely make this sweater. The cat appliqué looks intricate, but it’s actually built from simple flat pieces sewn together. The velvet bow? That’s just ribbon. No fancy stitchwork required. Whether you’re a confident beginner ready to try your first garment or an experienced crocheter looking for a charming weekend project, this orange ginger cat velvet bow sweater crochet pattern breaks everything down into manageable steps.
Why This Cat Sweater is Easier Than You Think
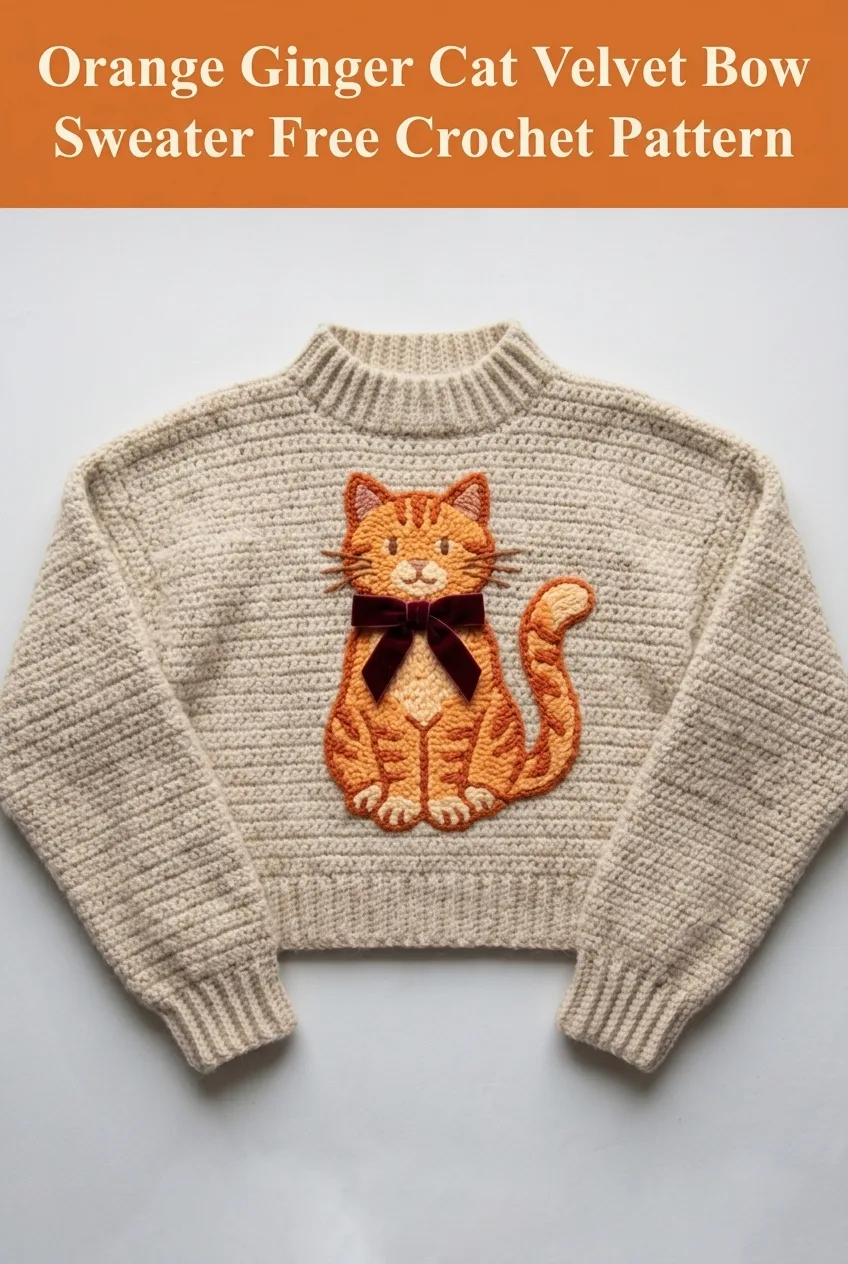
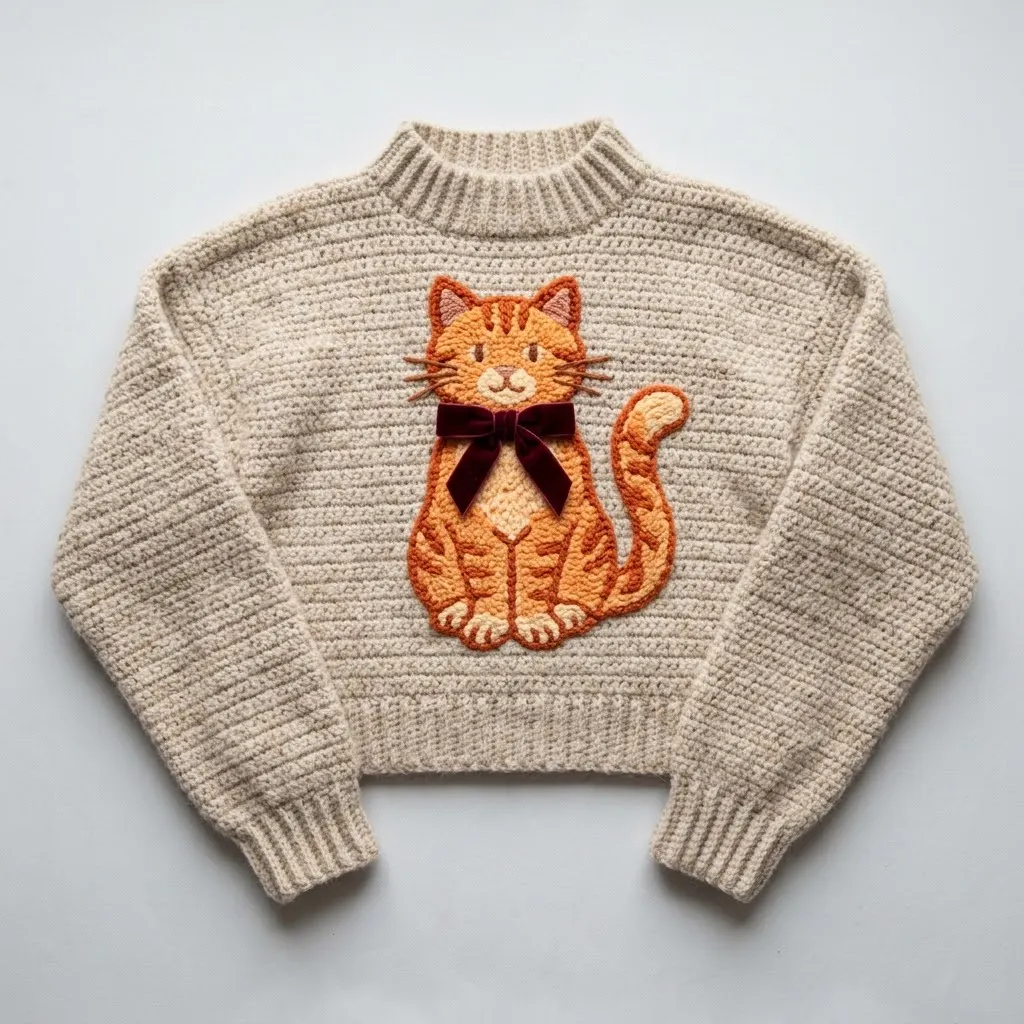
Let me address the elephant in the room. Or rather, the cat on the sweater. That adorable tabby motif with its cream belly, orange stripes, and sweet little face looks like it requires advanced skills. It doesn’t. The cat is a separate appliqué made from basic shapes. You crochet the body, head, ears, and tail as flat pieces. Then you embroider the stripes and facial features with simple surface stitches. Finally, you sew everything onto the finished sweater and add a velvet ribbon bow.
The sweater itself uses a classic raglan construction worked from the bottom up. The body and sleeves are made separately, then joined at the yoke. This method means you’re never juggling too many stitches at once. The ribbed neckline and cuffs add polish without complexity.
Materials You’ll Need
Yarn for Main Sweater:
Yarn for Cat Appliqué:
Additional Materials:
Gauge
For main sweater: 14 stitches and 16 rows = 4 inches in half double crochet using H/8 hook
For appliqué: 16 stitches and 18 rows = 4 inches in single crochet using G/6 hook
Gauge matters for garment fit. Take time to swatch and adjust your hook size if needed.
Stitch Abbreviations and Definitions
Ch (chain): Yarn over, pull through loop on hook. This creates your foundation.
Sl st (slip stitch): Insert hook, yarn over, pull through stitch and loop on hook in one motion. Used for joining and invisible movement.
Sc (single crochet): Insert hook into stitch, yarn over, pull up a loop (2 loops on hook), yarn over, pull through both loops. Creates a short, dense stitch.
Hdc (half double crochet): Yarn over, insert hook into stitch, yarn over, pull up a loop (3 loops on hook), yarn over, pull through all 3 loops. Slightly taller than single crochet with nice drape.
Sc2tog (single crochet 2 together): Insert hook into next stitch, yarn over, pull up a loop, insert hook into following stitch, yarn over, pull up a loop (3 loops on hook), yarn over, pull through all 3 loops. This decreases by one stitch.
Hdc2tog (half double crochet 2 together): Yarn over, insert hook into next stitch, yarn over, pull up a loop, yarn over, insert hook into following stitch, yarn over, pull up a loop (5 loops on hook), yarn over, pull through all 5 loops. Decrease stitch for half double crochet fabric.
Inc (increase): Work 2 stitches into the same stitch.
BLO (back loop only): Work into only the back loop of the stitch, creating a ribbed texture.
Size Information
This pattern is written for size Medium. Finished bust measures approximately 40 inches with 4 to 6 inches of positive ease. Length from shoulder to hem is approximately 20 inches. Sleeve length is approximately 18 inches from underarm.
For size adjustments, add or subtract multiples of 4 stitches to the foundation chain for the body and sleeves.
Orange Ginger Cat Velvet Bow Sweater Crochet Pattern Instructions
Back Panel
Foundation: With H/8 hook and oatmeal yarn, ch 72.
Row 1: Hdc in 3rd ch from hook and in each ch across. Turn. (70 hdc)
Rows 2 through 50: Ch 2 (does not count as stitch throughout), hdc in each st across. Turn. (70 hdc)
Your back panel should measure approximately 20 inches wide and 12.5 inches tall. Fasten off and set aside.
Front Panel
Work exactly as back panel through Row 50. Do not fasten off. Continue to armhole shaping.
Sleeves (Make 2)
Foundation: With H/8 hook and oatmeal yarn, ch 36.
Row 1: Hdc in 3rd ch from hook and in each ch across. Turn. (34 hdc)
Row 2: Ch 2, hdc in each st across. Turn. (34 hdc)
Row 3 (Increase Row): Ch 2, 2 hdc in first st, hdc in each st to last st, 2 hdc in last st. Turn. (36 hdc)
Rows 4 through 6: Ch 2, hdc in each st across. Turn. (36 hdc)
Continue pattern, increasing 1 stitch at each end every 4th row until you have 52 hdc total. Work even until sleeve measures approximately 17 inches from foundation. Fasten off, leaving a long tail for seaming.
Joining Body and Sleeves for Yoke
Lay out your pieces with right sides facing you. You’ll join them in this order: front panel, sleeve, back panel, sleeve.
Joining Round: With right side facing, join yarn at bottom right of front panel. Ch 2, hdc across 70 sts of front, place marker, hdc across 52 sts of first sleeve, place marker, hdc across 70 sts of back, place marker, hdc across 52 sts of second sleeve, place marker. Join with sl st to top of ch 2. (244 hdc)
Raglan Decreases
Round 1: Ch 2, *hdc to 2 sts before marker, hdc2tog, slip marker, hdc2tog,* repeat from * around. Join with sl st. (236 hdc)
Round 2: Ch 2, hdc in each st around. Join with sl st. (236 hdc)
Repeat Rounds 1 and 2 until 108 stitches remain. Try on the sweater to check fit. Adjust decrease rounds as needed.
Ribbed Neckline
Round 1: Ch 1, sc in BLO of each st around. Join with sl st. (108 sc)
Rounds 2 through 8: Ch 1, sc in BLO of each st around. Join with sl st. (108 sc)
Fasten off and weave in ends.
Ribbed Cuffs
Join oatmeal yarn at sleeve seam with sl st.
Round 1: Ch 1, sc evenly around sleeve opening, working approximately 34 sc. Join with sl st. (34 sc)
Rounds 2 through 10: Ch 1, sc in BLO of each st around. Join with sl st. (34 sc)
Fasten off. Repeat for second sleeve.
Bottom Ribbing
Join oatmeal yarn at side seam with sl st.
Round 1: Ch 1, sc evenly around bottom edge, working approximately 140 sc total. Join with sl st. (140 sc)
Rounds 2 through 8: Ch 1, sc in BLO of each st around. Join with sl st. (140 sc)
Fasten off and weave in all ends.
Cat Appliqué Instructions
This is where the magic happens. Don’t worry. Each piece is simple on its own.
Cat Body
Foundation: With G/6 hook and orange yarn, ch 22.
Row 1: Sc in 2nd ch from hook and in each ch across. Turn. (21 sc)
Rows 2 through 24: Ch 1, sc in each st across. Turn. (21 sc)
Row 25 (Begin Shaping): Ch 1, sc2tog, sc to last 2 sts, sc2tog. Turn. (19 sc)
Rows 26 through 28: Ch 1, sc in each st across. Turn. (19 sc)
Continue decreasing every 4th row until 11 stitches remain. Work 2 more rows even. Fasten off.
Cat Head
Foundation: With orange yarn, ch 18.
Row 1: Sc in 2nd ch from hook and in each ch across. Turn. (17 sc)
Rows 2 through 14: Ch 1, sc in each st across. Turn. (17 sc)
Row 15: Ch 1, sc2tog, sc to last 2 sts, sc2tog. Turn. (15 sc)
Row 16: Repeat Row 15. (13 sc)
Fasten off, leaving a long tail.
Cat Ears (Make 2)
Foundation: With orange yarn, ch 8.
Row 1: Sc in 2nd ch from hook and in each ch across. Turn. (7 sc)
Row 2: Ch 1, sc2tog, sc 3, sc2tog. Turn. (5 sc)
Row 3: Ch 1, sc2tog, sc 1, sc2tog. Turn. (3 sc)
Row 4: Ch 1, sc3tog. Fasten off. (1 sc)
Inner Ears (Make 2)
Work as ears using pink yarn, but stop after Row 3. Fasten off.
Cat Tail
Foundation: With orange yarn, ch 25.
Row 1: Sc in 2nd ch from hook and in each ch across. Turn. (24 sc)
Rows 2 through 4: Ch 1, sc in each st across. Turn. (24 sc)
Fasten off. Curl the tail gently into a curved shape when attaching.
Cream Belly Patch
Foundation: With cream yarn, ch 10.
Row 1: Sc in 2nd ch from hook and in each ch across. Turn. (9 sc)
Rows 2 through 12: Ch 1, sc in each st across. Turn. (9 sc)
Row 13: Ch 1, sc2tog, sc 5, sc2tog. Turn. (7 sc)
Row 14: Ch 1, sc2tog, sc 3, sc2tog. Turn. (5 sc)
Fasten off.
Assembling the Cat
1. Sew inner ears to outer ears using whip stitch
2. Attach ears to top corners of head
3. Using dark brown yarn, embroider eyes with small satin stitches or French knots
4. Embroider nose with pink yarn in a small triangle
5. Add whiskers with straight stitches using dark brown yarn
6. Embroider stripes on body and head using backstitch or surface slip stitch with dark orange or rust yarn
7. Sew cream belly patch to center of body
8. Attach head to body with whip stitch
9. Sew tail to side of body, curving it upward
Attaching Appliqué to Sweater
Position completed cat on front center of sweater, approximately 3 inches above bottom ribbing. Pin in place. Using oatmeal yarn and tapestry needle, whip stitch around all edges, securing appliqué firmly. Take care to stitch through only the back layer of the appliqué edge to keep stitches invisible from the front.
Adding the Velvet Bow
Tie velvet ribbon into a classic bow. Trim ends at an angle to prevent fraying. Using sewing needle and coordinating thread, tack bow securely at the cat’s neck. Add a few hidden stitches on the back of each loop to maintain shape.
Finishing Your Orange Ginger Cat Sweater
Weave in all remaining ends. Block your sweater by soaking in lukewarm water with a drop of wool wash. Gently squeeze out excess water without wringing. Lay flat on a towel and shape to measurements. Allow to dry completely before wearing.
The back loop only ribbing at the neckline, cuffs, and hem creates that beautiful stretchy texture you see in the photo. This technique mimics knit ribbing beautifully.
Customization Ideas
Want to make this sweater your own? Try these variations:
Tips for Crochet Sweater Success
Seaming matters. Take your time joining pieces. Neat seams make your sweater look professional.
Check your gauge often. Especially in the yoke, where fit is critical.
Try it on as you go. Once the yoke is partially complete, slip it over your head to check the fit before continuing.
Block before attaching the appliqué. This ensures your sweater is the correct size and shape before you commit to appliqué placement.
This orange ginger cat velvet bow sweater crochet pattern creates a truly special garment. The combination of simple stitches, thoughtful construction, and that irresistible cat motif makes it a project you’ll be proud to wear or gift. The vintage feel of the velvet bow adds sophistication, while the playful tabby brings joy.
Thank you so much for choosing this pattern for your next project. I genuinely hope you love making it as much as I loved designing it. If you crochet this sweater, I would absolutely love to see it. Tag me on Instagram or share your finished piece in my Facebook group. Your photos make my day.
If this pattern caught your eye, go ahead and save it to your Pinterest boards so you can find it when you’re ready to start. And please drop a comment below if you make this cozy cat sweater. I read every single one, and hearing about your projects brings me so much happiness. Happy crocheting, friend.
