
I call this one the "Lilac Dreams Dress," and honestly, it has quite a history in my pattern notebook. The original sketch dates back to when my niece was just a toddler and I wanted to make her something truly special for her second birthday. I spent weeks perfecting those cascading fan lace tiers, ripping back rows more times than I care to admit, until the drape was exactly right. She wore it for every fancy occasion that year, and now I finally have the complete pattern written up properly to share with you.

This dress has been through multiple test rounds since then. Each tier taught me something new about how cotton yarn behaves in lace, how to get that beautiful waterfall effect without the fabric getting too stiff, and how to create that gorgeous high-low hemline that makes little ones look like they stepped out of a fairy tale.
If you have been looking for a show-stopping heirloom piece that combines structured bodice work with romantic lace detailing, this is the project for you. It takes patience, yes. But the finished result is absolutely worth every stitch.
About This Lavender Lace Party Dress Crochet Pattern
This crochet pattern creates a stunning toddler party dress featuring a fitted bodice with a sweet peter pan collar, a satin ribbon waistband, and a dramatic three-tiered skirt in cascading fan lace. The most striking detail is the high-low hemline, where the front sits shorter than the back, creating that elegant, almost formal silhouette you see in designer children’s clothing.
The dress is constructed from the top down, starting at the collar and working through the bodice in joined rounds. Then you transition to the tiered skirt sections, each worked in beautiful fan shell stitches that stack and layer for that waterfall effect.
Skill Level: Intermediate to Advanced
This is not a beginner project, and I want to be upfront about that. You will be working garment shaping in the round, attaching a collar worked flat, managing multi-tier fan lace with precise stitch counts, and creating the high-low hemline through partial rounds. If you are comfortable reading patterns carefully, using stitch markers, and working into specific stitches like the back loop only, you can absolutely do this.
Time Estimate: Approximately 18 to 24 hours for an experienced crocheter. Budget extra time for blocking, ribbon threading, and all those finishing details that make the dress look polished.
Finished Measurements
The pattern is written for size 2T with modifications for 3T and 4T noted throughout in parentheses as: 2T (3T, 4T).
Size 2T: Chest 20 in / 51 cm, waist 19 in / 48 cm, front length from shoulder 16 in / 41 cm, back length from shoulder 20 in / 51 cm
Size 3T: Chest 21 in / 53 cm, waist 20 in / 51 cm, front length from shoulder 17 in / 43 cm, back length from shoulder 21 in / 53 cm
Size 4T: Chest 22 in / 56 cm, waist 21 in / 53 cm, front length from shoulder 18 in / 46 cm, back length from shoulder 22 in / 56 cm
The garment is designed with approximately 1 inch / 2.5 cm of ease at the chest for comfortable movement.
Materials Needed
Yarn: Light weight yarn (weight category 3 / DK weight), 100 percent mercerized cotton or cotton blend for optimal drape and stitch definition
Amount: 600 (680, 760) yards / 549 (622, 695) meters total in one color
Hooks:
Notions:
Yarn Suggestions
Option 1: Paintbox Yarns Cotton DK. 100 percent cotton, 137 yards / 125 meters per 50 g ball. Color: Misty Lilac. Excellent stitch definition and smooth finish ideal for lace work. You will need approximately 5 (5, 6) balls.
Option 2: Cascade Yarns Ultra Pima. 100 percent Pima cotton, 220 yards / 201 meters per 100 g skein. Superior sheen and drape. You will need approximately 3 (4, 4) skeins.
Option 3: Drops Safran. 100 percent Egyptian cotton, 175 yards / 160 meters per 50 g ball. Affordable and widely available with consistent dye lots. You will need approximately 4 (4, 5) balls.
Substitution note: Choose any DK weight or light DK weight yarn in 100 percent cotton or at least 50 percent cotton blend. Avoid yarns with significant halo like mohair blends as they will obscure the lace pattern. Always swatch to confirm gauge before beginning.
Gauge
Bodice (E-4 / 3.5 mm hook, worked in hdc in joined rounds):
18 hdc x 14 rounds = 4 in x 4 in / 10 cm x 10 cm
Fan lace skirt (F-5 / 3.75 mm hook, one fan pattern repeat):
One fan shell (5 dc) plus connecting stitches = 1.5 in / 3.8 cm wide; one full fan lace row height = 1.25 in / 3.2 cm tall
Gauge is critical for correct fit. If your gauge is looser, go down a hook size. If tighter, go up a hook size. I recommend swatching both sections before beginning.
Abbreviations and Stitch Definitions
Let me walk you through every abbreviation you will encounter. If you are newer to pattern reading, bookmark this section.
Special Stitches for This Crochet Tutorial
Fan Shell Stitch (5-dc shell)
This is the star of the skirt tiers. To work a fan shell:
1. Identify the designated center stitch
2. Work 5 double crochet stitches into that single stitch
3. The result is a beautiful fan shape that spreads outward
This is abbreviated throughout as "5-dc shell in st."
Fan Lace Repeat Unit
Each full repeat works as follows: skip 2 stitches, work a 5-dc shell in the next stitch, skip 2 stitches, single crochet in the next stitch. This creates a 6-stitch repeat that produces the signature layered lace texture.
Scallop Edge Stitch
Used to finish the collar and tier hems:
1. Slip stitch into base stitch
2. Chain 3, work 2 dc into same stitch
3. Slip stitch into next stitch
4. Repeat across
Picot Stitch
A decorative bump used on the collar edge:
1. Single crochet into stitch
2. Chain 3
3. Slip stitch into first chain of chain-3
Ribbon Channel Row
This clever technique creates a slot for threading your ribbon. Work half double crochet through the back loop only around the entire round. The unused front loops create a horizontal ridge on the right side where the ribbon will be threaded later.
Pattern Notes Before You Begin
Read through these notes carefully. They will save you confusion later.
1. The dress is worked from the top down: collar first (flat), then bodice (in the round), then skirt tiers (in the round with partial rounds for high-low shaping).
2. The back of the dress has a small opening at the upper center back secured with two snaps or small buttons. This opening is created by working the first two bodice rounds flat before joining to work in the round.
3. Stitch markers are essential. Place markers at each underarm point and at center front and center back throughout bodice construction.
4. The skirt divides into three tiers. Tier 1 is shortest and sits just below the waist. Tier 2 hangs below Tier 1. Tier 3 is longest and forms the hem. All front tiers are shorter than the back, achieved by working turning rows that stop at the side seams on the back panels only.
5. The ribbon waistband sits in the channel between the bodice and Tier 1 skirt. Thread it through the front loops left exposed, bring both ends to center front, and tie in a bow.
6. Chain-3 turning chains at the beginning of dc rows count as the first dc unless otherwise noted.
7. At the start of each skirt tier, stitch counts increase because new stitches are picked up into both the tops of stitches and chain spaces of the previous tier.
Step by Step Crochet Instructions
Collar
Using E-4 / 3.5 mm hook, ch 56 (60, 64).
Foundation row (WS): Sc in 2nd ch from hook and in each ch across. Turn. (55, 59, 63 sc)
Row 1 (RS): Ch 1, sc in first st, hdc in next 2 sts, dc in next 3 sts, hdc in next 2 sts, sc in next st. Repeat this 9-st sequence 4 (4, 5) more times adjusting to fill, ending with sc in last st. Turn. (55, 59, 63 sts)
The collar is a simple curved strip that will be attached to the neckline later. Rows 1 through 5 shape its slight curve by adding small increases on the outer edge.
Row 2: Ch 1, working in blo, sc in each st across, working 2 sc in the 4th st from each end to create gentle curve. Turn. (57, 61, 65 sts)
Row 3: Ch 1, sc across, do not increase. Turn. (57, 61, 65 sts)
Row 4: Ch 1, sc across. Turn. (57, 61, 65 sts)
Row 5 (outer edge, RS facing): Ch 1, work scallop edge across as follows: sl st in first st, ch 3, 2 dc in same st, sl st in next st. Repeat across to end. Fasten off. Leave long tail for seaming.
Inner edge of collar (straight foundation chain edge): With RS facing, join yarn at right end of foundation edge, work sc picot border as follows: sc in first ch, ch 3, sl st into first ch of ch-3, sc in next ch. Repeat across. Fasten off.
Set collar aside. It will be attached after the neckline of the bodice is established.
Bodice Neckline Setup
Using E-4 / 3.5 mm hook, ch 76 (82, 88). Join with sl st to form a ring, being careful not to twist.
This foundation ring represents the top of the bodice including neckline edge. The collar will be sewn to the outside of this edge when complete. The chain count divides into 4 sections: front (28, 30, 32), right side (6, 7, 8), back (28, 30, 32), left side (6, 7, 8) for underarms.
Rnd 1: Ch 2 (does not count as st), hdc in each ch around. Join with sl st to top of first hdc. (76, 82, 88 hdc)
Place markers as follows: pm in st 1 (center back left), pm in st 28 (29, 30) for right back-to-front underarm, pm in st 34 (36, 38) for left front-to-back underarm.
Rnd 2: Ch 2, hdc in each st around. Join. (76, 82, 88 hdc)
Rnds 3 through 5: Rep Rnd 2 three times. (76, 82, 88 hdc each round)
Now begin raglan-style yoke shaping to separate body and sleeves. The underarm stitches are placed on hold and new stitches are chained to bridge the underarms.
Rnd 6 (Armhole separation round): Ch 2, hdc in first 28 (30, 32) sts (front panel), ch 5 (6, 7) to bridge right underarm, skip 6 (7, 8) sts, hdc in next 28 (30, 32) sts (back panel), ch 5 (6, 7) to bridge left underarm, skip 6 (7, 8) sts. Join.
Stitch count: 28 + 5 + 28 + 5 = 66 for 2T; 30 + 6 + 30 + 6 = 72 for 3T; 32 + 7 + 32 + 7 = 78 for 4T
Rnd 7: Ch 2, hdc in each st and each ch around. Join. (66, 72, 78 hdc)
Verification: 66 / 6 = 11 fan repeats, 72 / 6 = 12 repeats, 78 / 6 = 13 repeats. All divide cleanly for fan lace.
Bodice Body
Continue working in joined rounds with E-4 / 3.5 mm hook.
Rnds 8 through 11: Ch 2, hdc in each st around. Join. (66, 72, 78 hdc each round)
Rnd 12 (waist shaping, 2T only): Ch 2, (hdc in next 9 sts, hdc2tog) 6 times. Join. (60 hdc for 2T; 72, 78 hdc for 3T and 4T remain unchanged)
The waist shaping produces a gentle inward curve. For 3T and 4T the waist is not decreased as the proportions remain flattering without.
Rnds 13 and 14 (2T only): Ch 2, hdc in each st around. Join. (60, 72, 78 hdc)
Rnd 15 (ribbon channel round, all sizes): With blo only, ch 2, hdc through blo of each st around. Join with sl st to first hdc. (60, 72, 78 hdc)
This completes the bodice.
Checkpoint: After Rnd 15, the bodice should measure approximately 6 in / 15 cm tall for 2T, 6.5 in / 16.5 cm for 3T, and 7 in / 18 cm for 4T from the top of the neckline to the ribbon channel row.
Do not fasten off. Proceed to Tier 1 skirt.
Skirt Tier 1
Switch to F-5 / 3.75 mm hook.
The skirt begins by picking up stitches into the front loops left exposed in Rnd 15. These front loops face toward you when the dress is right side out.
Setup round: With RS facing, insert hook into any exposed front loop from Rnd 15, join yarn, ch 1, sc into same loop, sc into each remaining exposed front loop around. Join with sl st to first sc. (60, 72, 78 sc)
Increase round (Tier 1 base): Ch 3 (counts as first dc), dc in same st, 2 dc in each st around. Join with sl st to top of ch-3. (120, 144, 156 dc)
Verification: 120 / 6 = 20 fan repeats; 144 / 6 = 24 fan repeats; 156 / 6 = 26 fan repeats. All divisible.
Fan lace round 1 (Tier 1, Rnd 1): Ch 1, sc in first st, sk 2 sts, 5-dc shell in next st, sk 2 sts, sc in next st. Repeat (sk 2, 5-dc shell in next, sk 2, sc in next) around. Join with sl st to first sc. (20, 24, 26 shells + 20, 24, 26 sc)
Fan lace round 2 (Tier 1, Rnd 2): Ch 3, 2 dc in same st (top of first sc from prev rnd), sk 2 dc, sc in next dc (3rd dc of shell, the center), sk 2 dc, 5-dc shell in next sc. Repeat across. Join. (20, 24, 26 shells shifted by half a repeat)
This alternating round staggers the shells to create the interlocking fan lace texture visible in the skirt.
Fan lace round 3 (Tier 1, Rnd 3): Ch 1, sc into top of ch-3 from previous round, sk 2 dc, 5-dc shell in next sc, sk 2 dc, sc in 3rd dc of shell. Repeat across. Join. (120, 144, 156 sts)
Repeat fan lace rounds 2 and 3 alternately for 2 more rounds total (4 fan lace rounds total for Tier 1).
Scallop edging round (Tier 1 hem): Sl st to first st, ch 3, 2 dc in same st, sl st in next st. Repeat across. Join. Fasten off.
Checkpoint: Tier 1 should measure approximately 3 in / 7.5 cm from the ribbon channel to the scallop hem edge.
Skirt Tier 2
Tier 2 is worked by picking up stitches into the sc stitches in Fan Lace Round 1 of Tier 1 (the valley sc between the shells). This creates the layered waterfall effect.
Rnd A: With RS facing and F-5 hook, join yarn to the sc between the first two shells of Tier 1 Fan Lace Round 1. Ch 1, sc in same place, ch 3, sc in next sc-between-shell. Repeat around for all 20 (24, 26) sc positions. Join. (20, 24, 26 sc + 20, 24, 26 ch-3 sps)
Rnd B (increase round): Ch 3, 5 dc into first ch-3 sp (6 dc counting the ch-3), 6 dc into each remaining ch-3 sp around. Join. (120, 144, 156 dc)
Fan lace rounds for Tier 2: Work fan lace rounds 1 through 3 exactly as written for Tier 1, then repeat rounds 2 and 3 for 3 more rounds. Tier 2 has 6 total fan lace rounds.
Scallop edging round (Tier 2 hem): Work same scallop edging as Tier 1. Fasten off.
Checkpoint: Tier 2 should measure approximately 4.5 in / 11.5 cm from its pickup row to its scallop hem.
Skirt Tier 3
Tier 3 is the longest tier and creates the high-low silhouette. On the back, Tier 3 extends 4 extra fan rows compared to the front.
Rnd A: Join yarn to sc between first two shells of Tier 2 Fan Lace Round 1. Ch 1, sc in same sp, ch 3, sc in next sc-between-shell. Repeat around all 20 (24, 26) positions. Join. (20, 24, 26 ch-3 sps)
Rnd B: Ch 3, 5 dc into first ch-3 sp, 6 dc into each remaining ch-3 sp around. Join. (120, 144, 156 dc)
Tier 3 all-around rounds (Rnds 1 through 4): Work fan lace rounds 1 and 2 alternately for 4 full rounds around. (120, 144, 156 sts per round)
Tier 3 back-only rounds (back extension, Rnds 5 through 8): Turn work so WS faces up. Work fan lace back and forth in rows on the back 60 (72, 78) sts only, turning at each side seam marker.
Row 5 (back, RS): Join at right side seam marker. Ch 1, sc in same st, work fan lace repeat across back sts to left side seam marker. Turn. (back sts only: 60, 72, 78 sts)
Row 6 (back, WS): Ch 3, 2 dc in same st (half shell at turn edge), work fan lace across. Turn.
Row 7 (back, RS): Ch 1, sc at edge, work fan lace across. Turn.
Row 8 (back, WS): Repeat Row 6. Turn.
Scallop edging on FRONT hem: With RS facing, work scallop edging along the front fan-lace row 4 edge (the lower front edge): sl st in first st, ch 3, 2 dc in same st, sl st in next. Repeat across front only. Fasten off.
Scallop edging on BACK hem: After completing back rows 5 through 8, work scallop edging along the bottom edge of row 8 across the back. Fasten off.
Side seam edges: Work sc edging along each side edge of the back extension rows to neaten. Fasten off.
Final Checkpoint: Front length from shoulder to front hem should be approximately 16 in / 41 cm for 2T (17 in / 43 cm for 3T, 18 in / 46 cm for 4T). Back length from shoulder to back hem should be approximately 20 in / 51 cm for 2T (21 in / 53 cm for 3T, 22 in / 56 cm for 4T).
Collar Attachment
Place the completed collar around the neckline of the bodice with RS facing out and the inner picot edge aligned with the top of the bodice Rnd 1. The collar should curve naturally with the rounded outer edge facing away from the neck.
Using a yarn needle and the long tail, whip stitch or mattress stitch the inner edge of the collar to the top of the bodice. Distribute evenly.
Fold the collar outward so the scallop edge lays flat against the bodice front and sides, leaving the center back open for the closure gap.
Sew the small bow onto the center front of the collar where the two collar halves meet.
Back Closure
Work a sc edging along each back opening edge. Sew two snaps or two small buttons and corresponding loops to close the opening.
Button loop (if using buttons): On the left back opening edge, after sc edging, ch 5 at each button position, sl st to form a loop. Sew corresponding button to right back opening edge.
Ribbon Waistband
Cut the satin ribbon into one length of approximately 44 in / 112 cm.
Thread the ribbon through the front loops exposed in the ribbon channel round using a blunt tapestry needle or bodkin. Start at center back, thread all the way around, bring both ends out at center front, and tie into a neat bow.
Trim ribbon ends at a 45-degree angle to prevent fraying, or use a lighter flame briefly to seal synthetic ribbon ends.
Finishing and Blocking
Weave in all yarn ends securely using a tapestry needle. Ensure all tier pickup joins are neat on the wrong side.
Wet block the dress: Submerge in cool water with a few drops of gentle wool wash. Gently squeeze out water without wringing. Roll in a clean towel to remove excess moisture.
Pin the dress to a blocking board: Pin the collar flat with the scallop edge spread evenly, pin the bodice to the correct chest and length measurements, and spread each skirt tier so the fan shells open fully and the scallop hems lie flat. The front hem should curve up naturally relative to the back hem.
Allow to dry completely (12 to 24 hours) before unpinning.
After blocking, rethread the ribbon if needed and retie the bow.
Care Instructions
Hand wash in cool water with gentle soap. Do not wring. Roll in a towel to remove excess water. Lay flat to dry. Do not machine wash or tumble dry as the ribbon and cotton yarn may distort. Do not iron directly on the ribbon. If pressing is needed, use a damp pressing cloth over the crocheted fabric only with the iron on a cool cotton setting.
Store folded or hung carefully to preserve the tier shape.
Size Customization Tips
To size up beyond 4T: Add 6 sts to the bodice foundation chain (one additional fan repeat), and add 2 additional fan lace rounds to each tier. Add approximately 1 in / 2.5 cm to bodice length.
To size down below 2T: Remove 6 sts from the foundation and subtract 1 fan lace round from each tier. Bodice length can be shortened by 1 in / 2.5 cm.
For a longer back train: Add 2 additional back-only fan rows to Tier 3.
For a simpler look without the high-low hem: Work Tier 3 evenly all around for the same number of rounds as the back extension.
Fan repeat divisibility reminder: Any time you alter the foundation stitch count, confirm the new count is divisible by 6 before proceeding.
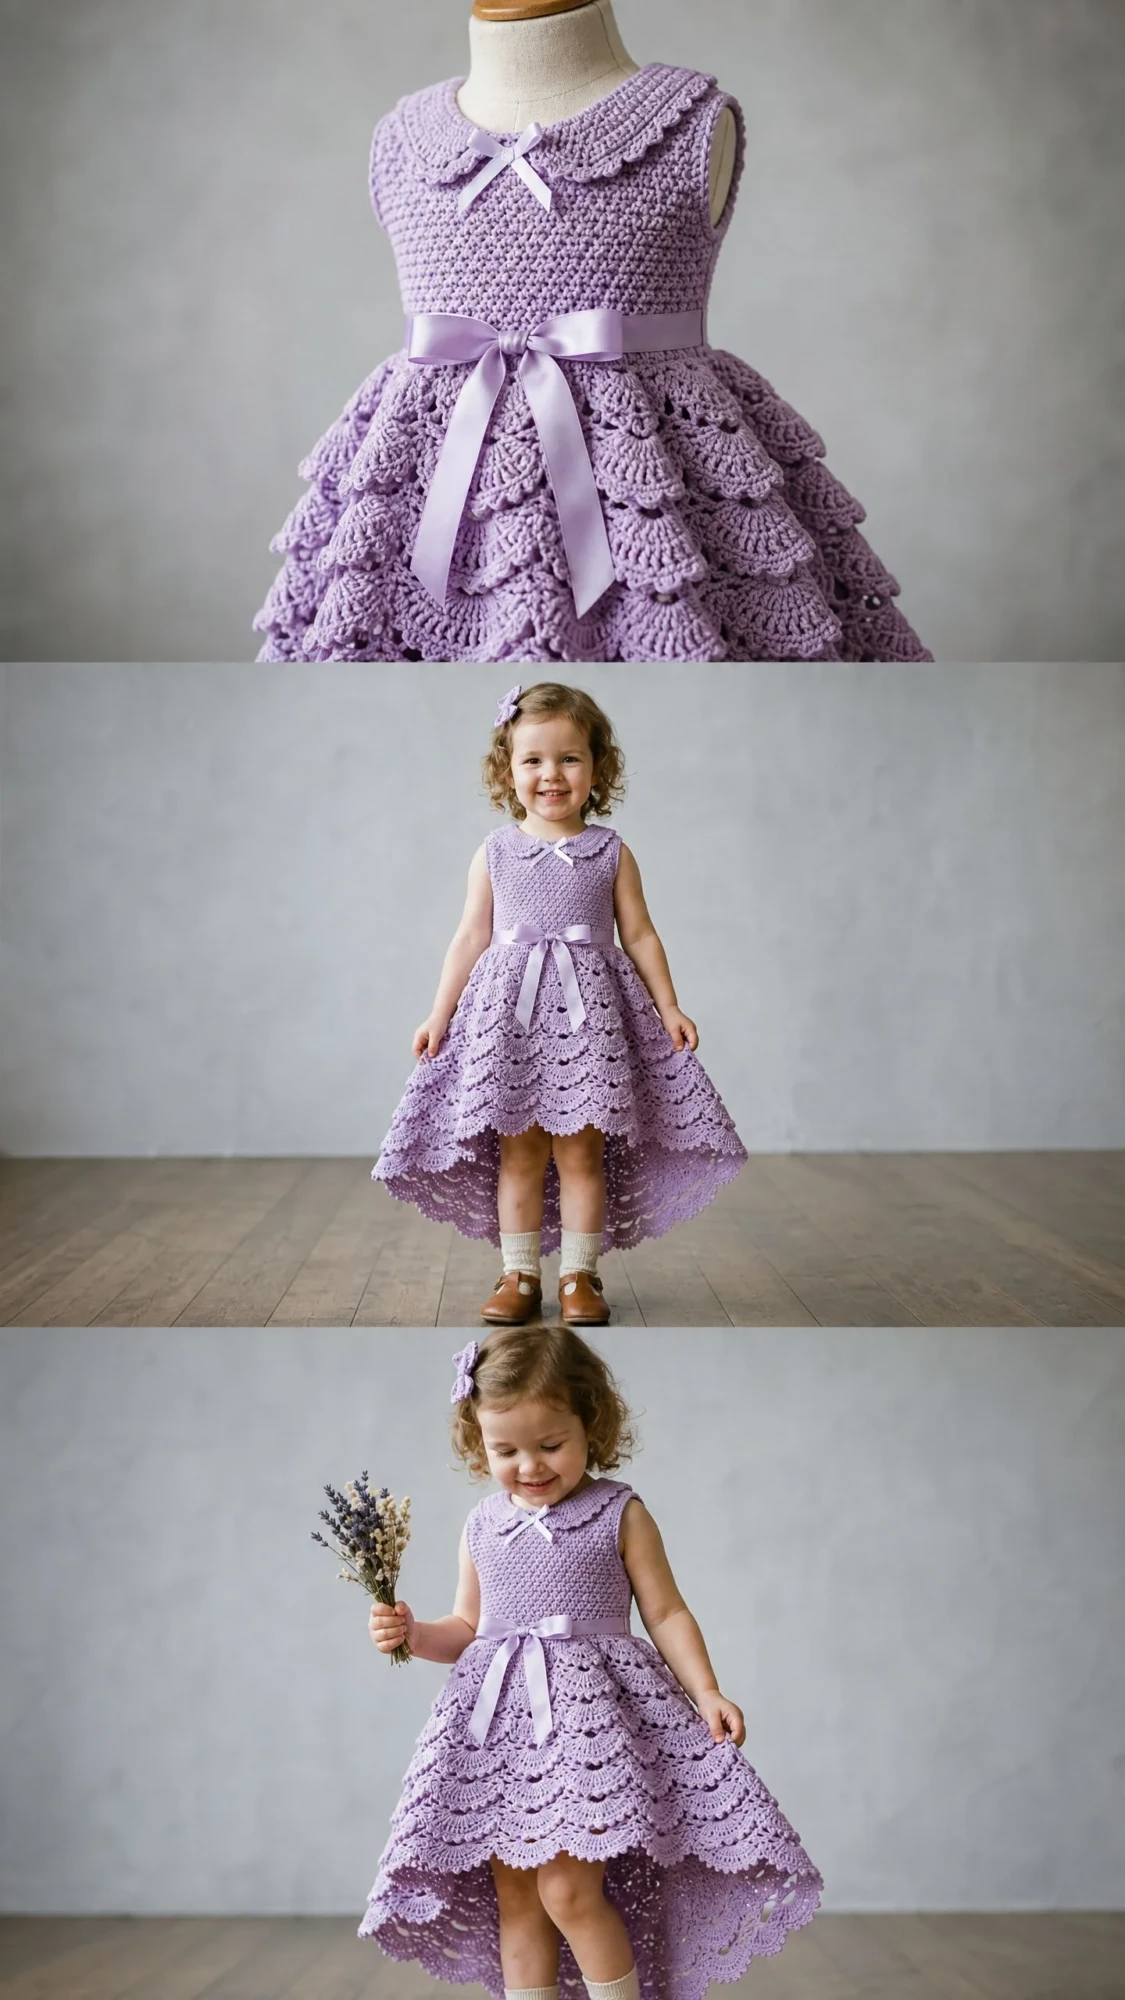
Final Thoughts on This Lavender Lace Party Dress Crochet Pattern
This dress is truly a labor of love. Every tier, every shell, every carefully placed stitch comes together to create something that will be treasured for years. I know it is a significant time investment, but when you see a little one twirling in this dress, watching those lace tiers flutter and sway, you will understand exactly why it was worth every moment.
Take your time with this project. Trust the pattern, use your stitch markers religiously, and do not skip the blocking step. That final press is what transforms your work from handmade to heirloom quality.
Thank you so much for choosing this pattern for your next project. I genuinely cannot wait to see your finished dresses. If you make one, please share a photo with me on Instagram or in my Facebook group. There is nothing I love more than seeing these designs come to life in your hands.
If this Lavender Lace Party Dress has captured your heart, go ahead and save it to your Pinterest boards so you can find it when you are ready to cast on. And please drop a comment below if you make one. I would love to hear which size you chose and how it turned out!
You Might Also Like
- Ocean Blue Lattice Crochet High Tops Free Pattern
- Sage Green Boho Halter Dress Free Crochet Pattern
- Cream and Peach Ombre Baby Dress Free Crochet Pattern
- Ocean Wave Peplum Dress Free Crochet Pattern
