Let me guess. You saw a gorgeous crocheted dress somewhere and thought, "I could never make that." The intricate lacework, the fitted bodice, those perfectly structured cups. It looks like something only a professional could pull off.
Here’s the truth: this sage green boho halter dress is absolutely within your reach. Yes, it has some advanced techniques. Yes, it takes time. But every single element breaks down into manageable steps that you already know or can easily learn. Puff stitches? Just yarn overs and pulled loops. Diamond mesh? Single crochets and chains. That’s it.
If you can follow a recipe with multiple components, you can make this dress. I’m walking you through every section, every stitch, every checkpoint along the way. By the end, you’ll have a stunning bohemian mini dress with a fitted halter bodice, open mesh midriff, and a tiered skirt with a pointed picot hem. Let’s break the myth that beautiful garments are beyond your skill level.
Why This Boho Halter Dress Pattern Works
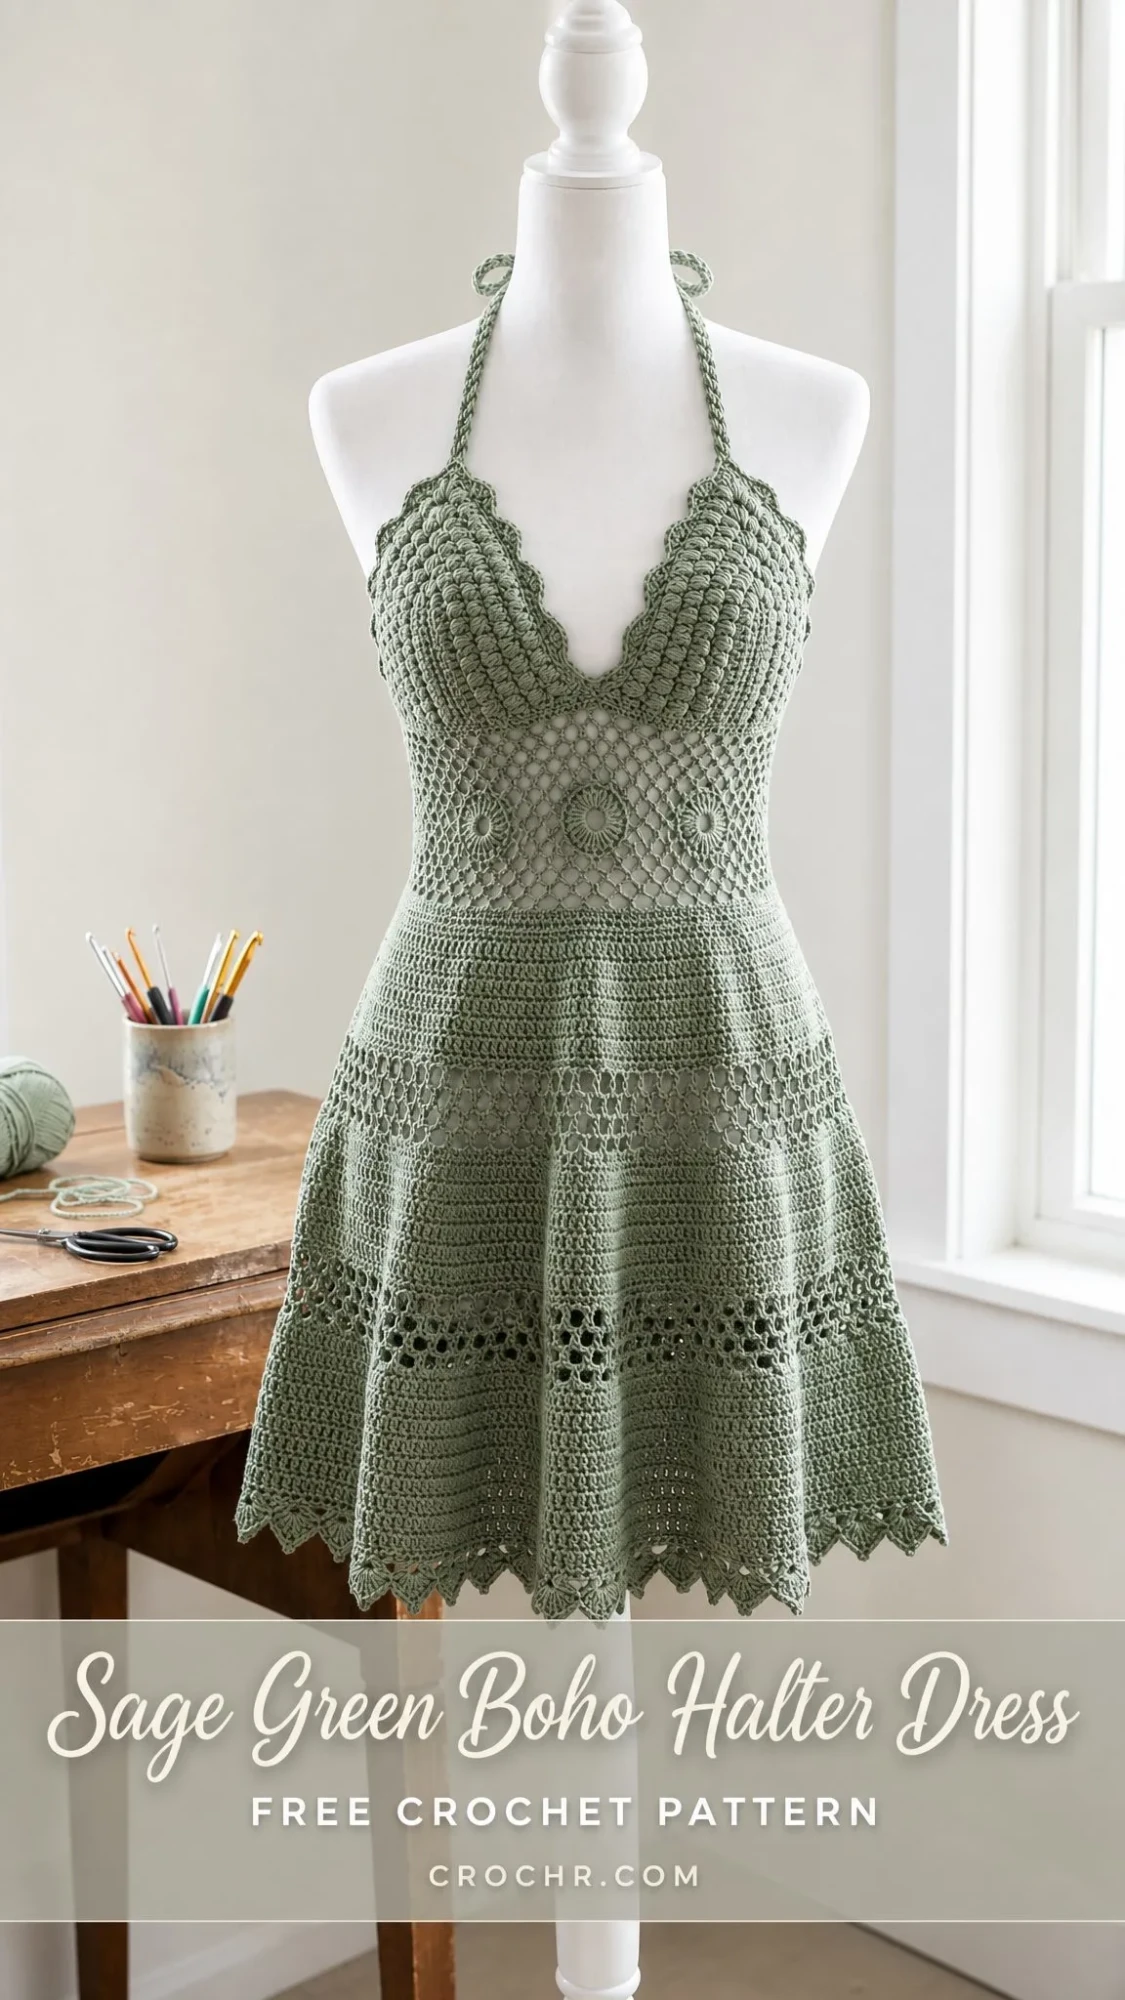
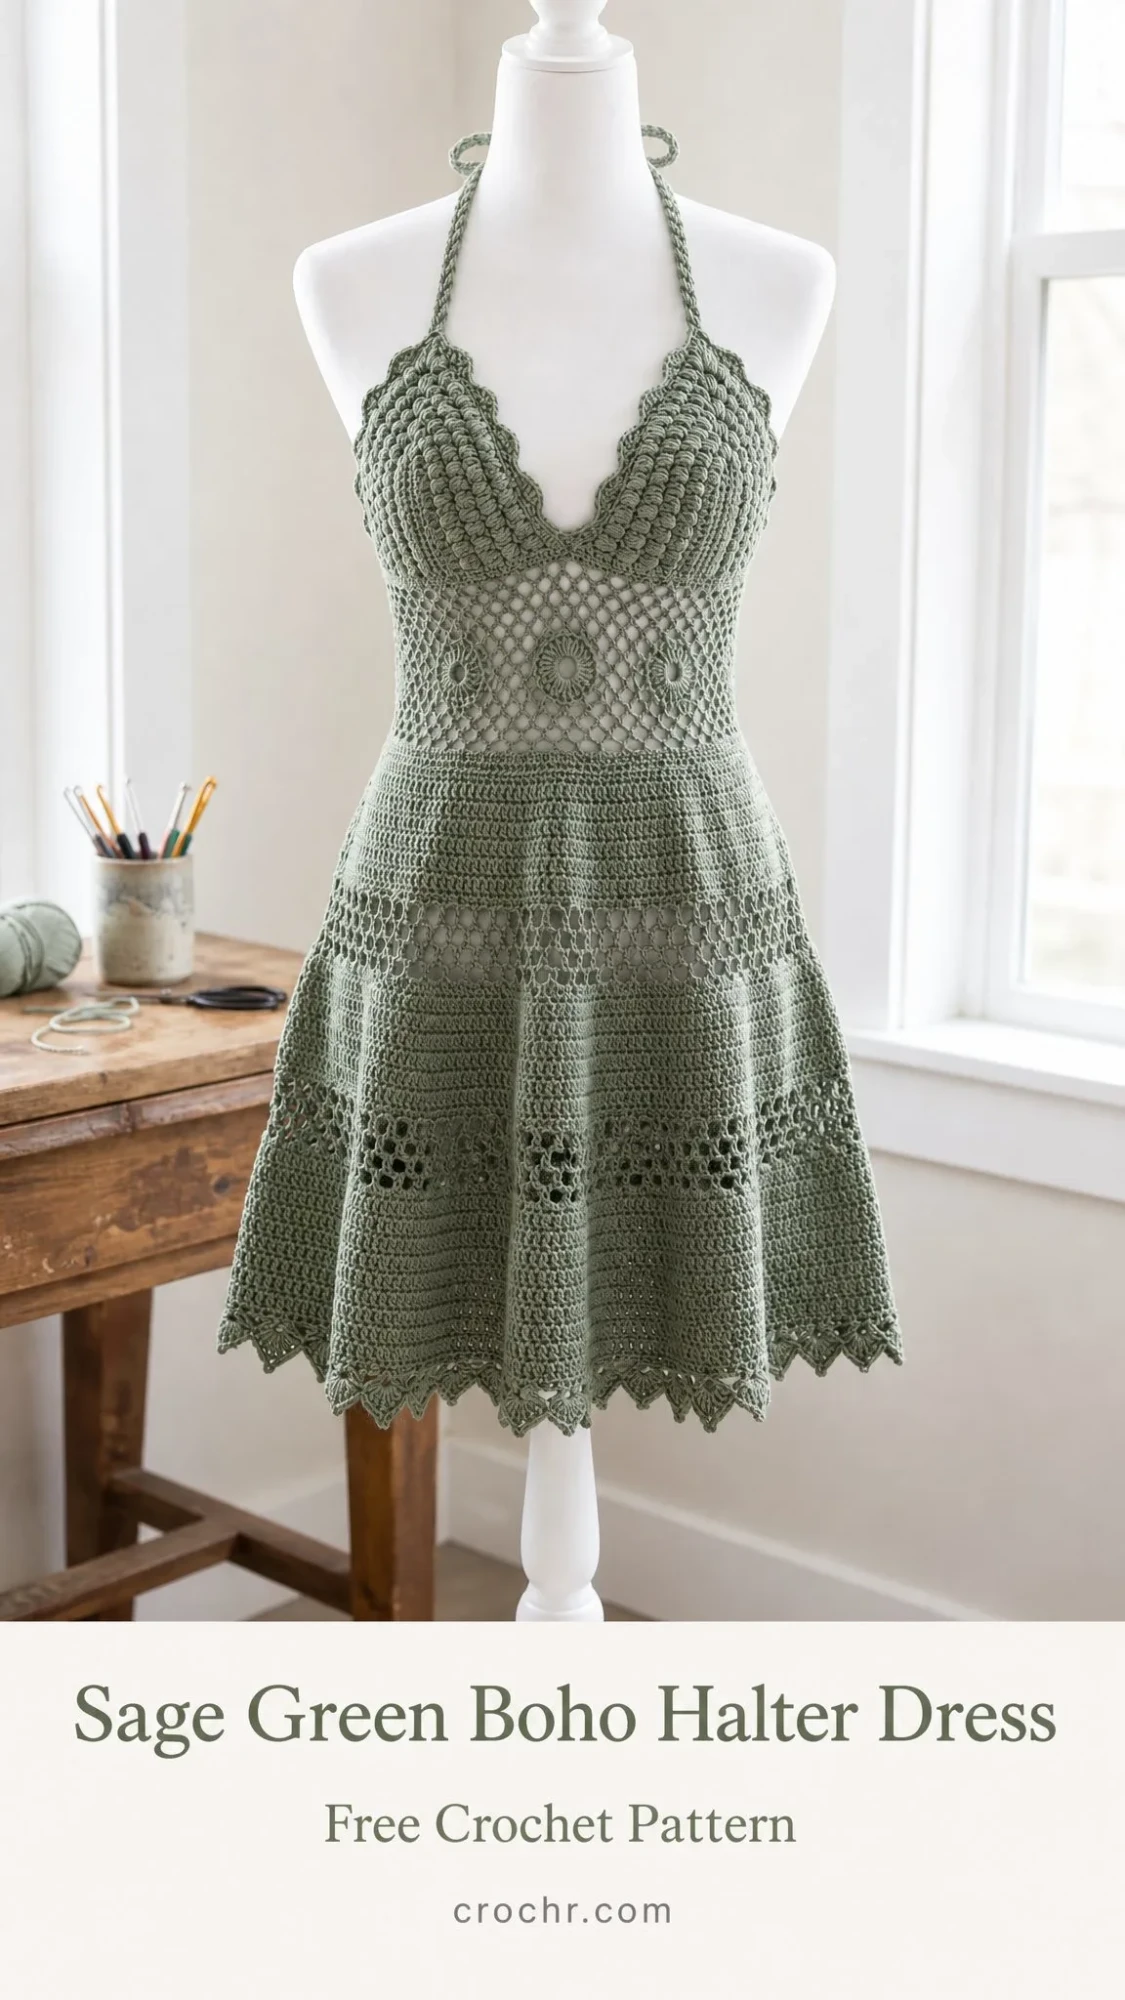
This crochet pattern creates a showstopper piece that looks far more complicated than it actually is. The dress features two structured bra cups worked in a textured puff stitch cluster pattern, joined at center front with a scalloped V-neckline. Below that, an open diamond mesh midriff cinches at the waist before flaring into a three-tiered skirt.
The construction method is smart. You work each section separately, then join them together. This means you’re never juggling a massive, unwieldy project. Each piece stays small and portable until assembly.
The finished measurements for size Small/Medium (US 6 to 10):
Materials You’ll Need
Yarn: 1,400 to 1,600 yards of DK weight (CYCA 3 / Light) cotton or cotton-blend yarn in sage green
DK weight cotton gives you crisp stitch definition. The lace sections open beautifully while solid sections hold their shape. I recommend:
Hooks:
Notions:
Gauge (Please Check This)
Using E-4 / 3.5 mm hook:
Puff stitch cluster swatch:
Diamond mesh gauge:
I cannot stress this enough: take time to check your gauge. A difference of even half a stitch per inch will significantly affect the fit of this dress. Adjust your hook size as needed.
Abbreviations and Stitch Definitions
Before we dive in, here’s every abbreviation you’ll encounter. I’m defining each one in plain English so nothing trips you up.
Special Stitches for This Crochet Pattern
Puff Stitch Cluster (puff-cl)
This creates the beautiful texture on the bodice cups. Don’t let the name intimidate you.
Step 1: Yarn over, insert hook into the designated stitch or space.
Step 2: Yarn over and pull up a loop to approximately 0.75 inch / 2 cm tall. Keep it loose and puffy.
Step 3: Repeat Steps 1 and 2 two more times in the same stitch or space. You now have 7 loops on your hook.
Step 4: Yarn over and draw through all 7 loops at once.
Step 5: Chain 1 to close and secure the top of the cluster. This chain 1 counts as the top of the puff-cl.
Scallop Shell
Work 5 double crochet (dc) into the same stitch or space. That’s it. Five stitches fanning out from one point.
Picot (pc)
Step 1: Chain 4.
Step 2: Slip stitch into the first chain made (the one closest to where you started). This forms a small decorative loop.
Diamond Mesh
On each row or round: (Sc into next st or sp, ch 3, skip 3) repeated across or around. On the following rows, work your sc into the ch-3 space of the previous row. Each repeat covers 4 stitches and creates a 1-inch square opening.
Granny Circle Motif
These small circles become the side embellishments on the midriff.
Rnd 1: Magic ring, ch 3 (counts as dc), work 11 dc into ring, join with sl st to top of ch-3. (12 dc)
Rnd 2: Ch 3, dc in same st, 2 dc in each st around, join with sl st to top of ch-3. (24 dc)
Rnd 3: Ch 1, sc in same st, ch 3, skip 1 st, (sc in next st, ch 3, skip 1 st) around, join with sl st to first sc. (12 sc, 12 ch-3 sps)
Fasten off, leaving a long tail for sewing.
Braided Chain Tie
Make three separate chains of the desired length. Lay them flat, hold the ends together, and braid them like you would braid hair. Secure each end by knotting or slip stitching the chain ends together.
Important Pattern Notes
1. The bodice cups are worked flat in rows. Right cup and left cup are mirror images.
2. Turning chains: For single crochet rows, chain 1 at the beginning. This chain 1 does NOT count as a stitch. For double crochet rows or rounds, chain 3 counts as the first dc unless stated otherwise.
3. The dress is primarily worked in joined rounds from the midriff down. Join each round with a slip stitch to the first stitch unless noted otherwise.
4. Stitch counts in parentheses at the end of each row reflect total working stitches, not counting turning chains.
5. Block the finished dress thoroughly before wearing. Cotton relaxes significantly with wet blocking, and the lace panels only open to their full dimension after blocking.
6. The skirt uses hook size F-5 / 3.75 mm. Switch hooks when you reach that section.
Section 1: Right Cup
The right cup is worked flat from the bottom curved edge up to the shoulder strap attachment. Using your E-4 hook and main color yarn, chain 26.
Row 1 (WS): Sc in 2nd ch from hook and in each ch across. Turn. (25 sc)
Row 2 (RS): Ch 1, sc in first st, (puff-cl in next st, ch 1, skip 1 st) 11 times, sc in last st. Turn. (1 sc, 11 puff-cl, 11 ch-1 sps, 1 sc = 24 working positions)
Row 3 (WS): Ch 1, sc in first st, (sc in top of puff-cl, sc in ch-1 sp) 11 times, sc in last st. Turn. (25 sc)
Row 4 (RS): Ch 1, sc in first st, (puff-cl in next st, ch 1, skip 1 st) 11 times, sc in last st. Turn. (24 working positions)
Row 5 (WS): Ch 1, sc in first st, (sc in top of puff-cl, sc in ch-1 sp) 11 times, sc in last st. Turn. (25 sc)
Rows 2 through 5 establish the puff-cluster texture. Now you’ll add shaping.
Row 6 (RS, increase at center front edge): Ch 1, 2 sc in first st, (puff-cl in next st, ch 1, skip 1 st) 11 times, sc in last st. Turn. (26 working positions)
Row 7 (WS): Ch 1, sc in first 2 sts, (sc in top of puff-cl, sc in ch-1 sp) 11 times, sc in last st. Turn. (26 sc)
Row 8 (RS, increase at center front edge): Ch 1, 2 sc in first st, (puff-cl in next st, ch 1, skip 1 st) 12 times, sc in last st. Turn. (28 working positions)
Row 9 (WS): Ch 1, sc in first 2 sts, (sc in top of puff-cl, sc in ch-1 sp) 12 times, sc in last st. Turn. (28 sc)
Row 10 (RS): Ch 1, sc in first st, (puff-cl in next st, ch 1, skip 1 st) 13 times, sc in last st. Turn. (28 working positions)
Row 11 (WS): Ch 1, sc in each st and ch-sp across. Turn. (28 sc)
Row 12 (RS, begin underarm decrease): Ch 1, sc in first st, (puff-cl in next st, ch 1, skip 1 st) 12 times, sc2tog over last 2 sts. Turn. (27 working positions)
Row 13 (WS): Ch 1, sc in each st and ch-sp across. Turn. (27 sc)
Row 14 (RS, underarm decrease): Ch 1, sc in first st, (puff-cl in next st, ch 1, skip 1 st) 11 times, puff-cl in next st, sc2tog. Turn. (26 working positions)
Row 15 (WS): Ch 1, sc in each st across. Turn. (26 sc)
Row 16 (RS, underarm decrease): Ch 1, sc in first st, (puff-cl in next st, ch 1, skip 1 st) 11 times, sc2tog. Turn. (25 working positions)
Row 17 (WS): Ch 1, sc in each st across. Turn. (25 sc)
Row 18 (RS): Ch 1, sc in first st, (puff-cl in next st, ch 1, skip 1 st) 11 times, sc in last st. Turn. (25 working positions)
Row 19 (WS): Ch 1, sc in each st across. Turn. (25 sc)
Row 20 (RS, final shaping row): Ch 1, sc2tog, (puff-cl in next st, ch 1, skip 1 st) 10 times, sc in last st. Turn. (24 working positions)
Row 21 (WS): Ch 1, sc in each st across. Turn. (24 sc)
Row 22 (RS): Ch 1, sc2tog, (puff-cl in next st, ch 1, skip 1 st) 10 times, sc2tog. Turn. (23 working positions)
Row 23 (WS): Ch 1, sc in each st across. Turn. (23 sc)
Do not fasten off. Place a stitch marker in the last loop and set aside.
Section 2: Left Cup
Using E-4 hook and main color, chain 26.
Row 1 (WS): Sc in 2nd ch from hook and in each ch across. Turn. (25 sc)
Row 2 (RS): Ch 1, sc in first st, (puff-cl in next st, ch 1, skip 1 st) 11 times, sc in last st. Turn. (24 working positions)
Row 3 (WS): Ch 1, sc in each st and ch-sp across. Turn. (25 sc)
Row 4 (RS): Ch 1, sc in first st, (puff-cl in next st, ch 1, skip 1 st) 11 times, sc in last st. Turn. (24 working positions)
Row 5 (WS): Ch 1, sc in each st across. Turn. (25 sc)
Row 6 (RS, increase at center front edge, END of row): Ch 1, sc in first st, (puff-cl in next st, ch 1, skip 1 st) 11 times, 2 sc in last st. Turn. (26 working positions)
Row 7 (WS): Ch 1, sc in each st across. Turn. (26 sc)
Row 8 (RS): Ch 1, sc in first st, (puff-cl in next st, ch 1, skip 1 st) 12 times, 2 sc in last st. Turn. (28 working positions)
Row 9 (WS): Ch 1, sc in each st across. Turn. (28 sc)
Row 10 (RS): Ch 1, sc in first st, (puff-cl in next st, ch 1, skip 1 st) 13 times, sc in last st. Turn. (28 working positions)
Row 11 (WS): Ch 1, sc in each st across. Turn. (28 sc)
Row 12 (RS, underarm decrease at BEGINNING): Ch 1, sc2tog, (puff-cl in next st, ch 1, skip 1 st) 12 times, sc in last st. Turn. (27 working positions)
Row 13 (WS): Ch 1, sc in each st across. Turn. (27 sc)
Row 14 (RS): Ch 1, sc2tog, (puff-cl in next st, ch 1, skip 1 st) 11 times, puff-cl in next st, sc in last st. Turn. (26 working positions)
Row 15 (WS): Ch 1, sc in each st across. Turn. (26 sc)
Row 16 (RS): Ch 1, sc2tog, (puff-cl in next st, ch 1, skip 1 st) 11 times, sc in last st. Turn. (25 working positions)
Row 17 (WS): Ch 1, sc in each st across. Turn. (25 sc)
Row 18 (RS): Ch 1, sc in first st, (puff-cl in next st, ch 1, skip 1 st) 11 times, sc in last st. Turn. (25 working positions)
Row 19 (WS): Ch 1, sc in each st across. Turn. (25 sc)
Row 20 (RS): Ch 1, sc in first st, (puff-cl in next st, ch 1, skip 1 st) 10 times, sc2tog. Turn. (24 working positions)
Row 21 (WS): Ch 1, sc in each st across. Turn. (24 sc)
Row 22 (RS): Ch 1, sc2tog, (puff-cl in next st, ch 1, skip 1 st) 10 times, sc2tog. Turn. (23 working positions)
Row 23 (WS): Ch 1, sc in each st across. Turn. (23 sc)
Do not fasten off.
Checkpoint
Each cup should measure approximately 5 inches / 12.5 cm tall and 6.5 inches / 16.5 cm wide at the widest point (around Rows 10 to 11). If your measurements are significantly different, check your gauge and puff stitch height.
Section 3: Neckline and Cup Join
Step 1: With RS facing, hold the right cup and left cup with center front edges touching. Using the live loop from the right cup, slip stitch the two center front edges together. Work sl st through 1 st from each cup simultaneously, working down from Row 23 to Row 1 at center front (approximately 8 to 10 row ends). This creates the V of the neckline. Fasten off after the join.
Step 2: Scalloped V Neckline Edging
Rejoin yarn at the right strap attachment point (top corner of the right cup, Row 23 outer edge) with RS facing.
Edging Row 1: Ch 1, sc evenly along the top of the right cup (approximately 23 sc), work (sc, ch 1, sc) at the center V point, sc evenly along the top of the left cup (approximately 23 sc). Turn. (approximately 49 sc total with 1 corner ch-1 sp at V)
Edging Row 2 (Scallop): Ch 1, sc in first st, skip 1 st, 5 dc in next st (shell), skip 1 st, (sc in next st, skip 1 st, 5 dc in next st, skip 1 st) across to 2 sts before V corner, sc in next st, work (sc, ch 2, sc) in corner ch-1 sp, sc in next st, skip 1 st, continue (5 dc in next st, skip 1 st, sc in next st, skip 1 st) across left cup top edge, ending with sc in last st.
Fasten off.
Section 4: Halter Ties
Make 2 braided halter ties.
For each tie: Make three ch-120 chains (approximately 30 inches / 76 cm each). Braid the three chains together. Secure the ends by slip stitching through all three chains.
Attach one tie to the top corner of the right cup by threading through the corner stitch and knotting securely. Attach the second tie to the top corner of the left cup.
Optional tassels: Wrap yarn approximately 20 times around a 3-inch piece of cardboard. Tie off at the top, cut the bottom loops, and attach to each tie end.
Section 5: Midriff
The midriff is worked in the round from the bottom edge of the joined cups. With RS facing and E-4 hook, rejoin yarn at the bottom right underarm edge.
Work sc evenly around the full bottom circumference:
Join with sl st to first sc, pm. (70 sc)
Rnd 1: Ch 1, sc in each st around, join. (70 sc)
Rnd 2: Ch 1, sc in each st around, join. (70 sc)
Rnd 3: Ch 4 (counts as dc + ch 1), skip 1 st, (dc in next st, ch 1, skip 1 st) 34 times, join with sl st to 3rd ch of ch-4. (35 dc + 35 ch-1 sps)
Rnd 4: Sl st into ch-1 sp, ch 1, sc in same ch-1 sp, ch 3, (sc in next ch-1 sp, ch 3) 34 times, join with sl st to first sc. (35 sc + 35 ch-3 sps)
Rnds 5 through 9: Sl st into ch-3 sp, ch 1, sc in same sp, ch 3, (sc in next ch-3 sp, ch 3) 34 times, join. (35 sc + 35 ch-3 sps each round)
Rnd 10 (waist decrease): Sl st into ch-3 sp, ch 1, sc in same sp, ch 2, (sc in next ch-3 sp, ch 2) 34 times, join. (35 sc + 35 ch-2 sps)
Rnds 11 and 12: Rep Rnd 10. (35 sc + 35 ch-2 sps each round)
Rnd 13 (flare toward hip): Sl st into ch-2 sp, ch 1, sc in same sp, ch 3, (sc in next ch-2 sp, ch 3) 34 times, join. (35 sc + 35 ch-3 sps)
Rnd 14: Ch 1, sc in each sc and 3 sc in each ch-3 sp around, join. (140 sc)
Checkpoint
The midriff should measure approximately 6 inches / 15 cm tall. The waist area (Rnds 10 to 12) should be visibly narrower than the chest and hip.
Section 6: Side Circle Motifs
Make 2 granny circle motifs using the instructions in Special Stitches. After blocking, position one on each side of the midriff, centered on the mesh at approximately waist level. Sew in place using the long tail.
Section 7: Back Waist Ties
Cut or leave open the center back 4 inches / 10 cm. Work sc edging along both back edges (approximately 12 to 14 sc per edge). Add ch-100 ties at the top and midpoint of the opening. Add tassels to each tie end.
Section 8: Skirt
Switch to F-5 / 3.75 mm hook.
Tier 1: Solid SC Band
Rnds 1 through 4: Ch 1, sc in each st around, join. (140 sc each round)
Tier 2: Shell Lace Band
Rnd 5: Ch 1, sc in first st, skip 2 sts, 5 dc in next st (shell), skip 2 sts, (sc in next st, skip 2 sts, 5 dc in next st, skip 2 sts) around, join to first sc.
Continue working alternating tiers of solid single crochet and shell lace until the skirt reaches approximately 17 inches / 43 cm, ending with a pointed picot hem. Work the picot edging by adding (sc, picot, sc) evenly along the bottom edge.
Finishing Your Boho Halter Dress
Blocking is essential. Wet block the entire dress by soaking it in lukewarm water, gently squeezing out excess moisture, and pinning it to blocking mats. Shape the lace sections to open fully and let the bodice cups maintain their three-dimensional form. Allow to dry completely.
Weave in all ends securely. Attach any remaining tassels.
Time Investment
Expect this crochet pattern to take approximately 40 to 60 hours for an experienced crocheter. Take your time with each section. This is a marathon, not a sprint.
Thank you so much for choosing this pattern. I truly hope you love making this dress as much as I loved designing it. If you create one, I would absolutely love to see it! Tag me on Instagram or share in my Facebook group. Your makes always brighten my day.
Save this boho halter dress crochet pattern to your Pinterest boards so you can find it when you’re ready to start. And please drop a comment below if you make one. I read every single comment and love hearing about your projects!
