
OH MY GOODNESS, this dress! If you have been waiting for that PERFECT heirloom baby dress pattern, your search ends right here. This crochet rose garden baby dress is absolutely STUNNING and worth every single stitch.
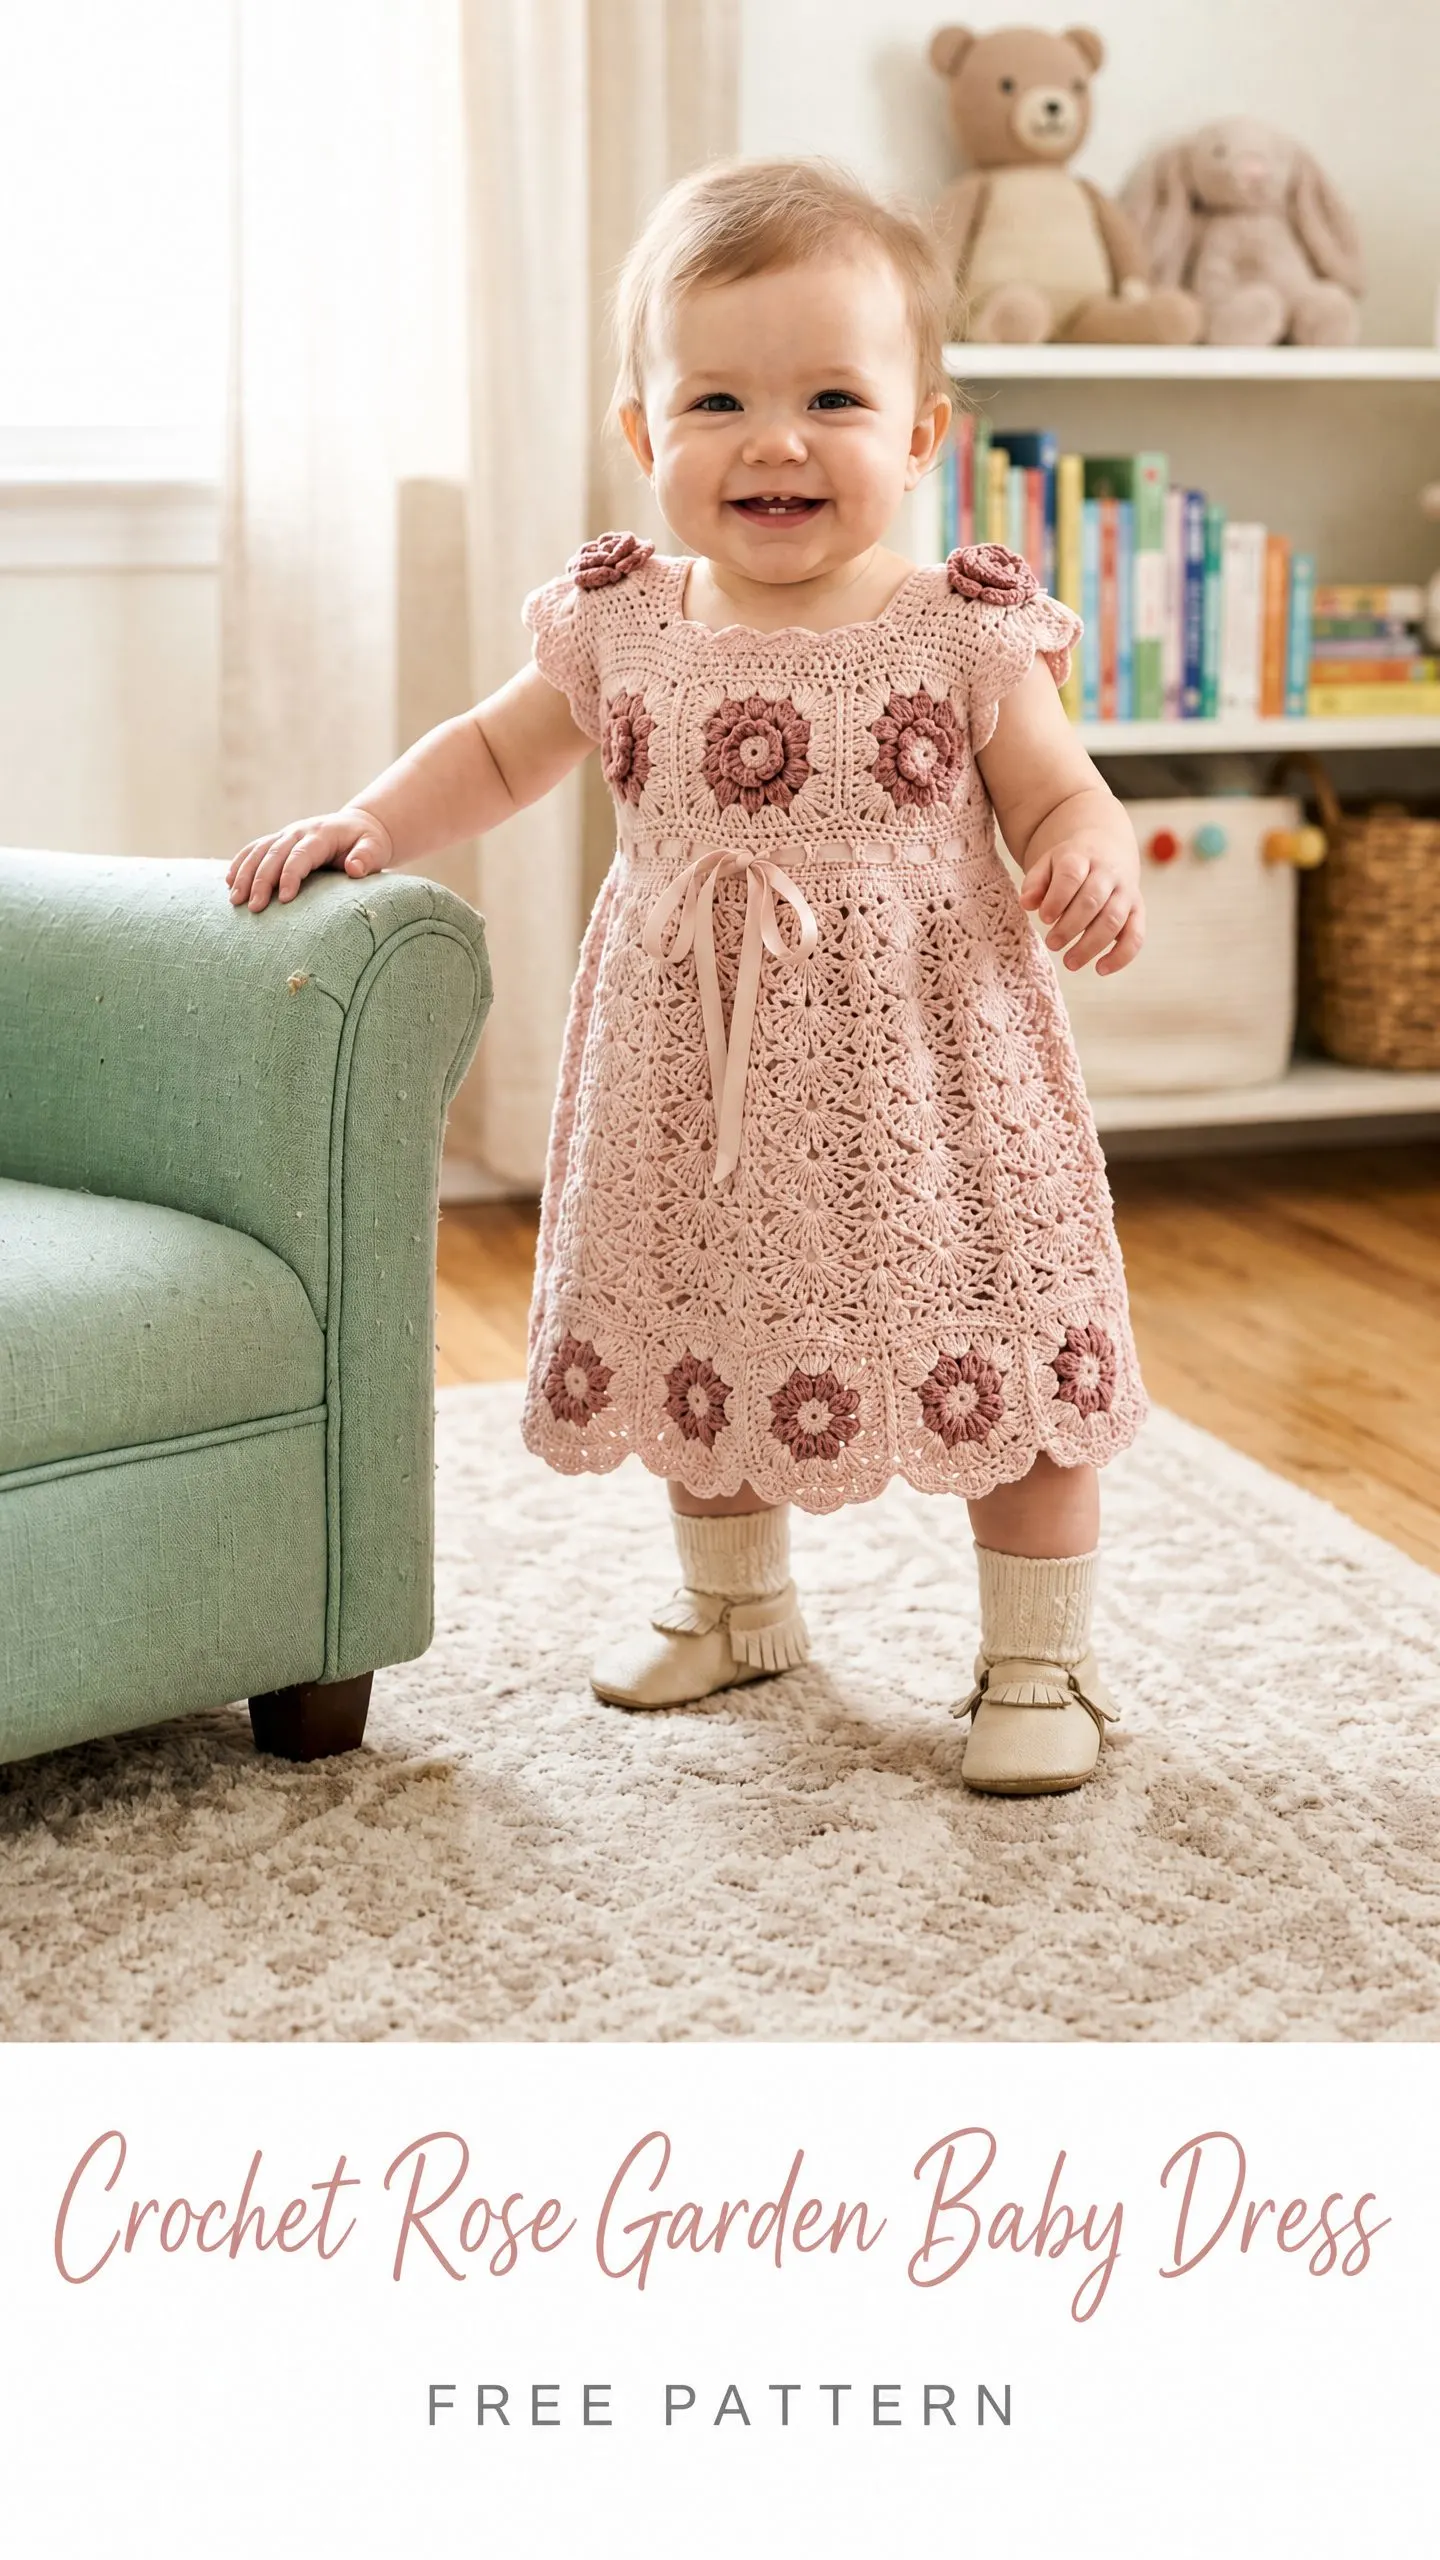
I know what you are thinking. A dress with granny squares, fan lace, AND rose embellishments? That sounds intimidating. But here is the truth. If you can crochet a granny square and work basic double crochet stitches, you can absolutely make this gorgeous little dress. The construction is logical, the pieces come together beautifully, and the result looks like something from a high-end baby boutique.
This pattern creates a 12-month size dress that makes the most incredible gift for baby showers, first birthdays, or special photo sessions. Plan for about 20 to 30 hours of crochet time, depending on your experience level. Trust me when I say every hour is worth it when you see that finished dress.
Why This Baby Dress Pattern Is So Special
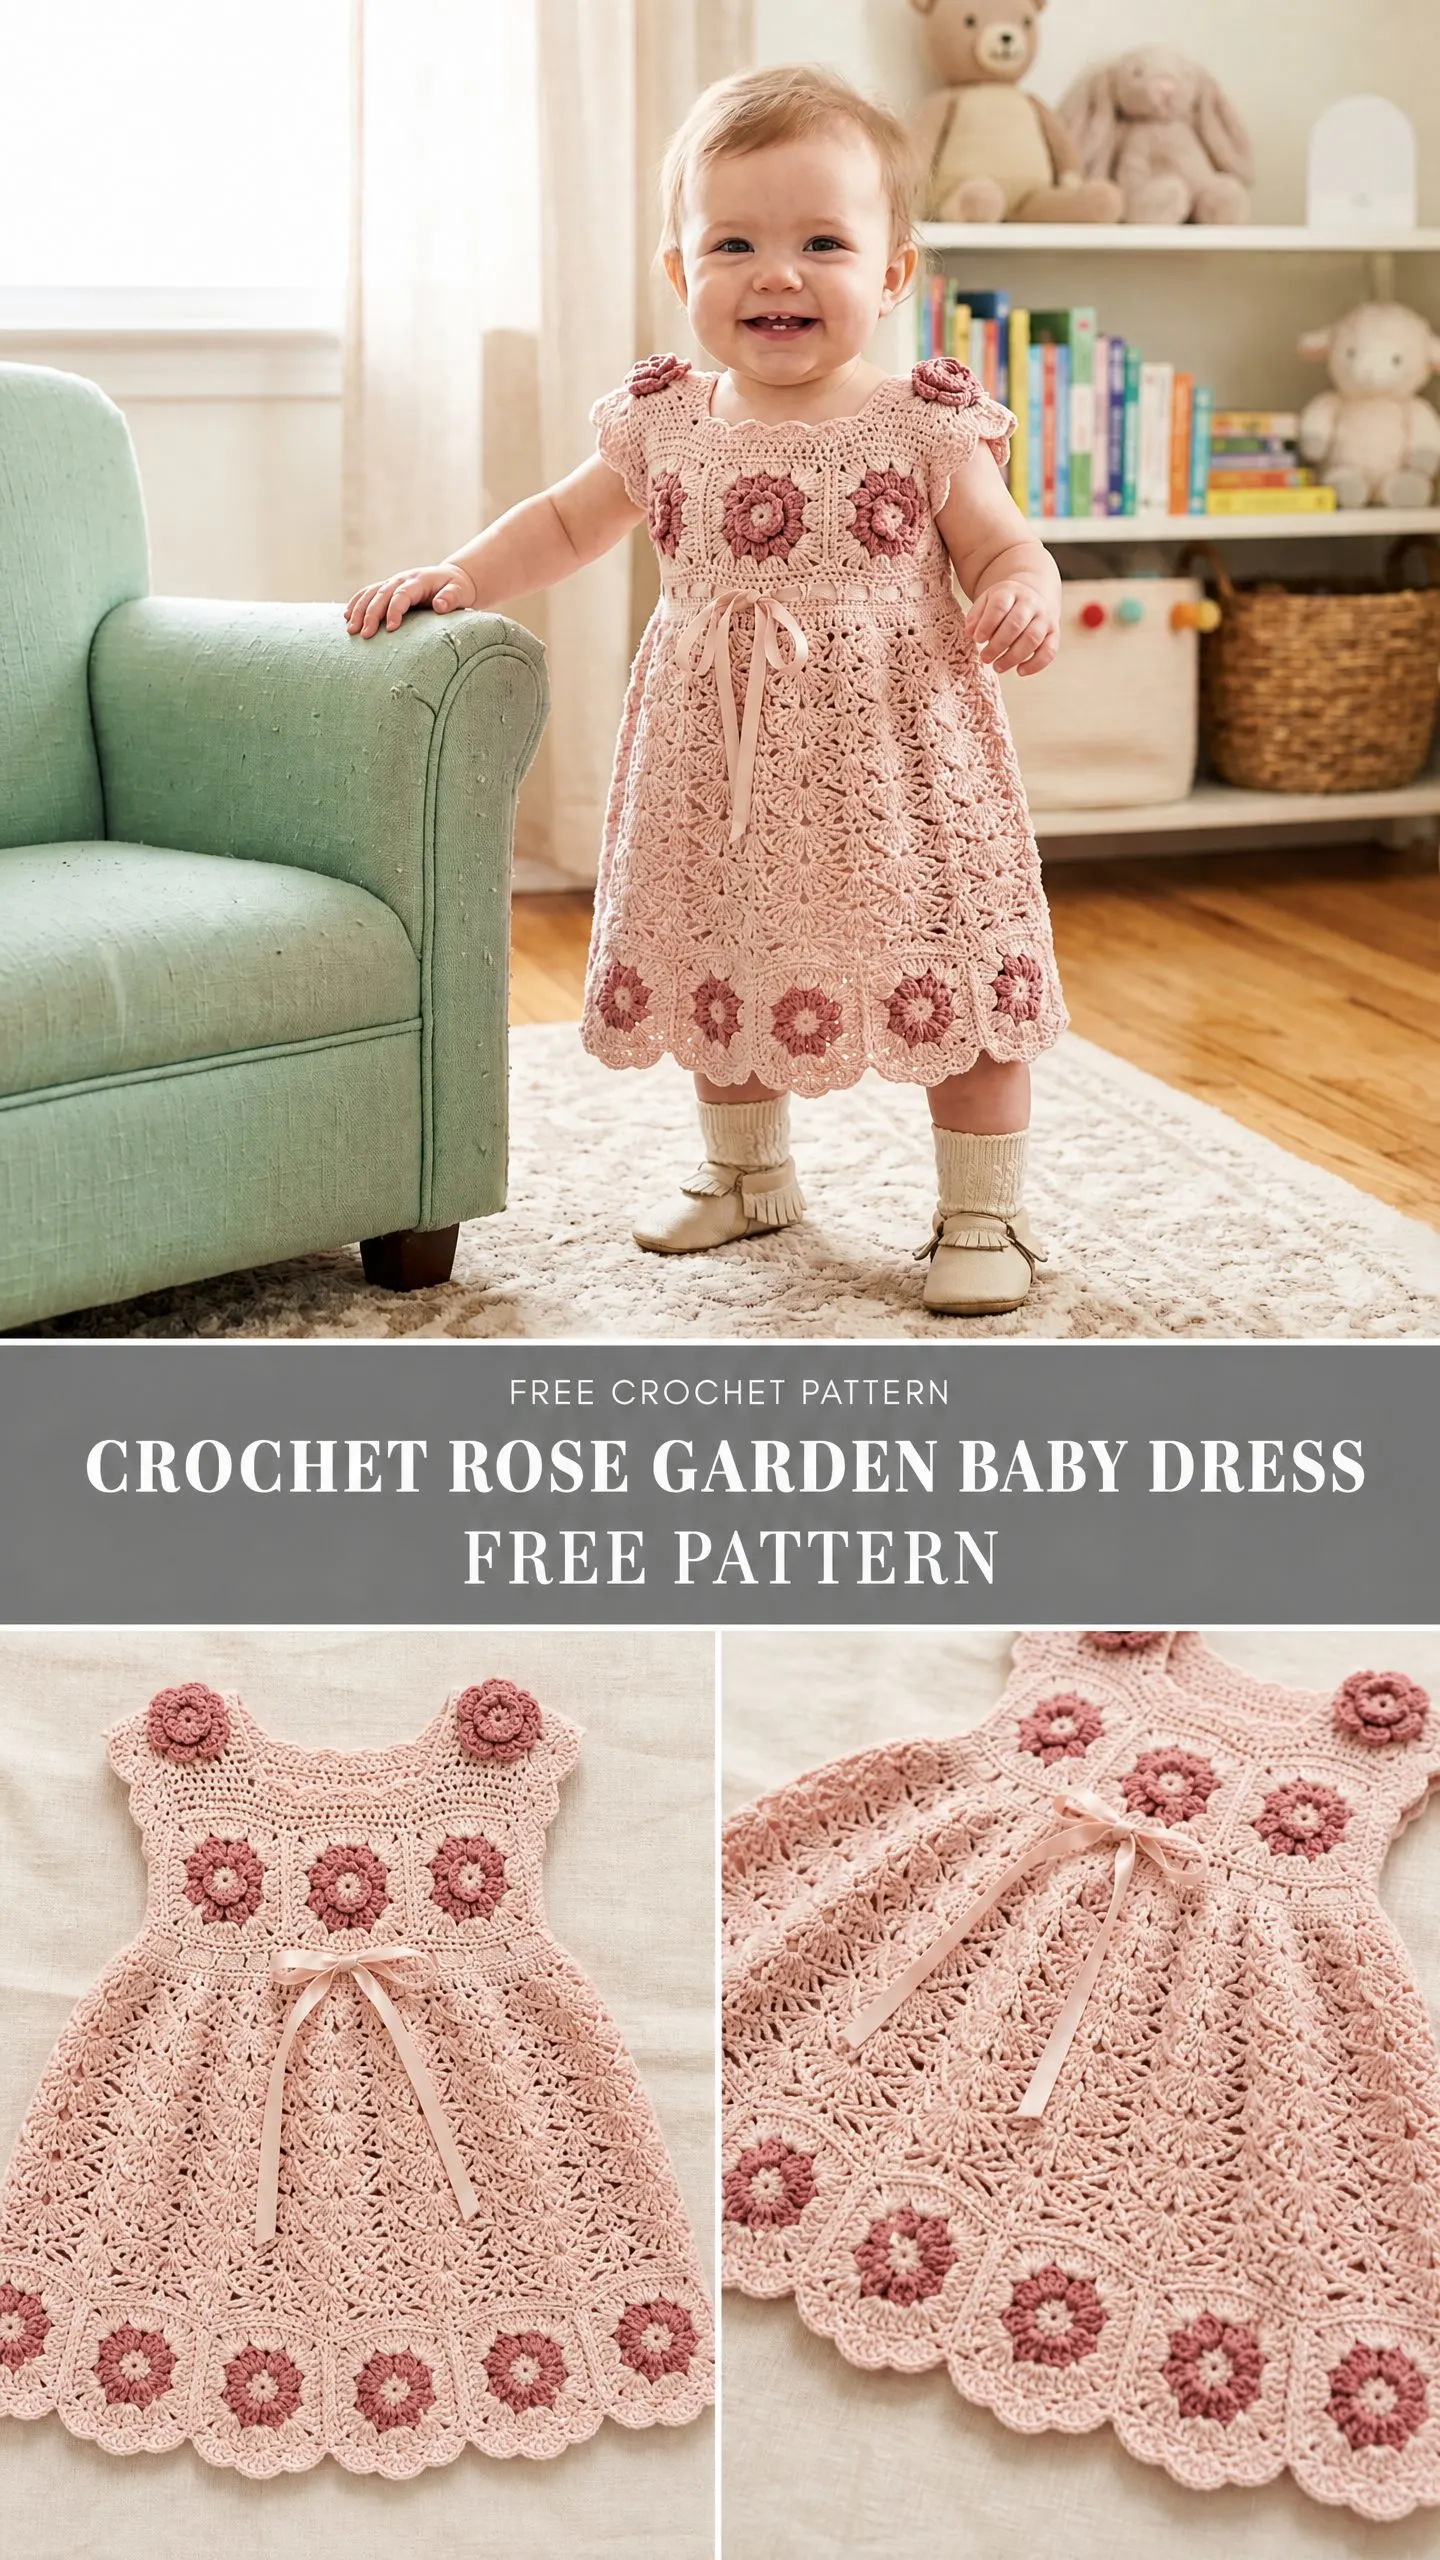
The crochet rose garden baby dress combines several beautiful techniques into one cohesive design. You will work granny-style flower square motifs for the bodice, fan lace stitches for the flowing skirt, and sweet rolled roses for the shoulder embellishments. A satin ribbon threads through the waist for an adjustable, elegant finish.
The dusty rose flowers against the soft blush pink background create a vintage, romantic aesthetic. This is the kind of dress that becomes a family keepsake, passed down through generations or carefully preserved in a memory box.
Skill level: Intermediate to Advanced. You should feel comfortable joining motifs, working lace repeats, and reading multi-step special stitches. If you have completed at least two garment projects and know your way around granny squares, you are ready for this.
Finished Measurements
This pattern is written for size 12 months with the following dimensions:
Size Customization Tips
Want to adjust the size? Here are your options. Moving up one hook size, from 2.5 mm to 2.75 mm, will add approximately 1 to 1.5 inches to both chest and length.
For a larger toddler size (18 to 24 months), add two additional motifs to the bodice row. That means one extra motif on the front and one extra on the back. Then work two additional fan lace repeat rows in the skirt before adding the hem motifs. Every additional fan repeat adds 12 stitches to the circumference, so recalculate your stitch counts proportionally.
Materials Needed for This Crochet Baby Dress
Yarn
You will need light weight yarn (Category 3 / DK weight) in 100 percent cotton or a cotton blend. Cotton gives excellent drape, structure, and washability for baby garments.
Main Color (MC): Blush pink, approximately 600 yards (550 meters)
Contrast Color (CC): Dusty rose or mauve, approximately 150 yards (137 meters)
Recommended Yarn Options
Paintbox Yarns Cotton DK (100% cotton, 137 yards per 50 gram skein): Use 5 skeins in MC and 2 skeins in CC. This yarn offers excellent stitch definition and a wide color range.
Lion Brand 24/7 Cotton (100% mercerized cotton, 186 yards per 100 gram ball): Use 4 balls in MC and 1 ball in CC. The mercerized finish gives beautiful drape and a subtle sheen perfect for the lace skirt.
Drops Safran (70% cotton / 30% viscose, 175 yards per 50 gram skein): Use 4 skeins in MC and 1 skein in CC. The viscose content adds softness and sheen ideal for baby garments.
Substitution note: Choose any DK weight cotton yarn with a smooth, tightly plied construction. Avoid fuzzy or textured yarns because they will obscure the lace pattern. Always swatch before starting!
Hooks
Notions
Gauge
Getting gauge right is critical for this dress to fit properly. Do not skip this step!
With US B-1 / 2.25 mm hook and MC:
If your gauge is off, adjust your hook size. Too big? Go down a hook size. Too small? Go up a hook size. Do not proceed until your gauge matches.
Abbreviations and Stitch Definitions
Let me walk you through every abbreviation you will encounter. I am defining them all so you never have to wonder what a term means.
ch = chain: Yarn over, pull through loop on hook. This is your foundation stitch.
sl st = slip stitch: Insert hook, yarn over, pull through both loops at once. Used for joining and moving across stitches invisibly.
sc = single crochet: Insert hook, yarn over, pull up a loop (2 loops on hook), yarn over, pull through both loops. A short, tight stitch.
dc = double crochet: Yarn over, insert hook, yarn over, pull up a loop (3 loops), yarn over, pull through 2 loops (2 loops remain), yarn over, pull through last 2 loops. A taller stitch that creates the fan patterns.
hdc = half double crochet: Yarn over, insert hook, yarn over, pull up a loop (3 loops), yarn over, pull through all 3 loops at once.
tr = treble crochet: Yarn over twice, insert hook, yarn over, pull up a loop (4 loops), yarn over, pull through 2 loops three times.
MR = magic ring: An adjustable starting ring that closes completely. Make a loop, work stitches into the loop, then pull the tail to close.
ch-sp = chain space: The gap or hole created by a chain in the previous row or round.
FLO = front loop only: Work into only the front loop of the stitch, leaving the back loop unworked.
BLO = back loop only: Work into only the back loop of the stitch.
RS = right side: The front or public side of your work.
WS = wrong side: The back or private side of your work.
sk = skip: Pass over the indicated stitch without working into it.
sp = space
st(s) = stitch(es)
rnd = round
rep = repeat
rem = remaining
beg = beginning
MC = main color (blush pink)
CC = contrast color (dusty rose)
Special Stitches for This Pattern
These are the specific stitch combinations that make this dress so beautiful. Read through them before you start so they feel familiar when you encounter them.
Flower Square Motif
This motif creates a raised-center flower with granny-style corners. Each completed motif measures 2.5 inches (6.5 cm) square. You will use CC for rounds 1 and 2, then switch to MC for rounds 3 and 4.
Round 1 (CC): Make a MR. Ch 1. Work 8 sc into ring. Pull ring closed. Sl st to first sc to join. (8 sc)
Round 2 (CC): Ch 1. In each st around work: (sc, ch 2, sc). This creates 8 petals. Sl st to first sc to join. (16 sc, 8 ch-2 spaces)
The petals will curl forward naturally on the RS, creating that beautiful raised flower center effect.
Round 3 (MC): Working behind the petals of Round 2, sl st into the back loop of each sc from Round 1. You will see these loops from behind. Ch 3 (counts as first dc), work 2 dc into same st, ch 2, (3 dc, ch 2) into each remaining back loop around. Sl st to top of beg ch-3. (8 groups of 3 dc, 8 ch-2 spaces)
Round 4 (MC): Sl st into next 2 dc sts and into first ch-2 sp. Ch 3 (counts as first dc). In same ch-2 sp work (2 dc, ch 2, 3 dc). This is a corner. Ch 1. In next ch-2 sp work 3 dc. Ch 1. In next ch-2 sp work corner: (3 dc, ch 2, 3 dc). Ch 1. Work 3 dc in next ch-2 sp. Ch 1. Repeat from corner instruction two more times. Sl st to top of beg ch-3 to join.
Your final round structure has 4 corners of (3 dc, ch 2, 3 dc), with each side having one group of 3 dc between corners, all groups separated by ch-1 spaces. Fasten off, leaving MC tail for joining.
Fan Stitch
One fan equals (dc, ch 1, dc, ch 1, dc, ch 1, dc, ch 1, dc) all worked into one stitch. That is 5 dc with ch-1 spaces between, worked into the same stitch. Also written as a 5-dc fan.
Fan row (RS): Ch 3, turn. Sk first 2 sts. Work 5-dc fan into next st. Sk 2 sts. Sc into next st. Continue (sk 2 sts, work 5-dc fan into next st, sk 2 sts, sc into next st) across. Final st: work sc into turning chain.
Return row (WS): Ch 1, turn. Sc into first sc. (Ch 2, sc into center dc of next fan, ch 2, sc into next sc) across. Final sc into top of turning chain.
Scallop Edging
Working from RS, sl st to join at edge. Ch 1. (Sc in first st, sk 1 st, 5 dc in next st, sk 1 st, sc in next st) across or around. Each scallop uses 5 sts. Join with sl st at end of round.
Rolled Rose Embellishment
Row 1: With CC and larger hook (C-2 / 2.75 mm), ch 36. Work 3 dc into 4th ch from hook. Work 3 dc in each ch across. (108 dc total across 33 working chains plus foundation ch)
Fasten off leaving a long tail.
Assembly: Roll the strip tightly from one end, coiling it into a rose shape. The outer edge (the top of the dc columns) forms the petals. Thread the yarn tail through the bottom of the coil several times to secure. Do not cut the tail until the rose is completely secure.
Pattern Notes Before You Begin
Read these notes carefully. They will save you confusion later!
1. Construction order: Flower square motifs first, then joined for the bodice. The skirt works downward from the waist join. Hem flower squares are made separately and joined to the skirt bottom. Edging, roses, ribbon, and button bands come last.
2. Bodice front: 4 flower square motifs joined in a strip. Bodice back: Two strips of 2 motifs each (left back and right back), leaving a center back opening for buttons.
3. Skirt: Worked in joined rounds using the fan stitch pattern, increasing in width as it descends.
4. Joining method: Use the flat join method (sl st through both corner ch-2 spaces with WS together, RS facing out) or the join-as-you-go method on Round 4.
5. Ribbon: Threaded through the dc row at the waist and tied in a bow at the front.
6. Neckline: Finished with a round of sc, then a scallop edging round.
7. Armholes: Receive only a single round of sc. No scallop here, which keeps them neat without adding bulk.
8. Stitch counts in parentheses at the end of rows and rounds refer to total working stitches after the stated operation.
9. When working in rounds, join each round with sl st to beginning stitch unless otherwise stated. Ch-3 at start of a round counts as first dc throughout.
10. Block all motifs before joining. This ensures accurate sizing and much easier assembly.
Step-by-Step Pattern Instructions
Section 1: Flower Square Motifs for Bodice and Hem
Make 14 flower square motifs total using the Flower Square Motif instructions above.
Block each motif to 2.5 inches (6.5 cm) square before joining.
Section 2: Joining Bodice Motifs
Bodice Front: Join 4 motifs in a horizontal strip.
Using the flat join method: Hold two motifs with WS together. Using MC and hook, sl st through the corner ch-2 sp of both motifs. Ch 1. Working along the shared edge, sl st through each corresponding dc and ch-1 sp across to the next corner ch-2 sp. Sl st through both corner ch-2 sps. Fasten off.
Join motif 3 to motif 2 along its right edge in the same manner. Join motif 4 to motif 3 along its right edge in the same manner.
The front bodice strip is now 4 motifs wide and 1 motif tall: approximately 10 inches (25.5 cm) wide and 2.5 inches (6.5 cm) tall.
Bodice Back Left Panel: Join 2 motifs in a horizontal strip using same flat join method. (5 inches / 12.7 cm wide, 2.5 inches / 6.5 cm tall)
Bodice Back Right Panel: Join 2 motifs in a horizontal strip. (5 inches / 12.7 cm wide, 2.5 inches / 6.5 cm tall)
The back opening falls between the two back panels at center back.
Section 3: Bodice Upper Yoke
The yoke adds height above the motif strip and forms the shoulder area. Work in sc rows across the top of the motif strips.
Each motif top edge has: 3 dc (corner group), ch-1, 3 dc (side group), ch-1, 3 dc (corner group) = 9 dc + 2 ch-1 sps = 11 working points per motif edge.
Yoke Front Setup Row (WS): Attach MC with RS facing to top-right corner of front motif strip. Ch 1. Sc into each dc, and 1 sc into each ch-1 sp across the top of all 4 joined motifs. At each join between motifs, work 1 sc into the shared corner point.
Stitch count: Motif 1 full = 11 sts. Each subsequent motif shares one corner, adding 8 sts. 4 motifs = 11 + 8 + 8 + 8 = 35 sts.
Work 1 sc in each st across. (35 sc)
Yoke Front Row 1 (RS): Ch 1, turn. Sc in each sc across. (35 sc)
Yoke Front Row 2 (WS): Ch 1, turn. Sc in each sc across. (35 sc)
Yoke Front Row 3 (RS): Ch 1, turn. Sc in each sc across. (35 sc)
Yoke Front Row 4 (WS): Ch 1, turn. Sc in each sc across. (35 sc)
Work 4 total sc rows above motif strip on front. Yoke front is now approximately 3.5 inches (9 cm) tall.
Yoke Back Left Panel Setup Row: Attach MC to top-right corner of left back panel. Work sc across top of 2 joined motifs: 11 + 8 = 19 sc. (19 sc)
Work 4 rows sc. (19 sc each row)
Yoke Back Right Panel Setup Row: Attach MC to top-right corner of right back panel. Work sc across top of 2 joined motifs: 19 sc. (19 sc)
Work 4 rows sc. (19 sc each row)
Section 4: Shoulder Joins and Armhole Shaping
The front yoke (35 sts) aligns with both back panels (19 sts each = 38 sts total for back).
Shoulder placement: Each shoulder seam spans 8 sts on the front and 8 sts on the corresponding back panel. The center front neck spans 35 – 8 – 8 = 19 sts.
Left Shoulder Seam Join: With WS of front and left back panel held together, using MC, sl st through corresponding sts across 8 shoulder sts on each piece. Fasten off. (8 st seam)
Right Shoulder Seam Join: Repeat for right shoulder. (8 st seam)
Armhole Edging (work on both armholes): Attach MC at underarm. Ch 1. Work 44 sc evenly around armhole opening, placing sc into each dc, ch-sp, and row-end sc around the full armhole. Sl st to first sc to join. (44 sc)
Round 2: Ch 1. Sc in each sc around. Sl st to join. Fasten off. (44 sc)
Do not add scallop edging to the armhole. This keeps the edge flat and comfortable against baby’s arms.
Checkpoint: After bodice assembly and armhole edging, the bodice should measure approximately 5 inches (12.7 cm) wide across front and 6 inches (15 cm) tall from bottom edge of motifs to top of shoulder. Neck opening should be approximately 5 inches (12.7 cm) wide.
Section 5: Neckline Edging
Attach MC at right back neck edge (top of right back panel, inner edge).
Neckline Pickup Round: Ch 1. Work sc evenly around entire neck opening:
Total: 11 + 2 + 19 + 2 + 11 = 45 sc.
Do not join into the round. The neckline is worked back and forth to accommodate the center back opening.
Neckline Row 1: Ch 1, turn. Sc in each sc. (45 sc)
Neckline Scallop Row (RS facing): Do not turn. With RS facing, work scallop along neck edge: (Sk 1 st, 5 dc in next st, sk 1 st, sc in next st) 11 times, end with sl st in last st. (11 scallops)
Fasten off.
Section 6: Waist Joining Round and Skirt Foundation
The skirt attaches to the bottom edges of the bodice motif strips.
Side Seams: Using MC, flat-join the side edges (right side of front motif strip to left side of back panel, and left side of front motif strip to right side of back panel). Each side seam spans one motif height (2.5 inches / 6.5 cm).
After side seaming, the bodice forms a tube (open at center back). Bottom circumference total: 35 + 19 + 19 + 2 = 75 sc.
Skirt Increase Round (RS facing): Attach MC at center back bottom right edge. Ch 3 (counts as dc). Work dc in each sc around, increasing to reach 108 sts for fan pattern.
Work (2 dc in next sc, dc in next sc) 33 times, dc in remaining 9 sc. This adds 33 increases. Total = 75 + 33 = 108 dc.
Sl st to top of beg ch-3 to join. (108 dc)
Section 7: Ribbon Channel Round
Round 1 (Ribbon Channel): Ch 5 (counts as dc + ch 2). Sk 1 dc. (Dc in next dc, ch 2, sk 1 dc) around. Sl st to 3rd ch of beg ch-5 to join. (54 dc, 54 ch-2 spaces)
This open mesh round allows the ribbon to thread through later.
Round 2 (Close Channel): Ch 3 (counts as dc). Working into each dc and each ch-2 sp of prev round: (dc in next dc, dc in ch-2 sp) around. Sl st to top of beg ch-3. (108 dc)
Checkpoint: The waist should measure approximately 17 inches (43 cm) in circumference relaxed, with 108 dc in the working round.
Section 8: Skirt Fan Lace Body
The skirt works downward using the Fan Stitch. With 108 stitches divided by 6, you have 18 fan repeats.
Fan Round 1 (RS): Ch 1. Sc in first dc. (Sk 2 dc, 5-dc fan in next dc, sk 2 dc, sc in next dc) 17 times. Sk 2 dc, 5-dc fan in next dc, sk 2 dc. Sl st to first sc. (18 fans, 18 sc)
Transition Round 1: Ch 1. Sc in same st. (Ch 2, sc in center dc of next fan, ch 2, sc in next sc) 17 times. Ch 2, sc in center dc of last fan, ch 2. Sl st to first sc. (18 sc at fan centers, 18 sc at fan bases, 36 ch-2 sps)
Fan Round 2: Ch 1. Sc in first sc. (Sk ch-2 sp, 5-dc fan in next sc, sk ch-2 sp, sc in next sc) 17 times. Sk ch-2 sp, 5-dc fan in next sc, sk ch-2 sp. Sl st to first sc. (18 fans, 18 sc)
Transition Round 2: Repeat Transition Round 1.
Continue alternating Fan Rounds and Transition Rounds until you have completed:
After 6 fan rounds and 6 transition rounds, the skirt measures approximately 6 inches (15 cm) below the waist.
Section 9: Hem Motif Attachment and Finishing
Attach your 6 remaining flower square motifs evenly around the hem, joining them to the last transition round. Space them evenly, with approximately 3 fan repeats between each motif.
Work a final round of scallop edging along the entire hem, incorporating the bottom edges of the flower motifs for a cohesive finish.
Section 10: Rose Embellishments
Make 2 rolled roses using CC and the larger hook following the Rolled Rose Embellishment instructions.
Sew one rose securely to each shoulder, positioning them at the shoulder seam where the bodice meets the yoke.
Section 11: Ribbon and Button Closure
Thread the satin ribbon through the ch-2 spaces of the ribbon channel round at the waist. Center the ribbon at the front and tie in a bow.
Create 3 small button loops along the left back edge using ch-5 loops attached at even intervals. Sew buttons to the right back edge to correspond with the loops.
Blocking Your Finished Dress
Wet block the completed dress by soaking it in lukewarm water for 15 to 20 minutes. Gently squeeze out excess water without wringing. Lay flat on blocking mats and pin to measurements. Allow to dry completely before removing pins.
Blocking makes an enormous difference in how professional your finished dress looks. The lace opens up beautifully, the motifs square up perfectly, and the whole garment drapes elegantly.
Care Instructions
Hand wash in cool water with mild detergent. Lay flat to dry. Store folded with acid-free tissue paper to preserve the shape. Because this dress is 100% cotton, it may shrink slightly if machine washed, so hand washing is strongly recommended.
I really hope you love making this crochet rose garden baby dress as much as I loved designing it. There is something incredibly satisfying about watching all those individual pieces come together into such an elegant finished garment. The look on a new parent’s face when they receive a handmade heirloom like this? Absolutely priceless.
If you found this crochet pattern helpful, I would love for you to save it to your Pinterest boards so you can find it easily when you are ready to start. And please, if you make this dress, leave a comment below or tag me on social media. Seeing your finished projects brings me so much joy, and I cannot wait to see the color combinations you choose!
You Might Also Like
- Strawberry Granny Square Cardigan Set Free Crochet Pattern
- Navy Sunflower Drawstring Pouch Free Crochet Pattern
- Sunset Peach Floral Tote Free Crochet Pattern
- Blush Pink Ruffle Halter Dress Free Crochet Pattern
