
I call this one "The Rosalie." It started as a sketch in an old spiral notebook I rediscovered while cleaning out my craft room last spring.
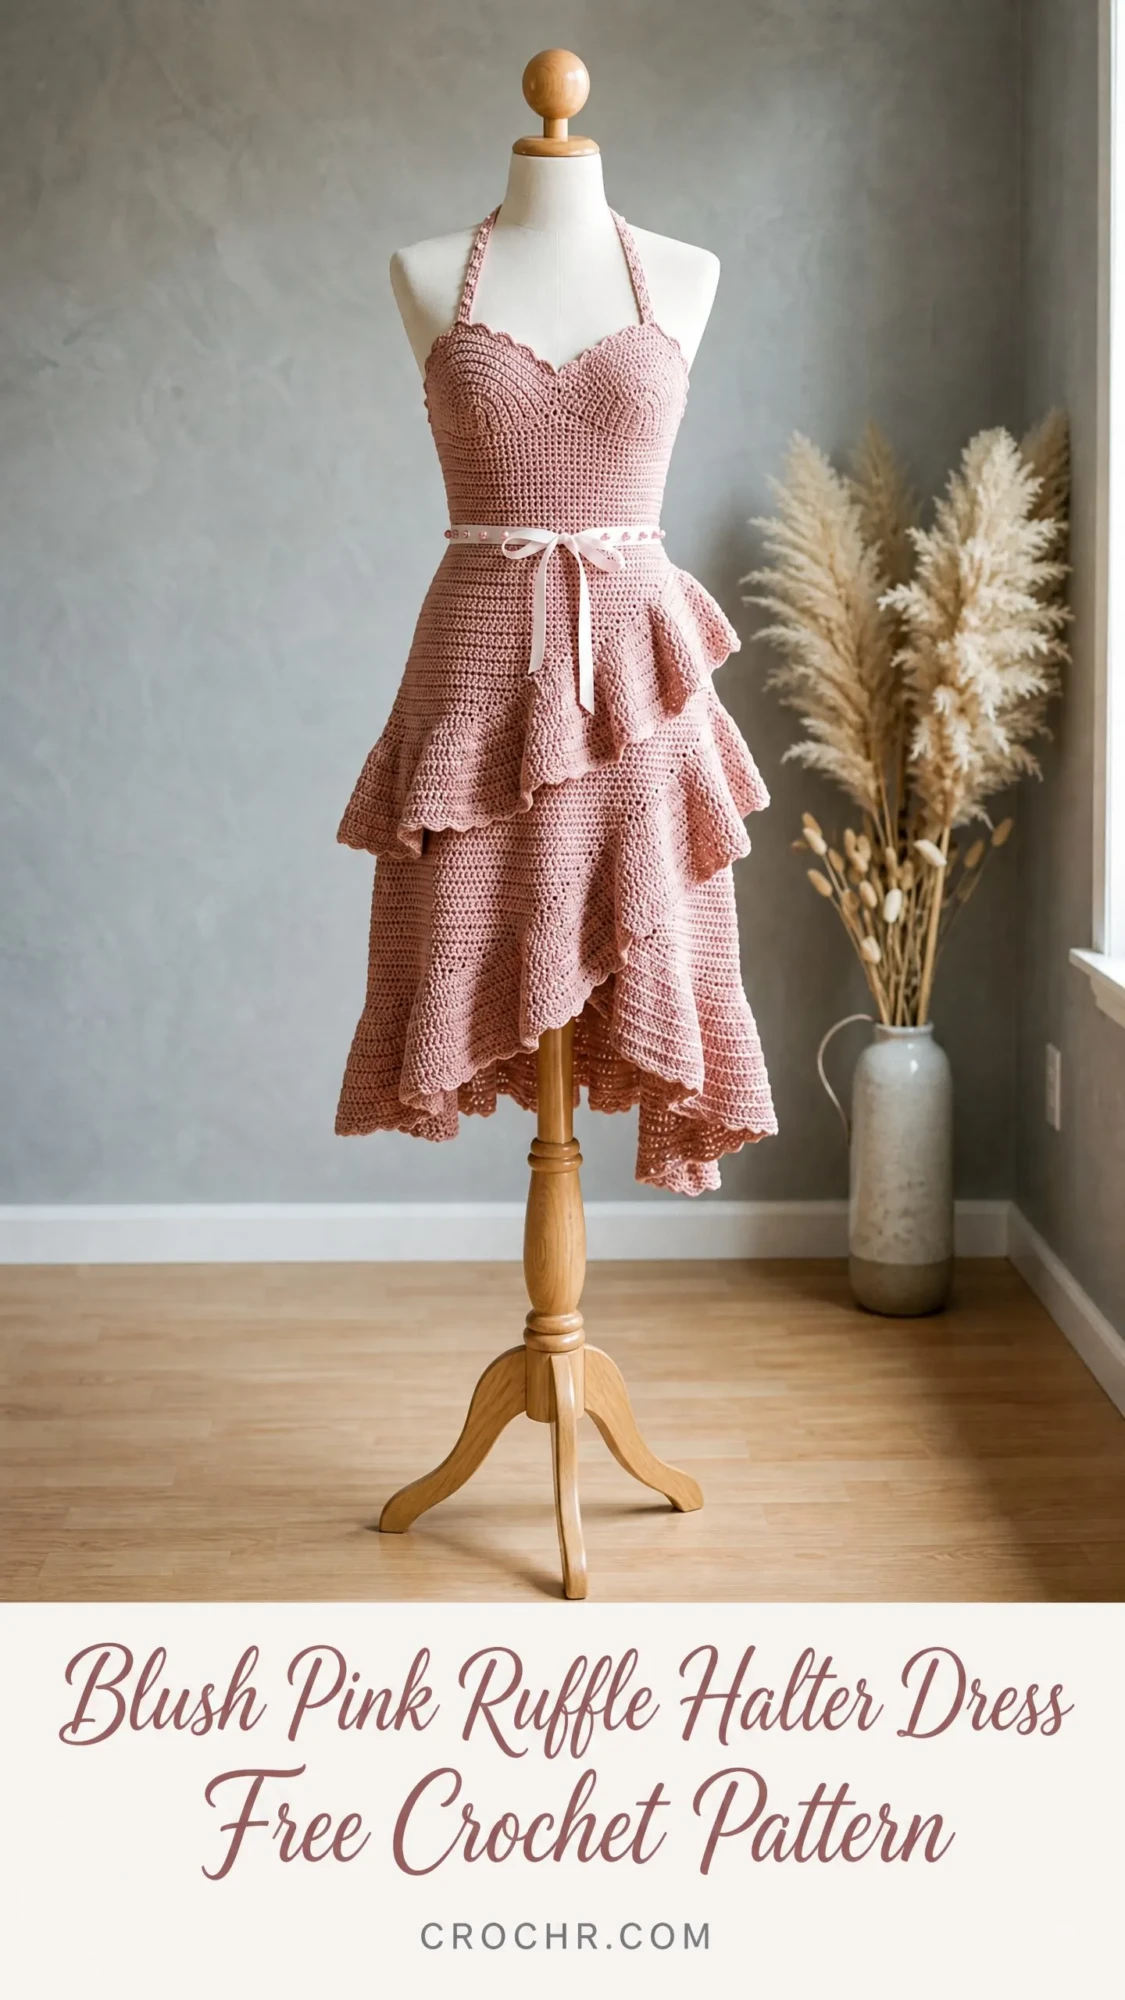
The drawing was rough, just a few quick lines capturing a silhouette I had imagined for a friend’s garden wedding. She wanted something romantic but not fussy, something that would move beautifully when she danced. I never did make it in time for that wedding, but the idea stayed with me for years.
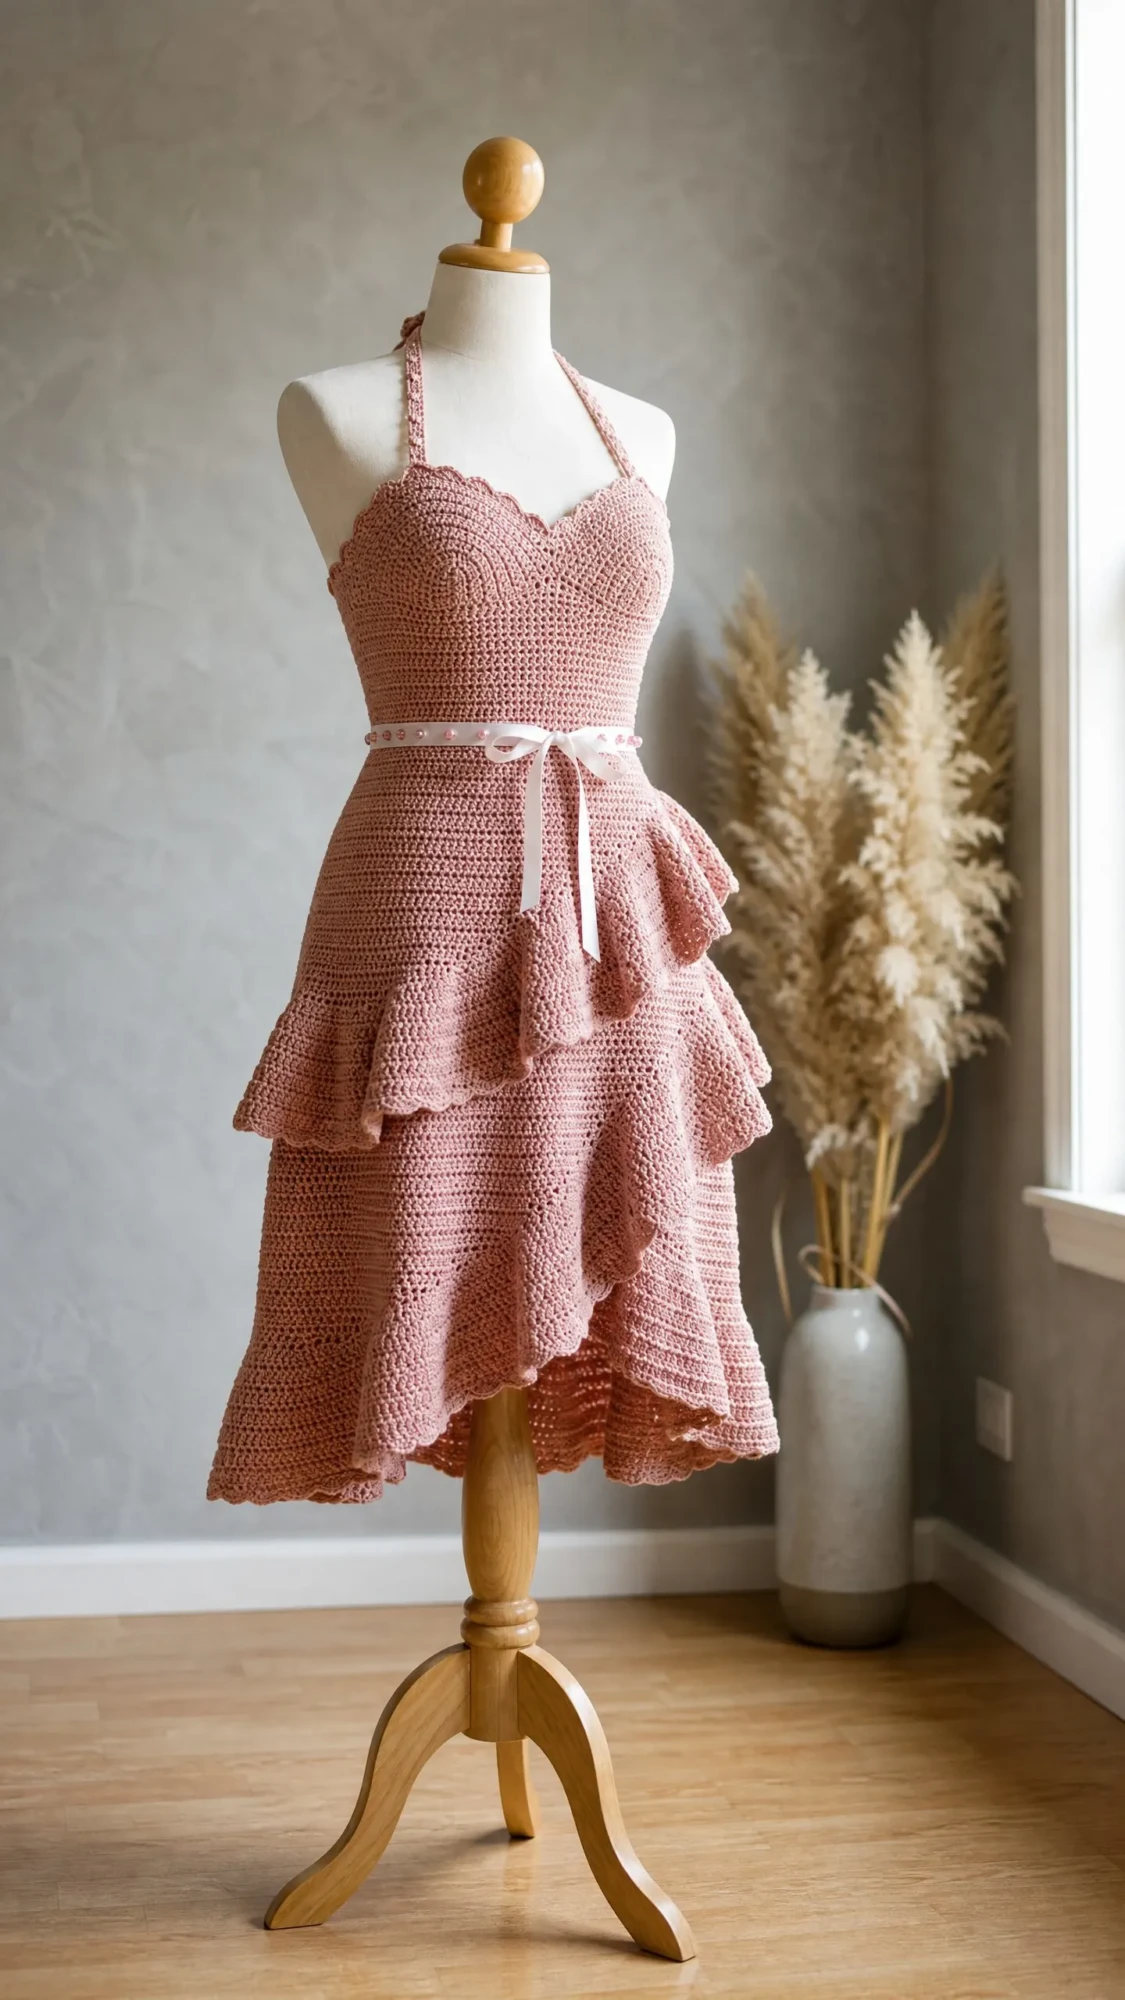
When I finally sat down to bring Rosalie to life, I wanted every detail to feel intentional. The sweetheart neckline, the cinched waist with its delicate ribbon, those cascading tiers that catch the light when you move. This blush pink ruffle halter dress crochet pattern is everything I dreamed it would be, and I cannot wait for you to make your own.
About This Crochet Dress Pattern
This dress is a showstopper. The construction moves from the fitted bodice downward through a structured waistband and into three dramatic tiered ruffles. Each tier is worked separately and creates that gorgeous asymmetrical hemline you see in the photos. The front sits at knee length while the back sweeps longer for elegant movement.
The sweetheart neckline is created by working two separate cup pieces that mirror each other. You will shape each cup with strategic increases and decreases, then join them together to form that romantic dip at the center. Braided halter ties attach at the top corners and fasten behind your neck.
A satin ribbon threads through an eyelet row at the waist, giving you that defined silhouette and adding a touch of polish. You can embellish the ribbon with tiny pearl beads if you want extra sparkle.
The skirt features three layered tiers. Each one starts at the waistband, increases outward to create fullness, and finishes with a ruffle stitch row that triples the stitch count for maximum drama. Shell stitch edging along every hem adds those pretty scalloped edges.
Skill Level
This pattern sits at advanced intermediate. You should feel comfortable with shaping techniques, working increases for circular construction, and maintaining consistent gauge in a fitted garment. If you have completed at least two fitted crochet tops before, you are ready for this dress.
The trickiest parts are the sweetheart cup shaping and the asymmetrical tier construction. I will walk you through both step by step. Take your time, use stitch markers generously, and trust the process.
Time Estimate
Plan for approximately 40 to 55 hours of work if you crochet at a moderate pace. This is not a weekend project. Think of it as a labor of love, something you work on over several weeks. The results are absolutely worth the investment.
Finished Measurements
This pattern is written for size Small/Medium.
Bust: 34 inches (86.5 cm)
Waist: 28 inches (71 cm)
Hip at widest skirt point: 54 inches (137 cm)
Bodice length from underarm to waist: 6 inches (15 cm)
Total length at center front from waist to shortest ruffle: 18 inches (45.5 cm)
Total length at center back from waist to longest ruffle: 26 inches (66 cm)
Size customization tips appear at the end of the pattern.
Materials You Will Need
Yarn: Sport weight (CYCA 2), 100 percent mercerized cotton, approximately 1800 yards (1646 meters) total in dusty rose or blush pink
Hooks:
Notions:
Yarn Suggestions
Option 1: Paintbox Yarns Simply DK in Blush Pink. This DK weight works to sport gauge on a smaller hook. Swatch before committing. 100 percent cotton, 137 yards (125 meters) per 50g ball. You will need approximately 13 to 14 balls.
Option 2: Lion Brand 24/7 Cotton in Rose. Sport or light DK weight. 100 percent mercerized cotton, 186 yards (170 meters) per 100g ball. You will need approximately 10 balls.
Option 3: Scheepjes Catona in Old Rose. Sport weight. 100 percent mercerized cotton, 62 yards (57 meters) per 25g ball. You will need approximately 29 balls.
Substitution note: Choose a smooth, tightly spun cotton or cotton blend sport weight yarn. Avoid fuzzy or textured yarns because stitch definition is essential for this dress to look its best. Always work a gauge swatch and wash it before beginning.
Gauge
With E/4 (3.5 mm) hook in single crochet:
20 stitches = 4 inches (10 cm)
24 rows = 4 inches (10 cm)
With F/5 (3.75 mm) hook in single crochet:
18 stitches = 4 inches (10 cm)
22 rows = 4 inches (10 cm)
Gauge is critical for fit. Swatch in the round, then wash and block your swatch before measuring. Cotton yarn relaxes significantly when wet blocked, so this step prevents unpleasant surprises later.
Abbreviations
Special Stitches and Techniques
Shell Stitch
Work 5 double crochet (dc) into the same stitch or chain space. This creates a fan shape. On following rounds or rows, work the shell into the center (third) dc of the previous shell. One shell equals 5 dc.
Ruffle Stitch Row
Work 3 single crochet (sc) into every single stitch across the row or round. This triples your stitch count and creates the gathered ruffle effect. The ruffle stitch row is always the final row of each tier before the shell edging.
Eyelet Row
Work as follows: chain 2, skip 1 stitch, single crochet in next stitch. Repeat across. On the return row, work single crochet into each chain 2 space and each single crochet. Stitch count remains the same.
Sweetheart Cup Shaping
Each cup of the bodice sweetheart neckline is worked separately from a central point outward and upward. Shape with decreases at the inner edge and increases at the outer edge to form the curved V of the neckline. The two cups are then joined at the side seams.
Braided Halter Tie
Cut 6 lengths of yarn, each 80 inches (203 cm) long. Fold each in half and attach the fold to the designated stitch at the outer top edge of each bodice cup using a larks head knot. You will have 12 strands per side. Divide into 3 groups of 4 strands and braid tightly for 14 inches (35.5 cm). Secure the end with a knot and trim. Repeat for the second side.
Pattern Notes Before You Begin
1. The bodice is worked flat in two mirrored halves (left cup and right cup), then seamed at the sides. Each cup is worked from the center front bottom upward.
2. The waistband is worked in joined rounds after the bodice is assembled.
3. The skirt is worked in joined rounds from the waistband downward. There are three tiers. Each tier begins at a set back attachment row, increases in stitch count, and ends with a ruffle stitch row and shell edging.
4. Tier 1 is an asymmetrical overskirt ruffle attached at the hip that is shorter at the front and longer at the back. Tier 2 is a mid layer ruffle. Tier 3 is the longest underlayer.
5. The asymmetry is achieved by working the back of each tier with more rows than the front.
6. Chain 2 turning chains count as a dc in all double crochet rows.
7. Chain 1 turning chains do NOT count as a stitch in all single crochet rows.
8. Join all rounds with a slip stitch to the first stitch of the round unless otherwise instructed.
9. Block the finished dress before wearing. Cotton relaxes significantly with wet blocking.
10. The satin ribbon is threaded through the eyelet row at the waist after finishing and is tied in a bow at the center front.
Step by Step Instructions
Bodice Right Cup
The right cup forms the right side of the sweetheart bustline as worn. Work begins at the center bottom of the cup and fans upward and outward.
Foundation Chain: Ch 16.
Row 1 (RS): Sc in 2nd ch from hook and in each ch across. Turn. (15 sc)
Row 2: Ch 1, sc2tog over first 2 sts (inner edge decrease), sc in each st to end. Turn. (14 sc)
Row 3: Ch 1, sc in each st to last 2 sts, sc2tog (outer edge decrease to begin rounding the outer cup edge). Turn. (13 sc)
Row 4: Ch 1, sc2tog, sc in each st to end. Turn. (12 sc)
Row 5: Ch 1, sc in each st to end. Turn. (12 sc)
Row 6: Ch 1, sc2tog, sc in each st to end. Turn. (11 sc)
Row 7: Ch 1, sc in each st to last st, 2 sc in last st (outer edge increase to begin building cup width). Turn. (12 sc)
Row 8: Ch 1, sc in each st to end. Turn. (12 sc)
Row 9: Ch 1, sc2tog, sc in each st to last st, 2 sc in last st. Turn. (12 sc)
Row 10: Ch 1, sc in each st to end. Turn. (12 sc)
Row 11: Ch 1, sc in each st to last st, 2 sc in last st. Turn. (13 sc)
Row 12: Ch 1, sc in each st to end. Turn. (13 sc)
Row 13: Ch 1, sc in each st to last st, 2 sc in last st. Turn. (14 sc)
Row 14: Ch 1, sc in each st to end. Turn. (14 sc)
Row 15: Ch 1, sc in each st to last st, 2 sc in last st. Turn. (15 sc)
Row 16: Ch 1, sc in each st to end. Turn. (15 sc)
Row 17: Ch 1, sc in each st to last st, 2 sc in last st. Turn. (16 sc)
Row 18: Ch 1, sc in each st to end. Fasten off. (16 sc)
The right cup should measure approximately 3.2 inches (8 cm) wide at its widest point and 3 inches (7.5 cm) tall.
Bodice Left Cup
Work as for the right cup, mirroring all shaping. Where the right cup decreases at the inner (left) edge, the left cup decreases at the inner (right) edge.
Foundation Chain: Ch 16.
Row 1 (RS): Sc in 2nd ch from hook and in each ch across. Turn. (15 sc)
Row 2: Ch 1, sc in each st to last 2 sts, sc2tog (inner edge decrease). Turn. (14 sc)
Row 3: Ch 1, sc2tog, sc in each st to end (outer edge decrease). Turn. (13 sc)
Row 4: Ch 1, sc in each st to last 2 sts, sc2tog. Turn. (12 sc)
Row 5: Ch 1, sc in each st to end. Turn. (12 sc)
Row 6: Ch 1, sc in each st to last 2 sts, sc2tog. Turn. (11 sc)
Row 7: Ch 1, 2 sc in first st, sc in each st to end. Turn. (12 sc)
Row 8: Ch 1, sc in each st to end. Turn. (12 sc)
Row 9: Ch 1, 2 sc in first st, sc in each st to last 2 sts, sc2tog. Turn. (12 sc)
Row 10: Ch 1, sc in each st to end. Turn. (12 sc)
Row 11: Ch 1, 2 sc in first st, sc in each st to end. Turn. (13 sc)
Row 12: Ch 1, sc in each st to end. Turn. (13 sc)
Row 13: Ch 1, 2 sc in first st, sc in each st to end. Turn. (14 sc)
Row 14: Ch 1, sc in each st to end. Turn. (14 sc)
Row 15: Ch 1, 2 sc in first st, sc in each st to end. Turn. (15 sc)
Row 16: Ch 1, sc in each st to end. Turn. (15 sc)
Row 17: Ch 1, 2 sc in first st, sc in each st to end. Turn. (16 sc)
Row 18: Ch 1, sc in each st to end. Fasten off. (16 sc)
Joining the Cups and Working the Bodice Body
With RS facing, lay the right cup and left cup side by side. The inner edges form the sweetheart center V. Join yarn at the outer lower right edge of the right cup.
Joining Row (RS): Ch 1, work 16 sc evenly across the top of the right cup, ch 2 (this bridges the center V and does not count as stitches), work 16 sc evenly across the top of the left cup. Turn. (32 sc plus the 2 ch bridge)
Row 1 of Bodice Body: Ch 1, sc in first 16 sts, sc in each of the 2 ch of the bridge, sc in next 16 sts. Turn. (34 sc)
Row 2: Ch 1, sc in each st across. Turn. (34 sc)
Row 3: Ch 1, sc in each st across. Turn. (34 sc)
Row 4: Ch 1, sc2tog, sc in each st to last 2 sts, sc2tog. Turn. (32 sc)
Row 5: Ch 1, sc in each st across. Turn. (32 sc)
Row 6: Ch 1, sc in each st across. Turn. (32 sc)
Row 7: Ch 1, sc2tog, sc in each st to last 2 sts, sc2tog. Turn. (30 sc)
Row 8: Ch 1, sc in each st across. Turn. (30 sc)
Row 9: Ch 1, sc in each st across. Turn. (30 sc)
Row 10: Ch 1, sc2tog, sc in each st to last 2 sts, sc2tog. Turn. (28 sc)
Row 11: Ch 1, sc in each st across. Turn. (28 sc)
Row 12: Ch 1, sc in each st across. Fasten off. (28 sc)
Back Bodice Panel
The back bodice is a straight rectangle because the back sits higher than the sweetheart front.
Foundation Chain: Ch 35.
Row 1 (RS): Sc in 2nd ch from hook and in each ch across. Turn. (34 sc)
Rows 2 through 6: Ch 1, sc in each st across. Turn. (34 sc)
Row 7: Ch 1, sc2tog, sc in each st to last 2 sts, sc2tog. Turn. (32 sc)
Rows 8 and 9: Ch 1, sc in each st across. Turn. (32 sc)
Row 10: Ch 1, sc2tog, sc in each st to last 2 sts, sc2tog. Turn. (30 sc)
Rows 11 and 12: Ch 1, sc in each st across. Turn. (30 sc)
Row 13: Ch 1, sc2tog, sc in each st to last 2 sts, sc2tog. Turn. (28 sc)
Rows 14 and 15: Ch 1, sc in each st across. Fasten off after Row 15. (28 sc)
Side Seams
Hold front and back panels with RS together. Using a tapestry needle and yarn, whipstitch the side edges together on both sides. Leave the top edges open for the neckline and armhole areas. The bodice is open at the top and bottom. Turn RS out.
Checkpoint: The assembled bodice should measure approximately 6 inches (15 cm) from the top of the sweetheart cups to the bottom. The bottom circumference should measure approximately 28 inches (71 cm) around.
Waistband
Join yarn at the side seam at the bottom of the bodice with RS facing. Work in joined rounds.
Round 1: Ch 1, sc evenly around the entire bottom edge of the assembled bodice, placing 56 sc evenly distributed (14 sc per quarter). Join with sl st to first sc. (56 sc)
Round 2: Ch 1, sc in each st around. Join. (56 sc)
Round 3 (eyelet round): Ch 2, sk 1 st, sc in next st. Repeat (ch 2, sk 1 st, sc in next st) around to end. Join with sl st to first ch 2 sp. (28 eyelets)
Round 4: Ch 1, sc in each ch 2 sp and each sc around. Join. (56 sc)
Round 5: Ch 1, sc in each st around. Join. (56 sc)
Round 6: Ch 1, sc in each st around. Join. Fasten off. (56 sc)
Thread the satin ribbon through the eyelets of Round 3, beginning and ending at the center front. Tie in a bow. Embellish with pearl beads if desired.
Checkpoint: The waistband should measure approximately 1 inch (2.5 cm) tall and 28 inches (71 cm) in circumference.
Neckline Finishing
With RS facing, join yarn at the top right outer edge of the right bodice cup.
Neckline Row: Ch 1, sc evenly across the outer right edge of the right cup, work 3 sc into the center V point, sc evenly across the outer left edge of the left cup. You should have approximately 38 sc total across the sweetheart neckline edge, with 3 sc worked into the center V. Do not turn. (38 sc approximate)
Shell Edging for Neckline: Working from right to left, sl st in first sc, (sk 2 sts, 5 dc shell in next st, sk 2 sts, sl st in next st) repeat across, ending with sl st in last st. Adjust by skipping more or fewer stitches at the center V if needed to keep the scallop even. Fasten off.
Halter Ties
Attach the braided halter ties at the top outer corner of each cup as described in the Special Stitches section. After braiding, bring both ties up and over the back of the neck and tie in a bow or knot.
Skirt Tier 1 (Outermost and Shortest at Front)
Tier 1 attaches at the bottom of the waistband. It is worked in rounds but shaped asymmetrically by working additional rows on the back half only.
Join yarn with RS facing at the left side seam at the base of the waistband.
Round 1 (setup): Ch 1, sc in each waistband stitch around. Join. (56 sc)
Round 2: Ch 1, (sc in next 3 sts, inc in next st) repeat around. Join. (70 sc)
Round 3: Ch 1, sc in each st around. Join. (70 sc)
Round 4: Ch 1, (sc in next 4 sts, inc in next st) repeat around. Join. (84 sc)
Round 5: Ch 1, sc in each st around. Join. (84 sc)
Round 6: Ch 1, (sc in next 5 sts, inc in next st) repeat around. Join. (98 sc)
Round 7: Ch 1, sc in each st around. Join. (98 sc)
Round 8: Ch 1, (sc in next 6 sts, inc in next st) repeat around. Join. (112 sc)
Round 9: Ch 1, sc in each st around. Join. (112 sc)
Round 10: Ch 1, (sc in next 7 sts, inc in next st) repeat around. Join. (126 sc)
Mark the first 63 sts as FRONT and the second 63 sts as BACK.
Tier 1 Front Ruffle Finish
Working across the front 63 sts only (turn work flat for this section):
Ruffle Row: Ch 1, work 3 sc in each of the 63 front sts. (189 sc across front)
Shell Edging: Sl st in first st, (sk 2 sts, 5 dc in next st, sk 2 sts, sl st in next st) repeat across. (31 shells plus partial shells at edges) Fasten off.
Tier 1 Back Extension
Rejoin yarn at the first back stitch (st 64) and continue in rows across the back 63 sts only.
Row 1: Ch 1, sc in each of the 63 back sts. Turn. (63 sc)
Row 2: Ch 1, (sc in next 8 sts, inc in next st) repeat 7 times. Turn. (70 sc)
Row 3: Ch 1, sc in each st across. Turn. (70 sc)
Row 4: Ch 1, (sc in next 9 sts, inc in next st) repeat 7 times. Turn. (77 sc)
Row 5: Ch 1, sc in each st across. Turn. (77 sc)
Row 6: Ch 1, (sc in next 10 sts, inc in next st) repeat 7 times. Turn. (84 sc)
Row 7: Ch 1, sc in each st across. Turn. (84 sc)
Ruffle Row (Back): Ch 1, work 3 sc in each of the 84 sts. (252 sc)
Shell Edging (Back): Sl st in first st, (sk 2 sts, 5 dc in next st, sk 2 sts, sl st in next st) repeat across. (42 shells) Fasten off.
Checkpoint: The front skirt ruffle should hang approximately 8 inches (20.5 cm) below the waistband. The back ruffle should hang approximately 14 inches (35.5 cm) below the waistband.
Skirt Tier 2 (Middle Layer)
Tier 2 is worked into the back loops only of Round 1 of Tier 1.
Join yarn at the left side seam into the unused back loops of Tier 1, Round 1.
Round 1 (setup): Ch 1, sc in back loop only of each st around. Join. (56 sc)
Round 2: Ch 1, (sc in next 2 sts, inc in next st) repeat around to last 2 sts, sc in last 2 sts. Join. (74 sc)
Round 3: Ch 1, sc in each st around. Join. (74 sc)
Round 4: Ch 1, (sc in next 3 sts, inc in next st) repeat 18 times, sc in last 2 sts. Join. (92 sc)
Round 5: Ch 1, sc in each st around. Join. (92 sc)
Round 6: Ch 1, (sc in next 4 sts, inc in next st) repeat 18 times, sc in last 2 sts. Join. (110 sc)
Round 7: Ch 1, sc in each st around. Join. (110 sc)
Round 8: Ch 1, (sc in next 5 sts, inc in next st) repeat 18 times, sc in last 2 sts. Join. (128 sc)
Mark the first 64 sts as FRONT and the second 64 sts as BACK.
Tier 2 Front Ruffle Finish
Ruffle Row: Ch 1, work 3 sc in each of the 64 front sts. (192 sc)
Shell Edging: Sl st in first st, (sk 2 sts, 5 dc in next st, sk 2 sts, sl st in next st) repeat across. (32 shells) Fasten off.
Tier 2 Back Extension
Rejoin yarn at first back stitch (st 65).
Row 1: Ch 1, sc across 64 back sts. Turn. (64 sc)
Row 2: Ch 1, (sc in next 7 sts, inc in next st) repeat 8 times. Turn. (72 sc)
Row 3: Ch 1, sc in each st across. Turn. (72 sc)
Row 4: Ch 1, (sc in next 8 sts, inc in next st) repeat 8 times. Turn. (80 sc)
Row 5: Ch 1, sc in each st across. Turn. (80 sc)
Row 6: Ch 1, (sc in next 9 sts, inc in next st) repeat 8 times. Turn. (88 sc)
Row 7: Ch 1, sc in each st across. Turn. (88 sc)
Ruffle Row (Back): Ch 1, work 3 sc in each of the 88 sts. (264 sc)
Shell Edging (Back): Sl st in first st, (sk 2 sts, 5 dc in next st, sk 2 sts, sl st in next st) repeat across. (44 shells) Fasten off.
Checkpoint: The front mid layer ruffle should sit approximately 2 to 3 inches (5 to 7.5 cm) below Tier 1’s front hem. The back should be 2 to 3 inches below Tier 1’s back hem.
Skirt Tier 3 (Bottom Underlayer)
Tier 3 is the longest and widest tier. Work by joining into the back loops of Tier 2, Round 1.
Join yarn in the back loops of Tier 2 Round 1.
Round 1 (setup): Ch 1, sc in back loop only of each st around. Join. (56 sc)
Round 2: Ch 1, (sc in next st, inc in next st) repeat around. Join. (84 sc)
Round 3: Ch 1, sc in each st around. Join. (84 sc)
Round 4: Ch 1, (sc in next 2 sts, inc in next st) repeat around. Join. (112 sc)
Round 5: Ch 1, sc in each st around. Join. (112 sc)
Round 6: Ch 1, (sc in next 3 sts, inc in next st) repeat around. Join. (140 sc)
Round 7: Ch 1, sc in each st around. Join. (140 sc)
Round 8: Ch 1, (sc in next 4 sts, inc in next st) repeat around. Join. (168 sc)
Round 9: Ch 1, sc in each st around. Join. (168 sc)
Round 10: Ch 1, (sc in next 5 sts, inc in next st) repeat around. Join. (196 sc)
Round 11: Ch 1, sc in each st around. Join. (196 sc)
Round 12: Ch 1, (sc in next 6 sts, inc in next st) repeat around. Join. (224 sc)
Mark the first 112 sts as FRONT and the second 112 sts as BACK.
Tier 3 Front Ruffle Finish
Ruffle Row: Ch 1, work 3 sc in each of the 112 front sts. (336 sc)
Shell Edging: Sl st in first st, (sk 2 sts, 5 dc in next st, sk 2 sts, sl st in next st) repeat across. (56 shells) Fasten off.
Tier 3 Back Extension
Rejoin yarn at first back stitch (st 113).
Row 1: Ch 1, sc across 112 back sts. Turn. (112 sc)
Row 2: Ch 1, (sc in next 13 sts, inc in next st) repeat 8 times. Turn. (120 sc)
Row 3: Ch 1, sc in each st across. Turn. (120 sc)
Row 4: Ch 1, (sc in next 14 sts, inc in next st) repeat 8 times. Turn. (128 sc)
Row 5: Ch 1, sc in each st across. Turn. (128 sc)
Row 6: Ch 1, (sc in next 15 sts, inc in next st) repeat 8 times. Turn. (136 sc)
Row 7: Ch 1, sc in each st across. Turn. (136 sc)
Row 8: Ch 1, (sc in next 16 sts, inc in next st) repeat 8 times. Turn. (144 sc)
Row 9: Ch 1, sc in each st across. Turn. (144 sc)
Ruffle Row (Back): Ch 1, work 3 sc in each of the 144 sts. (432 sc)
Shell Edging (Back): Sl st in first st, (sk 2 sts, 5 dc in next st, sk 2 sts, sl st in next st) repeat across. (72 shells) Fasten off.
Finishing Your Dress
Weave in all ends securely using your tapestry needle. Take extra care at the tier attachment points and side seams where the dress will experience movement and stress.
Blocking is essential. Wet block your finished dress by soaking it in lukewarm water for 15 to 20 minutes. Gently squeeze out excess water without wringing. Lay flat on blocking mats or clean
You Might Also Like
- Autumn Sunset Ombre Granny Square Cardigan Free Pattern
- Mint Garden Bow Crochet Vest Free Crochet Pattern
- Dusty Rose Gradient Crochet Mini Dress Free Pattern
- Lavender Bunny Toilet Paper Cozy Free Crochet Pattern
