
THIS is one of those projects that looks like you spent weeks on it, but honestly? It works up so much faster than you’d think. Those gorgeous shell stitch stripes, the playful pompom fringe, the warm sunset colors. It’s an absolute showstopper, and I promise it’s easier than it looks.
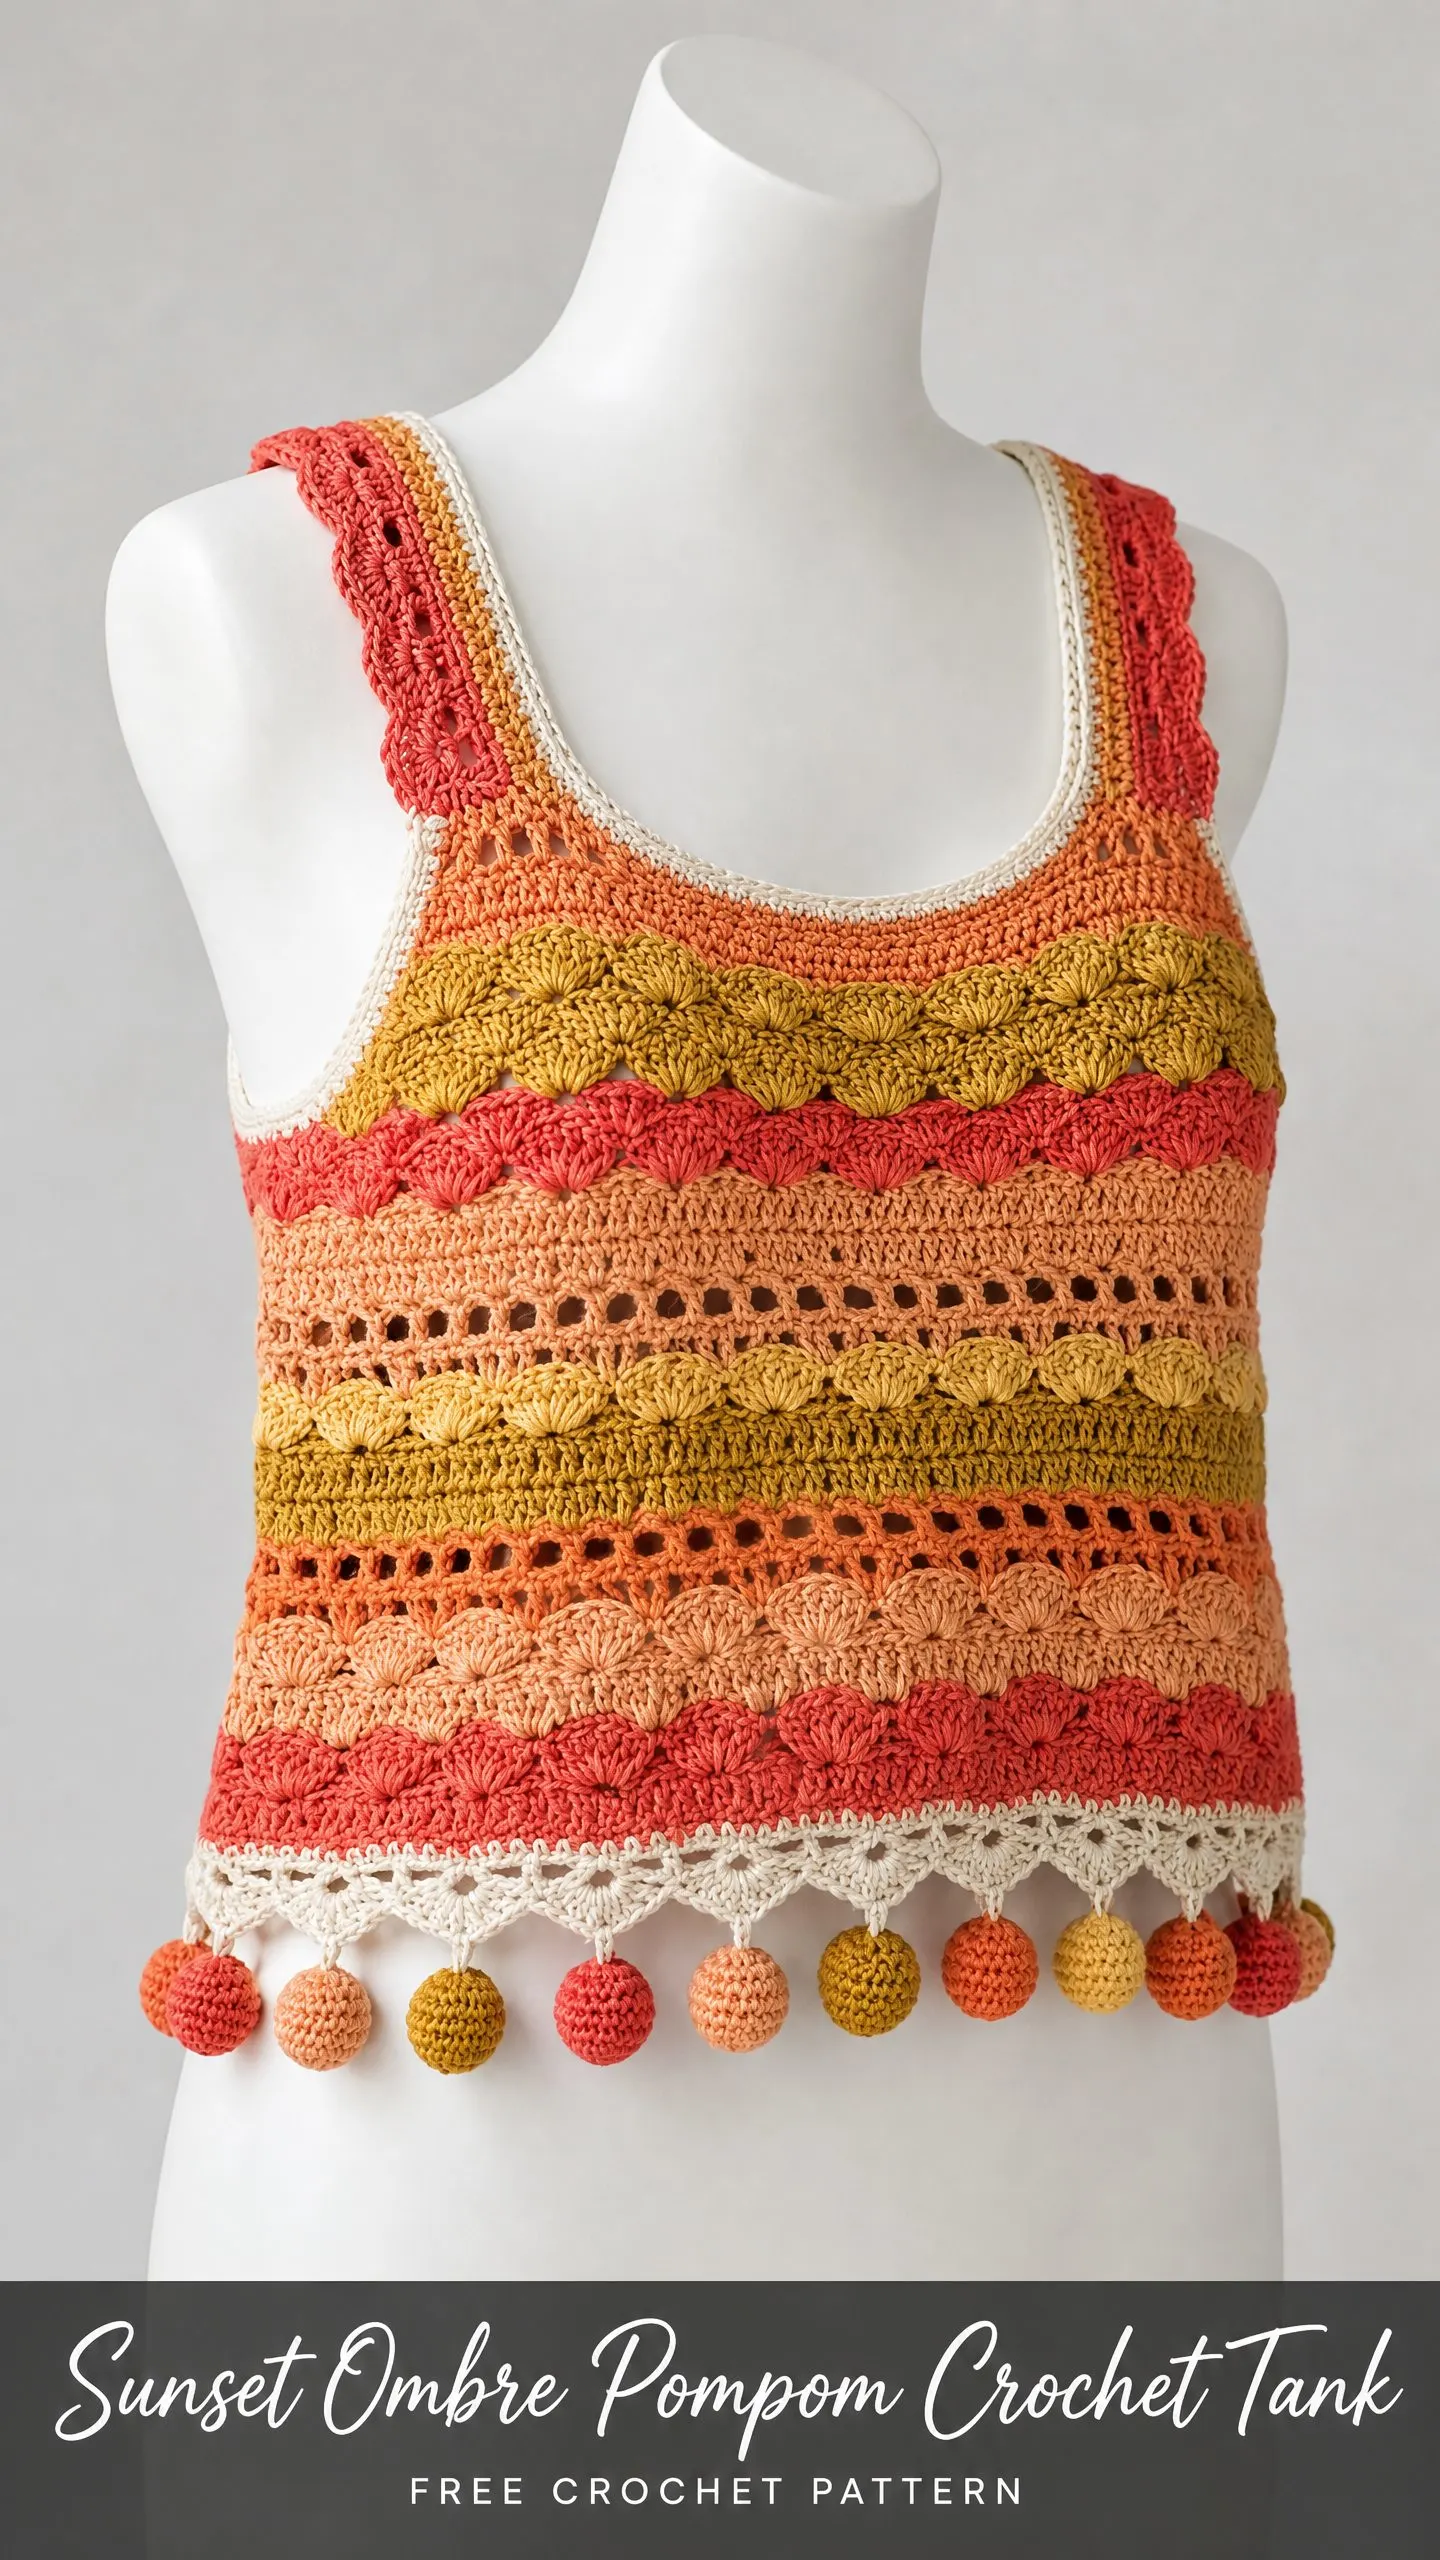
If you’ve been wanting to make a statement piece for your summer wardrobe, this is the one. The construction is straightforward. You work two flat panels, seam them together, and add the finishing details. The hardest part might be picking your color palette.
Whether you’re making this for yourself or as a gift for someone who loves boho style, you’re going to feel SO proud when it’s finished. Let’s dive in!
About This Crochet Tank Top Pattern
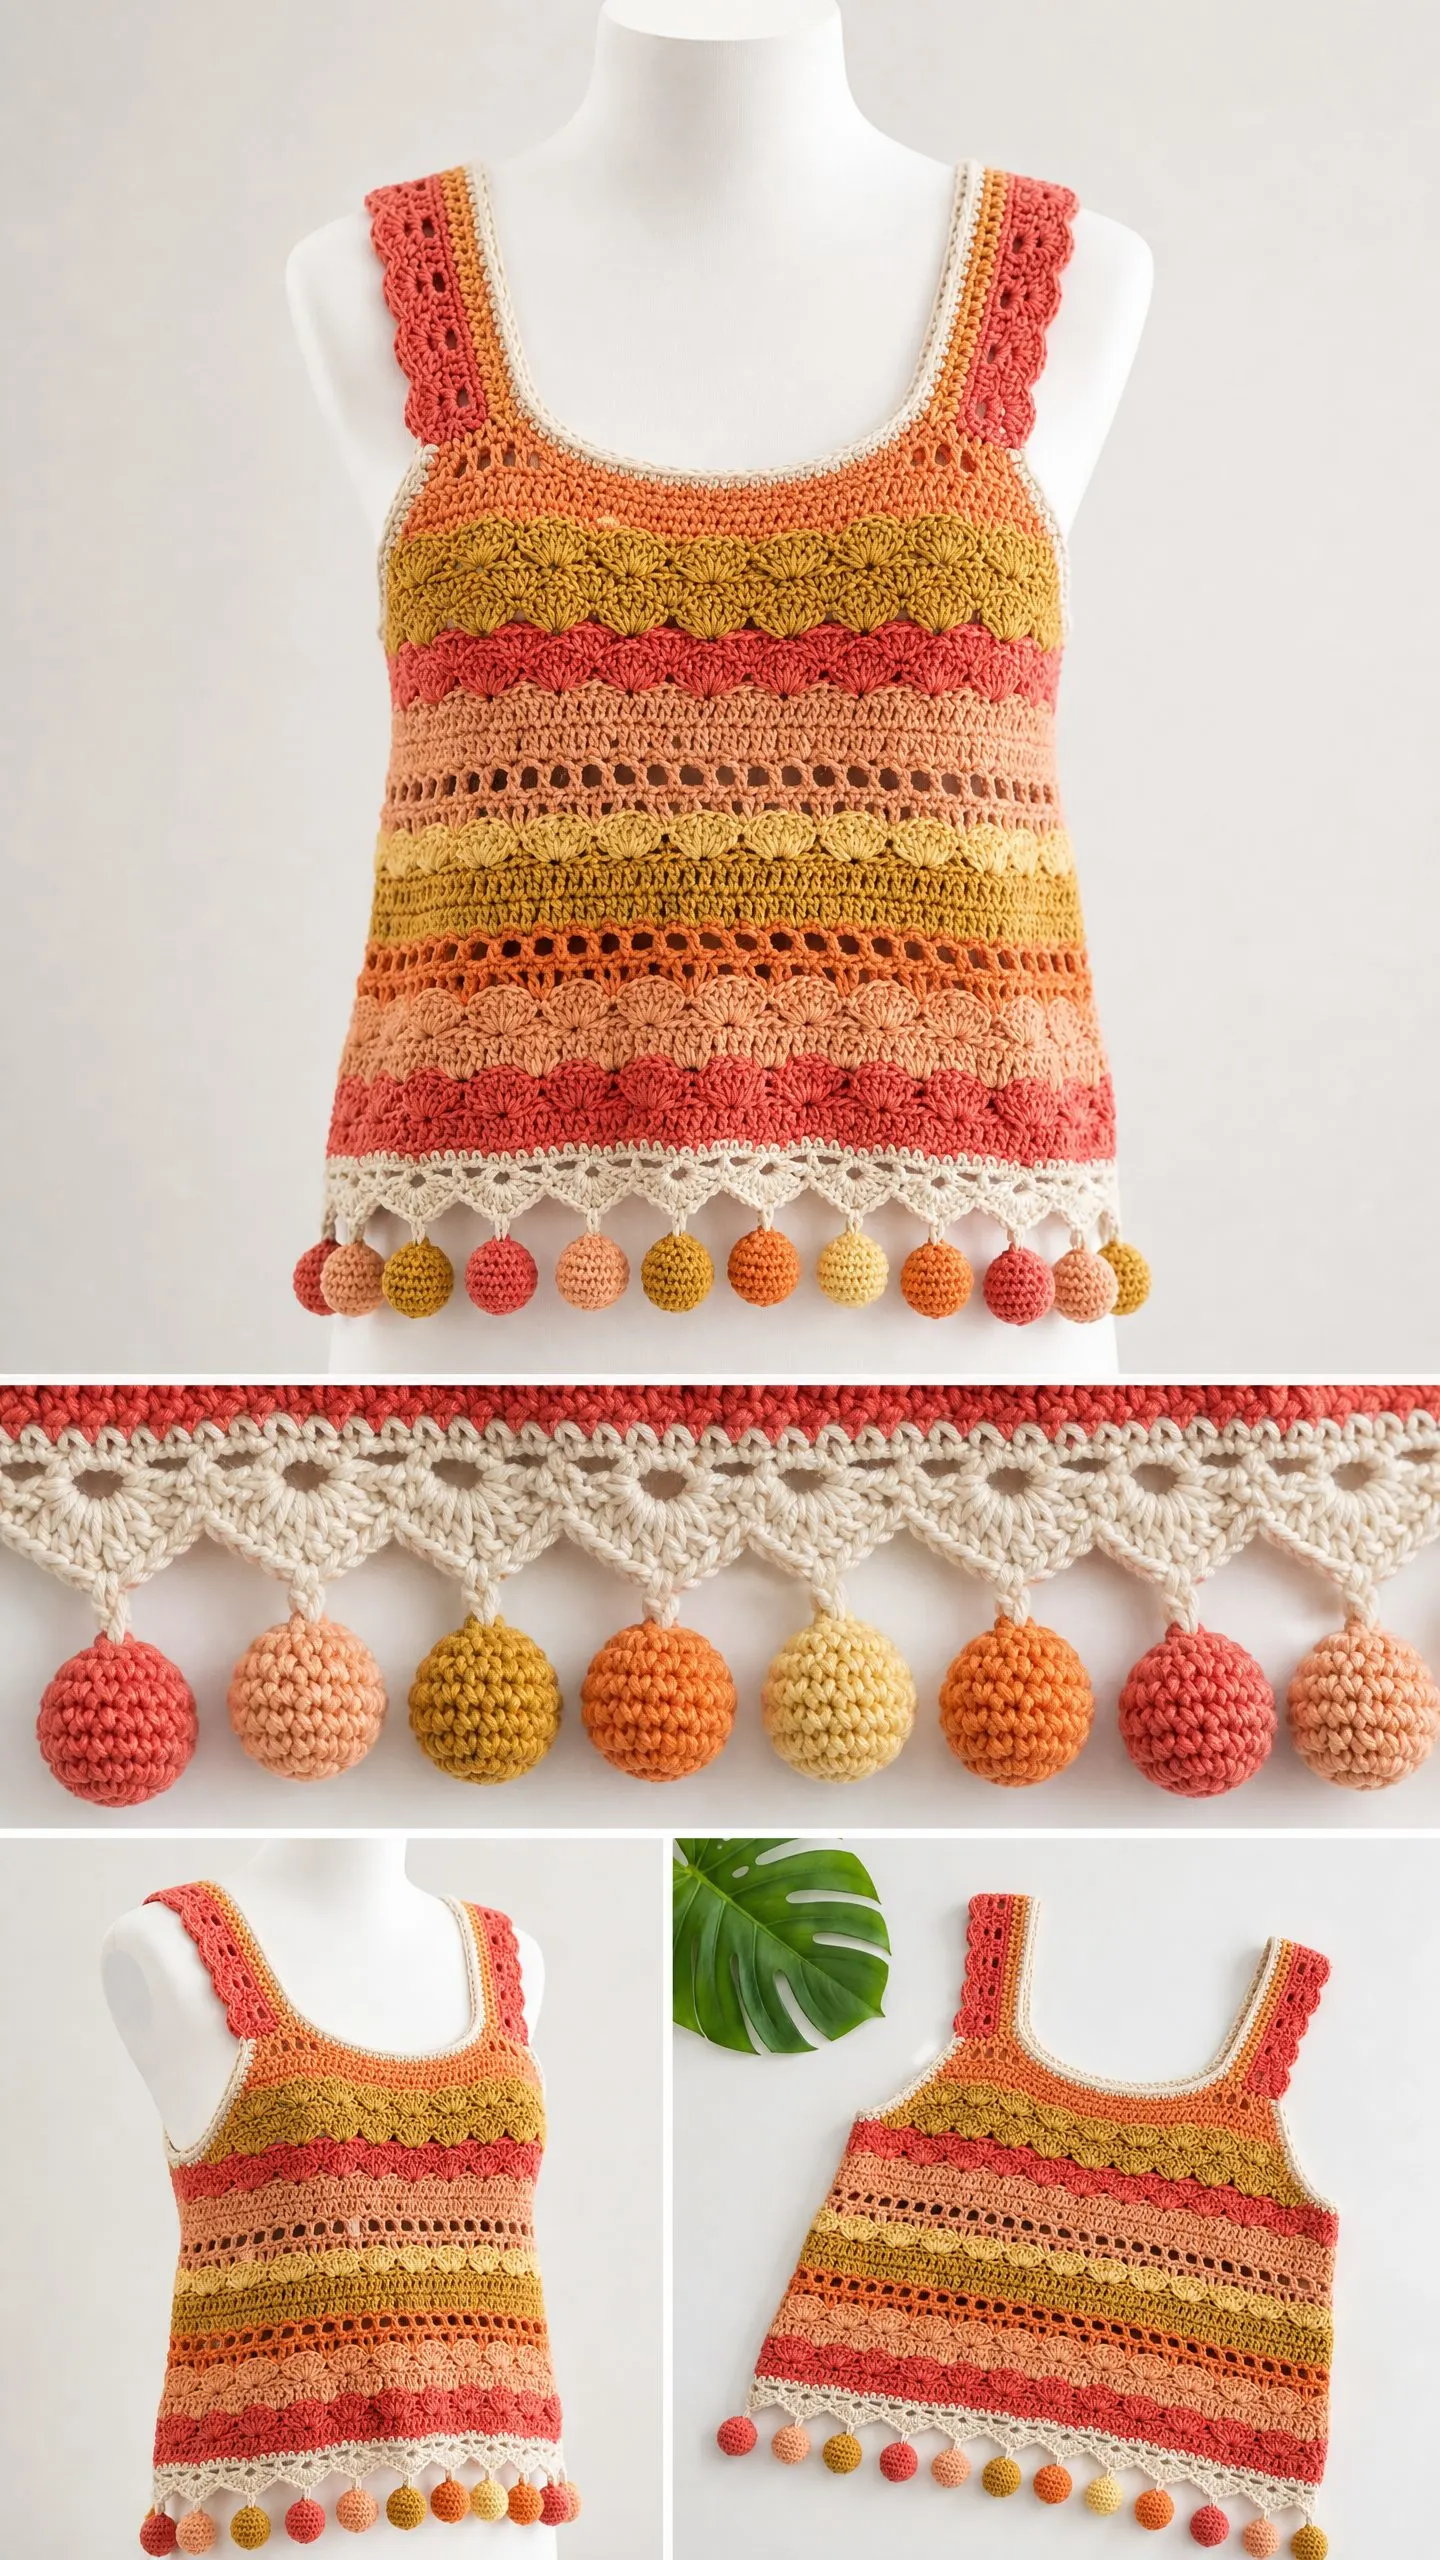
This striped boho crop tank features alternating shell stitch bands, lace mesh rows, and a cream picot border with crocheted ball fringe at the hem. Wide straps edged with a decorative shell border complete the retro sunset aesthetic that makes this piece absolutely unforgettable.
The tank is worked flat in two identical panels, which are then seamed at the sides. You’ll finish with strap edging and that stunning pompom hem border that gives it all the personality. The body is composed of horizontal stripes in five sunset colors worked in a repeating sequence of shell stitch rows and open mesh rows.
The crop length hits at or just above the natural waist, making it perfect for pairing with high-waisted jeans, flowy skirts, or layering over a fitted tank.
Skill Level
This pattern is rated intermediate. You’ll need confidence with shell stitches, mesh/lace rows, color changes at the end of rows, seaming, and crocheted ball construction. No advanced shaping calculations are needed, but neatness with color joins and clean finishing of 15 to 20 individual pompom balls is expected.
If you can work basic double crochet and single crochet confidently, and you’ve done at least one project with color changes, you can absolutely tackle this. I’ll walk you through everything.
Time Estimate
Plan for about 14 to 20 hours for a single size, including pompom construction and finishing. The body panels work up relatively quickly once you get into the rhythm of the shell stitch pattern. The pompoms take a bit of time, but they’re a great portable project. You can make them while watching TV!
Finished Measurements
The pattern is written for size Small/Medium, fitting a bust of 34 to 36 inches (86 to 91 cm).
Finished bust circumference (both panels): 36 in / 91 cm (18 in / 46 cm per panel)
Finished length (shoulder to hem): approximately 18 in / 46 cm
Strap width: approximately 2.25 in / 5.75 cm
The crop hem sits approximately 1 inch above the natural waist for a size Small/Medium.
Materials Needed
Yarn
You’ll need DK weight yarn (CYCA 3 Light) in six colors. I recommend 100% cotton or a cotton blend for the best drape and breathability. Here’s the yardage breakdown:
Recommended Yarn Brands
Lion Brand 24/7 Cotton in Coral, Tangerine, Goldenrod, Peach, Salmon, and Ecru works beautifully. This yarn has excellent stitch definition and is fully machine washable.
Paintbox Yarns Simply DK in Lipstick Red, Sherbet Orange, Mustard Yellow, Vintage Pink, and Champagne White is a budget-friendly option with clean color saturation.
Paintbox Yarns Cotton DK in Tomato Red, Mandarin Orange, Daffodil Yellow, Blush Pink, and Cream gives excellent drape and a soft hand against skin.
Hooks
Notions
Gauge
With E-4 (3.5 mm) hook in the shell stitch pattern:
4 shells wide x 5 rows = 4 in / 10 cm square
Alternatively: 18 dc = 4 in / 10 cm; 8 rows = 4 in / 10 cm
To check your gauge, work a foundation chain of 37. Work the shell stitch setup row and 5 rows of the stripe pattern. Block lightly and measure the center 4 inches only.
Gauge is critical for fit. Please don’t skip the swatch! Cotton yarn behaves differently than acrylic and doesn’t stretch to forgive gauge variations.
Abbreviations and Stitch Definitions
Here are all the stitches and abbreviations you’ll need, defined in plain language:
ch: chain. Wrap yarn over hook, pull through loop on hook.
sl st: slip stitch. Insert hook, yarn over, pull through stitch and loop on hook in one motion.
sc: single crochet. Insert hook, yarn over, pull up a loop (2 loops on hook), yarn over, pull through both loops.
dc: double crochet. Yarn over, insert hook, yarn over, pull up a loop (3 loops), yarn over, pull through 2 loops, yarn over, pull through remaining 2 loops.
hdc: half double crochet. Yarn over, insert hook, yarn over, pull up a loop (3 loops), yarn over, pull through all 3 loops.
st(s): stitch(es)
sp(s): space(s)
ch-sp: chain space. The hole or gap created by chain stitches.
rep: repeat
beg: beginning
sk: skip
yo: yarn over
RS: right side
WS: wrong side
t-ch: turning chain
pm: place marker
BLO: back loop only
approx: approximately
rem: remaining
tog: together
Special Stitches for This Crochet Pattern
Shell Stitch (sh)
Work 5 dc all into the same stitch or space. This creates a fan-shaped cluster that’s the signature element of this tank.
Picot
Ch 3, sl st into the first of those 3 chains. This creates a small decorative loop along the neckline.
Sc2tog (single crochet 2 together)
This is a decrease stitch. Insert hook into next st, yo, draw up a loop. Insert hook into following st, yo, draw up a loop. Yo and draw through all 3 loops on hook. One decrease made!
Dc2tog (double crochet 2 together)
Another decrease. (Yo, insert hook into next st, yo, draw up a loop, yo, pull through 2 loops) twice. Yo, draw through all 3 remaining loops.
Mesh Row (Lace Row)
(Ch 2, sk 2 sts or ch-sp, dc in next st) across. This creates an open ladder-like row of evenly spaced chains that adds lovely texture between the shell rows.
V-Stitch
(Dc, ch 1, dc) all into the same stitch or space.
Crocheted Ball Pompom
These adorable little balls are worked in the round and stuffed lightly. Here’s how:
Round 1: Using D-3 hook and chosen color, make a magic ring. Work 6 sc into ring. Pull ring closed. (6 sc)
Round 2: Work 2 sc into each st around. (12 sc)
Round 3: (Sc in next st, 2 sc in next st) 6 times. (18 sc)
Round 4: Sc in each st around. (18 sc)
Round 5: (Sc in next st, sc2tog) 6 times. (12 sc)
Begin stuffing the ball with scrap yarn or fiber fill.
Round 6: Sc2tog 6 times. (6 sc)
Fasten off, leaving a 12-in / 30-cm tail. Thread tail through remaining 6 sts, pull tight to close. The ball should be approximately 1.25 in / 3 cm in diameter.
Important Pattern Notes
Before you begin, read through these notes. They’ll save you confusion later!
The tank is worked in two flat panels. Both panels are identical. After blocking, they’re seamed together at the sides, leaving armhole openings. Then strap and neckline edging is worked.
The stitch repeat for the shell pattern is a multiple of 6 plus 4. The foundation chain for each panel is 103 chains, yielding 16 complete shell repeats plus the edge stitches.
Color changes are made on the last yarn-over of the last stitch in a row. Pull the new color through to complete the stitch, then chain the appropriate number of turning chains in the new color.
When carrying yarn up the side, do so only if the same color will return within 3 rows. For longer gaps, fasten off and rejoin.
The turning chain counts as follows: Ch 3 counts as first dc. Ch 1 counts as part of a chain space. Ch 2 counts as the first dc in mesh rows.
Work with consistent tension. Cotton yarn does not stretch to forgive gauge variations the way acrylic does.
To minimize ends, crochet over the carried yarn tails when working the first few stitches of each new section.
Body Panel Instructions (Make 2 Identical Panels)
The panel is worked from the bottom hem upward. The lower border is attached after seaming.
Foundation Chain
With Color A and E-4 hook, ch 103.
Row 1 (RS, setup row)
Dc in 4th ch from hook (counts as first dc), dc in same ch (beg half shell made), sk 2 ch, sc in next ch, (sk 2 ch, sh in next ch, sk 2 ch, sc in next ch) 16 times, sk 2 ch, 3 dc in last ch (half shell made). Turn. (16 shells + 2 half shells + 16 sc)
Row 2 (WS, shell row)
Ch 3, turn. 2 dc in first sc (partial shell), (sc in center dc of next sh, sh in next sc) 15 times, sc in center dc of last sh, 3 dc in top of t-ch. Change to Color F in last yo. Turn. (15 full shells + 2 half shells at edges + 16 sc; 100 working sts)
Row 3 (mesh/lace row, Color F)
Ch 3, turn. Dc in same st, ch 1, (sk 2 sts, dc in next sc, ch 1, sk 2 sts, dc in center of sh, ch 1) 16 times, sk 2 sts, dc in same turning ch top, dc in top of t-ch. Change to Color B in last yo. Turn. (Approx 34 dc + 33 ch-1 sps across)
Row 4 (shell row, Color B)
Ch 1, turn. Sc in first dc, (sh in next dc, sc in next dc) 16 times, sh in next dc, sc in top of t-ch. Change to Color C in last yo. Turn. (16 shells + 17 sc; 100 working sts)
Row 5 (shell row, Color C)
Ch 3, turn. 2 dc in first sc, (sc in center of next sh, sh in next sc) 15 times, sc in center of last sh, 3 dc in last sc. Change to Color F in last yo. Turn. (15 full shells + 2 half shells + 16 sc; 100 working sts)
Row 6 (mesh row, Color F)
Ch 3, turn. (Ch 1, sk 1, dc in next st) across, ending dc in top of t-ch. Change to Color D in last yo. Turn. (34 dc + 33 ch-1 sps; 100 working sts)
Row 7 (shell row, Color D)
Ch 1, turn. Sc in first dc, (sh in next ch-1 sp or dc, sc in next dc) across, ending sc in top of t-ch. Change to Color A in last yo. Turn. (16 shells + 17 sc; 100 working sts)
Row 8 (shell row, Color A)
Ch 3, turn. 2 dc in first sc, (sc in center of next sh, sh in next sc) 15 times, sc in center of last sh, 3 dc in last sc. Change to Color F in last yo. Turn. (15 full shells + 2 half shells + 16 sc; 100 working sts)
Row 9 (mesh row, Color F)
Ch 3, turn. (Ch 1, sk 1, dc in next st) across, ending dc in top of t-ch. Change to Color E in last yo. Turn. (34 dc + 33 ch-1 sps; 100 working sts)
Row 10 (shell row, Color E)
Ch 1, turn. Sc in first dc, (sh in next dc or ch-sp, sc in next dc) across, ending sc in top of t-ch. Change to Color C in last yo. Turn. (16 shells + 17 sc; 100 working sts)
Row 11 (shell row, Color C)
Ch 3, turn. 2 dc in first sc, (sc in center of next sh, sh in next sc) 15 times, sc in center of last sh, 3 dc in last sc. Change to Color F in last yo. Turn. (15 full shells + 2 half shells + 16 sc; 100 working sts)
Row 12 (mesh row, Color F)
Ch 3, turn. (Ch 1, sk 1, dc in next st) across, ending dc in top of t-ch. Change to Color B in last yo. Turn. (34 dc + 33 ch-1 sps; 100 working sts)
Row 13 (shell row, Color B)
Ch 1, turn. Sc in first dc, (sh in next dc or ch-sp, sc in next dc) across, ending sc in top of t-ch. Change to Color D in last yo. Turn. (16 shells + 17 sc; 100 working sts)
Row 14 (shell row, Color D)
Ch 3, turn. 2 dc in first sc, (sc in center of next sh, sh in next sc) 15 times, sc in center of last sh, 3 dc in last sc. Change to Color F in last yo. Turn. (15 full shells + 2 half shells + 16 sc; 100 working sts)
Row 15 (mesh row, Color F)
Ch 3, turn. (Ch 1, sk 1, dc in next st) across, ending dc in top of t-ch. Change to Color A in last yo. Turn. (34 dc + 33 ch-1 sps; 100 working sts)
Row 16 (shell row, Color A)
Ch 1, turn. Sc in first dc, (sh in next dc or ch-sp, sc in next dc) across, ending sc in top of t-ch. Change to Color C in last yo. Turn. (16 shells + 17 sc; 100 working sts)
Row 17 (shell row, Color C)
Ch 3, turn. 2 dc in first sc, (sc in center of next sh, sh in next sc) 15 times, sc in center of last sh, 3 dc in last sc. Change to Color F in last yo. Turn. (15 full shells + 2 half shells + 16 sc; 100 working sts)
Row 18 (mesh row, Color F)
Ch 3, turn. (Ch 1, sk 1, dc in next st) across, ending dc in top of t-ch. Change to Color E in last yo. Turn. (34 dc + 33 ch-1 sps; 100 working sts)
Row 19 (shell row, Color E)
Ch 1, turn. Sc in first dc, (sh in next dc or ch-sp, sc in next dc) across, ending sc in top of t-ch. Change to Color A in last yo. Turn. (16 shells + 17 sc; 100 working sts)
Row 20 (shell row, Color A)
Ch 3, turn. 2 dc in first sc, (sc in center of next sh, sh in next sc) 15 times, sc in center of last sh, 3 dc in last sc. Change to Color F in last yo. Turn. (15 full shells + 2 half shells + 16 sc; 100 working sts)
Checkpoint 1: After Row 20, your panel should measure approximately 10 in / 25.5 cm wide (unstretched) and approximately 9 in / 23 cm tall from the foundation chain. The stripe sequence should show approximately 6 to 7 distinct color bands alternating with cream mesh rows.
Row 21 (mesh row, Color F)
Ch 3, turn. (Ch 1, sk 1, dc in next st) across, ending dc in top of t-ch. Change to Color B in last yo. Turn. (34 dc + 33 ch-1 sps; 100 working sts)
Row 22 (shell row, Color B)
Ch 1, turn. Sc in first dc, (sh in next dc or ch-sp, sc in next dc) across, ending sc in top of t-ch. Change to Color D in last yo. Turn. (16 shells + 17 sc; 100 working sts)
Row 23 (shell row, Color D)
Ch 3, turn. 2 dc in first sc, (sc in center of next sh, sh in next sc) 15 times, sc in center of last sh, 3 dc in last sc. Change to Color F in last yo. Turn. (15 full shells + 2 half shells + 16 sc; 100 working sts)
Row 24 (mesh row, Color F)
Ch 3, turn. (Ch 1, sk 1, dc in next st) across, ending dc in top of t-ch. Change to Color C in last yo. Turn. (34 dc + 33 ch-1 sps; 100 working sts)
Row 25 (shell row, Color C)
Ch 1, turn. Sc in first dc, (sh in next dc or ch-sp, sc in next dc) across, ending sc in top of t-ch. Change to Color A in last yo. Turn. (16 shells + 17 sc; 100 working sts)
Row 26 (shell row, Color A)
Ch 3, turn. 2 dc in first sc, (sc in center of next sh, sh in next sc) 15 times, sc in center of last sh, 3 dc in last sc. Change to Color F in last yo. Turn. (15 full shells + 2 half shells + 16 sc; 100 working sts)
Row 27 (mesh row, Color F)
Ch 3, turn. (Ch 1, sk 1, dc in next st) across, ending dc in top of t-ch. Change to Color E in last yo. Turn. (34 dc + 33 ch-1 sps; 100 working sts)
Row 28 (shell row, Color E)
Ch 1, turn. Sc in first dc, (sh in next dc or ch-sp, sc in next dc) across, ending sc in top of t-ch. Change to Color B in last yo. Turn. (16 shells + 17 sc; 100 working sts)
Row 29 (shell row, Color B)
Ch 3, turn. 2 dc in first sc, (sc in center of next sh, sh in next sc) 15 times, sc in center of last sh, 3 dc in last sc. Change to Color F in last yo. Turn. (15 full shells + 2 half shells + 16 sc; 100 working sts)
Checkpoint 2: After Row 29, your panel should measure approximately 18 in / 46 cm wide (blocked) and approximately 13.5 in / 34 cm tall. You are now beginning the neckline and armhole shaping section.
Neckline and Armhole Shaping
The upper portion of the panel narrows at the center to form the scoop neckline, leaving two strap columns at each side. The panel is divided into three sections: Left Strap, Neckline Drop, and Right Strap. Each strap spans 3 shells wide (approximately 19 sts each side).
Right Strap (Work First)
Row 30 (RS, shell row, Color A): Ch 1, turn. Sc in first dc. (Sh in next sc, sc in center of next sh) 2 times. Sh in next sc. Sc in center of next sh. Leave remaining sts unworked. Turn. (3 shells + 4 sc across right strap = 19 working sts)
Row 31 (Color F, mesh row): Ch 3, turn. (Ch 1, sk 1, dc in next st) 9 times, dc in last sc. Turn. (10 dc + 9 ch-1 sps = 19 sts)
Row 32 (Color C, shell row): Ch 1, turn. Sc in first dc, (sh in next dc or ch-sp, sc in next dc) 3 times. Turn. (3 shells + 4 sc = 19 sts)
Row 33 (Color F, mesh row): Ch 3, turn. (Ch 1, sk 1, dc in next st) across. Turn. (10 dc + 9 ch-1 sps = 19 sts)
Fasten off. This completes the right strap column.
Left Strap
Skip the center 62 sts (neckline opening). Rejoin Color A at the 63rd stitch from the right edge, at the sc position that would begin the left strap.
Row 30L (RS, shell row, Color A): Ch 1, sc in joining st. (Sh in next sc, sc in center of next sh) 2 times. Sh in next sc. Sc in center of last sh. Turn. (3 shells + 4 sc = 19 sts)
Row 31L (Color F, mesh row): Ch 3, turn. (Ch 1, sk 1, dc in next st) across. Turn. (10 dc + 9 ch-1 sps = 19 sts)
Row 32L (Color C, shell row): Ch 1, turn. Sc in first dc, (sh in next dc or ch-sp, sc in next dc) 3 times. Turn. (3 shells + 4 sc = 19 sts)
Row 33L (Color F, mesh row): Ch 3, turn. (Ch 1, sk 1, dc in next st) across. Turn. (10 dc + 9 ch-1 sps = 19 sts)
Fasten off. This completes the left strap column.
Checkpoint 3: Each completed panel (before edging) should measure 18 in / 46 cm wide at the widest point and approximately 15 in / 38 cm tall to the top of the strap. The center neckline opening at the top of each panel should be approximately 10 in / 25.5 cm wide.
Assembly Instructions
Block both panels before seaming. This step makes a huge difference with cotton yarn!
Lay panels with wrong sides together. Using Color A and your yarn needle, whipstitch the side seams together, beginning at the bottom edge and ending 6 in / 15 cm from the top of the body portion. This leaves the upper 6 in / 15 cm open as armhole openings.
Whipstitch through the outermost loop of each row-end stitch for a clean seam. Match row counts carefully. The seam should be firm but not puckering.
Checkpoint 4: After seaming, the tank should measure 36 in / 91 cm around the bust. The armhole openings should each measure approximately 6 in / 15 cm tall.
Align the strap tops of the front and back panels. Using Color F and your yarn needle, whipstitch the strap tops together at the shoulder points, approximately 0.5 in / 1.25 cm inward from each outer edge.
Strap and Armhole Edging
With Color A and E-4 hook, join yarn at the base of one armhole opening on the side seam.
Round 1 (edging, Color A): Sc evenly around the entire armhole opening and strap edge, working approximately 1 sc per row-end st along the body, 1 sc per st across strap top, and 1 sc per row-end st back down the other side. Target stitch count: approximately 80 sc total around one complete armhole-strap loop. Sl st to join. (80 sc)
Round 2 (shell edging, Color A): Ch 3, sk 1 sc, (sh in next sc, sk 2 sc, sc in next sc, sk 2 sc) around, adjusting final repeat to join cleanly. Sl st to first ch-3. Fasten off. Weave in end.
Note: If 80 sc does not divide perfectly into the shell edging multiple of 6, work sc2tog at one inconspicuous point under the arm to reach the nearest multiple of 6 before working Round 2.
Repeat armhole edging on second armhole.
Neckline Edging
With Color F and E-4 hook, join at the left shoulder seam.
Round 1 (Color F): Sc evenly around the entire neckline opening. At the front neckline base, work approximately 1 sc per every 2 row-end sts for flatness. Total target: approximately 96 sc. Sl st to join. (96 sc)
Round 2 (picot edging, Color F): Ch 1, sc in first sc, (picot, sk 1 sc, sc in next sc) around. Sl st to join. Fasten off. (48 picots)
Lower Border
After both panels are seamed together at the sides, the lower border is worked across the foundation chain edge of both panels, working in the round.
Round 1 (border setup, Color F): Join Color F to the bottom right-hand corner of the joined panels. With RS facing, work 1 sc in each foundation chain st across the front panel, sc in the side seam, 1 sc in each foundation chain st across the back panel, sc in the second side seam. Sl st to join. (204 sc total)
Round 2 (picot shell border, Color F): Ch 3, (sh in sc 3 sts ahead, sk 2, sc in next sc, sk 2, sh in next sc) around, ending with sl st to top of ch-3. (34 shells + 34 sc)
Round 3 (Color F): Ch 1, sc in each st and ch of each sh around. (204 sc)
Round 4 (pompom attachment round, Color F): Ch 5, sl st in 3rd ch from hook (picot made), (ch 2, sk 2 sc, sl st in next sc, ch 5, sl st in 3rd ch from hook) around. Sl st to join. Fasten off.
This creates loops and picot points along the lower edge where you’ll attach the crocheted ball pompoms.
Crocheted Ball Pompoms
Make the following quantities using D-3 hook:
Total: 16 balls. Adjust quantity based on your finished lower border length. Aim for a pompom roughly every 2 in / 5 cm around the lower edge.
Attaching the Pompoms
Thread the long tail from each ball through your yarn needle. Draw the tail through a picot loop on the lower border. Draw the tail back through the ball itself once, then tie securely and weave in the end inside the ball for an invisible finish.
Alternate colors as you attach them, loosely following the color sequence from warm (coral) to cool (blush) and back again. Or attach randomly for a more playful look!
Finishing and Blocking Tips
Weave in all remaining ends before the final blocking. For cotton yarn, wet blocking gives the best results. Soak the finished tank in lukewarm water for 15 to 20 minutes, gently squeeze out excess water (don’t wring!), and lay flat on your blocking mat.
Pin the tank to the correct measurements, paying special attention to keeping the shell stitches open and the straps even. Let dry completely before unpinning.
Customization Ideas
Want to make this tank your own? Here are some ideas:
For a longer length: Add additional stripe repeats before beginning the neckline shaping. Each additional stripe sequence adds approximately 2 inches.
For a deeper neckline: Begin the strap shaping 2 to 4 rows earlier.
Without pompoms: The tank looks beautiful without the ball fringe too! Simply end after Round 3 of the lower border for a cleaner finish.
Different colors: Try cool tones like teals, blues, and purples for an ocean vibe. Or go neutral with creams, tans, and soft browns.
Final Thoughts
Thank you so much for choosing this pattern! I hope you love making your Sunset Ombre Pompom Crochet Tank as much as I loved designing it. If you make one, I would absolutely love to see it. Tag me on Instagram or share it in my Facebook group. There’s nothing better than seeing your beautiful creations come to life!
If this pattern brightened your day, go ahead and pin it to your Pinterest boards so you can find it easily later. And please drop a comment below if you make one. I read every single comment, and your photos and feedback make my whole week. Happy crocheting!
You Might Also Like
- Sunset Ombre Jellyfish Trio Free Crochet Pattern
- Pastel Garden Granny Square Tote Free Crochet Pattern
- Woodland Fox Ear Baby Beanie Free Crochet Pattern
- Ocean Wave Blue Striped Clutch Free Crochet Pattern
