
I have been dreaming about designing a show-stopping lace cardigan for years. Something that would combine every texture I love into one unforgettable piece. I wanted dense ribbing at the waist for structure, open diamond mesh across the chest for breathability, and those gorgeous pineapple motifs on the sleeves that make crocheters stop and stare. This cardigan had to work across multiple sizes, feel like an heirloom piece the moment you put it on, and showcase the kind of detailed lacework that Victorian seamstresses would have admired.
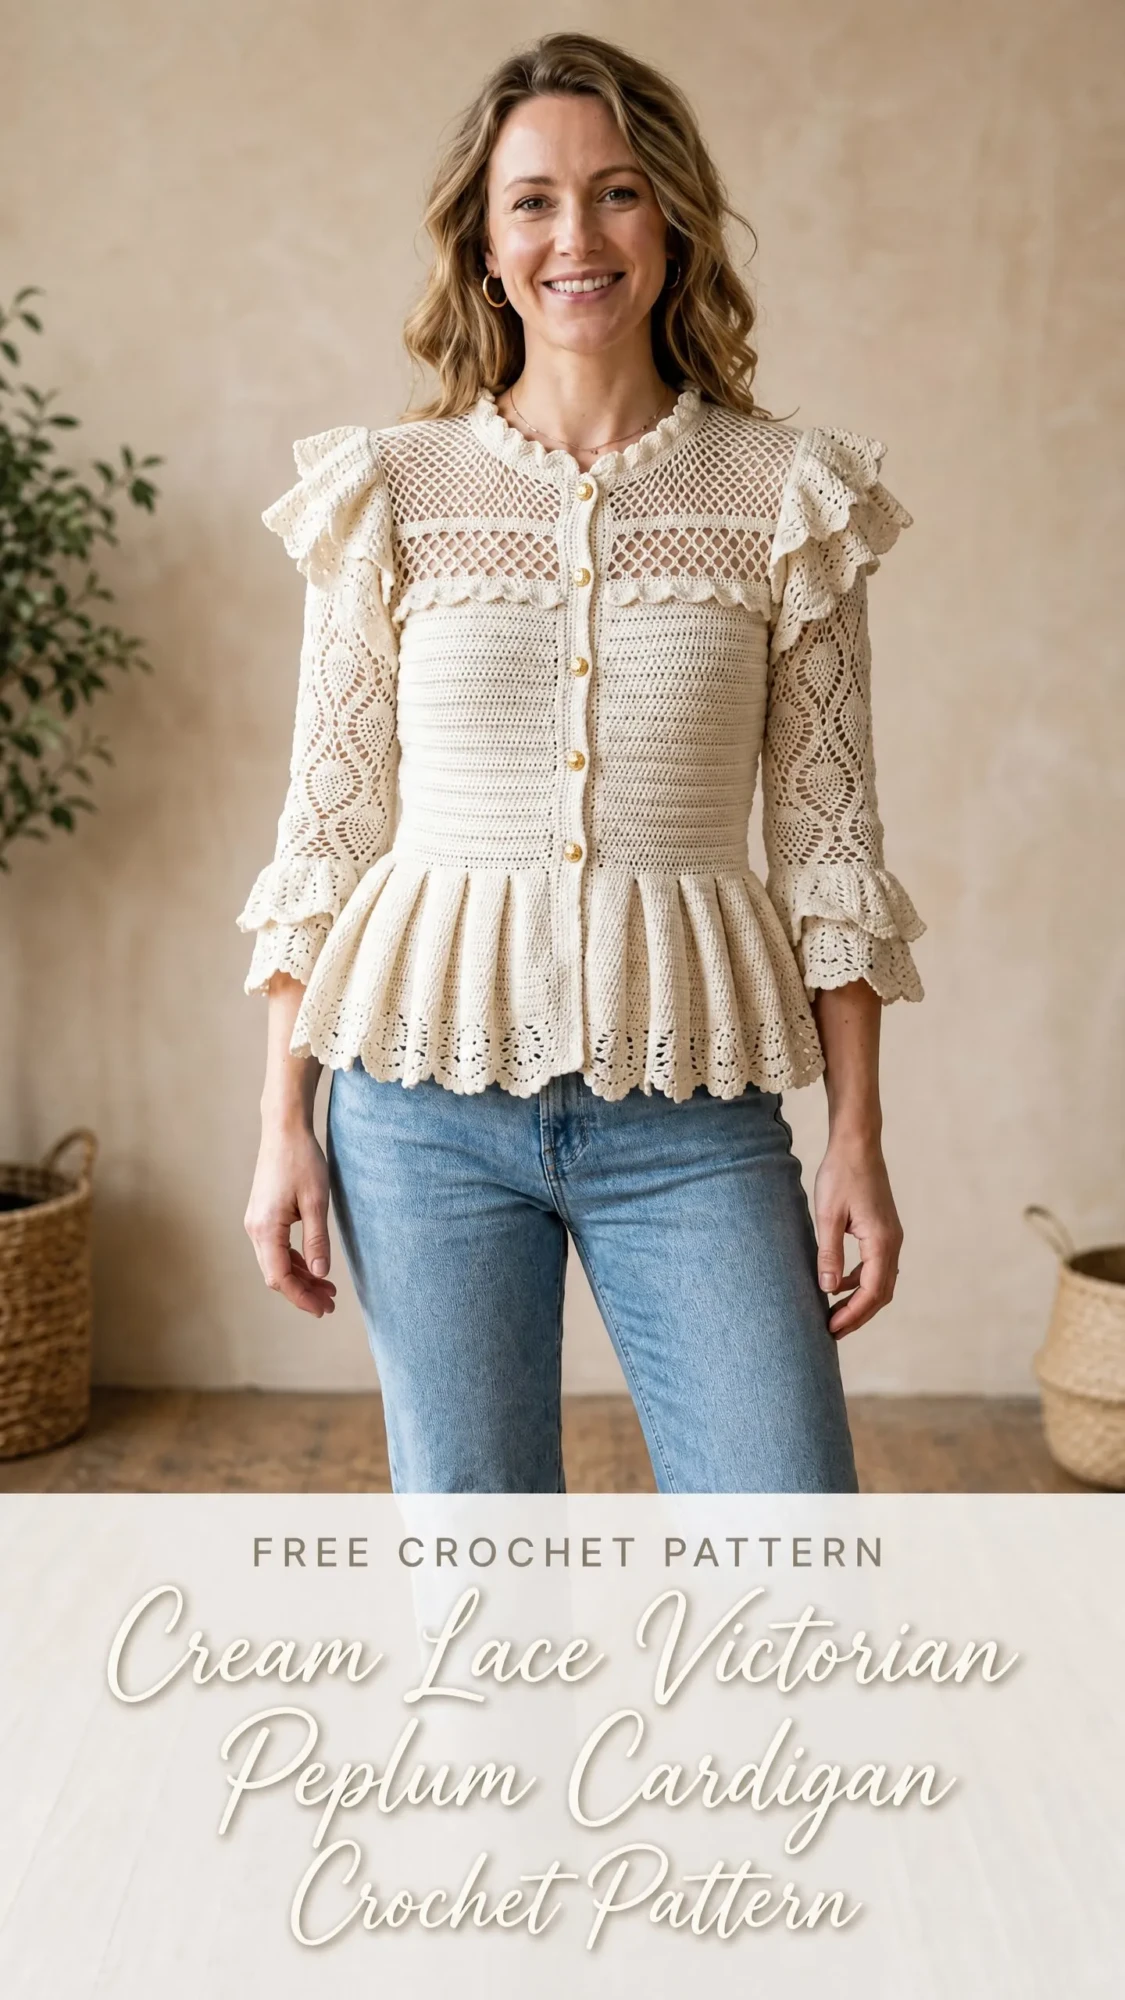
After countless hours of swatching, frogging, and refining, I am SO thrilled with how this turned out. The fitted waist flows into a dreamy pleated peplum. The cascading ruffles at the shoulders and cuffs add romantic movement without overwhelming the design. Every single texture reads beautifully in that creamy cotton yarn.
This is absolutely an advanced project. I want to be honest about that upfront. But if you have a few garments under your belt and you are ready to challenge yourself with something truly spectacular, this pattern will reward every stitch of effort you put in. Let me walk you through everything you need to know.
What Makes This Cardigan Special
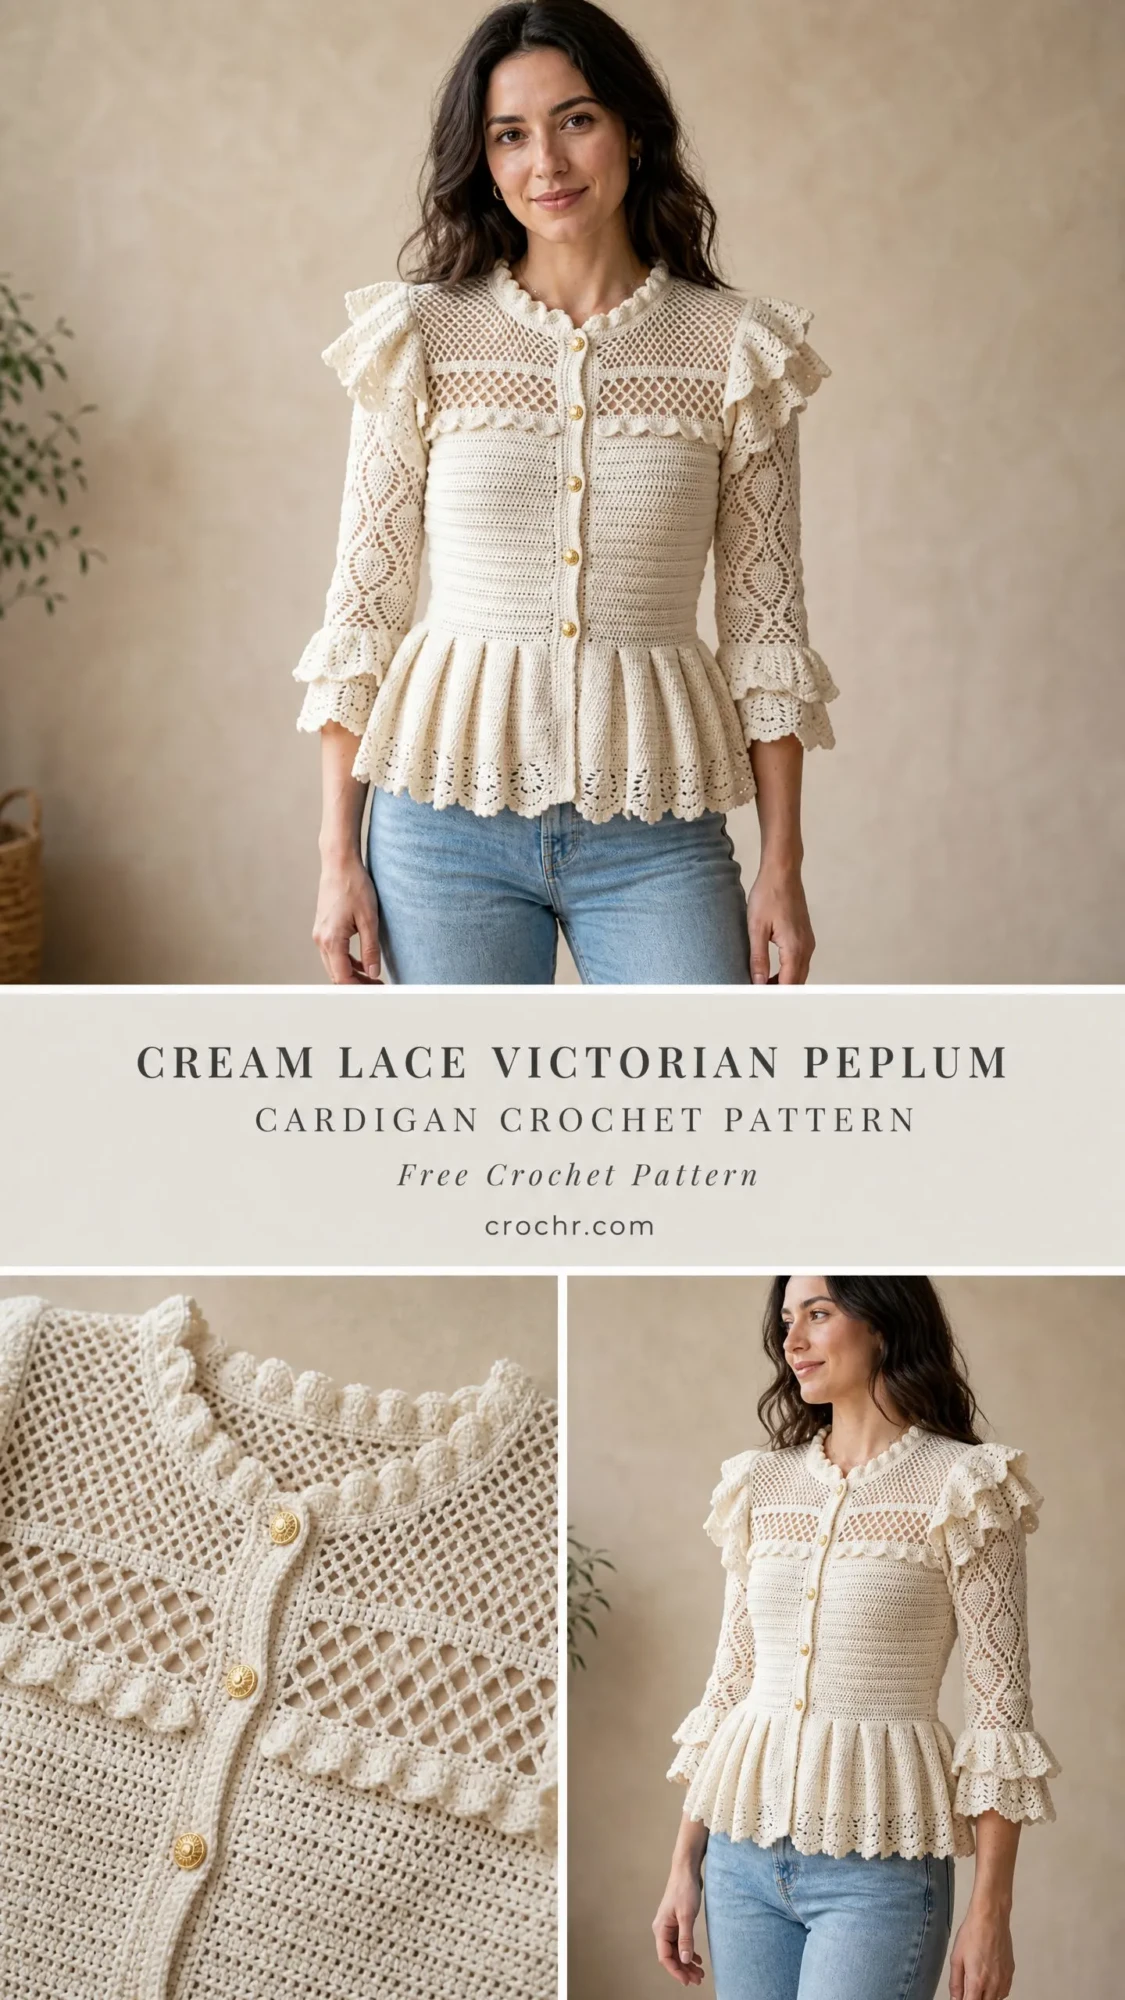
This heirloom-quality cardigan combines multiple crochet textures into a fitted, feminine silhouette inspired by Victorian lacework traditions. The construction features a structured bodice worked in dense single crochet ribbing at the waist, an open diamond mesh yoke and upper chest panel, intricate pineapple motif sleeves, a full peplum hem with scalloped edging, and cascading ruffle trim at the shoulders, sleeve cuffs, and front band.
Five decorative gold shank buttons close the center front, adding just the right amount of warmth and polish. The cream color allows every stitch texture to read clearly, which is exactly what you want when you are putting this much love into a piece.
The construction is worked in separate pieces. You will make a back panel, a left front panel, a right front panel, and two sleeves. Then everything gets seamed together, with ruffles and edgings applied afterward.
Skill Level and Time Commitment
This pattern requires comfort with working in turning chains consistently across pattern changes, reading multiple stitch pattern sections within one piece, seaming crocheted fabric neatly, constructing pineapple motifs in the round on sleeves, and applying layered ruffles with controlled fullness.
I recommend having several garment projects completed before attempting this design. If you are a confident intermediate crocheter who has made sweaters or cardigans before, you can absolutely tackle this with patience and careful attention to the instructions.
Time estimate: Approximately 80 to 120 hours for a size Medium, depending on your experience level. Set aside additional time for blocking and finishing. This is not a weekend project. Think of it as a labor of love that you will treasure for years.
Finished Measurements
This pattern is written for size Small (S), with changes for Medium (M), Large (L), and Extra Large (XL) in parentheses throughout.
Chest (buttoned): 34 (37, 40, 43) inches / 86.5 (94, 101.5, 109) cm
Waist: 28 (31, 34, 37) inches / 71 (78.5, 86.5, 94) cm
Hip at peplum base: 38 (41, 44, 47) inches / 96.5 (104, 112, 119.5) cm
Total length (shoulder to peplum hem): 22 (22.5, 23, 23.5) inches / 56 (57, 58.5, 59.5) cm
Sleeve length (underarm to cuff ruffle): 15 (15.5, 16, 16) inches / 38 (39.5, 40.5, 40.5) cm
Armhole depth: 7.5 (8, 8.5, 9) inches / 19 (20.5, 21.5, 23) cm
Materials You Will Need
Yarn
Main yarn: 100% mercerized cotton, DK weight (CYCA 3 Light), approximately 1,500 (1,650, 1,800, 1,950) yards / 1,372 (1,509, 1,646, 1,784) meters in cream or natural ecru.
Here are three excellent yarn options:
Option 1: Paintbox Yarns Cotton DK. 100% cotton, 273 yards / 250 meters per 100 g skein. This yarn has excellent stitch definition and a slight sheen that mimics the mercerized look in the finished garment. Purchase 6 (6, 7, 8) skeins in Champagne White or Vanilla Cream.
Option 2: Lion Brand 24/7 Cotton in DK weight. 100% mercerized cotton, 186 yards / 170 meters per 3.5 oz / 100 g skein. Widely available, consistent tension, and comes in Natural. Purchase 9 (9, 10, 11) skeins.
Option 3: Drops Safran. 100% Egyptian cotton, 175 yards / 160 meters per 50 g skein. Fine gauge with beautiful drape. Purchase 9 (10, 11, 12) skeins in Off White (color 17).
Substitution Note: Choose a smooth, tightly plied cotton or cotton blend DK yarn with good stitch definition. Avoid hairy or fuzzy fibers, as they will obscure the lace textures. If substituting with a linen cotton blend, expect a slightly stiffer hand that will soften considerably after washing and blocking. Always swatch in both stitch patterns before committing to a substitute.
Hooks
US size E-4 / 3.5 mm for bodice ribbing and solid sections.
US size F-5 / 3.75 mm for mesh and lace sections and sleeves.
Notions
Gauge
Using E-4 / 3.5 mm hook in single crochet (for bodice ribbing):
22 stitches x 24 rows = 4 inches / 10 cm, blocked.
Using F-5 / 3.75 mm hook in diamond mesh pattern (for yoke):
One 8-stitch diamond mesh repeat = approximately 1.5 inches / 3.8 cm wide; 4 rows of mesh = 1.5 inches / 3.8 cm tall, blocked.
Gauge is mandatory for this garment. A difference of even half a stitch per inch will cause significant sizing errors across the full chest width. Please make and block your swatches before beginning. I know swatching feels tedious, but trust me on this one. With a fitted garment like this, gauge really matters.
Abbreviations and Definitions
Let me walk you through every abbreviation you will encounter in this pattern:
Special Stitches for This Victorian Lace Cardigan
These special techniques create the beautiful textures throughout the garment:
Shell: Work 5 dc into the same stitch or space. This creates a fan-shaped cluster used in the peplum and ruffle edging.
Picot: Chain 3, slip stitch into the first chain made. This decorative knot is used along scalloped edges.
Pineapple Cluster (pc): [Yarn over, insert hook into designated stitch or space, yarn over and pull up a loop, yarn over and draw through 2 loops] 5 times in the same location. Yarn over and draw through all 6 loops on hook. This forms the rounded tip of each pineapple motif on the sleeves.
Double Treble Crochet (dtr): Yarn over 3 times, insert hook into stitch, yarn over and pull up a loop, [yarn over and draw through 2 loops] 4 times. This tall stitch forms the frame of pineapple motifs.
V-stitch (V-st): Work (dc, ch 2, dc) all into the same stitch or space.
Foundation Single Crochet (fsc): Used to start the back and front panels, this creates a foundation row with built-in turning chain height. Step 1: Chain 2. Step 2: Insert hook into second chain from hook, yarn over, pull up a loop (2 loops on hook). Yarn over, draw through 1 loop (the chain base is set), yarn over, draw through 2 loops (1 sc completed). Step 3: Insert hook into the single loop at the base of the stitch just made, yarn over, pull up a loop, yarn over, draw through 1 loop, yarn over, draw through 2 loops. Repeat Step 3 for each additional fsc.
Puff Stitch (puff): [Yarn over, insert hook into stitch, yarn over, pull up a loop to 1/2 inch] 3 times in the same stitch, yarn over, draw through all 7 loops on hook. Chain 1 to secure.
Scallop Edging Row: Slip stitch into first stitch, [skip 2 stitches, work 5 dc into next stitch, skip 2 stitches, slip stitch into next stitch] repeat across.
Ruffle Row: Work 3 dc into every stitch across (triples the stitch count to create gathered fullness).
Important Pattern Notes Before You Begin
Construction Method: This cardigan is worked flat in separate pieces (back panel, left front panel, right front panel, two sleeves) and then seamed at the shoulders and sides using a slip stitch seam on the wrong side. The peplum is picked up from the lower edge of the joined body and worked downward. Ruffles and edgings are all applied last.
Three Distinct Stitch Textures: The lower torso uses dense BLO single crochet to create a ribbed, elasticated texture. The mid-chest transition band uses open diamond mesh worked in dc and ch-2 spaces. The upper chest and yoke use a wider mesh grid.
Turning Chains: In single crochet sections, chain 1 at the start of each row; this chain does NOT count as a stitch. In double crochet sections, chain 3 at the start of each row; this chain DOES count as the first dc. In mesh sections, chain 5 at the start of each row; this counts as dc plus ch 2.
Hook Changes: Switch from E-4 to F-5 when transitioning from ribbing sections to any lace or mesh section. Switch back to E-4 for the peplum base rows.
Sizing: The four sizes are written with changes shown as S (M, L, XL). Where only one number appears, it applies to all sizes.
Seaming: Use a slip stitch seam worked on the wrong side with the E-4 hook, holding pieces with right sides together.
Blocking: This garment must be wet-blocked to open the lace fully and set the dimensions.
Step by Step Crochet Pattern Instructions
Back Panel
The back is worked from the lower torso upward. The lower section is BLO single crochet ribbing, the mid-section is diamond mesh, and the upper yoke is wider open mesh.
Using E-4 hook, work 94 (102, 110, 118) fsc. This foundation row serves as both the foundation chain and the first row of sc.
Back Panel Ribbing Section (Lower Torso)
Row 1 (RS): Ch 1, turn. Working in BLO, sc in each st across. (94, 102, 110, 118 sc)
Row 2 (WS): Ch 1, turn. Working in BLO, sc in each st across. (94, 102, 110, 118 sc)
Rows 3 through 10: Repeat Rows 1 and 2 four more times. (94, 102, 110, 118 sc after each row)
After Row 10, the ribbing section measures approximately 1.75 inches / 4.5 cm tall. This is the narrowest point that will sit at the natural waist.
Waist Shaping Increase Row (RS): Ch 1, turn. Working in BLO, sc in first 9 (10, 11, 12) sts, 2 sc in next st, [sc in next 9 (10, 11, 12) sts, 2 sc in next st] 8 times, sc in rem sts. (103, 111, 119, 127 sc)
Row 12: Ch 1, turn. Working in BLO, sc across. (103, 111, 119, 127 sc)
Row 13: Ch 1, turn. Working in BLO, sc across. (103, 111, 119, 127 sc)
Row 14: Ch 1, turn. Working in BLO, sc across. (103, 111, 119, 127 sc)
Row 15: Ch 1, turn. Working in BLO, sc across. (103, 111, 119, 127 sc)
Row 16: Ch 1, turn. Working in BLO, sc across. (103, 111, 119, 127 sc)
Checkpoint: After Row 16, the back panel should measure approximately 3.25 inches / 8.5 cm tall from the foundation row. The width at the widest point of the ribbing section should be approximately 18.75 (20.25, 21.75, 23.25) inches / 47.5 (51.5, 55, 59) cm when gently stretched to working width.
Back Panel Transition to Mesh (Middle Bodice)
Switch to F-5 hook.
The diamond mesh repeat used here is: [dc in st, ch 2, skip 2 sts] across, ending dc in last st.
Row A (RS): Ch 5 (counts as dc plus ch 2), turn. Skip first 3 sts, dc in next st, [ch 2, skip 2 sts, dc in next st] across to last 0 (0, 0, 0) sts. Turn.
For size S (103 sts): Row A produces 35 dc and 34 ch-2 spaces. (35 dc, 34 ch-2 sp)
For size M (111 sts): (38 dc, 37 ch-2 sp)
For size L (119 sts): (40 dc, 39 ch-2 sp)
For size XL (127 sts): (43 dc, 42 ch-2 sp)
Row B (WS): Ch 5, turn. Dc in first ch-2 sp, [ch 2, dc in next ch-2 sp] across, ch 2, dc in 3rd ch of beginning ch-5. Rep Row B for mesh section. (same mesh counts as Row A)
Rows 17 through 22 (6 mesh rows total): Work Rows A and B alternately. Maintain established mesh counts throughout.
After Row 22, the mesh middle section measures approximately 2.25 inches / 5.75 cm.
Back Panel Yoke Transition
The yoke uses a wider open mesh where ch-3 spaces replace ch-2 spaces, creating a slightly more open grid that matches the upper chest texture visible in the finished garment.
Row 23 (RS, Transition Row): Ch 6 (counts as dc plus ch 3), turn. Skip first ch-2 sp, dc in next dc post, [ch 3, dc in next dc post] across. (same dc post count as mesh section)
Row 24 (WS): Ch 6, turn. Dc in first ch-3 sp, [ch 3, dc in next ch-3 sp] across, ch 3, dc in 3rd ch of beg ch-6. (same dc post count)
Rows 24 through 32 (9 yoke rows total including Row 23): Work Row 24 pattern throughout.
Checkpoint: After Row 32, the back panel from foundation to current row should measure approximately 8 inches / 20.5 cm tall. The piece is now at the armhole shaping point.
Back Armhole Shaping
Row 33 (RS, Armhole Shaping): Sl st across first 2 dc posts and into the 3rd dc post, ch 6, work wide mesh across until 2 dc posts remain at end of row, turn, leaving last 2 dc posts unworked.
Size S: (31 dc posts)
Size M: (34 dc posts)
Size L: (36 dc posts)
Size XL: (39 dc posts)
Row 34 (WS): Ch 6, turn. Work wide mesh across, dc into 3rd ch of beg ch-6. (same counts as Row 33)
Row 35 (RS): Ch 6, turn. Skip first ch-3 sp, sl st into first dc post, ch 6, work wide mesh across until last dc post, turn, leaving final post unworked.
Size S: (29 dc posts)
Size M: (32 dc posts)
Size L: (34 dc posts)
Size XL: (37 dc posts)
Row 36 (WS): Ch 6, turn. Work wide mesh even. (same counts as Row 35)
Rows 37 through 44 (even armhole rows): Work wide mesh even, no further shaping.
Size S: (29 dc posts per row)
Size M: (32 dc posts per row)
Size L: (34 dc posts per row)
Size XL: (37 dc posts per row)
Checkpoint: After Row 44, the armhole opening measures approximately 4.5 inches / 11.5 cm. The back panel above the armhole shaping should measure approximately 12.5 inches / 32 cm total height from foundation.
Back Shoulder Shaping and Neck
Row 45 (RS, Right Shoulder): Work wide mesh across first 8 (9, 10, 11) dc posts only, turn. Leave remaining sts unworked. (8, 9, 10, 11 dc posts)
Row 46 (WS): Ch 6, turn. Work wide mesh across 8 (9, 10, 11) dc posts. Fasten off.
With RS facing, skip the center 13 (14, 14, 15) dc posts for the back neck opening. Rejoin yarn to the next dc post for the left shoulder.
Row 45L (RS, Left Shoulder): Ch 6, work wide mesh across remaining 8 (9, 10, 11) dc posts. (8, 9, 10, 11 dc posts)
Row 46L (WS): Ch 6, turn. Work wide mesh across. Fasten off.
Right Front Panel
The right front is half the width of the back at each section, with a vertical straight edge at center front where the button band will be added.
Using E-4 hook, work 47 (51, 55, 59) fsc.
Right Front Ribbing Section
Row 1 (RS): Ch 1, turn. Working in BLO, sc across. (47, 51, 55, 59 sc)
Rows 2 through 10: Ch 1, turn. Working in BLO, sc across. (47, 51, 55, 59 sc)
Waist Increase Row (RS): Ch 1, turn. Working in BLO, sc in first 9 (10, 11, 12) sts, 2 sc in next st, [sc in next 9 (10, 11, 12) sts, 2 sc in next st] 4 times, sc in rem sts. (52, 56, 60, 64 sc)
Rows 12 through 16: Ch 1, turn. BLO sc across. (52, 56, 60, 64 sc)
Right Front Mesh Section
Switch to F-5 hook.
Row 17 (RS): Ch 5, turn. Skip first 3 sts, dc in next st, [ch 2, skip 2 sts, dc in next st] across.
Size S: (18 dc posts, 17 ch-2 sp)
Size M: (19 dc posts, 18 ch-2 sp)
Size L: (20 dc posts, 19 ch-2 sp)
Size XL: (22 dc posts, 21 ch-2 sp)
Row 18 (WS): Ch 5, turn. Dc in first ch-2 sp, [ch 2, dc in next ch-2 sp] across, ch 2, dc in 3rd ch of beg ch-5. (same dc post counts)
Rows 17 through 22: Work 6 rows of diamond mesh same as back.
Row 23 (Transition, RS): Ch 6, turn. Skip first ch-2 sp, dc in next dc post, [ch 3, dc in next dc post] across. (same dc post counts)
Row 24 through 32 (WS and RS alternating): Work wide mesh (ch-3 spaces) same as back. Maintain dc post counts.
Right Front Armhole Shaping
Row 33 (RS, Armhole Edge): Sl st across first 2 dc posts, into 3rd dc post, ch 6, work wide mesh across to end (center front edge has no shaping here).
Size S: (16 dc posts)
Size M: (17 dc posts)
Size L: (18 dc posts)
Size XL: (20 dc posts)
Row 34 (WS): Ch 6, turn. Work wide mesh even. (same counts)
Row 35 (RS): Sl st into first dc post, ch 6, work wide mesh across to end.
Size S: (15 dc posts)
Size M: (16 dc posts)
Size L: (17 dc posts)
Size XL: (19 dc posts)
Row 36 (WS): Ch 6, turn. Work wide mesh even.
Rows 37 through 44: Work wide mesh even, no shaping. (same counts as Row 35)
Right Front Neck Shaping
Row 45 (RS, Neck Decrease): Sl st into first 3 dc posts, ch 6, work wide mesh to end.
Size S: (13 dc posts)
Size M: (14 dc posts)
Size L: (15 dc posts)
Size XL: (17 dc posts)
Row 46 (WS): Ch 6, turn. Work wide mesh, stopping 1 dc post before neck edge, turn.
Size S: (12 dc posts)
Size M: (13 dc posts)
Size L: (14 dc posts)
Size XL: (16 dc posts)
Row 47 (RS): Sl st into first dc post, ch 6, work wide mesh to end.
Size S: (11 dc posts)
Size M: (12 dc posts)
Size L: (13 dc posts)
Size XL: (15 dc posts)
Row 48 (WS): Work wide mesh even across remaining dc posts.
Shoulder rows (Row 49 through Row 50): Work wide mesh even. Fasten off.
Shoulder dc post counts after neck shaping:
Size S: (8 dc posts)
Size M: (9 dc posts)
Size L: (10 dc posts)
Size XL: (11 dc posts)
Buttonhole Placement: Mark the positions of 5 buttonholes evenly spaced along the center front edge before working the button band. The lowest buttonhole sits 1 inch / 2.5 cm above the waist increase row. The highest buttonhole sits 0.75 inch / 2 cm below the start of the neck shaping. Space the remaining 3 evenly between these two marks.
Left Front Panel
Work exactly as Right Front Panel, reversing all shaping: armhole shaping is worked at the end of RS rows and beginning of WS rows; neck shaping is worked at the beginning of RS rows and end of WS rows. No buttonholes are worked on the left front.
Sleeves (Make 2)
The sleeves are worked flat from cuff upward. The lower sleeve features pineapple motifs, the mid-sleeve is dense sc, and the upper sleeve is plain mesh.
Sleeve Cuff Foundation
Using E-4 hook, work 54 (54, 60, 60) fsc.
Cuff Ribbing Row 1 (RS): Ch 1, turn. Working in BLO, sc across. (54, 54, 60, 60 sc)
Rows 2 through 8: Ch 1, turn. BLO sc across. (54, 54, 60, 60 sc)
Checkpoint: After Row 8, the cuff ribbing measures approximately 1.5 inches / 3.8 cm.
Sleeve Pineapple Motif Section
Switch to F-5 hook.
Pineapple Setup Row (RS): Ch 3 (counts as dc), turn. Dc in next 2 sts, [ch 3, skip 3 sts, sc in next st, ch 3, skip 3 sts, work 7 dc in next st (fan base), skip 3 sts] 4 times, ch 3, skip 3, sc in next st, ch 3, dc in last 3 sts.
Pineapple Row 1 (WS): Ch 3, turn. Dc in next 2 sts, [ch 3, sc in ch-3 sp, ch 3, dc in each of 7 dc] repeat across, ch 3, sc in ch-3 sp, ch 3, dc in last 3 sts.
Pineapple Row 2 (RS): Ch 3, turn. Dc in next 2 sts, [ch 3, sc in ch-3 sp, ch 3, skip 1 dc, dc in next 5 dc] repeat across, ch 3, sc in ch-3 sp, ch 3, dc in last 3 sts.
Pineapple Row 3 (WS): Ch 3, turn. Dc in next 2 sts, [ch 3, sc in ch-3 sp, ch 3, skip 1 dc, dc in next 3 dc] repeat across, ch 3, sc in ch-3 sp, ch 3, dc in last 3 sts.
Pineapple Row 4 (RS): Ch 3, turn. Dc in next 2 sts, [ch 3, sc in ch-3 sp, ch 3, skip 1 dc, pc in center dc] repeat across, ch 3, sc in ch-3 sp, ch 3, dc in last 3 sts.
Pineapple Row 5 (WS): Ch 3, turn. Dc in next 2 sts, [ch 5, pc at top of pineapple cluster (work pc into the ch-1 closing space of the cluster), ch 5] repeat across, dc in last 3 sts.
Pineapple Row 6 (RS): Ch 3, turn. Dc in next 2 sts, [ch 3, sc in ch-5 sp, ch 3, sc in top of pc, ch 3, sc in next ch-5 sp, ch 3] repeat across, dc in last 3 sts.
Pineapple Row 7 (WS, Fan Reset): Ch 3, turn. Dc in next 2 sts, [ch 3, skip ch-3 sp, 7 dc in sc at center of pineapple tip row] repeat across, dc in last 3 sts.
Repeat Pineapple Rows 1 through 7 once more for the second full pineapple repeat.
Sleeve Increase Section
Switch to E-4 hook.
Close-out Row (RS): Ch 1, turn. Sc across the top of the last pineapple row, working 1 sc into each dc and 2 sc into each ch-3 sp.
Size S and M: (54 sc)
Size L and XL: (60 sc)
Increase Row: Ch 1, turn. 2 sc in first st, sc across to last st, 2 sc in last st. (adds 2 sts)
Work 1 plain row between each increase row (Ch 1, turn, BLO sc across).
Repeat Increase Row and plain row alternately until sleeve reaches:
Size S: Work 10 increase rows. (74 sc)
Size M: Work 10 increase rows. (74 sc)
Size L: Work 10 increase rows. (80 sc)
Size XL: Work 10 increase rows. (80 sc)
Sleeve Cap Shaping
Switch to F-5 hook.
Conversion Row (RS): Ch 5 (counts as dc plus ch 2), turn. Skip 3 sts, dc in next st, [ch 2, skip 2 sts, dc in next st] across.
Size S: (25 dc posts, 24 ch-2 sp)
Size M: (25 dc posts, 24 ch-2 sp)
Size L: (27 dc posts, 26 ch-2 sp)
Size XL: (27 dc posts, 26 ch-2 sp)
Cap Decrease Row 1 (WS): Sl st into first ch-2 sp and first dc post, ch 5, work mesh across until last dc post, turn, leaving last dc post unworked.
Size S and M: (23 dc posts)
Size L and XL: (25 dc posts)
Cap Decrease Row 2 (RS): Same as Decrease Row 1. (21 dc posts / 23 dc posts)
Cap Decrease Row 3 (WS): Same. (19 dc posts / 21 dc posts)
Cap Decrease Row 4 (RS): Same. (17 dc posts / 19 dc posts)
Cap Decrease Row 5 (WS): Same. (15 dc posts / 17 dc posts)
**Cap Decrease Row 6
You Might Also Like
- Cherry Blossom Spring Charm Bracelet Free Crochet Pattern
- Navy Blue Open Weave Crochet Shrug Free Pattern
- Autumn Harvest Sunflower Granny Tote Free Crochet Pattern
- Succulent Garden Crochet Bowl Free Crochet Pattern
