Granny squares and bags together? I know what you might be thinking. "That sounds complicated." Or maybe, "I’ve tried bags before and they turned out floppy." Here’s the truth: this tote is easier than it looks, and I’m going to walk you through every single step.
The Coastal Blue Granny Square Tote breaks down into small, manageable pieces. You make 18 simple three-round granny squares. You join them into two panels. You add a gusset, attach some handles, and suddenly you have a structured, professional-looking bag that holds its shape beautifully. If you can make a basic granny square, you can absolutely make this tote.
Whether you’re an intermediate crocheter ready to level up or a confident beginner looking for your first bag project, this pattern meets you where you are. The construction is seamed, which means you work flat pieces and join them together. No tricky in-the-round shaping. No complicated decreases. Just squares, borders, and assembly.
About This Coastal Granny Square Tote
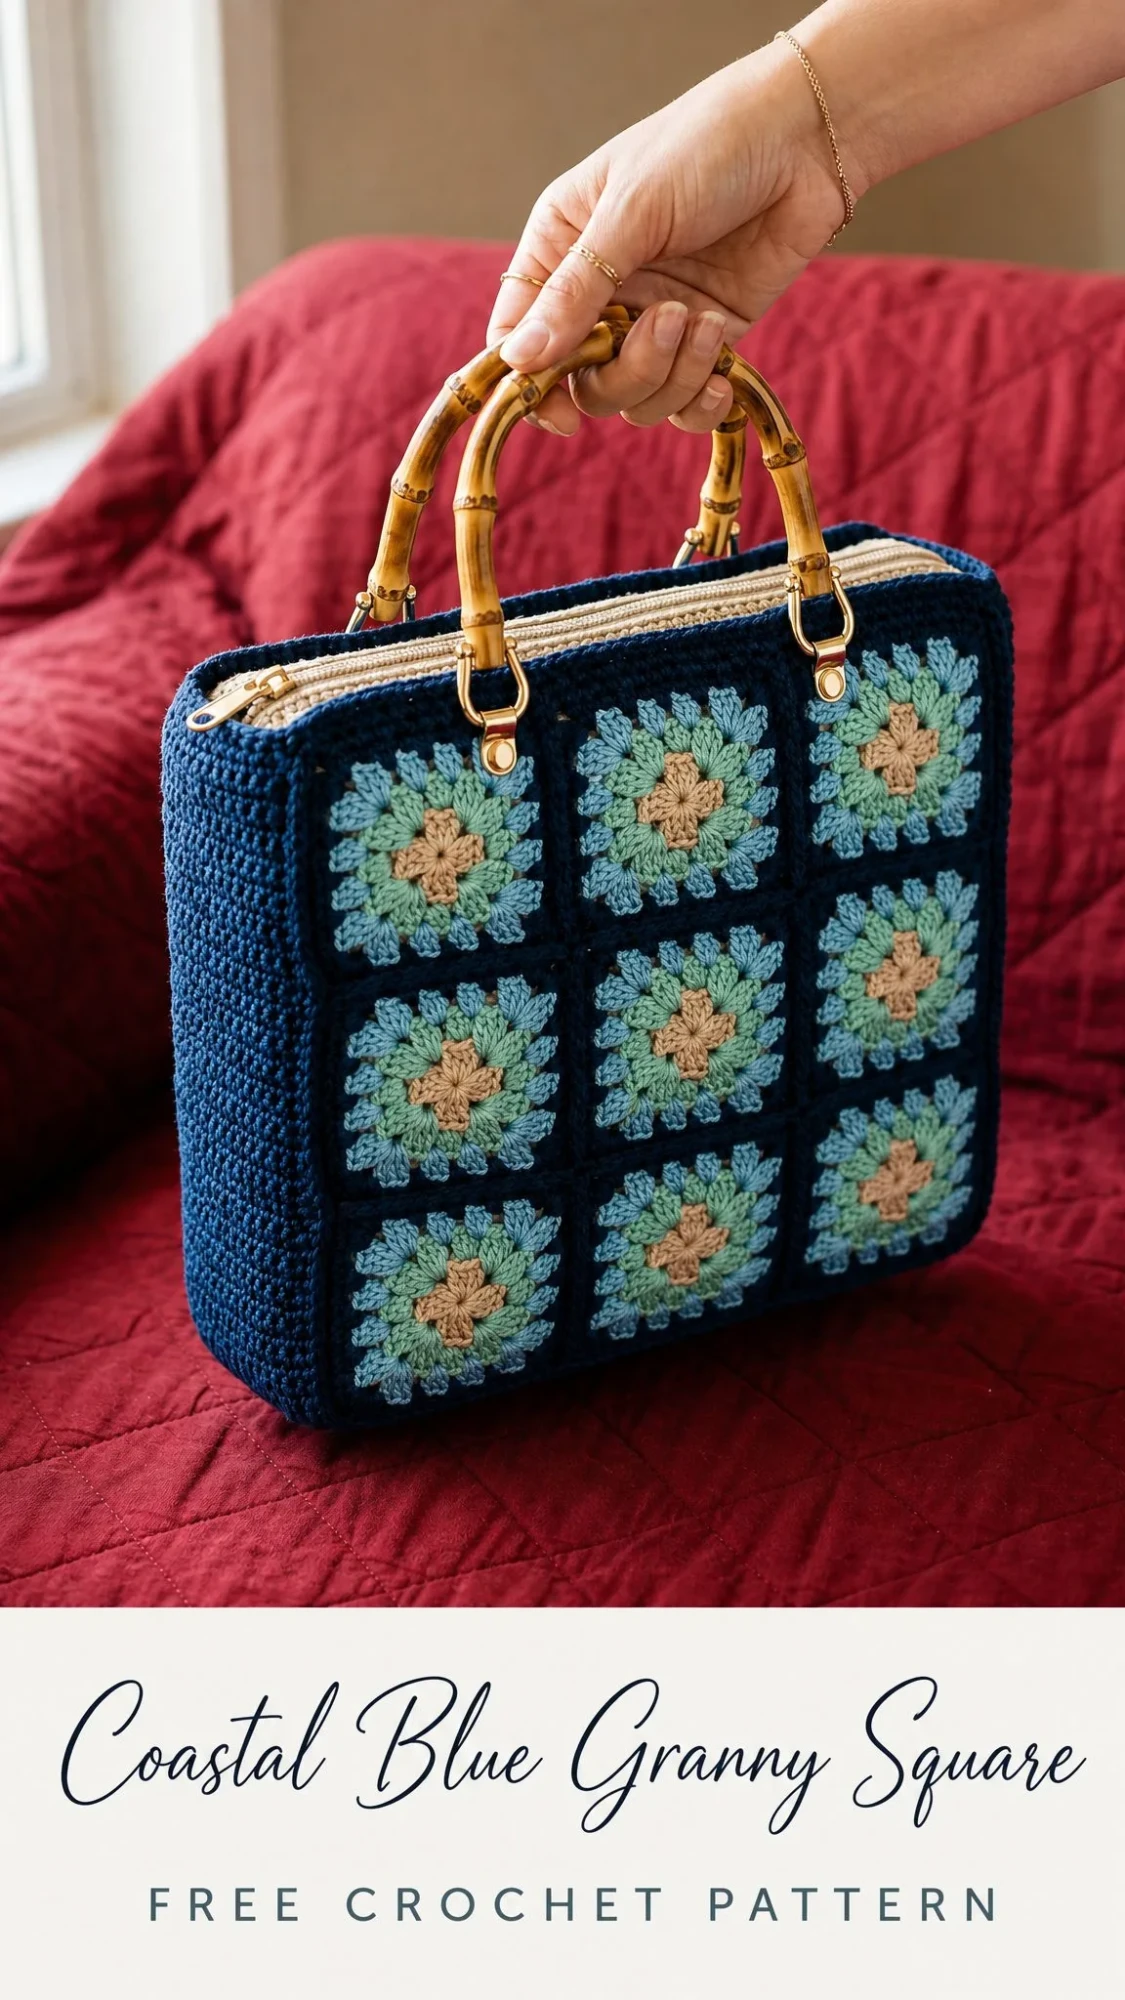
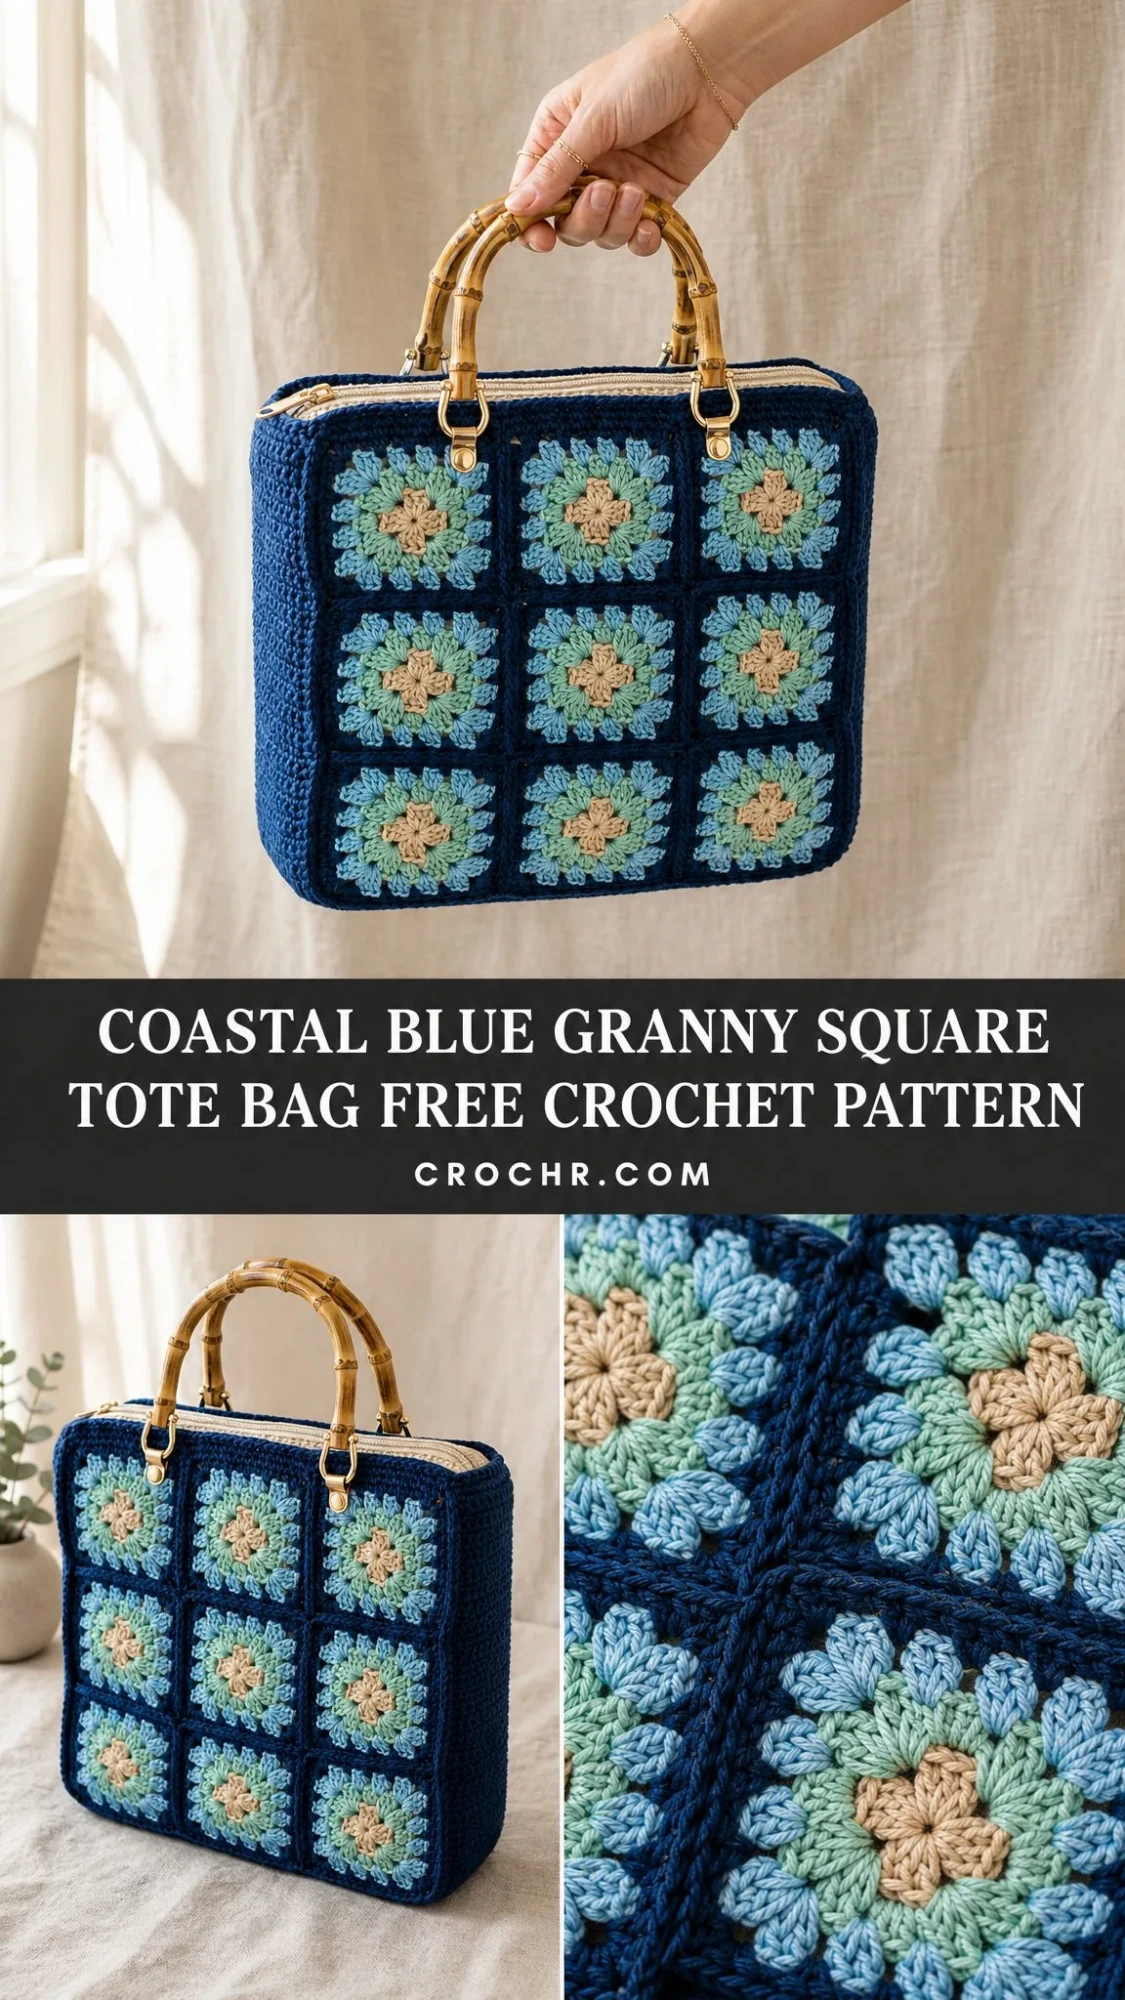
This structured carry-everywhere bag combines the nostalgic charm of classic granny squares with the clean lines of a modern accessory. Eighteen three-round squares form two crisp 3×3 panels, joined and framed in deep navy single crochet (sc) so every motif sits inside its own tidy window.
The color palette draws inspiration from the coast: deep ocean navy as the main color, sun-faded sky blue, soft sea-glass sage, and warm sand at the center of each square. A firm navy gusset gives the bag its boxy shape, and polished bamboo handles on gold D-rings lift the whole piece from cozy to coastal-chic.
Finished dimensions: 9.5 × 9 × 3 inches (24 × 23 × 7.5 cm), handles extra
Skill level: Intermediate. You should be comfortable with granny squares and basic seaming.
Time to make: 12 to 16 hours, spread over a relaxed weekend or two
Materials You’ll Need
Gathering your supplies before you start makes the whole process smoother. Here’s everything you need for this crochet tote bag pattern:
Yarn
You’ll need DK weight / light worsted (#3) cotton or cotton blend in four colors:
Yarn suggestions: Paintbox Yarns Cotton DK, Lion Brand 24/7 Cotton, or Yarn and Colors Must-Have. Any smooth DK cotton with good stitch definition works beautifully and helps the bag hold its shape.
Tools and Notions
Gauge
Getting your gauge right sets your final bag size, so take a moment to check this before diving in.
One finished granny square (3 rounds) = approximately 2.75 inches / 7 cm square
In navy single crochet: 18 stitches and 20 rows = 4 inches / 10 cm
If your squares are coming out larger, try going down a hook size. If they’re smaller, go up a hook size.
Abbreviations and Special Stitches
This pattern is written in US crochet terms. UK makers, please note: US single crochet (sc) equals UK double crochet (dc), and US double crochet (dc) equals UK treble (tr).
| Abbreviation | Meaning |
|---|---|
| ch | chain |
| sl st | slip stitch |
| sc | single crochet: insert hook, yarn over, pull up a loop, yarn over, pull through both loops |
| dc | double crochet: yarn over, insert hook, yarn over, pull up a loop, yarn over, pull through 2 loops, yarn over, pull through remaining 2 loops |
| st(s) | stitch(es) |
| sp | space |
| rnd | round |
| RS / WS | right side / wrong side |
| rep | repeat |
| [ ] | repeat instructions within brackets as directed |
Special Stitches
3-dc cluster (shell): Work 3 dc into the same stitch or space. This is the building block of every granny round.
Corner: Work (3 dc, ch 2, 3 dc) all into the same corner space.
Beginning shell: Ch 3 (this counts as your first dc), then work 2 dc in the same space.
Pattern Notes
The ch-3 at the start of a dc round counts as the first dc unless otherwise noted. Squares are worked in joined rounds with the right side always facing. I recommend weaving in ends as you go to keep finishing manageable. Keep your navy tension firm so the bag stands up on its own.
The Granny Square Pattern
You’ll make 18 squares total, which gives you nine squares per face of the bag. Each square has a sand center, sage middle round, and sky outer round.
Instructions for Each Square
Begin: With B (Sand), make a magic ring.
Round 1 (B, Sand): Ch 3 (counts as dc), 2 dc in ring, ch 2, [3 dc in ring, ch 2] 3 times; join with sl st to top of beginning ch-3. Fasten off B. (12 dc, 4 ch-2 corners)
Round 2 (C, Sage): Join C in any corner ch-2 sp. (Ch 3, 2 dc, ch 2, 3 dc) in same sp, ch 1, [(3 dc, ch 2, 3 dc) in next corner, ch 1] 3 times; join. Fasten off C. (24 dc, 4 corner spaces, 4 side ch-1 spaces)
Round 3 (D, Sky): Join D in any corner ch-2 sp. (Ch 3, 2 dc, ch 2, 3 dc) in same sp, ch 1, 3 dc in next ch-1 sp, ch 1, (3 dc, ch 2, 3 dc) in next corner, ch 1, 3 dc in next ch-1 sp, ch 1; rep from around; join. Fasten off, leaving the wrong side smooth. (36 dc, 4 corner spaces, 8 side ch-1 spaces)
Important: Block all 18 squares lightly to the same measurement before joining. Even squares make crisp navy windows and a professional-looking finished bag.
Joining Squares into Panels
Once your squares are blocked, it’s time to assemble them into panels.
Layout
Lay out 9 squares in a 3×3 grid for the front panel. Repeat for the back panel.
Joining Method
With A (Navy): Hold two squares with wrong sides together and whip stitch (or sc seam) through the back loops along one edge. Join squares into rows first, then join the rows together, matching corners carefully.
Repeat for the second panel. You now have 2 panels of 9 squares each.
Adding the Navy Border
The navy border frames your colorful motifs and creates a firm edge for seaming the gusset.
Work this border on both panels:
Round 1 (A, Navy): With RS facing, join navy yarn in any corner. Sc evenly around, working into each stitch and ch-sp. Work 3 sc in each corner. Aim for approximately 38 sc along each side. Join. (160 sc, including corners)
Round 2 (A, Navy): Ch 1, sc in each sc around, working 3 sc in each corner stitch; join. Fasten off. (168 sc)
The double navy round frames the motifs beautifully and gives you a firm edge to seam the gusset to.
Making the Gusset
The navy gusset wraps around the two long sides and the base of the bag, giving it that structured boxy shape.
Gusset Instructions (Make 1)
Foundation (A, Navy): Ch 15. Sc in 2nd ch from hook and across, turn. (14 sc)
Every row: Ch 1, sc in each st across, turn. (14 sc)
Continue until the strip measures approximately 27.5 inches / 70 cm. This should be long enough to travel up one side, across the base, and down the other side of a panel. Fasten off.
Making the Handle Tabs
The handle tabs connect your bamboo handles to the bag via D-rings.
Handle Tab Instructions (Make 4)
Row 1 (A, Navy): Ch 7, sc in 2nd ch from hook and across, turn. (6 sc)
Rows 2 through 10: Ch 1, sc in each st, turn. Fasten off, leaving a long tail for sewing. (6 sc each row)
Each tab folds through a D-ring and is stitched down. You’ll attach two tabs to each panel.
Assembly, Zipper, and Handles
Now comes the satisfying part: putting everything together.
Step 1: Attach the Gusset
With wrong sides together and navy yarn, sc or whip stitch one long edge of the gusset to the front panel. Start at a top corner, ease around the base, and finish at the opposite top corner. Repeat to join the second long edge to the back panel.
Step 2: Shape the Top
The open top edges of both panels and the gusset ends form the mouth of the bag. Work one tidy round of sc around the entire opening in navy for a clean lip. Work evenly around the entire opening.
Step 3: Set the Zipper
With a sharp needle and thread, hand-sew the zipper tape just inside the navy top lip. Ease it evenly so the teeth sit centered. Tuck and stitch the zipper ends down neatly.
Step 4: Mount the Handles
Slip a D-ring onto each handle ring. Thread a handle tab through each D-ring, fold the tab in half, and stitch firmly to the inside top edge of the bag. Attach two tabs evenly spaced on each panel (four tabs total). Check that both handles hang level before finishing.
Step 5: Optional Lining
For a polished, sturdy finish, cut cotton fabric to the bag’s inner dimensions plus seam allowance. Sew the fabric into a pouch shape, then hand-stitch inside just below the zipper.
Finishing and Care Instructions
Finishing Your Bag
Caring for Your Tote
How to Resize This Crochet Tote Pattern
The square grid construction makes resizing beautifully simple. Adjust the layout, and the navy border follows along.
Quick Math
Each square adds about 2.75 inches / 7 cm to a panel’s width or height. Decide on your finished size, divide by 2.75 inches, and that’s your grid. Then add the navy border and gusset around it.
Size Variations
Larger tote: Use a 4×4 grid (16 squares per panel) for a roomy approximately 12.5-inch bag. Alternatively, add a 4th round of sky to each square for bigger motifs.
Mini bag: Drop to a 2×2 grid per panel for a sweet little crossbody. Swap the bamboo handles for a chain strap.
Deeper bag: Widen the gusset by starting with more foundation chains. For example, ch 19 for 18 sc gives you a 4 inch / 10 cm base.
Yarn weight adjustments: Worsted weight yarn with a 5.0 mm hook makes everything larger. Aran cotton gives a chunkier, faster make. Re-check your gauge and recalculate yardage.
Color play: Keep navy as the frame and rotate the center three colors square-by-square for a scrappy, sea-glass effect.
Tips for Success with This Granny Square Bag Pattern
Block your squares. I cannot stress this enough. Blocking makes joining so much easier and gives you those crisp, professional-looking windows between each motif.
Keep your navy tension firm. This is what helps the bag stand up on its own. If your tension tends to be loose, consider going down a hook size for the navy sections only.
Weave in ends as you go. With 18 squares plus borders, tabs, and the gusset, you’ll have a lot of ends. Tackling them bit by bit prevents an overwhelming finishing session.
Test your zipper placement. Before sewing the zipper permanently, use pins or clips to check the placement. Make sure the zipper opens and closes smoothly and sits centered.
Check handle alignment. Before stitching the tabs permanently, hold the bag by the handles and make sure everything hangs evenly. Adjust placement if needed.
This Coastal Blue Granny Square Tote makes a wonderful project bag, everyday purse, or thoughtful handmade gift. The combination of classic granny squares with a modern structured shape creates something truly special, and the coastal color palette works beautifully year-round.
I hope you love making this bag as much as I enjoyed designing it. If you found this pattern helpful, I’d love for you to save it to your Pinterest boards so you can find it easily later. And if you make this tote, please drop a comment below or tag me on social media. Seeing your finished projects and color choices is honestly my favorite part of sharing patterns. Happy hooking!
