
I named this one "Harvest Gathering" in my notebook about three years ago. It started as a quick sketch during a rainy October afternoon when I was trying to figure out what to make for my sister’s Thanksgiving table. She wanted something handmade, something that felt like fall without being too kitschy, and something she could actually use year after year.
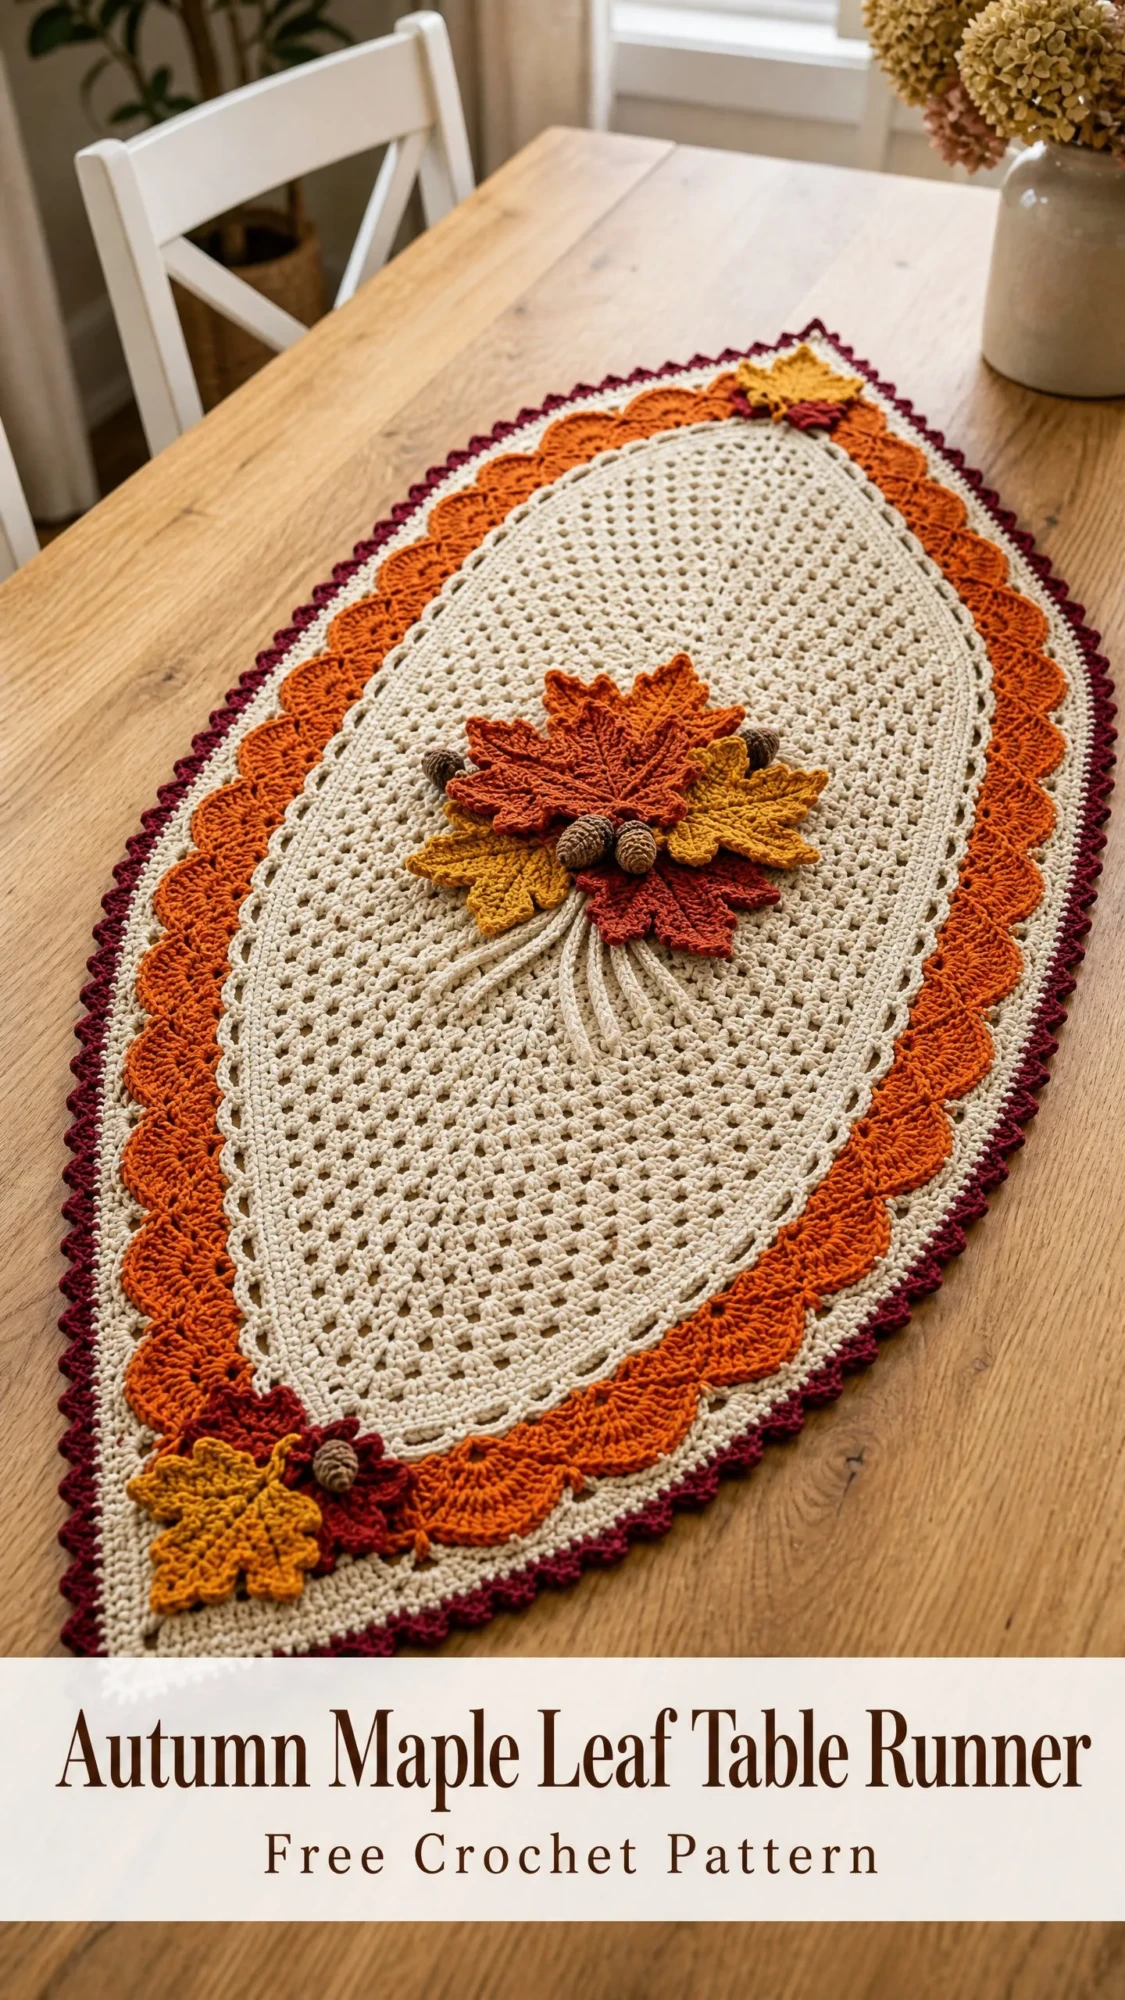
That little sketch turned into this table runner pattern, and I have to tell you, it has become one of my most requested designs. Every time I post a photo of it on my dining table, someone asks for the pattern. The elongated hexagonal shape gives it such an elegant silhouette, and those three dimensional maple leaves at the center make it feel like a real showpiece.
The best part? Once you understand the basic structure, this project practically works itself. You are essentially crocheting a big mesh oval, shaping it into a hexagon with some clever corner increases, adding gorgeous scalloped borders, and then making the cutest little leaf and acorn appliques to stitch on at the end. Let me walk you through every single step.
Why This Table Runner Works So Well
This crochet table runner hits that sweet spot between impressive and achievable. The mesh stitch base is wonderfully meditative to work. You are just alternating single crochets with chain one spaces around and around until you have built up the size you need. The magic happens when you start placing corner increases at strategic points. Suddenly your oval transforms into this beautiful stretched hexagon shape.
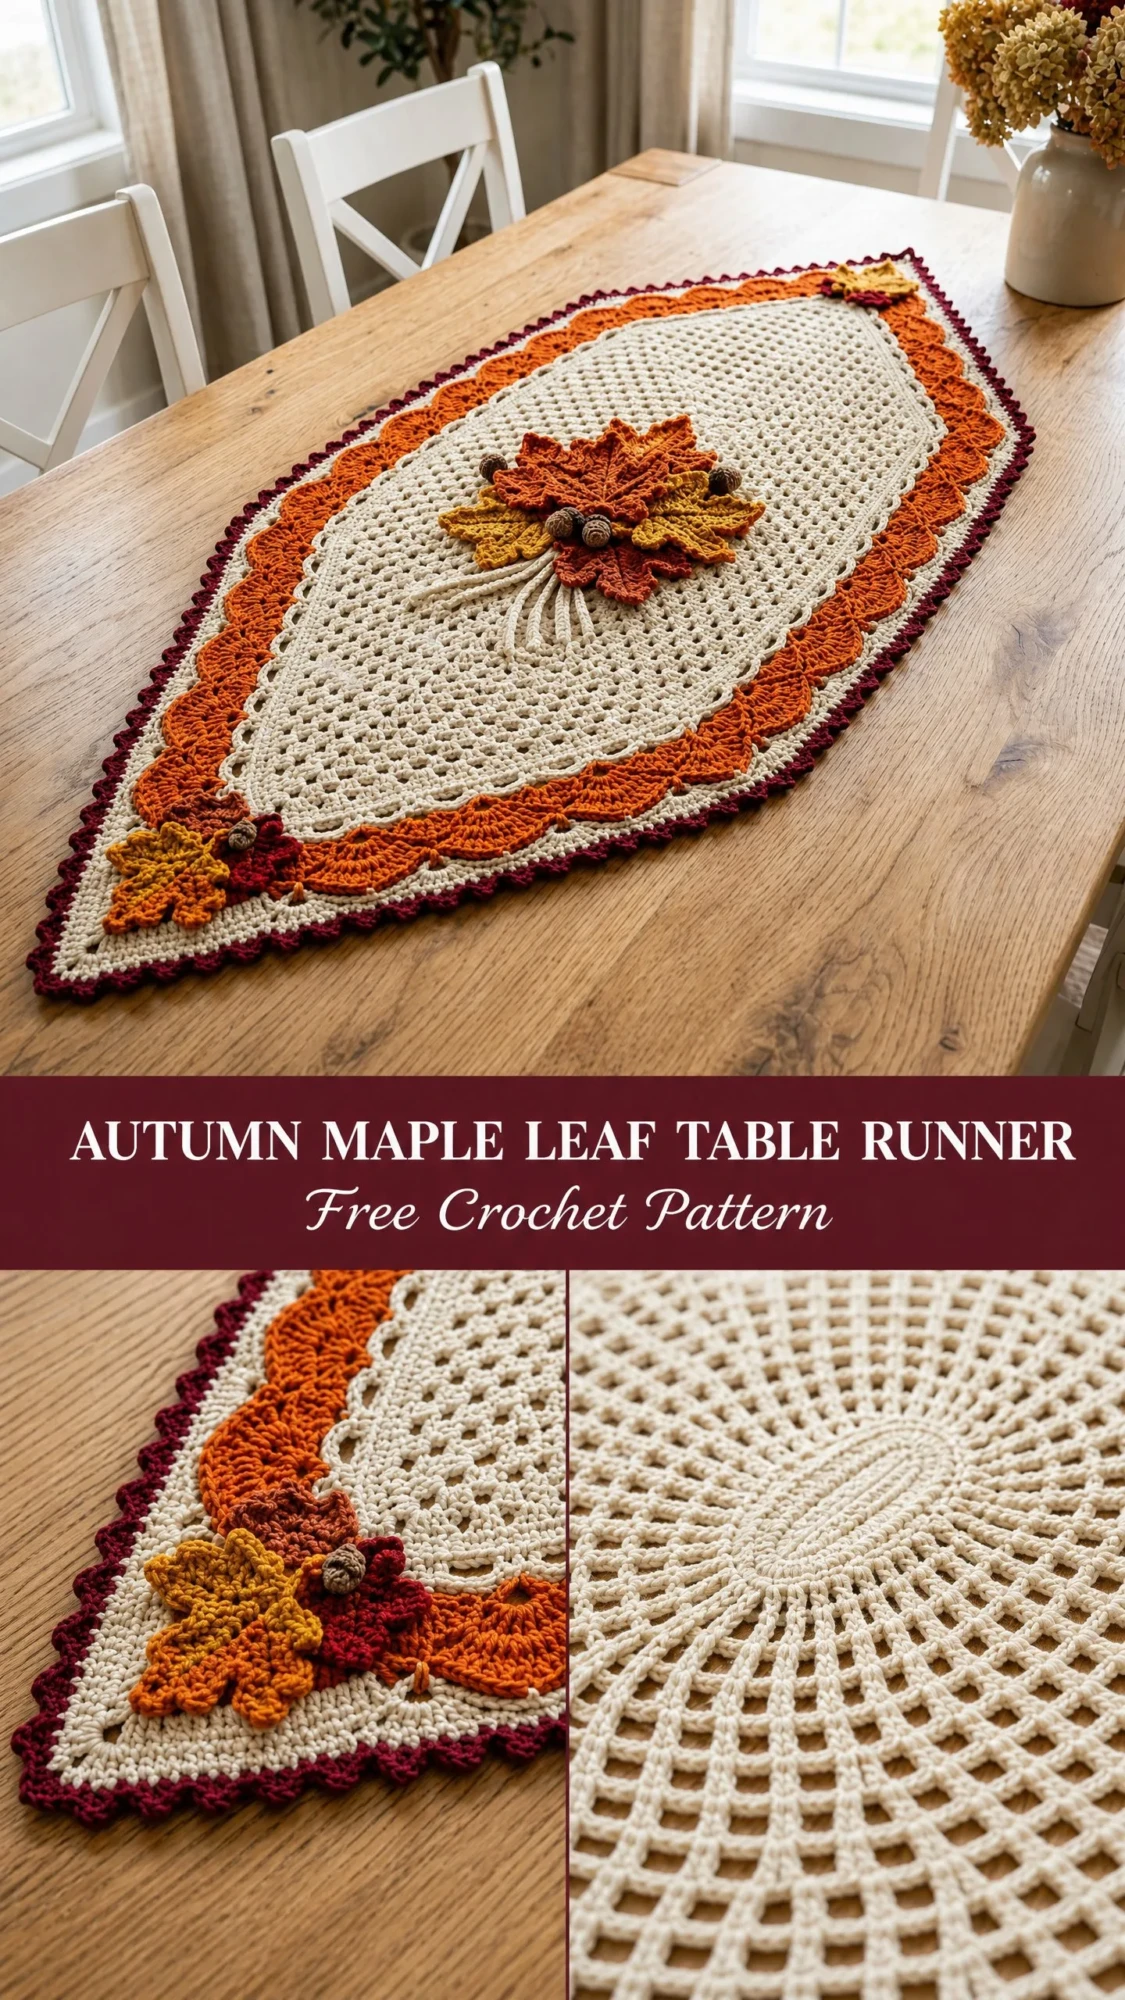
The layered borders add visual depth without adding complexity. The burnt orange fan stitch border frames the cream center perfectly. Then that deep burgundy picot edge gives the whole piece a polished, finished look. And those maple leaf appliques? They are worked separately and sewn on at the end, so you can take your time getting them just right.
Skill Level and Time Investment
I would call this an advanced beginner to intermediate project. If you are comfortable joining rounds, reading stitch counts, and working basic increases and decreases, you can absolutely make this. The leaf appliques require working into the front loop only and managing some shaping, but I will explain every step.
Plan for about 12 to 16 hours of total crochet time. That breaks down to roughly 4 to 5 hours for the base runner, 2 to 3 hours for the border rounds, 2 to 3 hours for the leaf appliques, 1 hour for the acorns, and 1 to 2 hours for finishing and blocking. You could easily spread this over a couple of weekends.
Finished Measurements
Your completed table runner will measure approximately 28 inches long by 14 inches wide at the widest point. Those measurements are taken after blocking, which is an essential step for this project. The elongated points at each short end give it that lovely diamond-like silhouette that looks so elegant running down the center of a table.
Materials You Will Need
Yarn (Worsted Weight, 100% Cotton or Cotton Blend Recommended):
Hooks:
Notions:
Yarn Suggestions: Lion Brand 24/7 Cotton works beautifully for this project. It is mercerized, holds stitch definition well, blocks flat, and is machine washable. Paintbox Yarns Simply DK or Drops Paris are also excellent choices.
Gauge
With Color A and your G-6 hook: 16 stitches and 18 rows = 4 inches in single crochet (sc) mesh pattern. This means you are working alternating sc and chain one (ch-1) spaces, counting each stitch and each chain space as one unit.
Gauge matters for this project because you want the finished runner to lay flat and reach the correct dimensions. If your swatch is too loose, go down a hook size. Too tight? Go up a hook size.
Abbreviations Used
Let me define every abbreviation before we dive in:
Special Stitches Explained
Mesh Stitch: This is the foundation of your runner. You work sc in one stitch, ch 1, skip the next stitch, then sc in the following stitch. Each sc paired with a ch-1 space counts as 2 units. It creates a lovely open, airy fabric.
Fan Stitch: Work 5 dc all into the same stitch or space. This creates a shell or fan shape. When the pattern calls for a 7-dc fan, you simply work 7 dc into that same spot.
Picot: Chain 3, then slip stitch into the first chain you made. This creates a tiny decorative loop.
Sc2tog (Decrease): Insert hook into first stitch, pull up a loop. Insert hook into second stitch, pull up a loop. You now have 3 loops on your hook. Yarn over and draw through all 3 loops at once.
Step by Step Instructions
Section 1: Base Runner
The base is worked as a flat elongated hexagon using mesh stitch rounds. You will start with a foundation chain that establishes the long axis of your runner.
Foundation Chain:
With Color A and your G-6 hook, chain 56.
Round 1 (RS):
Starting in the second chain from hook: sc in first ch, (ch 1, skip 1, sc) 26 times across to the last chain, work (sc, ch 2, sc) into the last chain for your first corner point. Do not turn. Now working along the opposite side of the foundation chain: (ch 1, skip 1, sc) 26 times back along the underside, ending with (sc, ch 2, sc) into the very first starting chain for your second corner point. Sl st to join to first sc of round. (112 units)
Round 2:
Ch 1, sc in same st as join. Work (ch 1, skip ch-sp, sc in next sc) across to corner ch-2 space. Into corner ch-2 space work (sc, ch 2, sc). Continue in mesh pattern across the second long side. Into the second corner ch-2 space work (sc, ch 2, sc). Sl st to join. (116 units)
Rounds 3 through 10:
Continue in mesh pattern exactly as Round 2, working (sc, ch 2, sc) into each corner ch-2 space each round.
Round 11 (Adding Side Corner Points):
Now you will add 2 new corner points at the midpoints of each long side to start creating the hexagonal shape.
Ch 1, sc in same st. Work in mesh pattern to the 27th unit along the first long side. Place a stitch marker here. Into this center sc work (sc, ch 2, sc) for your new side corner. Continue in mesh to the end corner, work (sc, ch 2, sc). Continue across the second long side, placing a new side corner (sc, ch 2, sc) at the midpoint. Work (sc, ch 2, sc) at the final end corner. Sl st to join. (156 units)
Rounds 12 through 20:
Work in mesh pattern, working (sc, ch 2, sc) into each of the 4 corner ch-2 spaces each round.
Round 21 (Adding Final Side Corner Points):
Add the final 2 corner points to achieve the full 6-corner hexagonal shape. Place new corners at the quarter and three-quarter marks along each long side.
Work in mesh to 14 units past the end corner along the first long side. Work (sc, ch 2, sc) for a new sub-corner. Continue in mesh 28 units to the existing side corner. Work (sc, ch 2, sc). Continue 14 units to end corner. Work (sc, ch 2, sc). Repeat the same placement along the second long side. Sl st to join. (244 units)
Rounds 22 through 28:
Work in established mesh pattern with (sc, ch 2, sc) at all 6 corner spaces each round.
Fasten off Color A. Weave in end.
Checkpoint: Your base runner should measure approximately 24 inches long and 10 inches wide. It should lie flat without curling.
Section 2: First Border (Color B, Burnt Orange)
Join Color B with a slip stitch to any corner ch-2 space.
Round 29 (Foundation Border):
Ch 3 (counts as first dc). Into the same corner ch-2 space work 2 more dc (3 dc total in corner). Work 1 dc into each sc and 1 dc into each ch-1 space along the edge to the next corner ch-2 space. Into the next corner ch-2 space work 5 dc (fan). Continue around, working 1 dc per unit between corners and 5-dc fans at each of the 6 corner ch-2 spaces. Sl st to top of beginning ch-3 to join. (354 dc)
Round 30 (Fan Scallop Border):
Ch 1, sc in same st as join. Work the fan scallop pattern: skip 2 sts, 5 dc in next st (fan made), skip 2 sts, sc in next st. Repeat around the entire perimeter. At each of the 6 corner zones, work a 7-dc fan instead of a 5-dc fan. Sl st to join to first sc.
Round 31 (Scallop Accent):
Ch 1, sc in first sc. Ch 3, sc in center dc of next fan. Ch 3, sc in next sc. Repeat around. At each 7-dc corner fan, work: sc in sc before fan, ch 3, sc in 2nd dc of fan, ch 3, sc in 4th dc of fan, ch 3, sc in 6th dc of fan, ch 3, sc in sc after fan. Sl st to join.
Fasten off Color B.
Section 3: Outer Edge (Color C, Deep Burgundy)
Round 32 (Solid Edging Round):
Join Color C with sl st to any sc of Round 31. Ch 1, sc in same st. Work 2 sc into each ch-3 arch around the perimeter. At each of the 6 corners, work 3 sc in the center arch instead of 2 sc. Sl st to join. (160 sc)
Round 33 (Picot Edging):
Ch 1, sc in first st. Picot (ch 3, sl st in first ch). Sc in next st. Picot. Continue alternating sc, picot around. At each of the 6 corner sts, work (sc, picot, sc, picot, sc) all in the same corner stitch.
Fasten off Color C. Weave in all ends.
Checkpoint: Your completed runner with all border rounds should now measure 28 inches long and 14 inches wide. Wet block the runner now before attaching appliques.
Section 4: Maple Leaf Appliques
Make 5 maple leaves total: 2 in Color B (Burnt Orange), 2 in Color D (Golden Yellow), 1 in Color E (Rust).
Each Leaf Lobe (make 5 lobes per leaf, 25 lobes total):
With F-5 hook and appropriate leaf color, ch 12.
Row 1: Starting in 2nd ch from hook: sc in first, hdc in next, dc in next, tr in next 3, dc in next, hdc in next, sc in next 2, sl st in last ch. (11 sts)
Do not fasten off. Rotate work to the opposite side of the foundation chain.
Row 2: Sl st in first ch, sc in next 2, hdc in next, dc in next, tr in next 3, dc in next, hdc in next, sc in last. (11 sts)
Fasten off leaving a 6-inch tail.
Leaf Assembly:
Arrange 5 lobes in a fan shape to mimic a maple leaf. The center lobe points straight up. Two lobes angle at 30 degrees to either side of center. The final two outer lobes angle at 60 degrees to either side. Using the yarn tails, sew the base of each lobe together with 3 to 4 stitches.
Stem:
With F-5 hook and Color A, join yarn at the base cluster. Ch 8, sl st back down the chain. Fasten off.
Section 5: Acorn Embellishments
Make 5 acorns total.
Acorn Body (Color G):
With F-5 hook and Color G, make a magic ring.
Stuff lightly with scrap yarn.
Sl st to next st. Fasten off leaving a tail. Thread tail through remaining 7 sts, pull tight, and secure.
Acorn Cap (Color F):
With F-5 hook and Color F, make a magic ring.
Fasten off leaving a tail.
Cap Stem: With F-5 hook and Color F, join to top center of cap with sl st. Ch 4, sl st back down. Fasten off.
Sew the cap to the body using the tail.
Section 6: Attaching Appliques
Position your 3-leaf cluster at the center of the runner, approximately 14 inches from each end. Arrange the leaves so the orange leaf is uppermost, the yellow leaf angles to the lower left, and the rust leaf angles to the lower right. Pin in place.
Sew each leaf down by stitching through the mesh base at the stem point and along the outer tip of the center lobe. Allow the 3D structure to remain slightly raised.
Place 3 acorns nestled at the base of the center leaf cluster. Sew each acorn through its body base using 4 to 5 stitches.
At each pointed short end corner, place 1 remaining leaf angling outward toward the tip. Position the leaf so approximately one-third overlaps onto the orange border and two-thirds rest on the cream mesh. Sew down. Place 1 acorn at the base of each end corner leaf.
Blocking and Finishing
Wet blocking is essential for this project. Submerge the completed runner in cool water. Gently press to saturate but do not wring. Roll briefly in a clean towel to remove excess water. Lay flat on a blocking mat and pin the 6 corner points to measurements: 28 inches along the long axis and 14 inches across the widest point. Allow to dry completely, which may take 12 to 24 hours.
Care Instructions
Machine wash on gentle cycle in cold water or hand wash. Use mild detergent and do not bleach. Lay flat to dry. If the runner loses its shape after washing, simply re-wet and re-block to measurements. Store flat or rolled to prevent permanent crease lines.
Make It Your Own
Want a shorter runner? Reduce the foundation chain to 38 chains and work only 22 rounds instead of 28. Your finished piece will measure approximately 20 inches by 10 inches.
Need a longer runner for a larger table? Increase the foundation chain to 80 chains and add 4 additional mesh rounds after Round 28. You will end up with a runner approximately 38 inches by 14 inches.
Thank you so much for choosing this pattern for your fall table. I truly hope you enjoy making it as much as I enjoyed designing it. If you create your own Harvest Gathering runner, I would absolutely love to see it! Share your photos on Instagram or in my Facebook group and tag me so I can cheer you on.
If this pattern is calling your name, go ahead and save it to your Pinterest boards so you can find it when you are ready to start. And please drop a comment below if you make one. I read every single comment and hearing about your projects honestly makes my whole day.
You Might Also Like
- Succulent Garden Crochet Bowl Free Crochet Pattern
- Mint Chocolate Chameleon Amigurumi Free Crochet Pattern
- Sunset Orange Chameleon Amigurumi Free Crochet Pattern
- Lavender Dream Crescent Purse with Silver Accents Free Crochet Pattern
