
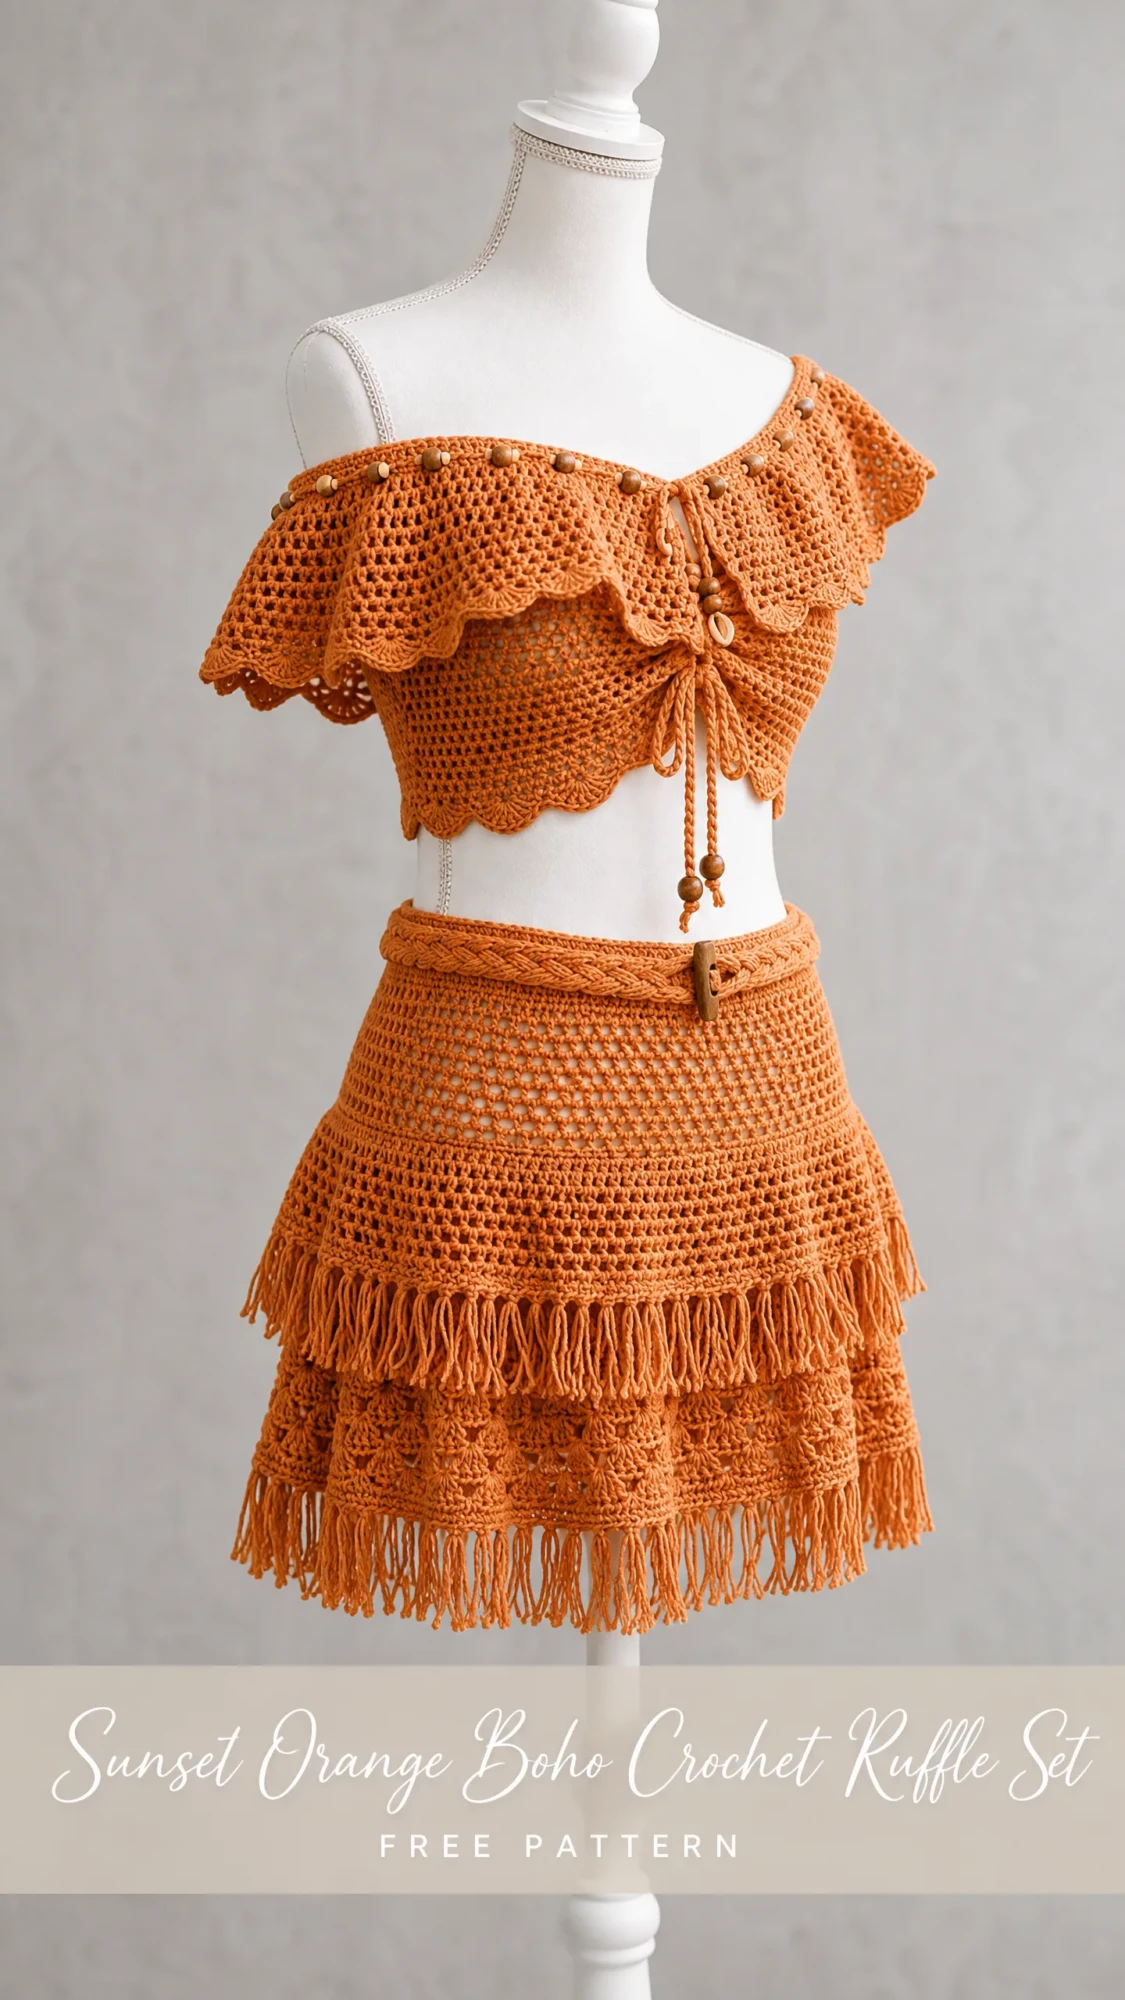
This is HANDS DOWN one of the most stunning summer projects I have ever put together. We are talking a complete boho two-piece set that looks like it walked straight off a boutique rack. The off-shoulder ruffle crop top paired with that tiered fringe mini skirt? Absolute showstopper.
I know what you might be thinking. A coordinated set sounds intimidating. But here is the thing. Once you break it down, this project is just mesh stitch, shells, and fringe. That is it. You already know those stitches.
This set takes around 20 to 30 hours total, which makes it perfect for a dedicated weekend project or a satisfying two-week evening endeavor. The finished result makes an incredible gift for yourself or someone who loves bohemian style. Trust me, you will want to make one in every color once you finish the first.
About This Crochet Pattern
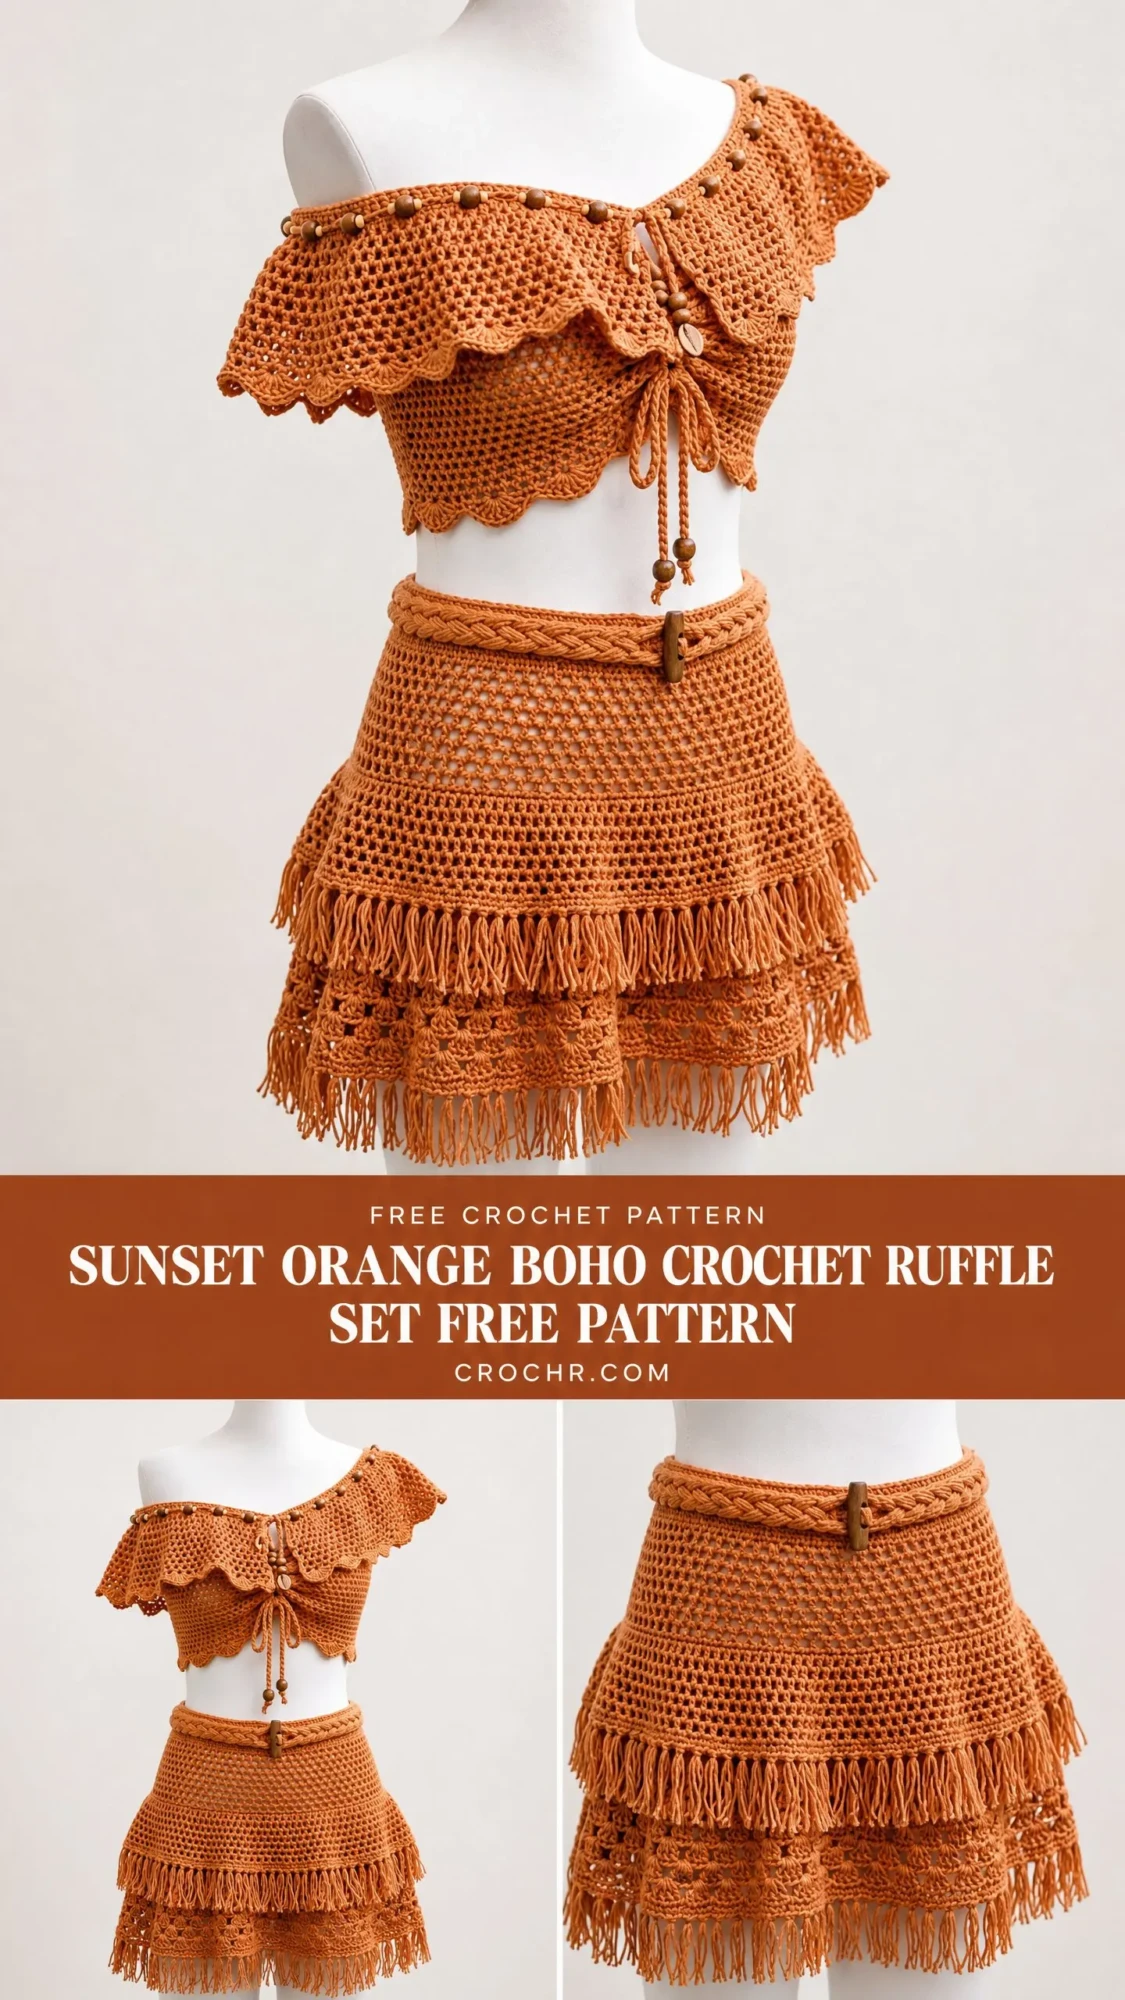
This Sunset Orange Boho Crochet Ruffle Set consists of two coordinating pieces worked in warm terracotta cotton yarn. The crop top features a dramatic off-shoulder ruffle neckline adorned with wooden beads, an open mesh body, and a decorative front tie with beaded ends. The matching mini skirt includes a braided waistband with a wooden toggle closure, mesh body construction, and two gorgeous tiers of fringe.
The skill level sits at intermediate to advanced. You will need comfort working in the round, shaping with increases and decreases, constructing ruffled edges, attaching fringe, and assembling a multi-piece garment. If you have completed at least two simpler garment projects before, you are ready for this one.
The finished size accommodates a Small/Medium, fitting a 32 to 36 inch bust and a 26 to 32 inch waist. I will share customization tips later so you can adjust the sizing to fit perfectly.
Materials You Will Need
Gathering your supplies before you start makes the whole process smoother. Here is everything required for both pieces.
Yarn:
Approximately 800 to 1000 yards of worsted weight 100 percent cotton yarn in terracotta or rust orange. You will use a single color throughout both pieces.
Some excellent yarn options include:
Any smooth worsted weight cotton or cotton-blend yarn works beautifully. Avoid fuzzy or textured yarns because they will obscure the lovely open mesh stitchwork.
Hooks:
Notions:
Gauge
Getting your gauge right is critical for a wearable result. Take the time to swatch before diving in.
With US H-8 / 5.0 mm hook and worsted weight cotton yarn:
Mesh stitch gauge: 14 stitches and 8 rows = 4 inches / 10 cm
Single crochet gauge: 14 sc and 16 rows = 4 inches / 10 cm
If your gauge runs too loose, go down one hook size. If too tight, go up one hook size. Swatch both the mesh pattern and single crochet before beginning.
Finished Measurements
Top finished measurements:
Skirt finished measurements:
Abbreviations and Stitch Definitions
Let me walk you through every stitch term you will encounter. Understanding these before you begin will make the instructions much easier to follow.
beg means beginning
ch means chain, which is the foundation loop created by yarning over and pulling through
ch-sp means chain space, the gap created by a chain stitch
dc means double crochet. Yarn over, insert hook, pull up a loop, yarn over and pull through 2 loops, yarn over and pull through remaining 2 loops
hdc means half double crochet. Yarn over, insert hook, pull up a loop, yarn over and pull through all 3 loops at once
lp(s) means loop or loops
rem means remaining
rep means repeat
rnd means round
RS means right side, which is the outside of your garment
sc means single crochet. Insert hook, pull up a loop, yarn over and pull through both loops
sk means skip
sl st means slip stitch. Insert hook, yarn over, pull through both the stitch and the loop on your hook in one motion
sp(s) means space or spaces
st(s) means stitch or stitches
t-ch means turning chain
tog means together
WS means wrong side
yo means yarn over
Special Stitches and Techniques
These special techniques appear throughout the pattern. Read through them before starting so you know what to expect.
Mesh Stitch (Worked in Rows)
The mesh stitch creates an open grid fabric that gives this set its breezy, bohemian look. Each mesh unit consists of one double crochet, chain 1, skip 1. At the start of each row, chain 4 to count as the first dc plus ch-1 space. Work (dc, ch 1, sk 1) across to the last stitch, then dc in the last stitch. On subsequent rows, work dc into each dc of the previous row and chain 1 over the chain space.
Mesh Stitch (Worked in Rounds)
Join yarn and ch 4 at the beginning of each round. This counts as dc plus ch 1. Work (dc, ch 1) into each ch-1 space around, placing dc into the dc and ch 1 over the ch-sp from the previous round. Join with sl st to the third ch of the beginning ch-4. Do not turn.
Shell Stitch
Work 5 dc into the same stitch or space. This creates a beautiful fan or shell of 5 double crochet stitches that adds gorgeous texture to the lower tier of the skirt.
Scallop Edge
This technique creates a wavy ruffle border. Into each designated stitch or space, work: sc, hdc, dc, hdc, sc. Each scallop unit uses 5 stitches worked into 1 point.
Fringe Attachment
Cut 2 strands of yarn each 10 inches long for each fringe knot. Fold the 2 strands together in half. Insert your crochet hook through a designated stitch from front to back, pull the folded loop through, then draw both yarn tails through the folded loop. Pull firmly to secure the knot. Trim all fringe to an even length of approximately 3.5 inches after attachment.
Braided Cord
Cut 9 strands of yarn each 90 inches long. Divide into 3 groups of 3 strands each. Knot all 9 strands together at one end. Braid the three groups together until the braid measures 35 inches. Knot at the end. This becomes your skirt waistband.
Drawstring Tie
Cut 2 strands of yarn each 50 inches long. Hold together and fold in half. Attach the midpoint to the center front of the top body using a lark’s head knot through the mesh opening. Thread a wooden bead onto each pair of tails. Knot below each bead to secure. Trim ends to approximately 4 inches below the lower bead.
Important Pattern Notes
Before you begin, here are some key things to keep in mind:
1. The crop top body is worked flat in rows from the bottom edge upward, then the ruffle is worked along the top edge. The piece is seamed at the sides after the body is complete.
2. The skirt is worked in rounds from the waist downward, beginning with the mesh body, followed by fringe tiers.
3. Wooden beads are threaded onto the yarn and slid into position along the top neckline ruffle row as you work, or sewn on afterward with the yarn needle.
4. Right side of work is the outside of the garment throughout.
5. When joining rounds, always join to the top of the beginning chain with a slip stitch unless otherwise instructed.
6. Do not turn work at the end of rounds unless specifically instructed.
7. Chain-4 at the beginning of a mesh round counts as dc plus ch-1 throughout.
8. All fringe is attached after the garment pieces are fully constructed and blocked.
Part One: The Crop Top
Section 1A: Top Body (Worked Flat, Then Seamed)
The top body is worked as two flat panels using mesh stitch. Both panels are identical. Work one panel, then work a second identical panel.
Foundation Row:
Using US H-8 / 5.0 mm hook, chain 55.
Row 1 (RS): Dc in 5th ch from hook (the skipped 4 chs count as dc plus ch-1), (ch 1, sk 1 ch, dc in next ch) across to end. Turn. (27 dc, 26 ch-1 sps)
Row 2: Ch 4, turn (counts as dc plus ch 1). Sk first ch-1 sp, dc in next dc, (ch 1, dc in next dc) across, ending with dc in 3rd ch of t-ch. Turn. (27 dc, 26 ch-1 sps)
Rows 3 through 12: Rep Row 2. Continue in mesh pattern as established. Turn at end of each row. (27 dc, 26 ch-1 sps each row)
After Row 12, your body panel should measure approximately 6 inches in height. This is your first checkpoint. Lay the panel flat. It should be approximately 15 inches wide and 6 inches tall.
Work a second identical panel (Rows 1 through 12). Fasten off, leaving a 24-inch yarn tail on the second panel for seaming.
Section 1B: Seaming the Body
With WS facing together and RS facing out, align the two panels at their side edges. Using the yarn needle and the long tail, whipstitch or mattress stitch the left side seam, working through the outermost dc column of each panel. Begin at the lower edge and work upward. Seam the right side seam using a new length of yarn. Leave the top edge and the bottom edge fully open. You now have a tube.
The tube should measure approximately 30 inches in circumference and 6 inches tall. Try the tube on or compare against your dress form. It should fit comfortably around the bust with slight ease.
Section 1C: Top Ruffle
The ruffle is worked along the top edge of the assembled tube in two phases.
Ruffle Foundation Round:
With RS facing, join yarn to the top edge of the tube at the right side seam with a sl st.
Rnd 1 (Ruffle Foundation): Ch 3 (counts as dc). Work dc in each dc and 2 dc in each ch-1 sp all the way around the top opening of the tube. Join with sl st to top of beg ch-3. (158 dc)
Place a stitch marker at the beginning of this round.
Rnd 2 (Ruffle Increase): Ch 3 (counts as dc). Dc in same st as join. Work 2 dc in each dc around. Join with sl st to top of beg ch-3. (316 dc)
This doubling creates the volume needed for the ruffle to flare outward. Do not turn.
Rnd 3 (Ruffle Body): Ch 3 (counts as dc). Dc in each dc around. Join with sl st to top of beg ch-3. (316 dc)
Rnd 4 (Scallop Edge Setup): Work dc across and decrease 4 sts evenly by working dc2tog at 4 evenly spaced points (once every 79 sts): (dc in next 78 dc, dc2tog) x 4 times. Join with sl st. (312 dc)
Rnd 5 (Scallop Edging): Using US G-6 / 4.0 mm hook for tighter edge definition, join yarn at beg of round. Sl st into first dc. (Sk 2 dc, shell of 5 dc into next dc, sk 2 dc, sl st into next dc) around. (52 scallop shells)
The ruffle should measure approximately 2.5 to 3 inches deep from the body of the top.
Section 1D: Lower Body Edging
With RS facing, join yarn at the lower edge of the tube at the right side seam. Using US H-8 / 5.0 mm hook:
Rnd 1 (Lower Edge): Ch 1. Sc in each dc and sc in each ch-sp evenly around lower opening. Work 1 sc per dc and 1 sc per ch-sp. Adjust count to 108 sc by working 2 sc into 2 evenly spaced stitches. Join with sl st to first sc. (108 sc)
Rnd 2 (Scallop Lower Edge): With US G-6 / 4.0 mm hook. Work (sl st in next st, sk 1 st, 5 dc in next st, sk 1 st, sl st in next st, sk 1 st) x 18 times. (18 scallop shells)
Section 1E: Neckline Bead Embellishment and Drawstring
Thread 8 to 12 wooden beads onto a separate length of yarn. Using your yarn needle, weave this beaded strand through the top of Rnd 1 of the Ruffle Foundation, spacing beads evenly around the top. Knot the strand ends together at the back and weave in ends.
For the drawstring, cut 2 lengths of yarn each 50 inches long. Fold in half to find midpoint. Insert hook at center front of body, approximately 1 inch below the ruffle base. Pull midpoint loop through to RS. Draw both tails through the loop to anchor. Separate tails into 2 pairs. Thread a wooden bead onto each pair approximately 8 inches below the attachment point. Knot yarn below each bead. Trim tails to 4 inches below the lower bead.
Part Two: The Tiered Fringe Mini Skirt
Section 2A: Skirt Waistband (Braided Cord)
Follow the Braided Cord special stitch instructions to create a 35-inch braid. Thread the toggle button onto the braid approximately 2 inches from one knotted end. Set aside while working the skirt body.
Section 2B: Skirt Body (Worked in Rounds)
The skirt is worked in rounds from the waist edge downward.
Foundation Round (Waistband Channel):
Using US H-8 / 5.0 mm hook, chain 128 and join with sl st to form a ring, being careful not to twist the chain. (128 ch)
Rnd 1 (Waistband Channel): Ch 4 (counts as dc plus ch 1). Sk 1 ch, dc in next ch, (ch 1, sk 1 ch, dc in next ch) around. Join with sl st to 3rd ch of beg ch-4. (64 dc, 64 ch-1 sps)
Rnd 2: Ch 4. (Dc in next dc, ch 1) around. Join with sl st to 3rd ch of beg ch-4. (64 dc, 64 ch-1 sps)
Rnd 3: Rep Rnd 2. (64 dc, 64 ch-1 sps)
Section 2C: Skirt Mesh Body
Rnds 4 through 12: Continue in mesh stitch as established, working (dc in next dc, ch 1) around each round. Join each round. (64 dc, 64 ch-1 sps per round)
After Rnd 12, the skirt body should measure approximately 5 inches below the waistband.
Section 2D: First Fringe Tier Base
Rnd 13 (Increase for Flare): Ch 3 (counts as dc). Dc in same st as join. (2 dc in next dc, dc in ch-1 sp, 2 dc in next dc, dc in ch-1 sp) around. Join with sl st to top of beg ch-3. (192 dc)
Rnd 14: Ch 3 (counts as dc). Dc in each dc around. Join with sl st. (192 dc)
Rnd 15: Ch 3. Dc in each dc around. Join with sl st. (192 dc)
Rnd 16 (Fringe Row 1): Ch 1. Sc in each dc around. Join with sl st to first sc. (192 sc)
Place a stitch marker in Rnd 16 to identify it for fringe attachment later.
Section 2E: Second Tier Mesh Section
Rnd 17: Ch 4 (counts as dc plus ch 1). Sk 1 sc, dc in next sc, (ch 1, sk 1 sc, dc in next sc) around. Join with sl st to 3rd ch of beg ch-4. (96 dc, 96 ch-1 sps)
Rnds 18 through 19: Ch 4. (Dc in next dc, ch 1) around. Join. (96 dc, 96 ch-1 sps each round)
Section 2F: Shell Stitch Lower Tier
Rnd 20 (Shell Stitch Setup): Ch 3 (counts as dc). Dc in each dc and 1 dc in each ch-1 sp around. Join with sl st. (192 dc)
Rnd 21 (Shell Stitch Row): Ch 1. Sc in first dc. (Sk 2 dc, 5 dc shell in next dc, sk 2 dc, sc in next dc) around. End with sl st to first sc. (32 shells)
Rnd 22 (Second Shell Row): Ch 3. Work (sc in center dc of next shell, ch 3, 5 dc shell in next sc between shells, ch 3) around. End with sl st to beg ch. (32 shells)
Rnd 23 (Lower Edging): Ch 1. Sc in each st and 2 sc in each ch-3 sp around. Join. (approximately 224 sc)
The skirt body should now measure approximately 8 inches from the waist edge to the lower sc row.
Section 2G: Attaching Fringe
First Fringe Tier: Attach fringe to every sc of Rnd 16. Cut yarn in pairs of 10-inch lengths, 2 strands per fringe knot. Work 1 fringe knot in every sc around Rnd 16. (192 fringe knots)
Trim all fringe evenly to 3.5 inches.
Second Fringe Tier: Attach fringe to every sc of Rnd 23. Attach 1 fringe knot in every sc around. (approximately 224 fringe knots)
Trim all fringe evenly to 3.5 inches.
Section 2H: Threading the Waistband
Thread the completed braided cord waistband through the ch-1 spaces of Rnd 1 of the skirt, weaving in and out of alternating ch-sps all the way around the waist channel. Draw both ends of the braid to the front. The toggle button should be positioned at the front opening. When wearing, cinch the braid to your desired waist size and fasten the toggle.
Finishing and Blocking
Weave in all yarn tails using your yarn needle, being careful not to pucker the mesh.
Wet blocking is recommended: Soak both pieces in cool water for 15 minutes. Gently squeeze out excess water without wringing. Lay flat on a blocking mat. Use T-pins to pin each piece to the correct finished measurements. Allow to air dry completely, which may take 12 to 24 hours depending on humidity.
Blocking opens up the mesh pattern significantly and evens the scallop edges. After blocking, attach any remaining wooden beads to the ruffle neckline using a yarn needle, spacing beads approximately 1.25 inches apart along the ruffle base row.
Size Customization Tips
To make a larger size, add multiples of 4 chains to the foundation chain for both the top body and the skirt, keeping all mesh repeats in groups of 4 stitches plus the appropriate turning chain. Add 1 to 2 rows to the body sections to add length. To widen the ruffle proportionally, add the same number of chains across the ruffle foundation as added to the body.
For a longer skirt, add additional rounds to the main body before beginning the fringe tiers. Each additional round adds approximately 0.4 inches of length.
Care Instructions
Hand wash in cool water with a gentle soap. Do not wring or twist. Roll in a clean towel to remove excess water. Lay flat to dry away from direct sunlight to prevent fading of the terracotta color. Iron on low heat with a pressing cloth if needed. Do not tumble dry. Do not bleach. Store flat or folded to prevent stretching of the mesh.
You Did It!
Thank you so much for choosing this pattern for your next crochet adventure. I genuinely hope you love making this boho set as much as I loved designing it. There is something deeply satisfying about finishing a coordinated outfit that you made entirely with your own hands.
I would absolutely love to see your finished set! Tag me on Instagram or share your photos in our Facebook group. Seeing your creations honestly makes my whole day.
If this pattern is calling to you, go ahead and save it to your Pinterest boards so you can find it when you are ready to start. And please drop a comment below when you finish yours. I cannot wait to see the beautiful colors and variations you all create!
You Might Also Like
- Midnight Garden Peony Motif Tote Free Crochet Pattern
- Burnt Orange Autumn Granny Cardigan Free Crochet Pattern
- Sage Garden Granny Square Maxi Dress Free Crochet Pattern
- Dusty Rose Diamond Lattice Vest Free Crochet Pattern
