
I’ve been looking for the perfect granny square cardigan pattern for ages, and this one finally checks every box. The burnt orange, chocolate brown, and cream colorway feels like a crisp autumn afternoon wrapped around your shoulders. This is my favourite kind of project: classic granny squares transformed into something modern and wearable.
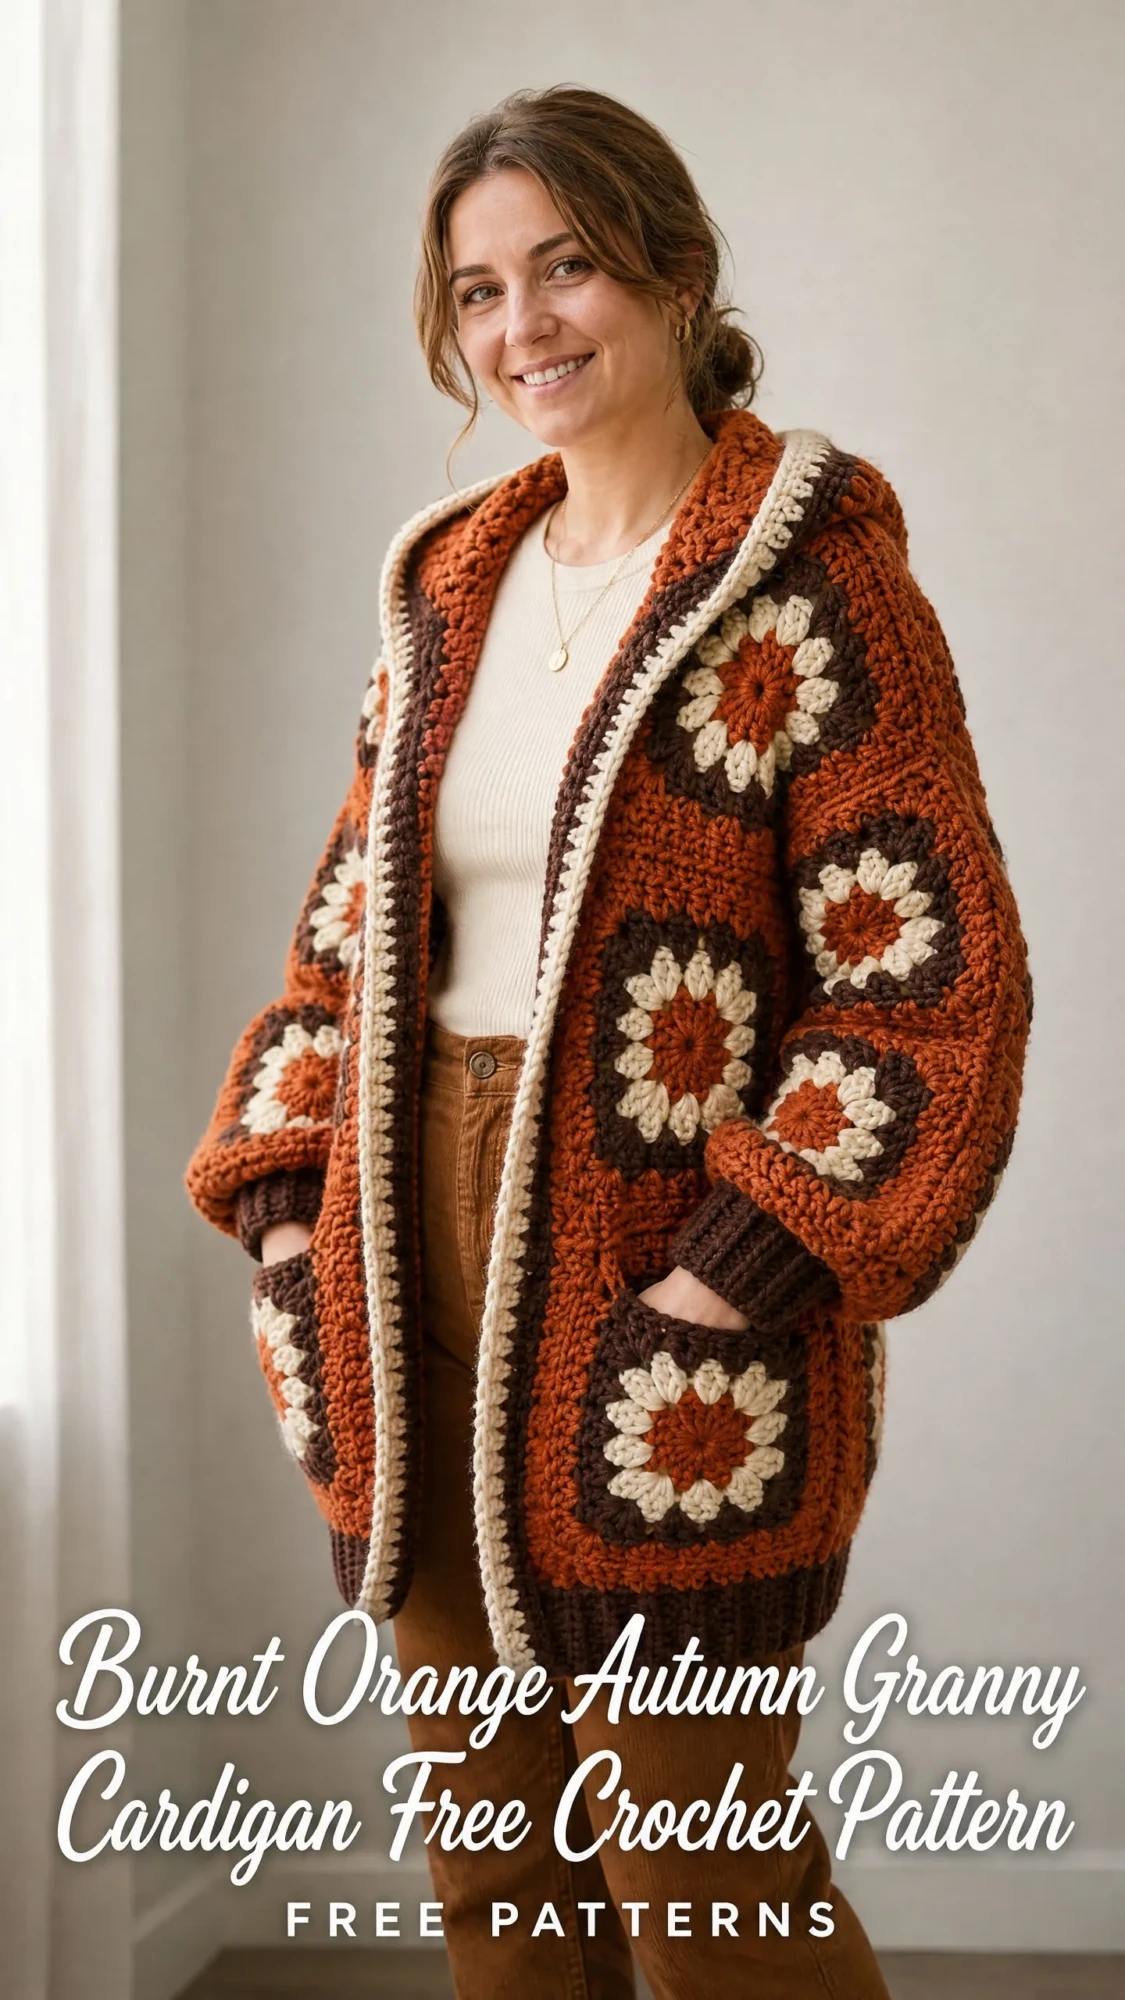
If you’ve ever wanted to make a cozy oversized cardigan but felt intimidated by garment construction, this is the one to try. The entire thing is built from simple granny squares joined together. No complicated shaping. No confusing decreases. Just squares, seaming, and ribbing.
Let me walk you through everything you need to know to make your own.
What You’re Making
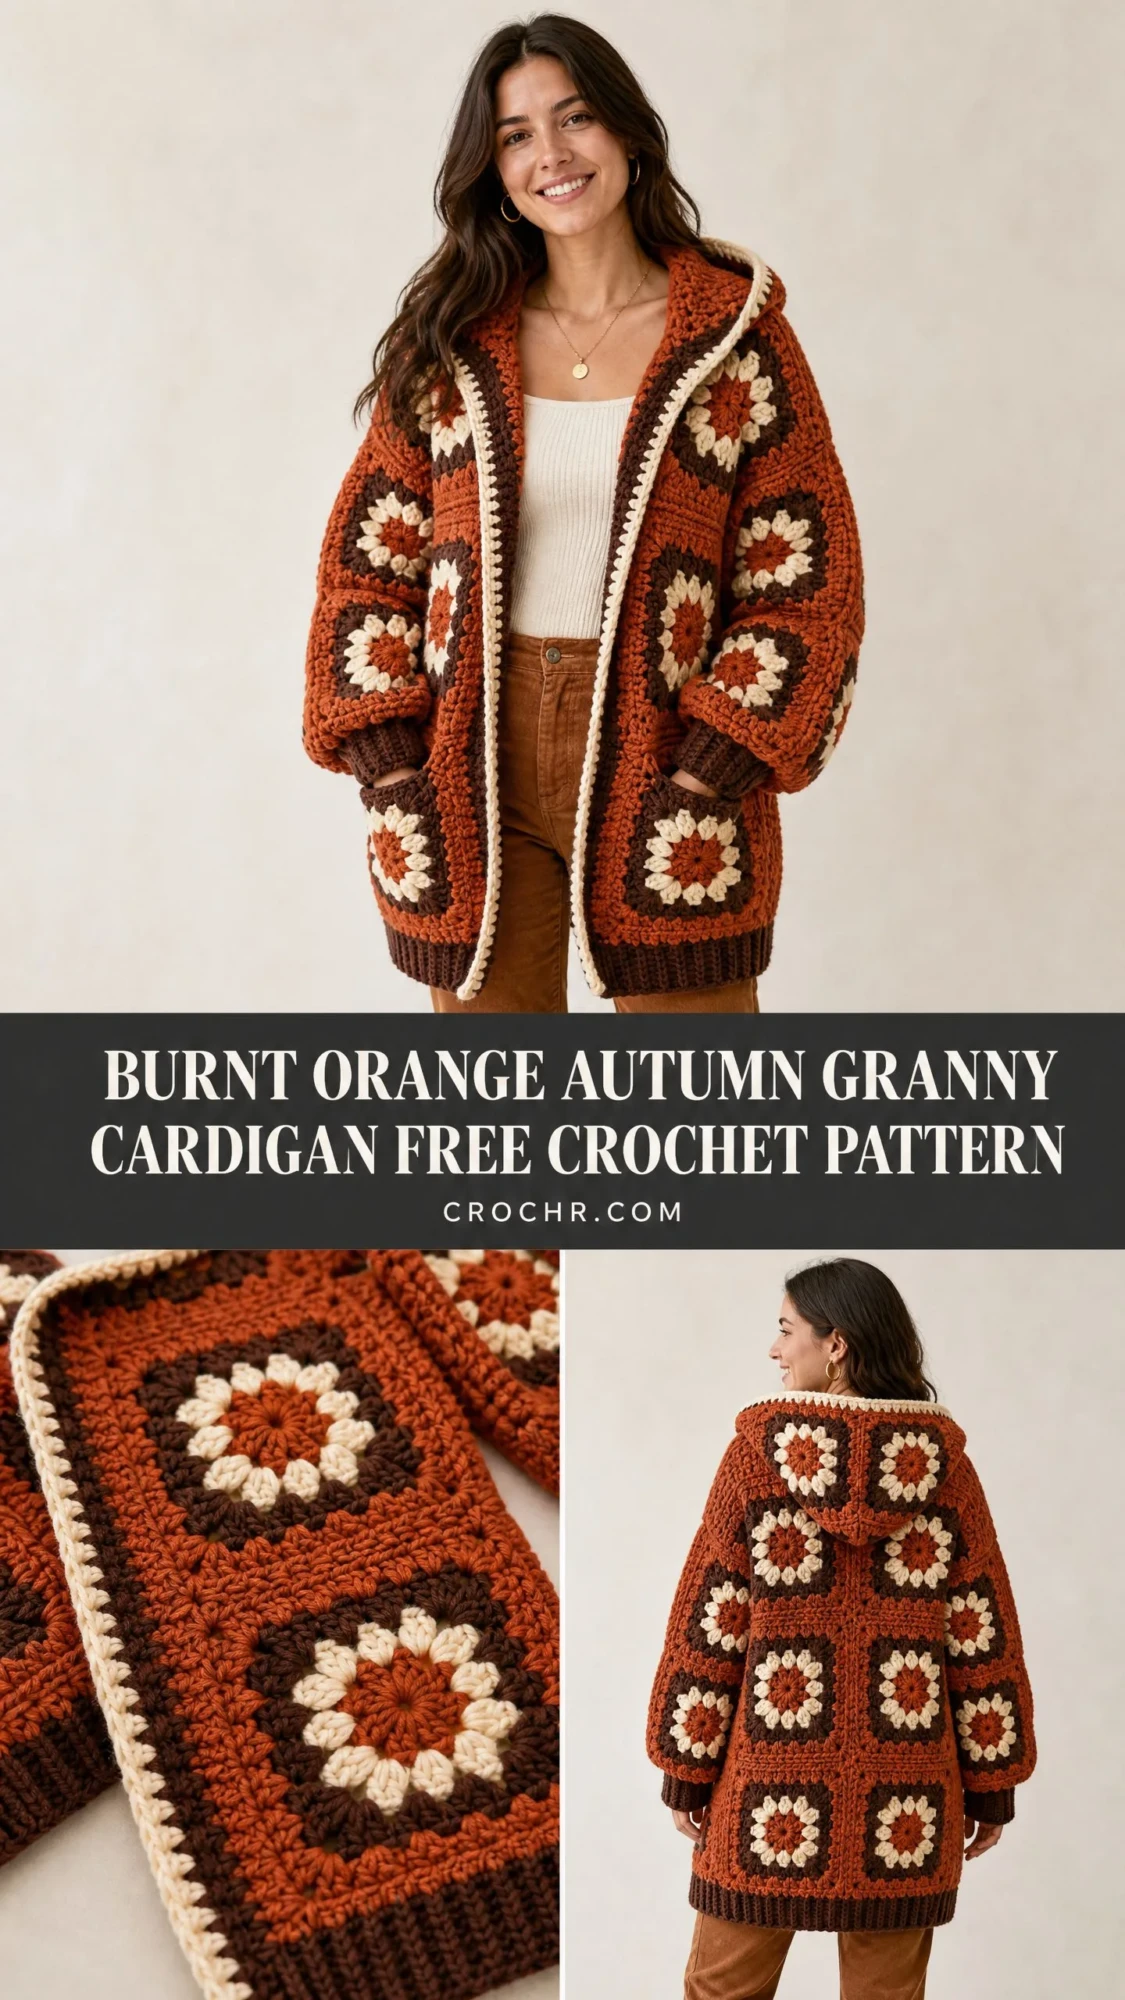
This oversized hooded cardigan features an open front with no buttons or zipper, patch pockets made from single granny squares, ribbed hem and cuffs, and a cream border running along the front opening and hood edge. The construction is straightforward: you make 78 granny squares, join them into panels, seam the panels together, then add the finishing touches.
The finished cardigan fits a Medium (US 8-10) with these measurements:
Skill Level
This pattern is rated intermediate. You should be comfortable working granny squares in rounds, joining squares with a flat join, seaming crochet panels, picking up stitches for ribbing, and working a simple shaped hood. Nothing here is advanced, but the construction sequence requires attention to layout and joining order. Take your time with the assembly section and you’ll be fine.
Time Estimate
Plan for approximately 40 to 55 hours for a size Medium, depending on your working speed. This is definitely a project to savour over several weeks rather than rush through in a weekend.
Materials You’ll Need
Yarn
You’ll need bulky weight yarn (weight 5) in three colors:
Recommended Yarn Options
Option 1: Lion Brand Wool-Ease Thick and Quick (80% acrylic, 20% wool), 6 oz / 170 g, 106 yards / 97 m per skein. Purchase 9 skeins Color A, 5 skeins Color B, 3 skeins Color C. This yarn gives excellent stitch definition for granny squares and blocks beautifully.
Option 2: Paintbox Yarns Simply Chunky (100% acrylic), 3.5 oz / 100 g, 137 yards / 125 m per skein. Purchase 7 skeins Color A, 4 skeins Color B, 3 skeins Color C. Affordable, widely available, and consistent in tension.
Option 3: Malabrigo Chunky (100% merino wool), 3.5 oz / 100 g, 104 yards / 95 m per skein. Purchase 9 skeins Color A, 5 skeins Color B, 3 skeins Color C. Luxurious hand and beautiful stitch definition. Requires gentle blocking.
Substitution Note: Choose any bulky weight yarn that achieves the stated gauge. Avoid yarns with a lot of halo like mohair blends, as they obscure the granny square structure. Always check gauge before beginning.
Hooks
Notions
Gauge
With N/P-15 (10 mm) hook: One completed 4-round granny square equals 5 inches x 5 inches / 12.7 cm x 12.7 cm after blocking.
In double crochet rows: 8 dc equals 4 inches / 10 cm. 4 rows dc equals 4 inches / 10 cm.
Gauge is critical for this garment. An incorrectly sized square will change the finished dimensions significantly. Adjust hook size as needed.
Abbreviations
Let me define every stitch abbreviation you’ll encounter:
Special Stitches
Granny Cluster
This is the building block of your entire cardigan. Here’s how to work one:
Step 1: Yarn over, insert hook into designated ch-sp or space.
Step 2: Yarn over, pull up a loop (3 loops on hook).
Step 3: Yarn over, pull through 2 loops (2 loops on hook).
Step 4: Yarn over, insert hook into same sp.
Step 5: Yarn over, pull up a loop (4 loops on hook).
Step 6: Yarn over, pull through 2 loops (3 loops on hook).
Step 7: Yarn over, insert hook into same sp.
Step 8: Yarn over, pull up a loop (5 loops on hook).
Step 9: Yarn over, pull through 2 loops (4 loops on hook).
Step 10: Yarn over, pull through all 4 loops on hook.
This completes one 3-dc granny cluster. It counts as 3 dc worked into the same space. Don’t overthink it. If you’ve ever made a granny square before, you already know this stitch.
Flat Slip Stitch Join
This is how you’ll connect all your squares together:
Step 1: Hold two squares with right sides facing each other, or side by side depending on section.
Step 2: Insert hook through the outermost loops of the corresponding corner or edge stitches of both squares simultaneously.
Step 3: Draw up a loop and pull through the loop on hook (sl st made).
Step 4: Move to the next pair of corresponding stitches and repeat.
This creates a flat, visible seam on the right side that reads as a decorative ridge.
Ribbing Row
Worked in back loop only single crochet (blo sc) back and forth in short rows perpendicular to the garment edge, then attached with a sl st join. Full instructions are in the ribbing sections below.
dc2tog (Double Crochet 2 Together Decrease)
Step 1: Yarn over, insert hook into first stitch, pull up a loop, yarn over, pull through 2 loops (2 loops on hook).
Step 2: Yarn over, insert hook into next stitch, pull up a loop, yarn over, pull through 2 loops (3 loops on hook).
Step 3: Yarn over, pull through all 3 loops on hook. Decrease complete.
Important Pattern Notes
Before you dive into making squares, read through these notes:
1. All granny squares are worked in the round from the center outward. Do not turn between rounds.
2. Square distribution: Back panel is 4 squares wide x 5 squares tall (20 squares). Each front panel is 2 squares wide x 5 squares tall (10 squares each, 20 total). Each sleeve is 3 squares wide x 4 squares tall (12 squares each, 24 total). Hood panel is 2 squares wide x 5 squares tall (10 squares). Two pocket squares. Grand total: 78 squares.
3. Color sequence for each square: Round 1 with Color C (cream), Round 2 with Color A (burnt orange), Round 3 with Color B (dark chocolate brown), Round 4 with Color A (burnt orange).
4. All squares must be blocked to 5 in x 5 in / 12.7 cm x 12.7 cm before joining. This step is mandatory for even seaming. I cannot stress this enough.
5. Turning chains in ribbing sections count as the first stitch. Turning chains in granny square rounds do not count as stitches.
Granny Square Instructions
Make 78 squares total.
With Color C and N/P-15 hook:
Foundation Ring
Ch 4, sl st to first ch to form ring. (4-ch ring)
Round 1 (Color C)
Ch 3 (does not count as st throughout), work 3-dc cluster into ring, ch 2, (work 3-dc cluster into ring, ch 2) 3 times, sl st to top of first cluster to join. Fasten off Color C.
You now have 4 clusters and 4 ch-2 corner spaces.
Round 2 (Color A)
Join Color A with sl st to any ch-2 corner sp. Ch 3, work 3-dc cluster into same corner sp, ch 2, work 3-dc cluster into same corner sp (first corner made), ch 1, (work 3-dc cluster into next corner sp, ch 2, work 3-dc cluster into same corner sp, ch 1) 3 times, sl st to top of first cluster. Fasten off Color A.
You now have 8 clusters: 2 per corner. 4 ch-2 corner sps. 4 ch-1 side sps.
Round 3 (Color B)
Join Color B with sl st to any ch-2 corner sp. Ch 3, work 3-dc cluster into same corner sp, ch 2, work 3-dc cluster into same corner sp (corner), ch 1, work 3-dc cluster into next ch-1 side sp, ch 1, (work 3-dc cluster into next corner sp, ch 2, work 3-dc cluster into same corner sp, ch 1, work 3-dc cluster into next ch-1 side sp, ch 1) 3 times, sl st to top of first cluster. Fasten off Color B.
You now have 12 clusters: 2 per corner plus 1 per side. 4 ch-2 corner sps. 8 ch-1 sps.
Round 4 (Color A)
Join Color A with sl st to any ch-2 corner sp. Ch 3, work 3-dc cluster into same corner sp, ch 2, work 3-dc cluster into same corner sp (corner), ch 1, (work 3-dc cluster into next ch-1 sp, ch 1) twice, (work 3-dc cluster into next corner sp, ch 2, work 3-dc cluster into same corner sp, ch 1, (work 3-dc cluster into next ch-1 sp, ch 1) twice) 3 times, sl st to top of first cluster. Fasten off Color A.
You now have 16 clusters: 2 per corner plus 2 per side. 4 ch-2 corner sps. 12 ch-1 sps.
Block each square to 5 in x 5 in / 12.7 cm x 12.7 cm. Pin corners firmly.
Checkpoint
Each blocked square should measure exactly 5 in x 5 in. Along each side you will count 2 clusters flanking each corner sp and 2 clusters in the side with ch-1 sps between each cluster. If your square is smaller than 5 in, go up a hook size. If larger, go down a hook size.
Joining the Panels
Back Panel
Arrange 20 squares in a 4-square wide by 5-square tall grid. Join squares in horizontal rows first using the flat slip stitch join, working through corresponding ch-1 sps and cluster tops along each edge. Then join the horizontal rows to each other.
The back panel should measure 20 in wide x 25 in tall / 51 cm wide x 63.5 cm tall after joining and before ribbing.
Front Right Panel
Arrange 10 squares in a 2-square wide by 5-square tall grid. Join same as back. Panel measures 10 in wide x 25 in tall / 25.4 cm wide x 63.5 cm tall.
Front Left Panel
Repeat as for Front Right Panel.
Sleeve Panels (make 2)
Arrange 12 squares in a 3-square wide by 4-square tall grid. Join same as body panels. Each flat sleeve panel measures 15 in wide x 20 in tall / 38 cm wide x 51 cm tall.
Hood Panel
Arrange 10 squares in a 2-square wide by 5-square tall grid. Join same as body panels. Hood panel measures 10 in wide x 25 in tall / 25.4 cm wide x 63.5 cm tall.
Pocket Squares (make 2)
Each pocket is a single granny square. Do not join to anything yet.
Assembling the Cardigan Body
Step 1: Shoulder Seams
Place Back panel and Front Right panel with right sides together, aligning top edges. Using Color B and flat slip stitch join, seam across the top 2 squares of the front right panel to the corresponding top 2 squares on the right side of the back panel. This creates the right shoulder seam.
Repeat for Front Left panel and left side of back panel.
Step 2: Side Seams
With RS together, seam the front panels to the back panel along both side edges. Seam from bottom hem up 15 in / 38 cm (3 squares), leaving the top 10 in / 25.4 cm (2 squares) open as the armhole.
Step 3: Sleeve Seaming and Attachment
Fold each sleeve panel so the 3-square-wide edges meet. Seam the long side edge using flat slip stitch join to form a tube. The tube is 20 in / 51 cm long and 15 in / 38 cm in circumference.
Align the top raw edge of the sleeve tube with the armhole opening on the body. Pin sleeve cap to armhole and join with flat slip stitch join all around. Ease as needed.
Assembly Checkpoint
After assembling body and sleeves, try the cardigan on or lay flat. The chest should measure approximately 44 in / 112 cm across, sleeve length from shoulder seam to raw cuff edge should be approximately 20 in / 51 cm, and total body length should be approximately 25 in / 63.5 cm before ribbing is added.
Hem Ribbing
The ribbing is worked sideways in short rows, then attached to the bottom edge.
With M/N-13 hook and Color B:
Foundation
Ch 7.
Row 1: Sc in 2nd ch from hook and in each ch across, turn. (6 sc)
Row 2: Ch 1, sc in blo of each st across, turn. (6 sc)
Repeat Row 2 until the ribbing strip measures 40 in / 101.6 cm (the full bottom circumference). Approximately 64 to 68 rows.
Do not fasten off. Sl st the ribbing strip onto the bottom raw edge of the cardigan body, working 1 sl st per end of ribbing row through the corresponding edge st of the granny square panel. When the full bottom is attached, sl st the short ends of the ribbing strip together to join. Fasten off. Weave in ends.
The ribbing adds approximately 3 in / 7.6 cm to the bottom length, bringing total garment length to approximately 28 in / 71 cm.
Cuff Ribbing (make 2)
With M/N-13 hook and Color B:
Foundation
Ch 7.
Row 1: Sc in 2nd ch from hook and in each ch across, turn. (6 sc)
Row 2: Ch 1, sc in blo of each st across, turn. (6 sc)
Repeat Row 2 until the strip measures 15 in / 38 cm (the circumference of the sleeve cuff opening). Approximately 24 to 26 rows.
Attach cuff to sleeve bottom edge same as hem ribbing. Join short ends. Fasten off. Weave in ends.
Hood Assembly
Fold the hood panel in half with right sides together so it forms a 10 in wide x 12.5 in tall rectangle. Seam across the top 10 in / 25.4 cm edge using flat slip stitch join to close the top of the hood.
Attaching Hood to Neckline
The open raw edge of the hood (10 in wide x 2 = 20 in around) matches the neckline perimeter. With RS together, pin hood open edge to neckline, centering the hood back seam at the center back neck. Join with flat slip stitch join all around the neckline. Fasten off.
Hood Border
With N/P-15 hook and Color C, starting at the bottom right front edge of the hood opening: Pick up and sc evenly around the front hood opening edge at a rate of 1 sc per cluster top or ch-1 sp encountered. Work 1 rnd of sc evenly around. Do not turn. Fasten off.
Front Border
With N/P-15 hook and Color C, starting at the bottom right front hem corner:
Row 1 (pick-up row): Working up the Right Front edge, sc evenly along the full front opening edge and around the hood opening and down the Left Front edge, working 1 sc per cluster-top or joining point encountered. Approximate total: 74 sc. Turn.
Row 2: Ch 1, sc in each sc across. Turn. (74 sc)
Row 3: Ch 1, sc in each sc across. Fasten off. (74 sc)
Pocket Construction and Attachment
Each pocket is one blocked granny square (5 in x 5 in).
With Color C and N/P-15 hook, work a sl st border around three sides of each pocket square (bottom and two sides), leaving the top open.
Position each pocket on the front panels approximately 4 in / 10 cm from the side seam and 8 in / 20 cm up from the bottom ribbing edge. Pin in place.
Using Color B and yarn needle, whip stitch the two side edges and bottom edge of each pocket square to the front panel surface, matching the square grid lines. Leave top edge open.
Size Customization Tips
The entire garment is based on multiples of the 5 in granny square. To resize, adjust the number of squares per panel:
For a size Small (chest 38 to 40 in): Use 3 squares wide for the back and adjust fronts accordingly.
For a size Large (chest 48 to 50 in): Use 5 squares wide for the back (25 in) and 3 squares wide for each front.
For length adjustments: Each additional row of squares adds 5 in to body or sleeve length.
Finishing and Blocking
1. Weave in all ends securely using a yarn needle, working ends through the backs of cluster stitches in at least two directions.
2. Block the finished cardigan by soaking in lukewarm water with wool wash for 10 to 15 minutes. Gently press out excess water in a towel. Do not wring.
3. Lay flat on blocking mats. Pin to finished measurements. Allow to dry completely (24 to 48 hours).
4. For 100% acrylic yarns, steam blocking is recommended. Hold a steam iron 1 to 2 inches above the surface. Do not press iron directly onto crochet.
Care Instructions
You Did It!
Thank you so much for choosing this pattern for your next cozy project. I hope you love wearing your finished cardigan as much as I loved designing it. There’s something so satisfying about transforming simple granny squares into a wearable garment that looks this good.
If you make this cardigan, I would absolutely love to see it! Tag me on Instagram or share a photo in our Facebook group. Seeing your finished projects is honestly the best part of sharing patterns.
Don’t forget to save this pattern to your Pinterest boards so you can find it easily when you’re ready to start. And if you have any questions along the way, drop a comment below. Happy crocheting!
You Might Also Like
- Tropical Fish Charm Bracelet Free Crochet Pattern
- Ocean Blues Granny Square Bag Free Crochet Pattern
- Sage Green Cable Knit Crop Sweater Free Crochet Pattern
- Dusty Rose Grid Tie Cardigan Free Crochet Pattern
