
I call this one the Garden Party Romper, and it has quite the history. This design started as a rough sketch in my notebook about three years ago when I was daydreaming about the perfect summer outfit. Something breezy, feminine, and just a little bit fancy.
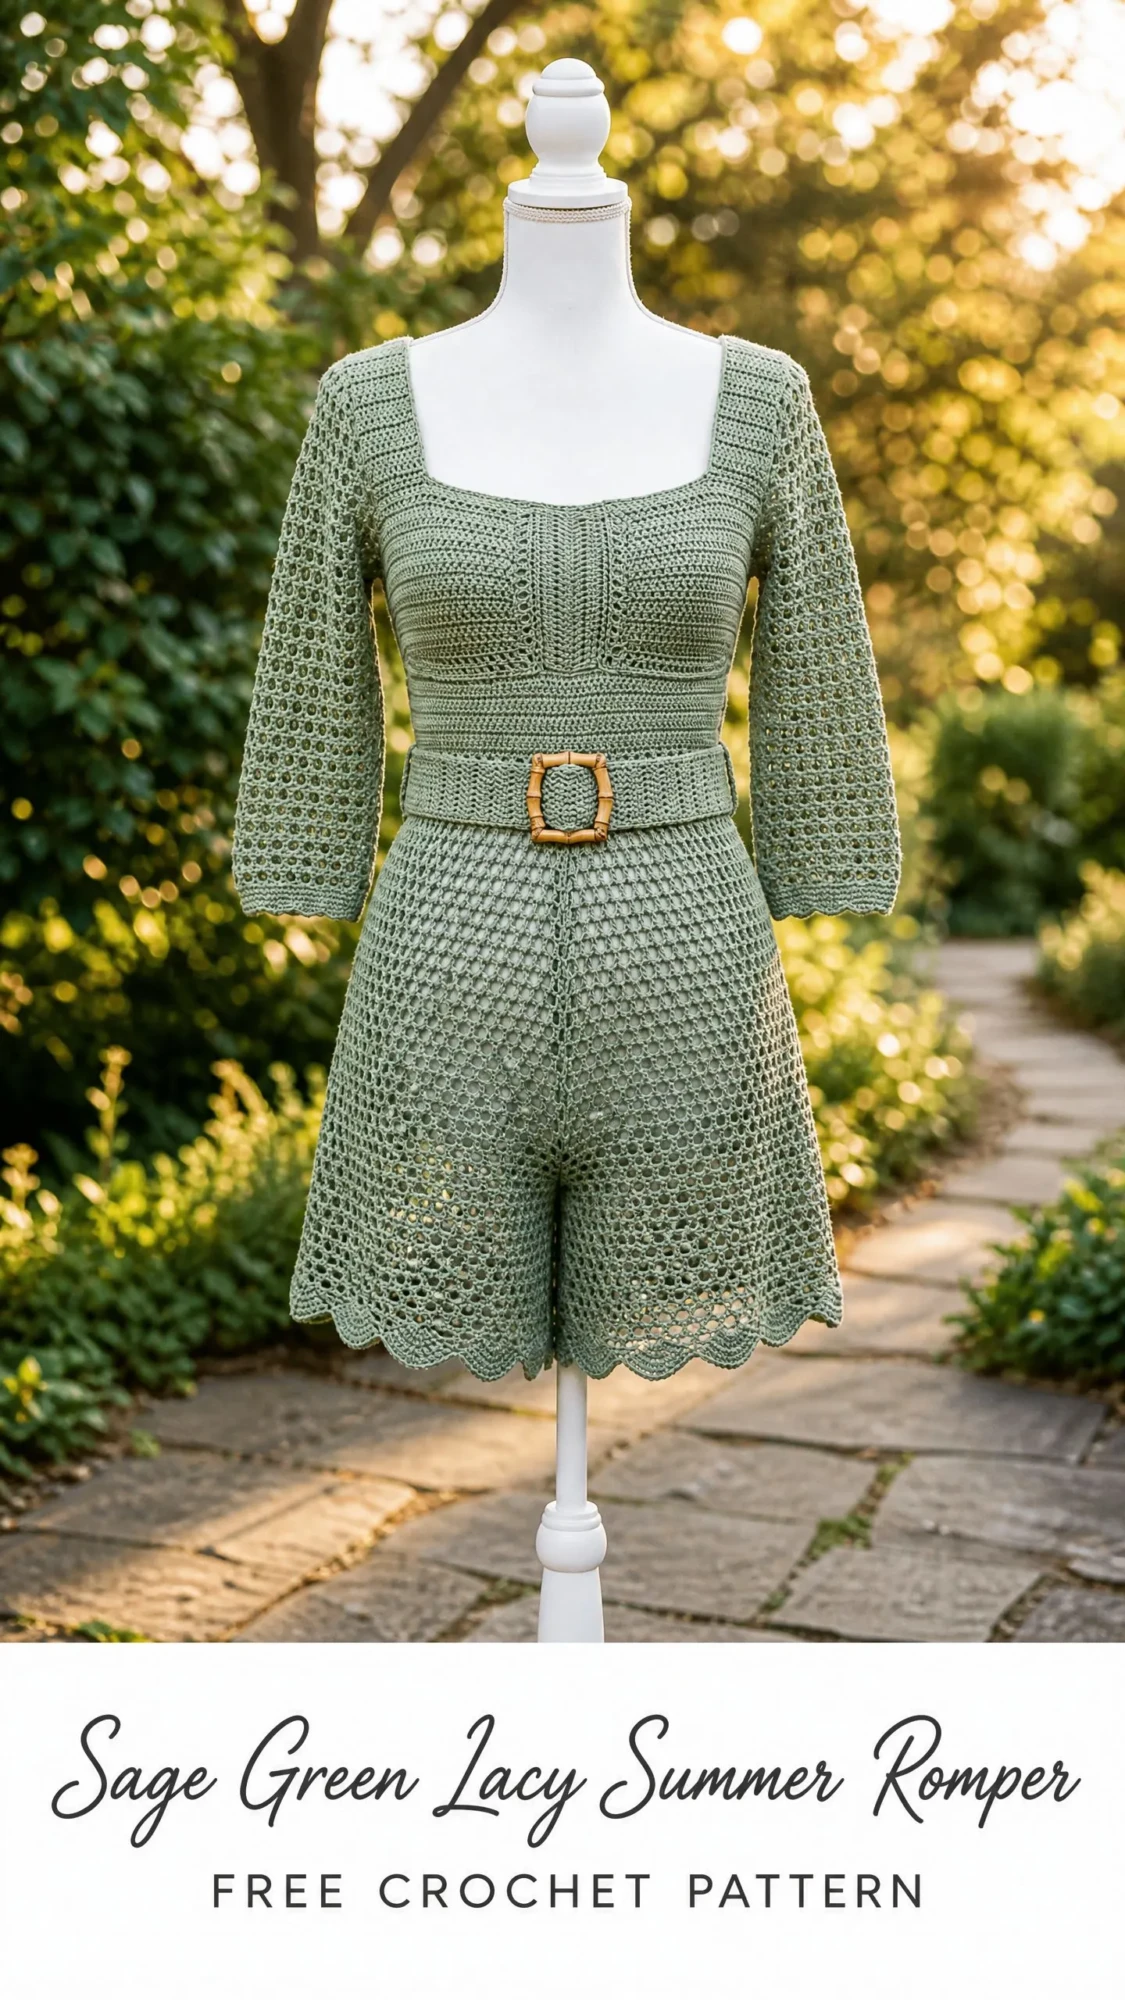
I originally made a version for my sister’s birthday, and she wore it to a vineyard wedding that June. The sage green against all those rolling hills? Absolutely stunning. Since then, I have refined the construction, tweaked the fit, and finally written it all down properly.
Now it is your turn. This romper combines structured bodice shaping with open lacy mesh for breathability, finished off with those dreamy scalloped hems. It is definitely an advanced project, but if you have made fitted garments before, you are ready for this challenge.
Why This Crochet Pattern Works for Summer
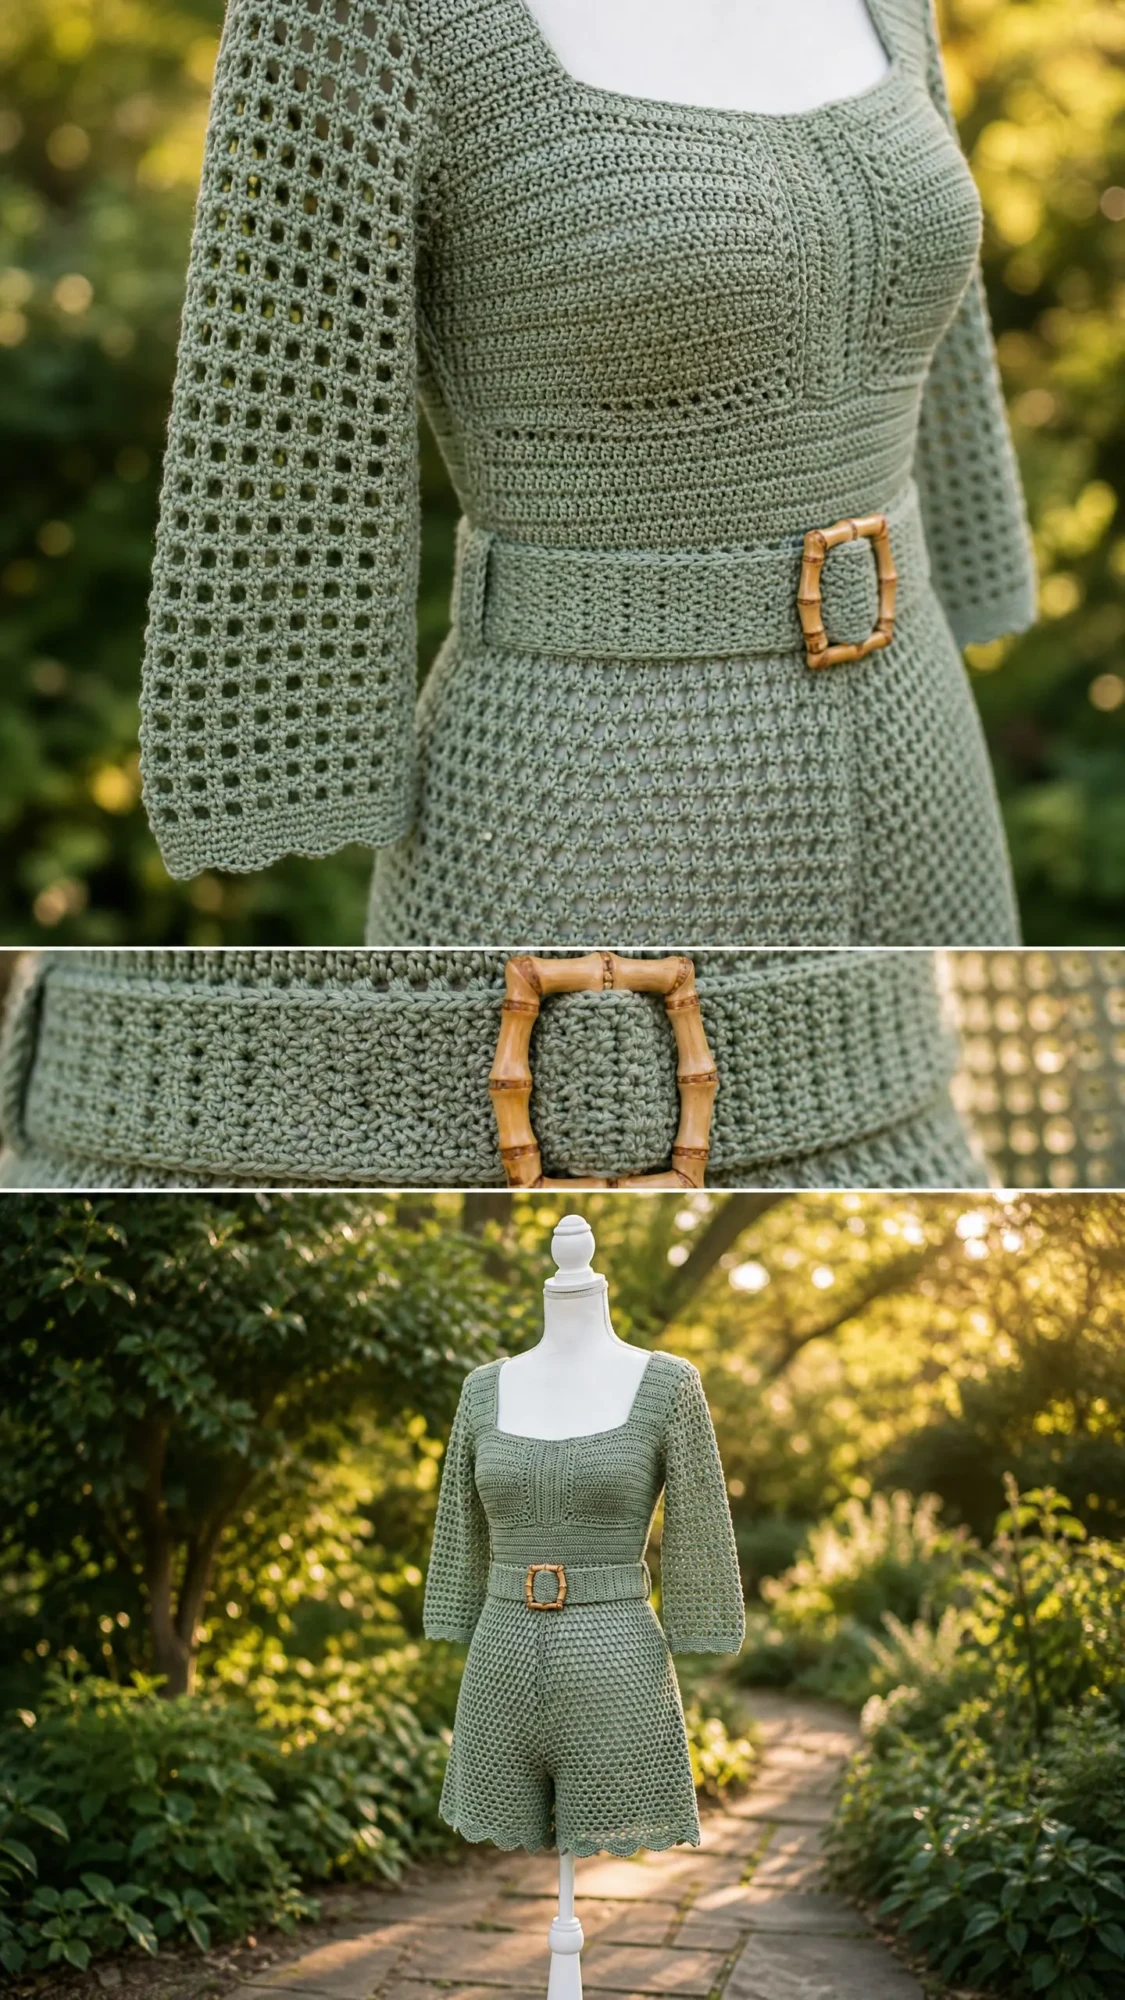
The secret to this lacy summer romper crochet pattern is the combination of textures. The bodice front uses tight single crochet ribbing that gives structure and support. Meanwhile, the sleeves and shorts feature an open mesh grid stitch that lets air flow through beautifully.
Cotton yarn is essential here. The mercerized cotton options I recommend have a subtle sheen and excellent stitch definition. Plus, cotton breathes in hot weather and washes like a dream.
The three quarter length sleeves hit at the perfect spot on your arm. Not too short, not too long. And those scalloped hems on both the sleeves and shorts add the prettiest finishing touch.
Materials You Will Need
Yarn: DK weight (CYCA 3) smooth mercerized cotton or cotton blend yarn. You will need approximately 1,600 yards total.
Here are my top yarn recommendations:
1. Paintbox Yarns Simply DK in Spearmint or Pistachio. This is 100% cotton with 137 yards per 50g skein. You will need about 12 skeins.
2. Lion Brand 24/7 Cotton DK in Sage. This 100% mercerized cotton comes in 186 yards per 100g ball. Grab about 9 balls.
3. Drops Safran in a sage or dusty green colorway. The 70% cotton and 30% polyamide blend gives extra durability at stress points. You will need approximately 10 skeins.
A quick note on yarn substitution: any DK weight smooth yarn at gauge will work. I strongly recommend cotton or a cotton blend for structure and washability. Avoid 100% acrylic because it lacks the drape needed for the shorts to hang correctly.
Hooks:
Additional Materials:
Gauge (Please Do Not Skip This)
I know gauge swatches feel tedious, but for a fitted garment like this romper, they are absolutely essential. A difference of even one stitch per 4 inches will significantly change your finished fit.
Bodice ribbing with E-4 hook in single crochet through back loop only: 20 stitches and 22 rows = 4 inches
Mesh stitch with F-5 hook: 18 stitches (that is 9 mesh repeats of chain 1, double crochet) and 10 rows = 4 inches
Scallop edging: Each scallop spans approximately 1.5 inches
Work a swatch of at least 20 stitches by 20 rows in each stitch pattern. Wash and dry your swatch, then remeasure before you begin.
Finished Measurements
This pattern is written for size Small (US 4 to 6). I have included adjustment notes for Medium and Large throughout.
Skill Level and Time Estimate
This is an advanced crochet pattern. You should feel confident working in the round, doing raglan-style armhole shaping, reading stitch counts across multiple sections, seaming sleeves into armholes, and maintaining gauge over an open mesh pattern.
Plan for approximately 30 to 45 hours of work, depending on your pace and familiarity with the yarn.
Abbreviations and Stitch Definitions
Let me walk you through all the terms you will encounter:
Special Stitches Explained
Mesh Stitch (worked in the round)
This creates the beautiful open grid you see in the sleeves and shorts. Each repeat is 2 stitches wide, consisting of 1 double crochet and 1 chain-1 space.
Here is how to work a mesh round: Chain 3 (this counts as your first double crochet). Skip the double crochet directly below. Double crochet in the next chain-1 space. Chain 1. Skip the next double crochet. Double crochet in the next chain-1 space. Chain 1. Repeat this to the end of the round. End with chain 1, then slip stitch to the top of your beginning chain-3 to close.
Single Crochet Through Back Loop Only (sc-tbl)
This stitch creates the structured ribbed texture on the bodice front panel. Insert your hook under the back loop only, which is the loop farthest from you. Yarn over, pull up a loop. Yarn over, pull through both loops on hook. This creates a visible horizontal ridge on the right side.
Shell Stitch
Work 5 double crochets all into the same stitch or space. This creates a pretty fan shape.
Scallop Edging
Round 1: Single crochet evenly around your hem edge.
Round 2: Skip 1 single crochet. Work a 5-double crochet shell into the next single crochet. Skip 1 single crochet. Slip stitch into the next single crochet. Repeat around.
Your hem stitch count must be divisible by 4 for even scallops.
Construction Overview
Understanding how this romper comes together will help you stay oriented:
1. Bodice is worked in the round from the bottom waist edge upward
2. Armholes are shaped by working flat (separately for front and back)
3. Sleeves are worked separately in the round from cuff upward, then seamed in
4. Shorts are worked downward in the round from the lower bodice edge
5. Scallop edging is added to all hems
6. Belt is worked flat with belt loops attached to waistband
Part One: Bodice Instructions
Foundation
With your F-5 hook and main color, chain 122. Without twisting, slip stitch to the first chain to form a ring.
Round 1 (set-up mesh round, RS): Chain 3 (counts as double crochet here and throughout). Skip the first chain. Double crochet in the next chain. Chain 1. Skip 1 chain, double crochet in the next chain, chain 1. Repeat from to to the last 2 chains. Skip 1 chain. Double crochet in the last chain. Chain 1. Slip stitch to the top of your beginning chain-3 to close. (61 mesh units = 122 working stitch positions)
Place a locking marker at position 1 (the chain-3 top) and a second marker at position 32. This divides your round into a front section of 31 mesh units and a back section of 30 mesh units. The front panel center 5 mesh units (positions 14 through 18) will transition to sc-tbl in Round 3.
Round 2 (mesh): Chain 3. Double crochet in the next chain-1 space. Chain 1. Skip the double crochet. Repeat from to around. End with chain 1. Slip stitch to the top of your beginning chain-3. (61 mesh units)
Round 3 (introduce front panel): Work in established mesh to marker at position 14. Remove the marker. Work 10 sc-tbl across the next 10 stitch positions, working into the chain-1 spaces and double crochet tops alternately to keep even spacing. Replace your marker after the 10th sc-tbl. Continue in mesh to the end of the round. Slip stitch to close. (51 mesh units + 10 sc-tbl = 122 total stitch positions)
Your front panel is now 10 stitches wide, approximately 2.2 inches. On every subsequent round, these 10 stitches are worked in sc-tbl while all other stitches continue in mesh.
Rounds 4 through 10: Work in established pattern, keeping the front panel in sc-tbl and all other stitches in mesh. Slip stitch to close at the end of each round. (51 mesh units + 10 sc-tbl per round)
Waist Shaping
Round 11 (decrease round): Work in established pattern to 3 stitches before the right side marker. Sc2tog across the next 2 stitches. Single crochet in the next stitch. Continue in pattern to 3 stitches before the left side marker. Single crochet in the next stitch. Sc2tog across the next 2 stitches. Continue to the end. Slip stitch to close. (120 total stitch positions)
Rounds 12 through 16: Work even in established pattern. (120 stitch positions per round)
Round 17 (decrease round): Repeat Round 11 decreases at both side markers. (118 stitch positions)
Rounds 18 through 20: Work even. (118 stitch positions per round)
Round 21 (decrease round): Repeat decreases. (116 stitch positions)
Rounds 22 through 23: Work even. (116 stitch positions per round)
Checkpoint: After Round 23, your bodice should measure approximately 4.5 inches from the foundation edge. The waist is drawn in by the three decrease rounds.
Underbust and Bust Shaping
Round 24 (increase round): Work in established pattern to 1 stitch before the right side marker. Work 2 double crochets in the next chain-1 space (increase made). Continue in pattern to 1 stitch before the left side marker. Work 2 double crochets in the next chain-1 space (increase made). Continue to the end. Slip stitch to close. (118 stitch positions)
Rounds 25 and 26: Work even. (118 stitch positions per round)
Round 27 (increase round): Repeat Round 24 increases. (120 stitch positions)
Rounds 28 and 29: Work even. (120 stitch positions per round)
Round 30 (increase round): Repeat increases. (122 stitch positions)
Rounds 31 through 34: Work even. (122 stitch positions per round)
Round 35 (bust increase round): Work in established pattern to 2 stitches before the right side marker. Work 2 double crochets in the next space. Double crochet in the next stitch. Work 2 double crochets in the space after the right side marker. Continue to 2 stitches before the left side marker. Work 2 double crochets in the next space. Double crochet in the next stitch. Work 2 double crochets in the space after the left side marker. Continue to the end. Slip stitch to close. (126 stitch positions)
Rounds 36 through 38: Work even. (126 stitch positions per round)
Round 39 (bust shaping): Repeat Round 35 style increase, adding 4 total. (130 stitch positions)
Rounds 40 through 42: Work even. (130 stitch positions per round)
Checkpoint: After Round 42, your bodice should measure approximately 8.5 inches from the foundation. The piece widens from waist (116) back up to bust (130).
Armhole Division and Shaping
Round 43 (Divide for Armholes): Work across 65 front stitches in established pattern. Chain 4 (armhole bridge, right side). Skip 0 stitches. Join with slip stitch to the far side of the back 65 stitches. You will now work the back and front flat for Rounds 44 through 56 to create armhole openings.
Bodice Back (worked flat)
Row 43B (WS, set-up): With wrong side facing, attach yarn to the first back stitch. Chain 3. Work in mesh across 63 back stitches. Turn. (64 stitch positions, which is 32 mesh units)
Row 44B: Chain 3. Skip the first space. Work in mesh across to the last 2 stitches. Leave the last 2 stitches unworked (armhole shaping). Turn. (60 stitch positions)
Row 45B: Chain 3. Skip the first space. Work in mesh across to the last 2 stitches. Leave the last 2 stitches unworked. Turn. (56 stitch positions)
Row 46B: Chain 3. Work in mesh across. Turn. (56 stitch positions)
Rows 47B through 54B: Work even in mesh. Turn at the end of each row. (56 stitch positions per row)
Row 55B (shoulder divide): Work across 18 stitches. Chain 2. Skip 20 center back neck stitches. Work across the remaining 18 stitches. Fasten off both shoulder sections separately.
Bodice Front (worked flat)
Row 43F (WS): With wrong side facing, attach yarn to the first front stitch. Chain 3. Work in established mesh, keeping the front panel sc-tbl section intact, across 63 front stitches. Turn. (64 stitch positions)
Row 44F: Chain 3. Skip the first space. Work in pattern across to the last 2 stitches. Leave the last 2 stitches unworked. Turn. (60 stitch positions)
Row 45F: Chain 3. Skip the first space. Work in pattern across to the last 2 stitches. Leave the last 2 stitches unworked. Turn. (56 stitch positions)
Rows 46F through 52F: Work even in established pattern. (56 stitch positions per row)
Row 53F (neckline divide): Work across 18 stitches in established pattern. Chain 2. Skip 20 center front stitches. Attach to the remaining 18 stitches with slip stitch. Work across to the end. You now have two shoulder sections of 18 stitches each. Work each shoulder separately for 2 more rows in established pattern, then fasten off.
Shoulder Seam: With right sides together, use slip stitch seaming to join the front and back shoulder sections at each shoulder. Each shoulder seam is 18 stitches. Weave in ends.
Neckline and Armhole Edging
Neckline Edging: With E-4 hook and right side facing, attach yarn at center back neck. Work 1 round of single crochet evenly around the entire neckline, approximately 80 single crochets total. Slip stitch to the first single crochet to close. Work 1 round of slip stitch for a clean finish. Fasten off. (80 sc)
Armhole Edging: With E-4 hook and right side facing, attach yarn at the underarm. Work 1 round of single crochet evenly around the armhole opening, approximately 56 single crochets. Keep the count divisible by 4 for sleeve seaming. Fasten off. Mark the underarm point and shoulder seam point with locking markers. (56 sc)
Part Two: Sleeves (Make 2)
The sleeves are worked in the round from the cuff upward, then seamed into the armhole openings.
With your F-5 hook and main color, chain 48. Slip stitch to the first chain to form a ring, being careful not to twist.
Round 1 (cuff mesh set-up): Chain 3. Skip the first chain. Double crochet in the next chain. Chain 1. Skip 1 chain. Repeat from to around. End with chain 1. Slip stitch to the top of your beginning chain-3. (24 mesh units = 48 stitch positions)
Rounds 2 through 5: Work even in mesh. (24 mesh units per round)
Round 6 (sleeve increase): Chain 3. Double crochet in the first chain-1 space. Chain 1. Double crochet in the same chain-1 space (increase made). Continue in mesh around, working a second increase at the position directly opposite (position 13). Slip stitch to close. (26 mesh units = 52 stitch positions)
Rounds 7 through 9: Work even. (26 mesh units per round)
Round 10 (increase): Repeat Round 6 increases at the same 2 positions. (28 mesh units = 56 stitch positions)
Rounds 11 through 13: Work even. (28 mesh units per round)
Round 14 (increase): Repeat increases. (30 mesh units = 60 stitch positions)
Rounds 15 through 18: Work even. (30 mesh units per round)
Round 19 (increase): Repeat increases. (32 mesh units = 64 stitch positions)
Rounds 20 through 23: Work even. (32 mesh units per round)
Round 24 (increase): Repeat increases. (34 mesh units = 68 stitch positions)
Rounds 25 through 28: Work even. (34 mesh units per round)
Checkpoint: After Round 28, your sleeve should measure approximately 12.5 inches from the cuff foundation.
Sleeve Cap Shaping (worked flat)
Row 29: Chain 3. Work in mesh across, leaving the last 6 stitches unworked. Turn. (62 stitch positions)
Row 30: Chain 3. Work in mesh across, leaving the last 6 stitches unworked. Turn. (56 stitch positions)
Row 31: Chain 3. Work in mesh across. Turn. (56 stitch positions)
Fasten off, leaving a 24-inch tail for seaming.
Sleeve Scallop Edging
With your E-4 hook and right side facing, attach yarn to the foundation chain of the sleeve cuff. Work scallop edging as described in the Special Stitches section. (12 scallops total)
Seaming Sleeves
Hold the sleeve right side to right side against the armhole opening. Pin every 4 stitches around. Using your tapestry needle and yarn tail, seam with whip stitch, matching the 56 sleeve cap stitches to the 56 armhole stitches one to one. Weave in ends. Repeat for the second sleeve.
Part Three: Shorts Instructions
The shorts are worked downward in the round from the lower waist edge of the bodice.
Set-up: With right side facing and F-5 hook, attach yarn at the center back of the foundation chain on the bodice bottom edge.
Round 1 (hip join round): Chain 3. Work double crochet and chain-1 mesh into every other available chain stitch around the bottom edge, adjusting to achieve 76 mesh units. (76 mesh units = 152 stitch positions)
Round 2: Work even in mesh. Slip stitch to close. (76 mesh units = 152 stitch positions)
Round 3 (hip increase): Work in mesh, adding 2 evenly spaced increases at the two side positions. (78 mesh units = 156 stitch positions)
Rounds 4 through 6: Work even in mesh. (78 mesh units = 156 stitch positions per round)
Round 7 (hip increase): Repeat increases at 2 side positions. (80 mesh units = 160 stitch positions)
Rounds 8 through 10: Work even. (80 mesh units = 160 stitch positions per round)
Checkpoint: After Round 10, your shorts should measure approximately 4.5 inches from the hip join round.
Crotch Divide
Round 11: Work across 80 mesh units for the front of the shorts. Chain 4 (crotch bridge). Slip stitch to the first stitch of the back section. Chain 3. Work across 80 mesh units for the back section. Chain 4 (crotch bridge). Slip stitch to the top of the first chain-3. (168 total stitch positions)
Left Leg
Round 1 (leg set-up): Attach yarn at the left side crotch bridge. Chain 3. Work in mesh around the left leg. Slip stitch to close. (82 mesh units = 164 stitch positions)
Rounds 2 through 5: Work even. (82 mesh units per round)
Round 6 (leg taper, decrease round): Work in mesh to the last 2 units before the start-of-round marker. Work dc2tog across the next 2 double crochets with chain 1. Skip the chain-1 space. Repeat at the opposite side of the leg. (80 mesh units = 160 stitch positions)
Rounds 7 through 10: Work even. (80 mesh units per round)
Final leg round: Slip stitch evenly around the leg hem to tighten and prepare for scallop edging. Adjust stitch count to 160, which is divisible by 4 for scallop edging. (160 stitch positions)
Scallop Edging (Left Leg): Work scallop edging around the leg hem. (40 scallops)
Right Leg: Repeat the Left Leg instructions, attaching yarn at the right side crotch bridge.
Crotch finishing: Use your yarn tail to seam the two 4-chain crotch bridges together with a slip stitch seam from the wrong side.
Part Four: Waistband and Belt
Waistband
With your E-4 hook and main color, right side facing, attach yarn at the center front of the waist. Work 1 round of single crochet evenly around the natural waist of the garment, inserting your hook into the row ends or edges. Aim for 108 single crochets around. (108 sc)
Work 3 more rounds of sc-tbl for a total of 4 rounds of waistband. (108 sc per round)
Belt Loops (make 4)
With your E-4 hook and main color, chain 14. Single crochet in the 2nd chain from the hook and in each chain across. (13 sc) Fasten off, leaving 6-inch tails. Fold each loop and sew to the waistband at the left front, right front, left back, and right back positions.
Belt
With your E-4 hook and main color, chain 7.
Row 1: Single crochet in the 2nd chain from the hook and in each chain across. Turn. (6 sc)
Row 2: Chain 1. Sc-tbl in each single crochet across. Turn. (6 sc)
Repeat Row 2 until the belt measures 32 inches, or your desired length to fit through the buckle with extra length for tying. Fasten off.
Fold one short end of the belt over the bottom bar of the bamboo rectangular ring buckle. Sew the folded end down securely with your yarn tail and tapestry needle.
Size Customization Tips
To size up: For every inch of additional circumference needed, add 4 to 5 stitches to the bodice foundation chain. Keep your foundation chain divisible by 2.
For the shorts, every 2 additional inches of hip circumference requires adding approximately 9 stitches to Round 1. Make sure all final hem stitch counts remain divisible by 4 for scallop edging.
For a longer romper: Add rounds to the shorts before the crotch divide. Each additional round adds approximately 0.4 inches to the outseam length.
For shorter sleeves: Omit increase rounds. Each increase round removed shortens the sleeve by approximately 1.5 inches.
Blocking and Finishing Your Lacy Summer Romper
Wet blocking is essential for this garment. The mesh stitch will open up significantly when wet, evening out the grid and allowing the scallops to reach their full beauty.
1. Weave in all ends securely before blocking
2. Submerge the completed romper in cool water for 20 minutes. Do not wring
3. Press gently between two towels to remove excess water
4. Lay flat on blocking mats
5. Use rust-proof pins to open the mesh sections and position the scallops evenly
6. Pin the square neckline to maintain its geometric shape
7. Allow to dry completely, which may take 24 to 48 hours
8. Do not hang to dry as the wet cotton will stretch the garment lengthwise
Care Instructions
Machine wash on a gentle cycle in cool water using a mesh laundry bag. Use mild detergent. Do not use bleach or fabric softener.
I really hope you love making this romper as much as I loved designing it. There is something so satisfying about creating a complete outfit from scratch, and I know you are going to look amazing in yours. If you found this crochet pattern helpful, I would love it if you saved it to your Pinterest boards so you can find it again later. And please, please leave a comment below if you make one. Seeing your finished projects absolutely makes my day!
You Might Also Like
- Midnight Garden Peony Motif Tote Free Crochet Pattern
- Forest Green Elegant Peplum Crochet Top Free Pattern
- Buttercream Yellow Dragon Amigurumi Plush Free Crochet Pattern
- Mustard Sunflower Bow Bucket Bag Free Crochet Pattern
