
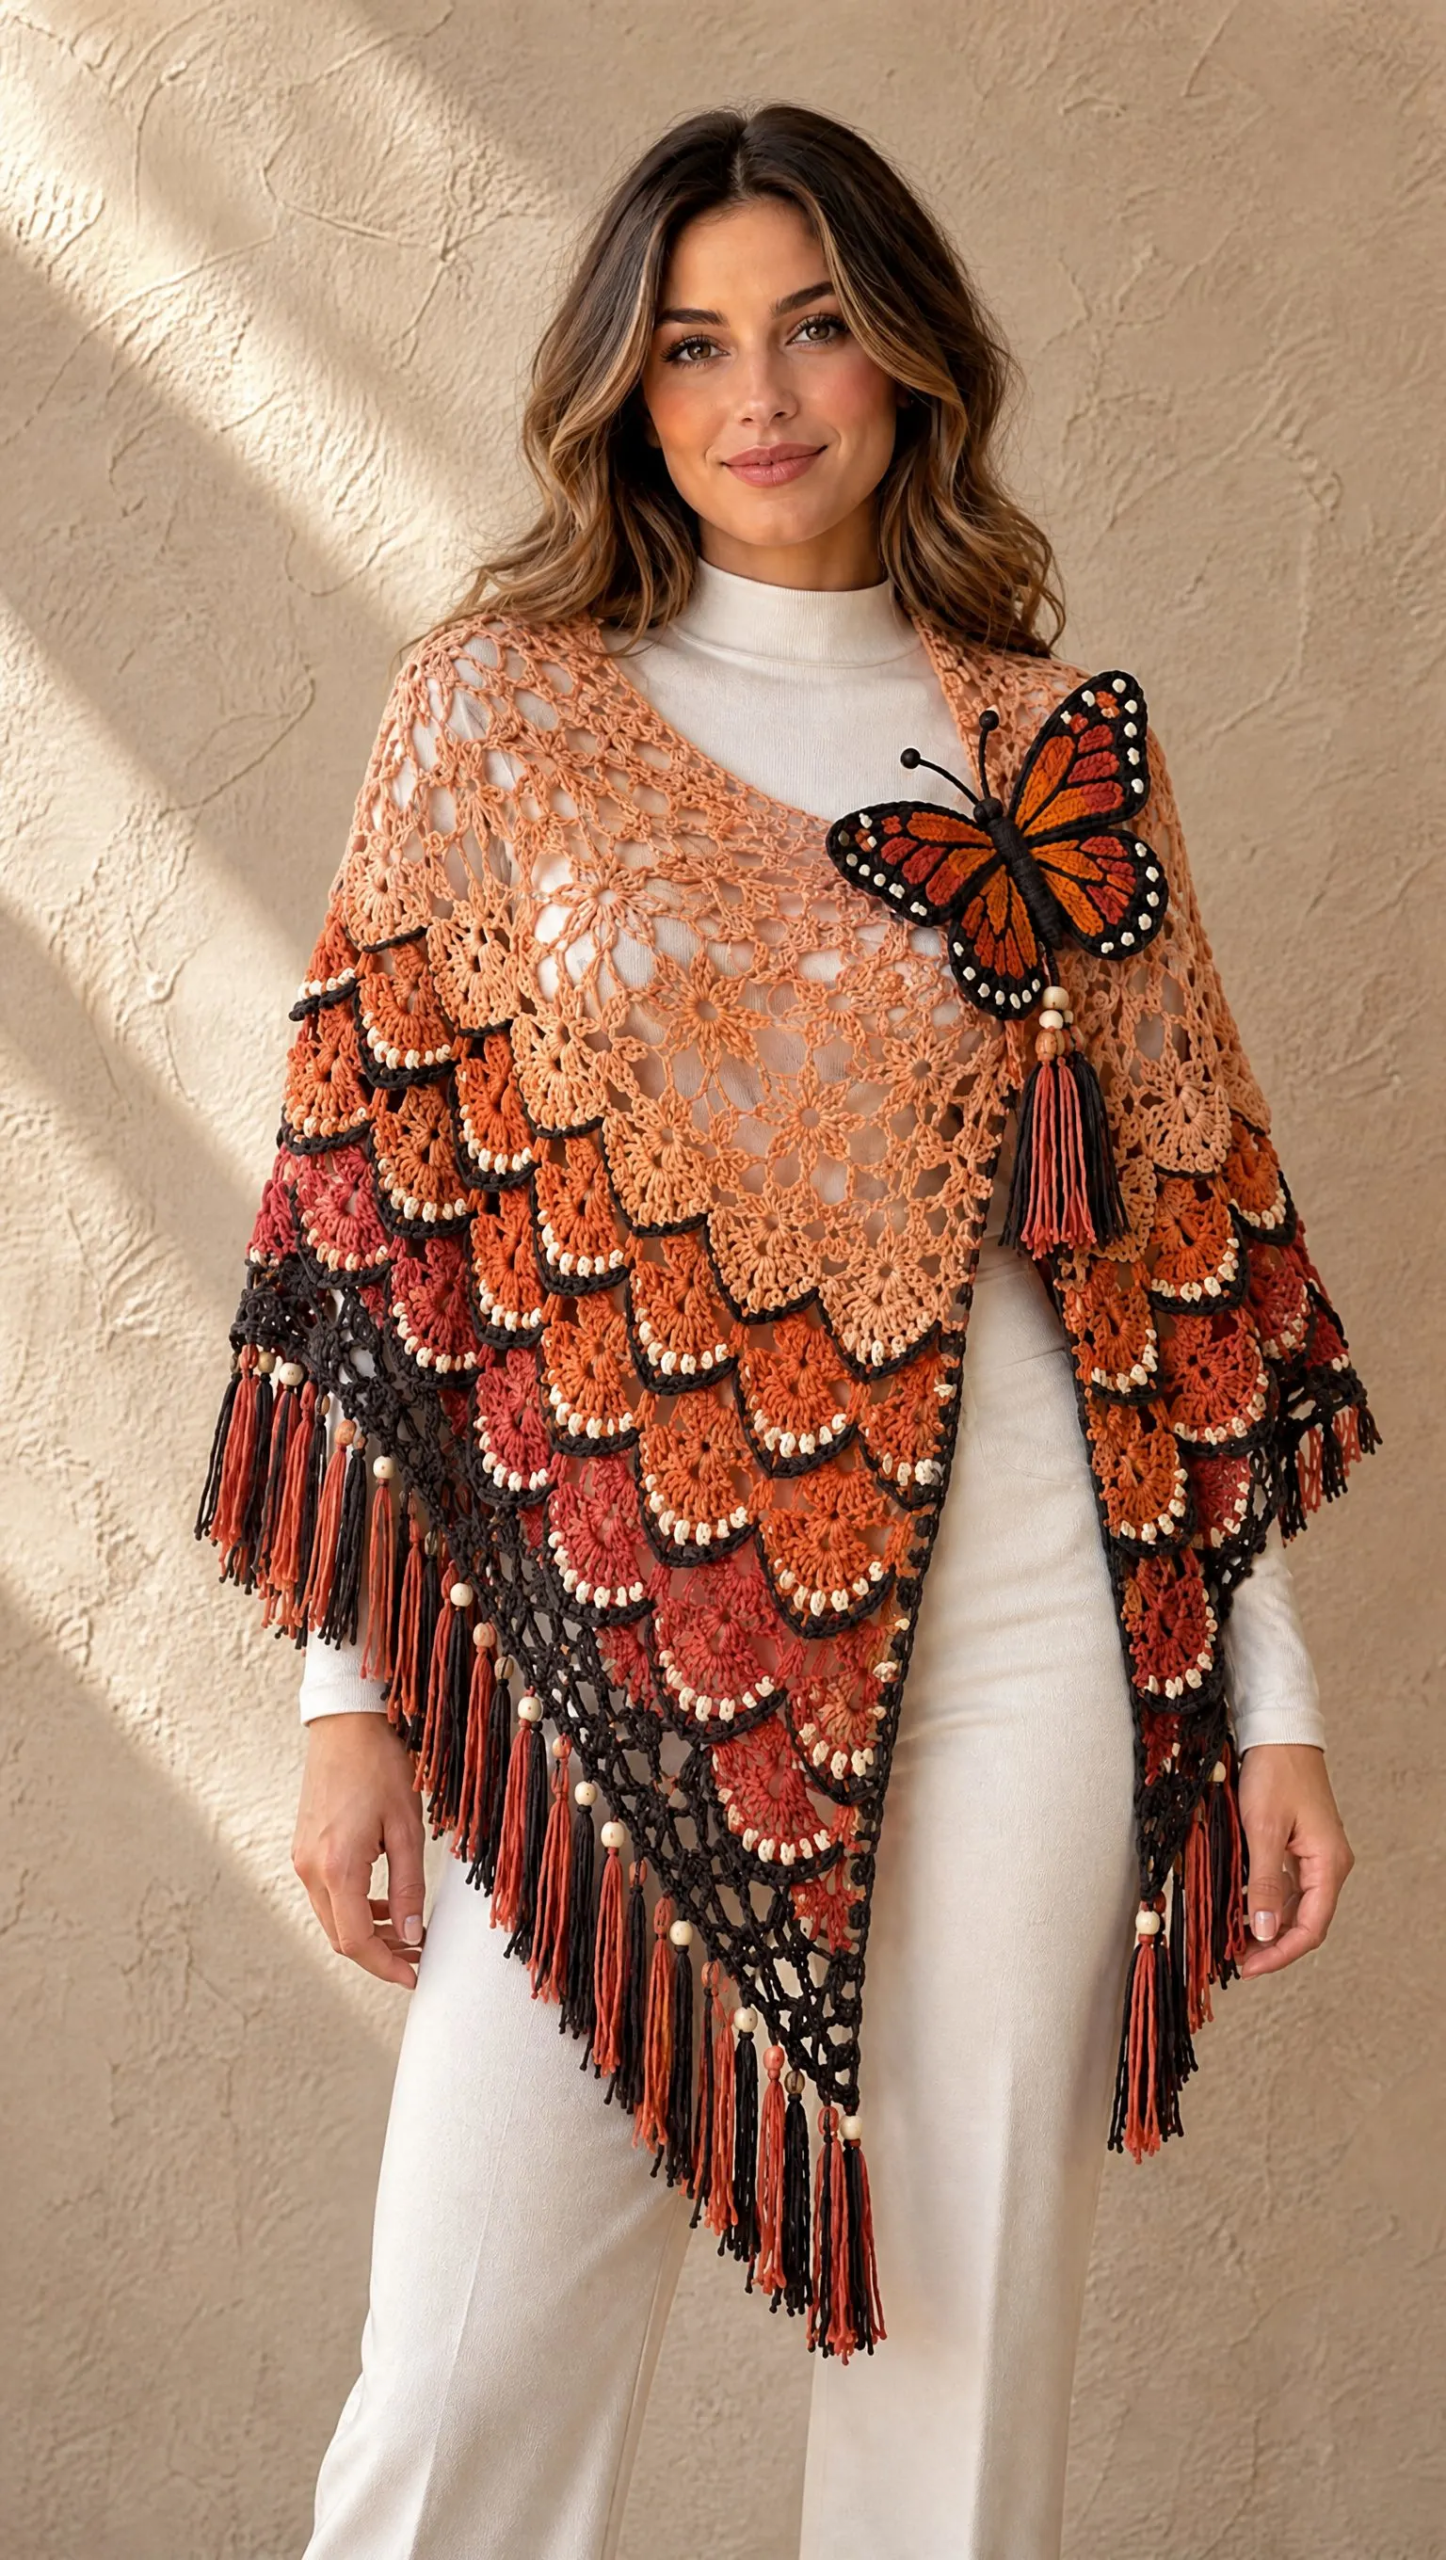
A stunning triangular shawl like this one keeps you warm during those transitional seasons while making a serious style statement. The Sunset Monarch Shawl combines an airy lace yoke with raised overlapping scales that create incredible texture and dimension. It works up in sport weight cotton or cotton-bamboo blend yarn, making it perfect for cool summer evenings or layering in autumn.
Get the Ad-Free PDF Pattern
You can find the free pattern below, or you can purchase the ad-free printable PDF from my shop.
Get the Printable PDF →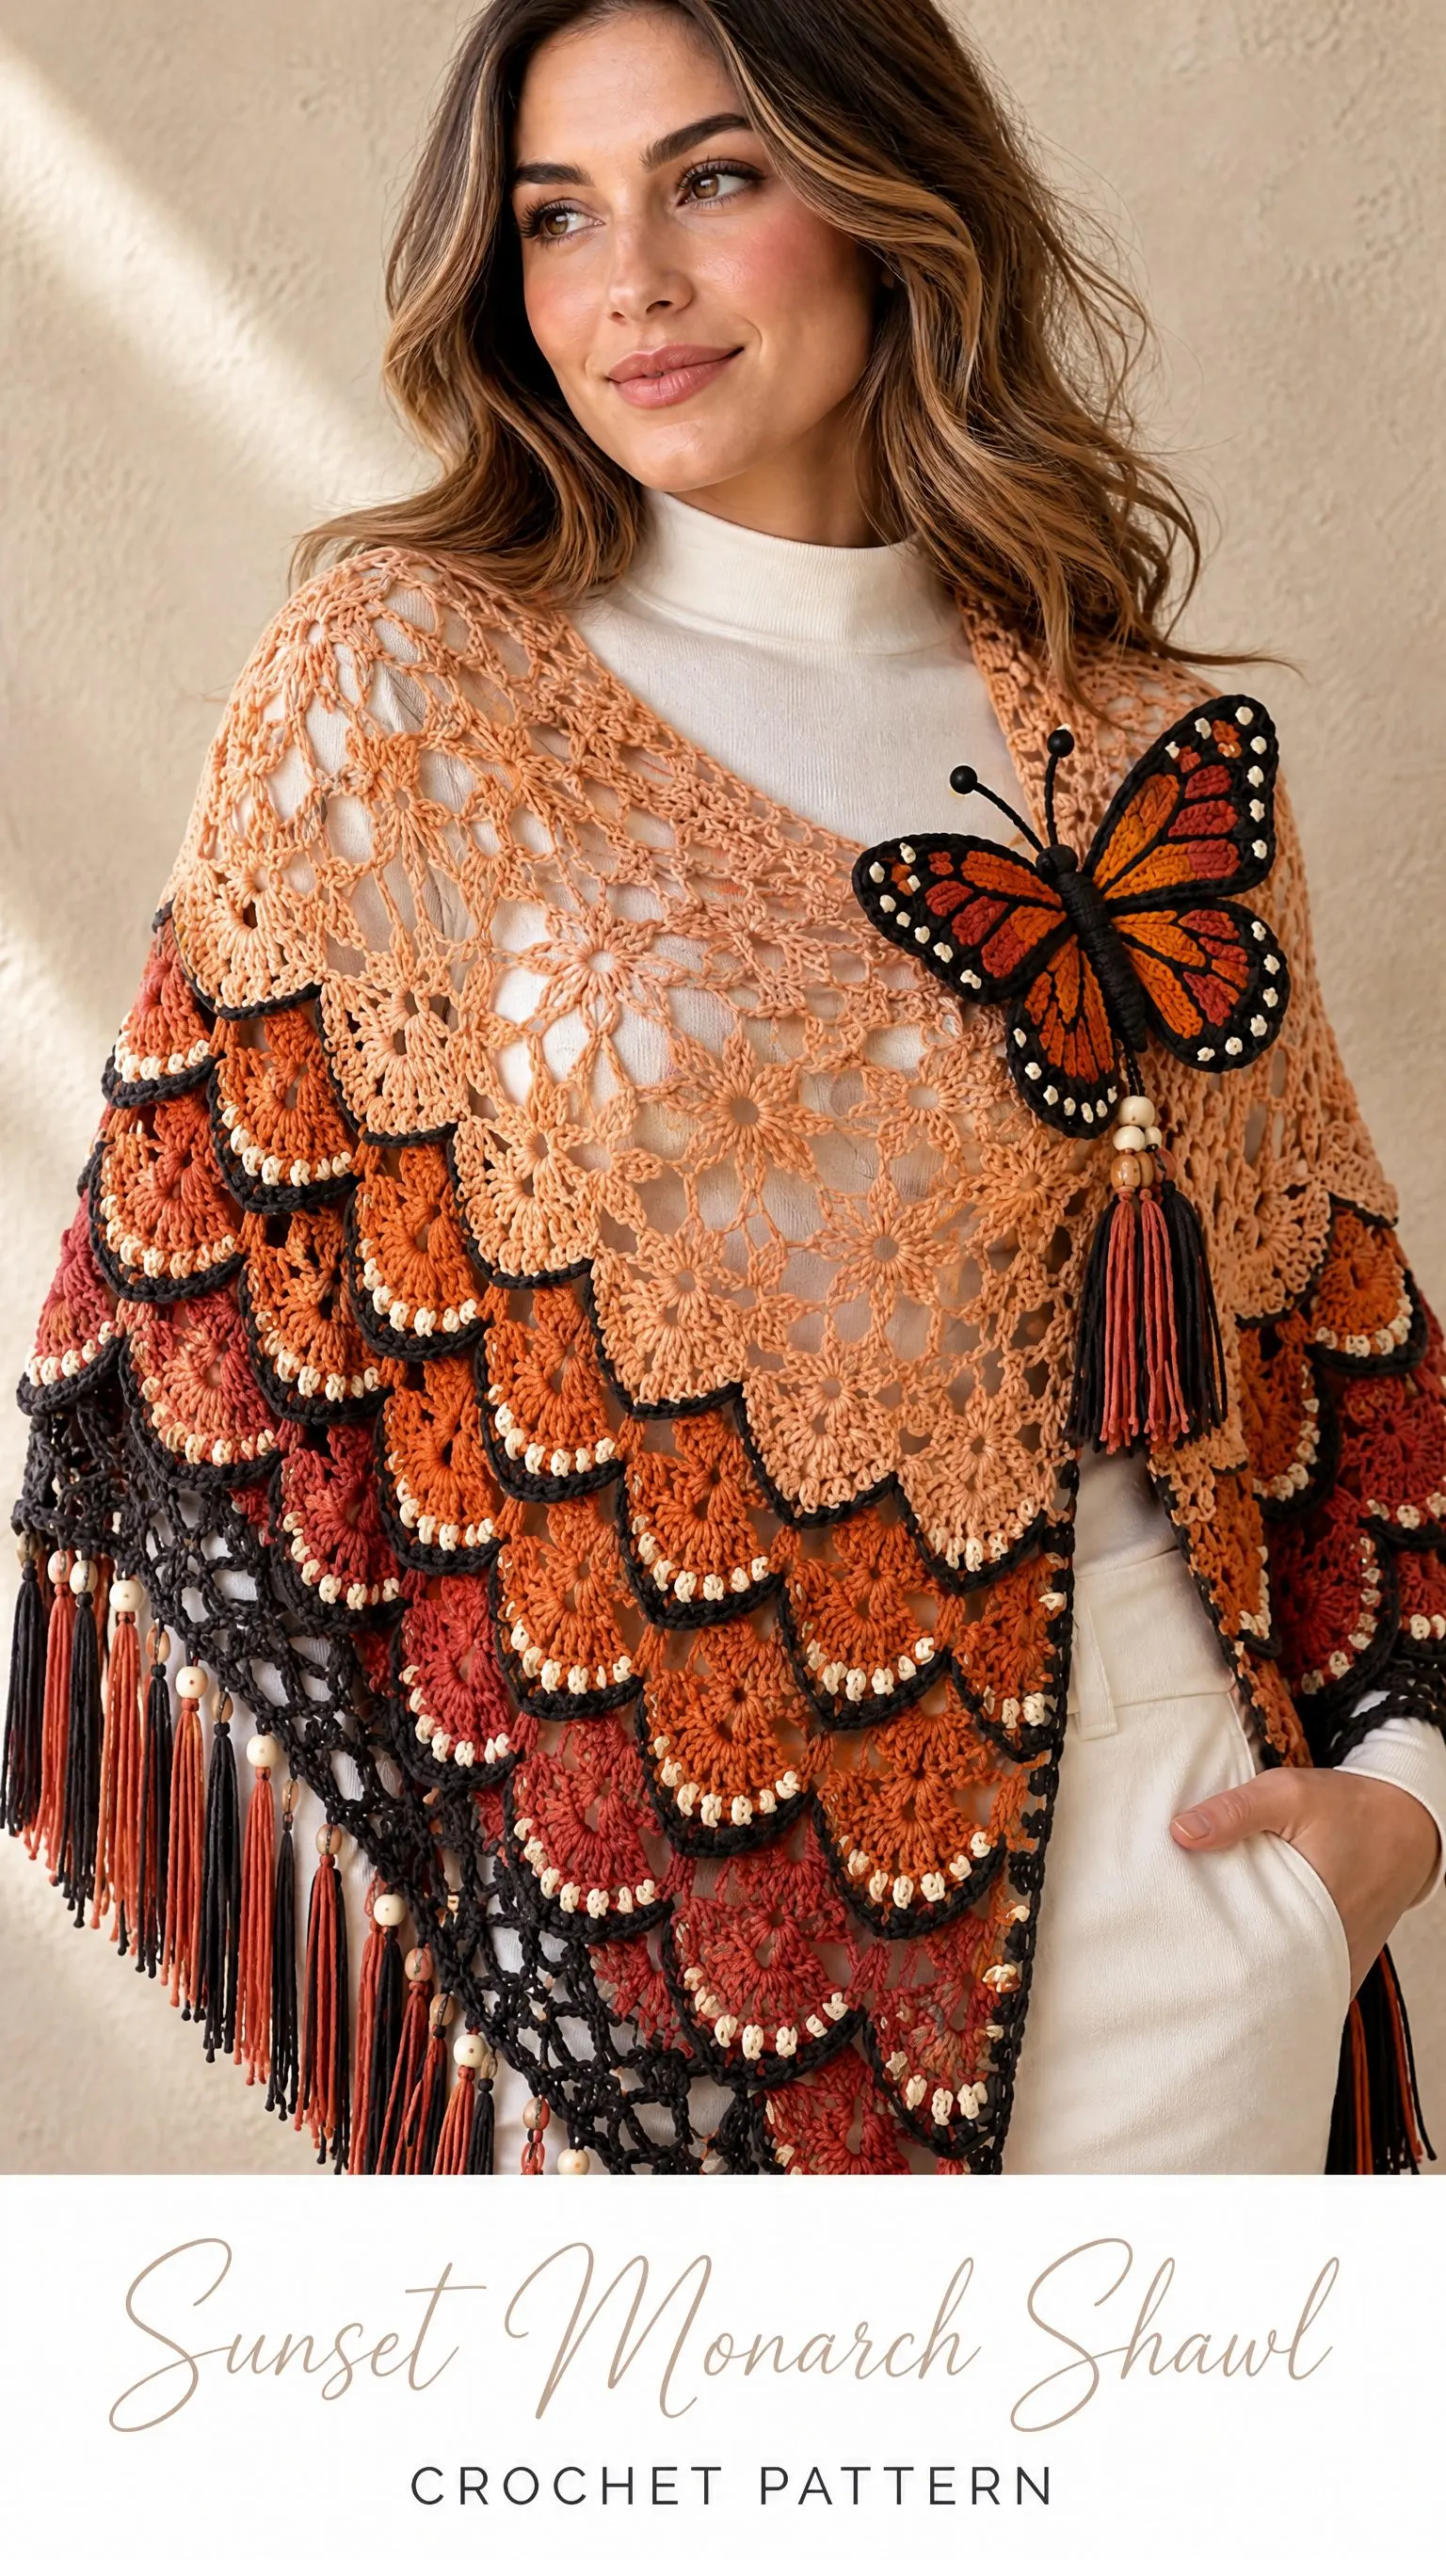
This pattern uses familiar stitches like double crochet (dc), treble crochet (tr), and chains, but arranges them in a way that creates those gorgeous scalloped scales you see in the photos. The construction is straightforward once you understand the rhythm. You will work from the center neck down, building the triangle with increases at the edges and center spine.
Whether you are making this for yourself or as a gift for someone who appreciates wearable art, this shawl delivers. The graduated sunset colors paired with that dimensional monarch butterfly fastening make it a true showpiece. Let me walk you through everything you need to bring this beauty to life.
Project Overview and Skill Level
This pattern is rated intermediate to advanced. You should be comfortable with basic crochet stitches and ready to try some new techniques like surface slip stitch, working into spaces, and applique assembly.
Finished Measurements:
The construction follows a logical progression. You will create a top-down triangular shawl with four distinct sections: the airy lace yoke, the raised overlapping scale field, the openwork hem, and finally the separate butterfly fastening.
Materials You Will Need
Gathering your supplies before you start makes the whole process smoother. Here is everything this pattern calls for:
Yarn (Sport / Light DK Weight, #2-#3):
| Color | Amount | Use |
|---|---|---|
| Pale peach / apricot | 350 m / 383 yd | Upper lace and first scales |
| Apricot / burnt peach | 280 m / 306 yd | Scale field |
| Pumpkin orange | 240 m / 262 yd | Scale field and butterfly |
| Deep coral | 260 m / 284 yd | Lower scales and fringe |
| Charcoal | 320 m / 350 yd | Scale outlines, hem, fringe, butterfly veins and body |
| Warm cream / ivory | 45 m / 49 yd | Accent stitches and butterfly dots |
Choose a smooth cotton or cotton-bamboo blend with good stitch definition. This helps the lace stay open and the scales maintain their shape.
Hooks:
Adjust your hook size as needed to obtain gauge.
Additional Supplies:
Gauge
Getting your gauge right ensures your shawl matches the intended measurements.
18 dc x 9 rows = 10 cm / 4 inches in blocked double crochet.
Scale tier depth: approximately 5.5 cm / 2 1/8 inches after blocking.
Always make a gauge swatch before starting. If your stitches are too tight, go up a hook size. Too loose? Go down a size.
Abbreviations and Special Stitches
Let me define every stitch abbreviation you will encounter:
Construction Notes Before You Begin
Understanding the structure helps everything make sense:
1. Work the shawl from the center neck downward. Every right side (RS) row has an increase section at both outer edges and at the center spine.
2. Place a locking marker in the center ch-2 space and move it upward every row. This is the easiest way to keep the triangle symmetrical.
3. The scale field is built in two-row tiers: a mesh foundation row followed by a fan row. Alternate the fan positions so the scales overlap like shingles.
4. Charcoal is added as a narrow surface outline after each colored tier. This keeps the fabric flexible and gives that gorgeous dark-edged look you see in the photos.
5. For a broader shawl, continue the lace repeat or add additional scale tiers before the hem. For a shallower shawl, stop earlier and proceed to the border.
Part 1: Airy Peach Shoulder Lace
With pale peach/apricot yarn and your 3.5 mm hook, you will create the delicate upper portion. Turn after every row unless instructed otherwise. The first ch-3 counts as a dc throughout.
Row 1 (RS): Ch 6. Sl st to first ch to form a ring. Ch 3, 2 dc in ring, ch 2, 3 dc in ring. Turn.
Row 2: Ch 3, dc in same st, ch 2, sk 1 dc, V-st in next dc, ch 2, work (2 dc, ch 2, 2 dc) in center ch-2 sp, ch 2, V-st in next dc, ch 2, sk 1 dc, 2 dc in last st. Turn.
Row 3: Ch 3, dc in same st, ch 3, sc in first ch-2 sp, ch 3, V-st in next ch-1 sp, ch 3, work (dc, ch 1, dc, ch 2, dc, ch 1, dc) in center ch-2 sp, ch 3; mirror across second half, ending ch 3, 2 dc in last st. Turn.
Row 4: Ch 3, dc in same st. Ch 2, 3-dc fan in next ch-3 sp, ch 2, sc in next ch-3 sp; rep to last V-st before center. Ch 2, V-st in that V-st, ch 2, work (2 dc, ch 2, 2 dc) in center sp. Mirror across second half. End 2 dc in last st. Turn.
Row 5: Ch 3, dc in same st. Ch 3, sc in center dc of next 3-dc fan, ch 3, V-st in next V-st or open ch-sp; rep to center. Work (V-st, ch 2, V-st) in center ch-2 sp. Mirror across second half. End 2 dc in last st. Turn.
Row 6: Ch 3, dc in same st. Ch 2, 3-dc fan in next ch-3 sp, ch 2, sc in next ch-3 sp; rep across, placing V-sts in established V-sts. At center work (2 dc, ch 2, 2 dc). Mirror. End 2 dc in last st. Turn.
Rows 7-18: Repeat the lace logic of Rows 5-6, maintaining the edge increases and the center ch-2 spine. Keep the fabric open and balanced by placing each fan into a chain space and each sc into the top of the fan below. Finish on a WS row.
At the end of Row 18, the yoke should measure about 22-25 cm / 8.5-10 inches deep after gentle stretching.
Sizing checkpoint: The top edge should sit comfortably from upper arm to upper arm without pulling. If you want more shoulder coverage, add 2-4 more lace rows before beginning the scales.
Part 2: Graduated Raised Scale Field
This is where the magic happens. The overlapping scales create that stunning texture.
Color order: pale apricot → apricot → pumpkin orange → deep coral. Work 2-3 tiers in each shade, or blend as desired.
Scale Tier A: Mesh Foundation
RS mesh row: Ch 4 (counts as dc + ch 1), dc in same st. Ch 2, sk next fan/sc group, V-st in next open space; rep to center. In center ch-2 sp work (V-st, ch 2, V-st). Mirror across the second half. End (dc, ch 1, dc) in last st. Turn.
WS stabilizing row: Ch 1, sc in first st. Ch 3, sc in next V-st ch-1 sp; rep to center. Work (sc, ch 3, sc) in center sp. Mirror. Turn.
Scale Tier B: Raised Fans
RS fan row: Ch 1, sc in first st. In next ch-3 sp work 7 tr, sc in next ch-3 sp; rep across to center. In center ch-3 sp work (5 tr, ch 2, 5 tr) to preserve the point. Mirror to opposite edge. Turn.
WS locking row: Ch 1. Sc in each sc; over each scale work ch 5 loosely behind the 7-tr fan and sc in the next valley. Do not crochet through the fan face. The loose back chain lets the scale lift away from the fabric, creating that dimensional effect.
Offset next tier: On the following mesh row, place the first V-st halfway between two scales rather than directly above a scale. This creates the overlapping shingle effect. Continue alternating aligned and offset tiers.
Suggested Tier Distribution:
| Tiers | Main Shade | Count | Visual Effect |
|---|---|---|---|
| 1-2 | Pale apricot | 2 | Soft transition from lace |
| 3-5 | Apricot | 3 | Warm midtone |
| 6-8 | Pumpkin orange | 3 | Saturated center field |
| 9-11 | Deep coral | 3 | Dramatic lower edge |
Charcoal Outline
After every colored fan row, with RS facing and 3.0 mm hook, join charcoal at the right-hand valley. Surface sl st loosely along the curved top edge of each scale. At each fan tip make (sl st, ch 1, sl st) to sharpen the scallop. Fasten off after each tier so the outline does not pull the shawl inward.
Cream Accents
Every second scale, add 3 tiny cream surface slip stitches centered near the lower rim of the fan. Keep them sparse and evenly spaced for that delicate photographed look.
Stop point: Continue until the shawl is about 67-70 cm / 26-27.5 inches deep before the hem. The lower edge should form a smooth triangle with no ruffling. If it cups, add a ch to the next mesh spaces; if it flares, remove a ch from every third mesh space.
Part 3: Charcoal Openwork Hem
Join charcoal at one upper corner with RS facing.
Hem Round 1: Work sc evenly down first side, placing 2 sc at every scale valley and 3 sc around the center point. Work up second side. Along the top neck edge, work sc evenly without tightening. Join with sl st.
Hem Round 2: Ch 5 (counts as dc + ch 2), sk 2 sc, dc in next sc. *Ch 2, sk 2 sc, dc in next sc; rep around the two lower sides only. At the center point work (dc, ch 3, dc). Turn at the opposite upper corner.
Hem Round 3: Ch 1, sc in first dc. *In next ch-2 sp work (sc, ch 3, sc), sc in next dc; rep across. In center ch-3 sp work (sc, ch 5, sc). Fasten off at the opposite upper corner.
Fringe and Beads
The fringe adds beautiful movement and weight to your finished shawl.
1. Cut 42-48 cm / 16.5-19 inch strands: 2 charcoal + 2 coral for each fringe bundle. Finished fringe will be about 20-23 cm / 8-9 inches after knotting and trimming.
2. Attach one bundle through every second ch-3 picot space along the two lower sides. Use a lark’s head knot and pull firmly but not enough to distort the hem.
3. For beaded bundles, slide one warm ivory bead onto one charcoal strand before attaching. Position the bead 2-4 cm / 1-1.5 inches below the hem and secure beneath it with a small overhand knot.
4. Use beads only on about every fourth fringe bundle for the sparse photographed effect.
5. After blocking, comb the fringe with fingers and trim into a soft shallow V, leaving the center-point bundles 2-3 cm longer.
Part 4: Monarch Butterfly Fastening
The butterfly is the crown jewel of this design. Finished size is about 16-18 cm / 6.25-7 inches wide. Use your 3.0 mm hook. Work 4 wings separately, then add charcoal borders, surface veins, cream dots, body, and antennae.
Upper Wing (make 2)
R1: With pumpkin orange, ch 5. In 2nd ch from hook: sc, hdc, dc, 5 tr in last ch. Working along opposite side of foundation chain: dc, hdc, sc. Turn.
R2: Ch 1, sc in first 3 sts, 2 hdc in next 2 sts, 2 dc in next 3 sts, (tr, ch 1, tr) in top center st, 2 dc in next 3 sts, 2 hdc in next 2 sts, sc in remaining sts. Turn.
R3: Ch 1. Work sc around, making 2 sc in each rounded corner and 3 sc in the ch-1 tip. Fasten off orange.
Border: Join charcoal. Sc evenly around. At outer tip work (sc, picot, sc). Fasten off.
Lower Wing (make 2)
R1: With deep coral or pumpkin orange, ch 4. In 2nd ch from hook: sc, hdc, 5 dc in last ch. Work opposite side: hdc, sc. Turn.
R2: Ch 1. Sc in first 2 sts, 2 hdc in next 2 sts, 2 dc in next 2 sts, (dc, ch 1, dc) at rounded tip, 2 dc in next 2 sts, 2 hdc in next 2 sts, sc to end. Turn.
R3: Sc evenly around, 3 sc in tip. Fasten off main color.
Border: Join charcoal and sc around; picot once at the outer tip. Fasten off.
Wing Veins and Cream Dots
Using charcoal and a tapestry needle or surface-slip-stitch hook, create one central vein from each wing base to tip, then add 2-3 branching diagonal veins on each side. Keep the yarn relaxed so the wing stays flat.
With cream yarn, embroider or crochet 5-7 tiny French-knot-style dots around the charcoal outer border of each upper wing and 3-4 on each lower wing. Keep dots about 4-5 mm apart.
Body and Antennae
Body: With charcoal, ch 18. Starting in 2nd ch, sl st in 4 ch, sc in next 5, hdc in next 5, sc in final 3. Fasten off. Fold the narrow strip lengthwise and whipstitch to form a slim padded body.
Antennae: Join charcoal at head. Ch 10, sl st back 8 ch, fasten off. Repeat on opposite side. Lightly steam-shape into gentle curves; do not iron directly.
Butterfly Assembly
1. Lay the two upper wings behind the body at about a 35-degree upward angle. Place lower wings beneath them at about a 25-degree downward angle.
2. Whipstitch wing bases together securely with charcoal, then sew the body over the join so all attachment stitches are hidden.
3. Optionally sew the butterfly onto a 4-5 cm / 1.5-2 inch felt or crocheted oval backing for extra stability.
4. Attach the butterfly to the upper-right chest edge of the shawl with invisible stitches or to a small removable shawl pin / snap base. Keep the wings free so they remain dimensional.
5. Make one coral-and-charcoal tassel, 10-12 cm / 4-4.75 inches long, and sew it directly beneath the butterfly body. Add 1-2 ivory beads above the tassel if desired.
Part 5: Blocking, Finishing, and Fit
Proper finishing makes all the difference in how professional your shawl looks.
1. Weave in all ends on the WS by traveling through matching-color stitches for at least 5 cm / 2 inches, changing direction once. Do not cut ends flush until after blocking.
2. Soak the shawl in cool water with a small amount of wool/cotton wash for 10-15 minutes. Press out water in a towel; do not wring.
3. Pin the upper edge nearly straight, then open the triangle to the target wingspan. Pin every scale tip and the charcoal picot hem so the silhouette is crisp but not overstretched.
4. Allow to dry completely. Attach fringe and butterfly after blocking if you prefer to keep them perfectly shaped.
5. Try on over an opaque top. Arrange the front in a broad asymmetric V with the longest point toward lower center-left. The butterfly should sit high on the wearer’s right chest and remain unobstructed.
Fit Adjustments
| Goal | Adjustment | Keep in Mind |
|---|---|---|
| More wingspan | Add 2-4 lace rows before scales, or add 1-2 scale tiers | Maintain the center increase every row |
| Less depth | Work fewer scale tiers | Stop only after a complete fan + locking row |
| Lighter drape | Use fingering yarn and a 3.25-3.5 mm hook | Expect smaller scale depth; add more tiers |
| More dramatic scales | Use 9 tr instead of 7 tr in each fan | Increase backing chain from ch 5 to ch 6 |
| Shorter fringe | Cut 30-34 cm strands | Finished fringe will be about half the cut length |
Troubleshooting Common Issues
Triangle twists: The center increase was missed or worked twice. Count both halves between edge and center markers before continuing.
Scales lie too flat: Use a slightly larger hook for the 7-tr fans, or make 9 tr per fan while keeping the mesh row unchanged.
Edges curl inward: Surface-slip-stitch outlines are too tight. Remove and rework them loosely with a larger hook.
Lower edge ruffles: Reduce chain spaces in the next mesh tier or skip one planned V-st every 5-6 repeats.
Butterfly droops: Add a small backing oval and stitch through both shawl fabric and backing at several points.
Final Checklist
Before you call this project complete, run through this list:
Care Instructions
Hand wash cool, reshape flat, and dry away from direct heat. Store folded rather than hanging from the butterfly fastening. If beads are glass or wood, protect them from impact and avoid soaking for long periods.
You Did It!
Thank you so much for choosing this pattern for your next project. I hope the process was as enjoyable as the finished shawl is beautiful. This is truly a statement piece that showcases your skills and patience.
If you make this Sunset Monarch Shawl, I would absolutely love to see it! Tag me on Instagram or share a photo in my Facebook group. Seeing your creations honestly makes my whole day.
Save this pattern to your Pinterest boards so you can find it whenever inspiration strikes, and please drop a comment below if you make one. I love hearing about your color choices and any clever modifications you come up with. Happy crocheting!
Want a Quick & Easy Printable Version?
Get a clean, beautifully formatted PDF of this pattern — easy to follow step by step, ready to print or save on any device. No scrolling, no distractions, just the pattern.
Get the Printable PDF →You Might Also Like
- Sage Green Cable Knit Crop Sweater Free Crochet Pattern
- Mint Ocean Waves Doll Dress Free Crochet Pattern
- Soft Lavender Purple Crochet Backpack Free Pattern
- Monarch Butterfly Autumn Cardigan Free Crochet Pattern
