
Last summer, my sister hosted a garden party that I still think about. The food was simple, the company was wonderful, but what I remember most clearly is walking up to her table and seeing these gorgeous sunflower placemats at every seat. She had made them herself, and I spent half the afternoon turning mine over, studying the petals, and asking her approximately one thousand questions about the construction.
Get the Ad-Free PDF Pattern
You can find the free pattern below, or you can purchase the ad-free printable PDF from my shop.
Get the Printable PDF →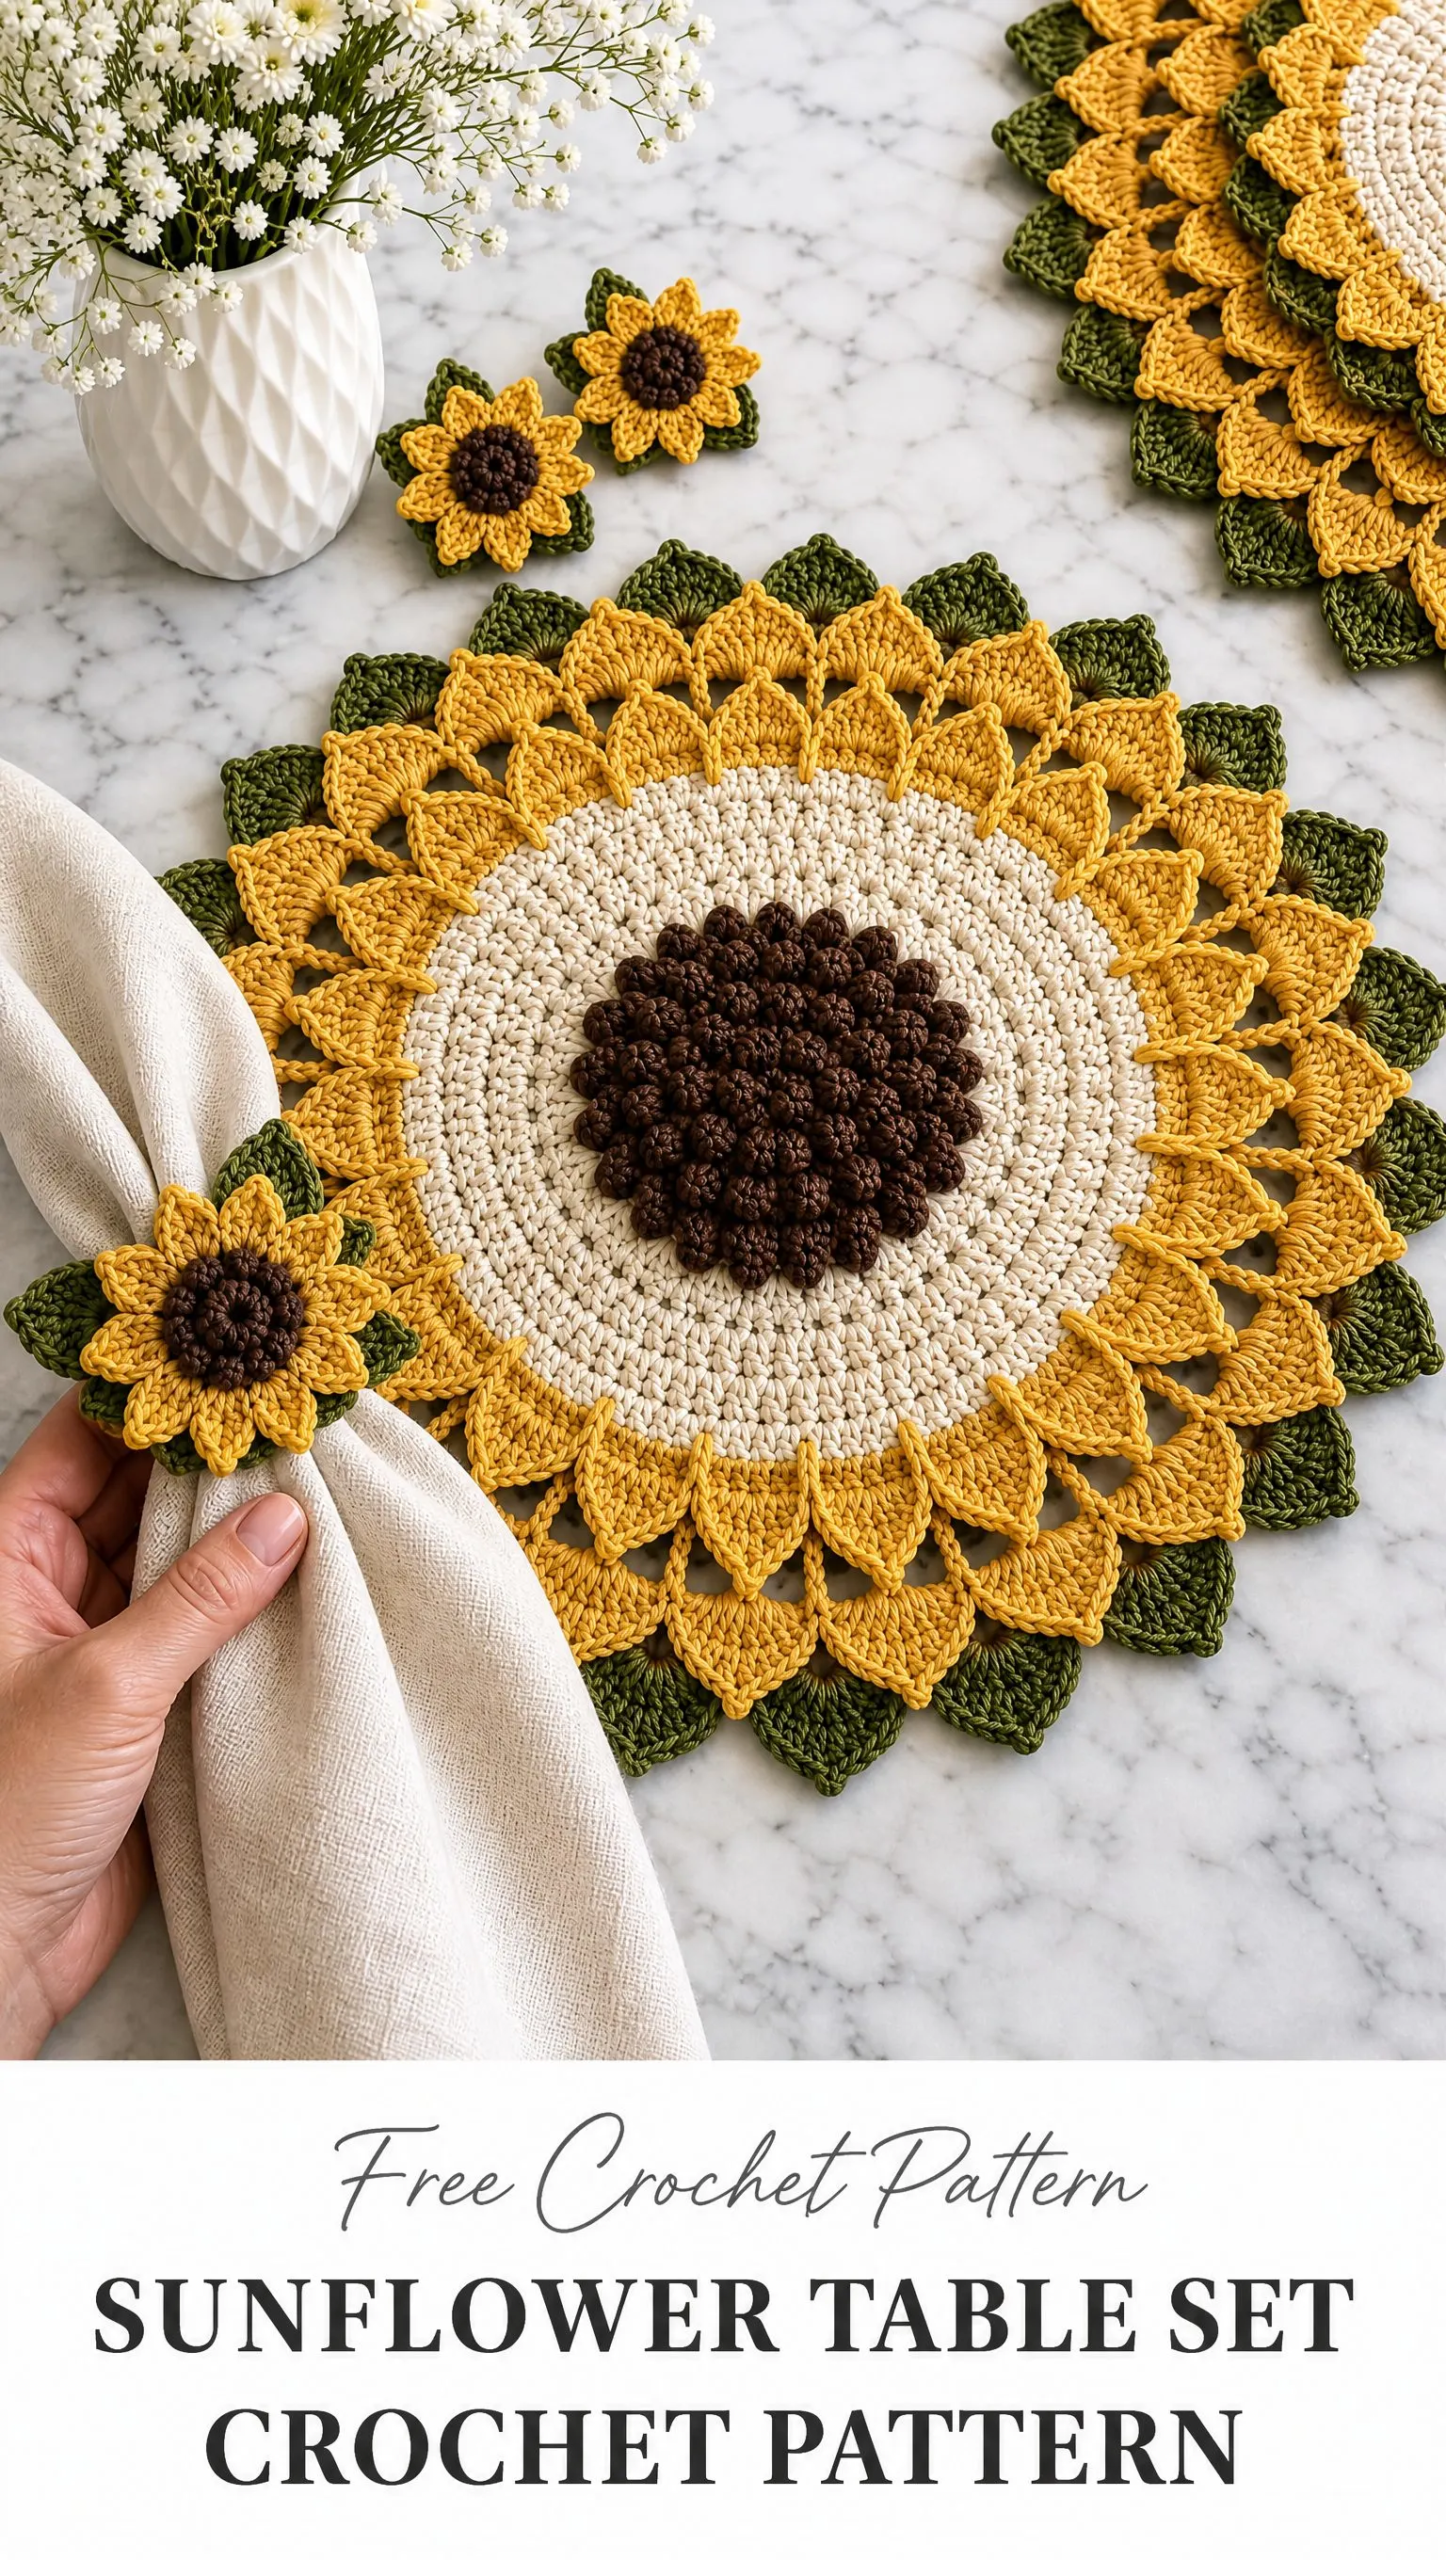
I finally sat down and worked out my own version, and honestly, I am so proud of how it turned out. The dimensional petals, the textured popcorn center that looks like real sunflower seeds, the little olive leaves peeking out around the edges. It is the kind of project that looks incredibly impressive on a table but is actually built from familiar stitches worked in a clever way.
Whether you are decorating for a late summer dinner party, making a set for your own breakfast nook, or putting together a handmade housewarming gift, this sunflower table set delivers major wow factor. The matching napkin ring ties the whole look together, and once you make one, you will want a full set for every seat at your table.
What You Will Make
This sunflower table set crochet pattern includes two coordinating pieces that work beautifully together or separately.
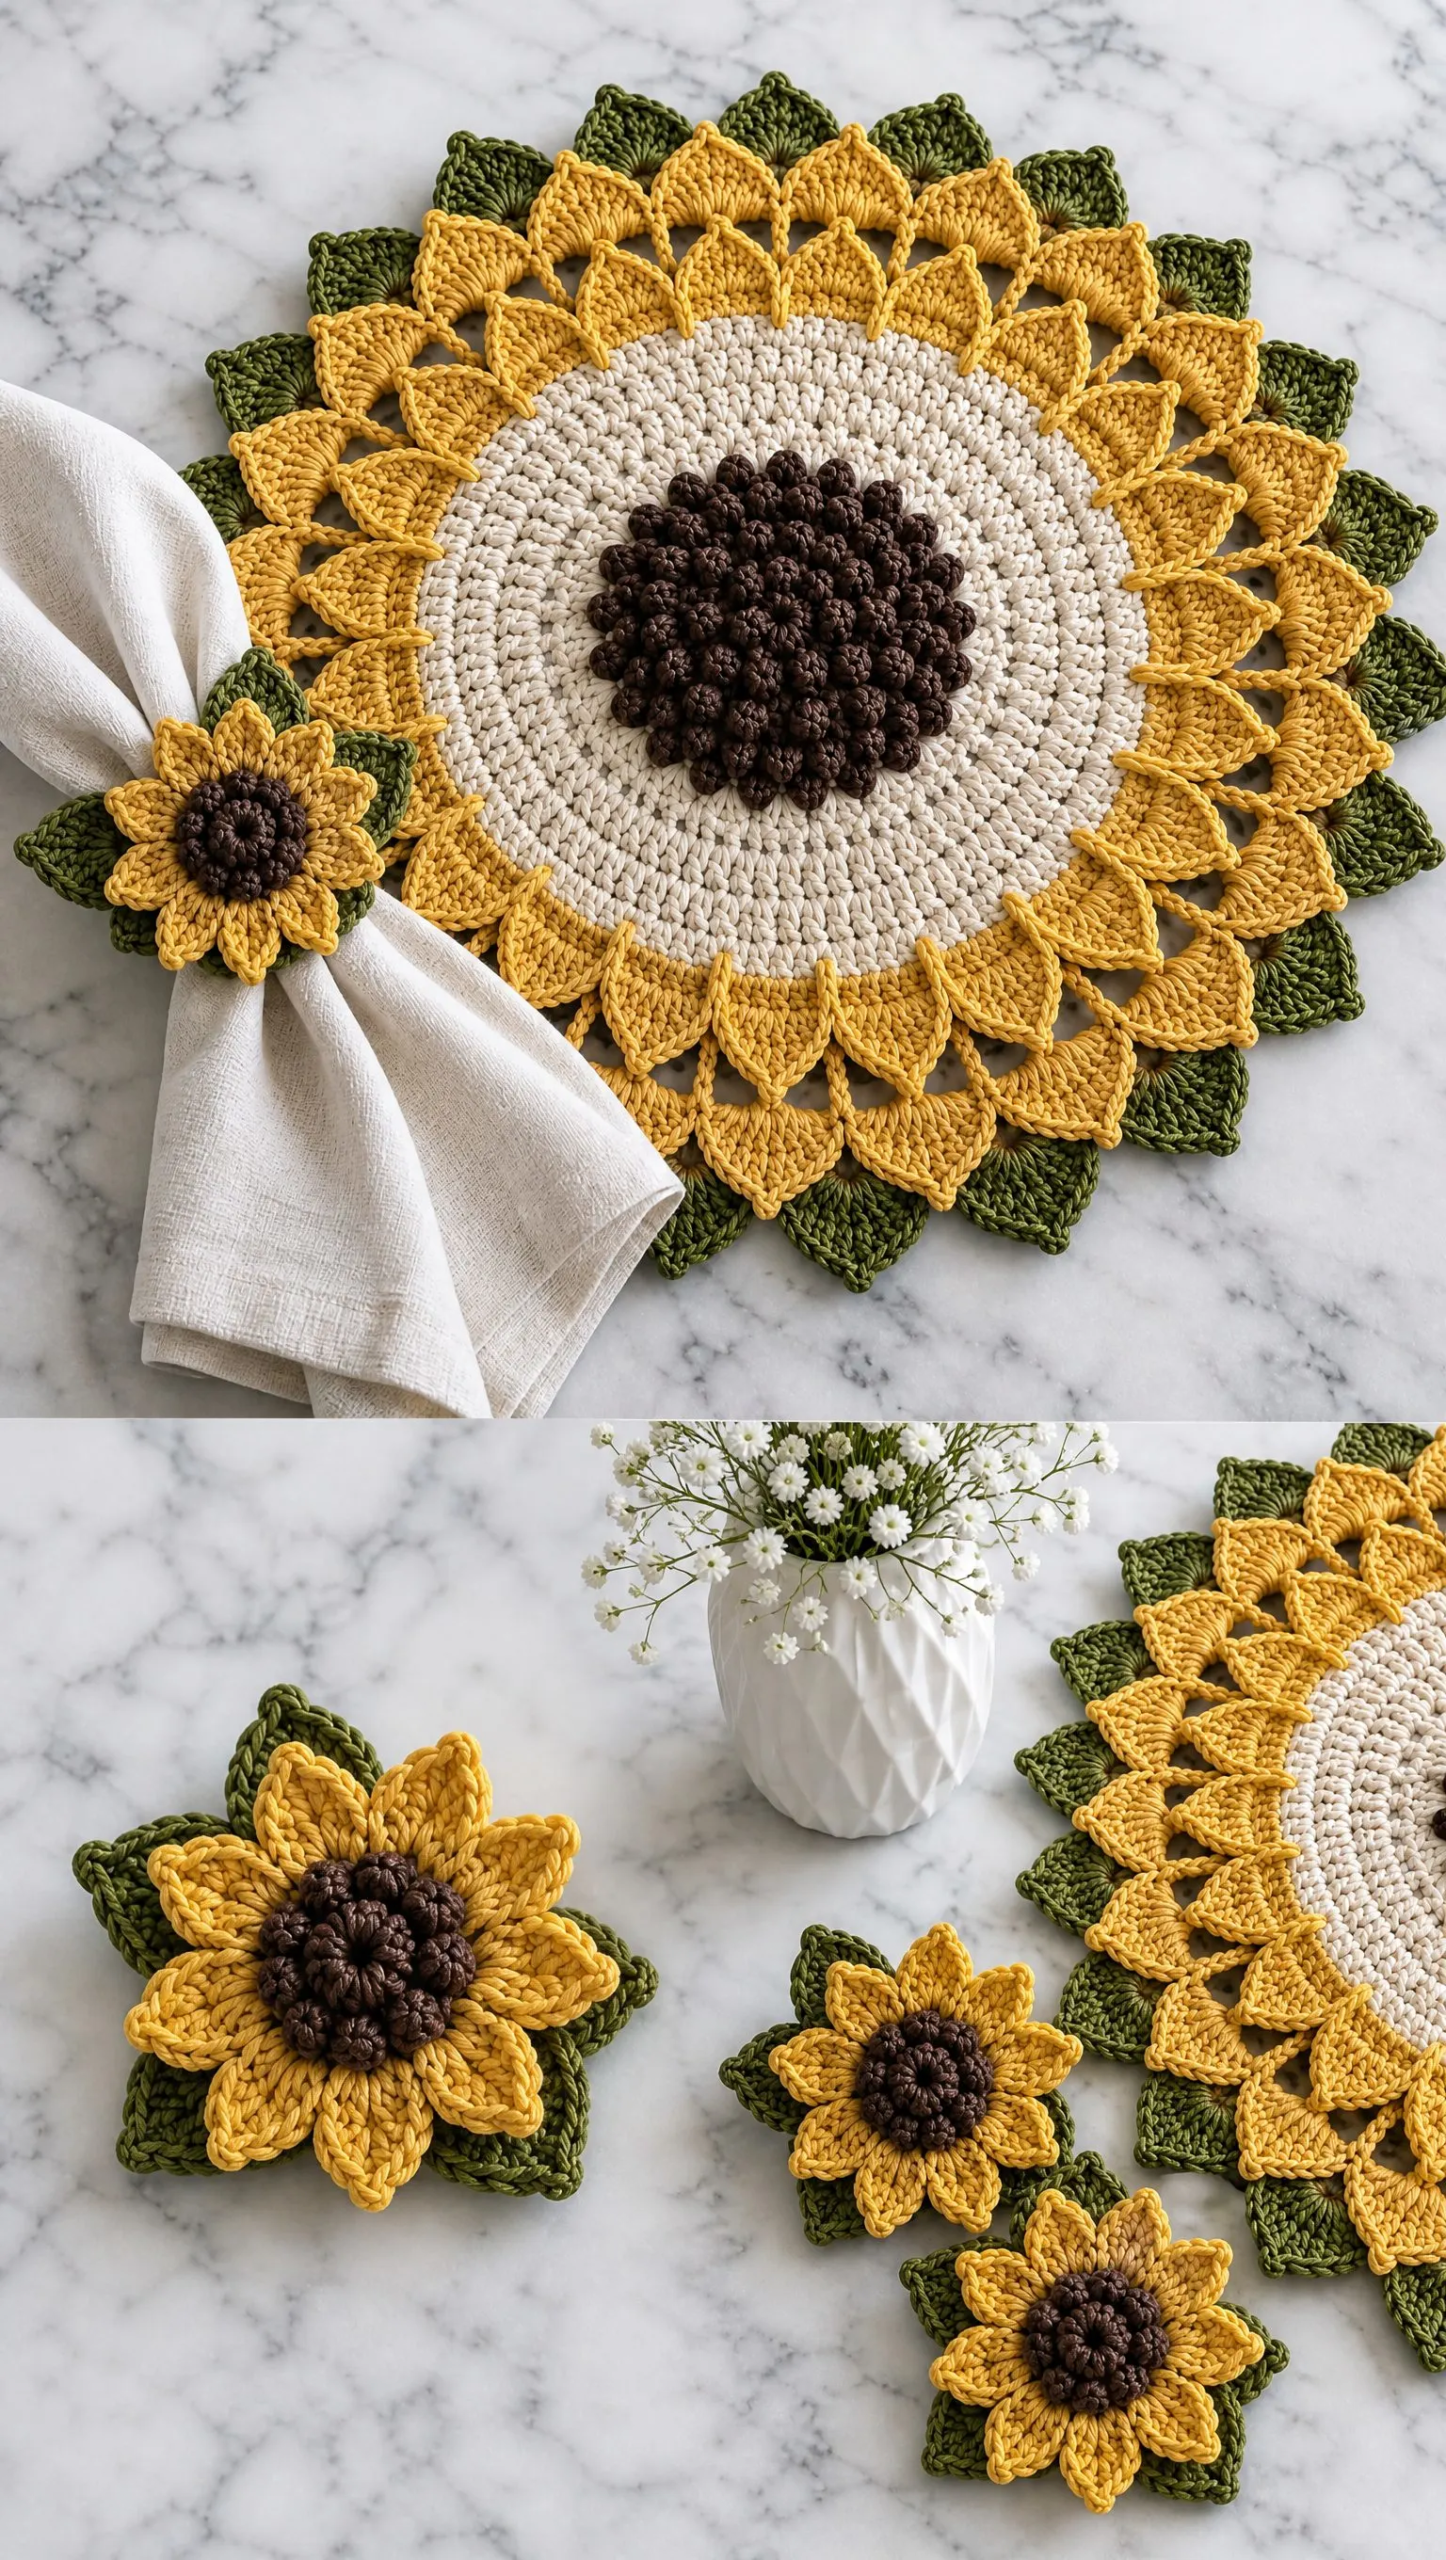
The Placemat measures approximately 16.5 to 17.5 inches (42 to 44.5 cm) in diameter. It features a textured cocoa brown popcorn center, a broad cream disk, two tiers of golden yellow petals, and an olive green leaf scallop border. The construction keeps everything flat enough for practical table use while still giving you that gorgeous dimensional botanical look.
The Napkin Ring Flower measures approximately 4.75 to 5.25 inches (12 to 13.5 cm) across. It repeats the same color palette in a compact layered flower attached to a simple band. The brown popcorn center, two layers of golden petals, and two olive leaves create a miniature version of the placemat design.
A complete one place setting takes approximately 8 to 12 hours depending on your pace. The placemat alone runs about 6 to 9 hours, while the napkin ring flower takes 1.5 to 2.5 hours.
Skill Level
This is an intermediate level crochet pattern. The stitches themselves are familiar to most crocheters, but the project asks you to do several things at once. You will need to maintain a flat circular gauge, work popcorn stitches cleanly so they pop to the right side, place petals into chain spaces, shape tapered points, and assemble a layered napkin ring flower so the attachment remains concealed.
If you have made circular projects like mandalas, doilies, or round dishcloths before, you have the skills for this. The pattern guides you through each step, and I have included a troubleshooting section for common issues.
Materials Needed
Yarn
You will need #4 medium weight (aran) cotton yarn in four colors. Choose a smooth matte cotton or cotton rich blend with a firm twist. The yarn should produce a firm fabric that is not floppy.
| Color | Role | Estimated Yardage |
|---|---|---|
| Cream or warm ivory | Placemat disk | 140 to 170 yards (128 to 155 m) |
| Golden yellow or mustard | Placemat petals and ring flower | 105 to 135 yards (96 to 123 m) |
| Cocoa brown | Textured centers | 45 to 60 yards (41 to 55 m) |
| Olive green | Placemat edging, leaves, band | 55 to 75 yards (50 to 69 m) |
Recommended Yarns:
If substituting a cotton blend, match gauge and finished diameter rather than relying only on the yarn label.
Hooks and Tools
Gauge
In double crochet (dc), approximately 14 dc by 8 rounds equals 4 inches (10 cm) after light blocking.
Exact stitch gauge is less important than keeping the circle flat and reaching the stated finished diameter before the petal sections. After every two rounds, place the work on a flat surface. If the edge cups upward, loosen tension or add a few evenly spaced increases. If it ripples, tighten tension or omit a few increases. Make all corrections symmetrically.
Abbreviations and Special Stitches
Standard Abbreviations
Special Stitches
5-dc Popcorn (pc): Work 5 dc in the same stitch. Remove hook from working loop, insert hook from front to back through the top of the first dc, place working loop back on hook, and pull through. Chain 1 to lock only when the pattern specifically says to do so.
Pointed Petal: In the indicated chain space work: sc, hdc, dc, tr, ch 2, sl st in second ch from hook (this creates the picot point), tr, dc, hdc, sc. One petal made.
Olive Leaf Scallop: In the indicated space work: sc, hdc, dc, tr, ch 2, sl st in second ch from hook, tr, dc, hdc, sc. This is structurally similar to the petal but worked more tightly and with a smaller hook if needed.
Placemat Pattern Instructions
Work in joined rounds with the right side facing. Chain 3 at the beginning of dc rounds counts as the first dc unless stated otherwise. Join with a slip stitch to the top of the beginning ch-3. Move the beginning of round with a slip stitch only when instructed.
Section A: Cocoa Popcorn Center
This textured center mimics the seed head of a real sunflower. The popcorns should sit on the right side like raised sunflower seeds. If they push to the back, pop them forward with your fingertip before continuing.
Rnd 1 (Cocoa): MR, ch 3, 11 dc in ring; join. 12 dc.
Rnd 2: Ch 3, dc in same st, 2 dc in each st around; join. 24 dc.
Rnd 3: Ch 3, dc in same st, pc in next st; 2 dc in next st, pc in next st around; join. 36 sts total (12 popcorns).
Rnd 4: Ch 3, dc in same st, dc in next st, pc in next st; 2 dc in next st, dc in next st, pc in next st around; join. 48 sts.
Rnd 5: Ch 3, dc in same st, dc in next 2 sts, pc in next st; 2 dc in next st, dc in next 2 sts, pc in next st around; join. 60 sts.
Rnd 6: Ch 3, dc in same st, dc in next 3 sts, pc in next st; 2 dc in next st, dc in next 3 sts, pc in next st around; join. 72 sts. Fasten off Cocoa.
Section B: Broad Cream Disk
Join Cream in any stitch. Continue the standard 12-increase rhythm. The counts below include the beginning ch-3 as a stitch.
Rnd 7: Ch 3, dc in same st, dc in next 5 sts; 2 dc in next st, dc in next 5 sts around; join. 84 dc.
Rnd 8: Ch 3, dc in same st, dc in next 6 sts; 2 dc in next st, dc in next 6 sts around; join. 96 dc.
Rnd 9: Ch 3, dc in same st, dc in next 7 sts; 2 dc in next st, dc in next 7 sts around; join. 108 dc.
Rnd 10: Ch 3, dc in same st, dc in next 8 sts; 2 dc in next st, dc in next 8 sts around; join. 120 dc.
Rnd 11: Ch 3, dc in same st, dc in next 9 sts; 2 dc in next st, dc in next 9 sts around; join. 132 dc.
Rnd 12: Ch 3, dc in same st, dc in next 10 sts; 2 dc in next st, dc in next 10 sts around; join. 144 dc.
Rnd 13: Ch 3, dc in same st, dc in next 11 sts; 2 dc in next st, dc in next 11 sts around; join. 156 dc.
Rnd 14: Ch 3, dc in same st, dc in next 12 sts; 2 dc in next st, dc in next 12 sts around; join. 168 dc. Fasten off Cream.
At this point the disk should measure roughly 10.5 to 11.5 inches (26.5 to 29 cm) across, depending on yarn and tension.
Section C: First Golden Petal Tier
Rnd 15 (Foundation Arches, Gold): Join Gold in any st. Ch 1, sc in same st, ch 5, skip 5 sts, sc in next st around; join to first sc. 28 arches.
Rnd 16 (Petals): Sl st into first ch-5 sp. Work 1 pointed petal in each ch-5 sp around. Join with sl st to first sc. 28 petals. Do not fasten off.
Rnd 17 (Rear Arches): Working behind the petal bases, sl st into the join between two petals, ch 6 around; join. You should have 28 rear arches positioned between the first tier petals.
Section D: Second Offset Golden Petal Tier
Rnd 18: Sl st into first rear ch-6 sp. In each sp work: sc, hdc, 2 dc, 2 tr, ch 2, sl st in second ch from hook, 2 tr, 2 dc, hdc, sc. Join. 28 larger offset petals. Fasten off Gold.
While the work is still unblocked, gently pinch each ch-2 picot point between thumb and forefinger and tug outward. This creates the tapered sunflower silhouette without adding wire or stiffener.
Section E: Olive Leaf Scallop Border
Rnd 19 (Leaf Bases, Olive): Join Olive at the valley between any two outer petals. Sc in valley, ch 5 around, placing one ch-5 arch between each pair of petals. Join. 28 arches.
Rnd 20 (Leaf Scallops): Sl st into first ch-5 sp. Work 1 olive leaf scallop in each ch-5 sp around. Join, fasten off, and weave in ends.
Placemat Stitch Count Check
Use this table to verify your counts at each major section:
| Section | Key Count | Check |
|---|---|---|
| Brown center | 72 sts after Rnd 6 | 12 increase points maintained |
| Cream disk | 168 dc after Rnd 14 | 12 increases per round |
| Petal tier 1 | 28 arches / 28 petals | Even spacing around disk |
| Petal tier 2 | 28 offset petals | One per rear arch |
| Olive edge | 28 leaf scallops | One between each outer petal |
Napkin Ring Pattern Instructions
The ring is built from four pieces: green band, brown center, two gold petal layers, and two olive leaves. Assembly is intentionally flat at the back so the flower sits neatly against the napkin.
Section A: Olive Band
Row 1 (Olive, 3.5 to 4.0 mm hook): Ch 9. Sc in second ch from hook and in each ch across. 8 sc. Ch 1, turn.
Rows 2 to 32: Sc in each st across. Ch 1, turn. After Row 32, band should measure about 5.25 to 5.75 inches (13.5 to 14.5 cm) long.
Seam: Bring short ends together without twisting. Sl st or whipstitch through both layers. Fasten off, leaving a 10 inch (25 cm) tail for flower attachment.
Section B: Brown Flower Center
Rnd 1 (Cocoa): MR, ch 3, 11 dc in ring; join. 12 dc.
Rnd 2: Ch 1, pc in same st, ch 1; pc in next st, ch 1 around; join to top of first pc. 12 popcorns.
Rnd 3: Sl st into first ch-1 sp, ch 1; 2 sc in ch-1 sp, sc in top of next pc around; join. 36 sc. Fasten off.
Section C: Inner Golden Petal Layer
Setup: With Gold, join in any sc on the brown center. Ch 1, sc in next st, ch 4, skip 2 sts around; join. 12 ch-4 arches.
Petals: In each ch-4 sp work: sc, hdc, dc, tr, ch 2, sl st in second ch from hook, tr, dc, hdc, sc. Join. 12 petals. Fasten off.
Section D: Outer Golden Petal Layer
Turn the flower over. Join Gold to the back of any skipped stitch from the setup round so the new petals fall between the first layer.
Rear Setup: Sc around the back bar or unused stitch at the base between petals, ch 5 around. Join. 12 arches.
Outer Petals: In each ch-5 sp work: sc, hdc, 2 dc, tr, ch 2, sl st in second ch from hook, tr, 2 dc, hdc, sc. Join and fasten off. 12 offset outer petals.
Section E: Two Olive Leaves
Make 2.
Leaf: Ch 11. Starting in second ch from hook work: sl st, sc, hdc, dc, tr, tr, dc, hdc, sc, sl st. Ch 2. Working down the opposite side of the foundation chain, repeat the same stitch sequence in reverse: sl st, sc, hdc, dc, tr, tr, dc, hdc, sc, sl st. Sl st to base, fasten off leaving a sewing tail.
Section F: Ring Assembly
1. Place the two olive leaves behind the flower at roughly 4 o’clock and 8 o’clock so their tips show beyond the outer petals.
2. Sew the leaf bases securely to the back of the flower, keeping all stitches within the flower silhouette.
3. Center the band seam behind the flower. Using the long band tail, stitch through the band and the brown center backing for about 1.25 inches (3 cm) across.
4. Add several extra passes through the leaf bases so the leaves help conceal the band connection. Knot securely, bury all ends inside the brown center, and steam lightly from the wrong side only. Do not flatten the popcorns or petals.
Finishing, Blocking, and Care
Blocking the Placemat
Proper blocking transforms this project from nice to stunning. Here is the process:
1. Soak the finished placemat in cool water for 10 to 15 minutes with a small amount of wool safe or delicate detergent if desired.
2. Press water out gently in a towel. Do not wring.
3. Lay flat on blocking mats. Pin the cream disk first so it is circular, then pin every petal tip and olive leaf tip evenly around the edge.
4. Measure across several directions. Adjust until the diameter is consistent, approximately 16.5 to 17.5 inches (42 to 44.5 cm).
5. Allow to dry completely before removing pins.
Care Instructions
For 100% cotton, hand wash or gentle machine wash cold in a mesh bag. Reshape and dry flat. Avoid high dryer heat, which can distort petals and shrink cotton. Press only from the wrong side using a pressing cloth. Do not crush the popcorn center.
Troubleshooting Common Issues
| Problem | Likely Cause | Fix |
|---|---|---|
| Cream disk cups | Too few increases for your gauge | Add 4 to 8 increases evenly on the next round, then reassess |
| Cream disk ripples | Too many increases or loose gauge | Omit 4 to 8 increases evenly on the next round or go down 0.5 mm hook size |
| Petals twist | Chain arches too tight | Add 1 chain to each arch or work the arch round with a larger hook |
| Outer edge ruffles | Petals or leaves too wide | Use fewer tall stitches in each petal or a smaller hook for the edging |
| Flower flops on band | Attachment area too small | Stitch band to flower across a wider 1.25 to 1.5 inch (3 to 4 cm) area |
Color Variations to Try
Classic Sunflower: Cocoa center, warm golden petals, cream disk, olive edge.
Autumn Sunflower: Espresso center, rust gold petals, oatmeal disk, forest green edge.
Soft Farmhouse: Taupe center, pale ochre petals, natural cream disk, sage edge.
For a coordinated table, repeat the same four colors in the loose flowers and additional mats rather than changing accent colors piece by piece.
Frequently Asked Questions
Can I make the mat larger? Yes. Add more cream dc rounds before the petal section, continuing the 12 increase rhythm. Recalculate petal arches so they are evenly spaced. Aim for roughly one petal every 6 cream stitches.
Can I use #3/DK cotton? Yes, but the mat will be smaller unless you add extra cream rounds. Use a hook that gives firm but flexible fabric and block to your preferred size.
Can I stiffen the petals? Usually blocking is enough. For very soft yarn, a light fabric stiffener mist can be used only on the outer petals and leaves, never on the whole placemat.
Can I make matching loose flowers? Yes. Work the napkin ring flower through the two petal layers, add the leaves, and omit the band. These make beautiful gift toppers or garland pieces.
Pattern Checklist Before You Finish
Use this quick checklist to make sure everything looks right:
Final Thoughts on This Sunflower Table Set Crochet Pattern
This project is one of those rare makes that impresses everyone who sees it while still being completely achievable for an intermediate crocheter. The combination of the textured popcorn center, layered petals, and those sweet olive leaves creates something that genuinely looks like it belongs in a home decor magazine.
I hope you love making this sunflower table set as much as I enjoyed designing it. There is something so satisfying about sitting down to a meal at a table you have decorated with your own hands. Whether you make a single place setting or a full set for your dining table, these sunflowers bring such warmth and cheer to any gathering.
Thank you so much for choosing this pattern for your next project. I would absolutely love to see your finished sunflower sets! Tag me on Instagram or share a photo in my Facebook group so I can admire your work.
If this pattern brightened your day, save it to your Pinterest boards so you can find it again later. And if you make this sunflower table set, please leave a comment below. I love hearing how your projects turn out and seeing the color combinations you choose!
Want a Quick & Easy Printable Version?
Get a clean, beautifully formatted PDF of this pattern — easy to follow step by step, ready to print or save on any device. No scrolling, no distractions, just the pattern.
Get the Printable PDF →You Might Also Like
- Lavender Dream Crescent Purse with Silver Accents Free Crochet Pattern
- Autumn Harvest Granny Square Dress Set Free Crochet Pattern
- Sunflower Garden Cropped Cardigan Free Crochet Pattern
- Rose Garden Granny Square Tote Free Crochet Pattern
