
I don’t know about you, but I have a deep weakness for sweaters that make people stop and ask, "Wait, did you make that?" This spring bunny sweater is exactly that kind of project. The kind that looks impossibly intricate but breaks down into manageable pieces you can absolutely handle.
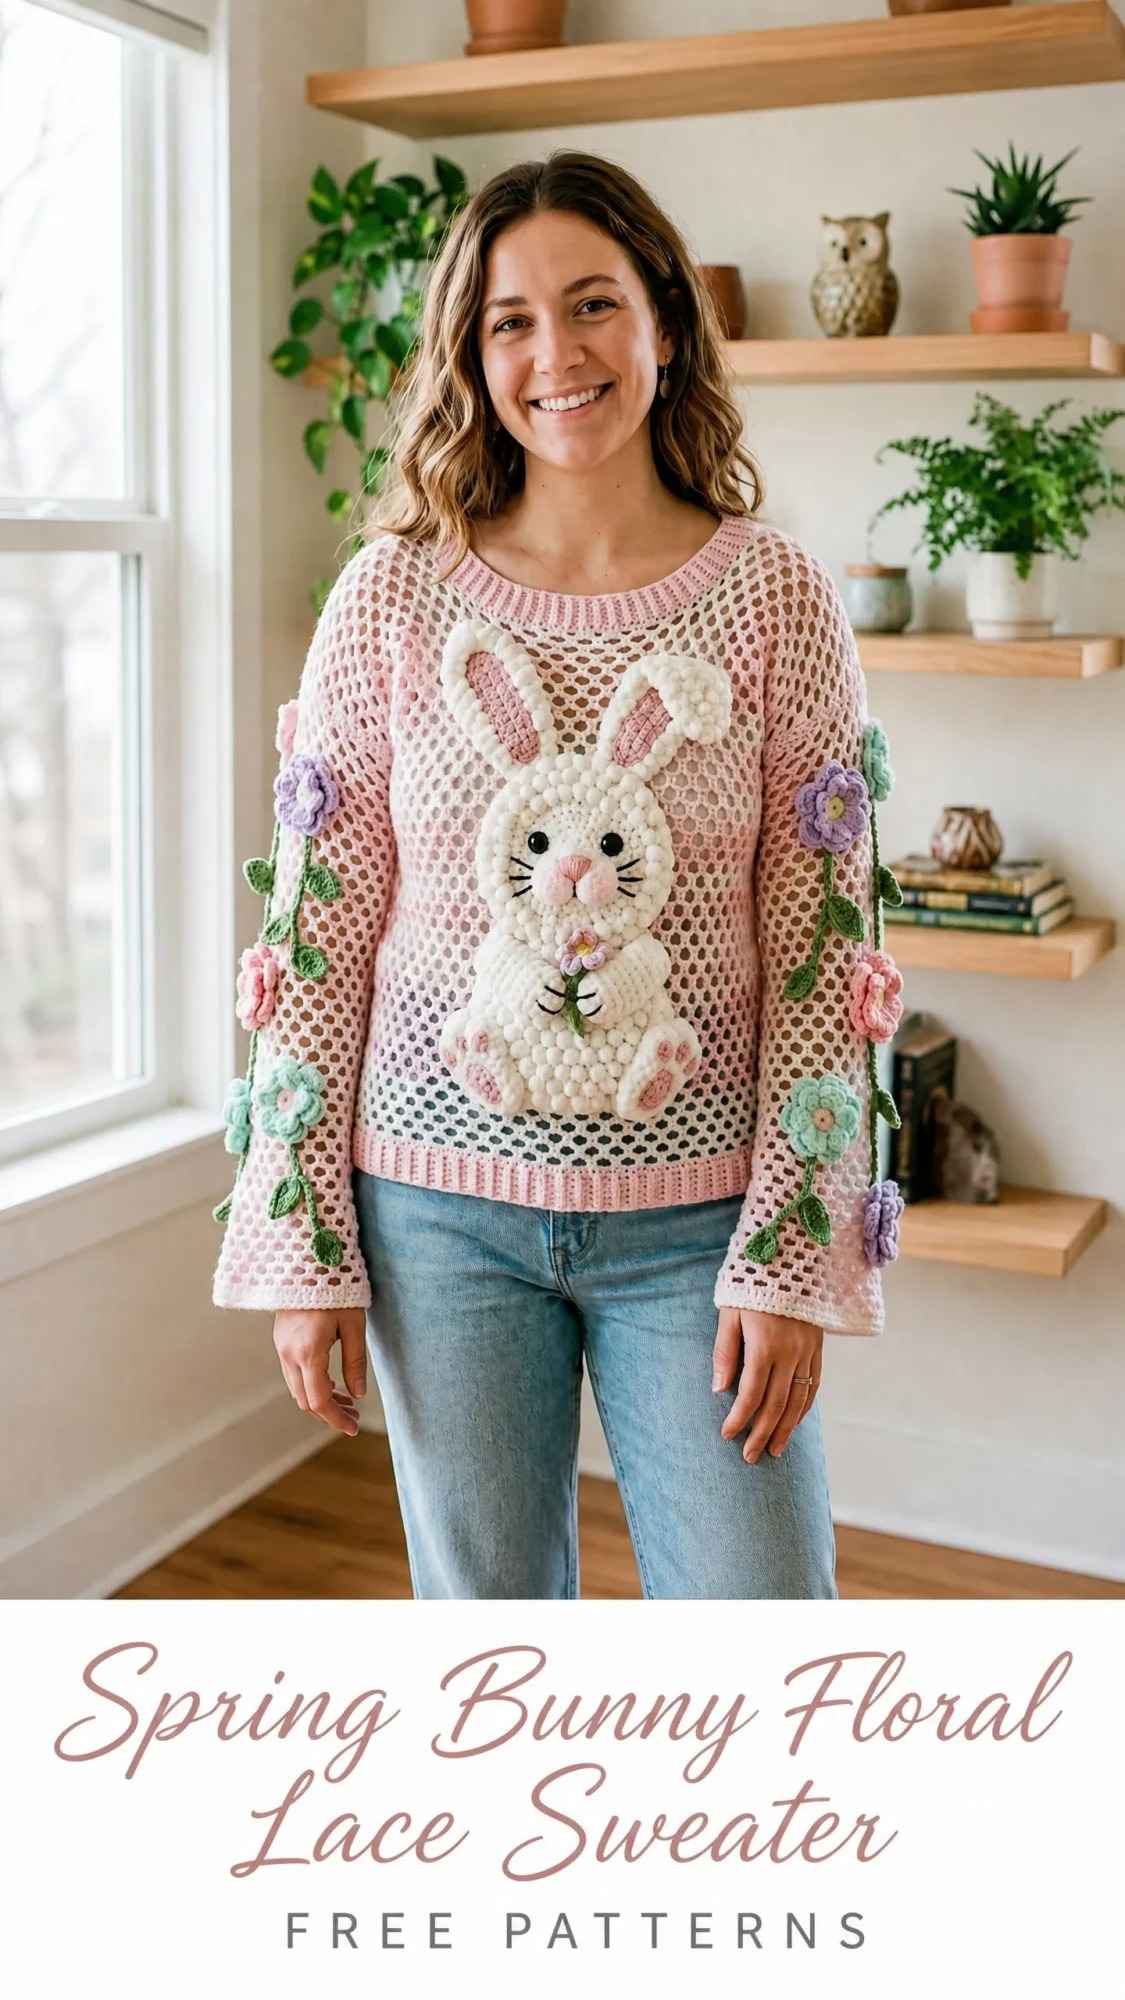
The open honeycomb mesh creates this gorgeous airy fabric that’s perfect for transitional weather. And that three-dimensional bobble stitch bunny holding a tiny flower? Pure joy. Add in scattered crochet flowers trailing down the sleeves, and you’ve got a wearable piece of art.
If you’ve been looking for a project that challenges you just enough without overwhelming you, this is it. Let me walk you through everything you need to bring this beauty to life.
Why This Crochet Sweater Pattern Works
This pull-over sweater is constructed in four flat pieces: a front panel, a back panel, and two sleeves. You’ll seam them together, then add all the fun embellishments afterward. The construction method keeps things straightforward even though the finished look is anything but basic.
The honeycomb mesh pattern that makes up the body uses a simple two-stitch repeat. Once you get into the rhythm, it practically works itself. The real magic comes from the separately crocheted bunny applique and those sweet floral embellishments that you attach at the very end.
Skill level: Advanced beginner to intermediate. If you’re comfortable with single crochet (sc), chain spaces, basic seaming, and you’re willing to tackle some simple shaping, you can absolutely do this. The bunny components use amigurumi-style techniques, but I’ll guide you through every step.
Materials You’ll Need
Gathering your supplies before you start makes everything smoother. Here’s your complete shopping list pulled directly from the pattern.
Yarn Requirements
Main Color (MC): Light pink, approximately 900 yards of DK weight yarn (#3 Light) for the sweater body
Contrast Color 1 (CC1): White, approximately 250 yards of DK weight yarn for the bunny body
Contrast Color 2 (CC2): Pink, approximately 20 yards for bunny inner ears, paws, and nose
Contrast Color 3 (CC3): Green, approximately 80 yards for vine stems and flower leaves
Contrast Color 4 (CC4): Lavender, approximately 30 yards for flowers
Contrast Color 5 (CC5): Mint green, approximately 30 yards for flowers
Contrast Color 6 (CC6): Medium pink, approximately 30 yards for flowers
Contrast Color 7 (CC7): Soft blue, approximately 20 yards for optional accent flowers
Recommended Yarn Brands
Lion Brand Vanna’s Choice works beautifully here. It’s 100% acrylic with 170 yards per 3.5 oz skein, and it gives excellent stitch definition for both the mesh and the bobble texture.
Paintbox Yarns Simply DK is another solid choice with a smooth, consistent texture and a wide color range for matching all those floral shades.
Drops Safran offers a cotton-poly blend if you prefer more breathable fabric with drape.
Quick tip: avoid fuzzy or heavily textured yarns for the body. They’ll obscure that pretty honeycomb pattern you’re working so hard to create.
Hooks and Notions
Gauge Information
Getting gauge right matters for garments. A difference of even one stitch per 4 inches will significantly change your finished bust measurement.
For the sweater body with MC and G-6 / 4.0 mm hook in Honeycomb Mesh Pattern:
17 stitches and 14 rows = 4 inches / 10 cm blocked
For the bunny applique with CC1 and E-4 / 3.5 mm hook in bobble stitch:
18 stitches and 20 rows = 4 inches / 10 cm
Always swatch before starting. Adjust your hook size up or down as needed to match gauge.
Finished Measurements
This pattern is written for size Medium with a relaxed, slightly oversized fit.
Size customization tips appear at the end of this tutorial.
Abbreviations and Stitch Definitions
Let me break down every stitch you’ll encounter. Understanding these before you start will make the pattern flow much more smoothly.
ch: chain. Wrap yarn over hook, pull through loop on hook.
sc: single crochet. Insert hook into stitch, yarn over, pull up a loop (2 loops on hook), yarn over, pull through both loops.
sl st: slip stitch. Insert hook into stitch, yarn over, pull through both the stitch and the loop on hook in one motion.
dc: double crochet. Yarn over, insert hook into stitch, yarn over, pull up a loop (3 loops), yarn over, pull through 2 loops (2 loops remain), yarn over, pull through remaining 2 loops.
hdc: half double crochet. Yarn over, insert hook, yarn over, pull up a loop (3 loops), yarn over, pull through all 3 loops at once.
sc2tog: single crochet two together (a decrease). Insert hook into first stitch, pull up a loop, insert hook into next stitch, pull up a loop (3 loops on hook), yarn over, pull through all 3 loops.
BLO: back loop only. Work into just the back loop of the stitch instead of both loops.
ch-sp: chain space. The gap created by a chain in the previous row.
sk: skip. Pass over the indicated stitch without working into it.
bo: bobble stitch. See the special stitches section below for the full technique.
RS: right side. The public-facing side of your work.
WS: wrong side. The inside or back of your work.
Special Stitches Explained
Honeycomb Mesh Pattern
This creates the beautiful open, hexagonal-looking mesh throughout the sweater. It’s worked over a multiple of 2 stitches plus 1.
Foundation Row (RS): Ch 1, sc in first st, (ch 1, sk 1 st, sc in next st) across. Turn.
Row 1: Ch 1, sc in first sc, (ch 1, sk ch-1 sp, sc in next sc) across. Turn.
Repeat Row 1 for the pattern. That’s it. Once you’ve got this rhythm down, the body practically flies off your hook.
Important note: Each sc-ch1 unit counts as 2 stitches. When I say a row contains 40 stitches in mesh, that means 20 sc and 20 ch-1 spaces.
Ribbing Stitch
Row 1: Ch 1, sc in BLO of each st across. Turn.
Repeat for all ribbing sections. Working in the back loop only creates that stretchy, ridged rib effect you see on the collar, cuffs, and hem.
Bobble Stitch (bo)
This creates the textured surface of the bunny. Here’s how it works:
1. Yarn over, insert hook into the indicated stitch
2. Yarn over, pull up a loop. Yarn over, pull through 2 loops. (2 loops on hook)
3. Yarn over, insert hook into the same stitch. Yarn over, pull up a loop. Yarn over, pull through 2 loops. (3 loops on hook)
4. Yarn over, insert hook into the same stitch. Yarn over, pull up a loop. Yarn over, pull through 2 loops. (4 loops on hook)
5. Yarn over, insert hook into the same stitch. Yarn over, pull up a loop. Yarn over, pull through 2 loops. (5 loops on hook)
6. Yarn over, pull through all 5 loops on hook. Ch 1 to close the bobble.
The bobble naturally pushes to the wrong side as you work. When you flip the bunny right side out, all those bobbles pop forward beautifully.
3D Flower Motif
Rnd 1: With any flower color, magic ring, ch 1, work 6 sc into ring, sl st to first sc to join. (6 sc)
Rnd 2: Ch 1, 2 sc in each sc around, sl st to first sc to join. (12 sc)
Rnd 3: (Ch 3, dc in same st, ch 3, sl st in next st) 6 times. Fasten off, leaving a tail for sewing.
This creates a sweet six-petal flower. For smaller buds, stop after Rnd 2.
Small Leaf
Ch 8. Sl st in 2nd ch from hook, sc in next ch, hdc in next ch, dc in next 2 ch, hdc in next ch, sc in last ch. Work 3 sc in the end ch. Rotate and work back up the other side of the foundation chain: sc in next ch, hdc in next ch, dc in next 2 ch, hdc in next ch, sc in next ch, sl st in last ch. Fasten off, leaving a tail for sewing. (approximately 14 sts total around)
Pattern Instructions
Back Piece
Foundation: With MC and G-6 hook, ch 87.
Row 1 (RS): Sc in 2nd ch from hook, (ch 1, sk 1 ch, sc in next ch) across. Turn. (86 sts: 43 sc, 43 ch-1 sp)
Row 2: Ch 1, sc in first sc, (ch 1, sk ch-1 sp, sc in next sc) across. Turn. (86 sts)
Rows 3 through 56: Rep Row 2. (86 sts)
Checkpoint: After Row 56, your back piece should measure approximately 16 inches tall from the foundation chain.
Back Armhole Shaping
Row 57 (RS): Sl st across first 6 sts (3 sc and 3 ch-1 sp). Ch 1, sc in next sc, cont in mesh pattern across to last 6 sts. Leave last 6 sts unworked. Turn. (74 sts: 37 sc, 37 ch-1 sp)
Row 58: Ch 1, sc2tog over first sc and ch-1 sp, ch 1, sc in next sc, cont in mesh across to last sc and ch-1 sp, sc2tog over last ch-1 sp and last sc. Turn. (72 sts: 36 sc, 36 ch-1 sp)
Row 59: Ch 1, sc2tog, ch 1, sc in next sc, cont in mesh across to last 2 sts, sc2tog. Turn. (70 sts: 35 sc, 35 ch-1 sp)
Row 60: Ch 1, sc2tog, ch 1, sc in next sc, cont in mesh across to last 2 sts, sc2tog. Turn. (68 sts: 34 sc, 34 ch-1 sp)
Rows 61 through 88: Work even in mesh pattern. (68 sts)
Checkpoint: After Row 88, your armhole depth should measure approximately 8 inches from Row 57.
Back Neck Shaping
Row 89 (RS): Work in mesh across first 20 sts. Fasten off. (20 sts: 10 sc, 10 ch-1 sp) This is the right shoulder.
Skip center 28 sts for back neck opening.
Rejoin MC at next sc. Work in mesh across remaining 20 sts. Fasten off. (20 sts: 10 sc, 10 ch-1 sp) This is the left shoulder.
Set back piece aside.
Front Piece
Foundation: With MC and G-6 hook, ch 87.
Rows 1 through 56: Work exactly as Back Piece Rows 1 through 56. (86 sts)
Front Armhole Shaping
Rows 57 through 60: Work exactly as Back Armhole Shaping Rows 57 through 60. (68 sts after Row 60)
Rows 61 through 80: Work even in mesh pattern. (68 sts)
Front Neck Shaping
Row 81 (RS): Work in mesh across first 26 sts. Fasten off. (26 sts: 13 sc, 13 ch-1 sp) This is the left front shoulder section.
Skip center 16 sts for front neck opening.
Rejoin MC at next sc. Work in mesh across remaining 26 sts. Fasten off. (26 sts: 13 sc, 13 ch-1 sp) This is the right front shoulder section.
Left Front Shoulder Neck Decrease
Rejoin MC at the neck edge of the left front shoulder section.
Row 82 (WS, working toward armhole): Ch 1, work in mesh across first 24 sts. Turn. (24 sts: 12 sc, 12 ch-1 sp)
Row 83: Work in mesh across first 22 sts. Turn. (22 sts: 11 sc, 11 ch-1 sp)
Rows 84 through 88: Work even across 22 sts. Fasten off after Row 88. (22 sts: 11 sc, 11 ch-1 sp)
Right Front Shoulder Neck Decrease
Rejoin MC at armhole edge of right front shoulder.
Row 82 (WS, working toward neck): Work in mesh across to last 2 sts, leave last 2 sts unworked. Turn. (24 sts: 12 sc, 12 ch-1 sp)
Row 83: Work in mesh across to last 2 sts, leave unworked. Turn. (22 sts: 11 sc, 11 ch-1 sp)
Rows 84 through 88: Work even across 22 sts. Fasten off after Row 88. (22 sts)
Sleeves (Make 2)
The sleeves are worked flat with increases along both sides to create a tapered shape.
Foundation: With MC and G-6 hook, ch 39.
Row 1 (RS): Sc in 2nd ch from hook, (ch 1, sk 1 ch, sc in next ch) across. Turn. (38 sts: 19 sc, 19 ch-1 sp)
Rows 2 through 5: Work even in mesh pattern. (38 sts)
Sleeve Increases
Work increase rows every 5th row. On an increase row, work 2 sc in the first and last sc.
Row 6: Inc row. (40 sts)
Row 11: Inc row. (42 sts)
Row 16: Inc row. (44 sts)
Row 21: Inc row. (46 sts)
Row 26: Inc row. (48 sts)
Row 31: Inc row. (50 sts)
Row 36: Inc row. (52 sts)
Row 41: Inc row. (54 sts)
Row 46: Inc row. (56 sts)
Row 51: Inc row. (58 sts)
Row 56: Inc row. (60 sts)
Row 61: Inc row. (62 sts)
Rows 62 through 67: Work even. (62 sts)
Checkpoint: Sleeve should measure approximately 18 inches from foundation to Row 67.
Sleeve Cap Shaping
Row 68 (RS): Sl st across first 6 sts. Ch 1, sc in next sc, cont in mesh across to last 6 sts. Leave last 6 sts unworked. Turn. (50 sts: 25 sc, 25 ch-1 sp)
Row 69: Ch 1, sc2tog, ch 1, sc in next sc, cont in mesh across to last 2 sts, sc2tog. Turn. (48 sts: 24 sc, 24 ch-1 sp)
Rows 70 through 75: Continue decreasing 2 sts each row. (36 sts after Row 75)
Row 76: Work even. (36 sts)
Row 77: Decrease row. (34 sts)
Row 78: Work even. (34 sts)
Row 79: Decrease row. (32 sts)
Row 80: Work even. (32 sts)
Row 81: Sl st across first 4 sts. Work even across next 24 sts. Leave last 4 sts unworked. Fasten off. (24 sts)
Assembly
Step 1: Block all four pieces before seaming. Wet block or steam block according to your yarn’s care instructions.
Step 2: Seam shoulder seams using mattress stitch or slip stitch seam with wrong sides together. The front shoulder has 22 sts and the back has 20 sts. Ease the extra 2 stitches of the front into the seam over the center 1 inch.
Step 3: Set in sleeves. Pin the sleeve cap to the armhole opening with right sides together, matching the center top of the sleeve cap to the shoulder seam. Sl st seam around. Repeat for second sleeve.
Step 4: Seam the underarms and side seams in one continuous seam on each side.
Neckline Trim
Join MC at the right shoulder seam. Work 1 round of sc evenly around the neck opening, picking up approximately 1 sc per row along vertical edges and 1 sc per stitch along horizontal edges. Approximate total: 72 sc. Join with sl st.
Ribbing Rounds: Ch 1, work 1 sc BLO in each sc around. Join with sl st. Repeat for 6 total ribbing rounds. Fasten off.
Hem Band
Pick up 1 sc in each chain loop around the bottom of the joined front and back. Total approximately 172 sc. Work 8 rounds of sc BLO ribbing. Fasten off.
Cuff Trim (Make 2)
Pick up 38 sc around each cuff opening. Work 8 rounds of sc BLO ribbing. Fasten off.
Bunny Applique Instructions
Bunny Body
Work in joined rounds with CC1 and E-4 hook.
Rnd 1: Magic ring, ch 1, 6 sc in ring. Join. (6 sc)
Rnd 2: 2 sc in each sc around. Join. (12 sc)
Rnd 3: (Sc in next sc, 2 sc in next sc) 6 times. Join. (18 sc)
Rnd 4: (Sc in next 2 sc, 2 sc in next sc) 6 times. Join. (24 sc)
Rnd 5: (Sc in next 3 sc, 2 sc in next sc) 6 times. Join. (30 sc)
Rnd 6: (Sc in next 4 sc, 2 sc in next sc) 6 times. Join. (36 sc)
Rnd 7: (Sc in next 5 sc, 2 sc in next sc) 6 times. Join. (42 sc)
Rnd 8: (Sc in next 6 sc, 2 sc in next sc) 6 times. Join. (48 sc)
Switch to bobble texture:
Rnd 9: Ch 1, (bo in next st, sc in next st) 24 times. Join. (48 sts)
Rnd 10: Ch 1, (sc in next bo, bo in next sc) 24 times. Join. (48 sts)
Rnds 11 through 20: Rep Rnds 9 and 10 alternately. (48 sts each round)
Rnd 21: Ch 1, (sc2tog, sc in next 6 sts) 6 times. Join. (42 sts)
Rnd 22: Ch 1, (bo in next st, sc in next st) 21 times. Join. (42 sts)
Rnd 23: Ch 1, (sc2tog, sc in next 5 sts) 6 times. Join. (36 sts)
Rnd 24: Ch 1, (bo in next st, sc in next st) 18 times. Join. (36 sts)
Rnd 25: Ch 1, (sc2tog, sc in next 4 sts) 6 times. Join. (30 sts)
Stuff with fiberfill now.
Rnd 26: Ch 1, (sc2tog, sc in next 3 sts) 6 times. Join. (24 sts)
Rnd 27: Ch 1, (sc2tog, sc in next 2 sts) 6 times. Join. (18 sts)
Rnd 28: Ch 1, (sc2tog, sc in next st) 6 times. Join. (12 sts)
Rnd 29: Ch 1, sc2tog 6 times. Join. (6 sts)
Fasten off, leaving a long tail. Thread through remaining 6 sts, pull tight, and secure.
Bunny Head
Rnds 1 through 6: Work increases as for body. (36 sts after Rnd 6)
Rnds 7 through 14: Alternate bobble rows. (36 sts each round)
Install 12 mm safety eyes between Rnds 9 and 10, spaced approximately 8 sts apart.
Rnds 15 through 19: Decrease rounds as written in the pattern. Stuff head firmly before closing.
Embroider the nose with CC2 using satin stitches. Add whiskers with CC1 using straight stitches, 3 per side.
Bunny Ears (Make 2)
Outer ear: With CC1 and E-4 hook, ch 15.
Rows 1 through 12: Work sc across 14 sts.
Rows 13 through 19: Decrease as written until 1 st remains. Fasten off.
Inner ear: Work the same with CC2, but make it slightly smaller by starting with ch 13 and working fewer rows.
Layer inner ear on outer ear and whipstitch together. Attach to head.
Finishing the Bunny
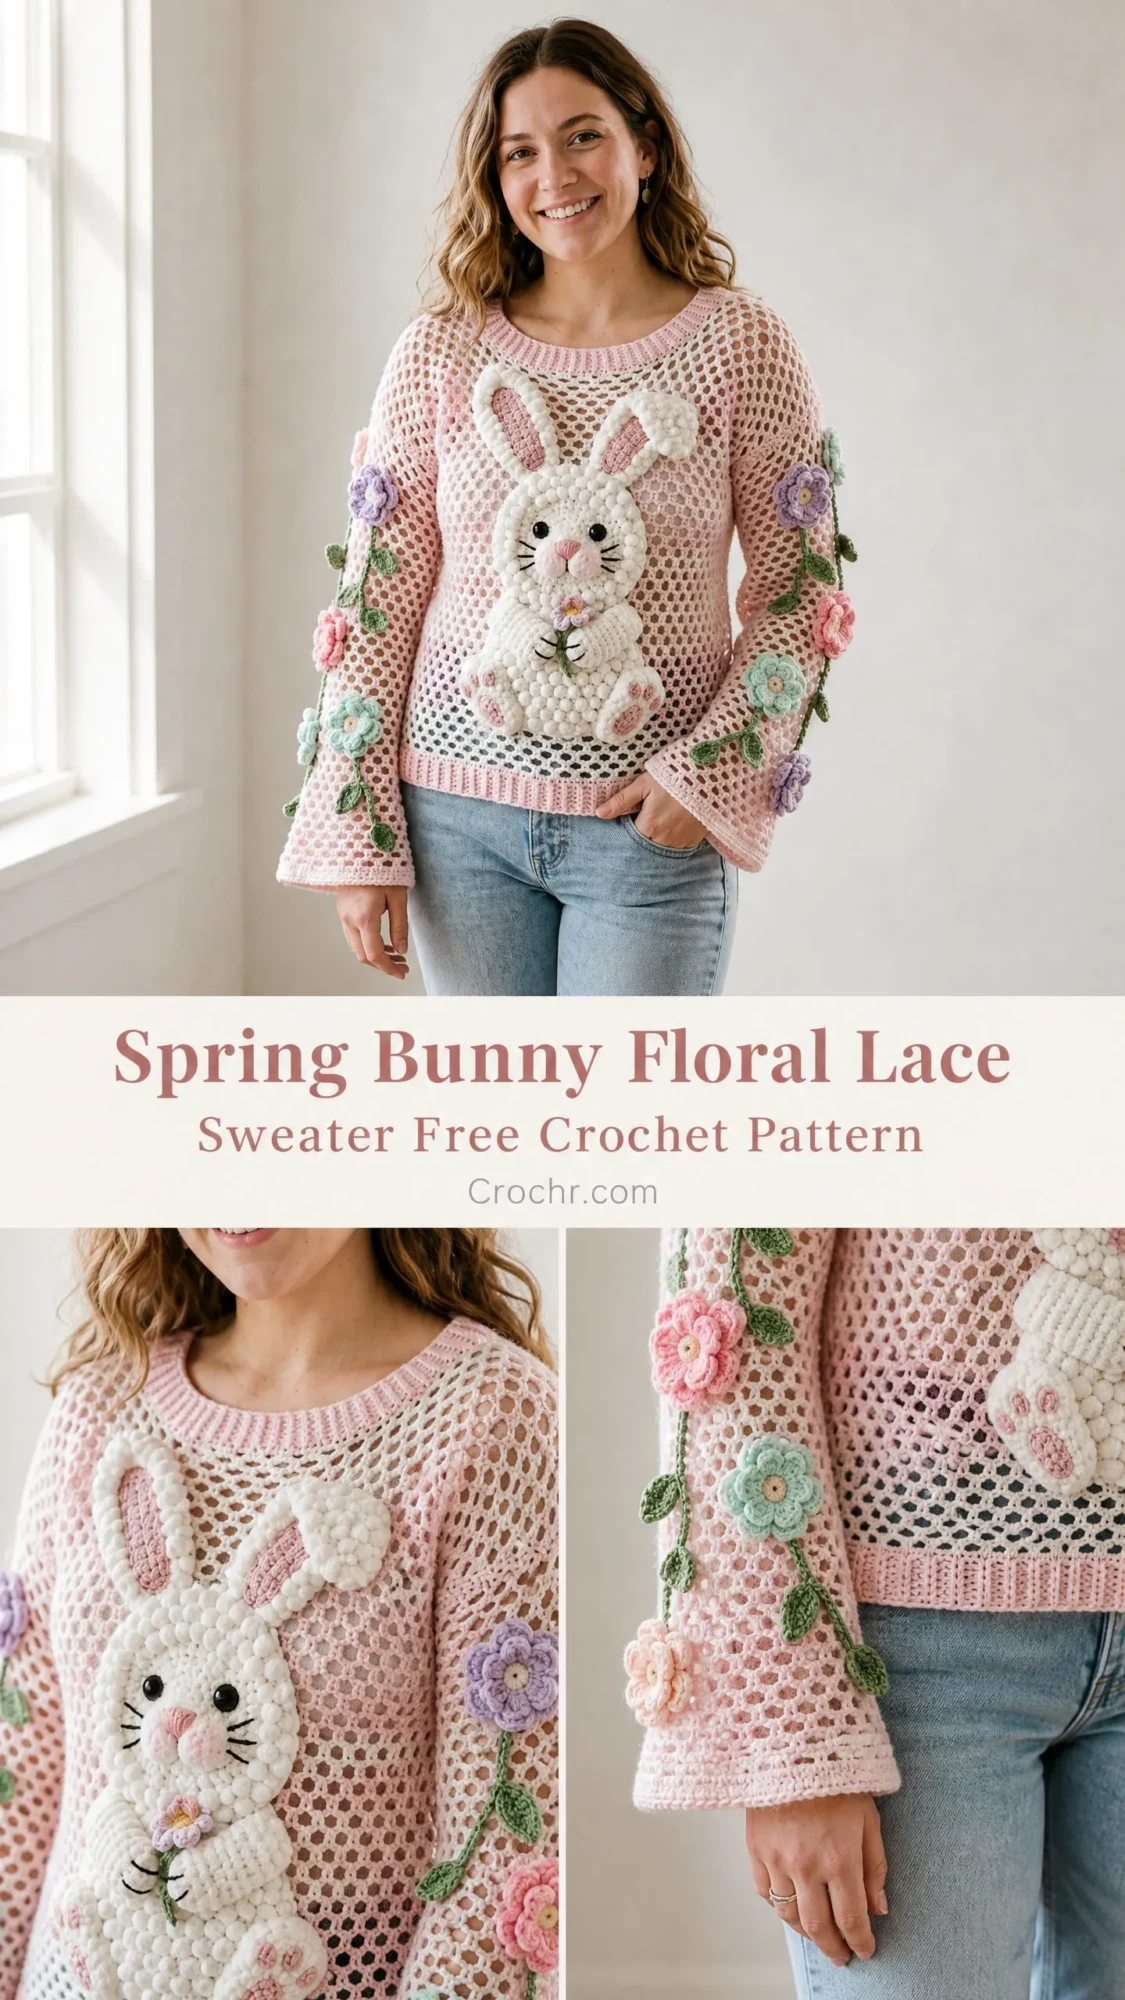
Sew the head to the body. Create small arms, legs, and a tail following amigurumi techniques. Position the bunny centered on the front panel and sew securely in place.
Floral Embellishments
Make approximately 4 to 5 larger flowers per sleeve and 3 to 4 on each side of the front panel using CC4, CC5, CC6, and CC7.
Create vine stems by chaining lengths of 15 to 25 chains with CC3. Attach leaves along the vines.
Pin all embellishments in place before sewing to ensure balanced placement. Sew securely using yarn tails.
Time Estimate
Plan for approximately 32 to 49 hours total:
Tips for Success
Block before seaming. It makes everything easier to work with and gives you accurate measurements.
Pin embellishments first. Take a photo before sewing so you can adjust placement if needed.
Don’t rush the bobble stitch. It takes practice, but once you find your rhythm, the texture is so satisfying.
Use stitch markers liberally. Mark your increases, armhole bind-offs, and neck shaping rows.
This sweater is a labor of love, but the finished result is absolutely worth every stitch. You’ll have a one-of-a-kind piece that celebrates the sweetness of spring and showcases your crochet skills beautifully.
Thank you so much for choosing this pattern for your next project. I truly hope you enjoy making it as much as I enjoyed designing it. If you complete your Spring Bunny Floral Lace Sweater, I would absolutely love to see it. Tag me on Instagram or share a photo in our Facebook group.
If this pattern made you smile or you’re excited to start, go ahead and save it to your Pinterest boards so you can find it easily when you’re ready. And please drop a comment below if you make one. I read every single one and they make my day!
You Might Also Like
- Dusty Rose Pink Drawstring Bucket Bag Free Crochet Pattern
- Sage Green Textured Slipper Socks Free Crochet Pattern
- Soft Lavender Purple Crochet Backpack Free Pattern
- Sage Green Granny Square Tote Free Crochet Pattern
