
A beautiful lace wrap makes the perfect lightweight layer for cool summer evenings, garden parties, or special occasions. This sage green garden wrap uses classic fan and shell stitches to create an elegant crescent shape that drapes beautifully across your shoulders. The project works up in DK weight cotton yarn, making it ideal for warmer weather when you want just a touch of coverage without added bulk.
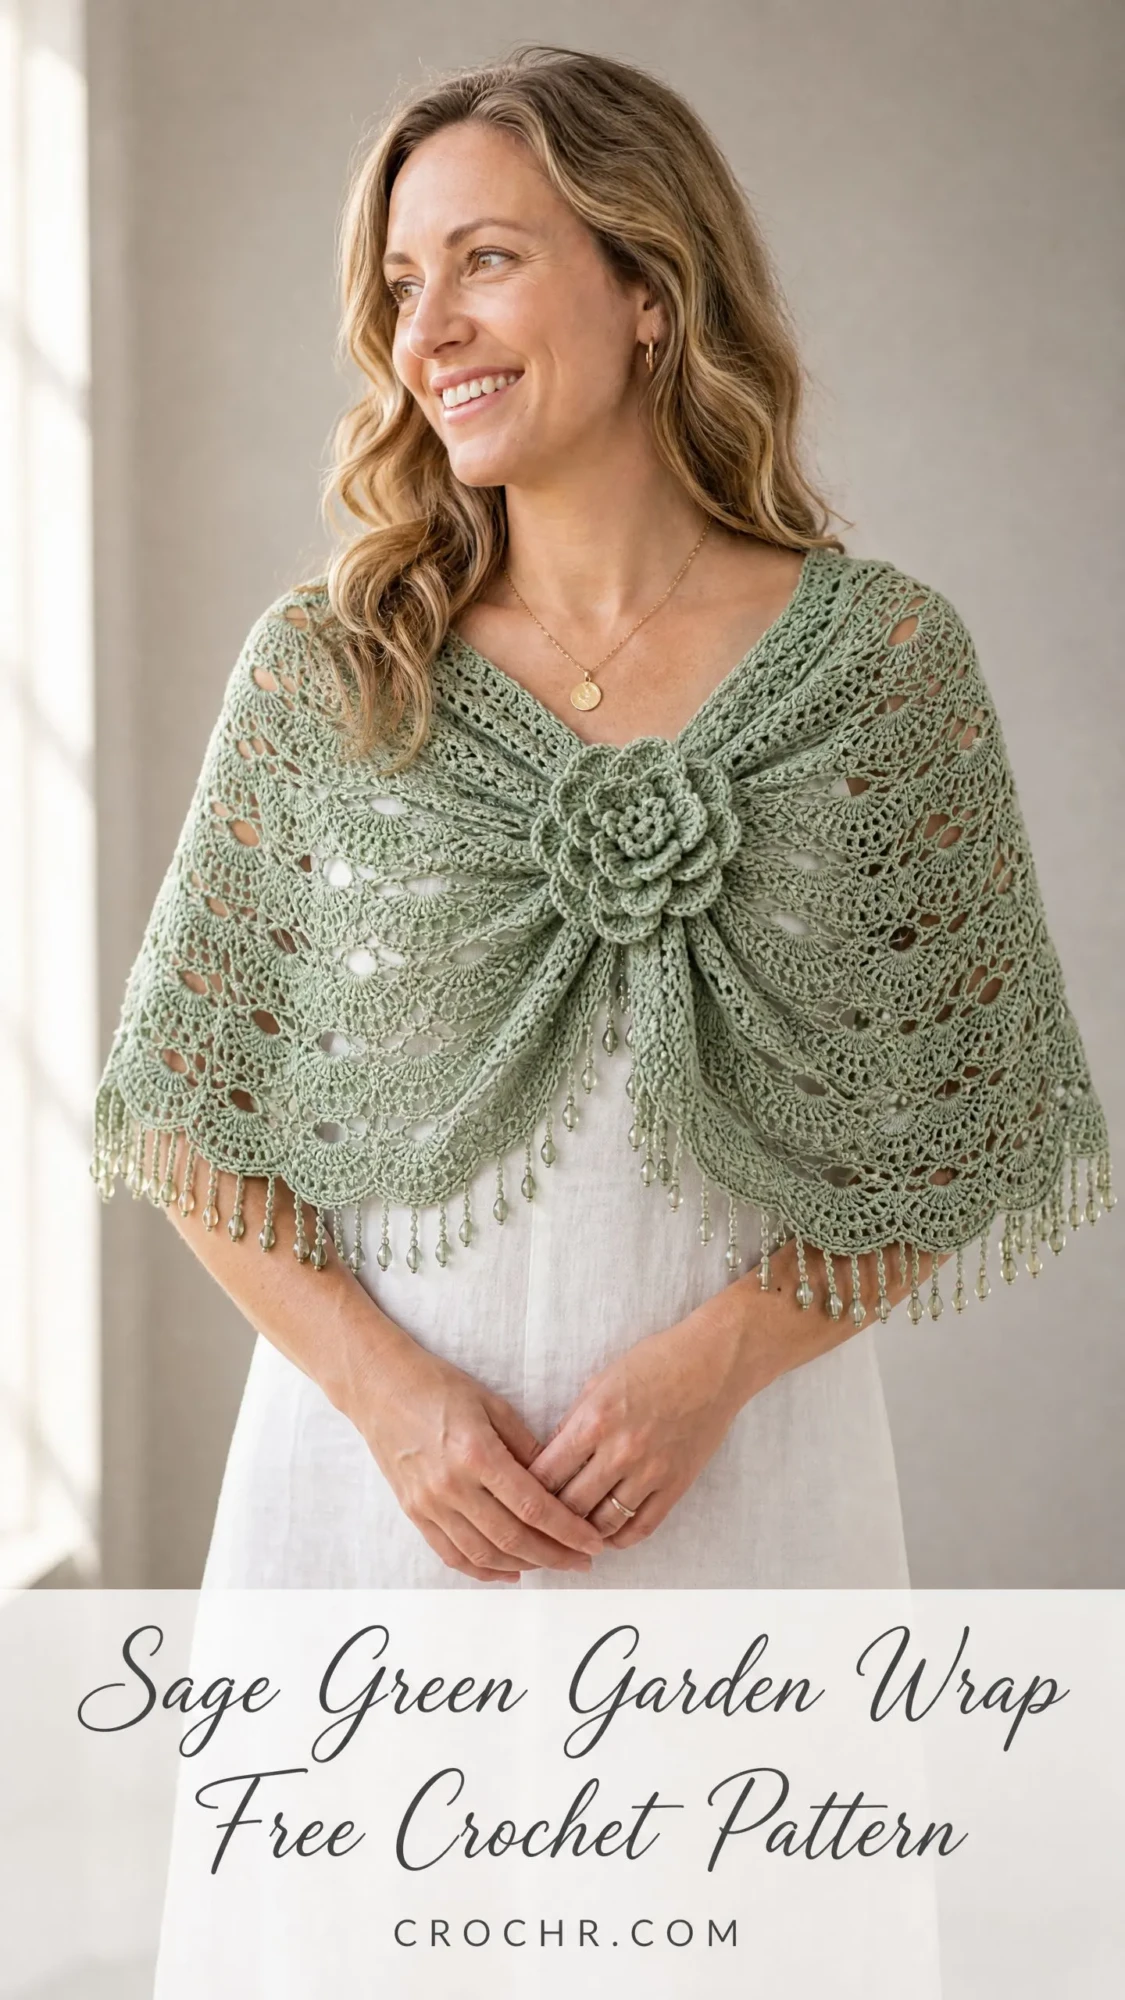
Whether you are making this for yourself or as a thoughtful handmade gift, the combination of delicate lace work and sparkling bead fringe creates a truly stunning finished piece. The dimensional rose brooch adds a romantic finishing touch that transforms this from a simple accessory into a statement piece.
If you are comfortable with basic crochet stitches and ready to try your hand at lace patterns, this wrap offers the perfect next step. The stitches themselves are straightforward. The challenge comes from keeping track of your repeats and maintaining the symmetry as the piece grows. I will walk you through every row so you always know exactly where you are.
About This Sage Green Garden Wrap Pattern
This crescent shaped wrap is worked from the top neck edge downward in increasing rows. The construction starts with a simple foundation and gradually introduces the lace pattern, so you have time to get comfortable with the rhythm before the fan stitches begin.
The body features a repeating fan and shell lace motif with open mesh sections that create an airy, breathable fabric. Along the lower edge, a scalloped picot border provides the perfect anchor point for crystal or glass bead fringe that catches the light beautifully.
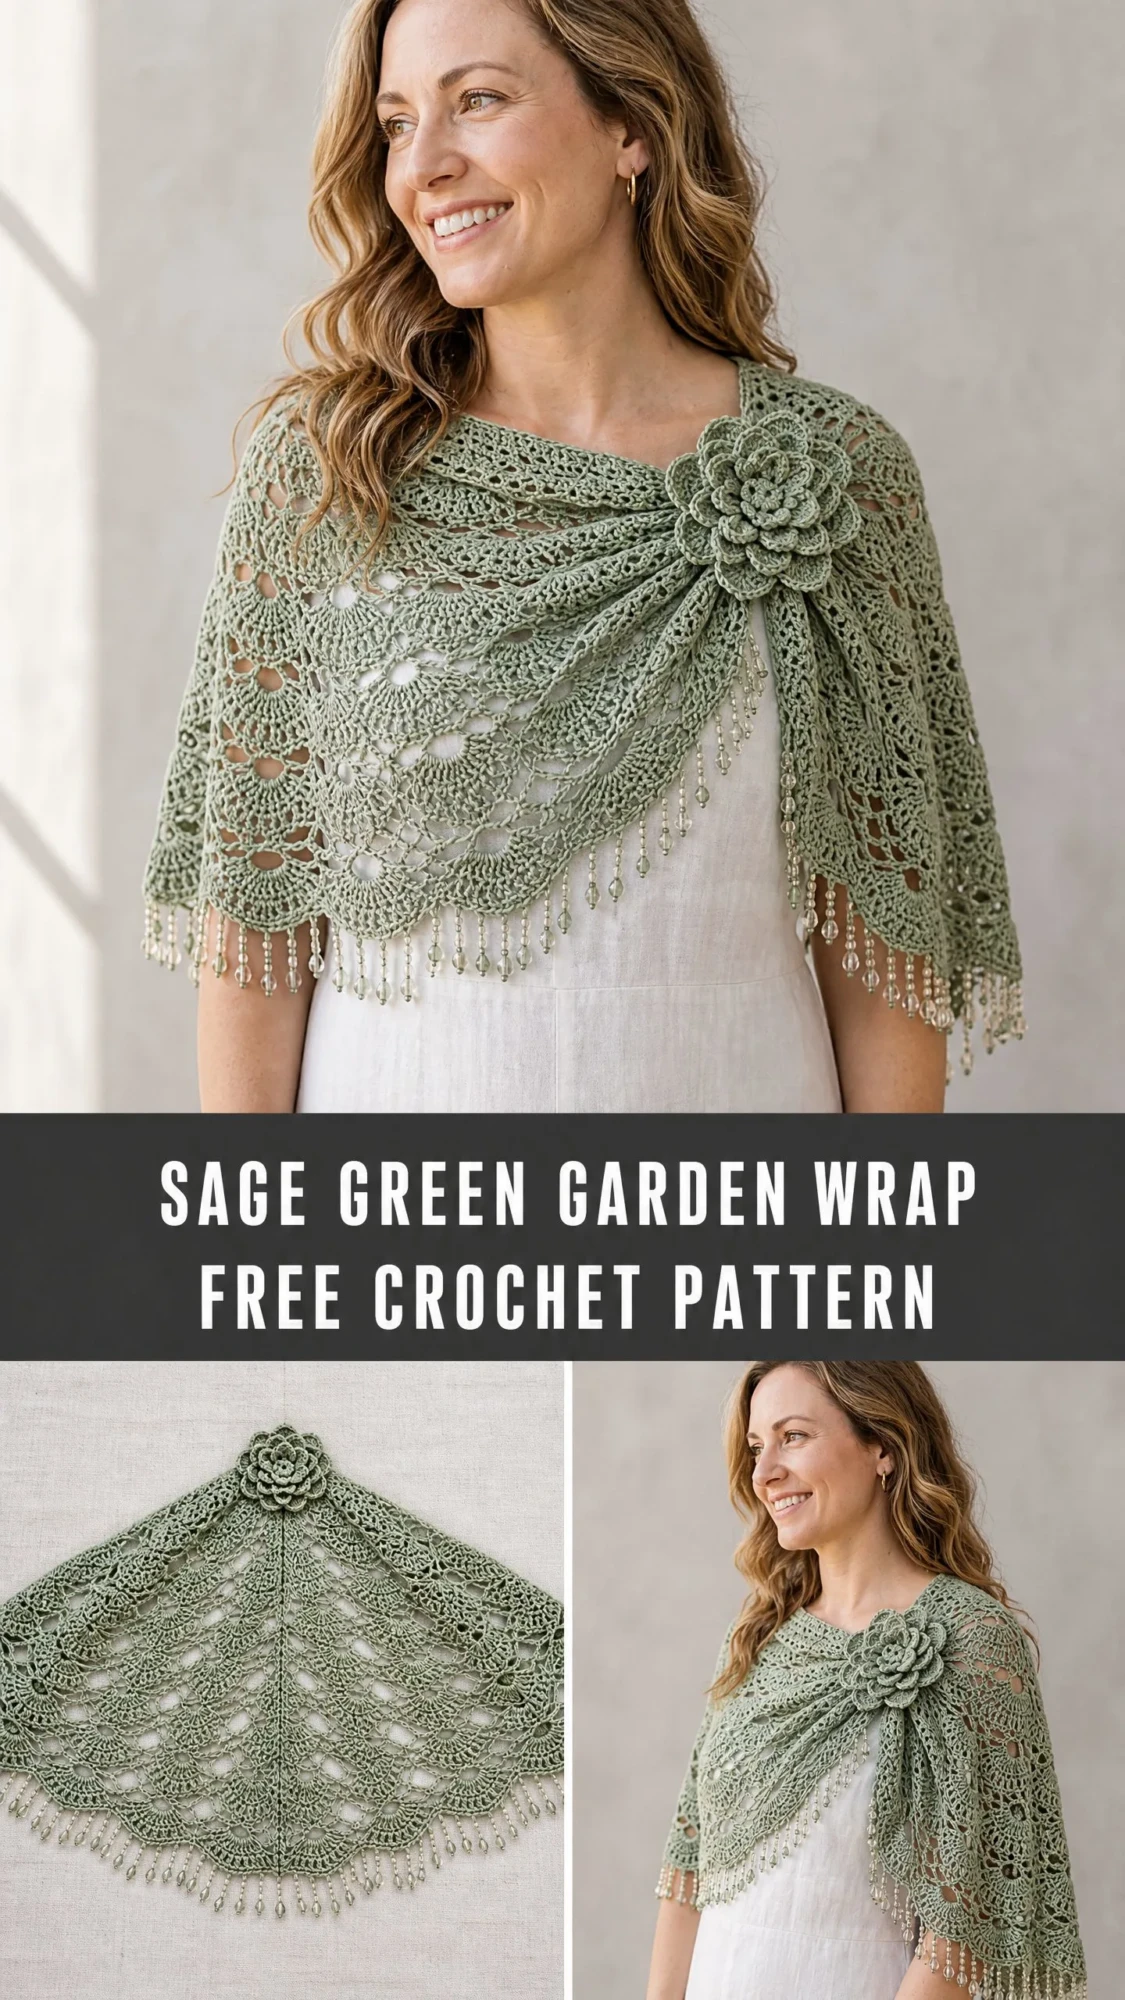
The separately crocheted dimensional rose brooch fastens the wrap at the front shoulder, allowing you to adjust the drape and fit to your preference. When finished, the wrap sits like a capelet with two tapered front panels that fall to approximately mid torso and a slightly longer back panel.
Skill Level
This pattern is rated Advanced Beginner to Intermediate. You will use chain spaces, shells, fans, and single crochet stitches, all of which are foundational techniques. However, the bead fringe attachment, dimensional rose construction, and the need to maintain lace repeats across increasing row counts require careful attention to stitch placement.
If you are comfortable following multi step lace repeats and can read your work to identify where your hook should go, you will find this manageable. Take your time, use stitch markers generously, and read each row completely before you begin working it.
Time Estimate
Plan for approximately 18 to 24 hours for the wrap body, plus 2 to 3 hours for the rose brooch and bead fringe finishing. Total estimated time is 20 to 27 hours spread across multiple crafting sessions.
Finished Measurements
This is designed as a one size fits most adult garment suitable for a 32 to 46 inch bust with the front panels pinned closed at the shoulder.
Materials Needed
Yarn: Approximately 650 to 750 yards / 595 to 686 meters of DK weight (light 3) smooth mercerized cotton or cotton blend yarn in sage green.
Hook: US size E-4 / 3.5 mm crochet hook for the wrap body and rose brooch.
Notions:
Yarn Suggestions
Option 1: Paintbox Yarns Simply DK (100% premium acrylic, 137 yards / 125 meters per 50 g skein). Use approximately 5 to 6 skeins in Spearmint Green or Pistachio. This yarn has excellent stitch definition and is machine washable, making it beginner friendly for a lace project.
Option 2: Lion Brand 24/7 Cotton DK (100% mercerized cotton, 186 yards / 170 meters per 100 g skein). Use approximately 4 skeins in Sage. The mercerized finish gives a slight sheen that beautifully mimics the finished look of this wrap.
Option 3: Paintbox Yarns Cotton DK (100% cotton, 137 yards / 125 meters per 50 g skein). Use approximately 5 to 6 skeins in Grass Green or Pistachio. Cotton will block beautifully and hold the lace open permanently.
Substitution Note: Choose a smooth yarn with good stitch definition in DK weight. Avoid heavily textured, brushed, or variegated yarns as these will obscure the lace pattern. Look for a finished gauge of approximately 18 stitches and 10 rows to 4 inches in double crochet. Mercerized cotton or cotton blends are preferred for the drape and sheen visible in the finished piece.
Gauge
18 dc = 4 inches / 10 cm
10 rows dc = 4 inches / 10 cm
One 12 stitch fan and shell repeat = approximately 2.25 inches / 5.75 cm in width
Gauge swatch: Chain 37. Row 1: dc in 4th ch from hook and in each ch across. (35 dc) Rows 2 to 10: ch 3, turn, dc across. Block swatch. Measure center 18 stitches over 4 inches / 10 cm.
Gauge is critical for the wrap to achieve the correct drape and finished dimensions. Adjust hook size up or down as needed. If your swatch measures too small, go up a hook size. If it measures too large, go down a hook size.
Abbreviations (US Terms)
Before we dive into the pattern, here is every abbreviation you will encounter with clear definitions:
Special Stitches for This Crochet Pattern
These special stitch combinations create the beautiful texture in this wrap. Practice them on a swatch if they are new to you.
Fan Stitch
Work 7 double crochet (dc) all into the same stitch or chain space. This creates the open fan shape visible along the lower body of the wrap. The stitches will naturally spread out to form a curved fan shape.
Shell Stitch (5-dc Shell)
Work 5 dc all into the same stitch or chain space. Used in the upper body section where the pattern is a bit more compact.
Picot
Chain 3, then slip stitch into the first chain you made. This creates a small decorative loop used on the lower border.
Scallop Edging
Work (sc, hdc, 3 dc, hdc, sc) all into the same chain space. This combination creates the wave edging along the bottom from which your bead fringe will hang.
Bead Fringe Unit
Cut a length of yarn approximately 8 inches / 20 cm. Fold in half. Using a crochet hook, pull the folded loop through a designated picot or chain space on the lower edge. Pull the two cut ends through the folded loop and tighten to form a lark’s head knot. Thread one or two teardrop beads onto the two strands. Tie an overhand knot below the bead(s) to secure. Trim ends evenly to approximately 1 inch / 2.5 cm below the knot.
Dimensional Rose
The rose is made from a long foundation strip that is then rolled and stitched into shape.
Rose Foundation Strip:
Chain 61.
Row 1: Sc in 2nd ch from hook and in each ch across. (60 sc)
Row 2: Ch 3 (counts as dc), turn. Work 2 dc in same st. Work 3 dc in each st across. (180 dc)
Row 3: Ch 1, turn. Sl st in each dc across. Fasten off, leaving a 24 inch tail for sewing.
To assemble the rose: Starting at one end of the strip, roll the strip tightly to form the center of the rose. As you roll, allow the strip to curve naturally so the dc petal row fans outward. After every 5 to 6 stitches of rolling, use the yarn tail and tapestry needle to stitch through the base of the strip to hold the roll in place. Continue rolling and stitching until the entire strip is formed into a rose shape. Secure the end firmly. Flatten the base slightly. Attach a shank pin back or large button to the back of the rose for use as a brooch.
Pattern Notes Before You Begin
Read through these notes before starting. They will save you confusion later.
1. The wrap is worked from the top neck edge downward in rows, turned at the end of each row.
2. The piece begins with a foundation chain that spans the neck edge.
3. Increases are made at regular intervals on each row to create the spreading capelet shape.
4. The lace fan and shell pattern begins after the first 4 setup rows.
5. Stitch count at the end of each row reflects the total number of working stitches, not counting the turning chain as a stitch unless specifically stated.
6. Important: The turning chain 3 at the beginning of double crochet rows does NOT count as a stitch in this pattern. Always work the first dc into the first stitch at the base of the turning chain.
7. Mark the center stitch of each row with a stitch marker. This center stitch will always be the peak of a fan or shell and helps track the symmetry of the pattern.
8. The lower border is worked across the bottom edge of the wrap after the main body is complete.
9. Bead fringe is attached after blocking.
10. The wrap is designed to be worn with the rose brooch pinning the two front panels together at one shoulder.
11. Read each row entirely before working it to understand the full repeat structure.
Construction Order
Part 1: Neck Setup Rows (Rows 1 to 4)
Part 2: Lace Body, Upper Section (Rows 5 to 14)
Part 3: Lace Body, Lower Section (Rows 15 to 28)
Part 4: Lower Scallop Border (Rows 29 to 31)
Part 5: Bead Fringe
Part 6: Rose Brooch (worked separately)
Step by Step Crochet Pattern Instructions
Part 1: Neck Setup Rows
Foundation Chain: Chain 127.
Row 1 (RS): Sc in 2nd ch from hook and in each ch across. Ch 1, turn. (126 sc)
Place a stitch marker in the 63rd stitch to mark center. This marker will help you maintain symmetry throughout the project.
Row 2 (WS): Sc in first st. (Ch 2, sk 2 sts, sc in next st) across. Ch 1, turn. (42 ch-2 spaces plus sc at each end)
You should have 42 ch-2 spaces with sc at each end and between each space. Total working positions: 43 sc plus 42 ch-2 spaces = 126 stitch positions.
Row 3 (RS): Sc in first sc. Work (sc, ch 2, sc) into each ch-2 space across. Sc in last sc. Ch 3, turn. (42 ch-2 spaces, 85 sc, total working stitches = 127 counting all sc)
Clarification for Row 3: You will work 1 sc in the first sc, then (sc, ch-2, sc) in each of the 42 ch-2 spaces (producing 84 sc from within spaces plus 42 ch-2 spaces), then 1 sc in the last sc. Total sc = 1 + 84 + 1 = 86 sc. Total ch-2 spaces = 42. Total working stitch positions = 128.
Row 4 (WS): Dc in first st. Ch 1, sk 1 st, dc in next st. (Ch 1, sk 1 st, dc in next st) across. Ch 3, turn.
Row 4 creates an evenly spaced mesh of dc and ch-1 spaces. You should have 64 dc and 63 ch-1 spaces. Total working positions = 127.
Checkpoint: After Row 4 the neck setup is complete. Your piece should measure approximately 2 inches / 5 cm tall from the foundation chain. The width across should be approximately 28 inches / 71 cm before the lace body begins to spread.
Part 2: Lace Body, Upper Section
The main lace pattern across the body is based on a 12 stitch repeat plus 7 stitches for the center and edge stitches. The repeat is: (sk 2, 5-dc shell in next st, sk 2, sc in next st, ch 3, sc in next st) = 9 working positions. For lower rows: (sk 2, fan of 7 dc in next st, sk 2, sc in next st, ch 3, sc in next st) as the piece widens.
Increases in the lace section are made by adding an extra ch-5 turning arch at each end of the row every other row, allowing one additional lace repeat to be added at the ends as the piece grows.
Row 5 (RS): Ch 5 (counts as dc plus ch 2) at beg of row. Dc in first dc (2 dc at edge with ch-2 between = left edge shell base). Work across in the following repeat: (sk 2 sts, work 5-dc shell in next st, sk 2 sts, sc in next ch-1 sp, ch 3, sc in next ch-1 sp) 10 times. Sk 2 sts. Work 5-dc shell in next st. Sk 2 sts. Work 5-dc shell in next st. Sk 2 sts. Sc in next ch-1 sp. Ch 3. Sc in next ch-1 sp. (sk 2 sts, 5-dc shell in next st, sk 2 sts, sc in next ch-1 sp, ch 3, sc in next ch-1 sp) 10 times. Sk 2 sts. 5-dc shell in next st. Dc in last st. Ch 5, dc in last dc (right edge mirror). Ch 3, turn. (147 sts)
You are distributing 21 shells of 5 dc across the row with sc-ch3-sc bridges between them. At each edge you work a partial shell to anchor the turning edge. Total dc in shells = 21 x 5 = 105. Plus 2 edge dc = 107 dc. Plus 20 sc-ch3-sc units = 40 sc plus 20 ch-3 spaces.
Row 6 (WS): Sc in first dc. Ch 3. Sc in top of same edge dc (left anchor). Work across: (5-dc shell in center ch-3 sp, sc in 3rd dc of next shell, ch 3, sc in 3rd dc of following shell) across, ending with 5-dc shell in last center ch-3 sp. Sc in top of right edge dc. Ch 3. Sc in last dc. Ch 3, turn. (147 sts)
Row 7 (RS): Work (ch 5, sc in center ch-3 sp, ch 5, sc in 3rd dc of shell) across, starting and ending with ch 5 arches at edges. This creates the open mesh transition row.
Row 7 opens up the mesh to transition from shells to fans in Row 8. You will have approximately 21 ch-5 arches on each side of the sc points. Total sc = 21 + 22 = 43 sc. Total ch-5 spaces = 42. (43 sc)
Row 8 (RS, Fan introduction row): Ch 3, turn. Work 5 dc in first ch-5 arch (half fan at edge). Sc in next sc. (Ch 3, sc in next sc, work 7-dc fan in next ch-5 arch, sc in next sc) across to last arch. Ch 3. Sc in last sc. Work 5 dc in last ch-5 arch. Ch 3, turn.
Row 8 introduces the 7-dc fan. You should have 20 full fans of 7 dc = 140 dc, plus 2 half-fans of 5 dc = 10 dc. Plus sc placements = approximately 43 sc. Plus ch-3 bridges = 22. (193 sts)
Row 9 (WS): Sc in 3rd dc of first half-fan. Ch 5. (Sc in 4th dc of next fan, ch 5, sc in same dc, ch 5) across, ending sc in 3rd dc of last half-fan. Ch 3, turn.
Row 9 creates double-arch bridges between fans, adding width for growth. (43 sc)
Row 10 (RS): Work 7-dc fan in first ch-5 arch. Sc in next sc. (Ch 3, sc in next sc, 7-dc fan in next ch-5 arch, sc in next sc) across, placing one new 7-dc fan in each ch-5 arch. End with sc in last sc. 7-dc fan in last ch-5 arch. Ch 3, turn.
Row 10 places a fan in every arch, including the new arches added in Row 9. You now have 22 full fans = 154 dc. Plus 43 sc plus 21 ch-3 bridges. (197 sts)
Row 11 (WS): Repeat Row 9 but work across all fans, including the 2 new edge fans. You should now have 44 ch-5 arches and 45 sc. (45 sc, 44 ch-sp)
Row 12 (RS): Repeat Row 10 across all arches. You now have 24 full fans = 168 dc. Plus 45 sc plus 23 ch-3 bridges. (213 sts)
Row 13 (WS): Repeat Row 9 pattern across all fans. You should now have 46 ch-5 arches and 47 sc. (47 sc, 46 ch-sp)
Row 14 (RS): Repeat Row 10 pattern across all arches. You now have 26 full fans = 182 dc. Plus 47 sc plus 25 ch-3 bridges. (229 sts)
Checkpoint: After Row 14 the upper lace body is complete. Your piece should measure approximately 6 inches / 15 cm from the neck edge to the current row. Width should measure approximately 40 inches / 101.5 cm. The fan pattern should be clearly visible as stacked fan shapes separated by chain bridges.
Part 3: Lace Body, Lower Section
In the lower section the fans continue but the bridge chains between them are lengthened to ch 5 throughout (instead of alternating ch 3 and ch 5) to create the more open, airy look visible in the lower wrap. Two additional fan repeats are added over the next 14 rows by working extra arches at the row ends, growing the total width.
Row 15 (WS): Ch 5, sc in 4th dc of first fan. (Ch 5, sc in same dc, ch 5, sc in 4th dc of next fan) across. Ch 5, sc in 4th dc of last fan. Ch 5, turn. (53 sc, 54 ch-5 arches)
Row 16 (RS): Work 7-dc fan in first ch-5 arch. (Sc in next sc, ch 5, sc in next sc, 7-dc fan in next ch-5 arch) across. End: sc in last sc, 7-dc fan in last ch-5 arch. Ch 5, turn.
Count: 28 fans x 7 dc = 196 dc. 27 pairs of sc-ch5-sc = 54 sc plus 27 ch-5 bridges. Plus 2 edge sc = 56 sc total. (252 sts)
Row 17 (WS): Sc in 4th dc of first fan. (Ch 5, sc in 4th dc of same fan, ch 5, sc in 4th dc of next fan) across. End ch 5, sc in 4th dc of last fan. Ch 5, turn. (57 sc, 58 ch-5 arches)
Row 18 (RS): Fan in first arch. (Sc in next sc, ch 5, sc in next sc, fan in next arch) across to end. Fan in last arch. Ch 5, turn.
Count: 30 fans x 7 dc = 210 dc. 58 sc pairs. (268 sts)
Row 19 (WS): Repeat Row 17 pattern. (61 sc, 62 ch-5 arches)
Row 20 (RS): Repeat Row 18 pattern across all arches. 32 fans x 7 dc = 224 dc. (284 sts)
Row 21 (WS): Repeat Row 17 pattern. (65 sc, 66 ch-5 arches)
Row 22 (RS): Repeat Row 18 pattern. 34 fans x 7 dc = 238 dc. (302 sts)
Row 23 (WS): Repeat Row 17 pattern. (69 sc, 70 ch-5 arches)
Row 24 (RS): Repeat Row 18 pattern. 36 fans x 7 dc = 252 dc. (320 sts)
Row 25 (WS): Repeat Row 17 pattern. (73 sc, 74 ch-5 arches)
Row 26 (RS): Repeat Row 18 pattern. 38 fans x 7 dc = 266 dc. (338 sts)
Row 27 (WS): Repeat Row 17 pattern. (77 sc, 78 ch-5 arches)
Row 28 (RS): Repeat Row 18 pattern. 40 fans x 7 dc = 280 dc. (358 sts)
Checkpoint: After Row 28 the full lace body is complete. Your piece should measure approximately 14 inches / 35.5 cm from the neck edge to the current row. Width at the lower edge should measure approximately 50 to 52 inches / 127 to 132 cm laid flat. You should have 40 fans across Row 28.
Part 4: Lower Scallop Border
The lower border adds the scalloped wave edging visible along the bottom of the wrap, from which bead fringe hangs. The border is worked across the live row 28 stitches and ch-5 arches.
Row 29 (WS, Picot foundation row): Ch 1, turn. Working across the top of Row 28, work sc in 4th dc of each fan and (sc, picot, sc) in each ch-5 bridge between fans. Work (sc, picot, sc) at each arch at row ends. Ch 1, turn.
Count: 40 fan peaks = 40 sc. 39 bridges between fans = 78 sc plus 39 picots. 2 end arches = 4 sc plus 2 picots. Total sc = 40 + 78 + 4 = 122 sc. (122 sc, 41 picots)
Row 30 (RS, Scallop row): Ch 1, turn. Work scallop stitch (sc, hdc, 3 dc, hdc, sc) in each picot space across. Between scallops, sl st in the sc between picot spaces. Ch 1, turn.
Count: 41 scallops x 7 sts = 287 sts within scallops. 40 sl sts between scallops. 2 sl sts at ends. (329 sts)
Row 31 (WS, Picot edging row): Ch 1, turn. Work sl st in first sc of first scallop. Work picot (ch 3, sl st in first ch) in top of first hdc. Sl st in first dc of scallop. Picot in top of center dc. Sl st in 3rd dc. Picot in top of last hdc. Sl st in last sc. (Sl st across the sl st between scallops. Rep for each scallop) across. Fasten off. Weave in ends.
Count: 41 scallops, 3 picots per scallop = 123 picots. (123 picots along lower edge)
Part 5: Bead Fringe
After blocking (see Finishing section below), attach bead fringe units using the lark’s head knot method described in Special Stitches. Attach one bead fringe unit to every other picot along the lower scallop border, placing them evenly in the center of each scallop at the center dc position.
Total bead fringe units: approximately 41 (one per scallop center).
Thread 2 teardrop beads onto each fringe unit, sliding them down to approximately 1 inch / 2.5 cm from the knot. Tie a firm overhand knot below the lower bead. Trim fringe ends to 0.5 inch / 1.25 cm below the final knot. The combined fringe length including beads should be approximately 2.5 to 3 inches / 6.5 to 7.5 cm.
Part 6: Rose Brooch
Follow the Dimensional Rose instructions given in the Special Stitches section above to complete the rose. The finished rose should measure approximately 3 to 3.5 inches / 7.5 to 9 cm in diameter.
After assembly and securing of all tail ends, stitch a shank pin back or sew a flat button to the back center of the rose base. Use the pin to fasten the two front panels of the wrap together at the left or right shoulder as preferred.
Alternatively, sew the rose directly to the wrap at the front shoulder area if a permanent attachment is desired.
Size Customization Tips
To make the wrap wider: Work additional fan rows in Part 3, adding 2 more fans per RS row. Every 2 additional fans adds approximately 4.5 inches / 11.5 cm to the total width. Add approximately 60 additional yards of yarn per 2 extra rows.
To make the wrap narrower: Begin with a shorter foundation chain. Reduce the chain by 24 stitches (2 full lace repeats) for each size reduction. A chain of 103 will produce a wrap approximately 8 inches / 20.5 cm narrower.
To make the wrap longer: Continue the lower section fan rows before working the border. Each additional RS and WS row pair adds approximately 0.75 inch / 2 cm to the length. Add approximately 35 to 40 yards per additional row pair.
For a longer center back point only: After Row 28, work 4 to 6 additional rows across only the center 20 fans, decreasing by 2 fans per RS row, to create a tapered V point at center back. This adds visual length without significantly adding to the side panel length.
Finishing and Blocking Your Garden Wrap
Wet blocking is strongly recommended for this lace wrap. Wet blocking opens the lace fans and sets the scalloped border permanently. Do not skip this step. It truly transforms the finished piece.
Step 1: Weave in all ends securely using a tapestry needle, working the tail through at least 2 inches of stitches in different directions.
Step 2: Fill a basin with cool water. Submerge the wrap and gently squeeze (do not wring) to saturate completely. Let soak for 15 to 20 minutes.
Step 3: Remove from water and roll in a clean dry towel to remove excess moisture. Do not twist.
Step 4: Lay the wrap flat on blocking mats. Pin the neck edge in a gentle curve. Pin the two front panel points outward to their finished length. Pin the lower scalloped edge to define the wave shape, placing a pin at each scallop peak and at each valley between scallops.
Step 5: Allow to dry completely before removing pins. Drying time is approximately 12 to 24 hours depending on yarn fiber content and humidity.
Step 6: Once fully dry, attach bead fringe as described in Part 5.
Step 7: Attach rose brooch.
Care Instructions
Hand wash in cool water with a gentle detergent. Lay flat to dry. Do not wring or machine dry. If using a cotton or cotton blend yarn, light ironing on the reverse side with a pressing cloth is acceptable after the piece is fully dry. Store flat or loosely rolled to prevent stretching. Remove the rose brooch pin before washing.
You Did It!
Congratulations on completing this beautiful sage green garden wrap crochet pattern! The combination of delicate lace work, sparkling bead fringe, and that gorgeous dimensional rose creates a truly special handmade piece. Whether you made this for yourself or as a gift for someone you love, I hope you enjoyed the process of watching those fans build row by row into something so elegant.
Thank you so much for choosing this pattern and trusting me to guide you through it. I would absolutely love to see your finished wrap! Tag me on Instagram or share a photo in my Facebook group. Seeing your creations is honestly the best part of designing patterns.
If you loved making this wrap, save it to your Pinterest boards so you can find it again later or share it with your crochet loving friends. And please drop a comment below if you make it. I read every single one and love hearing how your projects turn out. Happy crocheting!
You Might Also Like
- Forest Green Fox Granny Square Baby Blanket Free Pattern
- Terracotta Sunset Crochet Sneaker Boots Free Pattern
- Sunny Sunflower Crochet Pot Free Crochet Pattern
- Butter Yellow Chunky Bag on Bed Free Pattern
