Last winter, I found myself standing on my cold kitchen floor at 6 AM, cursing the tile beneath my bare feet while waiting for the coffee to brew. My husband had accidentally thrown my favorite store-bought slippers in the wash, and they came out looking like sad, felted lumps. I stood there shivering and thought, "I’m a crocheter. Why don’t I just make myself a pair?" That moment of freezing-toe frustration led me to create these cozy slipper socks, and honestly, they turned out better than anything I could have bought. Now I keep a pair by the bed, a pair by the back door, and I’ve made at least four more as gifts. Sometimes the best patterns come from the most annoying moments.
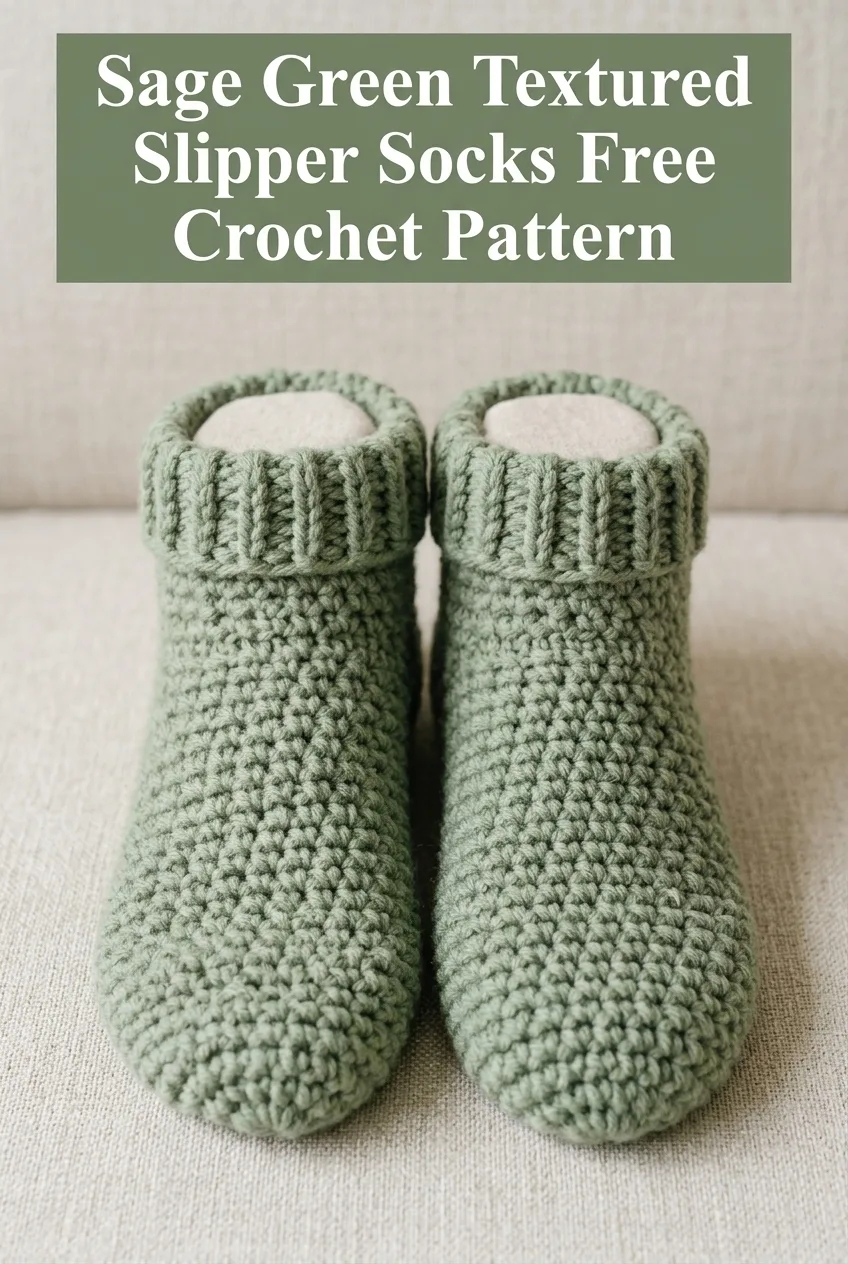
These textured slipper socks work up quickly with chunky yarn and feature a beautiful ribbed cuff that folds over for extra warmth around the ankles. The body uses a simple textured stitch pattern that creates thickness and cushion underfoot. Whether you’re making these for yourself or as a thoughtful handmade gift, this crochet pattern delivers cozy results without complicated techniques.
Why You’ll Love This Slipper Socks Crochet Pattern
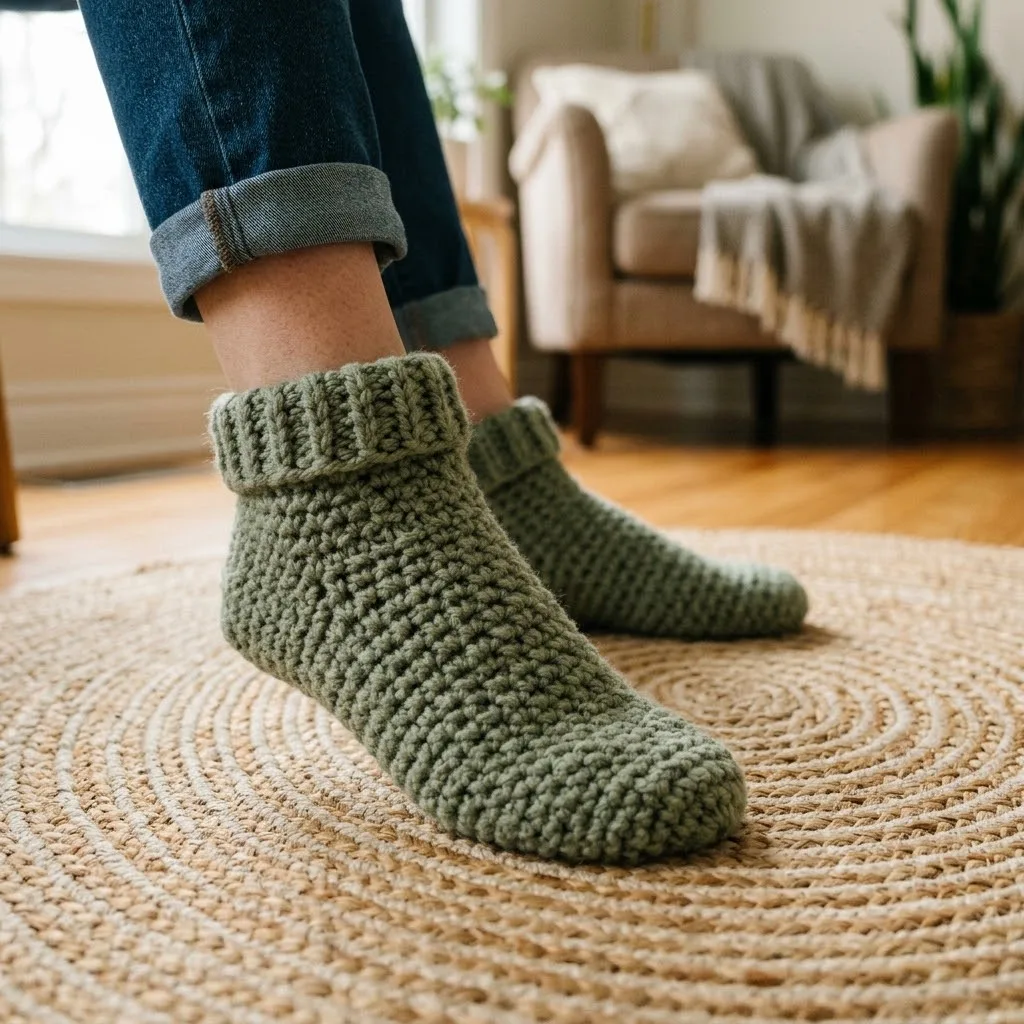
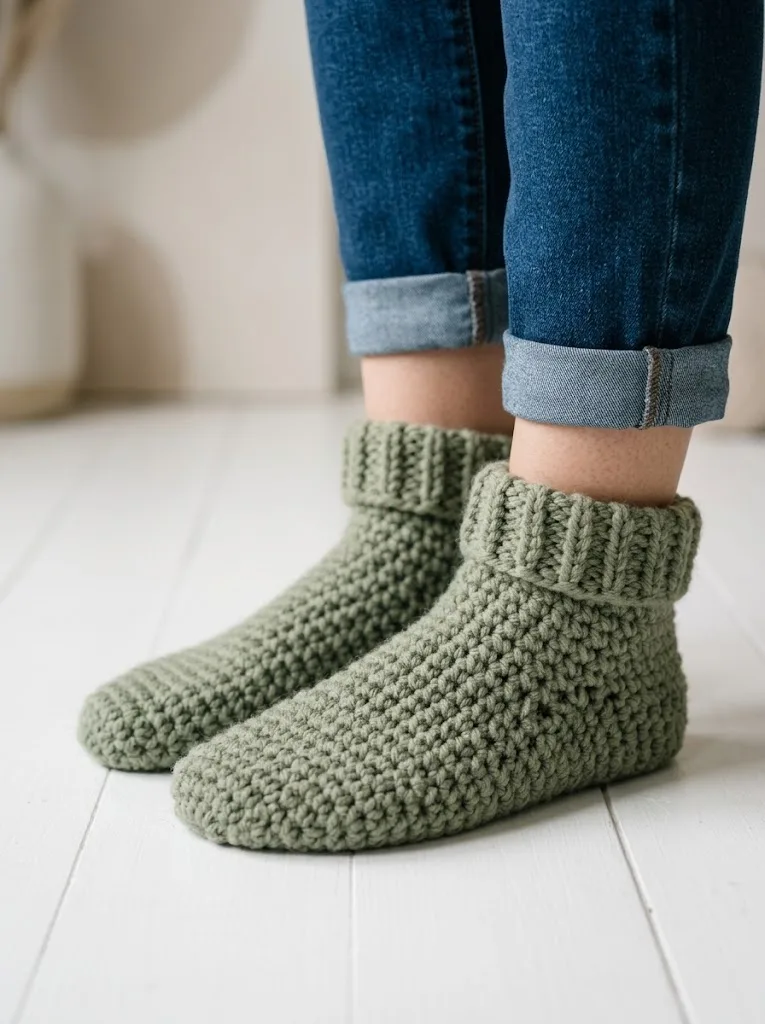
These aren’t your average crochet slippers. The construction method creates a dense, squishy fabric that actually provides cushion when you walk. The ribbed cuff adds stretch and stays put on your ankle without cutting off circulation. Plus, that sage green color? Absolutely gorgeous for fall and winter, though you can make these in any shade that makes you happy.
What makes this pattern special:
I designed this crochet tutorial with newer crocheters in mind, but experienced makers will appreciate how satisfying and fast this project comes together. The step by step instructions walk you through every detail, so you’ll never feel lost.
Materials Needed for Your Crochet Slipper Socks
Before you begin, gather everything you need. Having your supplies ready makes the crocheting process so much smoother.
Yarn:
Hook:
Notions:
Gauge:
Working in the textured stitch pattern with the J/10 hook: 12 stitches and 14 rows = 4 inches square
Checking your gauge matters for this project because you want your slippers to actually fit your feet. Take a few minutes to make a small swatch. If your swatch is too big, go down a hook size. If it’s too small, go up a hook size.
Sizing Information
This crochet pattern is written for Women’s Medium, which fits approximately shoe sizes 7 to 8. The finished slipper measures roughly 9 inches from heel to toe.
To adjust for other sizes:
The stretchy nature of crochet fabric means these slippers have some give, so don’t worry about getting it perfectly exact.
Stitches and Abbreviations Used
Let me define every stitch before we dive into the pattern. Understanding these terms will make the instructions crystal clear.
ch = chain. Wrap the yarn over your hook and pull through the loop already on your hook. This creates one chain stitch. If the pattern says "ch 10," you’ll make 10 of these in a row.
sl st = slip stitch. Insert your hook into the stitch, yarn over, and pull through both the stitch and the loop on your hook in one motion. This creates a very flat, tight stitch used mainly for joining or moving across stitches.
sc = single crochet. Insert your hook into the stitch, yarn over and pull up a loop (two loops on hook), yarn over and pull through both loops. This is your basic building block stitch.
hdc = half double crochet. Yarn over first, then insert your hook into the stitch, yarn over and pull up a loop (three loops on hook), yarn over and pull through all three loops at once. Slightly taller than single crochet.
BLO = back loop only. Instead of inserting your hook under both loops of the stitch, you only go under the back loop. This creates those beautiful horizontal ridges you see in the ribbing.
FLO = front loop only. The opposite of BLO. You insert your hook under only the front loop.
Special Techniques in This Pattern
Working in the Round: After constructing the sole, you’ll work in continuous rounds around the foot portion. Use a stitch marker to track where each round begins.
Textured Stitch Pattern: The body of these slipper socks uses alternating rows of single crochet and half double crochet to create that lovely bumpy texture visible in the pattern. This technique builds density and cushion.
Ribbing: The cuff uses half double crochet worked in the back loop only to create stretchy ribbing that mimics knit fabric.
Crochet Pattern Instructions
Ready to make your own cozy slipper socks? Let’s get started. Remember, you’ll make two of these, so consider making them at the same time to ensure they match.
Part One: The Sole
Using your J/10 (6.0mm) hook and bulky weight yarn, begin with the foundation.
Row 1: Ch 21. Sc in the second ch from the hook and in each ch across. Turn. (20 sts)
Row 2: Ch 1 (does not count as a stitch here and throughout). Sc in each st across. Turn. (20 sts)
Row 3: Ch 1. Hdc in each st across. Turn. (20 sts)
Rows 4 through 25: Repeat Rows 2 and 3, alternating between sc rows and hdc rows. Your sole should measure approximately 9 inches long when complete. (20 sts each row)
If you need a different size, this is where you add or subtract rows. Each row adds roughly a third of an inch to the length.
Row 26: Ch 1. Sc in each st across. Do not turn. (20 sts)
Part Two: Building the Foot
Now we transition to working in rounds around the edge of the sole. This creates the sides and top of the slipper.
Round 1: Without turning, rotate your work to crochet along the side edge. Work 26 sc evenly along the long edge of the sole, then work 20 sc across the starting chain edge (the heel end), then work 26 sc evenly along the other long edge. Join with a sl st to the first sc of Row 26. Place a stitch marker in this joining stitch. (92 sts total around)
Don’t stress about getting exactly 26 stitches along each side. The goal is to space them evenly so your slipper doesn’t pucker or ruffle. Aim for approximately one stitch per row edge.
Round 2: Ch 1. Sc in each st around. Join with sl st to first sc. (92 sts)
Round 3: Ch 1. Hdc in each st around. Join with sl st to first hdc. (92 sts)
Rounds 4 through 7: Repeat Rounds 2 and 3 two more times. (92 sts)
At this point, your slipper should be forming a nice cup shape around your foot when you try it on.
Part Three: Shaping the Toe
Here’s where the magic happens. We decrease to shape the toe area for a comfortable fit.
Round 8: Ch 1. Sc in the first 10 sts. *Sc2tog (insert hook in next st, pull up a loop, insert hook in following st, pull up a loop, yarn over and pull through all three loops)* repeat from * 10 times. Sc in remaining sts to end of round. Join with sl st. (82 sts)
Round 9: Ch 1. Sc in the first 8 sts. *Sc2tog* repeat 10 times. Sc in remaining sts. Join with sl st. (72 sts)
Round 10: Ch 1. Sc in the first 6 sts. *Sc2tog* repeat 10 times. Sc in remaining sts. Join with sl st. (62 sts)
Round 11: Ch 1. Sc in the first 4 sts. *Sc2tog* repeat 10 times. Sc in remaining sts. Join with sl st. (52 sts)
Try on your slipper at this point. The toe should feel snug but not tight. If you have longer toes, you might do one fewer decrease round.
Part Four: The Ankle
Now we build up the ankle portion before adding the ribbed cuff.
Round 12: Ch 1. Sc in each st around. Join. (52 sts)
Round 13: Ch 1. Hdc in each st around. Join. (52 sts)
Rounds 14 through 17: Repeat Rounds 12 and 13 two more times. (52 sts)
Your slipper should now reach just above your ankle bone. Perfect for adding that cozy folded cuff.
Part Five: The Ribbed Cuff
Switch to your I/9 (5.5mm) hook for this section. The smaller hook creates tighter ribbing with better stretch and recovery.
Setup Row: Ch 8.
Row 1: Hdc in the third ch from the hook (the skipped chains count as your first hdc) and in each ch across. Turn. (7 sts)
Row 2: Ch 2 (counts as first hdc). Hdc in the back loop only of each st across. Turn. (7 sts)
Rows 3 through 52: Repeat Row 2. (7 sts each row)
Your ribbed strip should measure approximately the same circumference as your slipper opening. If it seems too short, add more rows. If too long, remove a few rows.
Joining the Cuff: Fold the ribbed strip in half lengthwise with wrong sides together. Sl st through both layers along the short edge to create a tube.
Attach the ribbed cuff to the top of the slipper by placing the cuff tube over the ankle opening. Using your tapestry needle and a length of yarn, whip stitch the bottom edge of the cuff to Round 17 of the slipper, spacing your stitches evenly.
Fold the cuff down about 2 inches for that classic cozy look you see in the photos.
Part Six: Finishing
Weave in all your ends securely. I like to weave through at least 2 inches of stitches, then reverse direction for another inch. This prevents ends from popping out after washing.
Make a second slipper following the same instructions.
Tips for Success
Preventing slipping: If you plan to wear these on hard floors, consider adding grip to the soles. You can use fabric paint, hot glue dots, or purchase adhesive grip pads made for slippers.
Washing: Hand wash in cool water and lay flat to dry. Machine washing may cause the fibers to felt slightly, which actually adds durability but may shrink the slippers.
Yarn substitutions: While bulky weight yarn works best, you could use two strands of worsted weight held together for similar results.
Making them last: Reinforce the heel and toe areas by working a few extra rounds of single crochet on the inside of the sole before attaching the foot portion.
Who Will Love These Slipper Socks?
This crochet pattern makes wonderful gifts for pretty much everyone. I’ve made pairs for my mom, my sister, my college-aged niece, and several coworkers. They all adore them.
Consider making these for:
The how to crochet instructions in this pattern work for confident beginners who have completed a few projects and feel comfortable with basic stitches. If you’ve made a hat or a scarf, you can absolutely tackle these slipper socks.
Customization Ideas
Want to make these slippers even more special? Try these variations:
Colorwork: Use two contrasting colors, switching at Round 8 for a two-tone effect.
Button detail: Add a decorative button to the outside of each cuff for a cute accent.
Longer cuff: Double the ribbing length for a slouchy sock look that reaches mid-calf.
Pompoms: Attach small yarn pompoms to the back of each heel for playful charm.
Stripes: Change colors every 2 rounds in the foot portion for horizontal stripes.
I hope you enjoy making these sage green textured slipper socks as much as I enjoyed designing them. There’s something so satisfying about wearing handmade items, especially when they keep your toes toasty on cold mornings. Thank you for trusting me with your crafting time. I truly appreciate every one of you who chooses to make my patterns.
If you make these slipper socks, I would absolutely love to see them. Tag me on Instagram or share a photo in my Facebook group. Seeing your finished projects genuinely makes my whole day.
Save this crochet slipper socks pattern to your Pinterest boards so you can find it whenever the crocheting mood strikes. And please, drop a comment below if you make a pair. I love hearing which colors you chose and who you’re making them for. Your comments truly make this little corner of the internet feel like a real community.
