
Introduction
Baby garment crochet patterns look intimidating. I hear it all the time. The tiny sizes, the shaping, the lace work. But here is the truth: if you can work a double crochet and count your stitches, you can absolutely make this dress.
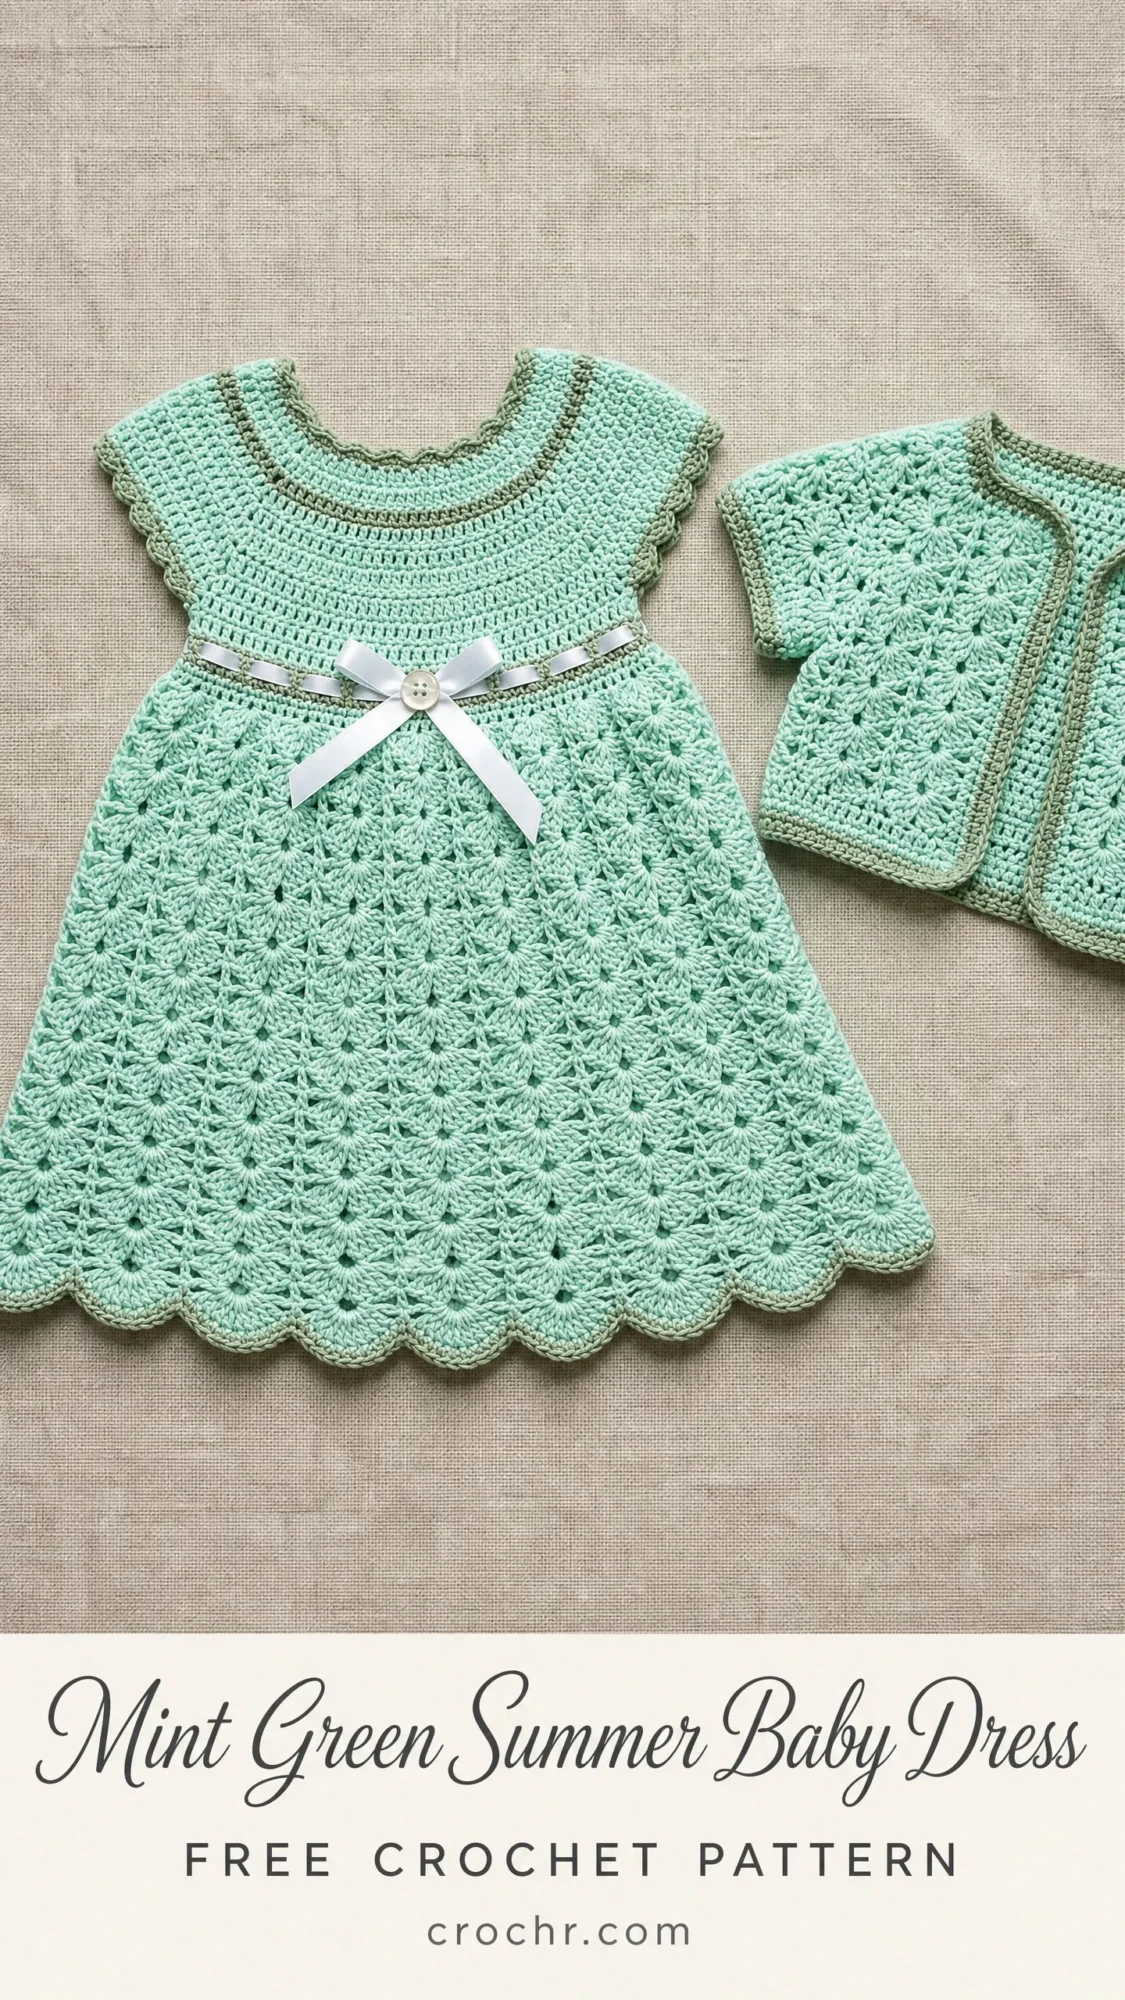
This mint green summer baby dress breaks down into simple, repeatable sections. The yoke is just single crochet with evenly spaced increases. The fan lace skirt follows a rhythm you will memorize after two rounds. And the whole thing is worked top down in joined rounds, which means zero seams to stress about at the end.
Whether you have made baby clothes before or this is your first tiny garment, I have written every round out fully with stitch counts so you always know exactly where you are. The matching bolero cardigan shown in the photos is included as an optional bonus section. Let’s walk through this together.
About This Crochet Pattern
This sweet baby dress features a seamlessly constructed round yoke worked from the neckline down. The bodice uses simple single crochet with strategic increase rounds to create a flat circular yoke that sits smoothly across the chest and shoulders. At the empire waist, a ribbon eyelet row allows you to thread a satin ribbon through for that classic dressed-up look.
The skirt portion uses a beautiful fan lace pattern that looks complex but is actually just five double crochets worked into the same space, repeated in an alternating pattern with single crochets and chain spaces. The scalloped hem forms naturally from the fan stitch structure.
Cap sleeves are created by the natural arc of the yoke and finished with a simple scallop edging. No separate sleeve construction required.
Finished Measurements
Size 6 to 12 months:
Size 12 to 18 months:
Size adjustments appear in parentheses throughout the pattern where they differ from the primary 6 to 12 month size.
Materials Needed
Yarn:
Hook:
Notions:
Yarn Suggestions
Paintbox Yarns Cotton DK works beautifully for this project. It is 100% cotton with 137 yards per 50 g ball. The shade Spearmint for MC and Champagne White or Pistachio for CC gives you excellent stitch definition for the lace work and machine washes well.
Drops Safran is another great option. This 50% cotton and 50% acrylic blend is lightweight and slightly stretchy. Try shade 11 Mint for MC and shade 23 Golden Yellow or shade 08 Light Beige for CC.
Lion Brand 24/7 Cotton is widely available and produces a slightly more structured fabric, which is ideal for a crisp skirt silhouette. Select Mint for MC and Ecru for CC.
Avoid fuzzy, hairy, or textured yarns as they will obscure the fan lace stitch pattern. Always swatch before beginning and adjust your hook size as needed to match gauge.
Gauge
20 single crochet stitches and 22 rows equals 4 inches / 10 cm in single crochet, blocked.
One full fan lace repeat, which is 9 stitches wide, measures approximately 1.75 inches / 4.5 cm wide.
Gauge is critical for garment fit. Please swatch before beginning.
Skill Level
This pattern is rated intermediate. You should be comfortable with working in joined rounds, increasing evenly across rounds, reading a multi-step fan lace repeat, working in the round top down, and basic finishing with ribbon.
If you are a confident beginner who can work shell stitches, you will succeed by reading ahead before each section. The pattern is written with full stitch counts at the end of every round so you can always check your work.
Stitch Abbreviations and Definitions
Before we begin, here are all the abbreviations used in this pattern with plain English definitions:
Special Stitches
Fan Stitch
Work 5 double crochet stitches into the same stitch or chain space. All 5 dc go into the same location, creating a fan shape that spreads outward at the top. In this pattern, fans are always worked into a chain 2 space unless otherwise stated.
Shell Stitch
Work 3 double crochet stitches into the same stitch or chain space. Shells are used in the yoke transition and sleeve edging.
V-Stitch
Work 1 dc into the indicated stitch, chain 2, then work 1 dc into the same stitch. You end up with 2 dc with a ch-2 space between them, all anchored in the same stitch.
Picot
Chain 3, then slip stitch into the first chain of that ch-3. This creates a small decorative knot used in the sleeve edging finish.
Scallop Edging
Skip 2 stitches, work 5 dc into the next stitch, skip 2 stitches, slip stitch into the next stitch. Repeat across or around, adjusting at the round end to close evenly.
Pattern Notes
1. The dress is worked from the neckline downward in joined rounds with the right side always facing.
2. Each round begins with a standing stitch or a beginning chain to match stitch height. Each round ends with a slip stitch into the top of the beginning stitch or chain to join.
3. The yoke is worked in single crochet with increase rounds to shape the neckline into a circle that lies flat against the chest.
4. At the underarm, stitches are chained across to bridge the front and back and to position the arm opening.
5. Cap sleeves are formed by the natural arc of the yoke upper edge and are finished separately.
6. The skirt begins at the waist with a chain space ribbon row, then fans out using fan lace repeats.
7. The pattern is written for size 6 to 12 months. Size 12 to 18 month adjustments appear in parentheses where they differ.
8. Stitch counts appear at the end of every round in parentheses.
9. Block the finished dress before attaching ribbon for best results.
Step by Step Crochet Pattern Instructions
Section 1: Neckline Foundation
Using MC, chain 72. For size 12 to 18 months, chain 80.
Slip stitch into the first chain to form a ring. Be careful not to twist the chain.
Round 1 (Neckline Edge, CC): Join CC in any chain. Ch 1, sc in each ch around. Join with sl st to first sc. (72 sc) For 12 to 18 months: (80 sc)
Round 2 (Neckline Trim, CC): Ch 1. Working in BLO, sc in each st around. Join with sl st to first sc. (72 sc) For 12 to 18 months: (80 sc)
Fasten off CC. Join MC.
Section 2: Yoke
The yoke is worked entirely in MC. Increases are distributed evenly across specific rounds to create a flat circular yoke.
Round 3: Ch 1, sc in each st around. Join. (72 sc) For 12 to 18 months: (80 sc)
Round 4 (Increase Round): Ch 1. [Sc in next 3 sts, 2 sc in next st] rep around. Join. (90 sc) For 12 to 18 months: (100 sc)
Round 5: Ch 1, sc in each st around. Join. (90 sc) For 12 to 18 months: (100 sc)
Round 6: Ch 1, sc in each st around. Join. (90 sc) For 12 to 18 months: (100 sc)
Round 7 (Increase Round): Ch 1. [Sc in next 4 sts, 2 sc in next st] rep around. Join. (108 sc) For 12 to 18 months: (120 sc)
Round 8: Ch 1, sc in each st around. Join. (108 sc) For 12 to 18 months: (120 sc)
Round 9: Ch 1, sc in each st around. Join. (108 sc) For 12 to 18 months: (120 sc)
Round 10 (Increase Round): Ch 1. [Sc in next 5 sts, 2 sc in next st] rep around. Join. (126 sc) For 12 to 18 months: (140 sc)
Round 11: Ch 1, sc in each st around. Join. (126 sc) For 12 to 18 months: (140 sc)
Round 12: Ch 1, sc in each st around. Join. (126 sc) For 12 to 18 months: (140 sc)
Round 13 (Increase Round): Ch 1. [Sc in next 6 sts, 2 sc in next st] rep around. Join. (144 sc) For 12 to 18 months: (160 sc)
Round 14: Ch 1, sc in each st around. Join. (144 sc) For 12 to 18 months: (160 sc)
Round 15: Ch 1, sc in each st around. Join. (144 sc) For 12 to 18 months: (160 sc)
Round 16 (CC Accent Round): Join CC. Ch 1, sc in each st around. Join. (144 sc) For 12 to 18 months: (160 sc)
Round 17 (CC Accent Round): Ch 1. Working in BLO, sc in each st around. Join. (144 sc) For 12 to 18 months: (160 sc)
Fasten off CC. Join MC.
Checkpoint: After Round 17, the yoke should measure approximately 3.5 inches / 9 cm from the neckline edge. The piece should lie flat without cupping or ruffling. If the yoke cups, try a larger hook. If it ruffles, try a smaller hook.
Section 3: Underarm Separation
In this section, the front and back yoke stitches are separated and underarm chains bridge the gap, forming the armhole openings.
Round 18 (Underarm Separation): Sc in next 44 sts (front body). Ch 8. Skip 28 sts (right sleeve held on marker). Sc in next 44 sts (back body). Ch 8. Skip 28 sts (left sleeve held on marker). Join with sl st to first sc of round. (96 sc + 16 ch = 112 working sts around body)
For size 12 to 18 months: Front body 48 sts. Ch 10. Skip 32 sts. Back body 48 sts. Ch 10. Skip 32 sts. Join. (96 sc + 20 ch = 116 working sts)
Section 4: Body and Waist Ribbon Row
Round 19: Ch 1. Sc in each st and each ch around the body. Join. (112 sc) For 12 to 18 months: (116 sc)
Round 20: Ch 1. Sc in each st around. Join. (112 sc) For 12 to 18 months: (116 sc)
Round 21: Ch 1. Sc in each st around. Join. (112 sc) For 12 to 18 months: (116 sc)
Round 22 (Ribbon Eyelet Row): Ch 3 (counts as dc). Skip 1 st. [Dc in next st, ch 1, skip 1 st] rep around to last st. Dc in last st. Ch 1. Join with sl st to 2nd ch of beg ch-3. (56 dc + 56 ch-1 spaces) For 12 to 18 months: (58 dc + 58 ch-1 spaces)
Round 23 (Below Ribbon Row): Ch 1. Sc in each dc and each ch-1 sp around. Join. (112 sc) For 12 to 18 months: (116 sc)
Round 24: Ch 1. Sc in each st around. Join. (112 sc) For 12 to 18 months: (116 sc)
Checkpoint: The body through Round 24 should measure approximately 2 inches / 5 cm below the underarm. The ribbon eyelet row should sit cleanly at the empire waist position.
Section 5: Waist Transition to Skirt
This round prepares the stitch count to be divisible by the 9 stitch fan lace repeat.
Round 25 (Size 6 to 12 months): Ch 1. [Sc in next 7 sts, 2 sc in next st] 14 times. Join with sl st to first sc. (126 sc)
Round 25 (Size 12 to 18 months): Ch 1. [Sc in next 10 sts, 2 sc in next st] 10 times. Sc in rem 6 sts. Join. (126 sc)
Both sizes now work the same skirt from Round 26 forward.
Section 6: Skirt Fan Lace Pattern
Round 26 (Both sizes, 126 sts): Ch 1. Sc in first st. [Ch 2, skip 2 sts, sc in next st] 41 times. Ch 2, skip 2. Join with sl st to first sc. (42 sc + 42 ch-2 sp)
Round 27 (Fan Lace Round, 21 fan repeats): Sl st into first ch-2 sp. Ch 3 (counts as dc). 4 dc in same sp (Fan made). [Ch 2, sc in next sc, ch 2, 5 dc in next ch-2 sp] 20 times. Ch 2. Sc in next sc. Ch 2. Join with sl st to top of ch-3. (21 Fans + 21 sc + 42 ch-2 sp)
Round 28 (Transition, chain sp row): Sl st across to center (3rd) dc of first Fan. Ch 1. Sc in center dc. [Ch 2, sc in next sc, ch 2, sc in 3rd dc of next Fan] 20 times. Ch 2. Sc in next sc. Ch 2. Join with sl st to first sc. (42 sc + 42 ch-2 sp)
Round 29 (Fan Lace Round 2): Sl st into first ch-2 sp. Ch 3. 4 dc in same sp. [Ch 2, sc in next sc, ch 2, 5 dc in next ch-2 sp] 20 times. Ch 2. Sc in next sc. Ch 2. Join with sl st to top of ch-3. (21 Fans + 21 sc + 42 ch-2 sp)
Round 30 (Transition): Sl st to center dc of first Fan. Ch 1. Sc in center dc. [Ch 2, sc in next sc, ch 2, sc in 3rd dc of next Fan] 20 times. Ch 2. Sc in next sc. Ch 2. Join with sl st to first sc. (42 sc + 42 ch-2 sp)
Continue repeating Rounds 29 and 30 until the skirt measures approximately 10 inches from the underarm, or desired length. End with a Fan Lace Round (odd numbered round).
Section 7: Scalloped Hem
The final round creates the beautiful scalloped edge you see in the finished dress.
Final Round (Scallop Edging): Work scallop edging around the hem by working 5 dc into each fan center and sl st between fans. Adjust spacing as needed to lie flat. Fasten off and weave in ends.
Section 8: Sleeve Finishing
Join MC at the underarm with a sl st. Ch 1. Sc evenly around the armhole opening. Join. Work one round of scallop edging: [skip 2 sts, 5 dc in next st, skip 2 sts, sl st in next st] around. Fasten off. Repeat for second sleeve.
Section 9: Finishing
1. Weave in all remaining ends with your yarn needle.
2. Block the dress gently by laying flat on a towel, shaping the fans to open evenly, and allowing to dry completely.
3. Thread the satin ribbon through the eyelet row at the empire waist.
4. Tie in a bow at the center front and secure with a few stitches if desired.
5. Sew the decorative button to the center of the bow.
Tips for Success
About the fan lace pattern: The rhythm is simple once you get it. Fan in the chain space, chain 2, single crochet in the single crochet, chain 2, repeat. Read each round fully before starting so you know where you are headed.
Checking your yoke: If your yoke is cupping like a bowl, your tension is too tight. Try going up a hook size. If it is ruffling and wavy, your tension is too loose. Try going down a hook size.
The ribbon eyelet row: This is just alternating double crochets and chain 1 spaces. The gaps created are what the ribbon will weave through later. Make sure your chain spaces are consistent in size.
Blocking matters: For a lace garment like this, blocking makes a huge difference. It opens up the fan stitches and makes the whole piece look polished and professional.
Final Thoughts on This Baby Dress Crochet Pattern
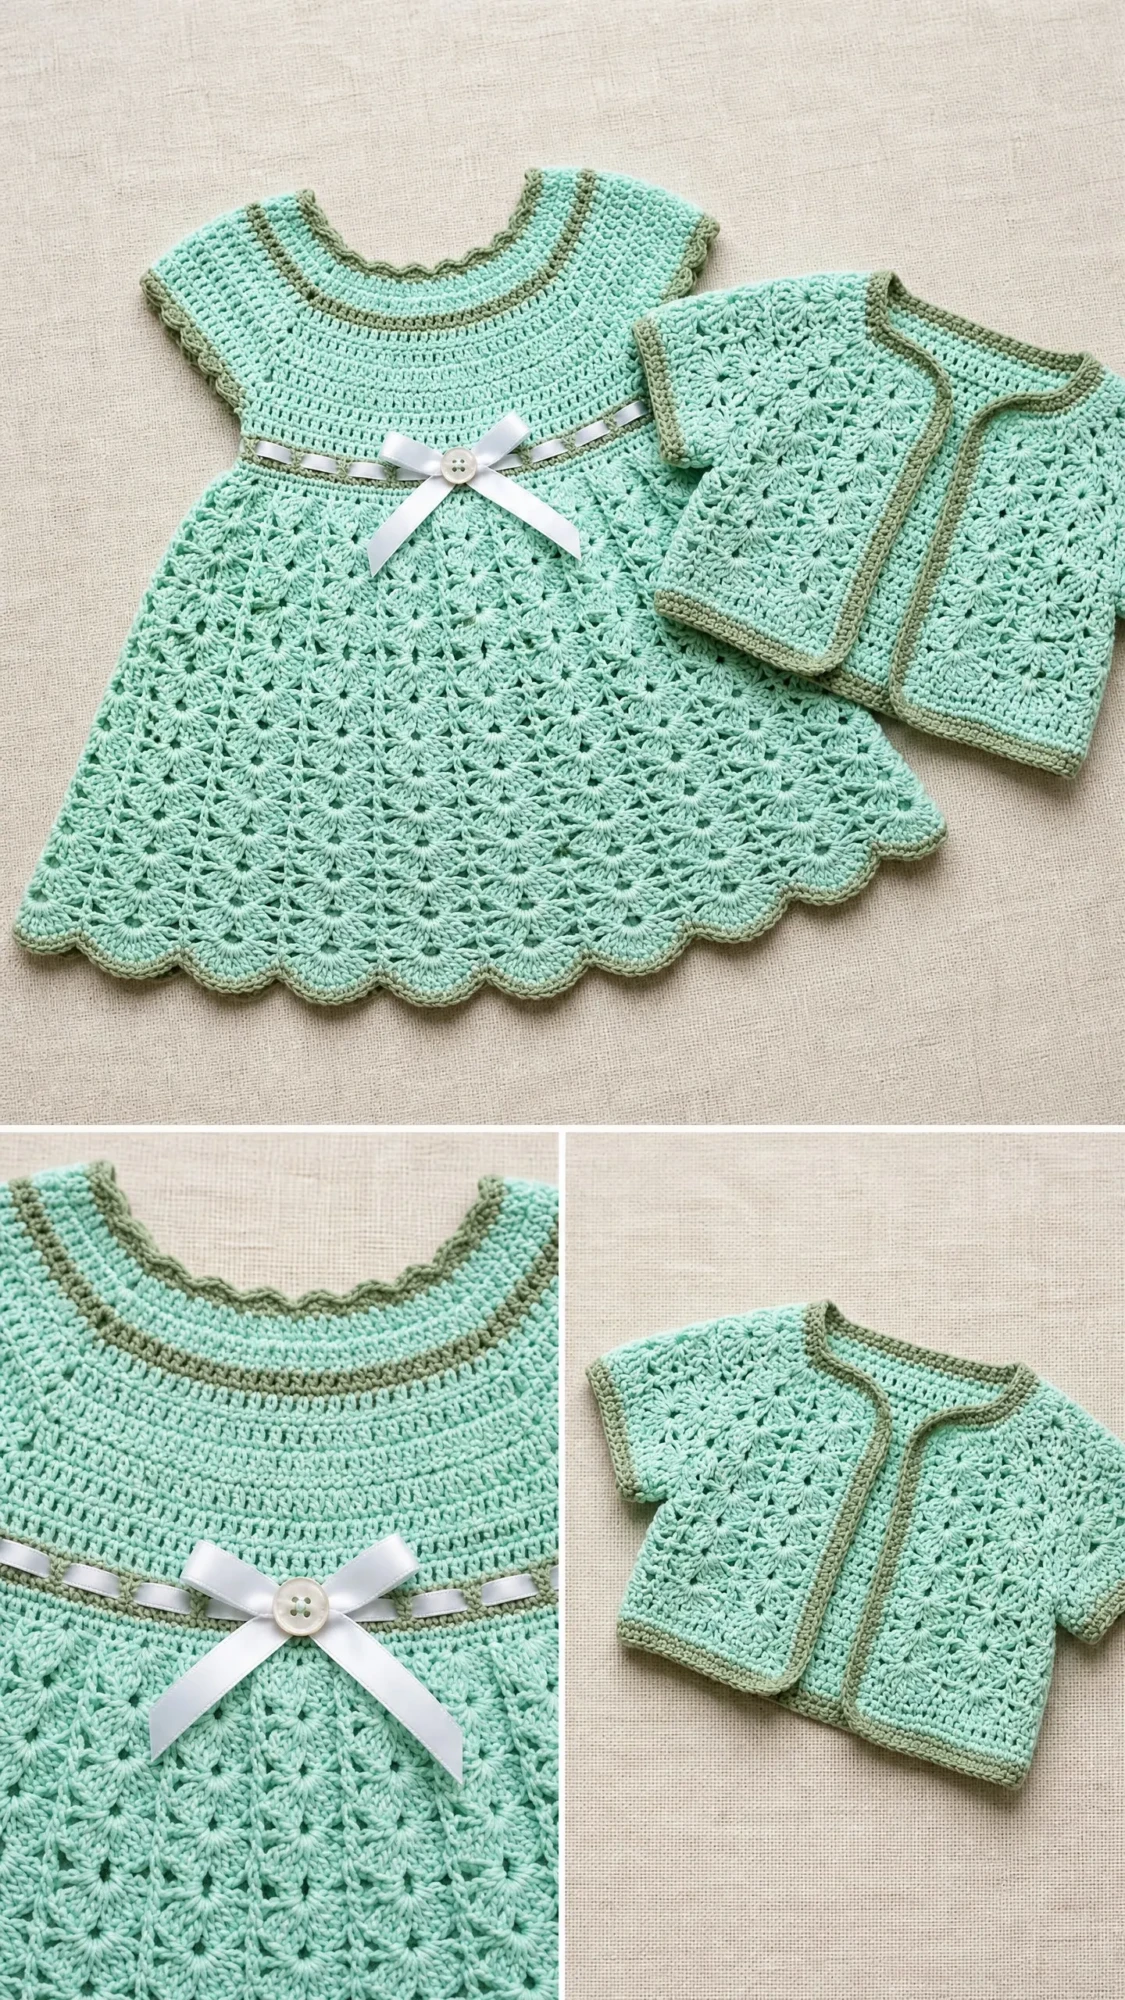
This mint green summer baby dress is one of those projects that looks far more complicated than it actually is. The construction is logical, the stitch counts are built in for checking your work, and the finished result is something any new parent would treasure.
The matching bolero cardigan shown in the reference images uses granny square construction joined seamlessly. That pattern is written as a separate optional section and adds 4 to 6 hours to the total project time if you want to create the complete set.
I hope you enjoy making this as much as I enjoyed designing it. The combination of the textured yoke, the delicate fan lace, and that sweet satin ribbon bow creates a classic look that works for everyday wear or special occasions.
If you love this pattern, I would be so grateful if you saved it to your Pinterest boards so you can find it again later and so other crocheters can discover it too. And please, drop a comment below if you make one. I would love to hear which color you chose and see how it turned out for you!
You Might Also Like
- Lavender Garden Baby Dress Free Crochet Pattern
- Coastal Blue Granny Square Tote Bag Free Crochet Pattern
- Tropical Fish Charm Bracelet Free Crochet Pattern
- Dusty Rose Pink Drawstring Bucket Bag Free Crochet Pattern
