
I call this one the "Heirloom Rosie" romper, named after my grandmother who taught me my very first chain stitch at her kitchen table. The design sat in my notebook for almost three years before I finally worked up the courage to put hook to thread and bring it to life.
When I found those original sketches tucked between grocery lists and half-finished granny square diagrams, I knew exactly what I had been trying to create. Something delicate enough to pass down through generations. Something that would make a new parent tear up a little when they unwrap it.
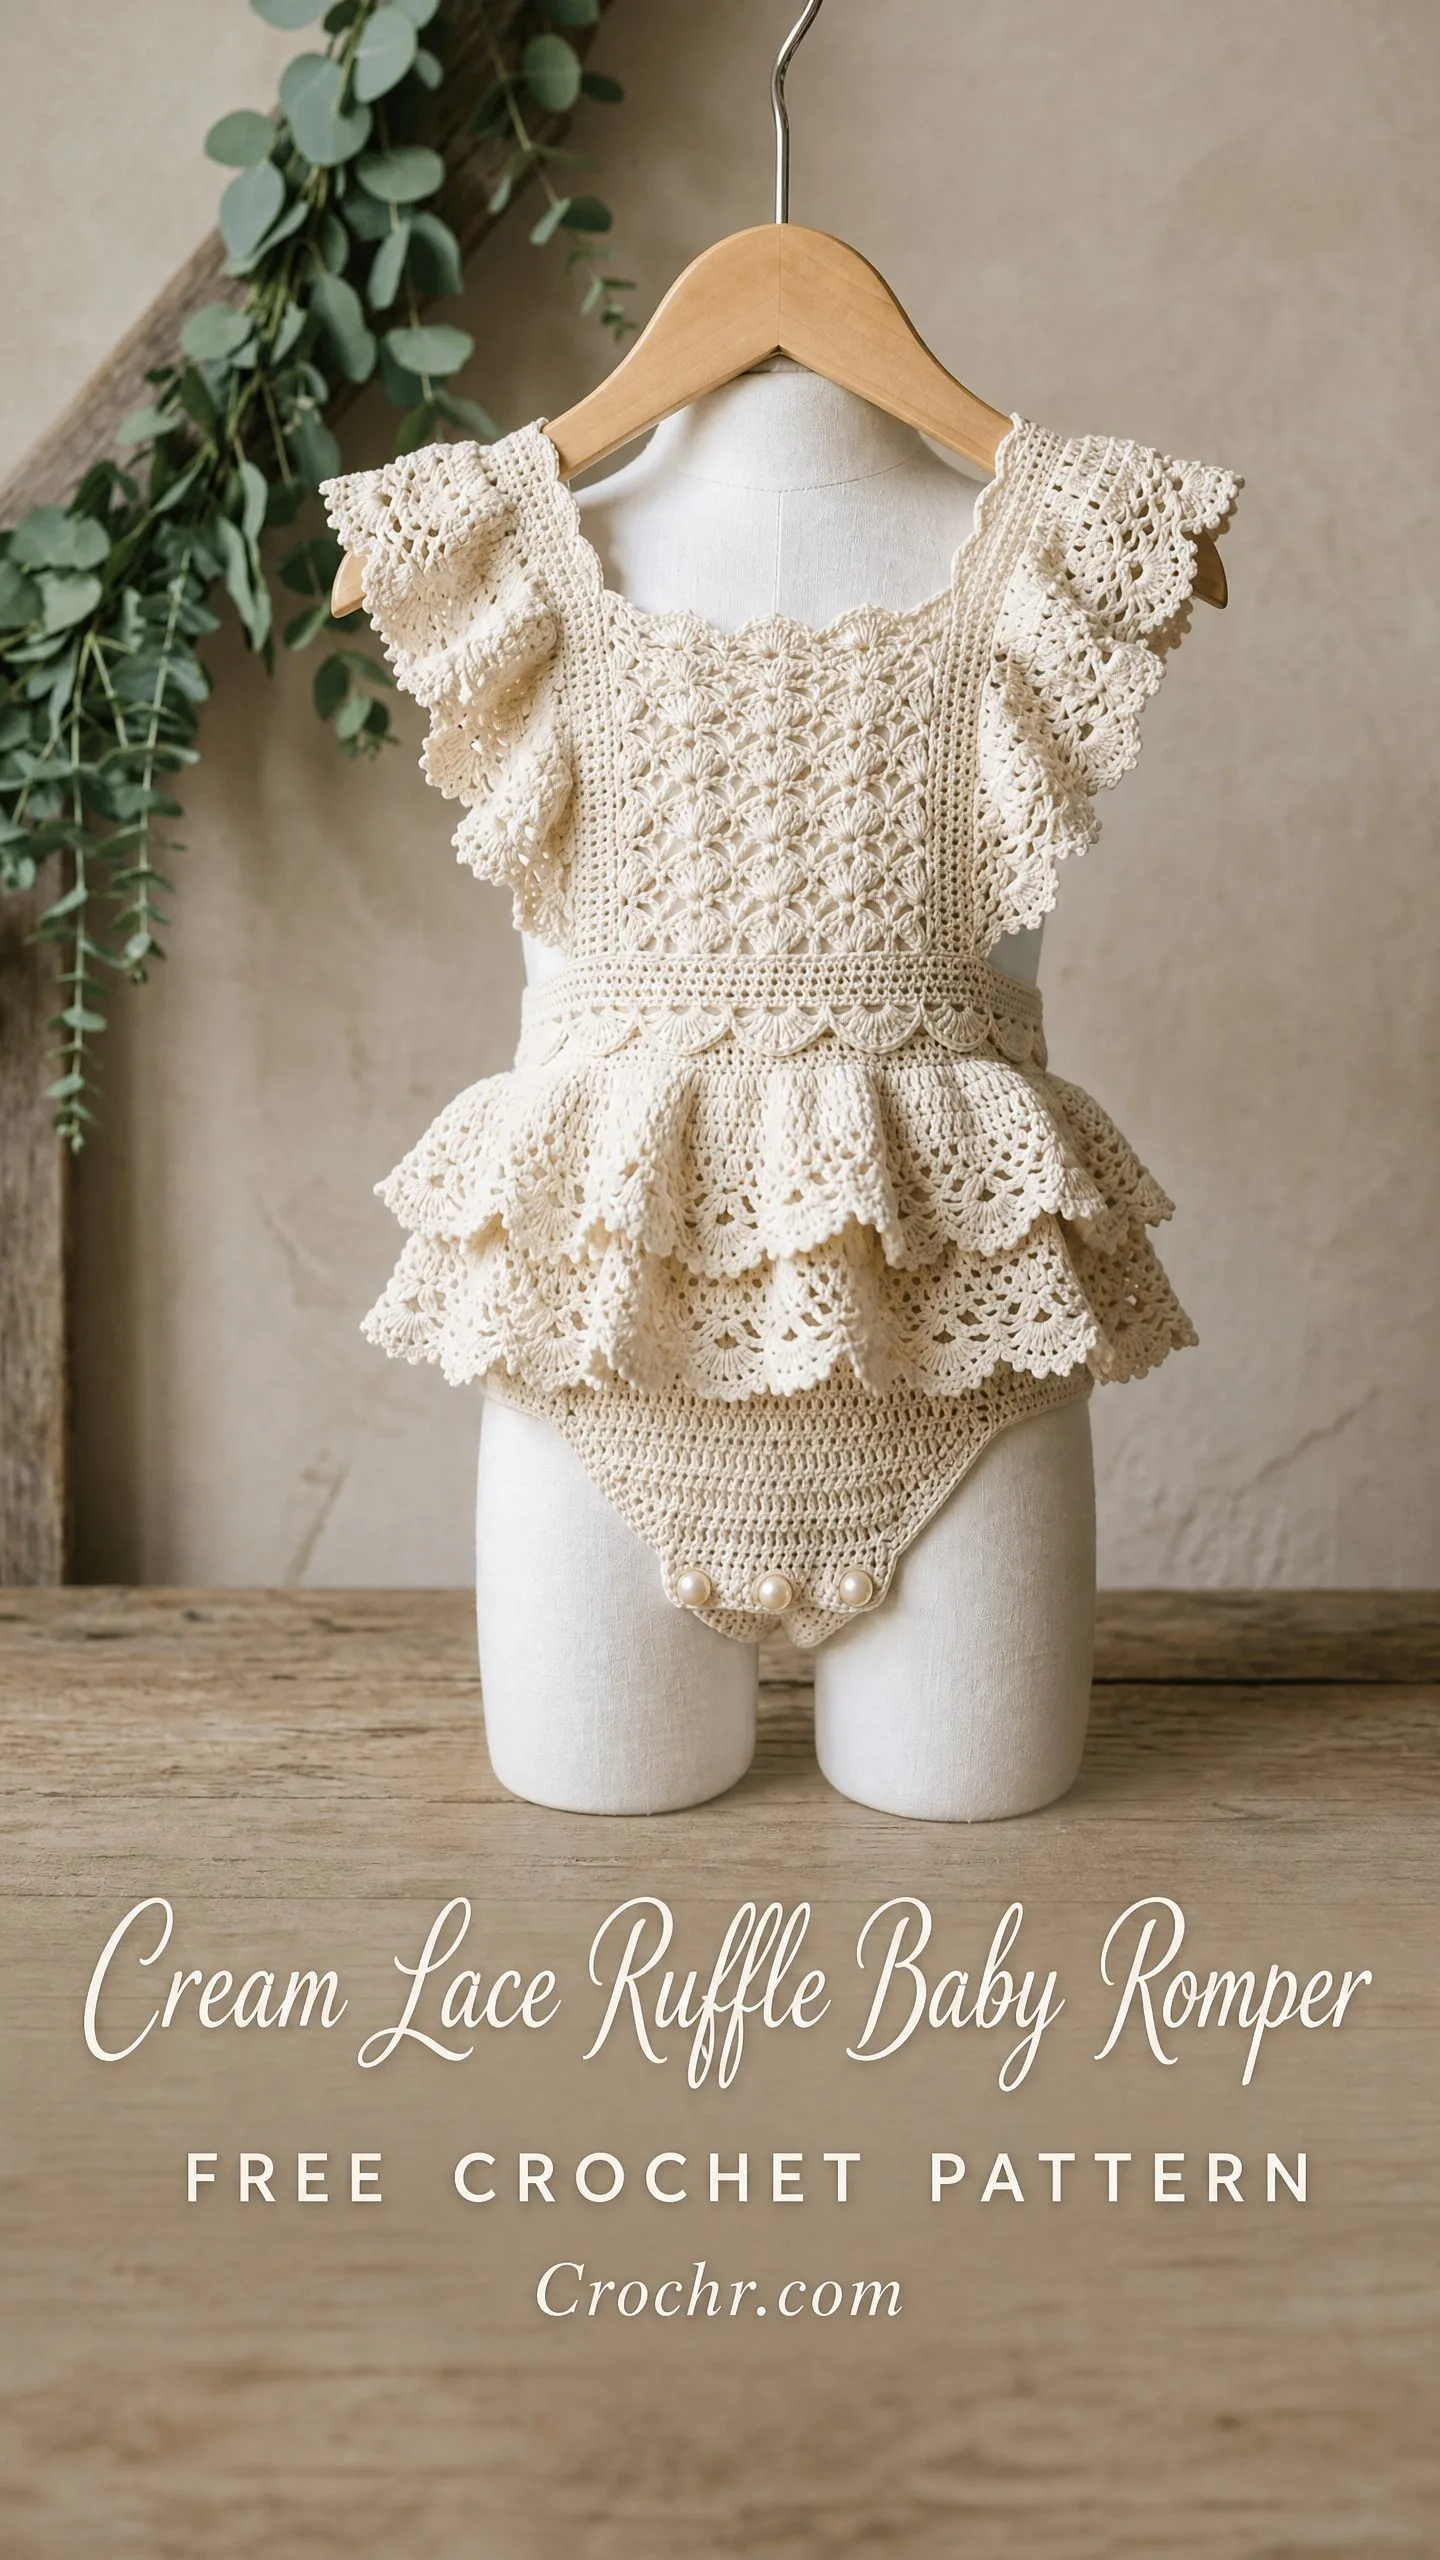
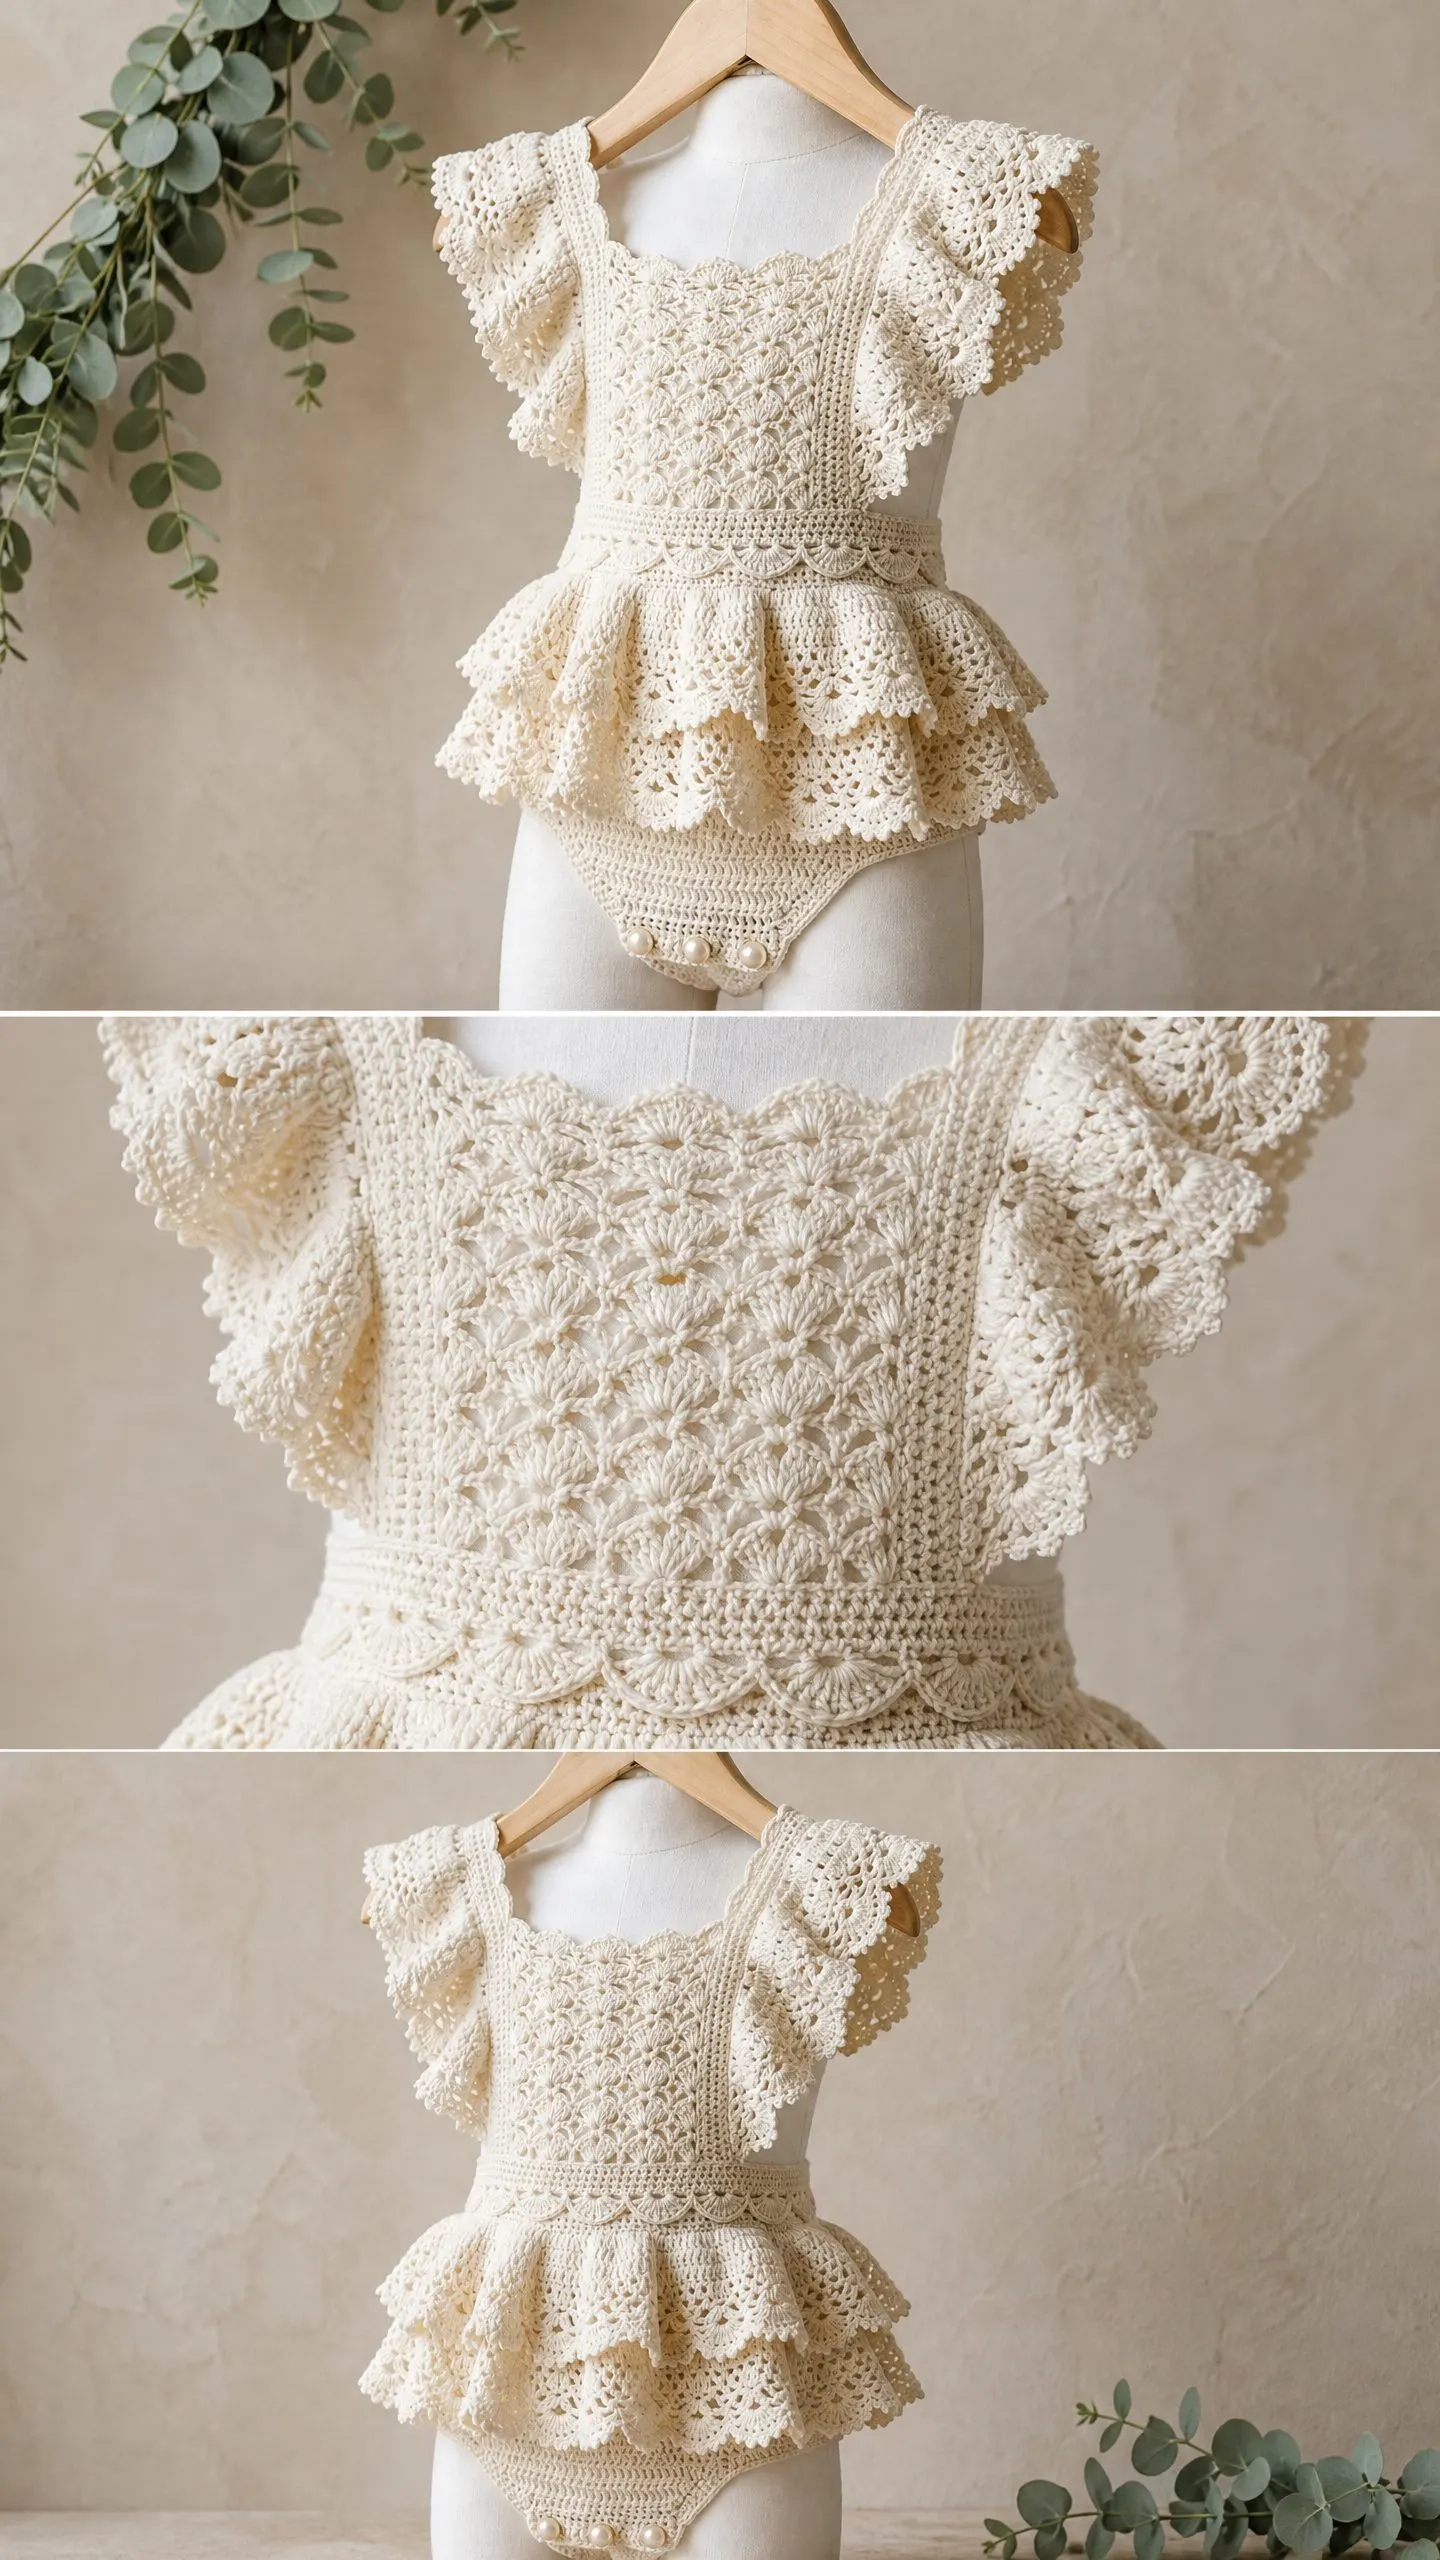
This romper is that something. With its lace diamond bodice, double-tiered ruffles, and sweet flutter sleeves, it captures everything I love about vintage baby clothes while being sturdy enough for actual wear. Let me walk you through every stitch.
About This Crochet Pattern
This one-piece baby romper features a structured bodice worked in a beautiful lace diamond shell texture. The construction starts from the bottom up, beginning with the crotch gusset and building upward through the diaper cover, torso, and bodice.
What makes this romper so special is the layered detailing. You will work double-tiered ruffle skirt panels that attach at the waist, creating that gorgeous vintage silhouette. The flutter sleeves get trimmed with scallop edging, and the diaper cover bottom includes closures at the crotch for practical diaper changes.
The back features a keyhole opening with a single button closure for easy dressing. Trust me, new parents will thank you for thinking about that detail.
Skill Level: Advanced Beginner to Intermediate
If you have completed a basic baby garment and worked simple lace before, you can absolutely make this. The bodice uses repeating shells and chain spaces, which sounds fancy but really just means you need to be comfortable with chains, double crochets, and paying attention to your stitch counts.
Time Estimate: Approximately 20 to 30 hours depending on your experience level and working pace.
Finished Measurements
This pattern is written for size 6 to 12 months with the following measurements:
Materials Needed
Yarn: Size 10 crochet thread or fingering weight (lace-weight on the heavier end) cotton yarn in cream or natural off-white. You will need approximately 800 to 1000 yards / 730 to 915 meters total.
Yarn Suggestions:
1. Paintbox Yarns Cotton Fresh DK (100% cotton, 186 yards / 170 meters per 50g skein). Slightly heavier than pure lace but works beautifully at gauge with excellent stitch definition.
2. Lion Brand 24/7 Cotton in Ecru (100% mercerized cotton, 186 yards / 170 meters per 3.5 oz skein). Widely available with a subtle sheen that suits the heirloom look perfectly.
3. Scheepjes Catona in Old Lace (100% mercerized cotton, 62 yards / 57 meters per 10g ball). A finer option for the finest lace texture. Purchase approximately 14 to 16 balls.
Important: Use 100% cotton or cotton-blend yarns only. Acrylic will not block into the crisp lace structure this pattern needs. Choose yarn with low stretch and tight twist for the best stitch definition.
Hook: US steel size 7 (1.65 mm) for thread, OR US B/1 (2.25 mm) for fingering weight cotton. Adjust hook size to meet gauge.
Notions:
Gauge
With B/1 (2.25 mm) hook and fingering weight cotton:
24 stitches and 28 rows = 4 inches / 10 cm in single crochet
1 lace shell repeat (1 shell + 1 chain-2 space = 7 stitches worked into 5 foundation stitches) = approximately 1.25 inches / 3.2 cm wide
1 lace pattern repeat in height (2 rows) = approximately 0.5 inch / 1.3 cm tall
Gauge is critical for this garment. Please do not skip making a gauge swatch. Adjust your hook size up or down as needed until you match these numbers.
Abbreviations and Stitch Definitions
Let me break down every stitch term you will encounter:
Special Stitches:
Special Stitch Patterns
Lace Diamond Shell Stitch
This creates the gorgeous bodice texture. It works over a multiple of 6 stitches plus 2.
Row 1 (RS): Ch 1, sc in first st, (ch 2, sk 2 sts, shell in next st, ch 2, sk 2 sts, sc in next st) rep across, turn.
Row 2 (WS): Ch 5 (counts as dc + ch 2), dc in same sc, (ch 2, sc in ch-2 sp of shell, ch 2, v-st in next sc) rep across, ending ch 2, sc in ch-2 sp of last shell, ch 2, v-st in last sc, turn.
Row 3 (RS): Ch 1, sc in first dc of v-st, (ch 2, shell in next sc, ch 2, sc in ch-2 sp of v-st) rep across, ending sc in 3rd ch of t-ch, turn.
Row 4 (WS): As Row 2.
Repeat Rows 3 and 4 for pattern.
Scallop Picot Edging
This lovely edging goes along ruffle hems, flutter sleeve hems, and neckline.
(sc in next st, ch 1, 5 dc in next st, ch 1, sk 1 st, sc in next st, ch 1, sk 1 st) rep around or across.
Ruffle Fan Stitch
Row 1: Attach yarn to pickup edge, ch 3 (counts as dc), 2 dc in same st, (sk 2 sts, sc in next st, sk 2 sts, 5 dc in next st) rep across, ending 3 dc in last st, turn.
Row 2: Ch 1, sc in first dc, (ch 2, 5 dc in next sc, ch 2, sc in center dc of next 5-dc group) rep across, ending sc in top of t-ch, turn.
Row 3: Ch 3, 2 dc in first sc, (ch 1, sc in center dc of 5-dc group, ch 1, 5 dc in next sc) rep across, ending 3 dc in last sc, turn.
Apply Scallop Picot Edging to final row.
Pattern Notes Before You Begin
1. The romper is constructed bottom-up. Start with the crotch gusset, build the diaper cover in rounds, transition to the torso in joined rounds, then split front and back at the underarm.
2. All rounds are joined with a slip stitch unless otherwise noted. Use a stitch marker to track beginning of round.
3. The back is open from neckline to waist for easy dressing. The two back panels are worked separately flat.
4. The ruffle tiers hang freely. They are each picked up along a separate pickup row.
5. Pearl buttons are sewn on after blocking. Use matching sewing thread for a clean finish.
6. When picking up along an edge, work approximately 1 sc per row end along vertical edges and 1 sc per stitch along horizontal edges.
7. Check your stitch count at every checkpoint. Lace patterns unravel quickly if you miss a chain space.
8. The ch-3 turning chain counts as the first dc unless otherwise noted.
Step-by-Step Instructions
Section 1: Crotch Gusset
The gusset forms the base of the diaper cover. This is a small flat rectangle.
Foundation: Ch 13.
Row 1: Sc in 2nd ch from hook and in each ch across. Turn. (12 sc)
Row 2: Ch 1, sc in each st across. Turn. (12 sc)
Row 3: Ch 1, sc in each st across. Turn. (12 sc)
Row 4: Ch 1, sc in each st across. Turn. (12 sc)
Row 5: Ch 1, sc in each st across. Turn. (12 sc)
Row 6: Ch 1, sc in each st across. Turn. (12 sc)
After Row 6, do not fasten off. Set aside. The gusset should measure approximately 2 inches / 5 cm wide and 1 inch / 2.5 cm tall.
Section 2: Diaper Cover
With RS of gusset facing, join the gusset into a ring by working around all four sides.
Round 1 (join into working round): Ch 1. Work 12 sc across the top of the gusset (the last row worked). Work 6 sc along the right short end (approximately 1 sc per row end). Work 12 sc along the starting chain edge. Work 6 sc along the left short end. Join to first sc with sl st. (36 sc)
Round 2: Ch 1, sc in each st around. Join. (36 sc)
Round 3: Ch 1, (sc in next 5 sts, 2 sc in next st) 6 times. Join. (42 sc)
Round 4: Ch 1, sc in each st around. Join. (42 sc)
Round 5: Ch 1, (sc in next 6 sts, 2 sc in next st) 6 times. Join. (48 sc)
Round 6: Ch 1, sc in each st around. Join. (48 sc)
Round 7: Ch 1, (sc in next 7 sts, 2 sc in next st) 6 times. Join. (54 sc)
Round 8: Ch 1, sc in each st around. Join. (54 sc)
Round 9: Ch 1, (sc in next 8 sts, 2 sc in next st) 6 times. Join. (60 sc)
Round 10: Ch 1, sc in each st around. Join. (60 sc)
Round 11: Ch 1, (sc in next 9 sts, 2 sc in next st) 6 times. Join. (66 sc)
Round 12: Ch 1, sc in each st around. Join. (66 sc)
Round 13: Ch 1, (sc in next 10 sts, 2 sc in next st) 6 times. Join. (72 sc)
Rounds 14 through 18: Ch 1, sc in each st around. Join. (72 sc each round)
Checkpoint: After Round 18, the diaper cover should measure approximately 3.5 inches / 9 cm from the gusset join and approximately 12 inches / 30.5 cm in circumference. The shape should be a smooth rounded cup.
Button Band Round 1: Ch 1, sc in BLO of each st around. Join. (72 sc)
Button Band Round 2: Ch 1, sc in each st around. Join. (72 sc)
Fasten off. Leave a 12 inch / 30.5 cm tail for sewing buttons.
Section 3: Torso Body
Rejoin yarn at center back of diaper cover at Round 13.
Pickup Round (Waist Ruffle Ridge): Attach yarn at center back, ch 1, sc in FLO of each st around Round 13. Join. (72 sc)
The front loops you left behind will be used later to attach the first ruffle tier.
Torso Round 1: Ch 1, sc in each st around. Join. (72 sc)
Torso Round 2: Ch 1, sc in each st around. Join. (72 sc)
Now transition to Lace Diamond Shell Stitch. With 72 stitches divided by 6, you have exactly 12 repeats.
Torso Round 3 (RS, lace round 1): Ch 1, (sc in first st, ch 2, sk 2 sts, shell in next st, ch 2, sk 2 sts) 12 times. Join to first sc. (12 shells, 12 sc, 24 ch-2 sps)
Torso Round 4: Ch 5 (counts as dc, ch 2), dc in same sc (first v-st made), (ch 2, sc in ch-2 sp of shell, ch 2, v-st in next sc) 11 times, ch 2, sc in ch-2 sp of last shell, ch 2. Join to 3rd ch of beginning ch-5. (12 v-sts, 12 sc)
Torso Round 5: Ch 1, sc in ch-2 sp of first v-st, (ch 2, shell in next sc, ch 2, sc in ch-2 sp of next v-st) 11 times, ch 2, shell in last sc, ch 2. Join to first sc. (12 shells, 12 sc)
Torso Rounds 6 through 12: Continue alternating between Round 4 and Round 5 patterns. (12 v-sts/shells, 12 sc each round)
Checkpoint: After Torso Round 12, the torso should measure approximately 3 inches / 7.5 cm tall above the waist pickup round.
Waist Band Round 1 (sc conversion): Ch 1, (sc in dc of v-st, sc in ch-2 sp of v-st, sc in dc of v-st, sc in ch-2 sp between, sc in next sc, sc in next ch-2 sp) 12 times. Join. (72 sc)
Waist Band Round 2: Ch 1, sc in BLO of each st around. Join. (72 sc)
Do not fasten off.
Section 4: Upper Bodice
Now split for armholes. Divide 72 stitches as follows: Front = 36 stitches, Right back = 15 stitches, Left back = 15 stitches, Underarm (each side) = 3 stitches skipped.
Front Bodice
Front Row 1 (RS): Ch 3 (counts as dc), work lace across 36 front stitches: (sc in next st, ch 2, sk 2 sts, shell in next st, ch 2, sk 2 sts) 6 times. End with sc in last front st. Turn. (6 shells, 6 sc)
Front Row 2 (WS): Ch 5 (counts as dc, ch 2), dc in same sc, (ch 2, sc in ch-2 sp of shell, ch 2, v-st in next sc) 5 times, ch 2, sc in ch-2 sp of last shell, ch 2, (dc, ch 2, dc) in last sc. Turn. (6 v-sts, 6 sc)
Front Row 3 (RS): Ch 1, sc in first dc, (ch 2, shell in next sc, ch 2, sc in ch-2 sp of v-st) 5 times, ch 2, shell in last sc, ch 2, sc in 3rd ch of t-ch. Turn. (6 shells, 6 sc)
Front Rows 4 through 10: Continue alternating Row 2 and Row 3 patterns.
Checkpoint: After Front Row 10, the front bodice should measure approximately 2.5 inches / 6.5 cm above the waist band.
Front Neckline Shaping
Front Row 11 (RS, neck shaping): Ch 1, sc in first dc, ch 2, shell in next sc, ch 2, sc in v-st sp. Turn, leaving center and left shoulder unworked. (right shoulder: 1 shell, 2 sc)
Right Shoulder Row 12 (WS): Ch 5, dc in same sc, ch 2, sc in shell sp, ch 2, (dc, ch 2, dc) in last sc. Turn. (1 v-st, 1 sc, 1 v-st)
Right Shoulder Row 13 (RS): Ch 1, sc in first dc, ch 2, shell in sc, ch 2, sc in 3rd ch of t-ch. Turn. (1 shell, 2 sc)
Right Shoulder Rows 14 through 16: Continue alternating Row 12 and Row 13 patterns.
For the Left Shoulder, skip center 2 lace repeats for the neckline. Attach yarn at left shoulder start position and mirror right shoulder rows exactly.
Back Panels
Right Back Row 1 (RS): Attach yarn at right back first stitch. Ch 1, sc in first st, (ch 2, sk 2, shell in next st, ch 2, sk 2, sc in next st) twice. End sc in last st. Turn. (2 shells, 3 sc)
Right Back Row 2 (WS): Ch 5, dc in same sc, ch 2, sc in shell sp, ch 2, v-st in next sc, ch 2, sc in shell sp, ch 2, (dc, ch 2, dc) in last sc. Turn. (2 v-sts, 2 sc)
Right Back Row 3 (RS): Ch 1, sc in dc, ch 2, shell in next sc, ch 2, sc in v-st sp, ch 2, shell in next sc, ch 2, sc in t-ch. Turn. (2 shells, 3 sc)
Rows 4 through 14: Continue alternating Rows 2 and 3.
Right Strap Row 15 (WS): Ch 5, dc in sc, ch 2, sc in first shell sp, ch 2, (dc, ch 2, dc) in next sc. Turn. Leave inner repeat unworked. (1 v-st, 1 sc, 1 v-st)
Right Strap Rows 16 through 18: Continue working the strap pattern.
Fasten off. Work the Left Back Panel as a mirror image.
Button Loop: Work 1 row of sc down the left center back inner edge, then ch 5, sl st into same stitch to form button loop. Work sc back up the right center back inner edge.
Shoulder Seam: Join each shoulder strap to the corresponding front shoulder by whip stitching on the WS.
Section 5: Flutter Sleeves
Sleeve Round 1: Attach yarn at underarm center, ch 1, sc evenly around armhole opening. Adjust count to 36 sc. Join. (36 sc)
Sleeve Round 2 (flutter fan increase): Ch 3 (counts as dc), 2 dc in same st, (sk 2 sts, sc in next st, sk 2 sts, 5 dc in next st) rep around. Join.
Sleeve Round 3: Work the Ruffle Fan Stitch Row 2 in the round.
Sleeve Round 4: Apply Scallop Picot Edging around entire sleeve.
Fasten off. Repeat for second sleeve.
Section 6: Ruffle Tiers
First Tier: Attach yarn to the front loops left behind in Round 13 of the diaper cover. Work Ruffle Fan Stitch for 3 rows, ending with Scallop Picot Edging.
Second Tier: Attach yarn to the front loops left behind in Waist Band Round 2. Work Ruffle Fan Stitch for 3 rows, ending with Scallop Picot Edging.
Section 7: Finishing
1. Neckline Edging: Work Scallop Picot Edging around entire neckline.
2. Blocking: Wet block the finished romper on your blocking board. Pin out all ruffles and lace details. Allow to dry completely.
3. Buttons: Sew pearl buttons at keyhole back and crotch closures using matching thread.
4. Weave in all ends using your tapestry needle.
Tips for Success
The most important thing with this pattern is counting. Lace patterns show every mistake, so check your stitch count at every checkpoint listed.
When working the shell stitches, make sure all your dc stitches are going into the same space. It is easy to accidentally split your stitches when working into chain spaces.
For the ruffle pickup rounds, work slowly and make sure you are picking up through the correct loops. The ridges created by working in FLO or BLO are what give those ruffles their beautiful definition.
Block this romper. I cannot emphasize this enough. Cotton lace needs blocking to open up the lace pattern and achieve that crisp heirloom look. Your finished piece will look completely different after blocking.
A Final Note
This romper takes time. Do not rush it. Put on a podcast, make yourself comfortable, and enjoy the process of creating something truly special.
The finished piece is the kind of garment that gets packed away in tissue paper and brought out again for the next baby in the family. It is the kind of gift that makes someone cry happy tears.
And honestly, that is why I designed Heirloom Rosie in the first place.
Thank you so much for choosing this pattern. I truly hope you love making it as much as I loved creating it. If you would like to share your finished romper, I would absolutely love to see it. Tag me on Instagram or post a photo to my Facebook group.
If this pattern inspired you, go ahead and save it to your Pinterest boards so you can find it when you are ready to start. And please drop a comment below if you make one. I read every single comment and seeing your beautiful finished projects is the best part of sharing these patterns.
You Might Also Like
- Sunset Coral Textured Crochet Dress Free Pattern
- Midnight Black Gothic Lace Choker Free Crochet Pattern
- Ocean Wave Teal Bikini Set Free Crochet Pattern
- Ocean Wave Fairy Dress Free Crochet Pattern
