THIS ONE IS GORGEOUS. Seriously, if you’ve been looking for a statement piece that shows off your crochet skills while still being approachable, the Coral Rose Garden Vest is exactly what you need on your hook.
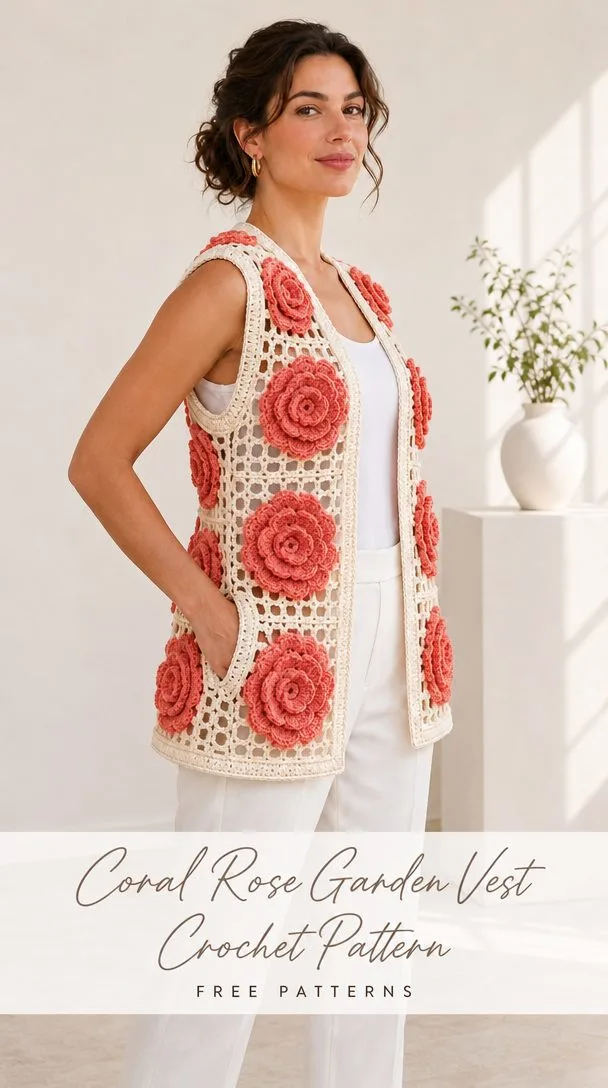
Picture this: a creamy open-mesh vest covered in bold, dimensional coral roses that look like they belong in a high-end boutique. It’s the kind of project that gets compliments before you even finish explaining what it is. The best part? The construction is smarter than it looks. You’re not joining fiddly motifs together and hoping for the best. Instead, you’re building a stable mesh foundation first, then sewing those stunning roses on top.
Whether you’re making this for yourself or as a show-stopping gift, this vest delivers serious impact. Let’s break down everything you need to know to create your own.
What Makes This Vest Design Special
The Coral Rose Garden Vest takes a clever approach to what could otherwise be a challenging construction. Rather than relying solely on motif-to-motif joining (which can be unpredictable for sizing), this pattern uses a square mesh lattice as the structural base. The mesh panels give you reproducible dimensions, and the roses are sewn on afterward, making placement easy and adjustable.
The finished vest measures approximately 60 cm in length with a 100 cm fabric span around the body, plus an 8 cm open front. It’s designed to fit an adult body with a bust measurement of 90 to 100 cm, worn open over an opaque top. The open lattice creates beautiful visual texture while the coral roses add dimensional drama.
This is a one-size worked example, but the pattern includes clear guidance for adjustments. Want 10 cm extra width? Add 4 cells to the back and 2 to each front. Need 10 cm more length? Add 8 rows. The math is straightforward once you understand the mesh structure.
Materials You’ll Need
Before you start, gather everything so you can work uninterrupted. Here’s your complete supply list pulled directly from the pattern:
Yarn
| Component | Amount |
|---|---|
| Mesh (cream) | 200 g |
| Motifs (coral) | 150 g |
| Total | 350 g / 1120 m |
The pattern calls for sport weight cotton at approximately 160 m per 50 g. Cotton gives the mesh stability and helps the roses hold their shape beautifully.
Pro tip from the pattern: Weigh one blocked motif and multiply by the total quantity (40 roses) before purchasing all your yarn. If your 8 cm sample flower weighs over 2 g, add an extra 50 g to your order.
Hooks
- 3.5 mm hook for the mesh fabric
- 3 mm hook for motifs and edging
Notions
- Tapestry needle
- 12 stitch markers
- Measuring tape
- Blocking mat
Gauge Information
Getting gauge right is essential for proper fit. The pattern specifies:
Mesh gauge: 8 square mesh cells and 8 rows = 10 x 10 cm after washing
One cell consists of a double crochet (dc) post plus a chain-1 (ch-1) opening.
Motif gauge: A six-petal flower should measure approximately 8 cm across
How to Check Your Gauge
- Swatch 16 cells by 16 rows in the mesh pattern
- Wash and dry flat
- Measure and adjust your main hook if needed
- Make one rose motif separately
- Alter only the motif hook to reach the target 8 cm diameter
This is important: the mesh is the structural garment. Your motifs must not pull the mesh smaller, so keep these two gauge checks separate.
Abbreviations and Special Stitches
The pattern uses US crochet terminology throughout. Here’s every abbreviation you’ll encounter:
| Abbreviation | Full Name | What It Means |
|---|---|---|
| ch | chain | The foundation loop you build from |
| sl st | slip stitch | A flat joining stitch with no height |
| sc | single crochet | A short stitch, one loop pulled through |
| hdc | half double crochet | Medium height, yarn over before inserting |
| dc | double crochet | Taller stitch, yarn over, insert, pull through in stages |
| tr | treble crochet | Even taller, two yarn overs to start |
| st(s) | stitch(es) | The individual loops you work into |
| sp | space | The gap between stitches |
| sk | skip | Pass over without working |
| rep | repeat | Do it again |
| RS/WS | right side/wrong side | The front and back of your work |
| BLO | back loop only | Insert hook in back loop, not both |
| yo | yarn over | Wrap yarn around hook |
| rnd | round | One complete circuit |
Special Techniques
FPdc/BPdc (Front Post/Back Post Double Crochet): Work a dc around the post of the next stitch, inserting your hook from the front or back respectively.
FPtr (Front Post Treble): Work a tr around the indicated post from the front.
dc2tog (Double Crochet Two Together): Work 2 incomplete dc over the next 2 stitches, then yarn over and pull through all 3 loops. This decreases 2 stitches down to 1.
Bobble: Work 5 incomplete dc in one stitch, yarn over and draw through all 6 loops. Counts as 1 stitch.
Picot: Ch 3, sl st into the first chain. Decorative chains are not counted as base stitches.
The Mesh Formula
The pattern uses a specific formula for creating the mesh:
Mesh M(C): Ch (2C+3); dc in fifth ch; [ch 1, sk 1 ch, dc in next ch] (C-1) times.
This gives you C cells and C+1 posts.
Later rows: Ch 4 (counts as first post + ch-1), dc in next post, [ch 1, dc in next post] across. Keep the final post in the third chain of the prior turning ch-4.
Star Connector
Ch 4, join into a ring; [ch 4, sl st in ring] 8 times; fasten off.
Sew the spoke tips to the underlying mesh at the intersections between adjacent motifs. These are decorative, not load-bearing.
Pattern Notes Before You Begin
Read through these carefully. They’ll save you confusion later:
- All measurements are after washing and drying flat
- Yarn amounts include approximately 15% allowance and are estimates
- Turn after every flat row
- Ch 1 for sc/hdc and ch 2 for dc/post-stitch fabric do not count as stitches
- Work the first stitch in the first stitch
- Mesh turning chains are the stated exception
- Joined rounds are not turned unless stated
- End every joined round with sl st to the first stitch; the join does not count
- Square brackets [ ] group a repeat
- Right and left refer to the wearer
- Make and block a sample before committing all your yarn
Construction Overview
The vest is built in a logical sequence that keeps things manageable:
- Work three rectangular mesh panels (one back, two fronts)
- Join shoulders and lower sides
- Sew motif rows onto the panels
- Finish with an open front border
Panel Dimensions
| Piece | Finished Size | Cell Count |
|---|---|---|
| Back | 50 cm x 60 cm | 40 cells wide |
| Each Front | 25 cm x 60 cm | 20 cells wide |
| Armhole Depth | 20 cm | 16 row ends |
| Shoulder Seam | 15 cm | 12 cells |
| Neck Gap (back) | 20 cm | 16 cells |
Motif Layout
You’ll make 40 coral rosettes total, arranged in 5 horizontal rows: 4 motifs across the back and 2 on each front panel.
You’ll also make 20 star connectors in cream to fill the gaps between flower rows.
Step-by-Step Instructions
Back Panel
Row 1: Make M(40). [40 cells / 41 posts]
Rows 2-48: Repeat mesh row. [40 cells / 41 posts]
Block to 50 x 60 cm. Mark the outer 12 cells at each top corner for shoulders; the central 16 cells form the back neck.
Front Panels (Make 2)
Row 1: Make M(20). [20 cells / 21 posts]
Rows 2-48: Repeat mesh row. [20 cells / 21 posts]
Block each panel to 25 x 60 cm. Mark the outer 12 top cells for the shoulder; the inner 8 cells remain part of the open front neckline.
Rose Motifs (Make 40 in Coral)
Each rose is formed from a flat scalloped strip that you roll into a flower shape.
Rose Row 1: Ch 27; dc in fifth ch; [ch 1, sk 1 ch, dc in next ch] 11 times. [12 cells]
Rose Row 2: Ch 1, turn; [sl st, ch 2, 5 dc, ch 2, sl st] in each cell. [12 petals]
Shaping the Rose:
- Roll the strip from one end
- Keep each petal slightly lower than the last to form layers
- Sew the base through every layer with 8-10 passes
- Do not flatten the top petals
- Target diameter: 8 cm
Star Connectors (Make 20 in Cream)
Using the star connector definition from the abbreviations section, make 20 connectors. Place them in gaps between flower rows, but not over the armhole openings.
Assembly Instructions
You’ll need: Cream yarn and 3.5 mm hook for joins; coral yarn and tapestry needle for motifs.
Seaming the Panels
Seam Pass 1: Sew each outer front shoulder to the matching outer back shoulder. [2 seams x 12 cells]
Seam Pass 2: Seam sides from hem upward through Row 32; leave the upper 16 rows open for each armhole. [2 seams x 32 row ends]
Placing the Motifs
Placement Pass 1: Mark 5 horizontal motif rows evenly between 5 cm above the hem and 5 cm below the top. [5 layout rows]
Placement Pass 2: Place back motifs centered at 6.25, 18.75, 31.25, and 43.75 cm from one side; front motifs at 6.25 and 18.75 cm from the side edge. [8 motif sites per row]
Sewing Everything Down
Sewing Pass 1: Secure each flower center and each petal tip to the lattice with matching coral yarn. [40 flowers attached]
Sewing Pass 2: Sew star connector tips at available gaps, keeping joins loose and all mesh openings unstressed. [8 anchored tips per connector]
Assembly Checkpoint
Before moving on, verify:
- Back is 50 cm wide
- Fronts are 25 cm each
- Both armholes remain fully open
- Motifs do not cross a side seam or shoulder seam under tension
Try on before adding borders.
Edgings and Details
You’ll need: 3 mm hook; cream border yarn.
Outer Border
Round 1: Around both fronts, back neck, and hem, work 1 sc per dc post, 1 per ch-1 space, 2 per mesh side row end; work 3 sc at each sharp corner. Record your total as E. [E sc]
Round 2: Ch 4, sk 1 sc, dc in next sc; [ch 1, sk 1 sc, dc in next sc] around; if one stitch remains, work dc into it; 3 dc at corners. Record new post count as P. [P posts + intervening ch-1 spaces]
Round 3: Sc in each post and each space; work 3 sc at corner centers. Record total as Q. [Q sc]
Armhole Edging (Work on Both)
Round 1: Pick up 2 sc per each of 32 row ends; join. [64 sc per armhole]
Round 2: Sc in each sc; repeat for second armhole. [64 sc per armhole]
Optional Pockets
The cover image shows pockets. To add them:
Make 2 mesh panels of 8 cells x 8 rows (10 x 10 cm). Sew three edges to fronts 8 cm above hem; leave tops open. Each pocket has 8 cells and 9 posts per row.
Edging Checkpoint
- Front edges hang vertically
- Armholes do not pinch
- Star joins are securely anchored
- Decorative pieces remain flexible
- Measure the final length including the border
Finishing Your Vest
You’ll need: Cream and coral yarn tails, tapestry needle, cool water and towels. No crochet hook required.
Finishing Pass 1: Weave each tail at least 5 cm through matching stitches; reverse direction and repeat. [0 loose tails]
Finishing Pass 2: Damp-block the vest flat; pin mesh to panel dimensions and lift petals with your fingertips to reshape them. Dry fully before moving.
Final Checkpoint
- Panel length: 60 cm plus approximately 2-4 cm border
- Back span: 50 cm
- Front spans: 25 cm each
- Let hang for 24 hours and check that floral motifs do not distort the mesh
Care Instructions
Follow your yarn label for specific guidance, but here are general recommendations:
- Hand wash gently in cool water with mild detergent
- Do not wring
- Support the wet garment to prevent stretching
- Reshape on a towel and dry flat away from direct heat
- Store folded to prevent stretching
Safety Notes
This is an adult garment. Keep long ties, yarn tails, needles, pins, buttons, and beads away from children and pets. Secure all small parts and inspect before wearing. Mesh garments need an opaque layer underneath for normal wear, and avoid snagging near moving equipment.
Sizing Adjustments
The pattern provides clear math for modifications:
For 10 cm extra width: Add 4 cells to the back and 2 cells to each front panel.
For 10 cm extra length: Add 8 rows to all panels.
Keep the upper 20 cm of each side open for the armhole regardless of length adjustments.
Tips for Success
Block your mesh panels before assembly. This ensures accurate sizing and makes motif placement much easier.
Don’t skimp on sewing the rose bases. Those 8-10 passes through every layer keep your roses from unraveling over time.
Keep star connectors loose. They’re decorative, not structural. If you pull them tight, you’ll distort the mesh underneath.
Try on before borders. It’s much easier to adjust fit at this stage than after you’ve added all the edging.
Let it hang before final inspection. Cotton can relax and settle. Give it 24 hours to show you its true drape.
Who Will Love This Pattern
This vest suits intermediate crocheters who are comfortable with basic stitches and ready to tackle a multi-component project. The individual techniques aren’t difficult, but managing the assembly requires patience and attention to detail.
If you’ve made granny square cardigans or motif blankets before, you have the skills for this. The rolled roses might be new to you, but they’re surprisingly intuitive once you try one.
The finished vest makes a spectacular gift for anyone who appreciates handmade fashion. It’s the kind of piece that looks like it came from an artisan boutique, which makes it perfect for birthdays, anniversaries, or just spoiling someone you love.
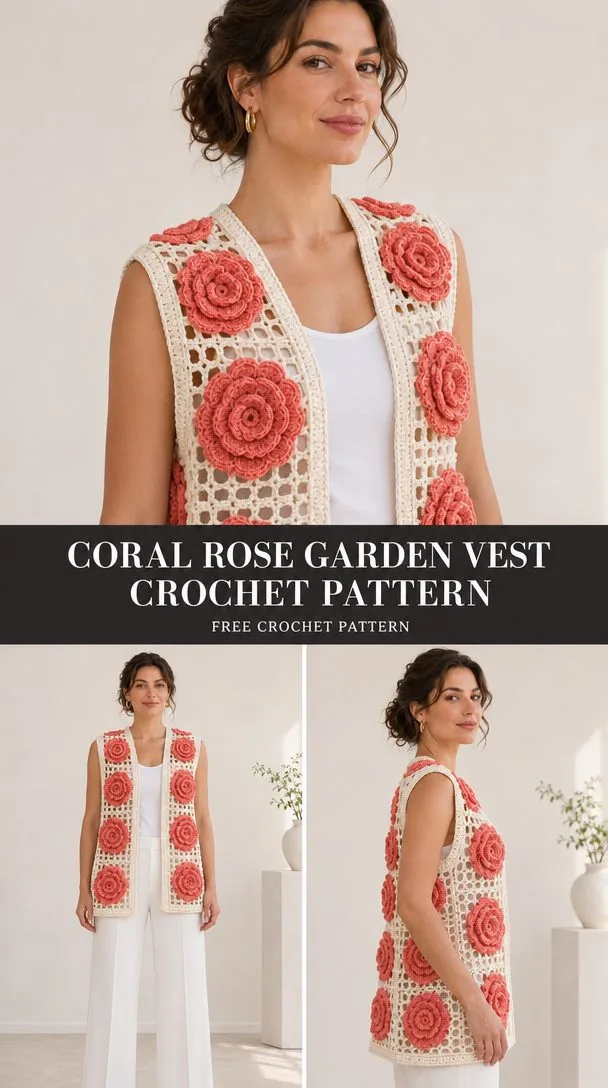
Final Thoughts on the Coral Rose Garden Vest Crochet Pattern
This vest is a true showpiece. The combination of the structured cream mesh with those bold, dimensional coral roses creates something that feels both vintage-inspired and completely modern. It’s the kind of project you’ll be proud to wear and even prouder to say you made yourself.
The construction method is clever, giving you control over fit and making motif placement stress-free. And once you get the rhythm of those mesh rows, they work up quickly.
Thank you so much for choosing this pattern! If you make your own Coral Rose Garden Vest, I’d absolutely love to see it. Share your finished photos on Instagram or Facebook and tag your creation so the crochet community can admire your work.
If this pattern is calling to you, go ahead and save it to your Pinterest boards so you can find it when you’re ready to start. And if you do make this gorgeous vest, please drop a comment below. Seeing your finished projects is the best part!
You Might Also Like
- Blush Pink Lacy Baby Dress Free Crochet Pattern
- Cherry Blossom Nose Cuff Crochet Pattern
- Coral Hibiscus Skirt Set Crochet Pattern
- Sage Checker Garden Dress Crochet Pattern