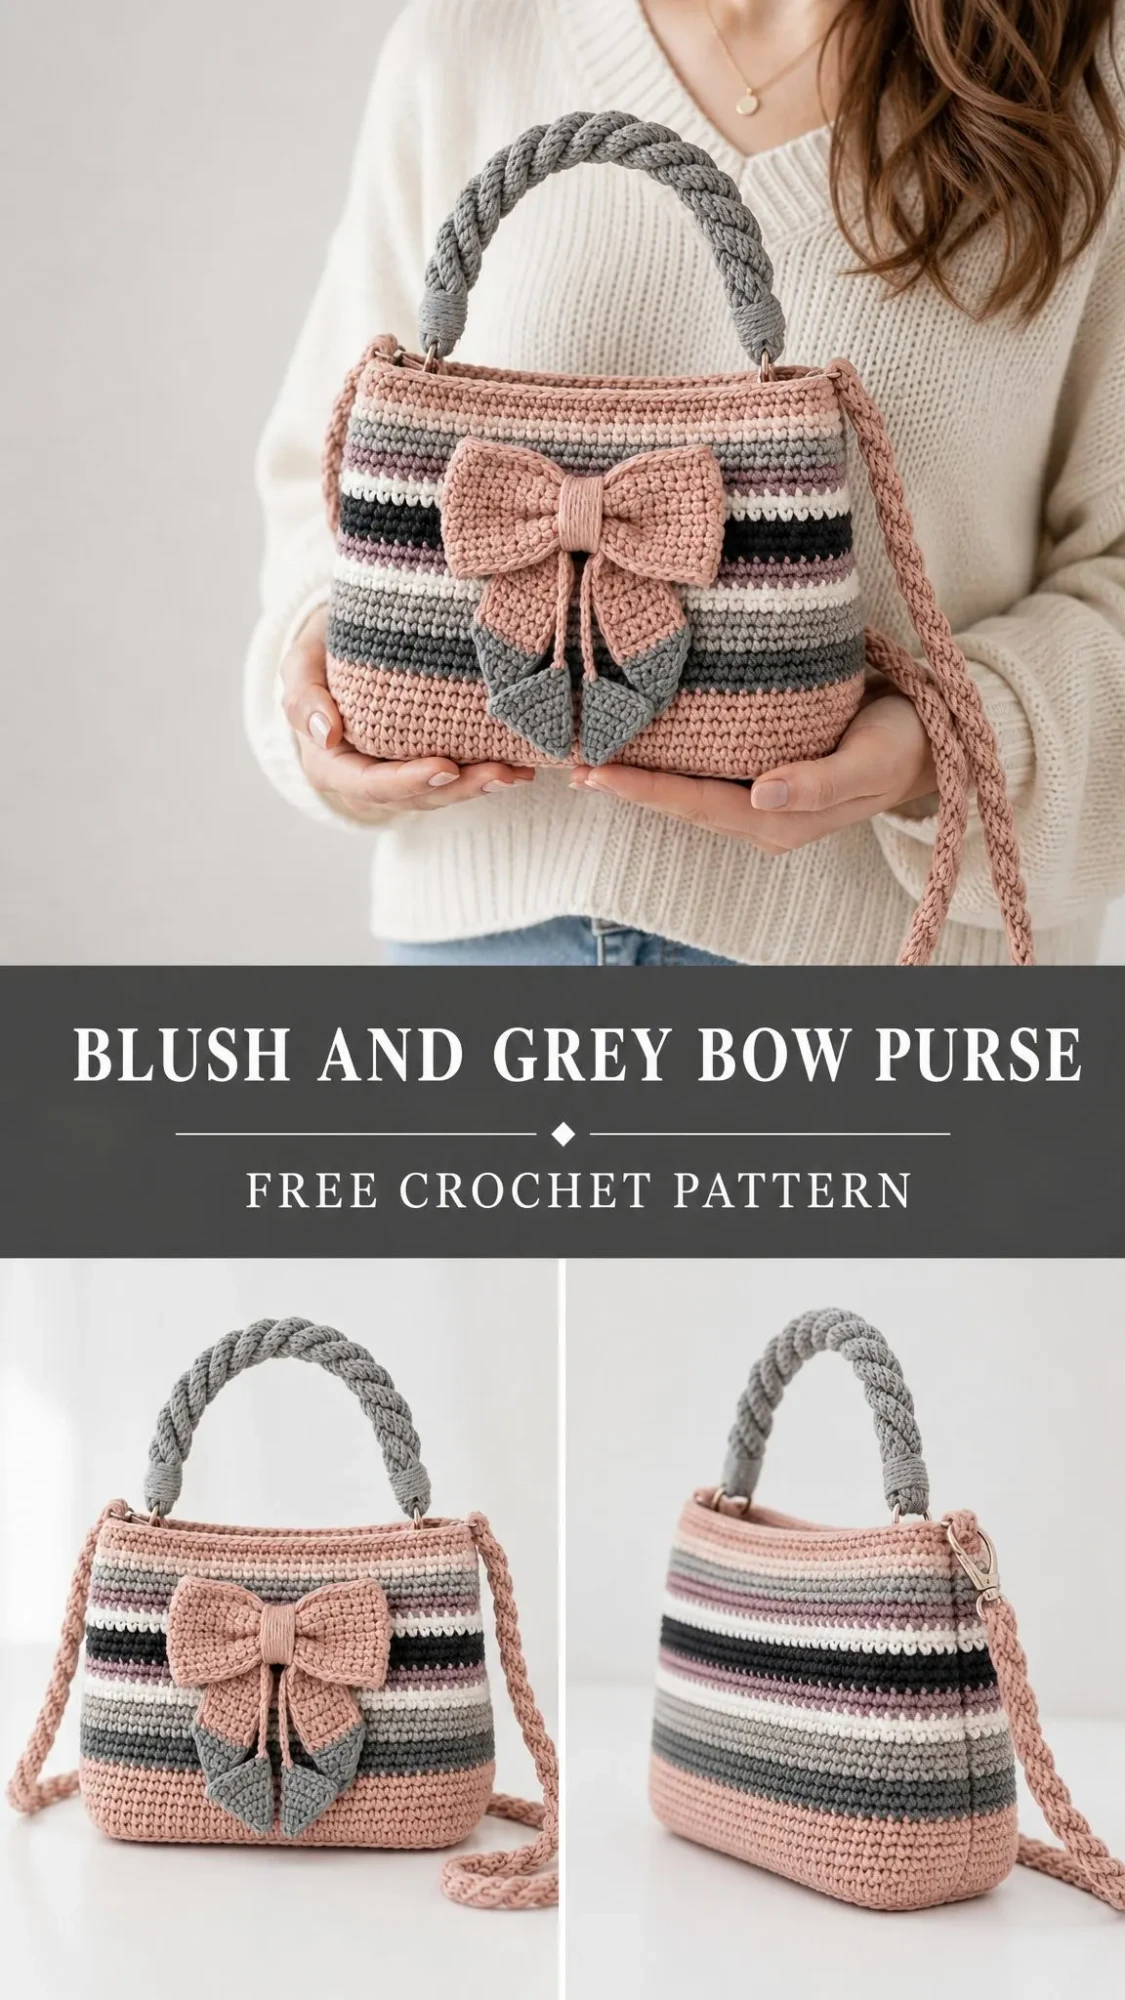
I call this one the Blush and Grey Bow Purse, and it started as a little sketch in my notebook about two years ago. I wanted to create something that felt polished and feminine without being fussy. Something that looked like it belonged in a boutique window but could actually be made at home with a hook and some cotton yarn.
Get the Ad-Free PDF Pattern
You can find the free pattern below, or you can purchase the ad-free printable PDF from my shop.
Get the Printable PDF →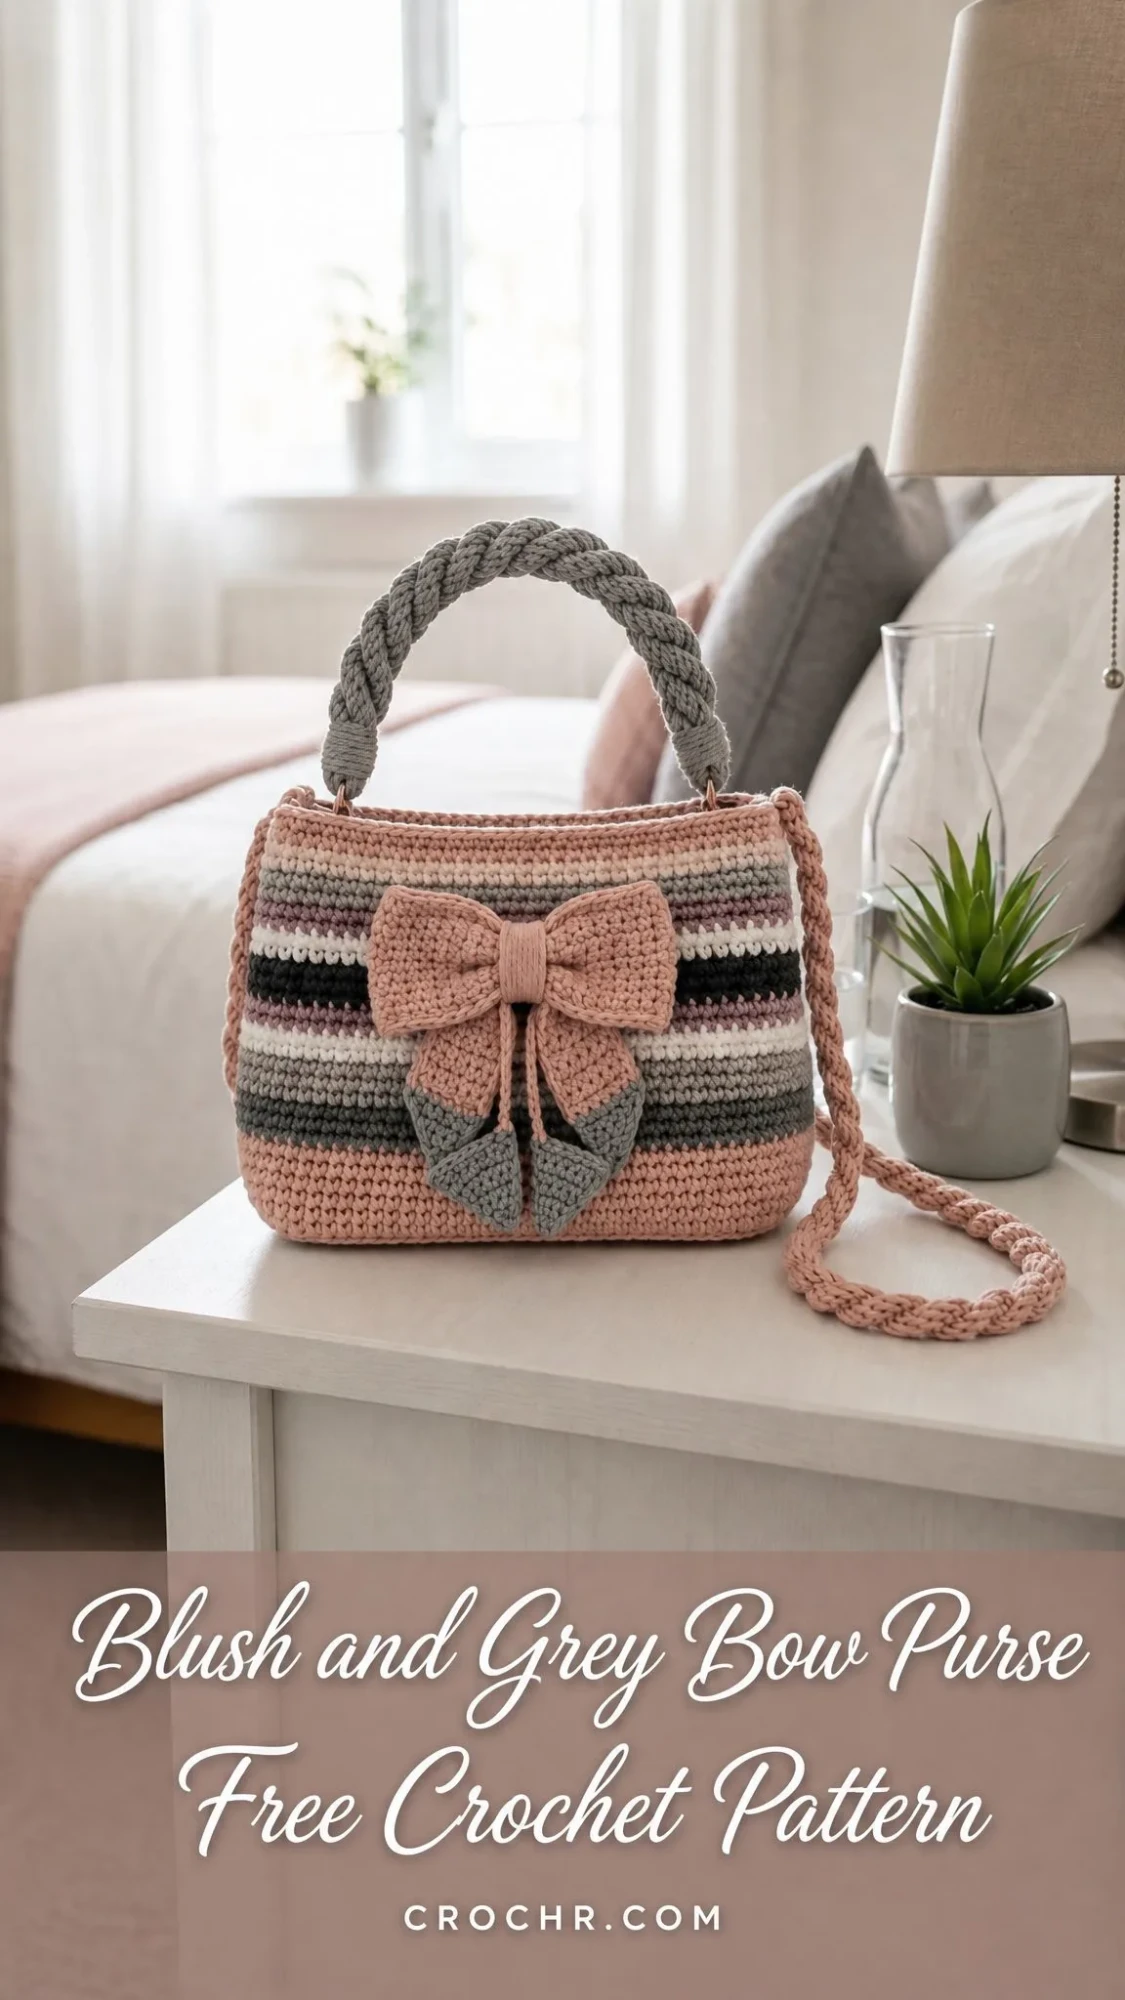
The design sat in that notebook for months until I finally pulled it out one rainy weekend. I remember thinking the bow might be too much, but once I pinched that rectangle into shape and wrapped the center band around it, I knew I had something special. The grey tails pointing downward, the braided handle, the soft blush stripes. It all came together better than I had imagined.
Now I get to share it with you. This purse is worked from the bottom up using joined single crochet rounds, which keeps everything neat and structured. The stripes are simple color changes, and the bow is just a rectangle that gets folded and wrapped. If you can chain, single crochet, and sew pieces together, you can absolutely make this bag.
Pattern Overview
This striped crochet handbag features a soft bow, a braided handle, and a matching shoulder strap. The construction starts with an oval base, then you work upward in joined rounds to create the body. The bow, handle, and strap are all made separately and sewn on at the end.
Skill Level: Confident beginner to intermediate
Estimated Time: 6 to 8 hours
Finished Dimensions:
Materials Needed
Gathering your supplies before you start makes the whole process smoother. Here is everything you will need:
Yarn:
Worsted weight or Aran weight cotton or cotton-acrylic blend yarn, approximately 235 yards (215 m) total, divided as follows:
Recommended Yarns:
Hook:
US G/6 (4.0 mm) crochet hook, or size needed to match gauge
Notions:
Optional:
Gauge
17 single crochet stitches and 18 rounds = 4 inches (10 cm) in joined single crochet, blocked.
Match both stitch and row gauge before beginning so your purse keeps the intended proportions. If your stitches are too loose, go down a hook size. If they are too tight, go up a hook size.
Abbreviations and Stitch Guide
Let me walk you through every abbreviation used in this pattern. If you are newer to crochet, read through this section before starting.
Special Stitches
Joined sc round: Chain 1, work single crochet stitches as instructed, join with a slip stitch to the first single crochet. The chain 1 does not count as a stitch.
Invisible color join: Cut yarn, pull tail through last stitch, thread tail on needle, insert under both top loops of the first stitch of the round, then back into the center of the final stitch. Weave in on the wrong side.
Single crochet decrease: Insert hook in next stitch, yarn over and pull up a loop. Insert hook in next stitch, yarn over and pull up a loop. Yarn over and pull through all 3 loops.
Twisted braided cord: Make 3 same-length crochet cords, knot one end, braid evenly, then bind and sew the ends flat. Keep the braid firm but not stretched.
Pattern Notes
Before you dive in, keep these tips in mind:
Instructions
Purse Base
Using Color A (blush), chain 27.
Round 1: Single crochet in 2nd chain from hook and next 24 chains, 3 single crochet in last chain. Working along the opposite side of the foundation chain, single crochet in next 24 chains, 2 single crochet in same chain as first single crochet. Join. (54 sc)
Round 2: Chain 1, 2 single crochet in first stitch, single crochet in next 24 stitches, 2 single crochet in each of next 3 stitches, single crochet in next 24 stitches, 2 single crochet in each of last 2 stitches. Join. (60 sc)
Round 3: Chain 1, [single crochet in next stitch, 2 single crochet in next stitch] 2 times, single crochet in next 24 stitches, [single crochet in next stitch, 2 single crochet in next stitch] 4 times, single crochet in next 24 stitches, [single crochet in next stitch, 2 single crochet in next stitch] 2 times. Join. (68 sc)
Round 4: Chain 1, single crochet in each stitch around. Join. (68 sc)
Round 5: Chain 1, working through back loops only, single crochet in each stitch around to turn the base upward. Join. (68 sc)
Checkpoint: After Round 5, the oval base should measure approximately 7.5 inches (19 cm) wide and 2.25 inches (5.5 cm) deep.
Striped Body
Continue in joined rounds with 68 single crochet in every round. Keep the joining seam at one side edge.
| Rounds | Color | Instructions |
|---|---|---|
| 6-12 | A (blush) | Single crochet in each stitch around. (68 sc each round) |
| 13-16 | B (medium gray) | Single crochet in each stitch around. (68 sc each round) |
| 17-18 | C (light gray) | Single crochet in each stitch around. (68 sc each round) |
| 19 | D (cream) | Single crochet in each stitch around. (68 sc) |
| 20 | E (charcoal) | Single crochet in each stitch around. (68 sc) |
| 21 | D (cream) | Single crochet in each stitch around. (68 sc) |
| 22 | F (dusty mauve) | Single crochet in each stitch around. (68 sc) |
| 23 | C (light gray) | Single crochet in each stitch around. (68 sc) |
| 24 | D (cream) | Single crochet in each stitch around. (68 sc) |
| 25-27 | B (medium gray) | Single crochet in each stitch around. (68 sc each round) |
| 28-34 | A (blush) | Single crochet in each stitch around. (68 sc each round) |
Top Edge and Structure
Round 35: With Color A, chain 1, single crochet in each stitch around. Join. (68 sc)
Round 36: Chain 1, slip stitch loosely in each stitch around for a tidy rim. Join, fasten off, and weave in ends. (68 sl sts)
Checkpoint: The bag body should measure approximately 8 inches (20.5 cm) wide across the front and 6.75 inches (17 cm) tall from base to rim.
Optional Lining and Closure
If you want to add a lining or closure:
Crochet Bow
The bow is my favorite part of this design. It looks intricate but is really just a rectangle that gets pinched and wrapped.
Main Bow Rectangle (Color A)
Chain 35.
Row 1: Single crochet in 2nd chain from hook and each chain across. Turn. (34 sc)
Rows 2-14: Chain 1, single crochet in each stitch across. Turn. (34 sc each row)
Fasten off, leaving a 20 inch (50 cm) tail. Fold the rectangle accordion-style through the center and wrap the tail around the middle 10 to 12 times to pinch into a bow shape.
Center Band (Color A)
Chain 9.
Row 1: Single crochet in 2nd chain from hook and each chain across. Turn. (8 sc)
Rows 2-12: Chain 1, single crochet in each stitch across. Turn. (8 sc each row)
Wrap around the pinched bow center and sew the short edges together at the back.
Two Lower Tails (Colors A and B)
Make 2. Begin with Color A. Chain 7.
Row 1: Single crochet in 2nd chain from hook and each chain across. Turn. (6 sc)
Row 2: Chain 1, increase, single crochet in next 4 stitches, increase. Turn. (8 sc)
Rows 3-6: Chain 1, single crochet in each stitch across. Turn. (8 sc each row)
Row 7: Change to Color B. Chain 1, decrease, single crochet in next 4 stitches, decrease. Turn. (6 sc)
Row 8: Chain 1, decrease, single crochet in next 2 stitches, decrease. Turn. (4 sc)
Row 9: Chain 1, decrease twice. Turn. (2 sc)
Row 10: Chain 1, single crochet in each stitch across. Fasten off. (2 sc)
Sew the tails behind the bow center so the gray tips angle downward. Add two 8 inch (20 cm) blush tie strands if you want the dangling bow strings shown in the sample.
Handle and Shoulder Strap
Braided Top Handle (Color B)
Make 3 cords: Chain 64, single crochet in 2nd chain from hook and each chain across. Fasten off. (63 sc per cord)
Knot or stitch the 3 cords together at one end, braid firmly, then bind the opposite end. The finished braid should be approximately 11.5 inches (29 cm) long before attachment.
Blush Shoulder Strap (Color A)
Make 3 cords: Chain 150, single crochet in 2nd chain from hook and each chain across. Fasten off. (149 sc per cord)
Braid the 3 cords evenly. The finished strap should measure approximately 34 inches (86 cm). For a longer crossbody strap, add 5 chains to each cord for every extra 1 inch (2.5 cm) desired.
Handle Tabs (Color A)
Make 2. Chain 9.
Row 1: Single crochet in 2nd chain from hook and each chain across. Turn. (8 sc)
Rows 2-6: Chain 1, single crochet in each stitch across. Turn. (8 sc each row)
Wrap one tab around each end of the gray braid and sew securely to the inside top edge of the bag.
Strap strength tip: Use several passes of matching yarn through the bag wall, handle tab, and braid end. Add D-rings or lobster clasps if the purse will be used often.
Assembly and Finishing
Now for the fun part: putting it all together.
1. Shape the bag: Steam lightly or wet-block the empty bag over a small box so the base, front, and back dry square.
2. Attach handle: Mark the top edge 1.25 inches (3 cm) in from each side on the front and back. Sew handle tabs just inside the rim, centered over the side edges.
3. Attach strap: Sew or clip the shoulder strap to the side edges near the rim. Keep the strap joins on the inside or back side.
4. Sew bow: Center the bow on the front. The top of the bow should sit approximately 1.75 inches (4.5 cm) below the rim. Sew through the bow center and a few points along the tails.
5. Finish ends: Weave all tails to the wrong side. Add lining, closure, and base insert if using.
Stripe placement tip: The front bow sits centered over the cream and charcoal band area, with the tails reaching into the gray lower stripe. Pin all parts before sewing so the motif sits straight.
Size Customization
Want to make your purse bigger or adjust the strap? Here is how:
Troubleshooting
If something does not look quite right, here are some common issues and fixes:
| Issue | Fix |
|---|---|
| Bag flares outward | Go down a hook size for the body or tighten joins at the side seam. |
| Base cups | Block flat. If severe, loosen Round 2 and Round 3 increases. |
| Stripe jog is visible | Place the join at the side under the strap or use the invisible color join. |
| Bow looks floppy | Add a few hidden stitches through the center and steam-block the bow wings. |
Care Instructions
Final Thoughts
Thank you so much for choosing to make this Blush and Grey Bow Purse. I truly hope you love how yours turns out, whether you stick with these exact colors or put your own spin on it with different shades from your stash. The structured shape, the cute bow, and those braided details make this bag such a satisfying project from start to finish.
If you make one, I would absolutely love to see it. Tag me on Instagram or share a photo on Facebook. Seeing your creations is honestly the best part of sharing these patterns.
Happy crocheting, friend.
If this pattern made your project list, save it to your Pinterest boards so you can find it easily when you are ready to start. And if you do make this purse, please leave a comment below. I love hearing how your projects turn out and seeing what color combinations you choose.
Want a Quick & Easy Printable Version?
Get a clean, beautifully formatted PDF of this pattern — easy to follow step by step, ready to print or save on any device. No scrolling, no distractions, just the pattern.
Get the Printable PDF →