
I have been dreaming about this design for months. I wanted to create a placemat that felt like spring on a table, something with layers of color and texture that would make people stop and stare.
Get the Ad-Free PDF Pattern
You can find the free pattern below, or you can purchase the ad-free printable PDF from my shop.
Get the Printable PDF →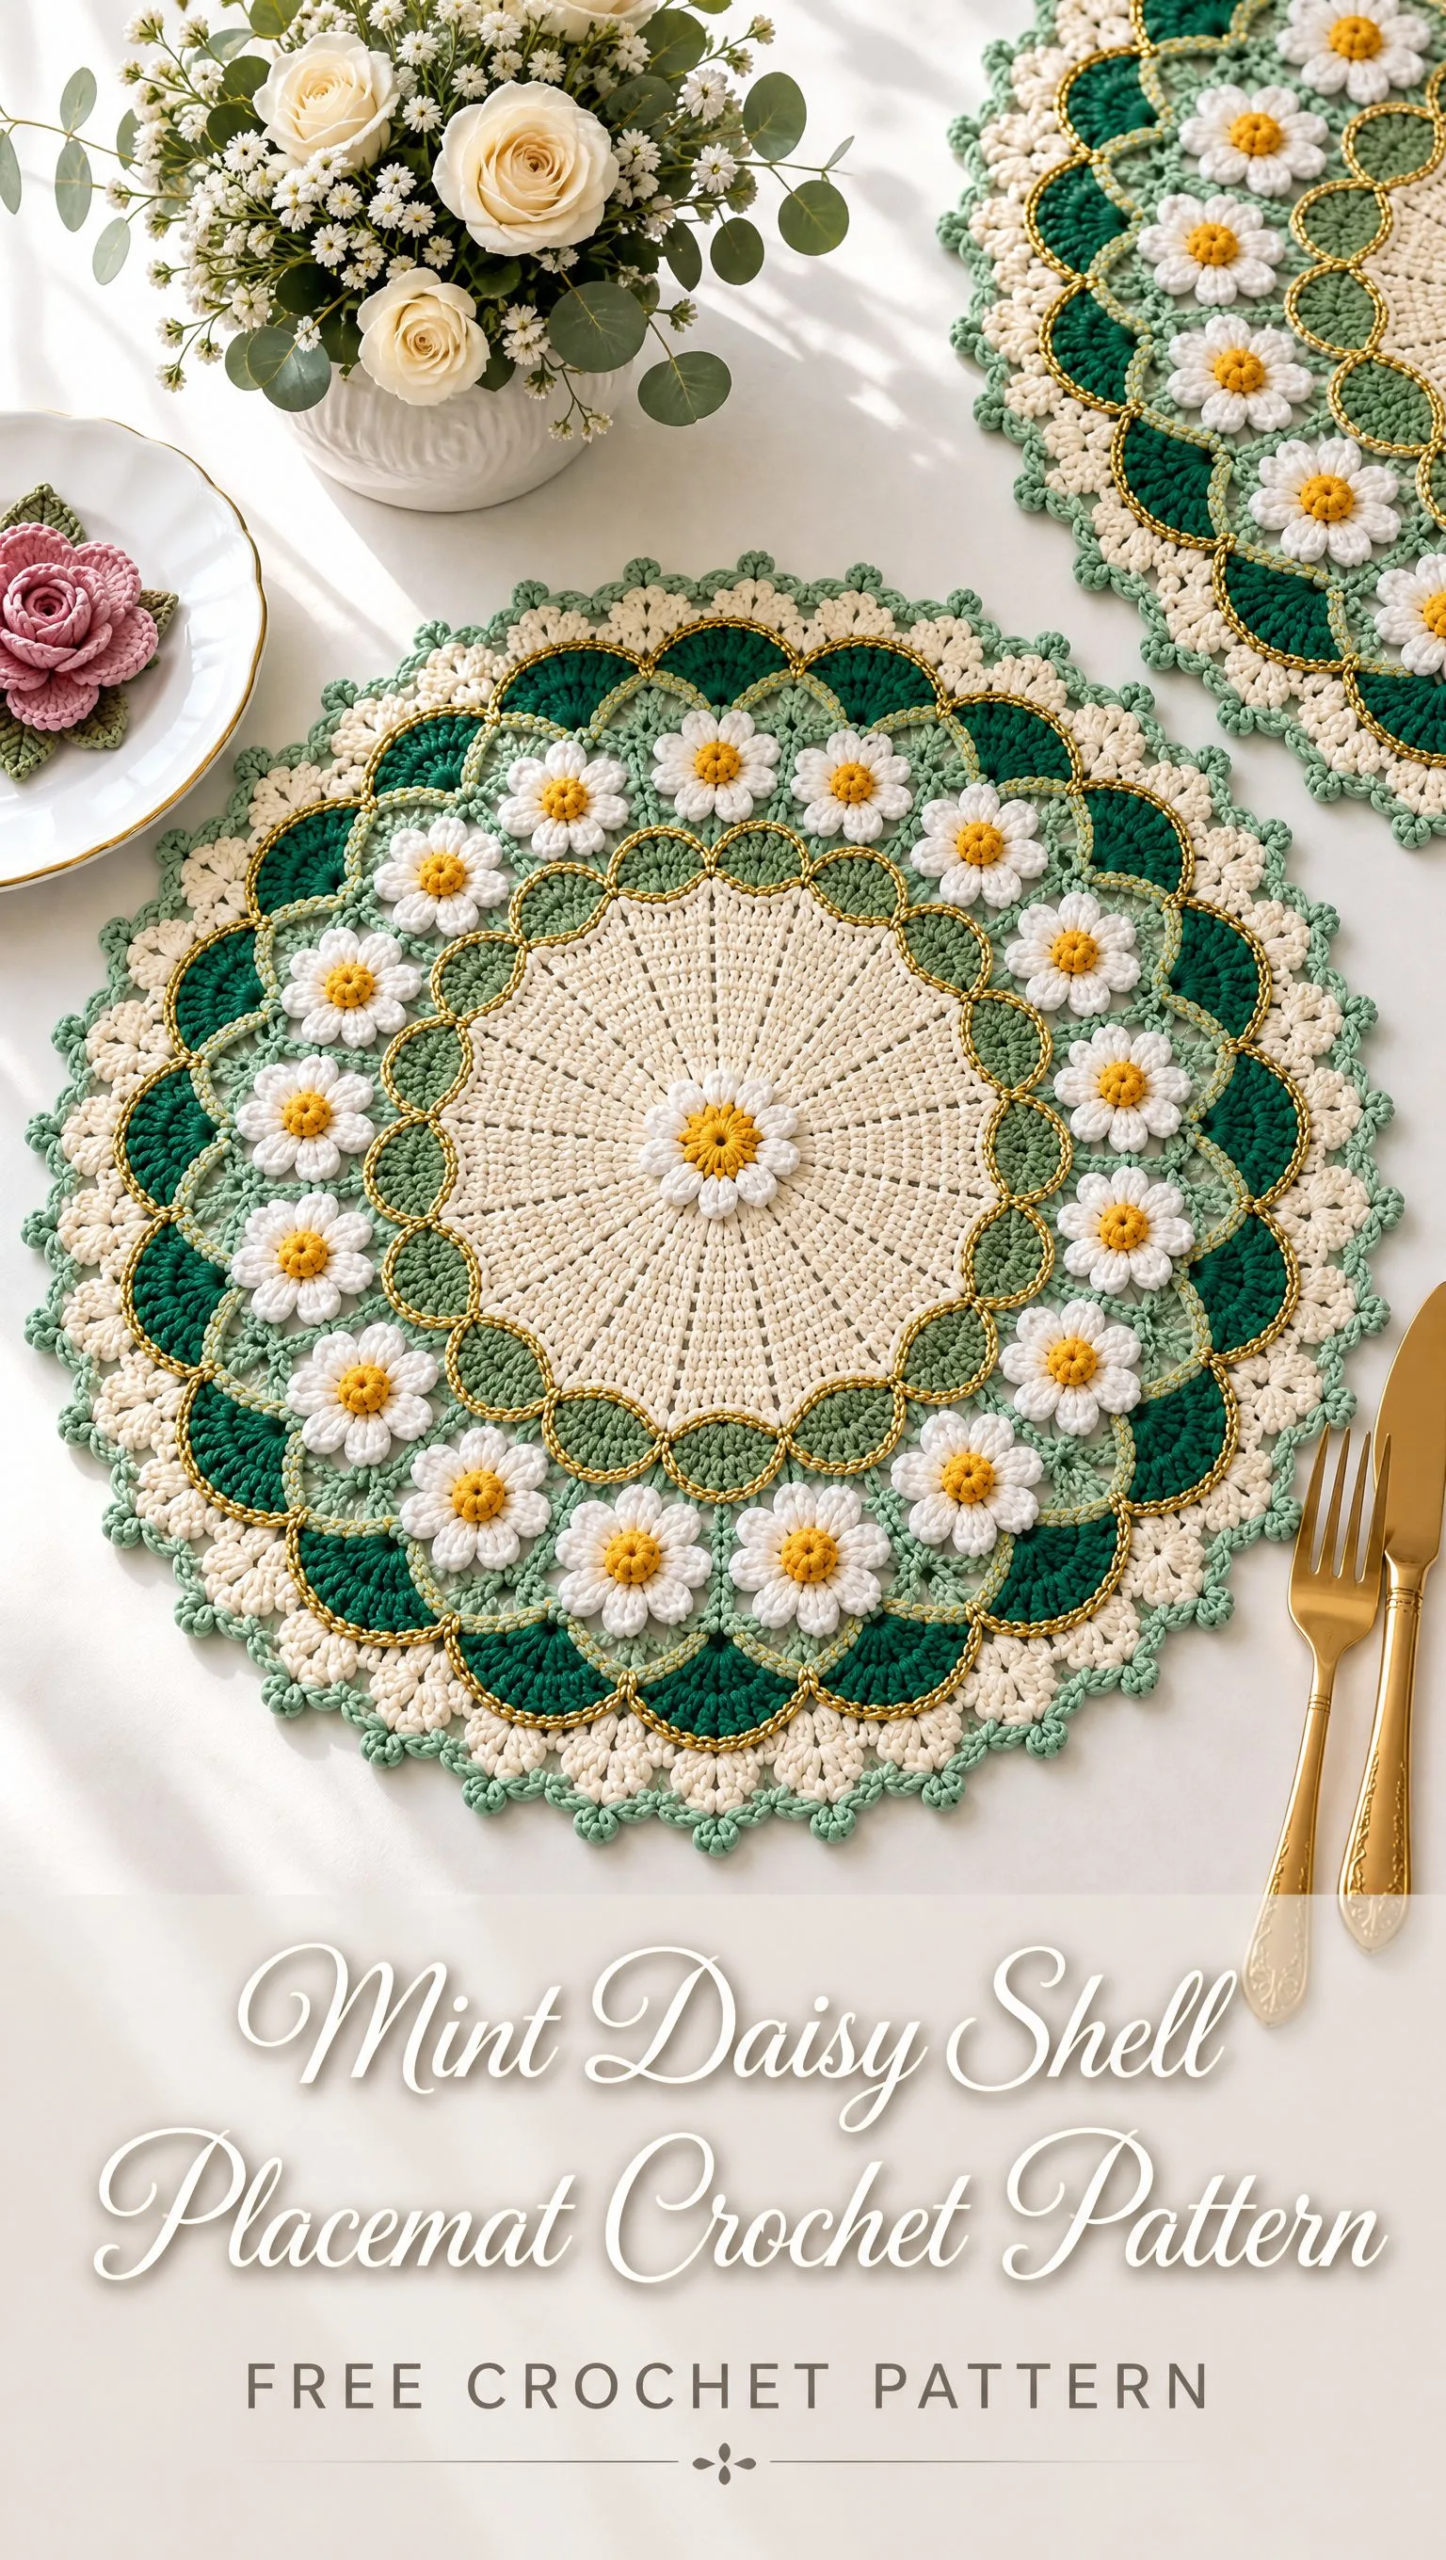
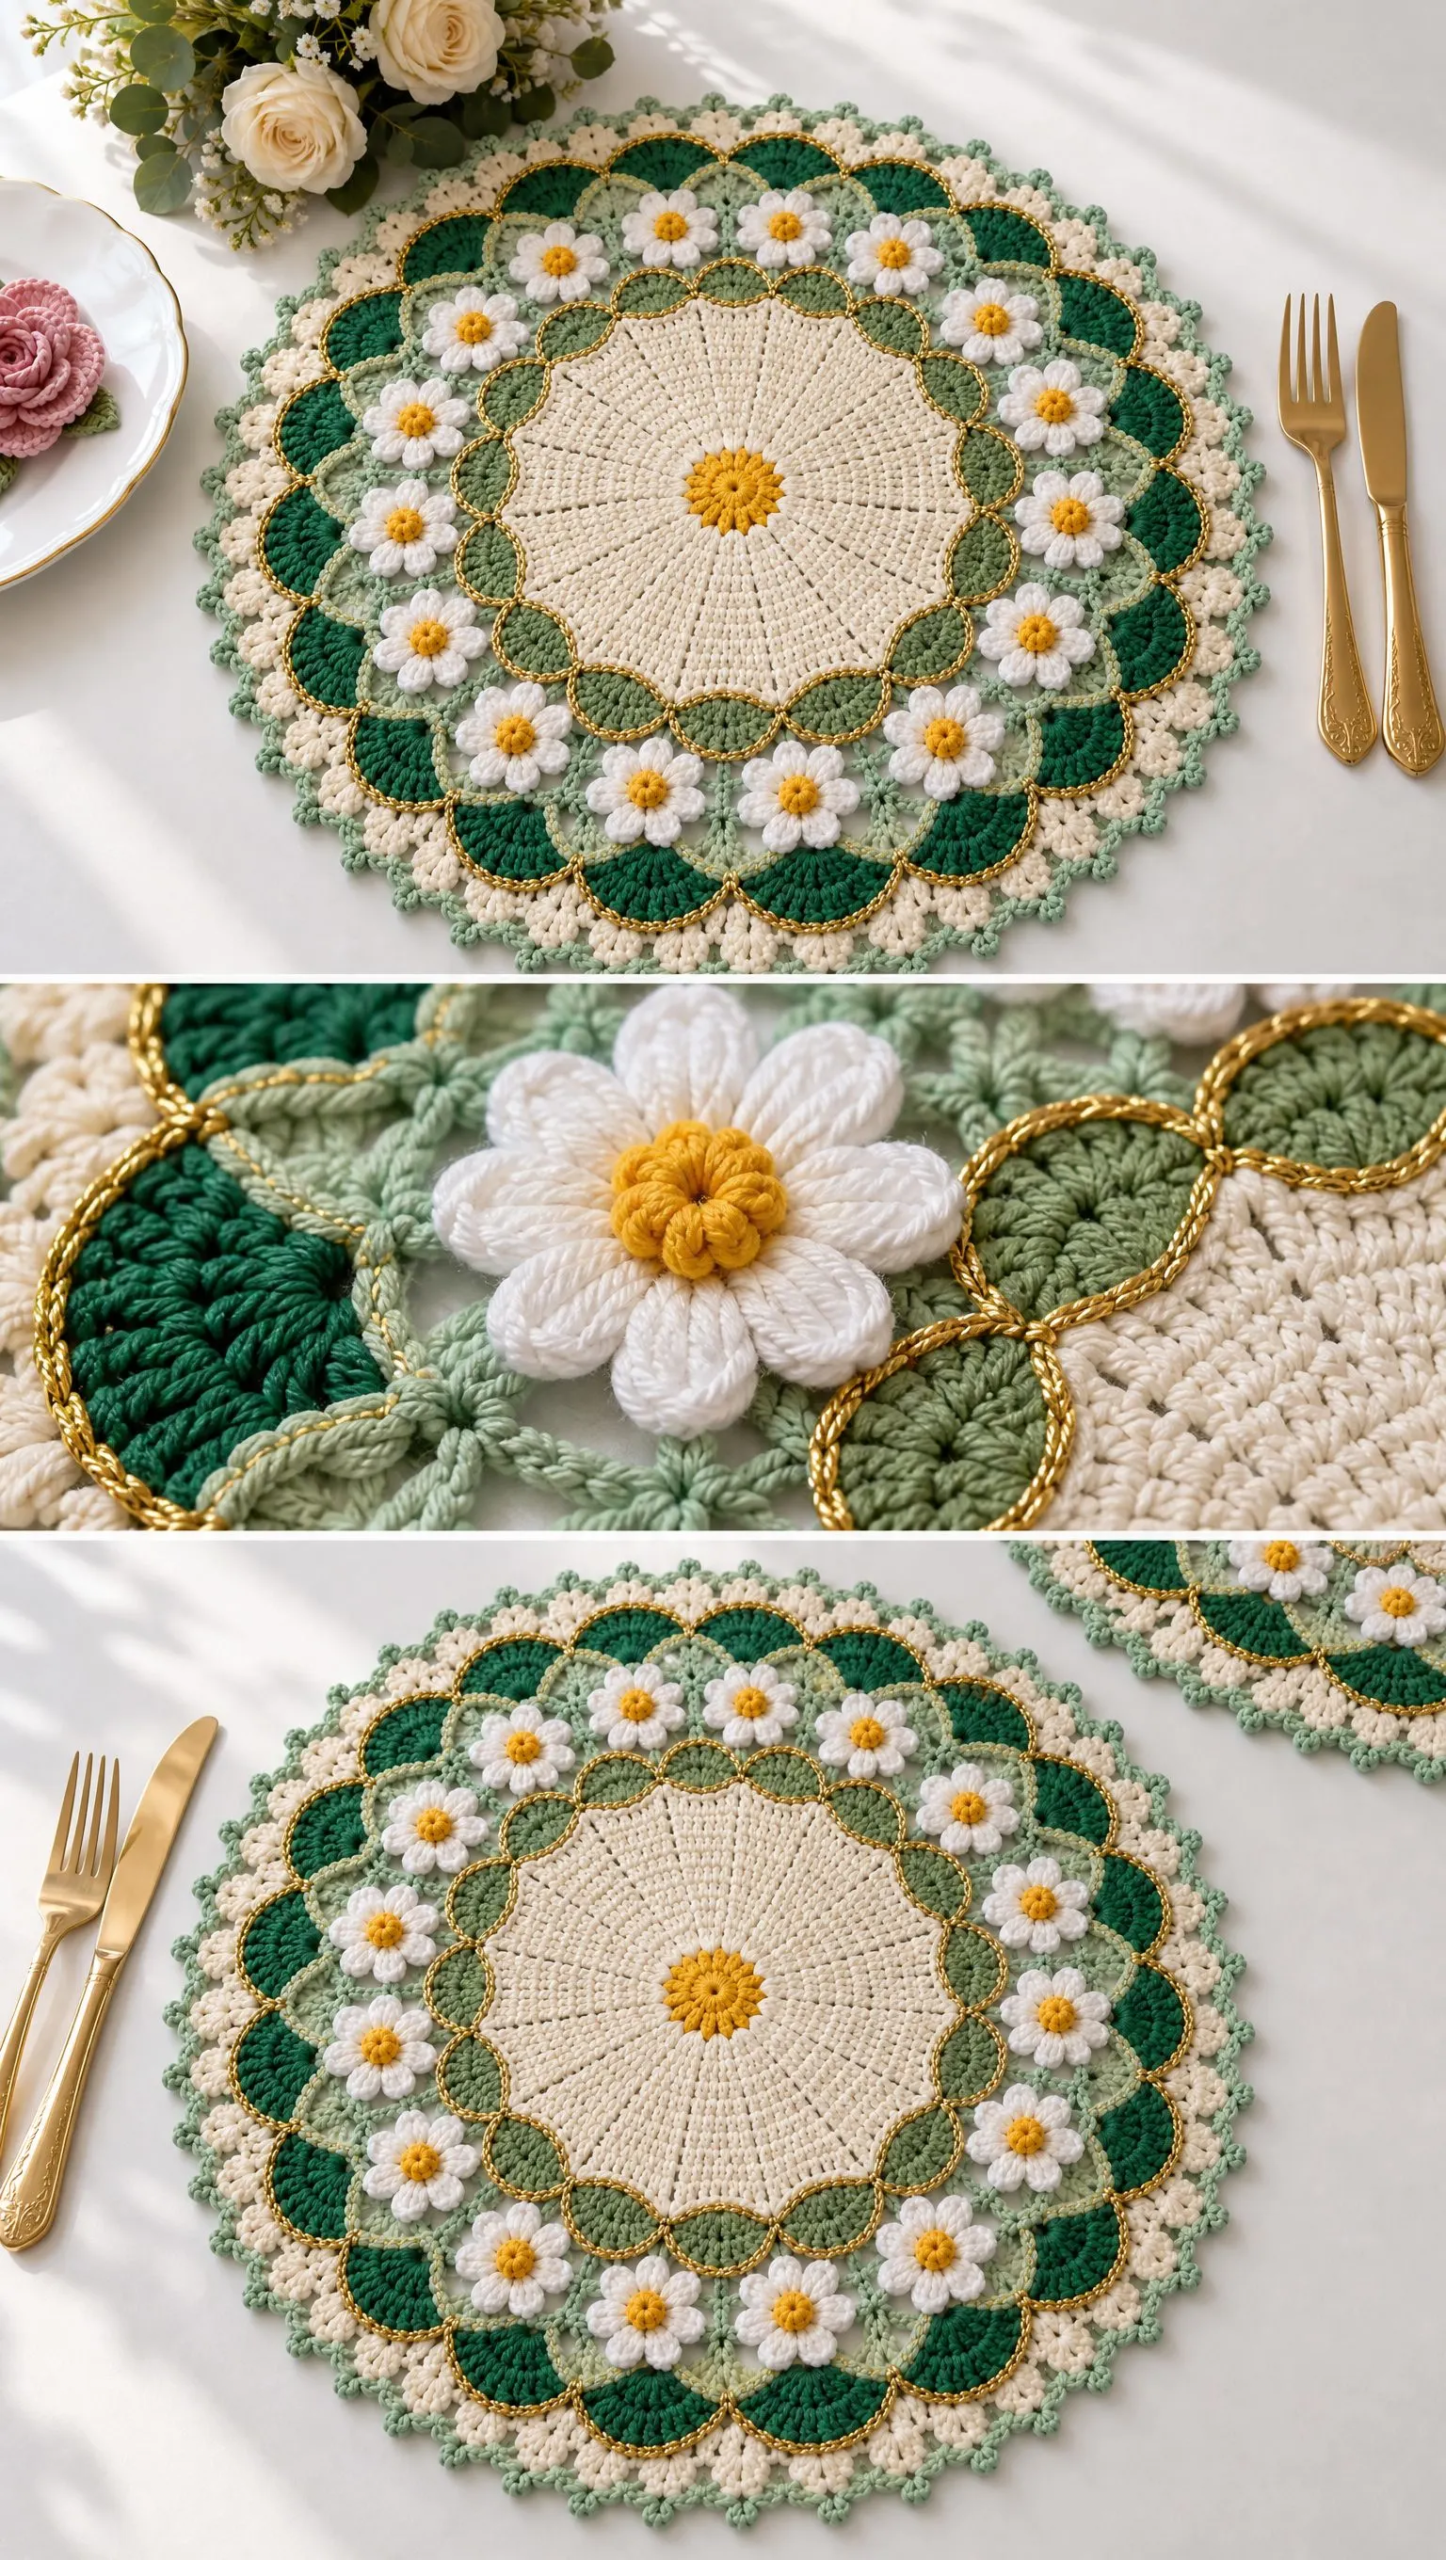
The goals were ambitious: a smooth center medallion with visible radiating lines, a ring of cheerful daisies, and an outer border that alternated between deep emerald and soft mint shells. Every element needed to work together without competing for attention.
I am SO pleased with how this turned out! The combination of the ivory center, sage scallops, and those sweet little daisy motifs creates something truly special. Let me walk you through every single step so you can make one for your own table.
About This Crochet Pattern
This Mint Daisy Shell Placemat is a confident intermediate project that combines several techniques into one stunning piece. You will work joined rounds from the center outward, make 24 separate daisy motifs, and join everything together with elegant shell borders.
The finished placemat measures approximately 15 to 16 inches (38 to 41 cm) in diameter after blocking. The center plate area spans about 9.5 to 10 inches before the floral border begins, with the decorative border adding roughly 2.5 to 3 inches of depth.
This is the kind of project that looks incredibly impressive but breaks down into manageable sections. You will tackle the center medallion first, then the sage transition, then make all your daisies, and finally complete the outer shells and picot edging.
Skill Level
This pattern is designed for confident intermediate crocheters. You should be comfortable with the following techniques:
If any of these feel unfamiliar, I recommend practicing on a small swatch first. The individual techniques are not difficult, but combining them all requires attention to detail.
Materials You Will Need
Yarn
You will need sport weight or light DK mercerized cotton in six colors. Here are the approximate yardages:
The total yardage comes to approximately 230 to 280 yards (210 to 255 meters) across all colors.
Hook and Tools
Gauge and Blocking Checkpoints
Gauge matters most in the flat center medallion. Measure after gently steaming or wet blocking at each checkpoint.
| Checkpoint | Target Size | What to Check |
|---|---|---|
| After Center Round 5 | 4.5 to 5 inches (11.5 to 12.5 cm) | If larger, go down 0.25 to 0.5 mm hook. If smaller, go up. |
| After Center Round 10 | 9.5 to 10 inches (24 to 25.5 cm) | Must lie flat with no cupping or waves |
| After Daisy Ring | 12.5 to 13 inches (32 to 33 cm) | Daisies should sit flat with arches open but not floppy |
| Finished | 15 to 16 inches (38 to 41 cm) | Block to a true circle, pin every 2 to 3 picots |
Abbreviations and Stitch Definitions
Before we dive into the step by step instructions, let me define every stitch and abbreviation you will encounter.
ch = chain: Wrap yarn over hook and pull through the loop on your hook. This creates one chain stitch.
sl st = slip stitch: Insert hook into indicated stitch, yarn over, and pull through both the stitch and the loop on your hook in one motion.
sc = single crochet: Insert hook into stitch, yarn over and pull up a loop (2 loops on hook), yarn over and pull through both loops.
hdc = half double crochet: Yarn over, insert hook into stitch, yarn over and pull up a loop (3 loops on hook), yarn over and pull through all 3 loops.
dc = double crochet: Yarn over, insert hook into stitch, yarn over and pull up a loop (3 loops on hook), yarn over and pull through 2 loops, yarn over and pull through remaining 2 loops.
tr = treble crochet: Yarn over twice, insert hook into stitch, yarn over and pull up a loop (4 loops on hook), yarn over and pull through 2 loops three times.
sp = space
st/sts = stitch/stitches
rnd = round
rep = repeat
sk = skip
yo = yarn over
Special Stitches
Yellow Bobble: Yarn over, insert hook in indicated stitch, pull up a loop, yarn over and pull through 2 loops. Repeat 4 more times in the same stitch (you will have 6 loops on hook). Yarn over and pull through all loops, chain 1 to close. The bobble should project toward the front of your work.
3-dc Cluster (cl): In indicated space, work 3 double crochet stitches, leaving the last loop of each dc on your hook. Yarn over and pull through all 4 loops, chain 1 to secure.
5-dc Shell: Work 5 double crochet stitches in the same indicated space.
7-dc Fan: Work 7 double crochet stitches in the same indicated space.
Picot: Chain 3, slip stitch in the first chain made.
Standing dc (optional): With a slip knot on hook, yarn over, insert in indicated space, pull up a loop and complete a double crochet. Use this in place of chain 3 starts for an invisible join.
Invisible Join: Cut yarn, pull tail through last stitch, thread tail on needle, pass under both loops of the first stitch, then back down through the top of the last stitch to imitate a normal stitch top.
Reading Stitch Counts: Numbers shown in parentheses at the end of each round are the total stitches or repeat units. Beginning chains count as a stitch only when explicitly stated.
Center Medallion Instructions
Work all rounds with the right side facing you. The increase points shift slightly from round to round so the disk stays round instead of becoming a 12-sided polygon. Place a marker in the first stitch of each round to keep track.
Sunflower Starburst (Rounds 1 to 2)
Round 1 with Yellow (B): Make a magic ring. Chain 2 (this does not count as a stitch), work 12 double crochet into the ring. Join with slip stitch to first dc. Tighten the ring securely. (12 dc)
Round 2 with Yellow (B): Chain 1, then work [sc in next dc, ch 3, sl st in second ch from hook, sl st in next ch] around the entire round. Join to first sc. Fasten off. (12 pointed rays)
You now have a cheerful sunflower center with 12 little rays pointing outward. This creates the focal point of your entire placemat.
Ivory Radiating Double Crochet Disk (Rounds 3 to 12)
Round 3: Join Ivory (A) in any sc from Round 2. Chain 3 (counts as dc), dc in same stitch, 2 dc in each remaining sc around. Join to top of ch-3. (24 dc)
Round 4: Chain 3, dc in next stitch, 2 dc in next stitch. Dc in next stitch, 2 dc in next stitch. Repeat from around. Join. (36 dc)
Round 5: Chain 3, dc in next stitch, 2 dc in next stitch. Dc in next 2 stitches, 2 dc in next stitch. Repeat from around, ending with dc in last stitch. Join. (48 dc)
Round 6: Chain 3, dc in next 2 stitches, 2 dc in next stitch. Dc in next 3 stitches, 2 dc in next stitch. Repeat from around. Join. (60 dc)
Round 7: Chain 3, dc in next 3 stitches, 2 dc in next stitch. Dc in next 4 stitches, 2 dc in next stitch. Repeat from around. Join. (72 dc)
Round 8: Chain 3, dc in next 4 stitches, 2 dc in next stitch. Dc in next 5 stitches, 2 dc in next stitch. Repeat from around. Join. (84 dc)
Round 9: Chain 3, dc in next 5 stitches, 2 dc in next stitch. Dc in next 6 stitches, 2 dc in next stitch. Repeat from around. Join. (96 dc)
Round 10: Chain 3, dc in next 6 stitches, 2 dc in next stitch. Dc in next 7 stitches, 2 dc in next stitch. Repeat from around. Join. (108 dc)
Round 11: Chain 3, dc in next 7 stitches, 2 dc in next stitch. Dc in next 8 stitches, 2 dc in next stitch. Repeat from around. Join. (120 dc)
Round 12: Chain 3, dc in next 8 stitches, 2 dc in next stitch. Dc in next 9 stitches, 2 dc in next stitch. Repeat from around. Join. (132 dc)
Flat Circle Check
At the end of Round 12, your medallion should measure about 9.5 to 10 inches (24 to 25.5 cm). If it ruffles, undo the final round and work only 10 increases instead of 12. If it cups upward, add 2 evenly spaced increases.
The exact final stitch count matters less than achieving a perfectly flat circle. However, the next round must be divisible by 24, so adjust with 1 to 2 increases or decreases in the setup round below.
Round 13 Setup with Ivory (A): Chain 1, sc evenly around, increasing as needed to end with exactly 144 sc. Join to first sc. Fasten off. (144 sc = 24 groups of 6)
Sage Scallop Transition (Rounds 14 to 15)
Round 14 Sage Anchors (C): Join sage in any sc. Chain 1, sc in same stitch. Chain 4, skip next 5 sc, sc in next sc. Repeat from around, ending with chain 4. Join to first sc. (24 ch-4 arches)
Round 15 Sage Scallops (C): Slip stitch into first ch-4 space. Chain 1, work [sc, hdc, 5 dc, hdc, sc] in same space and in each ch-4 space around. Join with slip stitch to first sc. Fasten off. (24 scallops)
Gold Outline (F): With fine gold thread and a smaller hook, surface slip stitch along the outer ridge of each sage scallop. Keep the line loose enough that the edge stays flat. Alternatively, hold gold with sage only for the final yarn over of each stitch in Round 15.
Mint Arch Foundation for Daisies (Rounds 16 to 17)
Round 16 Mint Arches (D): Join mint in the center dc of any sage scallop. Chain 1, sc in same stitch. Chain 7, sc in center dc of next scallop. Repeat from around, ending chain 7. Join to first sc. (24 ch-7 arches)
Round 17 Arch Reinforcement (D): Slip stitch into first ch-7 space. Work 7 sc in each ch-7 space around. Join to first sc. Fasten off. (168 sc distributed over 24 arches)
Making the 24 Daisy Motifs
Each daisy is worked separately, then attached to one mint arch. Keep the motifs small and lightly dimensional so the border remains practical under tableware.
Daisy Round 1 Yellow Center (B): Make a magic ring. Chain 1, work 8 sc into ring. Join to first sc. Do not turn. (8 sc)
Daisy Round 2 Bobble Center (B): Chain 1, work 1 bobble into each sc around. Join to first bobble. Fasten off, leaving a 6 inch (15 cm) tail for attaching later. (8 bobbles)
Daisy Round 3 White Petals (A or bright white): Join white between any two bobbles. Chain 4, 2 tr in same gap, chain 4, sl st in same gap. Slip stitch into next gap between bobbles. Repeat from around. Fasten off. (8 petals)
If you prefer flatter daisies, substitute 2 dc for the 2 tr. If you want the raised look shown in the project photos, use treble petals and block them outward with your fingers while damp.
Make all 24 daisies before moving on to attachment.
Attaching the Daisies
1. Lay the placemat flat with Round 17 facing up. Center one daisy over each mint arch.
2. Using the white tail or a separate length of white yarn, tack the back of two opposite petals to the 2nd and 6th sc of the corresponding 7-sc mint arch.
3. Add one tiny tack through the back of the yellow center into the 4th sc of the arch. Do not pull tightly. The center should remain modestly raised.
4. Repeat for all 24 daisies. Check that every flower faces the same direction and that the ring lies flat before weaving in tails.
Outer Emerald and Mint Shell Border (Rounds 18 to 19)
The outer border is worked behind and between the daisies so the petals remain visible. Work into the mint arch stitches that are not occupied by the attachment tacks.
Round 18 Bridge Round with Mint (D): Join mint in the first free sc after any daisy attachment point. Chain 1, sc in same stitch. Chain 5 behind the next daisy, sc in first free sc after that daisy. Repeat from around. Join. (24 ch-5 bridge spaces)
Round 19 Alternating Fans (D/E): Slip stitch into first ch-5 space. With Mint (D), work [sc, hdc, 7 dc, hdc, sc] in first ch-5 space. Drop mint to back (do not cut). Join Emerald (E) in next ch-5 space and work [sc, hdc, 7 dc, hdc, sc]. Pick up mint and work same fan in next space. Pick up emerald and work same fan in next space. Repeat from around. Join last fan neatly. (24 fans: 12 mint, 12 emerald)
Carry the resting yarn loosely along the back only across one fan. If the carried strand shows or tightens the edge, cut and rejoin each fan instead. Weaving additional tails is better than distorting the circle.
Gold Edging (F): Surface slip stitch loosely across the top loops of the 7 dc in each fan, dipping one stitch down at each fan valley. Do not work gold across the sc/hdc base stitches. Steam lightly and confirm the border remains flat.
Ivory Upright Clusters and Mint Picot Finish (Rounds 20 to 22)
Round 20 Ivory Cluster Crown (A): Join ivory in the center (4th) dc of any 7-dc fan. Chain 1, sc in same stitch. Chain 3, cluster in the valley between this fan and the next fan, chain 3, sc in center dc of next fan. Repeat from around. Join to first sc. (24 clusters, 24 center sc)
Round 21 Ivory Upright Points (A): Slip stitch into first ch-3 space. Chain 1, [sc, ch 3, 2 dc, ch 3, sc] in each ch-3 space around. Join. Fasten off. (48 small upright points, two per fan interval)
Round 22 Mint Picot Perimeter (D): Join mint in any outer ch-3 tip. Chain 1, sc in same tip. Chain 2, picot, chain 2, sc in next outer ch-3 tip. Repeat from around. Join with invisible join. Fasten off. (48 picots)
Finishing and Blocking Your Placemat
1. Weave in all ends on the wrong side, changing direction at least once so cotton tails do not pull free during washing.
2. Fill a basin with cool to lukewarm water and a small amount of gentle soap. Soak the placemat for 10 to 15 minutes without agitation.
3. Rinse thoroughly, press out water in a towel (do not wring), and lay flat on a blocking mat.
4. Measure from the center to the edge in at least eight directions. Pin the final circle to 15 to 16 inches (38 to 41 cm), or to the largest diameter that remains perfectly flat.
5. Pin every 2 to 3 picots and lightly shape each daisy so its petals radiate evenly. Keep the daisy centers slightly raised.
6. Allow to dry completely before removing pins. If using metallic gold thread, avoid direct high heat.
Troubleshooting Common Issues
Center cups upward: Your stitch height or tension is tight. Add 2 to 4 evenly spaced increases in the next plain round, or go up 0.25 mm hook size.
Center ripples: Too many stitches or loose tension. Remove 2 to 4 increases in the next round, or go down 0.25 mm hook size.
Daisy ring pulls inward: Increase each Round 18 bridge from chain 5 to chain 6.
Shell border ruffles: Replace 7-dc fans with 5-dc shells, or shorten Round 18 bridges by 1 chain.
Shell border cups: Use 8 to 9 dc in each fan, or lengthen Round 18 bridges by 1 chain.
Gold line makes edge stiff: Redo the gold slip stitches with a larger hook and very loose tension, or embroider the line after blocking instead.
Final picot edge waves: Work picot only on every second tip, or replace ch 2 + picot + ch 2 with ch 3 between tips.
Making a Matching Set
For four placemats, buy at least 4 times the listed yardage plus 10% extra so every mat can be blocked to the same diameter. Make all center medallions first, then all daisies, then complete borders assembly line style for the best consistency.
Care Instructions
Hand wash or machine wash inside a mesh bag on a gentle cycle in cool water if your yarn label allows. Reshape and dry flat. Do not tumble dry metallic thread. Re-block after washing if the decorative edge contracts.
Round by Round Quick Reference
Thank you so much for choosing this pattern! I really hope you enjoy making this beautiful placemat as much as I enjoyed designing it. If you create one, I would absolutely love to see your finished piece. Tag me on Instagram or share a photo in our Facebook group.
Save this Mint Daisy Shell Placemat crochet pattern to your Pinterest boards so you can find it whenever you are ready to start. And please drop a comment below if you make one. I always love hearing how your projects turn out!
Want a Quick & Easy Printable Version?
Get a clean, beautifully formatted PDF of this pattern — easy to follow step by step, ready to print or save on any device. No scrolling, no distractions, just the pattern.
Get the Printable PDF →You Might Also Like
- Sage Green Cottagecore Heart Crochet Cardigan Pattern
- Lavender Dream Crescent Purse with Silver Accents Free Crochet Pattern
- Sage Green Shell Stitch Romper Free Crochet Pattern
- Sunset Safari Beaded Animal Anklet Free Crochet Pattern
