
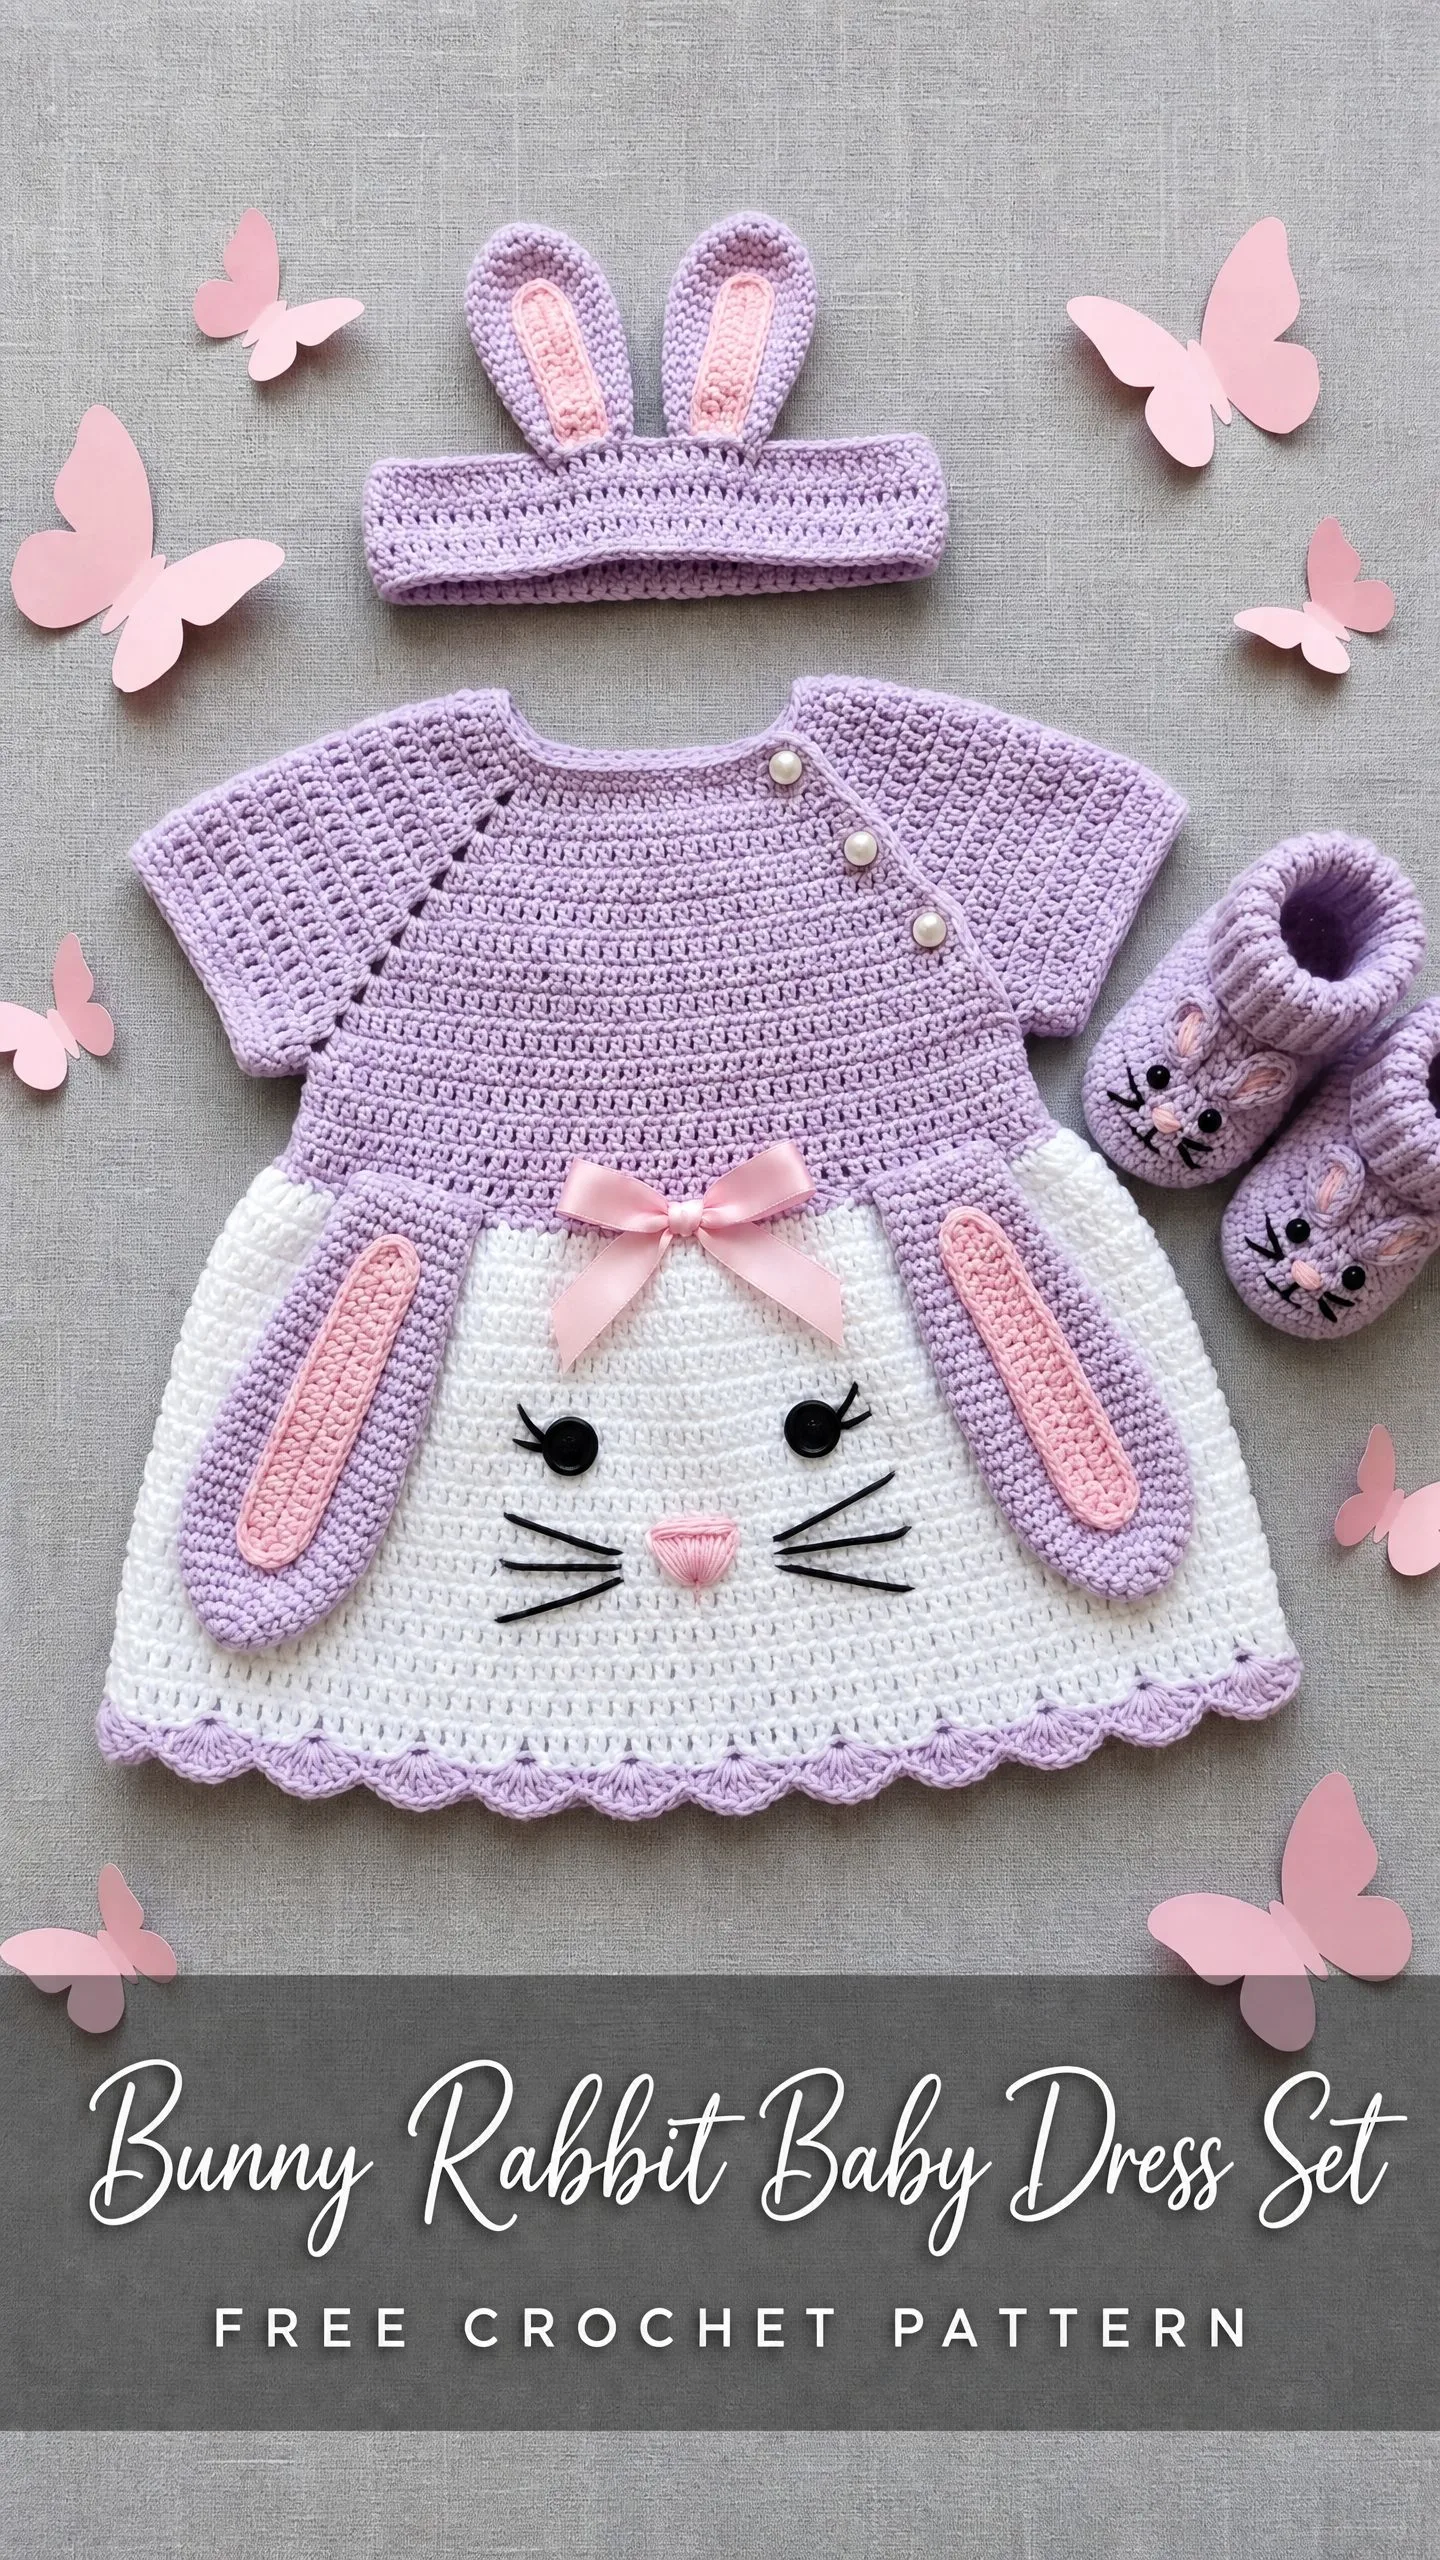
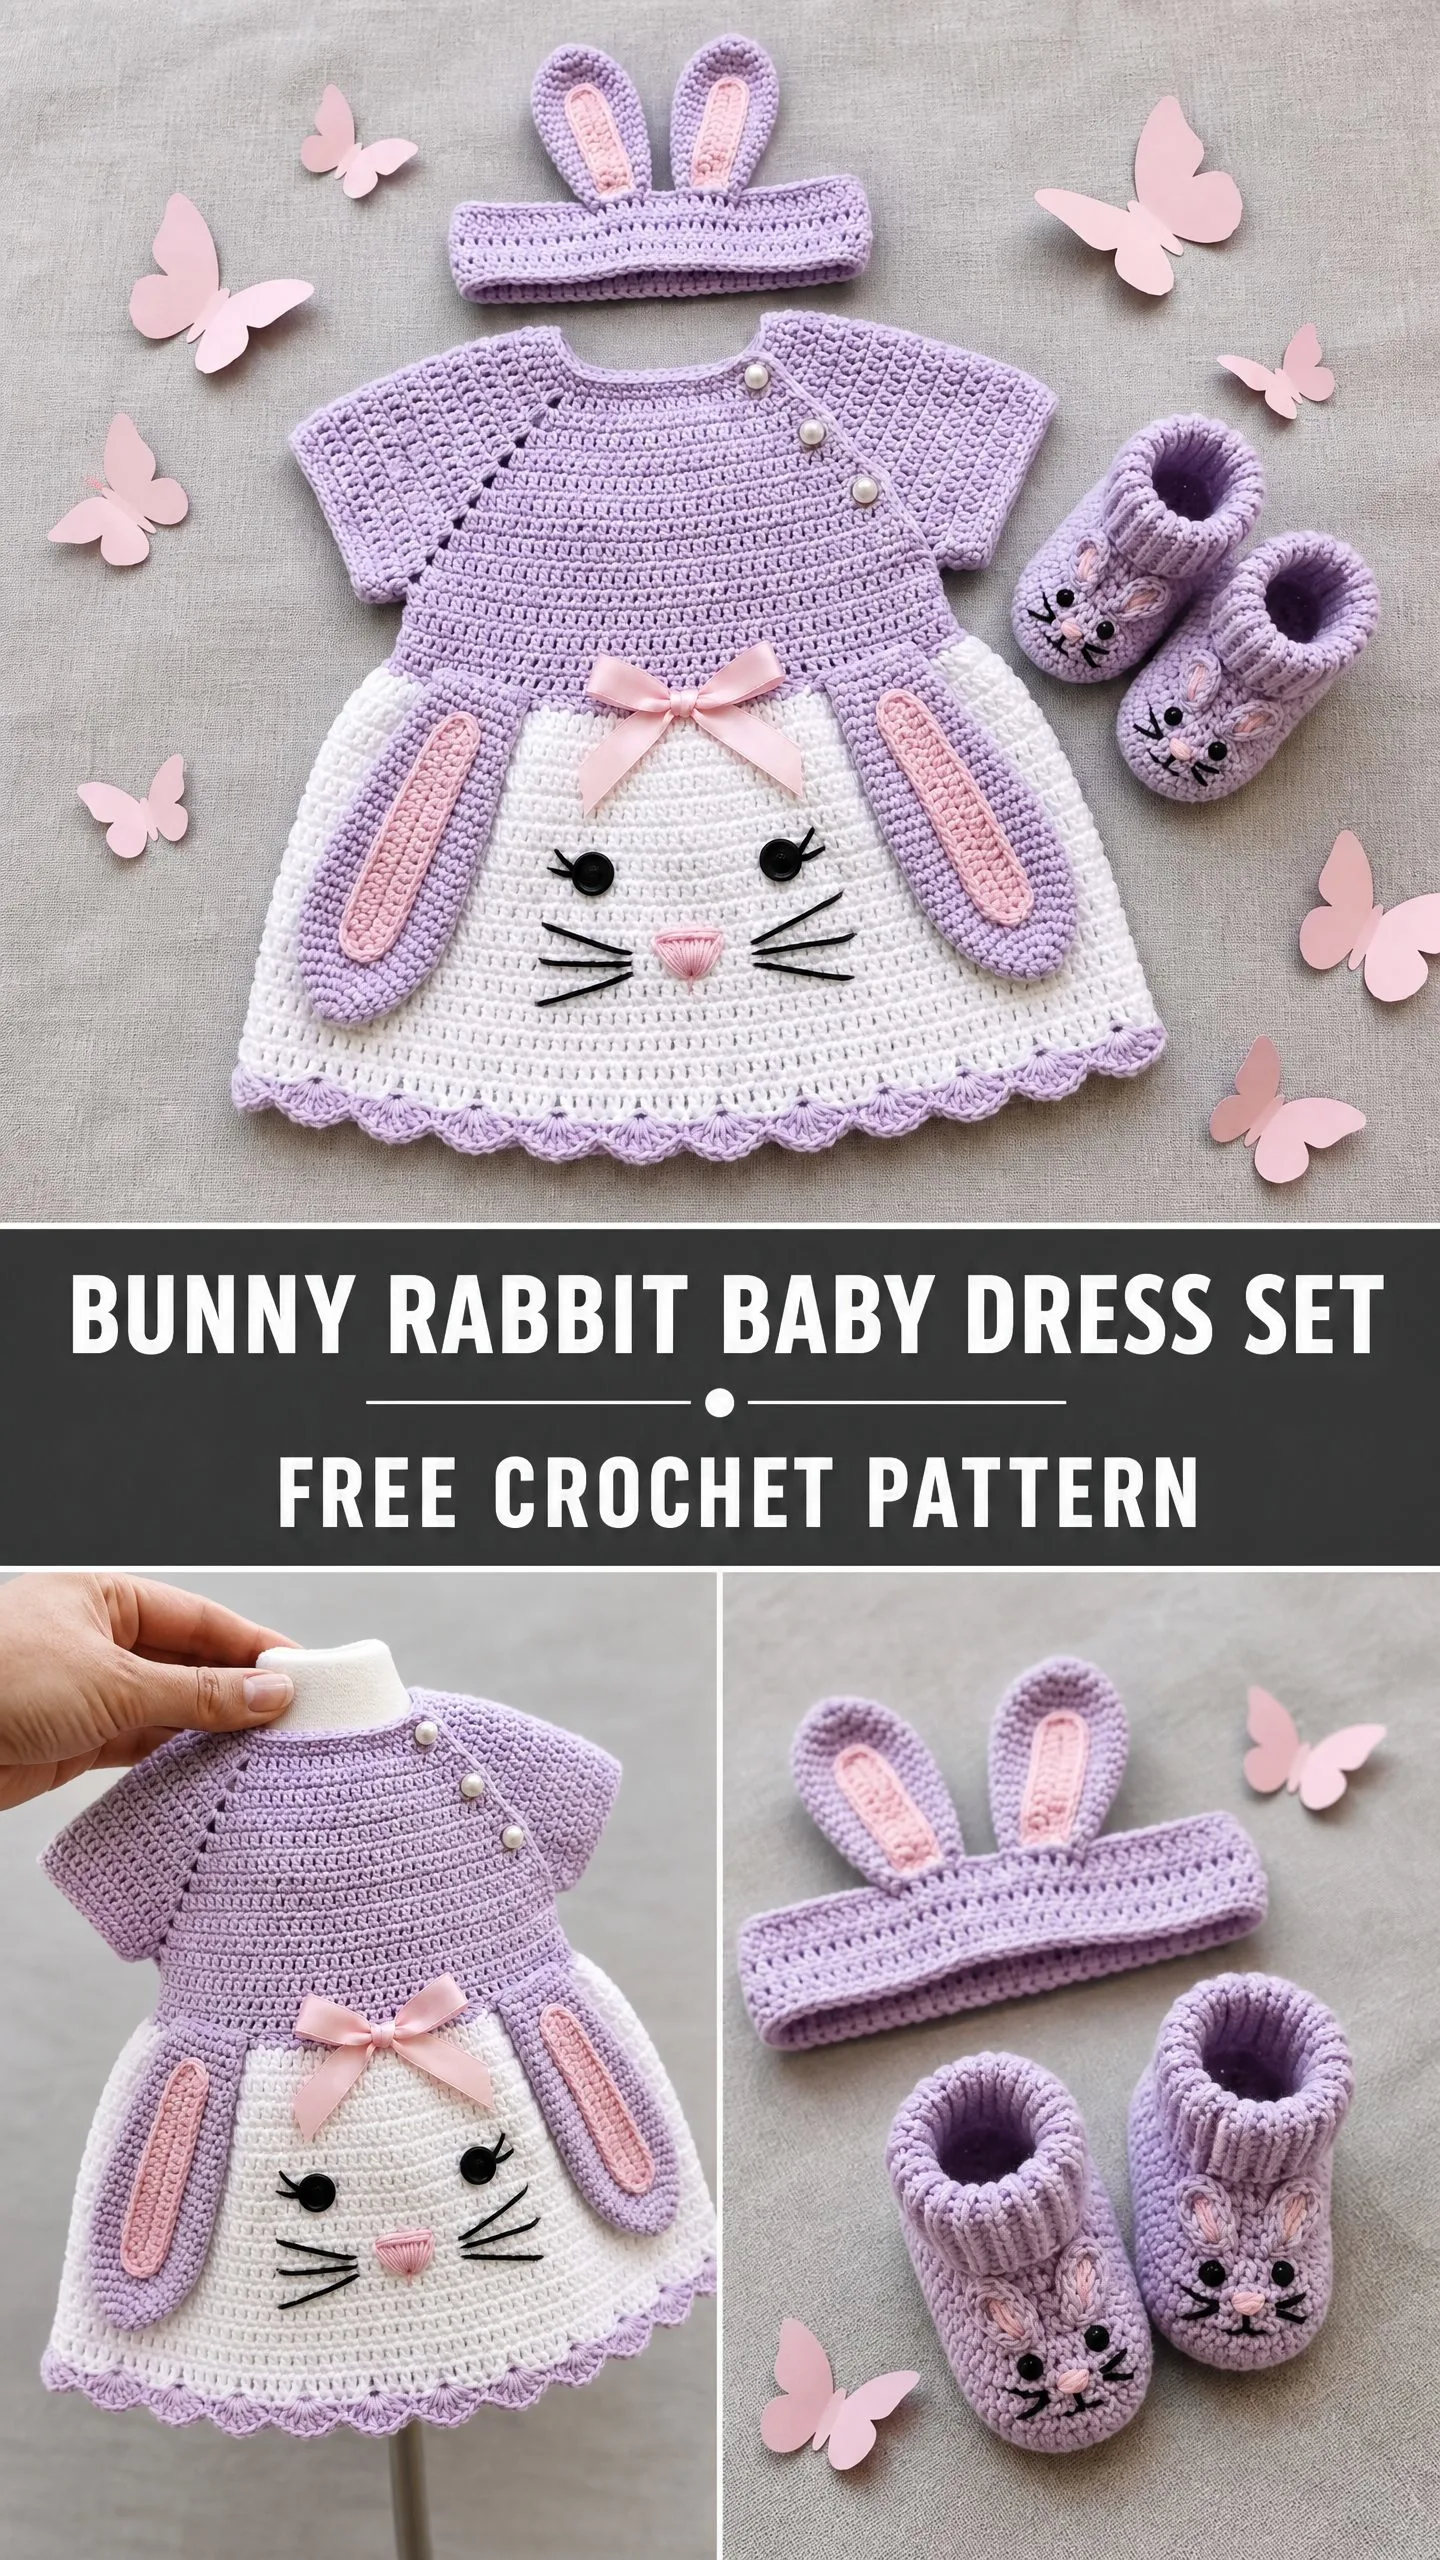
I pulled this pattern out of my design notebook last spring, and it immediately made me smile. I originally called it "Little Cottontail" because I designed it for my niece’s first Easter photo shoot three years ago. The complete set includes the dress, a matching headband with perky bunny ears, and the sweetest little booties with tiny bunny faces on the toes.
My sister cried when she saw the finished set. Real tears. That reaction is exactly why I design baby clothes. This bunny dress has been tucked away in my files ever since, waiting for the right moment to share.
Now it is your turn to create something that will make a new mom weep happy tears.
About This Crochet Pattern
This three piece baby ensemble features a top down raglan dress with a bunny face on the skirt, a coordinating headband with upright bunny ears, and adorable bunny booties. The dress uses a clever color block technique where the lavender bodice transitions to a white skirt panel, creating the perfect canvas for embroidered bunny features.
The construction is satisfying and logical. You start at the neckline and work your way down through raglan increases, separate the sleeves, then continue to the skirt. The white bunny face panel on the front is flanked by applied ear pieces that give the design its distinctive charm. A sweet pink ribbon bow sits at the waist, and pearl buttons close the shoulder for easy dressing.
Skill level: Intermediate. You should be comfortable with working in the round, raglan shaping, color changes, and basic embroidery. The headband and booties are beginner friendly on their own, but the dress yoke construction requires familiarity with top down garment shaping.
Time estimate: Plan for 10 to 14 hours total across all three pieces. The dress alone takes about 7 to 9 hours. Add extra time for the embroidery finishing.
Finished Measurements
The pattern includes two sizes: 3 to 6 months (with 6 to 12 month modifications in parentheses throughout).
Dress chest circumference: 17 in / 43 cm (19 in / 48 cm)
Dress length shoulder to hem: 12 in / 30.5 cm (14 in / 35.5 cm)
Headband circumference: 14 in / 35.5 cm (15 in / 38 cm)
Bootie foot length: 3.5 in / 9 cm (4 in / 10 cm)
Materials Needed
Yarn:
Hook: US size G-6 / 4.0 mm crochet hook
Notions:
Yarn Substitution Options
Paintbox Yarns Simply DK works beautifully for this project. This 100% acrylic yarn is machine washable and comes in excellent lavender, white, and pink shades. The smooth texture makes stitch definition clear for the raglan lines.
Lion Brand Pound of Love is another great choice if you prefer a slightly warmer, fluffier fabric. Note that this is worsted weight, so use a size H-5 / 5.0 mm hook and adjust your gauge accordingly.
Drops Safran is perfect for warmer climates. This 100% cotton DK weight yarn gives beautiful drape. Cotton has less stretch, so size up one hook if your gauge runs tight.
Avoid fuzzy or textured yarns. They will obscure the embroidery details on the bunny face.
Gauge
With MC and US G-6 / 4.0 mm hook, in half double crochet (hdc) worked in rows:
16 hdc and 12 rows = 4 in / 10 cm (blocked)
Gauge matters for fitted garments. Make a swatch of at least 20 stitches by 16 rows, block it, and measure before you begin. Adjust hook size up or down as needed.
Abbreviations Used
Special Stitches for This Baby Dress Pattern
Shell Stitch
Work 5 hdc all into the same stitch. This creates a fan shaped shell used at the hem edge. In the edging, shells are separated by: skip 2 stitches, single crochet in next stitch, skip 2 stitches, then shell into next stitch.
Raglan Increase Round
Work hdc to 1 stitch before the raglan marker, then work 2 hdc in next stitch, slip marker, 2 hdc in next stitch. Repeat at each of 4 raglan points, then hdc to end. This adds 8 stitches every increase round.
Hdc2tog (Half Double Crochet Decrease)
Yarn over, insert hook into next stitch, pull up a loop (3 loops on hook). Yarn over, insert hook into following stitch, pull up a loop (5 loops on hook). Yarn over, draw through all 5 loops. One stitch decreased.
Sc2tog (Single Crochet Decrease)
Insert hook into next stitch, pull up a loop. Insert hook into following stitch, pull up a loop. Yarn over, draw through all 3 loops. One stitch decreased.
Important Pattern Notes
1. The dress is worked top down in joined rounds with turning, beginning at the neck edge. After yoke shaping, separate the sleeves and work the body.
2. The button opening is at the right shoulder. Work the button band after the yoke is complete. Three pearl buttons close the shoulder.
3. Place stitch markers at each of the 4 raglan points at the beginning of the yoke and move them up every round.
4. At the end of each round, join with a slip stitch to the top of the first hdc of that round. The ch 2 does not count as a stitch throughout this pattern.
5. When changing from MC to CA at the skirt, do the color change on the last yarn over of the last hdc before the CA section begins.
6. Safety note: For infants under 3 years, replace plastic safety eyes with embroidered eyes using satin stitch in black embroidery floss.
7. Block all pieces by misting with water and pinning to measurements before assembly.
8. The bunny ears on the skirt are flat applique style panels worked separately and sewn to the sides. The headband carries the upright bunny ears.
Step by Step Crochet Pattern Instructions
DRESS
Neckline and Yoke Setup
With MC, ch 57 (63).
Row 1 (RS): Hdc in 3rd ch from hook (skipped ch does not count as stitch), hdc in each ch across, turn. (55 hdc) (61 hdc)
Row 2 (WS): Ch 2, hdc in first st, hdc across, hdc in last st, turn. (55 hdc) (61 hdc)
After Row 2, place stitch markers to divide the row into sections:
Smaller size stitch distribution (55 stitches total):
Larger size stitch distribution (61 stitches total):
Row 3 (Raglan Increase Row, RS): Ch 2, [hdc to 1 st before marker, 2 hdc in next st, sm, 2 hdc in next st] 4 times, hdc to end, turn. 8 sts increased. (63 hdc) (69 hdc)
Row 4: Ch 2, hdc in each st across, turn. (63 hdc) (69 hdc)
Row 5 (Raglan Increase Row): Ch 2, [hdc to 1 st before marker, 2 hdc in next st, sm, 2 hdc in next st] 4 times, hdc to end, turn. (71 hdc) (77 hdc)
Row 6: Ch 2, hdc in each st across, turn. (71 hdc) (77 hdc)
Row 7 (Raglan Increase Row): Ch 2, [hdc to 1 st before marker, 2 hdc in next st, sm, 2 hdc in next st] 4 times, hdc to end, turn. (79 hdc) (85 hdc)
Row 8: Ch 2, hdc in each st across, turn. (79 hdc) (85 hdc)
Row 9 (Raglan Increase Row): Ch 2, [hdc to 1 st before marker, 2 hdc in next st, sm, 2 hdc in next st] 4 times, hdc to end, turn. (87 hdc) (93 hdc)
Row 10: Ch 2, hdc in each st across, turn. (87 hdc) (93 hdc)
Row 11 (Raglan Increase Row): Ch 2, [hdc to 1 st before marker, 2 hdc in next st, sm, 2 hdc in next st] 4 times, hdc to end, turn. (95 hdc) (101 hdc)
Row 12: Ch 2, hdc in each st across, turn. (95 hdc) (101 hdc)
Checkpoint: Your yoke should measure approximately 3.5 in / 9 cm from the foundation chain at center back.
Underarm Separation
Row 13 (Separation Row, RS): Ch 2, hdc across 14 (15) Front sts to first marker, remove marker, ch 2, skip 18 (19) Sleeve sts to next marker, remove marker, hdc across 27 (29) Back sts to next marker, remove marker, ch 2, skip 18 (19) Sleeve sts to next marker, remove marker, hdc across 14 (15) Front sts to end, turn.
Row 14: Ch 2, hdc across all sts including 2 hdc worked into each ch-2 underarm space, turn.
Smaller: (63 hdc)
Larger: (67 hdc)
Work 2 hdc into each of the 2 chains of the underarm ch-2 space, giving 4 hdc total per underarm.
Bodice
Continue flat rows in hdc:
Rows 15 through 22: Ch 2, hdc in each st across, turn. (63 hdc) (67 hdc)
Checkpoint: The bodice from underarm to needle should measure approximately 2.5 in / 6.5 cm.
Skirt Color Change and Panel Setup
At the end of Row 22, do not turn. Slip stitch the last stitch to the first stitch of the same row to join, forming a ring.
Divide the 63 (67) sts into: Front panel 29 (31) sts in CA, Side/Back 34 (36) sts in MC.
For cleaner color blocks, work the skirt flat in two halves, then seam at sides.
Skirt Front Panel (worked flat in CA)
Row 23F (RS): Join CA at the right side edge of the front panel. Ch 2, hdc in each of 29 (31) front sts, turn. (29 hdc) (31 hdc)
Rows 24F through 28F: Ch 2, hdc across, turn. (29 hdc) (31 hdc)
Row 29F (increase row): Ch 2, [hdc in next 4 sts, 2 hdc in next st] 5 times, hdc in rem 4 (6) sts, turn. (34 hdc) (36 hdc)
Rows 30F through 34F: Ch 2, hdc across, turn. (34 hdc) (36 hdc)
Row 35F (increase row): Ch 2, [hdc in next 5 sts, 2 hdc in next st] 5 times, hdc in rem 4 (6) sts, turn. (39 hdc) (41 hdc)
Rows 36F through 40F: Ch 2, hdc across, turn. (39 hdc) (41 hdc)
Do not fasten off. Set front panel aside.
Skirt Back Panel (worked flat in MC)
Row 23B (RS): Join MC at the right side edge of the back 34 (36) sts. Ch 2, hdc in each of 34 (36) back sts, turn. (34 hdc) (36 hdc)
Row 24B (increase row): Ch 2, [hdc in next 5 sts, 2 hdc in next st] 5 times, hdc in rem 4 (6) sts, turn. (39 hdc) (41 hdc)
Rows 25B through 28B: Ch 2, hdc across, turn. (39 hdc) (41 hdc)
Row 29B (increase row): Ch 2, [hdc in next 6 sts, 2 hdc in next st] 5 times, hdc in rem 4 (6) sts, turn. (44 hdc) (46 hdc)
Rows 30B through 35B: Ch 2, hdc across, turn. (44 hdc) (46 hdc)
Row 36B (increase row): Ch 2, [hdc in next 7 sts, 2 hdc in next st] 5 times, hdc in rem 4 (6) sts, turn. (49 hdc) (51 hdc)
Rows 37B through 40B: Ch 2, hdc across, turn. (49 hdc) (51 hdc)
Joining Skirt and Shell Hem Edging
Join the front and back panels at the side edges using slip stitch on the WS or mattress stitch for an invisible seam. Total hem circumference: 88 sts (92 sts for larger size).
Edging Round 1 (adjustment round): With MC, sc evenly around hem edge, working 2 increases evenly spaced to achieve 90 (96) sc, join with sl st. (90 sc) (96 sc)
Edging Round 2 (shell round): With MC, ch 1, sc in first st, [sk 2 sts, 5 hdc in next st (shell made), sk 2 sts, sc in next st] rep around, join with sl st. (15 shells) (16 shells)
Fasten off and weave in ends.
Skirt Bunny Ear Side Panels
Make 2 outer ears in MC and 2 inner ears in CB.
Outer Ear (make 2, in MC)
Ch 7.
Row 1: Sc in 2nd ch from hook, sc in each ch across, turn. (6 sc)
Rows 2 through 4: Ch 1, sc across, turn. (6 sc)
Row 5 (increase): Ch 1, 2 sc in first st, sc to last st, 2 sc in last st, turn. (8 sc)
Rows 6 through 8: Ch 1, sc across, turn. (8 sc)
Row 9 (increase): Ch 1, 2 sc in first st, sc to last st, 2 sc in last st, turn. (10 sc)
Rows 10 through 14: Ch 1, sc across, turn. (10 sc)
Row 15 (decrease): Ch 1, sc2tog, sc to last 2 sts, sc2tog, turn. (8 sc)
Row 16: Ch 1, sc across, turn. (8 sc)
Row 17 (decrease): Ch 1, sc2tog, sc to last 2 sts, sc2tog, turn. (6 sc)
Row 18: Ch 1, sc across, turn. (6 sc)
Row 19 (decrease): Ch 1, sc2tog, sc to last 2 sts, sc2tog, turn. (4 sc)
Row 20: Ch 1, sc across, turn. (4 sc)
Row 21: Ch 1, sc2tog twice, turn. (2 sc)
Row 22: Ch 1, sc2tog. (1 sc)
Fasten off, leaving a long tail for sewing.
Inner Ear (make 2, in CB)
Ch 5.
Row 1: Sc in 2nd ch from hook, sc across, turn. (4 sc)
Rows 2 through 3: Ch 1, sc across, turn. (4 sc)
Row 4 (increase): Ch 1, 2 sc in first st, sc to last st, 2 sc in last st, turn. (6 sc)
Rows 5 through 8: Ch 1, sc across, turn. (6 sc)
Row 9 (decrease): Ch 1, sc2tog, sc to last 2 sts, sc2tog, turn. (4 sc)
Row 10: Ch 1, sc across, turn. (4 sc)
Row 11: Ch 1, sc2tog twice, turn. (2 sc)
Row 12: Ch 1, sc2tog. (1 sc)
Fasten off, leaving long tail.
Sew inner ear CB pieces centered onto outer ear MC pieces. Then sew completed ear panels to the sides of the skirt front panel, with the bottoms aligned at the waist join.
Bunny Face Embroidery
With black embroidery floss, embroider 2 round eyes using satin stitch. Position eyes approximately 4 rows down from the waist and 2 in / 5 cm apart, centered on the skirt panel.
With black embroidery floss, embroider 6 whisker lines (3 per side) using straight stitch. Each whisker approximately 0.75 in / 2 cm long.
With pink embroidery floss, embroider a small triangular nose centered below the eyes using satin stitch.
With black embroidery floss, embroider short curved lash lines above each eye (3 short strokes per eye curving upward).
Sew or tie the pink ribbon bow at center front at the waistline.
Button Band and Shoulder Closure
With RS facing, join MC at the neck edge of the right front shoulder opening.
Row 1: Ch 1, sc evenly along the right front shoulder edge, approximately 8 sc (10 sc). Turn.
Row 2: Ch 1, sc across. Turn. (8 sc) (10 sc)
Row 3 (buttonhole row): Ch 1, sc 1, [ch 2, sk 2, sc 2] 2 times (3 times for 3 buttons), sc to end. Turn.
Row 4: Ch 1, sc across, working 2 sc into each ch-2 sp. Turn. (8 sc) (10 sc)
Row 5: Ch 1, sc across. Fasten off. (8 sc) (10 sc)
Work a corresponding flat button band (without buttonholes) on the back right shoulder edge, working 5 rows of sc.
Overlap front button band over back button band and sew 3 pearl buttons aligned with the buttonholes.
Neck Edging
With RS facing, join MC at neck edge. Work 1 round of sc evenly around entire neckline, join. Fasten off and weave in ends.
Sleeve Finishing
The dress has cap sleeves formed by the yoke shaping. To finish the sleeve openings:
With RS facing, join MC at the underarm of one sleeve opening.
Round 1: Hdc in each of the 18 (19) held sleeve sts, pick up and hdc in each of the 4 underarm sts, join. (22 hdc) (23 hdc)
Round 2: Ch 1, sc in each st around, join. Fasten off.
Repeat for second sleeve.
Finishing Your Bunny Baby Dress Set
Block all pieces gently by misting with water and pinning to measurements. Let dry completely before assembling.
Weave in all remaining ends securely. For baby items, weave ends back and forth multiple times to prevent unraveling during washing.
Give all seams a final check to make sure buttons are secure and ear panels are firmly attached.
Tips for Success with This Crochet Tutorial
Check your gauge. Seriously. A fitted baby garment needs accurate measurements. Your test swatch saves hours of frustration.
Use stitch markers generously. Mark your raglan points, mark the beginning of rounds, mark where colors change. The more markers, the fewer mistakes.
Block before embroidering. The fabric will shift and settle when blocked. Embroider the face features after blocking for perfect placement.
Consider the recipient’s age. Safety eyes are adorable but not safe for infants under 3 years. Embroidered eyes are just as cute and completely safe.
Photograph your progress. If you need to frog back, photos help you remember where you were.
Thank you so much for choosing this pattern. I hope your Little Cottontail brings as much joy to its recipient as my original did to my niece. The look on a new parent’s face when they see this set is worth every stitch.
If you make this bunny baby dress set, I would absolutely love to see your finished project. Tag me on Instagram or share it in my Facebook group. Seeing your color choices and finishing touches is one of my favorite parts of designing.
Save this crochet pattern to your Pinterest boards so you can find it when you are ready to start. And please leave a comment below if you make it or have any questions along the way. I always love hearing from you.
You Might Also Like
- Ocean Blue Seashell Motif Tote Free Crochet Pattern
- Sage Green Cable Knit Crop Sweater Free Crochet Pattern
- Blue Morpho Butterfly Cape Free Crochet Pattern
- Rust Terracotta Autumn Granny Cardigan Free Crochet Pattern
