Let me address something right away. This gorgeous off-shoulder peplum top looks incredibly complex, but I promise you it’s more approachable than you think. I know what you’re probably thinking as you look at those dramatic puff sleeves and that flirty ruffled hem. "There’s no way I can make that." But here’s the truth. This top is built from basic stitches worked in straightforward sections, then assembled together. If you can single crochet and double crochet, you already have the foundation skills you need. Whether you’re an adventurous beginner ready for your first wearable project or an experienced crocheter looking for a stunning summer statement piece, this crochet pattern breaks everything down into manageable steps that won’t leave you frustrated or confused.
About This Romantic Boho Peplum Top Crochet Pattern
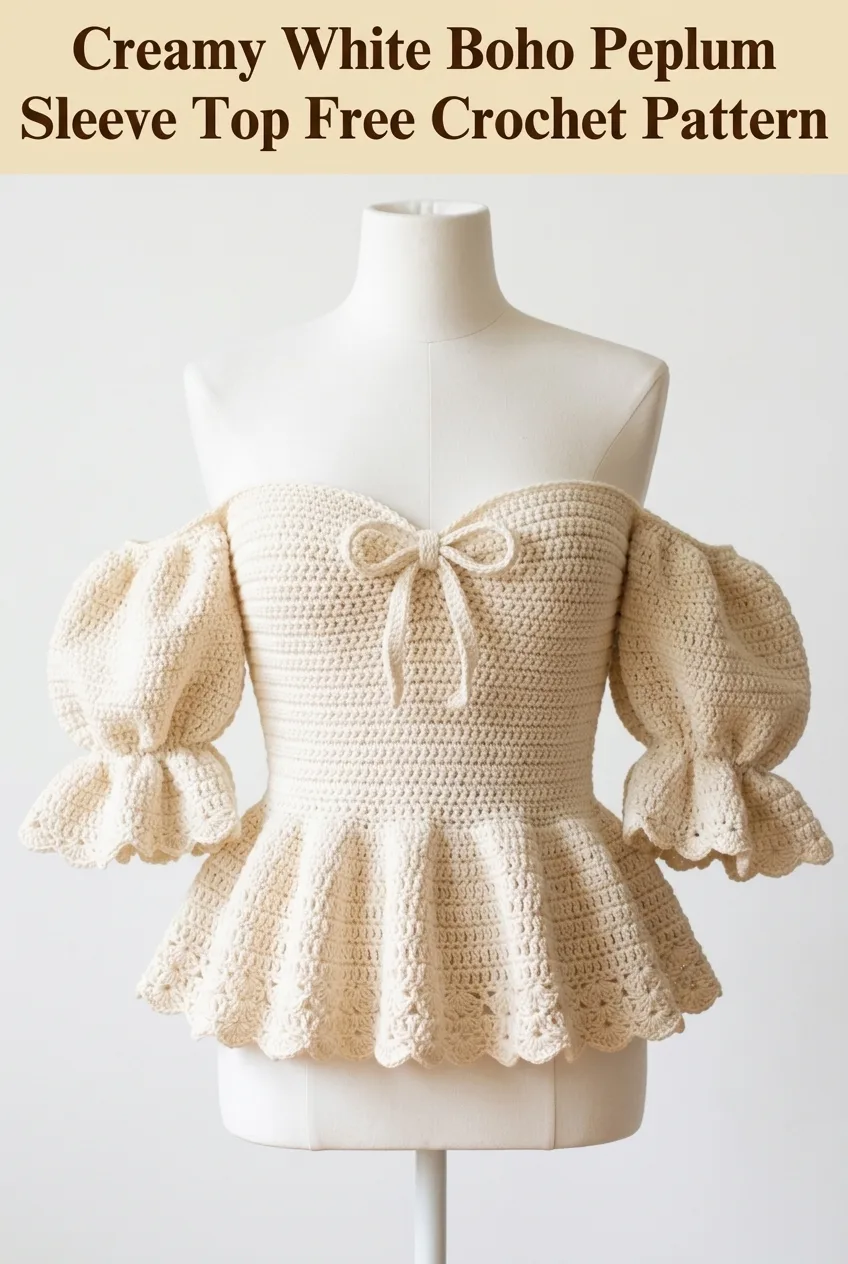
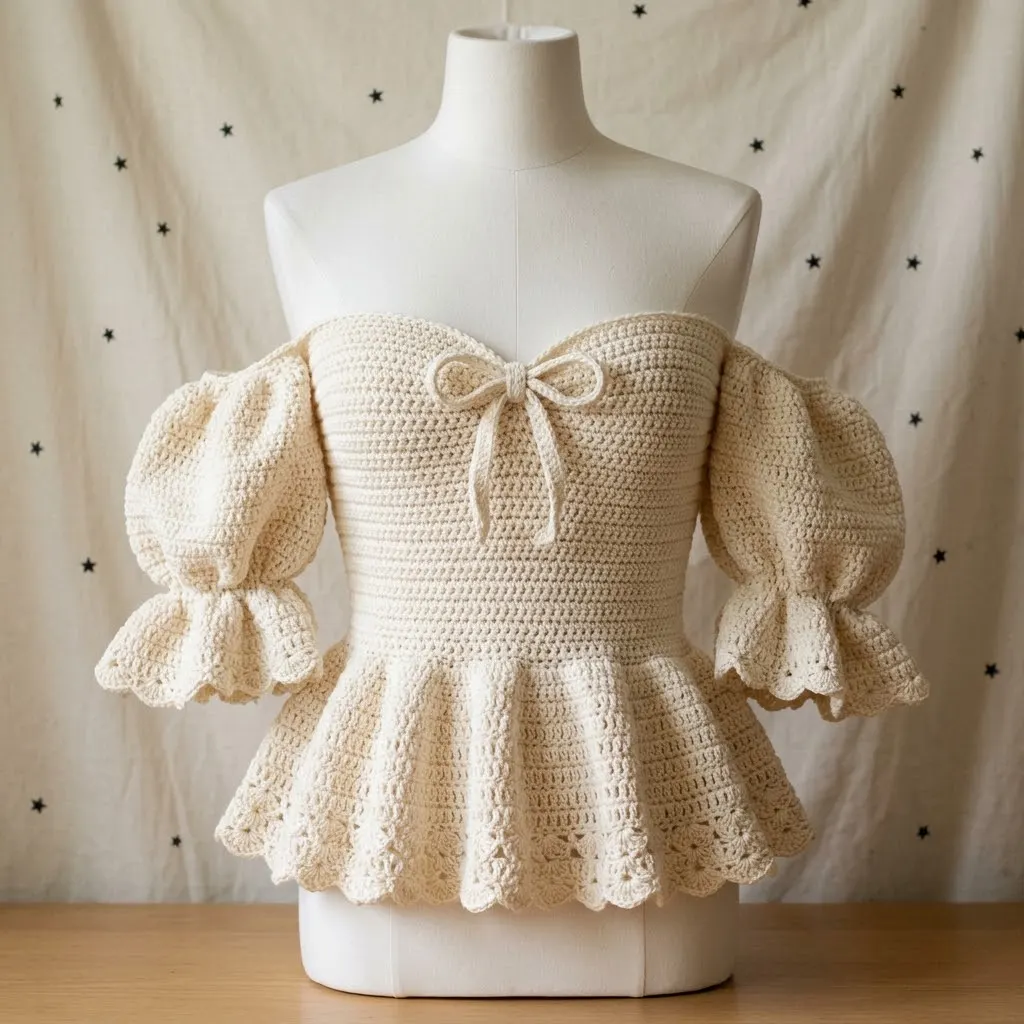
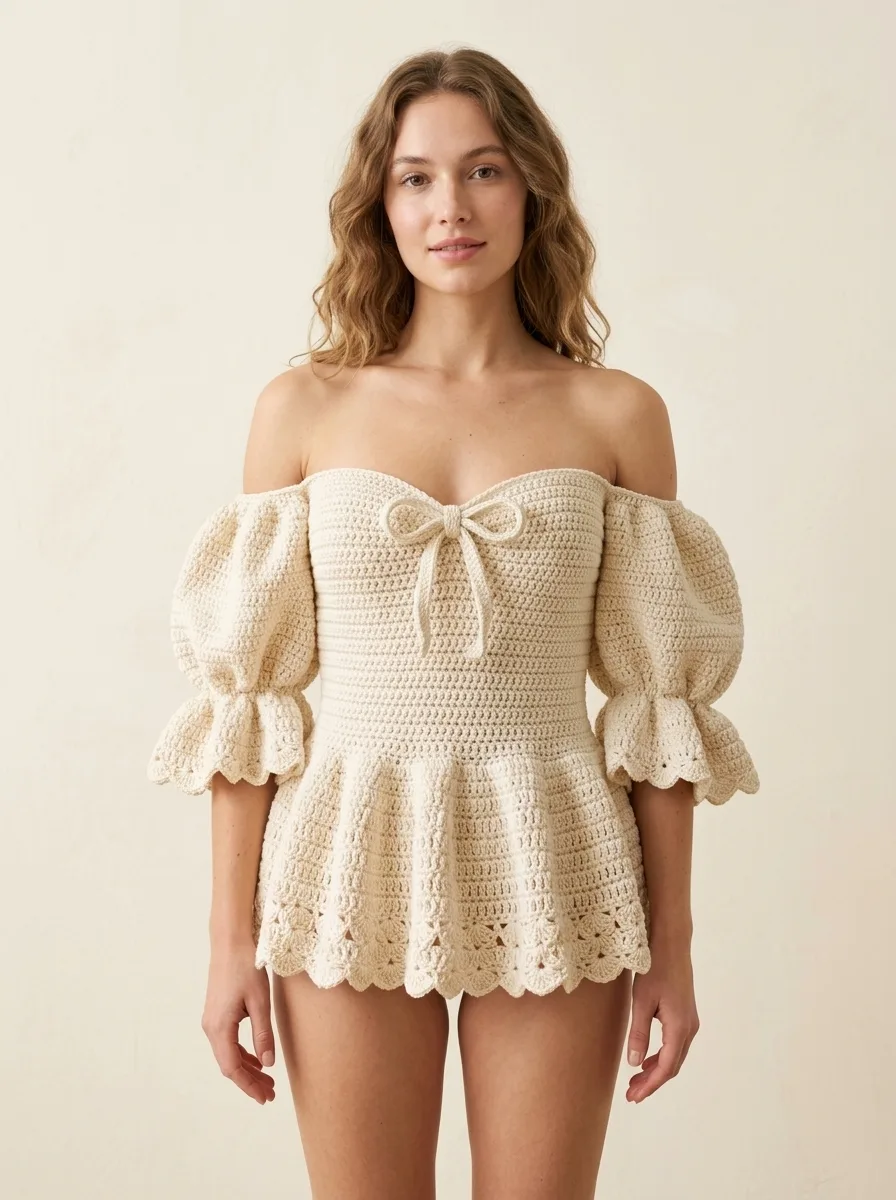
This dreamy off-shoulder top combines cottage-core charm with modern boho elegance. The fitted bodice features clean horizontal ribbing that creates a flattering, structured silhouette. Dramatic puff sleeves gather at the elbow with a sweet ruffled cuff, adding movement and femininity to the design. The peplum hem flares out with gorgeous pleats and a scalloped lace border that catches the light beautifully.
The creamy white yarn gives this piece a vintage, romantic feel that pairs wonderfully with high-waisted jeans, flowy skirts, or linen pants. It’s the kind of top that makes people stop and ask, "Did you really make that?"
Yes. Yes, you did.
Skill Level
Intermediate. This crochet tutorial requires comfort with basic stitches, working in rows and rounds, increasing and decreasing, and assembling multiple pieces. The techniques themselves are beginner friendly, but the construction involves several components that need to be joined carefully.
If you’ve made a simple garment before, like a basic top or cardigan, you’re ready for this project. If this is your first wearable, take your time with each section and don’t rush the finishing.
Finished Measurements
This pattern is written for size Small with notes for adjusting.
Materials Needed
Yarn:
Hook:
Notions:
Gauge
18 stitches and 20 rows = 4 inches in single crochet with 4.0mm hook
Please check your gauge! A fitted garment like this depends on accurate sizing. If your gauge is off, your top won’t fit properly. Make a 5 inch square, wash and block it, then measure. Adjust your hook size up or down as needed.
Abbreviations and Stitch Definitions
Let me define every stitch we’ll use so there’s no confusion as you work through this step by step crochet pattern.
ch = Chain. Wrap yarn over hook, pull through loop on hook. This creates the foundation for most crochet work.
sl st = Slip stitch. Insert hook, yarn over, pull through both the stitch and the loop on your hook in one motion. Used for joining and invisible movement.
sc = Single crochet. Insert hook into stitch, yarn over, pull up a loop (2 loops on hook), yarn over, pull through both loops. This is your shortest basic stitch.
hdc = Half double crochet. Yarn over, insert hook into stitch, yarn over, pull up a loop (3 loops on hook), yarn over, pull through all 3 loops. Slightly taller than single crochet.
dc = Double crochet. Yarn over, insert hook into stitch, yarn over, pull up a loop (3 loops on hook), yarn over, pull through 2 loops, yarn over, pull through remaining 2 loops. Creates a taller, more open fabric.
sc2tog = Single crochet 2 together (decrease). Insert hook in first stitch, pull up loop, insert hook in next stitch, pull up loop (3 loops on hook), yarn over, pull through all 3. This decreases your stitch count by one.
inc = Increase. Work 2 stitches into the same stitch.
BLO = Back loop only. Instead of inserting your hook under both loops of the stitch, insert it only under the back loop. This creates ribbing texture.
FLO = Front loop only. Insert hook only under the front loop.
Pattern Notes Before You Begin
1. The bodice is worked flat in rows, then seamed up the back.
2. The peplum is worked directly onto the bottom edge of the bodice.
3. Sleeves are worked separately and attached at the sides.
4. The bow tie at the center front is crocheted separately and sewn on.
5. Always count your stitches at the end of each row. Write it down if it helps!
Step by Step Crochet Pattern Instructions
Part 1: The Bodice (Front and Back Worked Together)
The bodice is worked in one piece that wraps around the body, with shaping at the top for the sweetheart neckline.
Foundation Row:
Ch 145 (or adjust in multiples of 4 for different sizes).
Row 1 (RS): Sc in 2nd ch from hook and in each ch across. Turn. (144 sc)
Rows 2 through 4: Ch 1, sc in BLO of each st across. Turn. (144 sc)
This back loop only technique creates the horizontal ribbed texture you see in the sample. It’s what gives the bodice that structured, almost knitted appearance.
Rows 5 through 40: Continue working ch 1, sc in BLO of each st across. Turn. (144 sc)
Your bodice should measure approximately 8 inches tall at this point.
Sweetheart Neckline Shaping
Now we’ll shape the curved top edge. This is worked over the next several rows.
Row 41: Ch 1, sc in BLO of first 36 sts. Turn. Leave remaining sts unworked. (36 sc)
Row 42: Ch 1, sc2tog, sc in BLO across to last 2 sts, sc2tog. Turn. (34 sc)
Rows 43 through 46: Repeat Row 42. (26 sc after Row 46)
Row 47: Ch 1, sc in BLO across. Fasten off. (26 sc)
This creates the left front curve.
Center Front Dip:
Skip center 36 stitches from Row 40. These form the sweetheart dip.
Right Front Shaping:
Join yarn to the 73rd stitch from the beginning of Row 40.
Row 41: Ch 1, sc in BLO of next 36 sts. Turn. (36 sc)
Rows 42 through 47: Work same as left front shaping. Fasten off. (26 sc)
Back Shaping (Both Sides):
The remaining stitches on each end form the back. Work 6 more rows of sc in BLO on each back section (36 sts each) without decreasing. This creates the straight back edge that will be seamed.
Part 2: The Peplum
The peplum is worked directly onto the bottom edge of the bodice, creating those gorgeous gathered pleats.
Turn the bodice upside down so the foundation chain is at the top.
Round 1: Join yarn at back seam location. Ch 1, work 144 sc evenly across the foundation edge. Sl st to first sc to join. (144 sc)
Round 2: Ch 3 (counts as dc), dc in same st, 2 dc in each st around. Sl st to top of ch-3. (288 dc)
This doubling creates the gathered, pleated effect.
Rounds 3 through 8: Ch 3, dc in each st around. Sl st to join. (288 dc)
Scallop Border:
Round 9: Ch 1, sc in first st, *skip 2 sts, 5 dc in next st (shell made), skip 2 sts, sc in next st*. Repeat from * around. Sl st to first sc.
Round 10: Sl st to center dc of first shell. Ch 1, sc in same st, *ch 3, sc in center dc of next shell*. Repeat around. Sl st to first sc. Fasten off.
The scalloped lace border adds that beautiful feminine finishing touch.
Part 3: Puff Sleeves
The sleeves are the showstopper of this design. Each sleeve is worked from the shoulder down.
Make 2.
Foundation: Ch 60. Sl st to first ch to form ring, being careful not to twist.
Round 1: Ch 1, sc in each ch around. Sl st to first sc. (60 sc)
Rounds 2 through 6: Ch 3, dc in each st around. Sl st to join. (60 dc)
Round 7 (Increase Round): Ch 3, *dc in next 2 sts, 2 dc in next st*. Repeat around. Sl st to join. (80 dc)
Rounds 8 through 14: Ch 3, dc in each st around. Sl st to join. (80 dc)
This creates the puff volume in the upper sleeve.
Gathering Round:
Round 15: Ch 1, *sc in next st, sc2tog*. Repeat around. Sl st to join. (approximately 54 sc)
Round 16: Ch 1, *sc2tog*. Repeat around. Sl st to join. (approximately 27 sc)
This dramatic decrease creates the gathered effect at the elbow.
Ruffle Cuff:
Round 17: Ch 3, 2 dc in each st around. Sl st to join. (54 dc)
Rounds 18 through 22: Ch 3, dc in each st around. Sl st to join. (54 dc)
Cuff Scallop Border:
Work same scallop border as peplum (Rounds 9 and 10 from peplum instructions).
Fasten off.
Part 4: Bow Tie
The sweet bow at center front ties the whole look together.
Tie Strands (Make 2):
Ch 80. Sc in 2nd ch from hook and each ch across. Fasten off. (79 sc)
Weave ties through the center front stitches where the sweetheart curves meet. Tie in a bow.
Assembly Instructions
1. Seam the back: With yarn needle and matching yarn, whip stitch or mattress stitch the back edges together from bottom of bodice to top.
2. Attach sleeves: Position each puff sleeve at the side of the bodice, approximately 2 inches below the top edge. The sleeve opening should align with the side of the bodice. Whip stitch in place, distributing the sleeve evenly.
3. Weave bow ties: Thread ties through stitches at center front neckline. Adjust and tie.
4. Weave in all ends. Take your time here. Loose ends can unravel and ruin your beautiful work.
Finishing and Care
Blocking: Wet block your finished top by soaking it in cool water for 15 minutes, then gently squeezing out excess water (don’t wring!). Lay flat on a towel and shape to measurements. Let dry completely.
Washing: Hand wash in cool water with mild detergent. Lay flat to dry. Cotton yarn may stretch when wet, so handle gently.
Customization Tips
For a larger size: Add stitches to your foundation chain in multiples of 4. Add 16 stitches for each size up (approximately 2 inches).
For a longer bodice: Add more rows before the sweetheart shaping.
For shorter sleeves: Stop the puff section earlier and begin the gathering round sooner.
Different colors: This design looks stunning in dusty rose, sage green, or classic black. Two-tone versions with a contrasting peplum and cuffs would be gorgeous too.
Troubleshooting Common Issues
Bodice too tight? Go up a hook size or add stitches to your foundation.
Peplum not flaring enough? Make sure you doubled every stitch in Round 2 of the peplum.
Sleeves not puffy enough? Add another increase round before the gathering.
Sweetheart neckline looks wonky? Block it! Pinning and blocking will smooth out any unevenness.
Why You’ll Love This Boho Peplum Top
This crochet pattern gives you a true statement piece. It’s the kind of handmade garment that looks like it came from a boutique. The combination of fitted structure and romantic flourishes creates something special that works for date nights, summer parties, photo sessions, or just feeling fabulous on a Tuesday.
The construction might seem ambitious at first glance, but each section builds logically on the last. Take it piece by piece, and before you know it, you’ll have a stunning top that showcases your crochet skills beautifully.
Thank you so much for choosing this pattern for your next project! I genuinely can’t wait to see your version of this romantic peplum top. If you make one, please share your photos with me on Instagram or in my Facebook group. Seeing your creations is honestly the best part of designing.
If this pattern inspired you, go ahead and save it to your Pinterest boards so you can find it easily when you’re ready to start. And please drop a comment below if you make this top or have any questions along the way. I love hearing from you, and your feedback helps other makers feel confident jumping in too. Happy crocheting!
