
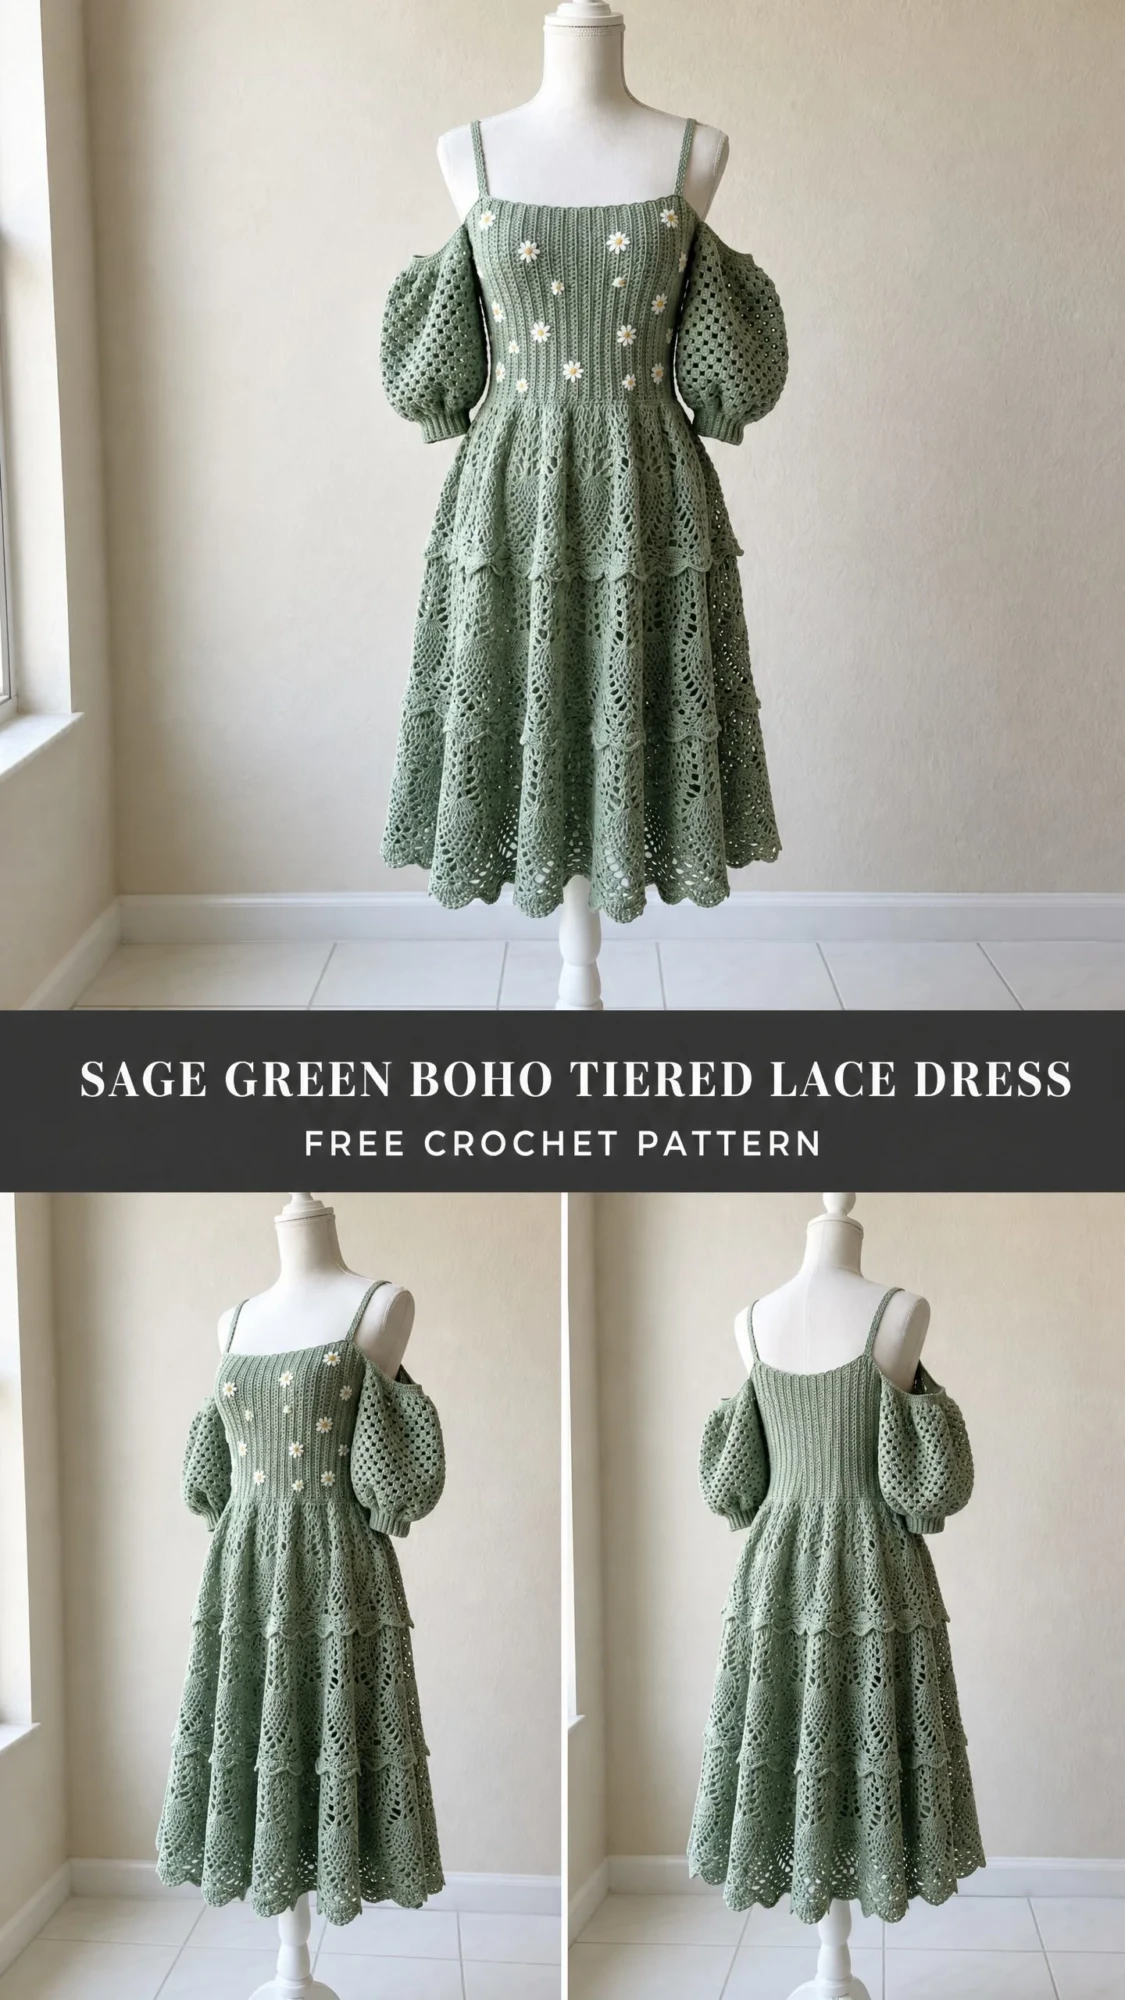
Looking for a stunning statement piece that will turn heads at summer weddings, garden parties, or beach vacations? This sage green boho tiered lace dress delivers exactly that. The construction combines a fitted ribbed bodice with three flowing lace tiers that create gorgeous movement when you walk. You will learn fan lace stitching, work detachable off-shoulder puff sleeves, and add sweet daisy appliques for that perfect bohemian finish.

This dress works up beautifully in DK weight cotton or cotton-blend yarn, making it breathable and comfortable for warm weather. The fitted bodice flatters your shape while the tiered skirt offers that dreamy, romantic silhouette everyone loves. If you have been wanting to challenge yourself with a garment project that looks way more complicated than it actually is, this crochet pattern is your perfect match.
Whether you are making this for yourself, a bridal shower gift, or a special occasion, the finished piece looks absolutely boutique-worthy. I have broken down every section into manageable steps so you can tackle this project with confidence. Let me walk you through everything you need to know.
Pattern Details at a Glance
Skill Level: Advanced Beginner to Intermediate
Finished Measurements (Size Small, US 4-6):
Time Estimate: 40 to 60 hours total
Materials You Will Need
Yarn:
Hooks:
Additional Supplies:
Recommended Yarn Choices
Lion Brand 24/7 Cotton in Sage works wonderfully here. This 100% mercerized cotton gives excellent stitch definition for the lace pattern and beautiful drape. You will need approximately 9 to 10 skeins.
Paintbox Yarns Simply DK offers a budget-friendly alternative. This 100% acrylic yarn in Grass Green or Misty Green is lightweight with good drape. Plan for 12 to 14 skeins.
Drops Safran features a 70% cotton and 30% viscose blend that adds gorgeous luster. The viscose content makes the lace absolutely shine. You will need 10 to 11 skeins.
Avoid stiff acrylics or fuzzy fibers that will obscure your beautiful lace work. Cotton and cotton-blend yarns photograph beautifully and hold the stitch definition you want.
Gauge Information
Getting gauge right matters a lot for a garment like this. Take the time to swatch before diving in.
Bodice Ribbing Gauge (E-4 / 3.5 mm hook):
18 single crochet (sc) x 22 rows = 4 inches / 10 cm in ribbed single crochet worked in back loop only
Lace Skirt Gauge (F-5 / 3.75 mm hook):
One full fan lace repeat (14 stitches wide) = approximately 2.75 inches / 7 cm
4 rows of fan lace pattern = approximately 2 inches / 5 cm
Work a 6 inch swatch in each gauge section before beginning. A larger hook will widen and lengthen the dress. A smaller hook will tighten and shorten it.
Abbreviations Used
Special Stitches Explained
Fan Lace Stitch
This creates the gorgeous open shell pattern for all three skirt tiers. It works over a multiple of 14 stitches plus 2.
Setup Row/Round: Work sc in first st, (sk 2 sts, 5 dc in next st, sk 2 sts, sc in next st, ch 3, sc in next st) across, ending with sk 2 sts, 5 dc in next st, sk 2 sts, sc in last st.
Continuation Row/Round: Ch 3, turn. Work 2 dc in first sc (half shell begun), sc in 3rd dc of next 5-dc shell, ch 3, sc in same dc, (5 dc in next sc, sc in 3rd dc of next shell, ch 3, sc in same dc) across to last sc, 3 dc in last sc (half shell completed).
For working in the round, do not turn. Join with sl st at the end of each round.
Daisy Applique
Round 1: With white yarn and E-4 hook, make a magic ring, ch 1, work 6 sc into ring, join with sl st to first sc. (6 sc)
Round 2: Ch 1, (sc in next st, ch 5, sl st in 2nd ch from hook, sc in next ch, hdc in next ch, dc in last ch, sl st into base sc again) 6 times, join with sl st to first sc. (6 petals)
Fasten off white. With yellow yarn, weave through the center ring and cinch slightly, knotting on the WS to secure.
Shell Stitch
Work 5 dc into a single stitch or chain space.
Step-by-Step Pattern Instructions
Section 1: Spaghetti Straps (Make 2)
With sage green yarn and E-4 hook, ch 50.
Row 1: Sc in 2nd ch from hook and in each ch across. (49 sc)
Fasten off leaving a long tail for sewing. Set straps aside.
Each strap measures approximately 10 inches / 25 cm. Adjust the starting chain if needed. Every 6 chains equals approximately 1 inch at gauge.
Section 2: Bodice Back Panel
The bodice uses lengthwise ribbing, meaning rows run vertically on the body. You will crochet a long strip and seam it into a tube.
With sage green yarn and E-4 hook, ch 41.
Row 1 (RS): Sc in 2nd ch from hook and in each ch across. (40 sc)
Row 2: Ch 1, turn, sc in blo of each st across. (40 sc)
Repeat Row 2 until the panel measures 17 inches / 43 cm from beginning (approximately 76 rows total).
Fasten off with a long tail for seaming.
Checkpoint: Your back panel should measure 17 inches wide and 7 inches tall.
Section 3: Bodice Front Panel
Work exactly as for the Bodice Back Panel through the same number of rows.
Before fastening off, work the strap attachment points:
Strap attach right: With RS facing, sl st across the first 6 sts, ch 1, sc in same st as last sl st and in next 6 sts, sl st, fasten off.
Strap attach left: Rejoin yarn at the last 6 sts of the same edge, sc across those 6 sts, fasten off.
Section 4: Bodice Assembly
With WS together, hold front and back panels with long edges aligned. Using a yarn needle and mattress stitch, seam the two side edges together. Leave the top edge open for armholes and the bottom edge open for skirt attachment.
Attach the straps at each marked attachment point on the front panel top edge and at corresponding points on the back panel. Sew securely through several rows of ribbing.
Checkpoint: The assembled bodice tube should measure approximately 34 inches circumference at the bust and 28 inches at the waist edge.
Section 5: Waistband
With RS facing, join sage green yarn at the right side seam of the bodice bottom edge with E-4 hook.
Rnd 1: Ch 1, sc evenly around the entire bottom edge, working approximately 1 sc per row end. Work exactly 154 sc total, join with sl st to first sc. (154 sc)
This count is crucial. 154 divides evenly by 14 (the fan lace repeat). Check your count carefully before proceeding.
Section 6: Skirt Tier 1
Switch to F-5 / 3.75 mm hook.
Rnd 1 (Fan setup round): Ch 3 (counts as first dc), (sc in next st, sk 2 sts, 5 dc in next st, sk 2 sts, sc in next st, ch 3) 11 times, join with sl st to top of beginning ch-3. (11 fan repeats, 11 ch-3 arches)
Rnd 2: Sl st into first ch-3 sp, ch 3, 2 dc in same ch-3 sp (half shell), sc in 3rd dc of first 5-dc shell, ch 3, sc in same dc, (5 dc in next ch-3 sp, sc in 3rd dc of next 5-dc shell, ch 3, sc in same dc) 10 times, 2 dc in same first ch-3 sp as beginning, join with sl st to top of ch-3. (11 fan shells)
Rnds 3 through 6: Repeat Rnd 2 pattern.
Rnd 7 (Scallop closing edge): Ch 1, sc in joining sl st, (ch 2, sl st in top of next dc, ch 2, sc in next dc, ch 2, sl st in next dc, ch 2, sc in sc between shells) across, join with sl st to first sc. Fasten off.
Checkpoint: Tier 1 should hang approximately 4 inches below the waistband.
Section 7: Skirt Tier 2
With F-5 hook, join sage green yarn at any ch-3 arch of Tier 1 Round 6.
Increase foundation round: Working into the ch-3 arches and sc points of Tier 1 Round 6, distribute increases to reach exactly 196 stitches. Work (sc, ch 1, sc, ch 1, sc) into each arch and sc into each sc-between-shells. Join with sl st. (196 sc)
Tier 2 Rnd 1 (Fan setup): (Sc in next st, sk 2 sts, 5 dc in next st, sk 2 sts, sc in next st, ch 3) 14 times, join with sl st. (14 fan repeats)
Tier 2 Rnds 2 through 8: Work the fan lace continuation rounds exactly as Tier 1.
Tier 2 Rnd 9 (Scallop closing edge): Ch 1, sc in joining sl st, (ch 2, sl st in top of next dc, ch 2, sc in next dc, ch 2, sl st in next dc, ch 2, sc in sc between shells) across, join with sl st to first sc. Fasten off.
Checkpoint: The skirt should hang approximately 10 inches below the waistband.
Section 8: Skirt Tier 3
With F-5 hook, join sage green yarn at any arch of Tier 2 Round 8.
Increase foundation round: Distribute increases to reach exactly 252 stitches. Work (sc, ch 1, sc, ch 1, sc, ch 1, sc, ch 1, sc) into each ch-3 arch, and (sc, ch 1, sc, ch 1, sc, ch 1, sc) into each sc-between-shells. Join with sl st. (252 sc)
Tier 3 Rnd 1 (Fan setup): (Sc in next st, sk 2 sts, 5 dc in next st, sk 2 sts, sc in next st, ch 3) 18 times, join with sl st. (18 fan repeats)
Tier 3 Rnds 2 through 14: Work the fan lace continuation pattern for 14 total rounds.
Tier 3 Rnd 15 (Scallop closing edge): Ch 1, sc in joining sl st, (ch 2, sl st in top of next dc, ch 2, sc in next dc, ch 2, sl st in next dc, ch 2, sc in sc between shells) across, join with sl st to first sc. Fasten off.
Checkpoint: The full dress should measure approximately 40 to 42 inches from strap top to hem.
Section 9: Off-Shoulder Puff Sleeves (Make 2)
Cuff:
With E-4 hook and sage green yarn, ch 26, join with sl st to form a ring.
Rnd 1: Ch 1, sc in blo of each ch around, join with sl st to first sc. (26 sc)
Rnds 2 through 8: Ch 1, sc in blo of each sc around, join with sl st. (26 sc)
Cuff to sleeve body transition:
Switch to F-5 hook.
Rnd 9 (increase round): Ch 3, (dc in next sc, 2 dc in next sc) 13 times, dc in last sc, join with sl st to ch-3. (40 dc)
Rnd 10: Ch 4 (dc plus ch-1), (sk 1 dc, dc in next dc, ch 1) 20 times, join. (20 dc, 20 ch-1 sps)
Rnds 11 through 14: Ch 4, (dc in next dc, ch 1) 20 times, join. (20 dc, 20 ch-1 sps)
Rnd 15 (puff expansion): Ch 1, (sc in dc, 2 sc in ch-sp) around, join. (60 sc)
Rnd 16: Ch 3, (2 dc in each sc) around, join. (120 dc)
Rnds 17 and 18: Ch 3, dc in each dc around, join. (120 dc)
Rnd 19 (begin gathering): Ch 3, (dc2tog over next 2 dc, dc in next 2 dc) 30 times, join. (90 dc)
Rnd 20: Ch 3, (dc2tog over next 2 dc, dc in next dc) 30 times, join. (60 dc)
Rnd 21 (drawstring round): Ch 1, sc in each dc around, join. (60 sc)
Top edge finishing: Cut a 30 inch length of sage green yarn. Thread through yarn needle and weave in and out through each sc of Rnd 21. This drawstring gathers the top of the sleeve.
Make second sleeve identically.
Sleeve attachment: Position each sleeve at the upper arm area of the bodice, centered at the side seam. Pull the drawstring to gather the top edge to approximately 12 inches. Knot the drawstring. Sew the gathered top edge to the bodice approximately 1.5 inches below the strap attachment points.
Section 10: Daisy Appliques (Make 10 to 15)
Using white yarn and E-4 hook, work the Daisy Applique as described in the Special Stitches section. Make 10 to 15 daisies. After blocking, scatter them across the front bodice panel in a casual arrangement, clustered more densely near center and scattered toward the waist. Sew each daisy securely using white yarn.
Size Customization Tips
To adjust the bust: Add or subtract 7 stitches to each bodice panel starting chain. This changes the bust by approximately 1.5 inches. Keep your waistband pickup count as a multiple of 14.
To widen the skirt: Add one fan lace repeat (14 stitches) to each tier. For M/L/XL, the tier counts become 12/15/19 repeats respectively.
To lengthen: Add 2 rounds to each tier for approximately 2 inches more length. To shorten, reduce Tier 3 rounds first.
For straps: Adjust in increments of 6 chains per 1 inch of length change.
Finishing and Blocking
Weave in all ends securely on the WS. Hand wash the dress in cool water with gentle wool or cotton wash. Press out excess water gently without wringing.
Lay the dress flat on blocking mats. Stretch and pin each lace tier to open the fan pattern fully. Pin scalloped edges evenly. Allow to dry completely flat, which may take 12 to 24 hours.
Once dry, sew daisy appliques to the blocked bodice. Attach straps and sleeves if not already done.
Care Instructions
Machine wash cold on gentle cycle if your yarn allows. Hand wash is recommended for cotton-blends. Lay flat to dry. Do not tumble dry or bleach. Cool iron on WS only if needed. Store folded flat or on a padded hanger.
Final Thoughts on This Crochet Dress Pattern
This sage green boho tiered lace dress is truly a showstopper. The combination of the fitted ribbed bodice, romantic puff sleeves, and those flowing lace tiers creates something genuinely special. Yes, it takes time and attention, but you will have a handmade dress that looks like it came from a high-end boutique.
I hope this crochet tutorial gives you all the confidence you need to tackle this beautiful project. Take it one section at a time, trust your gauge swatches, and enjoy watching those gorgeous lace tiers come together.
If you loved this pattern, save it to your Pinterest boards so you can find it easily when you are ready to start. And please, I would absolutely love to see your finished dresses. Drop a comment below or tag me on Instagram or Facebook with your photos. Happy crocheting!
You Might Also Like
- Sage Green Boho Crochet Lace Boots Free Pattern
- Sage Green Mini Round Bag Free Crochet Pattern
- Buttercream Yellow Dragon Amigurumi Plush Free Crochet Pattern
- Sunset Mermaid Amigurumi Doll Free Crochet Pattern
