
THIS is one of those projects that will absolutely stop people in their tracks. I’m talking a full showstopper dress that looks like it walked out of a boutique window, but you’re going to make it yourself with a hook and some cotton yarn. The tiered skirt, the ombre fade, those gorgeous scalloped hems. It’s ALL here.
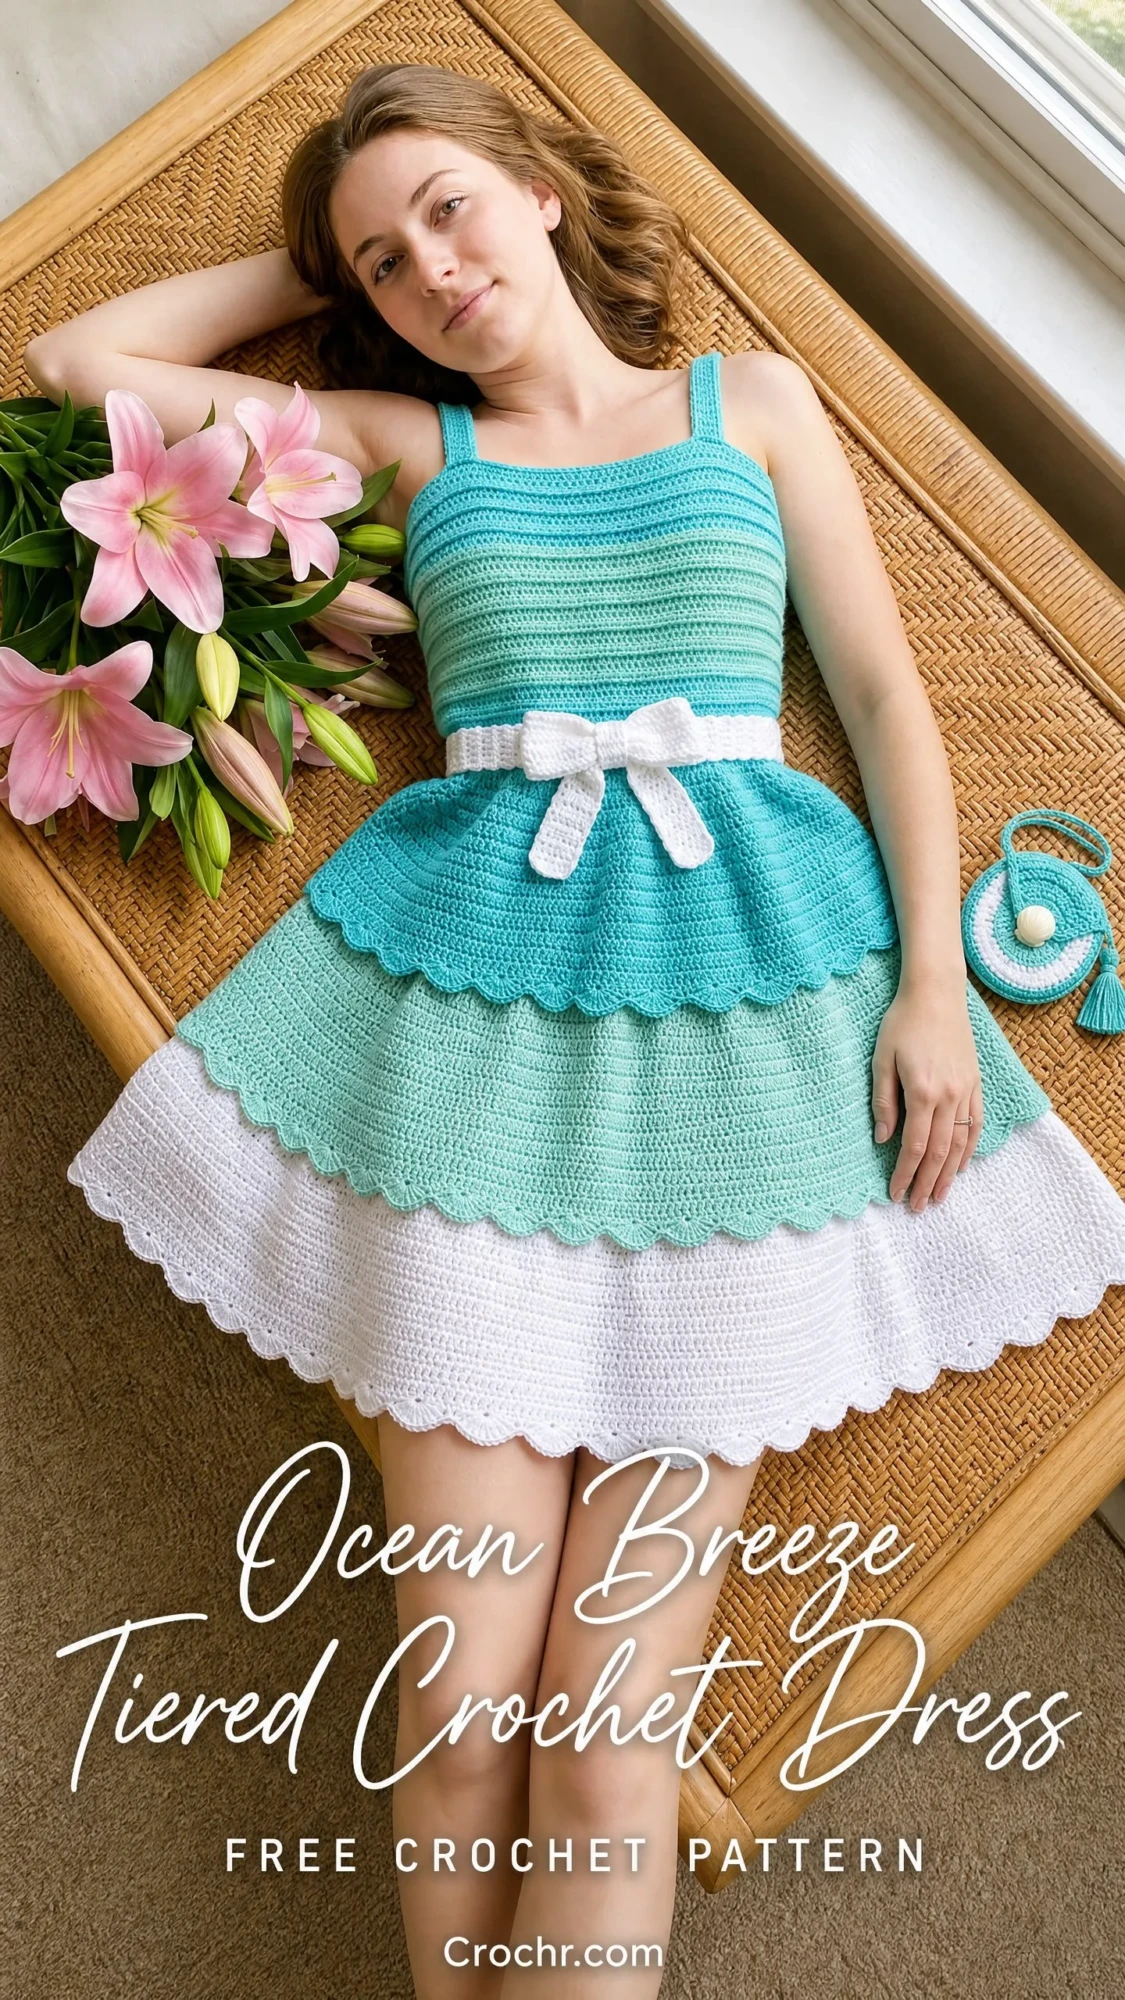
Now, I won’t sugarcoat it. This isn’t a weekend project. We’re looking at 20 to 30 hours of work depending on your pace. But here’s the thing. Every single hour is worth it because you’ll end up with a completely custom, fitted summer dress that nobody else owns. Plus a matching mini crossbody bag because why not?
If you’ve been wanting to level up your crochet skills and create something truly wearable, this Ocean Breeze Tiered Crochet Dress pattern is your moment. Let’s dive in.
What Makes This Crochet Dress Pattern Special
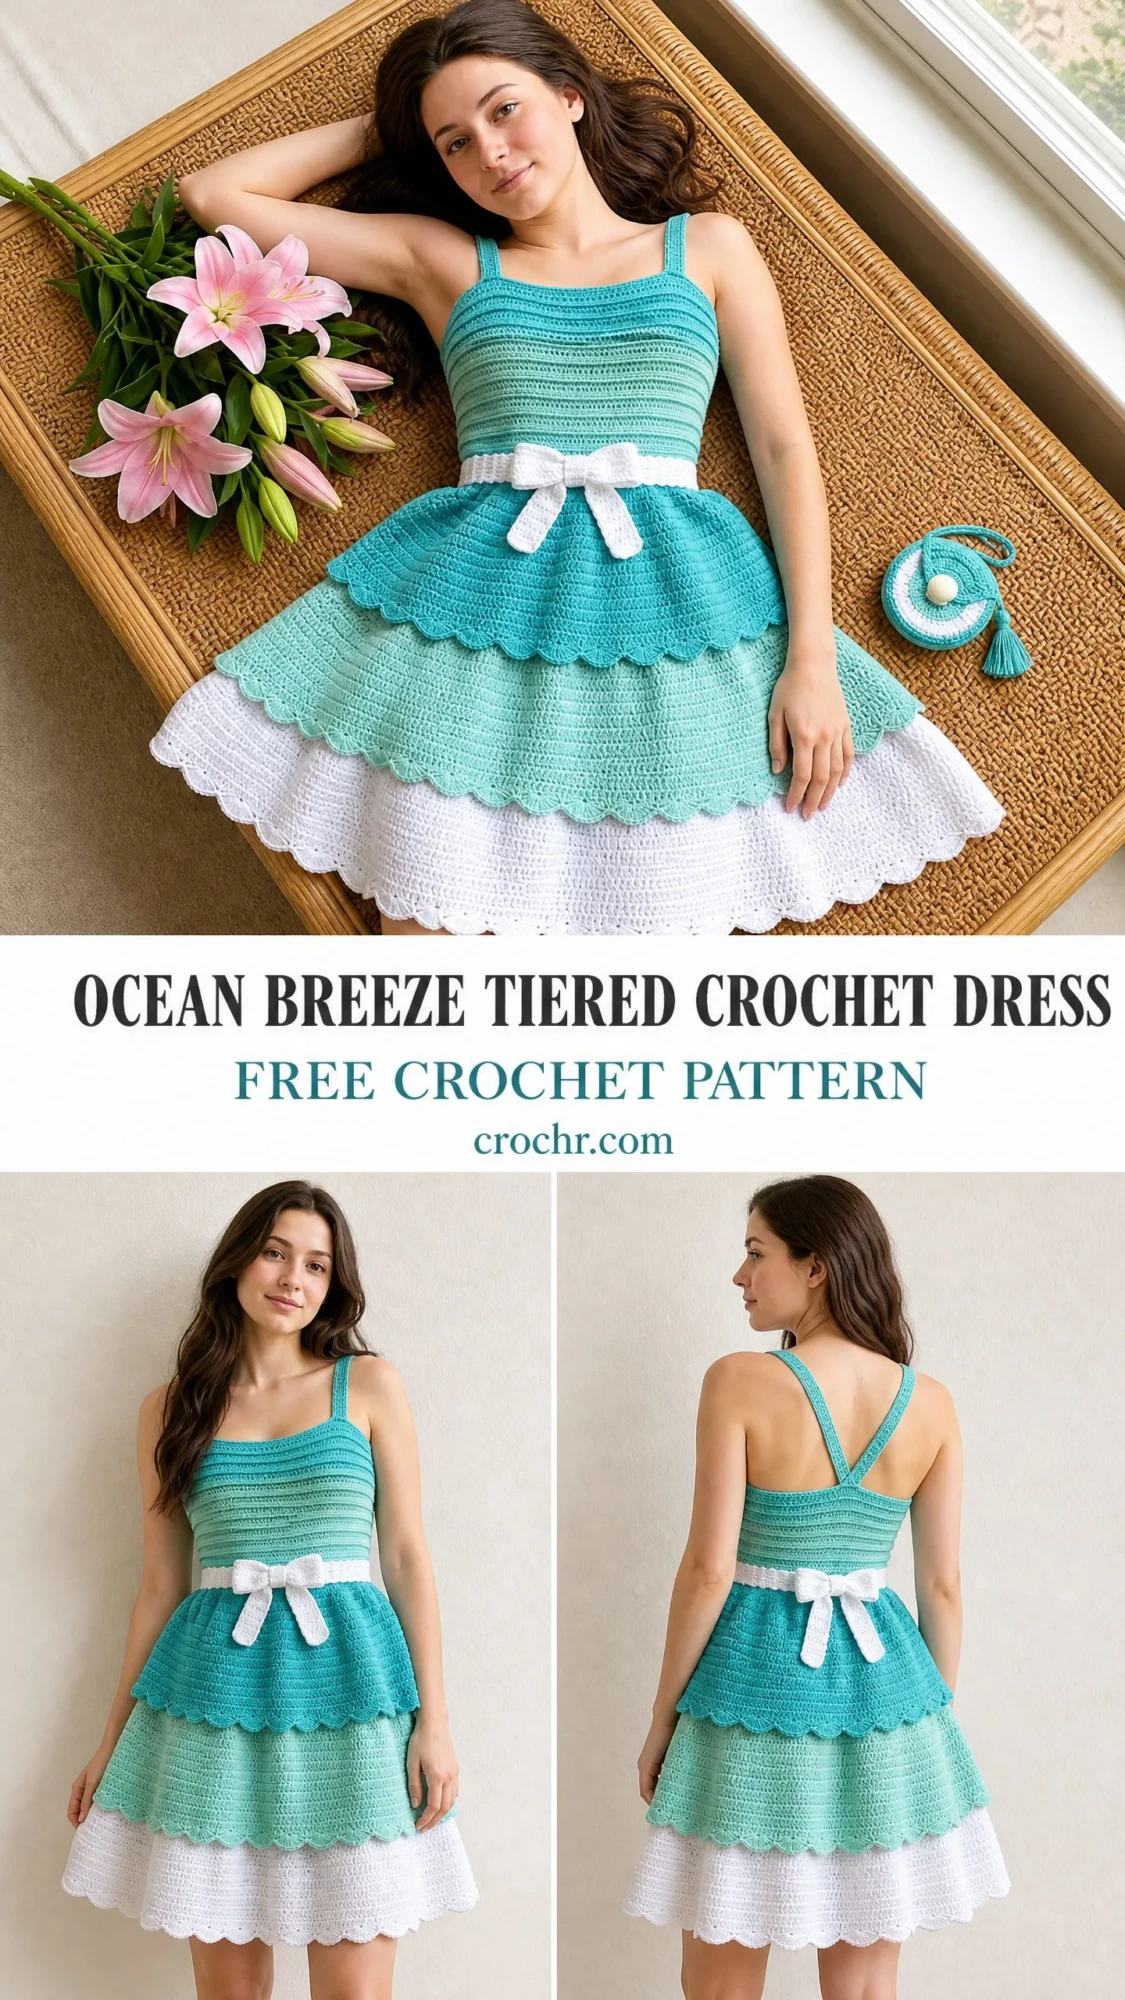
This dress features a fitted bodice with a square neckline and sweet spaghetti straps. The real magic happens below the waist, where three graduated tiers cascade from deep aqua through mint green to crisp white. Each tier ends with a shell stitch scallop edging that gives the hem that beautiful wave-like finish you see in the photos.
The construction is clever and totally doable. You’ll work the bodice flat in two panels, seam them together, then pick up stitches and work the skirt tiers in the round going downward. This top-down approach means you can try it on as you go and adjust the length if needed.
The ombre effect in the bodice comes from alternating colors every two rows. It sounds fancy, but it’s really just changing yarn at regular intervals. If you can single crochet and follow a color sequence, you can absolutely nail this technique.
Skill Level and Time Commitment
I’m rating this pattern as intermediate. You’ll need to be comfortable working both flat and in the round, executing even increases, joining new yarn for color changes, and creating those shell stitch scallops with consistent tension.
The techniques involved include:
If you’re an adventurous beginner who has completed a few projects and wants a challenge, go for it. Just take your time and trust the process.
Estimated completion time: 20 to 30 hours depending on your working pace.
Finished Measurements
This pattern is written for Women’s Small (US size 4 to 6) with adjustment instructions included for other sizes.
Materials You’ll Need
Yarn
You’ll need worsted weight cotton or cotton-blend yarn in three colors:
Yarn suggestions that work beautifully:
1. Lion Brand 24/7 Cotton in Turquoise (A), Sage (B), and White (C). This 100% mercerized cotton has excellent stitch definition and washes like a dream.
2. Paintbox Yarns Simply DK Cotton in Duck Egg Blue (A), Spearmint (B), and Paper White (C). Slightly lighter than true worsted but achieves gauge with a 4.0 mm hook for most crocheters.
3. Drops Safran in Turquoise (A), Light Mint (B), and Off White (C). A 100% Egyptian cotton with a matte finish that creates crisp fabric perfect for tiered construction.
Important note: Choose yarn with low stretch and high stitch definition. Pure acrylic is not recommended because cotton or cotton-blend yarns give the structured tiers their stability and those clean scalloped edges.
Hook
US Size G-6 / 4.0 mm hook (adjust to match gauge)
Notions
Gauge
Getting gauge right is critical for this fitted bodice. Please take time to check yours.
18 single crochet stitches x 22 rows = 4 inches / 10 cm worked flat in single crochet
18 single crochet stitches x 22 rounds = 4 inches / 10 cm worked in the round in single crochet
To check gauge: Work a 5 inch / 12.5 cm square in single crochet. Block lightly. Measure the center 4 inches. If you have more stitches than stated, go up a hook size. Fewer stitches? Go down a hook size.
Abbreviations and Stitch Definitions
Let me break down every abbreviation you’ll encounter. I’m defining these in plain English so nothing catches you off guard.
Special Stitches Explained
Shell Stitch
This creates the fan shape for each scallop point along the tier hems. Work 5 double crochet stitches into the same stitch or space. That’s it. Five dc in one spot creates a lovely shell shape.
Scallop Edging
This is the decorative border at the bottom of each tier. Here’s how it works:
1. Skip 2 stitches
2. Work 5 dc (a shell) into the next stitch
3. Skip 2 stitches
4. Slip stitch into the next stitch
5. Repeat steps 1 through 4 around
This is a 6-stitch repeat. The pattern ensures your stitch counts are multiples of 6 before you start the scallop edging.
Picot (Optional)
For extra detail at the tips of your shells: chain 3, then slip stitch into the first chain you made. This creates a small decorative loop.
Pattern Notes Before You Begin
Read these through before starting. They’ll save you confusion later.
1. The bodice is worked flat in two identical panels (front and back), then seamed at the sides.
2. The straps are extensions of the front and back panels worked in narrow rows.
3. All three skirt tiers are worked in the round, picking up stitches from the bottom of the previous tier’s last row (not the scallop edging).
4. Tier 1 uses Color A. Tier 2 uses Color B. Tier 3 uses Color C.
5. The ombre effect comes from alternating 2 rows each of Color A and Color B in the bodice.
6. Do not turn after joining rounds. Use a stitch marker to track the start of each round.
7. Chain 3 turning chains at the start of double crochet rows count as the first dc.
8. All stitch counts in parentheses reflect actual working stitches, not counting turning chains unless specified.
Ocean Breeze Tiered Crochet Dress Instructions
Bodice Front Panel
Foundation: With Color A and a 4.0 mm hook, chain 65.
Row 1 (RS): Sc in 2nd ch from hook and in each ch across. Turn. (64 sc)
Row 2 (WS): Ch 1, sc in each st across. Turn. (64 sc)
Rows 3 and 4: With Color B, ch 1, sc in each st across. Turn. (64 sc each row)
Rows 5 and 6: With Color A, ch 1, sc in each st across. Turn. (64 sc each row)
Rows 7 and 8: With Color B, ch 1, sc in each st across. Turn. (64 sc each row)
Rows 9 and 10: With Color A, ch 1, sc in each st across. Turn. (64 sc each row)
Rows 11 and 12: With Color B, ch 1, sc in each st across. Turn. (64 sc each row)
Rows 13 and 14: With Color A, ch 1, sc in each st across. Turn. (64 sc each row)
Rows 15 and 16: With Color B, ch 1, sc in each st across. Turn. (64 sc each row)
Rows 17 and 18: With Color A, ch 1, sc in each st across. Turn. (64 sc each row)
Rows 19 and 20: With Color B, ch 1, sc in each st across. Turn. (64 sc each row)
Rows 21 through 24: Continue alternating 2 rows each of Color A and Color B. (64 sc each row)
At the end of Row 24, the bodice panel measures approximately 4.5 inches / 11.5 cm.
Rows 25 through 28: Continue alternating. (64 sc each row)
Rows 29 through 34: With Color B only, ch 1, sc in each st across. Turn. (64 sc each row)
Rows 35 through 40: With Color A only, ch 1, sc in each st across. Turn. (64 sc each row)
At the end of Row 40, the bodice panel measures approximately 7.25 inches / 18.5 cm from foundation.
Rows 41 through 50: Ch 1, sc in each st across. Turn. (64 sc each row)
At the end of Row 50, the bodice front panel is complete and measures approximately 9 inches / 23 cm from foundation.
Fasten off. Weave in ends.
Checkpoint: Front panel should measure 14 inches / 35.5 cm wide and 9 inches / 23 cm tall laid flat.
Bodice Back Panel
Repeat all 50 rows exactly as the bodice front panel. (64 sc at all rows)
Fasten off. Weave in ends.
Joining Side Seams
Hold front and back panels with right sides together. Using Color A, slip stitch through both layers along each side edge for 9 inches / 23 cm (the full height of the bodice panels). Leave the top edge open for neckline and strap attachment. Leave the bottom edge open for skirt tier attachment. Turn right side out.
The bodice is now a tube of 128 stitches around, with open top and open bottom.
Neckline Shaping and Straps
The neckline is a simple straight square neck. The shoulder straps rise from the outer corners of each panel.
Right Front Strap:
With RS facing and Color A, join yarn at the right front outer corner (top edge).
Row 1: Ch 1, sc in first 6 sts. Turn. (6 sc)
Rows 2 through 20: Ch 1, sc in each st. Turn. (6 sc each row)
After Row 20, the strap measures approximately 3.5 inches / 9 cm. Do not fasten off.
Right Back Strap:
With Color A, join at right back outer corner (top edge of back panel, directly behind the front strap starting position).
Row 1: Ch 1, sc in first 6 sts. Turn. (6 sc)
Rows 2 through 20: Ch 1, sc in each st. Turn. (6 sc each row)
Joining Right Strap:
Hold the right front and right back strap ends together with right sides facing outward. Slip stitch through both layers across all 6 sts to join them into one continuous strap. (6 joined sts)
Fasten off. Weave in ends.
Left Strap:
Repeat right strap instructions for the left side.
Checkpoint: Straps should each measure 6 sc wide and 3.5 inches / 9 cm tall before joining.
Neckline Edging
With Color A, join at any point along the top front edge (between straps).
Round 1: Ch 1, sc evenly along the top front neckline (approximately 52 sc across front, then 6 sc along inner strap edge, 6 sc across strap top, 6 sc along inner strap edge, then 52 sc across back neckline, repeat for other strap). Sl st to first sc to join.
The exact count here isn’t critical. The goal is a tidy edge. Work in slip stitch all around for a cleaner finish if preferred.
Fasten off. Weave in ends.
Waistband
The waistband is a flat rectangle worked separately in Color C, then seamed around the waist join between the bodice base and Tier 1.
With Color C, chain 129.
Row 1: Sc in 2nd ch from hook and in each ch across. Turn. (128 sc)
Rows 2 through 6: Ch 1, sc in each st across. Turn. (128 sc each row)
Fasten off, leaving a 24 inch tail for seaming.
Sew or slip stitch the waistband into a ring by joining the two short ends. Then, using the tail, whip stitch the waistband along the inside of the bodice-skirt join, centering it over the join seam. The waistband sits 1 inch / 2.5 cm wide above and 1 inch / 2.5 cm wide below the join.
Waistband Bow
With Color C, chain 41.
Row 1: Sc in 2nd ch from hook and in each ch across. Turn. (40 sc)
Rows 2 through 6: Ch 1, sc in each st across. Turn. (40 sc each row)
Fasten off, leaving a tail.
Fold the rectangle in half to find the center. Pinch the center together and wrap a separate 12 inch length of Color C yarn several times tightly around the middle pinch to form the bow knot. Knot securely. Trim tails. Sew the bow to the center front of the waistband.
Skirt Tier 1
Tier 1 is worked in the round in Color A, picking up stitches from the bottom edge of the joined bodice.
With Color A and RS facing, join yarn at the right side seam at the bottom edge of the bodice.
Setup Round: Ch 1, work 1 sc in each st around the bottom edge of the bodice. Pm at beg of round. (128 sc)
Round 1: Ch 1, sc in each st around. Sl st to first sc. (128 sc)
Increase Round 1: Ch 1, (sc in next st, inc in next st) around. Sl st to join. (192 sc)
Rounds 2 through 4: Ch 1, sc in each st around. Sl st to join. (192 sc each round)
Increase Round 2: Ch 1, (sc in next 2 sts, inc in next st) around. Sl st to join. (256 sc)
Rounds 5 through 12: Ch 1, sc in each st around. Sl st to join. (256 sc each round)
After Round 12, Tier 1 measures approximately 3 inches / 7.5 cm from pickup round.
Tier 1 Adjustment Round:
Because 256 is not divisible by 6 (needed for the scallop repeat), you’ll decrease to 216 stitches.
Ch 1, (sc in next 4 sts, sc2tog) 40 times, sc in remaining 16 sts. Sl st to join. (216 sc)
Tier 1 Scallop Edging Round: Ch 1, (skip 2 sts, 5 dc in next st, skip 2 sts, sl st in next st) 36 times. Sl st to join. (36 shells)
Fasten off Color A. Weave in ends.
Checkpoint: Tier 1 should measure approximately 4 inches / 10 cm from the pickup round to the top of the scallop points.
Skirt Tier 2
Tier 2 is worked in Color B, picking up stitches from the last working round of Tier 1 (Round 12, before the adjustment round). You’ll work into the front loops of Round 12 since the scallop edging used the back loops.
With Color B and RS facing, join yarn at the right side seam area in the front loops of Tier 1 Round 12.
Setup Round: Ch 1, work 1 sc in each front loop around Round 12. Sl st to join. (256 sc)
Round 1: Ch 1, sc in each st around. Sl st to join. (256 sc)
Increase Round 1: Ch 1, (sc in next 3 sts, inc in next st) around. Sl st to join. (320 sc)
Rounds 2 through 4: Ch 1, sc in each st around. Sl st to join. (320 sc each round)
Increase Round 2: Ch 1, (sc in next 4 sts, inc in next st) around. Sl st to join. (384 sc)
Rounds 5 through 12: Ch 1, sc in each st around. Sl st to join. (384 sc each round)
After Round 12, Tier 2 measures approximately 3 inches / 7.5 cm from pickup round.
384 is divisible by 6 (384 ÷ 6 = 64), so no adjustment round is needed.
Tier 2 Scallop Edging Round: Ch 1, (skip 2 sts, 5 dc in next st, skip 2 sts, sl st in next st) 64 times. Sl st to join. (64 shells)
Fasten off Color B. Weave in ends.
Checkpoint: Tier 2 should measure approximately 4 inches / 10 cm from its pickup round to the top of its scallop points.
Skirt Tier 3
Tier 3 is worked in Color C, picking up stitches from the front loops of Tier 2 Round 12.
With Color C and RS facing, join at the right side seam area in the front loops of Tier 2 Round 12.
Setup Round: Ch 1, work 1 sc in each front loop around. Sl st to join. (384 sc)
Round 1: Ch 1, sc in each st around. Sl st to join. (384 sc)
Increase Round 1: Ch 1, (sc in next 3 sts, inc in next st) around. Sl st to join. (480 sc)
Rounds 2 through 4: Ch 1, sc in each st around. Sl st to join. (480 sc each round)
Increase Round 2: Ch 1, (sc in next 4 sts, inc in next st) around. Sl st to join. (576 sc)
Rounds 5 through 16: Ch 1, sc in each st around. Sl st to join. (576 sc each round)
After Round 16, Tier 3 measures approximately 4 inches / 10 cm from pickup round.
576 is divisible by 6 (576 ÷ 6 = 96), so no adjustment round is needed.
Tier 3 Scallop Edging Round: Ch 1, (skip 2 sts, 5 dc in next st, skip 2 sts, sl st in next st) 96 times. Sl st to join. (96 shells)
Fasten off Color C. Weave in ends.
Checkpoint: Total dress length from underarm to bottom of Tier 3 scallop should measure approximately 22 inches / 56 cm.
Mini Crossbody Bag
With Color A, make a magic ring.
Round 1: Ch 1, 6 sc into magic ring. Sl st to join. (6 sc)
Round 2: Ch 1, inc in each st around. Sl st to join. (12 sc)
Round 3: Ch 1, (sc in next st, inc in next st) around. Sl st to join. (18 sc)
Round 4: Ch 1, (sc in next 2 sts, inc in next st) around. Sl st to join. (24 sc)
Round 5: Ch 1, (sc in next 3 sts, inc in next st) around. Sl st to join. (30 sc)
Round 6: Ch 1, (sc in next 4 sts, inc in next st) around. Sl st to join. (36 sc)
Make a second identical circle for the bag back.
Bag Body:
Hold the two circles wrong sides together. Join Color A at any point. Work sc through both layers around 3/4 of the circumference (27 sts), joining them together. Leave the remaining 9 sts open as the bag mouth. Sl st and fasten off.
Edging around bag opening:
Join Color C at one corner of the bag mouth opening. Ch 1, sc around the opening edge. Sl st to join. Fasten off.
Bag Closure:
Sew a 12 mm wooden bead to the center of the bag front. On the back opening edge, create a small ch-3 loop to serve as the button loop closure.
Bag Strap:
With Color A, ch 120 (approximately 22 inches / 56 cm when worked).
Row 1: Sl st in each ch across for a firm strap.
Fasten off, leaving tails. Attach each end to the top corners of the bag opening.
Bag Tassel:
Cut 8 lengths of Color A each 5 inches / 12.5 cm long. Fold in half. Using a separate length of yarn, loop through the fold and tie to the bag closure point. Wrap a separate short length around all strands 0.5 inch / 1 cm below the fold to form the tassel neck. Knot and trim evenly.
Finishing and Blocking Your Dress
Wet blocking method: Submerge finished dress in cool water for 10 minutes. Gently press out excess water without wringing. Lay flat on a blocking mat or large towel. Shape the bodice panels flat and pin the scallop edging points of each tier into position, stretching slightly to open the shells. Allow to dry completely before removing pins (12 to 24 hours depending on humidity).
After blocking, sew all remaining ends securely into the interior of the work.
Run your fingers along all side seams to confirm they are even and secure.
Optional waistband support: If desired, thread a length of thin elastic or ribbon through the interior of the waistband for additional support and fit.
Care Instructions
Size Customization Tips
For Women’s Medium (size 8-10):
Foundation chain for bodice panels: chain 73 instead of 65 (72 working sts per panel, 144 sts total around bodice). All row counts remain the same. For each tier, begin with 144 sts instead of 128 sts on the pickup round and scale all stitch counts proportionally.
For Women’s Large (size 12-14):
Foundation chain for bodice panels: chain 81 (80 working sts per panel, 160 sts around).
General customization rule: Every 9 additional stitches added to each panel (18 stitches total around the bodice) adds approximately 2 inches / 5 cm to the finished bust circumference.
For length adjustment: Add or subtract full 2-round increments from any tier to maintain scallop alignment. Adding 2 rounds to Tier 3 adds approximately 0.36 inches / 1 cm of length.
For strap width adjustment: Work 4 sts wide for narrower straps or 8 sts wide for wider straps.
Important reminder: Ensure that the final sc round before any scallop edging is a multiple of 6. Use the adjustment round method described in Tier 1 if your custom stitch count requires it.
You Did It!
Thank you so much for choosing this pattern. I genuinely hope you love every moment of creating your own Ocean Breeze Tiered Crochet Dress. This is the kind of project that reminds us why we fell in love with crochet in the first place. Wearable, beautiful, and completely handmade by you.
I would absolutely love to see your finished dress! Tag me on Instagram or share in my Facebook group when you complete yours. Seeing your creations is honestly the best part of my day.
If this pattern is calling to you but you’re not quite ready to start, make sure you save it to your Pinterest boards so you can find it easily later. And if you do make this dress, please drop a comment below. I read every single one and your feedback means the world to me. Happy crocheting!
You Might Also Like
- Dusty Rose Pink Crochet Backpack Free Pattern
- Sage Green Bow Handbag Free Crochet Pattern
- Sage Green Boho Tiered Crochet Dress Free Pattern
- Dusty Rose Boho Romper Free Crochet Pattern
