A Stunning Tote That’s Easier Than You Think
Bobble stitches look intimidating. I get it. Those raised, puffy clusters seem like advanced territory that newer crocheters should avoid. But here’s the truth: if you can yarn over and pull through loops, you can absolutely make this gorgeous Ocean Blue Bobble Flower Bag.
The bobble flower stitch is simply five incomplete double crochets worked into the same stitch, then closed together at the top. That’s it. No magic, no mystery, just a specific sequence repeated across a few rows. The rest of this entire bag? Basic single crochet. Rows and rows of simple, meditative single crochet in beautiful aqua and teal cotton yarn.
Whether you’re an intermediate crocheter looking for your next project or a confident beginner ready to level up, this crochet pattern breaks everything down into manageable sections. You’ll work two flat panels, seam them together, add a reinforced base, and attach sturdy straps. By the end, you’ll have a structured, professional-looking tote perfect for the beach, the farmer’s market, or your growing yarn stash.
Why You’ll Love This Crochet Bag Pattern
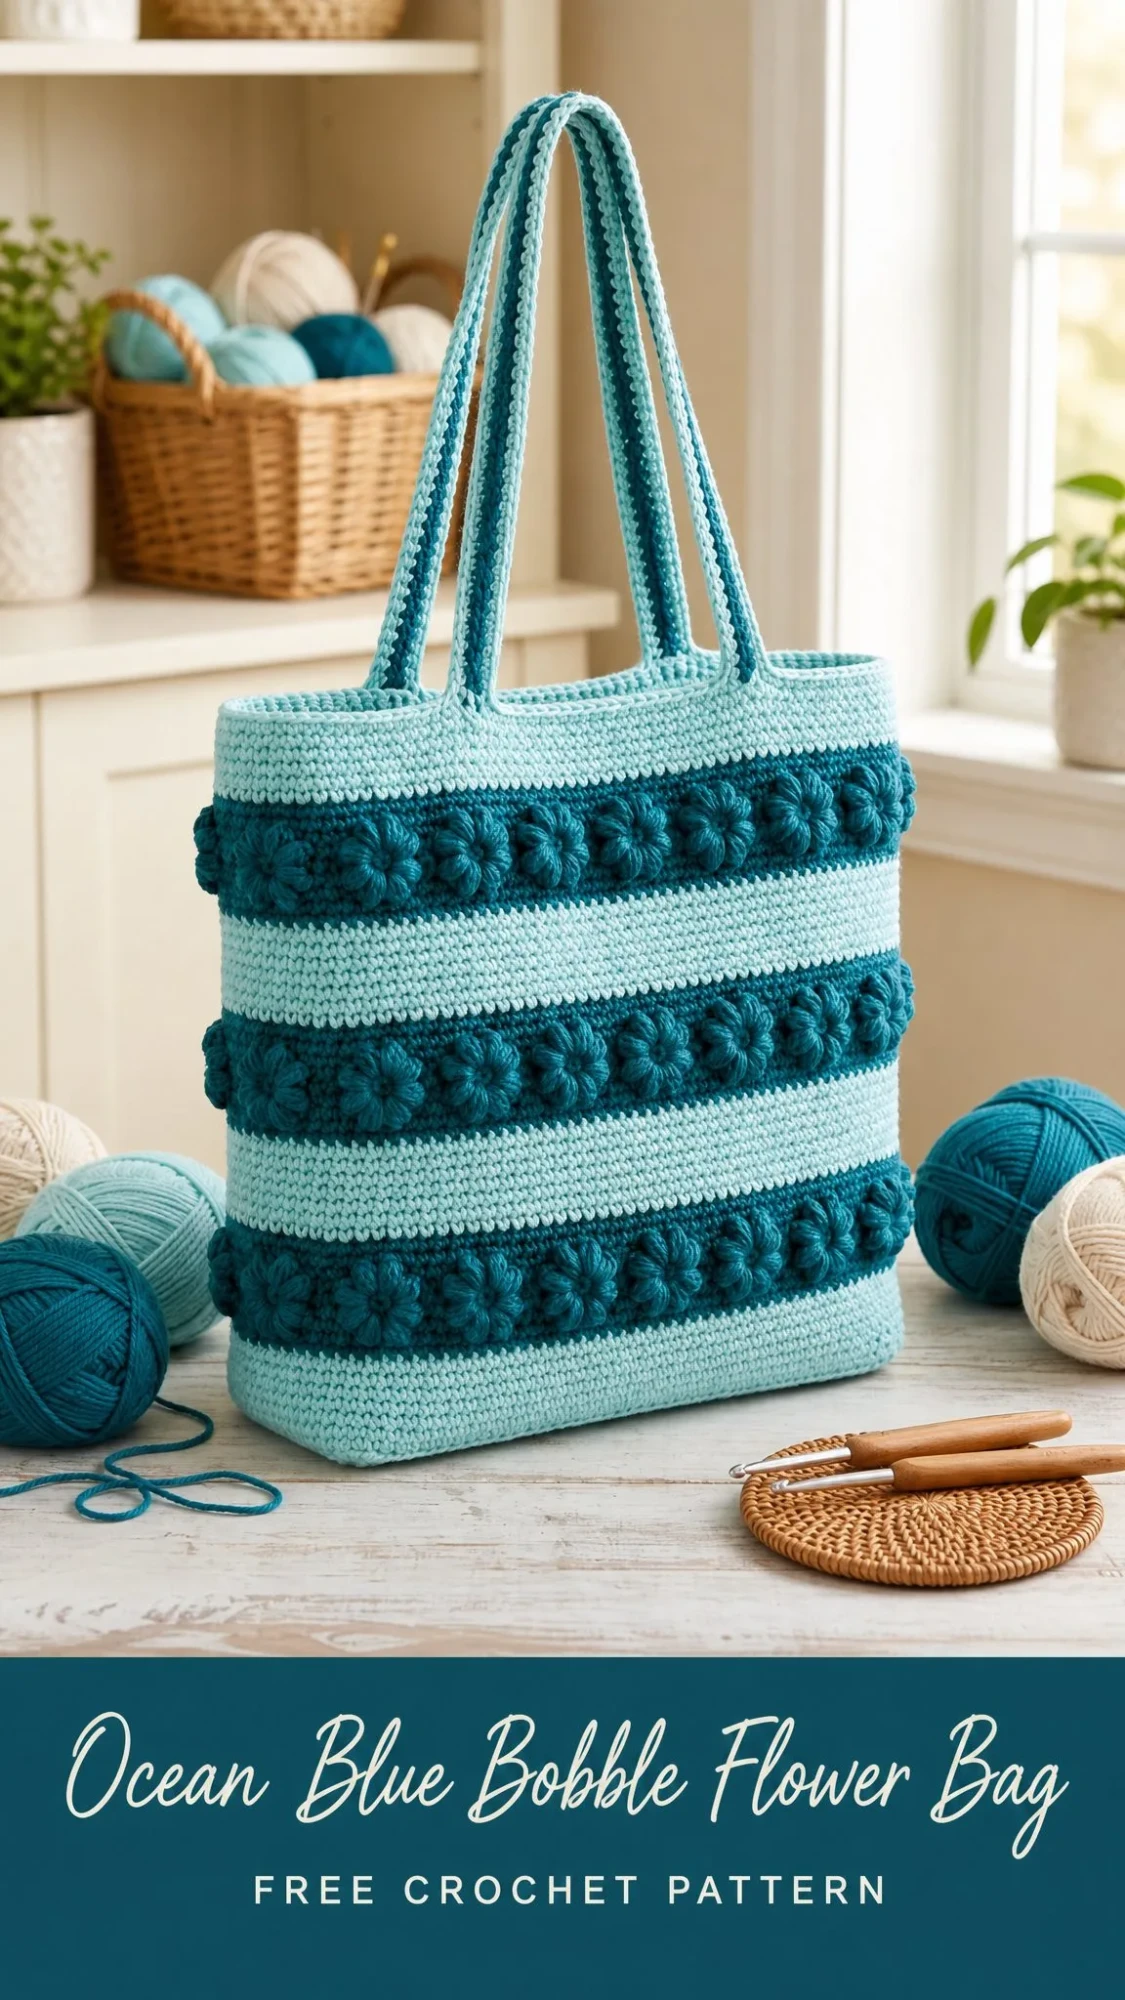
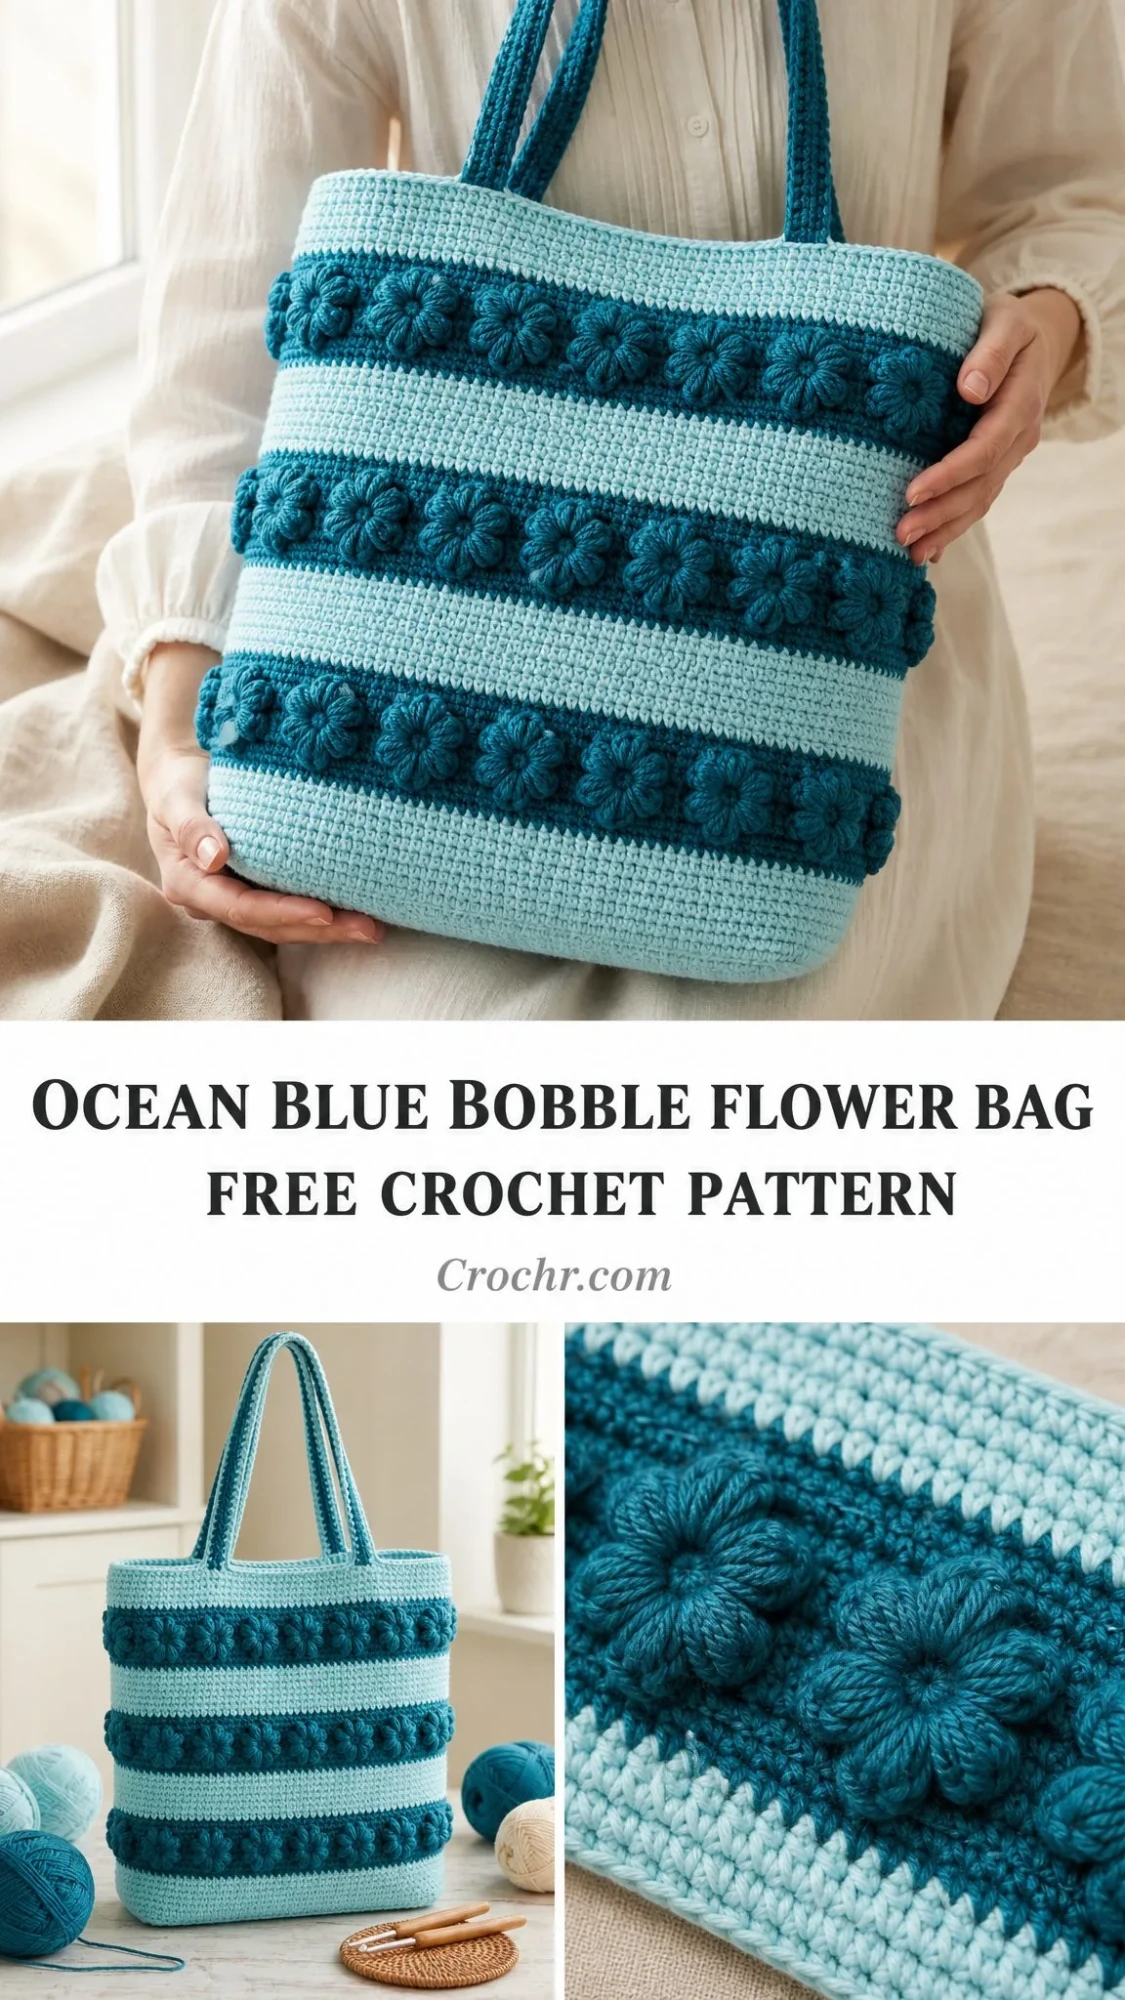
This Ocean Blue Bobble Flower Bag combines visual impact with practical construction. The light aqua body provides a fresh, clean canvas while three horizontal bands of deep teal bobble flowers create stunning dimensional texture. The finished bag holds its shape beautifully, thanks to the dense cotton fabric and optional base reinforcement.
I love that this design works up in sections. You’re never staring down an overwhelming number of complicated rows. Instead, you get rhythm: six rows of plain single crochet, three rows of bobble band, six more plain rows, and so on. The repetition builds confidence, and before you know it, you’ve created something that looks far more complex than it actually is.
The finished tote measures 14 inches wide by 13 inches tall, with a 4-inch gusset depth and comfortable shoulder straps. It’s sized perfectly for everyday use without being so large that items get lost at the bottom.
Materials You’ll Need
Gather these supplies before you start:
Yarn:
Hook:
Notions:
Yarn Suggestions
Lion Brand 24/7 Cotton works beautifully for this project. Try Aqua for Color A and Teal for Color B. This 100% mercerized cotton produces smooth, firm fabric with excellent stitch definition. You’ll need approximately 3 skeins of Color A and 2 skeins of Color B.
Paintbox Yarns Simply DK Cotton in Spearmint and Sailor Blue is another lovely option. Since this yarn runs slightly lighter than standard worsted, you may need to drop to a US G-6 / 4.0 mm hook to achieve gauge.
Important: Stick with cotton or cotton-blend yarn for this bag. Acrylic doesn’t provide the density and structure needed, and the bag may stretch and lose its shape over time.
Gauge
18 single crochet stitches and 20 rows = 4 inches / 10 cm, worked flat in single crochet with US H-8 / 5.0 mm hook, after blocking.
To make a gauge swatch: chain 23, work single crochet (sc) in the second chain from hook and across for 22 sc, then continue for 25 rows. Block your swatch before measuring. If your gauge is off, adjust your hook size. Even half sizes make a significant difference in finished dimensions.
Skill Level
This pattern is rated intermediate. You should be comfortable with single crochet, working in rows, and making color changes at row edges. The bobble flower stitch requires attention to tension and stitch placement, but I’ll walk you through it step by step.
Abbreviations
Let me define every stitch abbreviation before we begin:
Special Stitches
Bobble Flower (BF)
This is the star of the show. The bobble flower is a 5-petal cluster worked into a single stitch. Each petal is a partially completed double crochet, and all five petals close together at the top to form a raised dome.
Here’s how to work it:
Step 1: Insert hook into the indicated stitch.
Step 2: Yo, pull up a loop. You now have 3 loops on your hook. Yo, pull through 2 loops. You have 2 loops remaining. This is one incomplete dc. Do not complete it yet.
Step 3: Yo, insert hook into the same stitch, yo, pull up a loop, yo, pull through 2 loops. You now have 3 loops on your hook. This is your second incomplete dc.
Step 4: Repeat Step 3 three more times into the same stitch. You’ll have 7 loops on your hook total (representing 5 incomplete dc plus your standing loop).
Step 5: Yo and pull through all 7 loops on your hook. One loop remains. Your bobble flower is complete!
Step 6: Ch 1 to close and lock the bobble. This ch-1 does not count as a stitch. It just stabilizes the cluster. When working the next row, treat the base stitch of the BF as your working stitch and ignore the ch-1 lock.
The bobble will naturally puff outward on the right side of your work. Don’t worry if it feels awkward at first. After a few repeats, your hands will find the rhythm.
Color Change at Row Edge
At the end of the last stitch before changing colors, work until 2 loops remain on your hook. Drop the current color, pick up the new color, and pull the new color through both loops. Turn, ch 1 with the new color, and continue. You can carry the unused color loosely up the side edge since the color sections repeat.
Pattern Notes
Before you begin, keep these points in mind:
1. The bag is worked in two identical flat panels (front and back), each 63 stitches wide.
2. Panels are seamed together along the side and bottom edges using a slip stitch seam with right sides held together.
3. A separate base rectangle adds reinforcement and shape.
4. Straps are flat strips folded in half lengthwise and joined for double thickness.
5. All turning chains (ch 1, turn) do not count as a stitch. Simply begin your sc in the first stitch of the previous row.
6. Work firmly. A tighter tension improves bag structure significantly.
7. The right side faces you on odd-numbered rows in each section unless stated otherwise.
Instructions
Front Panel
With Color A and H-8 hook, chain 64.
Foundation Row (WS): Sc in second ch from hook and in each ch across. Turn. (63 sc)
Section 1: Light Aqua Base
Rows 1-6: Ch 1, sc in each st across. Turn. (63 sc each row)
After Row 6, your panel measures approximately 1.25 inches tall from the foundation. At the end of Row 6, change to Color B in the last stitch pull-through.
Section 2: First Teal Bobble Flower Band (Color B, 3 rows)
Row 7 (RS, Color B): Ch 1. Sc in first st. (BF in next st, sc in each of next 2 sts) repeat across to last 2 sts, BF in next st, sc in last st. Turn. (63 sts)
Let me break down the stitch count: You work 1 sc, then repeat (BF, sc, sc) 20 times across 60 stitches, then BF in the next stitch, then sc in the last stitch. Total: 1 + 60 + 1 + 1 = 63 stitches.
Row 8 (WS, Color B): Ch 1, sc in each st across. Turn. (63 sc)
Row 9 (RS, Color B): Ch 1. Sc in first 2 sts. (BF in next st, sc in each of next 2 sts) repeat across to last st, sc in last st. Turn. (63 sts)
Notice that the BF placement is offset by 1 stitch from Row 7. This creates a brick-laid bobble pattern across the band. You work 2 sc, then (BF, sc, sc) 20 times, then 1 sc. Total: 2 + 60 + 1 = 63 stitches.
At end of Row 9, change to Color A.
Section 3: Light Aqua Stripe (Color A, 6 rows)
Rows 10-15: Ch 1, sc in each st across. Turn. (63 sc each row)
After Row 15, your panel measures approximately 3 inches from the foundation. At end of Row 15, change to Color B.
Section 4: Second Teal Bobble Flower Band (Color B, 3 rows)
Row 16 (RS, Color B): Repeat Row 7 instructions. (63 sts)
Row 17 (WS, Color B): Ch 1, sc in each st across. Turn. (63 sc)
Row 18 (RS, Color B): Repeat Row 9 instructions. (63 sts)
At end of Row 18, change to Color A.
Section 5: Light Aqua Stripe (Color A, 6 rows)
Rows 19-24: Ch 1, sc in each st across. Turn. (63 sc each row)
After Row 24, your panel measures approximately 5 inches from the foundation. At end of Row 24, change to Color B.
Section 6: Third Teal Bobble Flower Band (Color B, 3 rows)
Row 25 (RS, Color B): Repeat Row 7 instructions. (63 sts)
Row 26 (WS, Color B): Ch 1, sc in each st across. Turn. (63 sc)
Row 27 (RS, Color B): Repeat Row 9 instructions. (63 sts)
At end of Row 27, change to Color A.
Section 7: Light Aqua Upper Body (Color A, remaining rows to top)
Rows 28-65: Ch 1, sc in each st across. Turn. (63 sc each row)
Row 66 (RS, Color A): Ch 1, sc in each st across. Fasten off, leaving a 6-inch tail. (63 sc)
Checkpoint: Your front panel should measure approximately 13 inches tall and 14 inches wide. If your dimensions are significantly off, check your gauge before making the back panel.
Back Panel
Repeat all Front Panel instructions exactly. The back panel is identical to the front panel. Fasten off, leaving a 24-inch tail for seaming.
Side and Bottom Seams
Hold front and back panels with right sides together (wrong sides facing outward). Align edges carefully and pin with stitch markers at corners.
Using Color A and your hook, work a slip stitch seam: Insert hook through both layers (one stitch from each panel aligned), draw up a loop of Color A, then slip stitch across. Work one slip stitch per row end along side edges and one slip stitch per stitch along the bottom edge.
Fasten off. Turn bag right side out.
Base Reinforcement Panel
This optional panel maintains shape and prevents the bottom from sagging. I highly recommend it.
With Color A, chain 19.
Row 1: Sc in second ch from hook and across. Turn. (18 sc)
Rows 2-66: Ch 1, sc in each st across. Turn. (18 sc each row)
Your base panel should measure approximately 4 inches wide and 14 inches long.
Fasten off. Insert the base panel flat into the bottom interior of the bag. With a yarn needle and Color A, whipstitch the base panel to the interior bottom seam all the way around.
Gusset Shaping
The bag achieves its 4-inch depth through box corners. Push the bottom corners inward so the side seam aligns with the bottom seam, forming a triangular point. The triangle base should measure 2 inches across. Whipstitch or slip stitch across this triangular fold. Repeat on the opposite corner.
Straps (Make 2)
Each strap is a long flat strip folded in half lengthwise for double thickness.
With Color B, chain 5.
Row 1: Sc in second ch from hook and in each ch across. Turn. (4 sc)
Rows 2-200: Ch 1, sc in each st across. Turn. (4 sc each row)
Your strap strip should measure approximately 40 inches long and 1 inch wide before folding.
Fasten off, leaving a 24-inch tail.
Fold the strap strip in half lengthwise. Using Color B and a yarn needle, whipstitch the long edges together firmly. Your finished strap is approximately 0.5 inch wide and 40 inches long.
Strap Placement: Measure 3.5 inches from each side edge inward along the top of both front and back panels. Mark these four points.
Thread each strap end through the bag at a marked point, leaving approximately 3 inches hanging inside. Sew a 1-inch by 1-inch box stitch through all layers at each attachment point, then add an X through the center for reinforcement.
Top Edging
With RS facing and Color B, join yarn at top right corner of bag opening.
Round 1 (RS): Ch 1, sc evenly around the entire top opening, working 1 sc per stitch along front and back top edges. Total approximately 130 sc around. Place marker at beginning of round. Join with sl st to first sc.
Round 2: Ch 1, sc in each st around. Join with sl st to first sc. (130 sc)
Fasten off Color B. Weave in ends.
Finishing and Blocking
Weave in all ends securely, working tails at least 2 inches in one direction and 1 inch back the other way. Cotton yarn can work loose with washing, so take your time here.
To block, wet the bag thoroughly in cool water and gently squeeze out excess water without wringing. Shape the bag over a sturdy box or folded towels. Allow to air dry completely, which takes 24 to 48 hours for cotton.
For added structure, spray lightly with fabric stiffener once fully dry, reshape, and allow to dry again.
Care Instructions
Machine wash on gentle cycle in cool water, or hand wash. Lay flat or reshape over a box to dry. Do not tumble dry. You can re-stiffen with fabric stiffener after each wash to restore structure.
Size Customization Tips
Wider bag: Add stitches to the foundation chain in multiples of 3 to maintain bobble repeat divisibility. Each additional 3 stitches adds approximately 0.66 inch to the width.
Taller bag: Add plain sc rows in Section 7. Five additional rows add approximately 1 inch of height.
Fourth bobble band: After Section 6, work another 6-row Color A section, then a 3-row Color B bobble band, then continue with plain aqua rows to the top. Add approximately 80 yards of Color B.
Smaller market bag: Chain 46 (45 working stitches) and work 52 rows total for a bag approximately 10 inches wide by 10.5 inches tall.
You Did It!
This Ocean Blue Bobble Flower Bag crochet pattern proves that stunning texture doesn’t require complicated techniques. Those gorgeous bobble flowers are just yarn overs and loops, repeated in a satisfying rhythm that becomes second nature after the first band.
Thank you so much for choosing this pattern. I hope you love making it as much as I loved designing it. If you create this beautiful tote, I’d absolutely love to see it! Share your finished bag on Instagram or Facebook and tag me so I can celebrate your work.
If you loved this project, go ahead and save it to your Pinterest boards so you can find it easily next time. And please drop a comment below if you make this bag. I read every single one, and hearing about your projects truly makes my day!
