
If you have been searching for a summer dress pattern that looks like a boutique find but works up with stitches you already know, this is the one. This mint green bohemian ruffle dress combines a fitted lace bodice with three cascading tiered ruffles that move beautifully when you walk. The construction uses diamond mesh lace for the bodice and shell stitches for the skirt, making it an achievable project for anyone comfortable with double crochet and basic shaping.
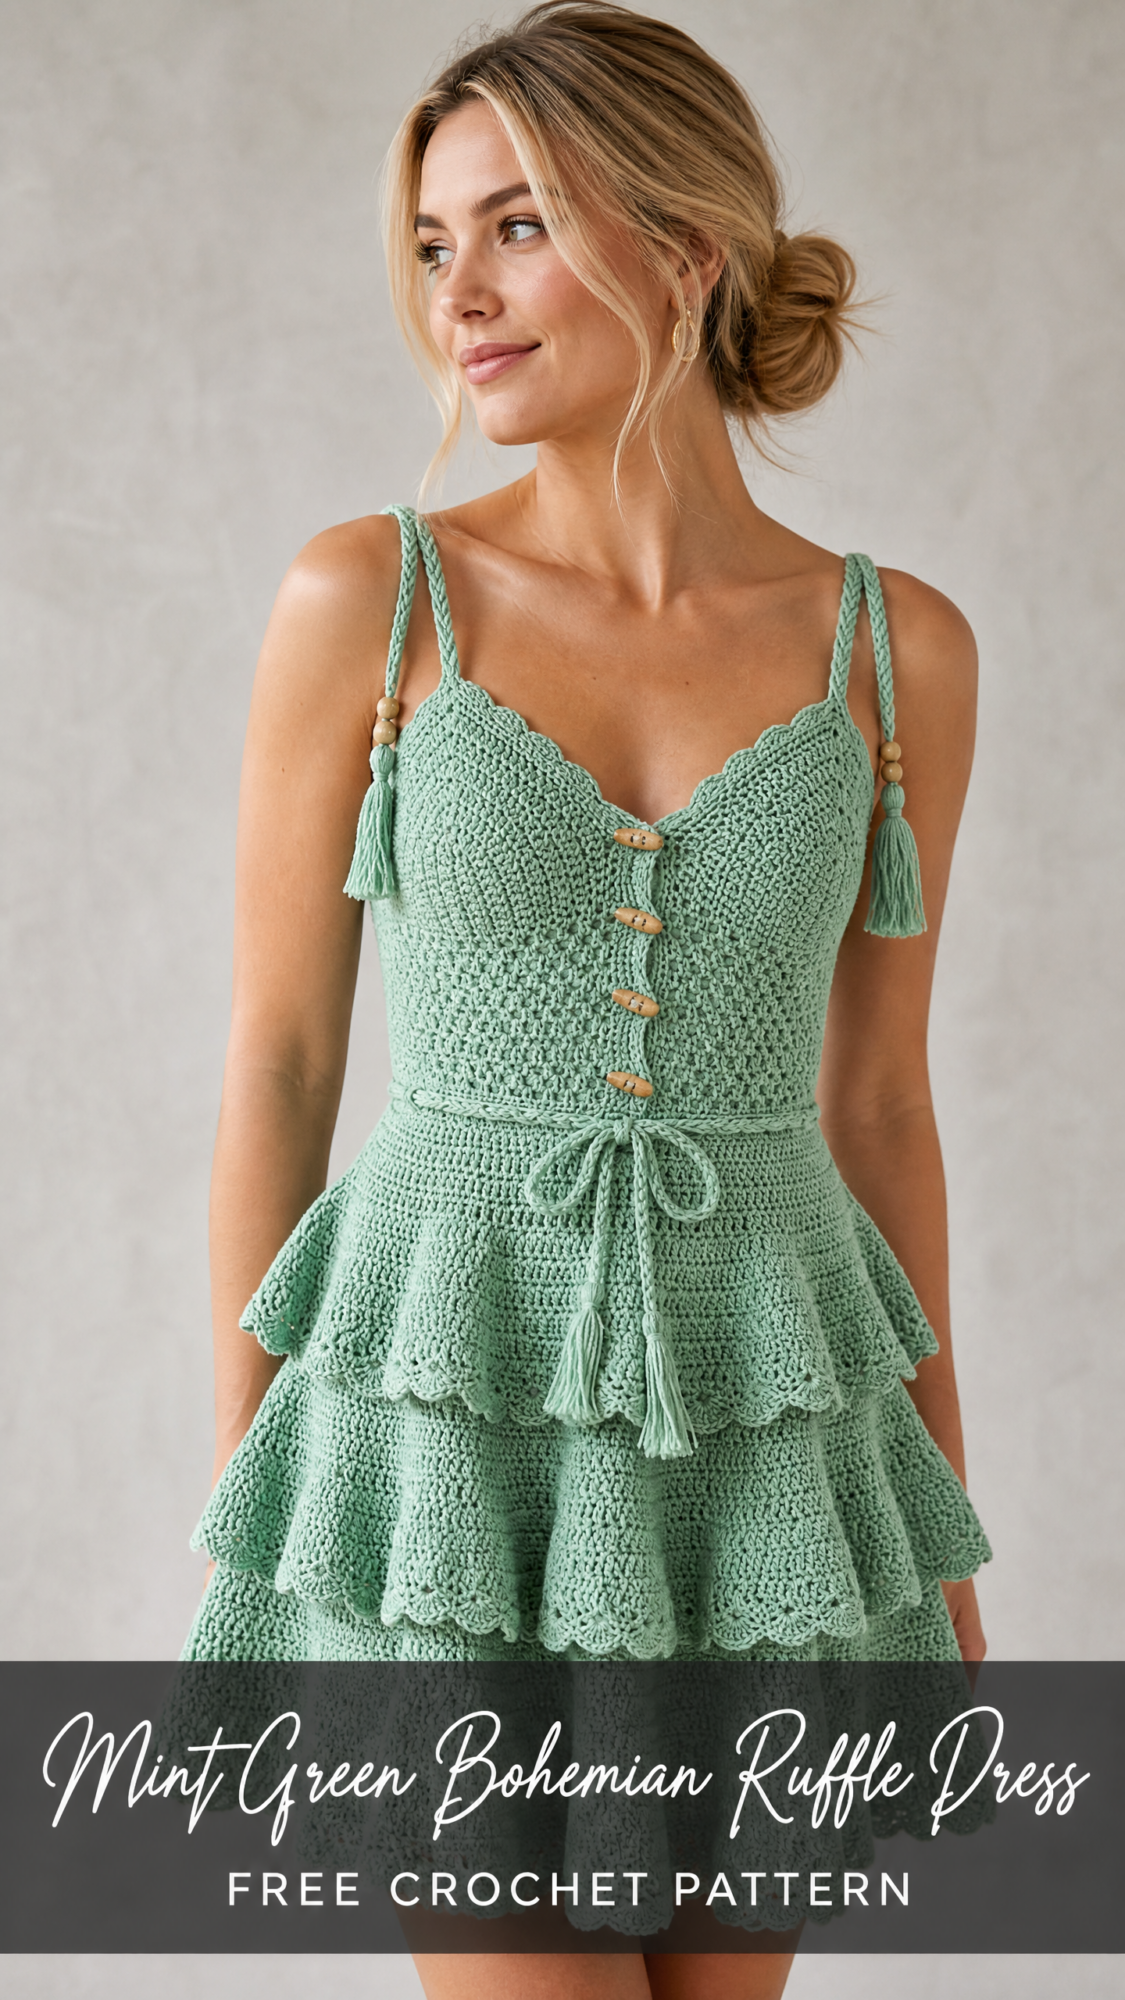
The dress fits a standard women’s size small to medium and features adjustable braided straps with wooden beads and tassels for that handcrafted artisan vibe. Whether you are making this for a beach vacation, a summer wedding guest outfit, or simply because you deserve something beautiful you made with your own hands, this pattern delivers. It also makes a stunning gift for someone special who appreciates one of a kind pieces.
I designed this pattern to give you a true wearable garment with professional shaping and finishing details. The waistband cinches in with decreases and includes an eyelet row for a drawstring tie. Each ruffle tier gets progressively wider, creating that dreamy cascading effect you see in high end boho fashion. Let me walk you through everything you need to bring this dress to life.
About This Crochet Dress Pattern
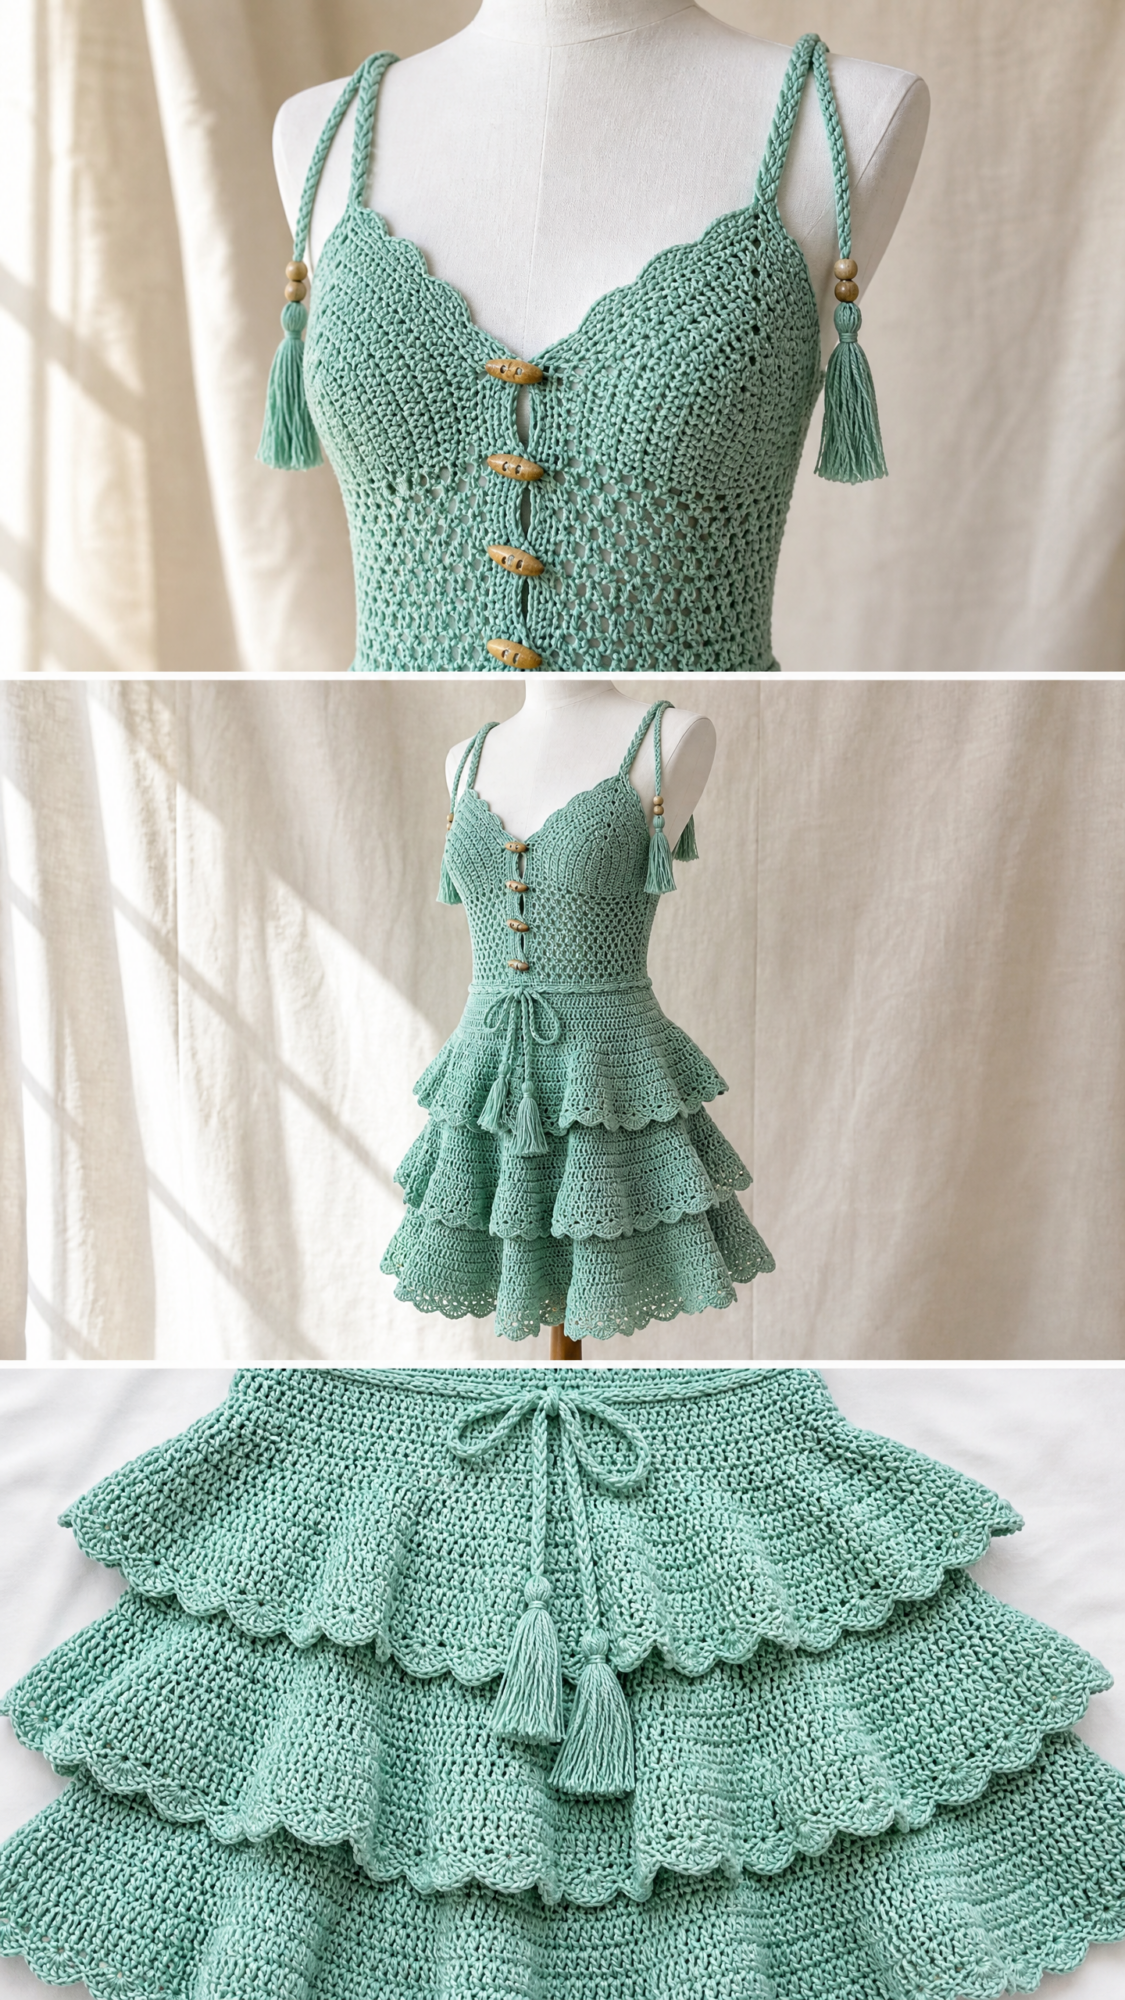
This bohemian ruffle dress is constructed in separate pieces that are then seamed and assembled. You will work the bodice front and back panels flat in a diamond mesh lace stitch, seam them at the sides, add a single crochet waistband worked in the round, and then attach three separate ruffle tiers. The straps are braided cords with bead and tassel embellishments.
Skill level: Advanced beginner to intermediate. The individual stitch patterns are not complex, but you need consistent tension, comfort with garment shaping, seaming multiple panels, and finishing techniques like tassels and braided cord.
Time estimate: Approximately 30 to 45 hours for an experienced crocheter. Newer crocheters may need up to 60 hours. This includes assembly and finishing but not blocking time.
Finished Measurements
Materials Needed
Yarn: Approximately 900 to 1050 yards (823 to 960 meters) of DK weight (CYCA 3) cotton or cotton blend yarn in mint green
Hook: US size E-4 / 3.5 mm crochet hook
Notions:
Yarn Suggestions
Lion Brand 24/7 Cotton in Mint: A 100 percent mercerized cotton DK weight yarn that gives excellent stitch definition and washes beautifully. Available widely and budget friendly.
Paintbox Yarns Simply DK in Spearmint Green: A smooth, tightly spun cotton blend that holds its shape well through multiple wears and washes. The sheen gives the scallop edges a lovely crispness.
Drops Paris in color 16 (Mint): A 100 percent cotton yarn with a slight matte finish that lends a more artisan boho feel to the finished piece.
Substitution note: Choose any DK weight cotton or cotton acrylic blend that matches the stated gauge. Avoid wool or superwash wool blends as they will stretch significantly under the weight of the ruffles and distort the silhouette. Always swatch before beginning.
Gauge
In Diamond Mesh Lace pattern (bodice stitch):
One repeat of 6 chains plus 1 chain 3 arch = approximately 1.5 inches (3.8 cm) wide
10 rows of diamond mesh = approximately 4 inches (10 cm) tall
In Shell Ruffle pattern (skirt tiers):
One 5 dc shell + 2 chain spaces = approximately 1.75 inches (4.5 cm) wide
6 rows of shell pattern = approximately 3 inches (7.6 cm) tall
In Single Crochet (waistband):
20 sc x 22 rows = 4 inches (10 cm) square
Gauge is mandatory for this garment. A difference of even one stitch per inch will significantly alter the fit. Swatch, block your swatch, then measure.
Abbreviations
Special Stitches
Diamond Mesh Lace Stitch (used in bodice)
This stitch creates an open diagonal diamond grid. It looks intricate but is simply single crochet stitches connected by chain 3 arches.
Row 1 (RS): Ch 1, sc in first st, ch 3, sk 2 sts, sc in next st. Repeat ch 3, sk 2 sts, sc in next st across to end.
Row 2 (WS): Ch 4 (counts as dc + ch 1), turn. Sc in first ch-3 arch, ch 3. Repeat sc in next ch-3 arch, ch 3 across. End sc in last arch, ch 1, dc in last sc.
Row 3 (RS): Ch 1, turn. Sc in first dc, ch 3. Repeat sc in next ch-3 arch, ch 3 across. End sc in 3rd ch of t-ch.
Repeat rows 2 and 3 for pattern.
Shell Stitch Ruffle (used in all three skirt tiers)
Shell: Work 5 dc all into the same stitch or space. This counts as 1 shell.
Scallop edge (used on every tier hem): Sl st into first st of shell, ch 3, 4 dc into same st, sl st into last st of same shell, sl st into the chain-sp between shells. Repeat across. This creates the visible scallop wave at each tier hem.
Adjustable Braid Strap
Cut 6 strands of yarn each 60 inches (152 cm) long. Hold all 6 together and fold in half. At the fold, create a loop and secure it with a slip knot to a fixed point. Divide the 12 working strands into 3 groups of 4 strands each. Braid tightly for approximately 14 inches (35.5 cm). Thread 2 wooden beads onto the braid. Continue braiding for 2 more inches (5 cm). Finish with a knot. Trim ends to 2 inches (5 cm) and unravel the cut ends to form a tassel. Make 2 straps.
Tassel (for waist tie ends and strap ends)
Cut 20 strands of yarn each 8 inches (20 cm) long. Fold all strands in half. Hold the folded end together. Wrap a separate 12 inch (30 cm) strand of yarn tightly around all strands approximately 0.5 inch (1.3 cm) from the folded end and tie firmly. Trim tassel ends to even length of approximately 2.5 inches (6.5 cm).
Pattern Notes Before You Begin
1. The bodice front and bodice back are worked separately and flat, then seamed at the sides. The front bodice has a center front V opening secured by 6 wooden bead buttons and button loops.
2. The waistband is worked in single crochet in the round after the bodice pieces are seamed.
3. The three ruffle tiers are each worked flat across a starting chain, then the short side edges are seamed to form a circle. Each tier is then attached at its top edge to the row below it.
4. Stitch counts given in parentheses at the end of each row represent the total number of working stitches or stitch units in that row, not the total number of yarn overs or loops.
5. The front bodice is worked in two panels (left cup and right cup) that begin separately at the lower center V, then are joined and worked together across the upper chest.
6. Turning chain counts: In the diamond mesh lace, the ch 4 at the start of WS rows counts as dc plus ch 1. The ch 1 at the start of RS rows does not count as a stitch. In the shell stitch tiers, the starting ch 3 at the beginning of each row counts as the first dc of the first shell.
7. All measurements are taken after light blocking.
8. Buttons on the front bodice are decorative. The bodice fits over the head and is held closed by the button and loop system at center front.
Step by Step Instructions
Bodice Back Panel
The back bodice is worked flat in diamond mesh lace from the bottom edge upward.
Foundation: Ch 61. (This sets up 20 ch-3 arches plus edge stitches, giving a working width of approximately 17.5 inches / 44.5 cm before seaming.)
Row 1 (RS): Sc in 2nd ch from hook, ch 3, sk 2 ch, sc in next ch. Rep ch 3, sk 2 ch, sc across. End sc in last ch. Turn. (20 ch-3 arches, 21 sc)
Row 2 (WS): Ch 4 (counts as dc + ch 1), sc in first ch-3 arch, ch 3. Rep sc in next ch-3 arch, ch 3 across all 20 arches. End sc in last arch, ch 1, dc in last sc. Turn. (20 ch-3 arches, 1 dc each side)
Row 3 (RS): Ch 1, sc in first dc, ch 3. Rep sc in next ch-3 arch, ch 3 across all 20 arches. End sc in 3rd ch of t-ch. Turn. (20 ch-3 arches, 21 sc)
Rows 4 through 20: Rep rows 2 and 3 alternately, ending with a RS row. After row 20, the back panel should measure approximately 8 inches (20 cm) tall.
Armhole Shaping (worked on rows 21 through 28)
Row 21 (WS): Sl st across first 6 sts (sl st into first sc, ch-3 arch, and next sc to skip 1 full arch repeat on each side). Ch 4, sc in next ch-3 arch, ch 3 across. Stop before last arch on this end. Turn. (18 ch-3 arches)
Row 22 (RS): Ch 1, sc in first dc, ch 3. Rep sc in next ch-3 arch, ch 3 across 18 arches. End sc in t-ch. Turn. (18 ch-3 arches)
Row 23 (WS): Ch 4, sc in first ch-3 arch, ch 3 across all 18 arches. End dc in last sc. Turn. (18 ch-3 arches)
Rows 24 through 28: Rep rows 22 and 23 alternately, maintaining 18 ch-3 arches. After row 28, armhole shaping is complete and back panel measures approximately 10 inches (25 cm). Fasten off and set aside.
Checkpoint: The back bodice panel should measure approximately 17 inches (43 cm) wide at the bottom, approximately 15 inches (38 cm) wide at the upper armhole edge, and 10 inches (25 cm) tall.
Bodice Front Panel: Right Cup
The front is worked in two cups that begin at center front and work outward, then are joined.
Foundation for right cup: Ch 10.
Row 1 (RS): Sc in 2nd ch from hook, ch 3, sk 2 ch, sc in next ch, ch 3, sk 2 ch, sc in last ch. Turn. (2 ch-3 arches and 3 sc)
Row 2 (WS): Ch 4, sc in first ch-3 arch, ch 3, sc in next ch-3 arch, ch 1, dc in last sc. Turn. (2 ch-3 arches)
Row 3 (RS) increase at outer edge: Ch 1, sc in dc, ch 3, sc in next arch, ch 3, sc in next arch, ch 3, sc in t-ch. Turn. (3 ch-3 arches)
Row 4 (WS): Ch 4, sc in first arch, ch 3, sc in next arch, ch 3, sc in next arch, ch 1, dc in last sc. Turn. (3 ch-3 arches)
Row 5 (RS) increase at outer edge: Ch 1, sc in dc, ch 3, sc in next arch, ch 3, sc in next arch, ch 3, sc in next arch, ch 3, sc in t-ch. Turn. (4 ch-3 arches)
Row 6 (WS): Ch 4, sc in first arch, ch 3 across 4 arches, ch 1, dc in last sc. Turn. (4 ch-3 arches)
Row 7 (RS) increase at outer edge: Ch 1, sc in dc, ch 3, sc across 4 arches in pattern, end sc in t-ch. Turn. (5 ch-3 arches)
Rows 8 through 20: Work even in pattern without increases, maintaining 5 ch-3 arches. After row 20, right cup measures approximately 8 inches (20 cm) tall and approximately 7.5 inches (19 cm) wide. Do not fasten off.
Bodice Front Panel: Left Cup
Repeat rows 1 through 20 of right cup instructions but mirror the shaping: make all outer edge increases on WS rows instead of RS rows. Do not fasten off.
Joining the Two Front Cups
With both cups on hook (right cup active), work across right cup in pattern, then chain 3 across center V gap (this creates the center V point), then work across left cup stitches in pattern. Turn. (11 ch-3 arches total across joined front)
Continue working both cups joined in flat rows in diamond mesh lace for rows 21 through 28 as follows, maintaining 11 ch-3 arches throughout:
Row 22 (WS): Ch 4, sc in first arch, ch 3 across all 11 arches, ch 1, dc in last sc. Turn. (11 arches)
Row 23 (RS): Ch 1, sc in dc, ch 3 across all 11 arches, sc in t-ch. Turn. (11 arches)
Armhole Shaping on Front
Row 24 (WS): Sl st to skip first arch. Ch 4, sc in next arch, ch 3 across 9 arches. Stop 1 arch before end. Turn. (9 arches)
Row 25 (RS): Ch 1, sc in dc, ch 3 across 9 arches, sc in t-ch. Turn. (9 arches)
Rows 26 through 28: Work even at 9 arches.
After row 28, front bodice panel measures approximately 10 inches (25 cm) tall. Fasten off.
Checkpoint: Lay front bodice over back bodice. The upper armhole edges should match in width. The front panel should be slightly narrower than the back due to the center V split.
Button Loop Border on Front Center V
With RS facing, join yarn at lower point of V. Work sc evenly up one side of V at a rate of 1 sc per row. At upper chest edge, sl st. Fasten off.
Rep for other side of V, but this time work button loops: sc 3, ch 3, sk 1, sc 3 six times evenly spaced. This creates 6 button loops. Fasten off.
Sew 6 wooden bead buttons to opposite V edge, aligned with button loops.
Seaming the Bodice
With yarn needle and matching yarn, seam front and back bodice panels together at both side seams using mattress stitch or whip stitch, RS facing out. Leave armhole edges open. Leave top shoulder area open (the straps will bridge the shoulder). The bodice should now form a tube.
Chest measurement around seamed bodice: approximately 32 to 34 inches (81 to 86 cm).
Waistband
The waistband is worked in the round in single crochet directly onto the lower edge of the seamed bodice.
Setup Rnd: With RS facing, join yarn at side seam at lower bodice edge. Sc evenly around entire lower edge of bodice, placing 1 sc per ch or st along the lower foundation chain edges. Place marker at start of round. (130 sc)
Rnd 1: Sc in each sc around. (130 sc)
Rnd 2 (decrease round): (Sc 11, sc2tog) repeat 10 times. (120 sc)
Rnd 3: Sc in each sc around. (120 sc)
Rnd 4 (decrease round): (Sc 10, sc2tog) repeat 10 times. (110 sc)
Rnd 5: Sc in each sc around. (110 sc)
Rnd 6 (tie eyelet round): Ch 1, sk 1, sc 1 all the way around 110 sts. (55 ch-1 spaces, 55 sc = 110 units)
Rnd 7: Sc in each sc and ch-sp around. (110 sc)
Rnd 8: Sc in each sc around. (110 sc)
Fasten off.
Waist Tie
Cut 8 strands of yarn each 70 inches (178 cm) long. Hold together and braid or twist into a cord. Finish each end with a small tassel (see special stitches). Thread through the eyelet holes in rnd 6 of waistband, bringing both tie ends out at center front. Add 1 wooden bead to each tie end just above tassel if desired.
Ruffle Tier 1 (attaches directly to lower waistband edge)
Tier 1 is worked flat and seamed into a ring.
Foundation: Ch 217.
Row 1 (RS): Sc in 2nd ch from hook, sk 2 ch, shell (5 dc) in next ch, sk 2 ch, sc in next ch. Rep (sk 2, 5 dc in next ch, sk 2, sc in next ch) 35 more times. Turn. (36 shells, 36 sc = 36 repeats)
Row 2 (WS): Ch 3 (counts as first dc), 2 dc in first sc, ch 1, sc in center (3rd) dc of shell, ch 1. Rep (shell in next sc, ch 1, sc in center dc of next shell, ch 1) across. End 3 dc in last sc. Turn. (35 full shells in middle, 2 half shells at edges, 36 sc between shells)
Row 3 (RS): Ch 1, sc in first dc, ch 1, shell in next sc, ch 1. Rep (sc in center dc of shell, ch 1, shell in next sc, ch 1) across. End sc in top of t-ch. Turn. (36 shells, 36 sc)
Rows 4 through 6: Rep rows 2 and 3, ending with a row 2 equivalent. After 6 rows, tier 1 measures approximately 3.5 inches (9 cm) tall.
Scallop Hem on Tier 1
Final hem row (RS): Ch 1, sc in first st. Work into each shell: (sc in ch-sp, sc in each of 5 dc of shell, sc in ch-sp, sc between shells) across all 36 shells. (approximately 252 sc across)
Now work scallop: Do not fasten off. Turn. Ch 1, sc in first sc, sk 2 sc, 5 dc in next sc, sk 2 sc, sc in next sc. Rep across. (36 scallop shells across hem)
Fasten off.
Seam tier 1: With RS together, seam short edges using sl st or mattress stitch to form a ring. Turn RS out.
Attach tier 1: With RS facing, hold tier 1 ring below waistband. Working through both the top edge of tier 1 and the lower edge of the waistband (rnd 8), sl st or sc evenly around to join, spacing evenly across 110 waistband stitches across 216 tier 1 top edge stitches (approximately every other stitch of tier 1). (110 joining sl sts or sc)
Ruffle Tier 2 (attaches to lower edge of tier 1)
Tier 2 is wider than tier 1, creating the cascading ruffle effect.
Foundation: Ch 325.
Rows 1 through 7: Work same shell stitch pattern as tier 1 rows 1 through 6, but with 54 shells throughout, for 7 rows total. After 7 rows, tier 2 measures approximately 4 inches (10 cm) tall. (54 shells per RS row)
Scallop Hem on Tier 2: Work same as tier 1 scallop hem but across 54 shells.
Seam short edges of tier 2 to form ring.
Attach tier 2: Sc or sl st tier 2 top edge to lower edge of tier 1 hem row, spacing 54 shell tier 2 evenly across tier 1 bottom, easing in fullness as you go.
Ruffle Tier 3 (hem tier, attaches to lower edge of tier 2)
Tier 3 is the largest and most dramatic ruffle and forms the hem of the dress.
Foundation: Ch 433.
Rows 1 through 9: Work same shell stitch pattern as tier 1, with 72 shells throughout, for 9 rows. After 9 rows, tier 3 measures approximately 5 inches (13 cm) tall. (72 shells per RS row)
Scallop Hem on Tier 3: Work same as tier 1 scallop hem but across 72 shells.
Seam short edges to form ring.
Attach tier 3: Sl st or sc tier 3 top edge to lower edge of tier 2 hem row, distributing fullness evenly around.
Straps (make 2)
Make 2 adjustable braid straps as described in Special Stitches.
Each strap is approximately 14 to 16 inches (35.5 to 40.5 cm) long. Both ends of each strap are finished with a tassel.
Attaching straps: At back bodice upper edge, working in the 4th arch from each side seam (2 attachment points at back), thread strap end through arch and tie with a firm double knot, leaving the tassel end hanging. At front bodice, attach strap to corresponding arch at front, approximately 4 arches from the V center. The strap can loop over the shoulder and thread through the back attachment to adjust length.
Thread 2 wooden beads onto each strap and tie a stopper knot below the beads to hold them in position.
Shoulder Shaping Note
There are no separate shoulder seams in this dress. The straps bridge the open top of the bodice and hold the garment up. The upper bodice edge (row 28 of both front and back) remains open and is not seamed. Ensure the bodice sits snugly enough at the bust that it does not require additional support beyond the straps.
Finishing and Blocking Your Bohemian Ruffle Dress
Step 1: Weave in all ends securely using yarn needle. Bury all ends inside seams wherever possible for cleanest finish.
Step 2: Wet block the finished dress. Fill a basin with cool water and a small amount of wool wash or gentle soap. Submerge the dress completely and gently press out air bubbles. Do not wring or twist. Gently squeeze out excess water.
Step 3: Lay the dress flat on a blocking board or clean towel. Pin the bodice to measurements (17 inches / 43 cm wide at bust, 11 inches / 28 cm wide at waist section). Pin each tier hem to encourage the scallop edge to lie flat and open.
Step 4: Allow to dry completely (12 to 24 hours).
Step 5: Optional: Lightly steam press the ruffle tiers using a damp cloth and low heat iron, or a garment steamer held 2 inches (5 cm) away. This sets the scallop shape beautifully.
Step 6: Sew wooden bead buttons to the left side of the front V opening, aligning them to the button loops made on the right side.
Step 7: If using optional elastic in the waistband, thread elastic through the waistband from the inside layer and secure the ends with a few tight stitches.
Care Instructions
Hand wash in cool water with gentle detergent. Do not machine wash unless the yarn label specifically permits it. Do not tumble dry. Lay flat to dry. Store folded or on a padded hanger to prevent stretching.
You Did It!
Thank you so much for choosing this pattern for your next crochet project. I truly hope you love wearing this dress as much as I loved designing it. There is something deeply satisfying about creating a wearable garment from scratch, and this bohemian ruffle dress is the kind of piece that gets compliments everywhere you go.
If you make this mint green bohemian ruffle dress, I would absolutely love to see your finished piece. Tag me on Instagram or share a photo in our Facebook group. Seeing your creations honestly makes my whole week.
Do not forget to save this crochet pattern to your Pinterest boards so you can find it easily when you are ready to start. And if you have any questions or want to share your progress, drop a comment below. I read every single one and am always happy to help. Happy crocheting!
You Might Also Like
- Lilac Dreams Floral Crochet Robe Free Pattern
- Mermaid Tail Sparkle Baby Blanket Free Crochet Pattern
- Sunset Coral Textured Crochet Dress Free Pattern
- Mint Garden Bow Crochet Vest Free Crochet Pattern
