
Let me address the elephant in the room. This adorable baby romper set looks complicated. Shell stitches, color changes, shaping, a matching bonnet? I get it. The whole thing seems like something only advanced crocheters should attempt.
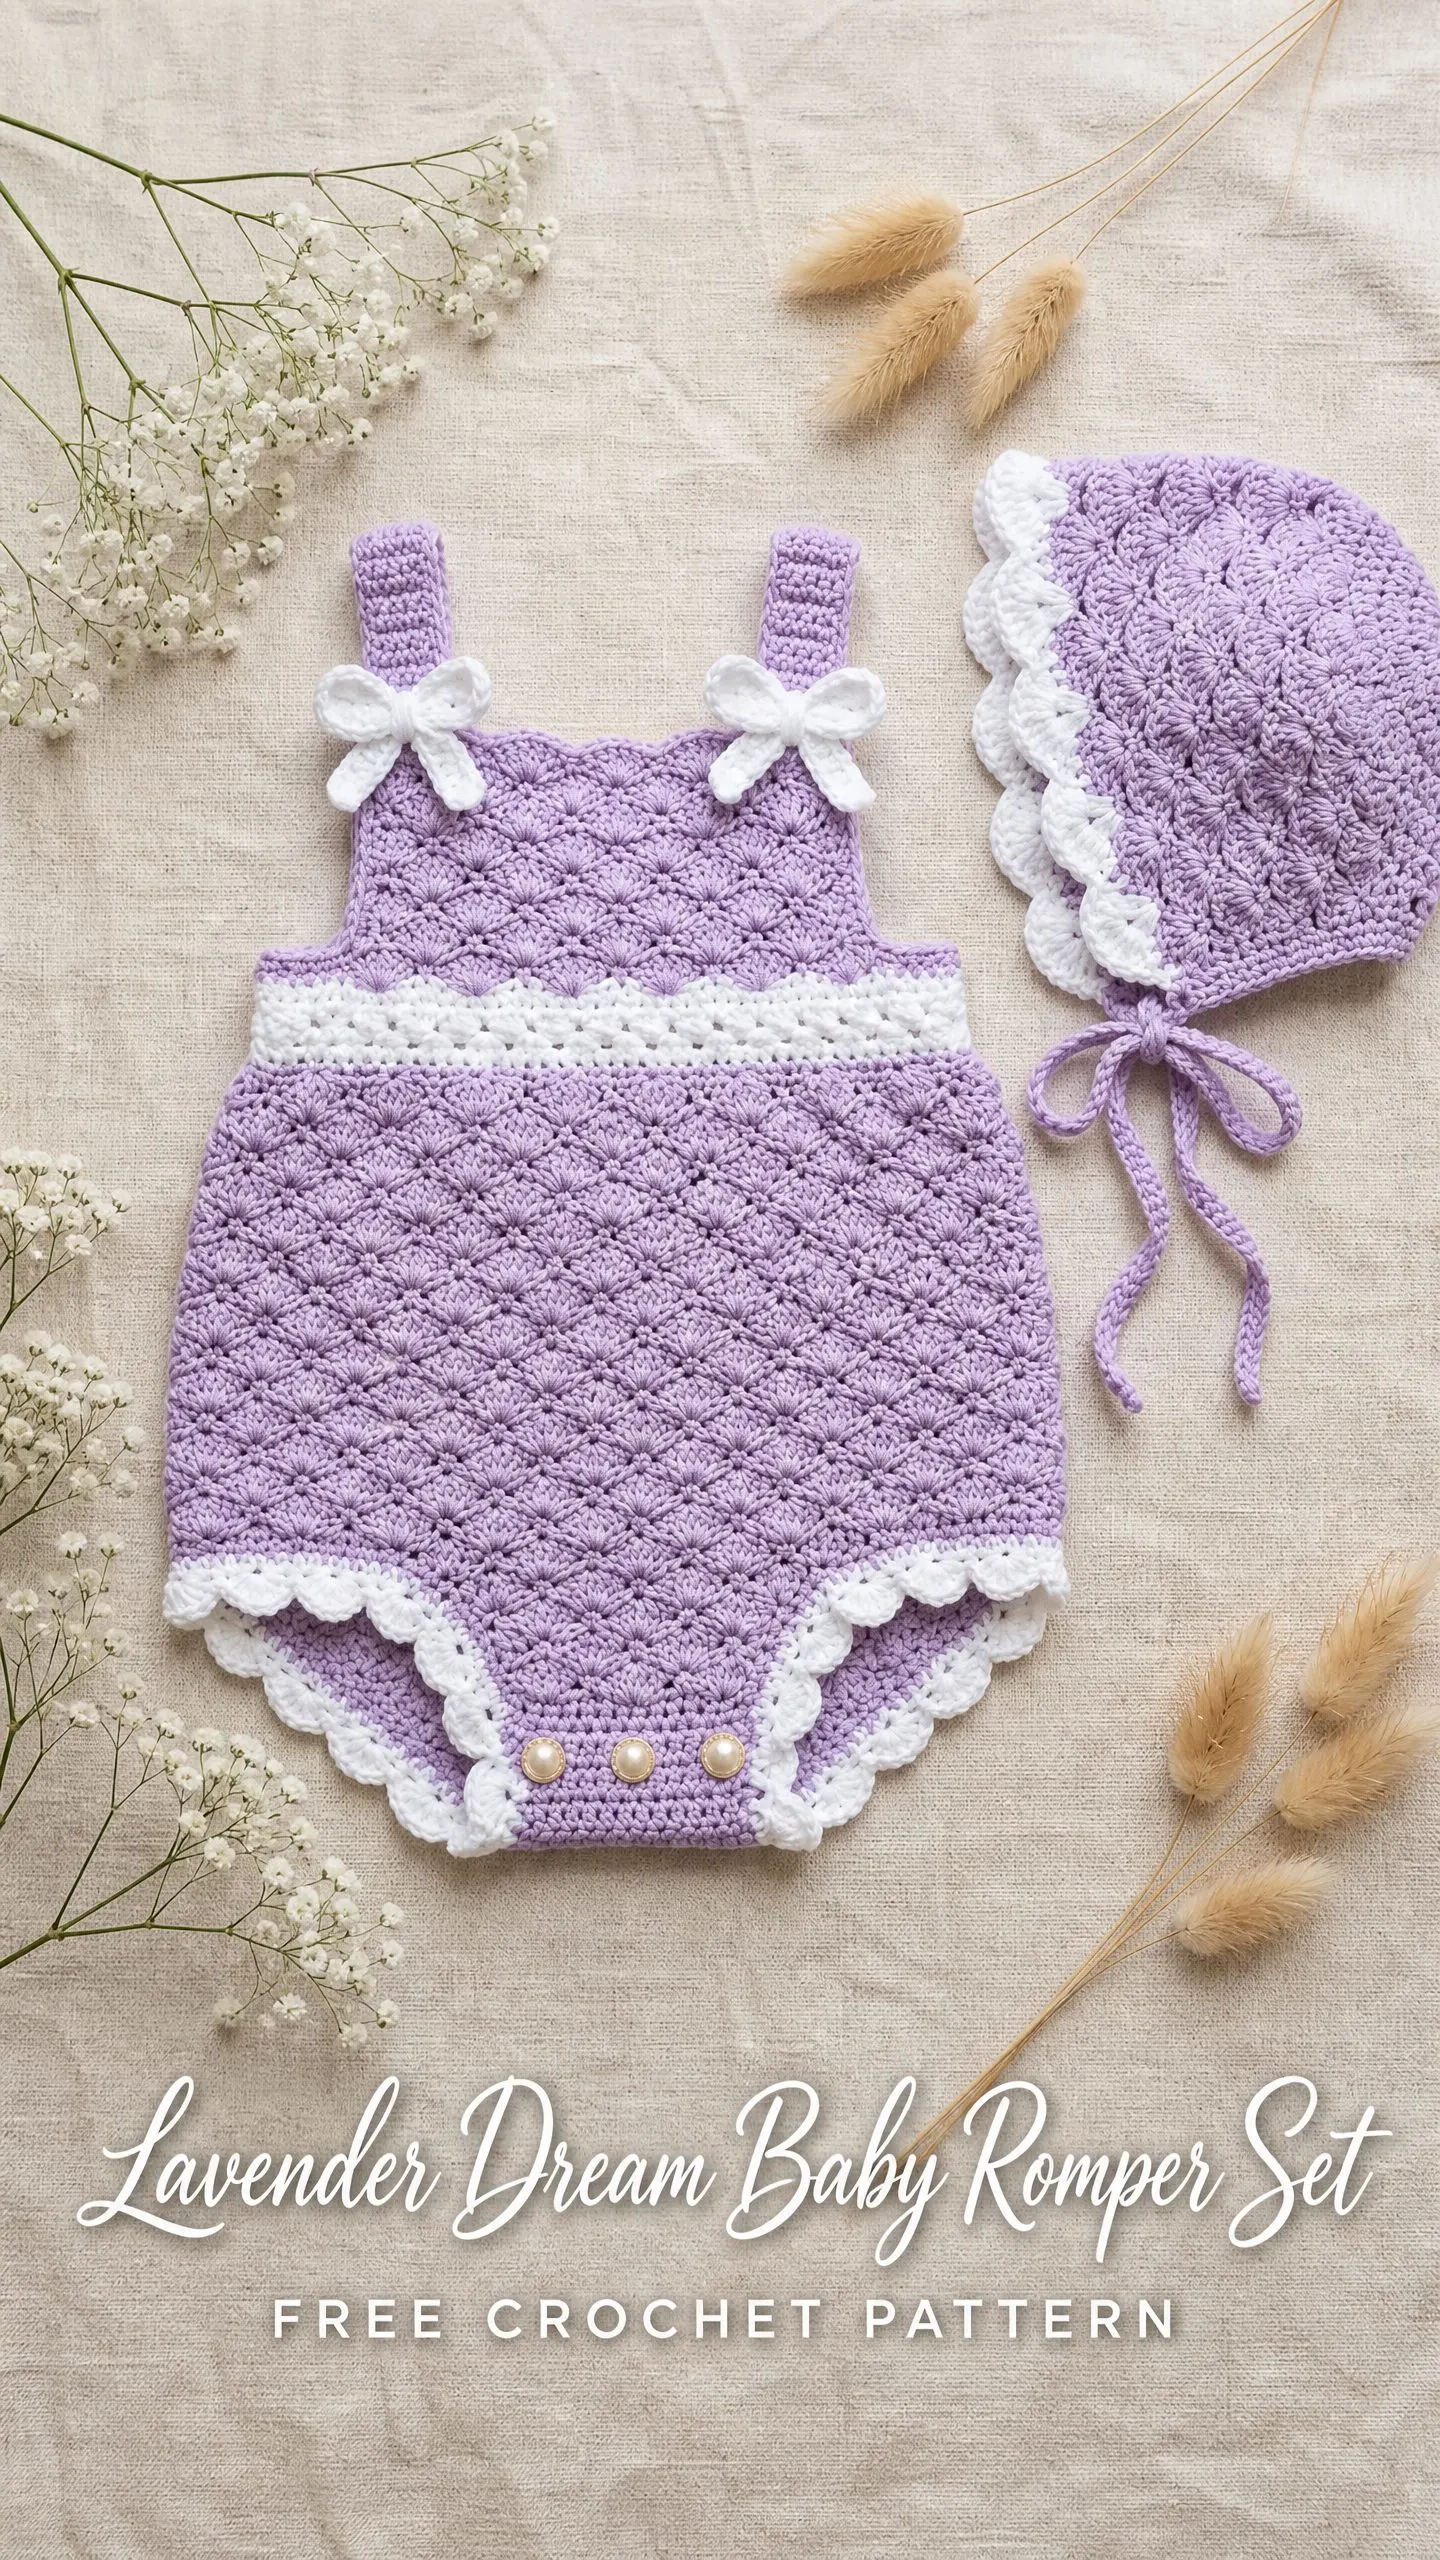
But here is the truth. If you can double crochet and single crochet, you already know the building blocks for this entire project. The shell lattice pattern is simply five double crochets worked into one stitch. That is it. You repeat that same motion over and over, and suddenly you have this gorgeous texture that looks like it took years of experience to master.
Whether you are an intermediate crocheter ready to tackle your first garment or a beginner who has been eyeing baby clothes patterns from afar, this Lavender Dream Baby Romper Set crochet pattern breaks everything down into manageable pieces. I will walk you through every single row, explain the tricky spots before you hit them, and give you all the checkpoint measurements so you know you are on track. Let us make something beautiful together.
About This Crochet Pattern
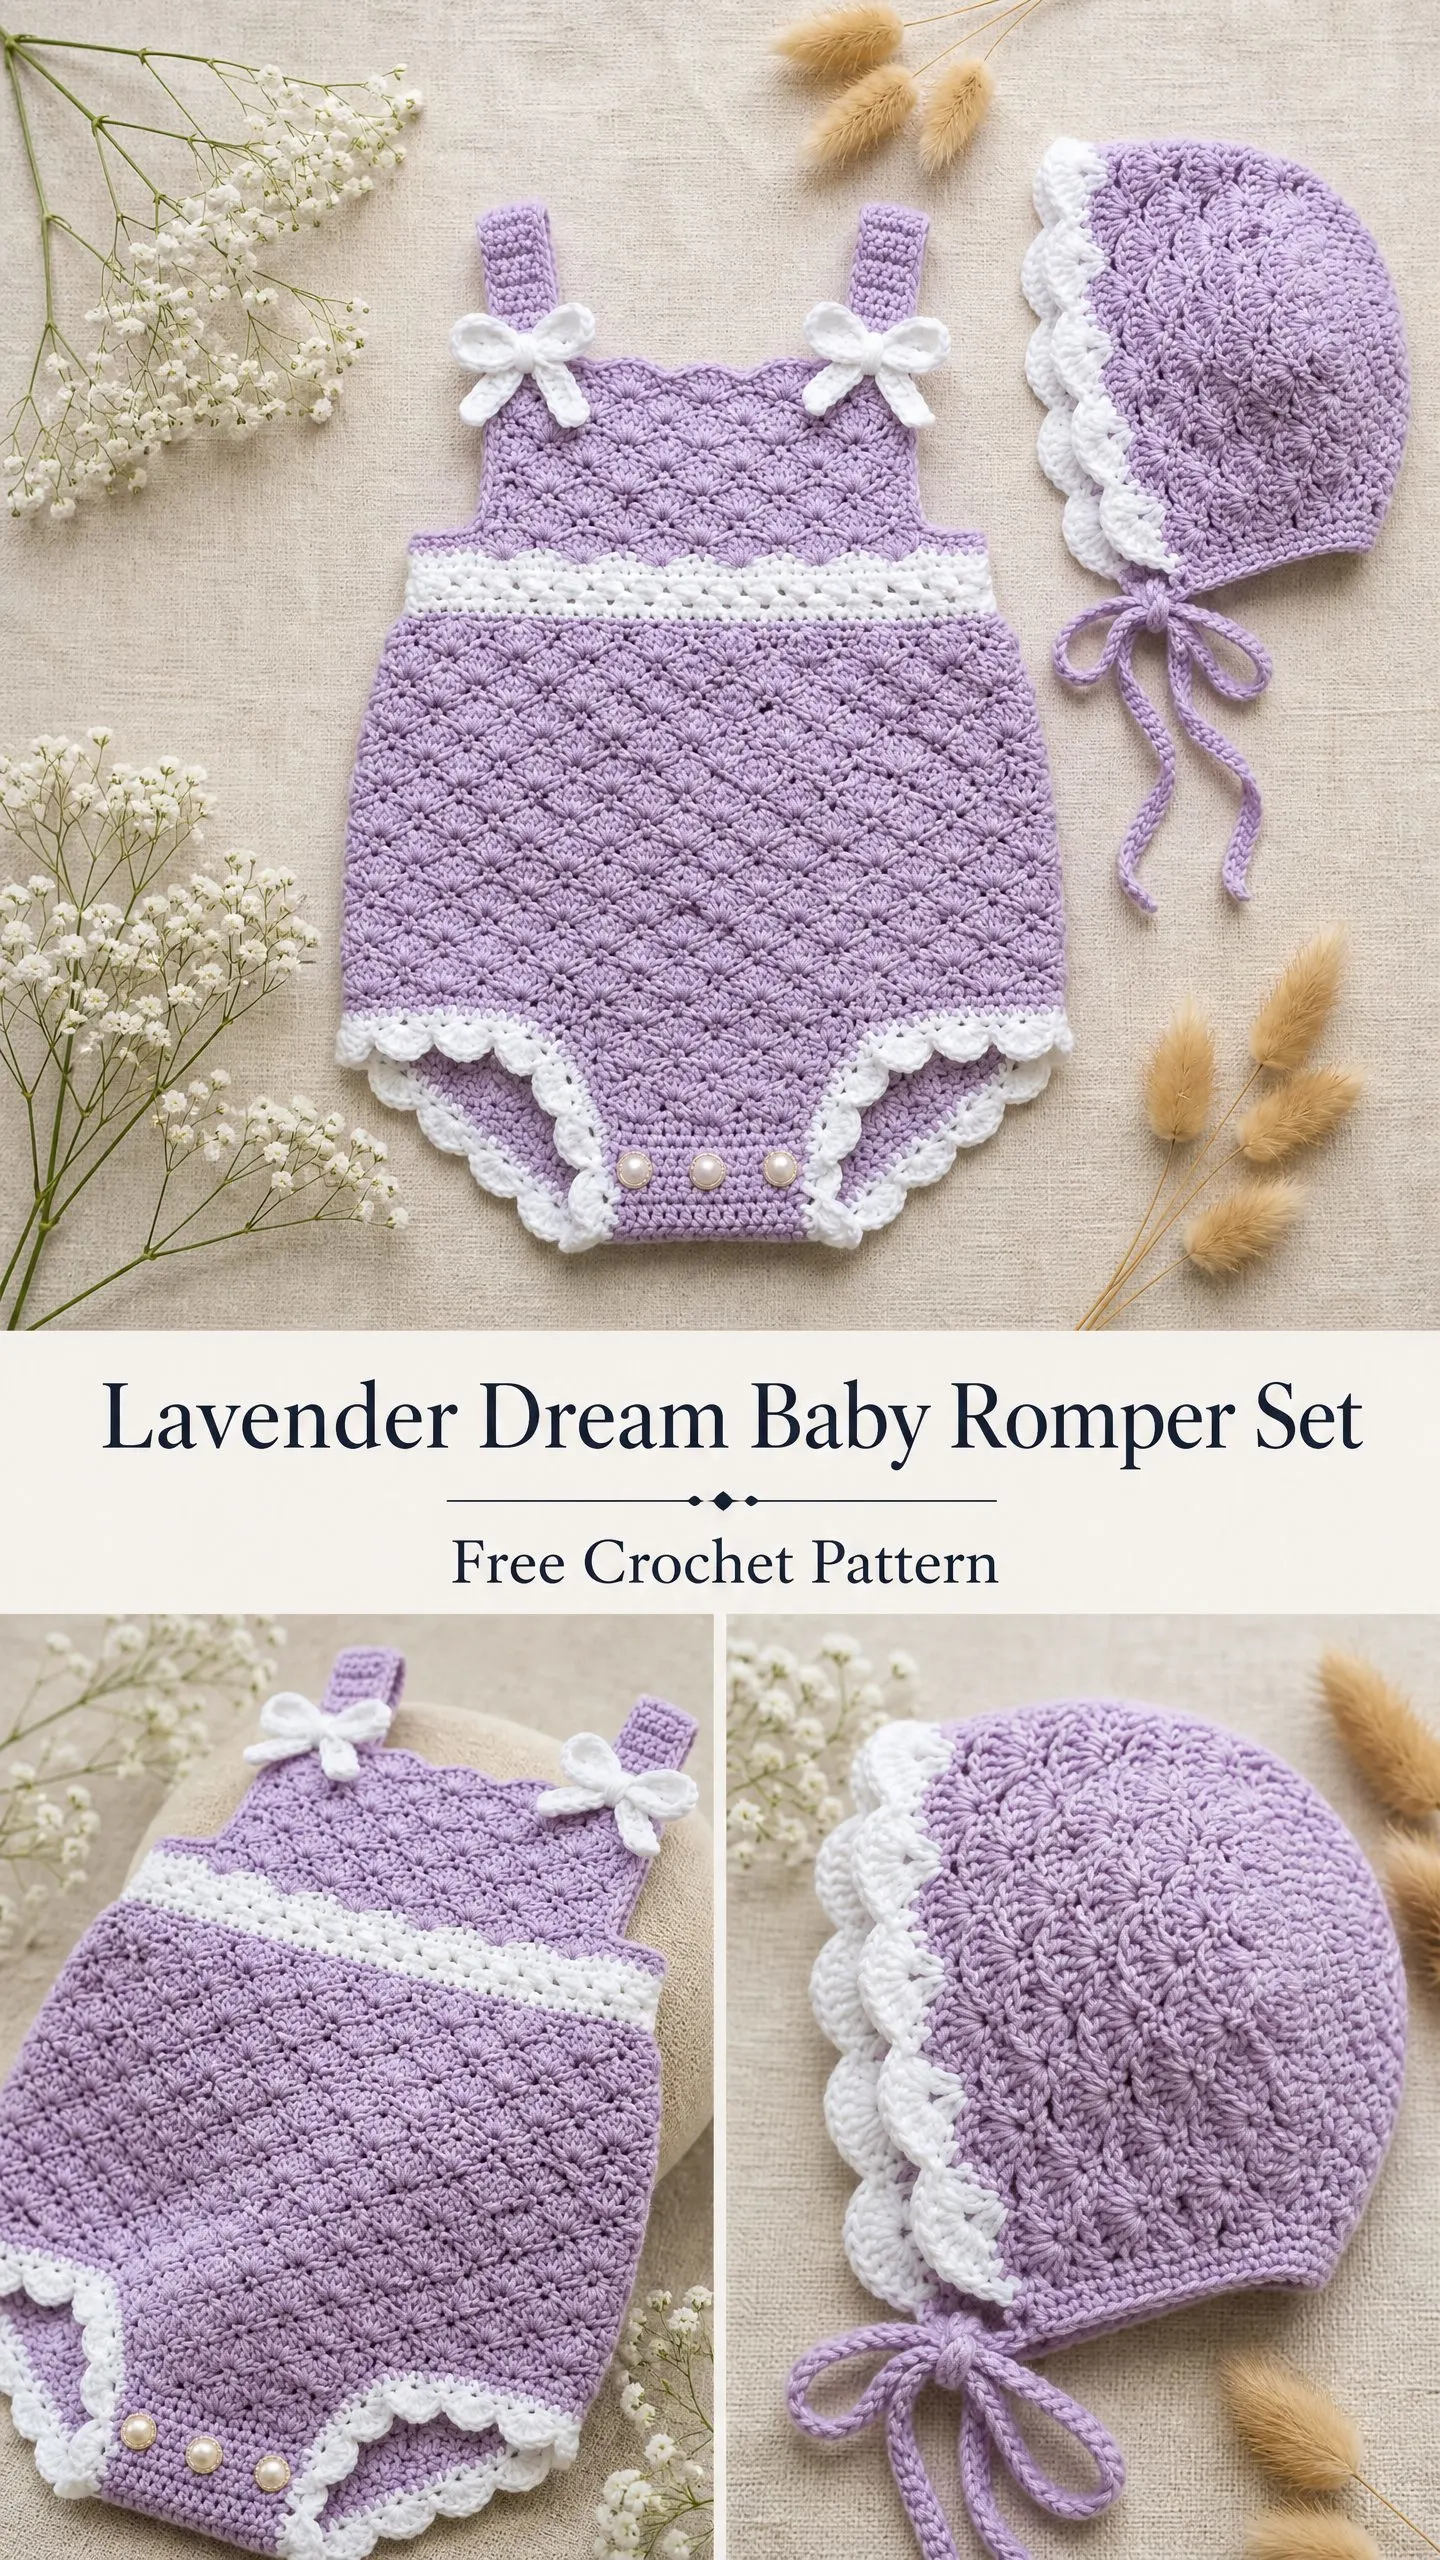
This heirloom style baby romper set includes a bubble romper and a matching bonnet, both worked in a soft lavender and white color combination. The romper features a shell lattice stitch body that creates that stunning diamond texture you see in the photos. A crisp white waistband breaks up the design, and adjustable shoulder straps with ribbon bows add the perfect finishing touch.
The set is sized for 3 to 6 month old infants and makes an unforgettable baby shower gift or newborn photo prop. The finished romper measures approximately 16 inches around the chest and 12 inches from top of bodice to crotch closure. The bonnet fits a head circumference of 15 to 16 inches.
Both pieces are worked flat in panels and then seamed together. The bonnet is worked in joined rounds from the crown outward. This construction method means no complicated in the round shaping for the romper body, which many crocheters find easier to manage.
Skill Level
This pattern is rated intermediate. You should feel comfortable with shell stitches, maintaining stitch counts across rows, making clean color changes, and reading row by row instructions carefully.
If you have completed a few dishcloths, scarves, or simple blankets, you are ready to level up to garment making with this project. The instructions are detailed enough that a motivated beginner can absolutely succeed. Just take your time and trust the process.
Time Estimate
Plan for approximately 14 to 20 hours of total crochet time if you work at an experienced intermediate pace. The romper body takes about 10 to 14 hours, while the bonnet adds another 4 to 6 hours. Finishing work, blocking, and adding embellishments require an additional 1 to 2 hours.
This is not a weekend project, but it is absolutely achievable over a week or two of evening crochet sessions. The repetitive shell pattern becomes almost meditative once you get the rhythm down.
Finished Measurements
Romper (sized for 3 to 6 months):
Bonnet:
I have included size customization tips at the end of the pattern for those who need to adjust up or down.
Materials Needed
Yarn
Main Color (MC): Light worsted weight yarn, also called weight 3 or DK weight, in lavender. You will need approximately 350 to 400 yards or 320 to 365 meters.
Contrast Color (CC): Same weight yarn in white. You will need approximately 100 to 120 yards or 91 to 110 meters.
Recommended Yarn Options
Option 1: Lion Brand 24/7 Cotton in Dusty Mauve and White. This 100 percent mercerized cotton is machine washable and holds stitch definition beautifully. It produces the clean, structured lattice texture visible in the finished garment and comes in generous 186 yard skeins.
Option 2: Paintbox Yarns Simply DK in Dusty Rose and Paper White. A 100 percent premium acrylic that feels soft against baby skin. It is colorfast after washing and widely available at a budget friendly price. The slight sheen mimics the look of cotton in photographs.
Option 3: Drops Safran in Lavender and Off White. A 100 percent Egyptian cotton that gives a slightly finer, heirloom appearance. Especially recommended for warmer climates.
Substitution note: Choose a smooth, tightly spun yarn with minimal fuzz so the shell lattice stitch stays crisp and readable. Avoid fuzzy or bouclé yarns. Always work a gauge swatch and adjust your hook size if needed.
Hook
US size E-4 or 3.5 mm crochet hook
Notions
Gauge
With MC and E-4 or 3.5 mm hook, after blocking:
Gauge is critical for this garment. A difference of even half a stitch per inch will cause the romper to be noticeably too large or too small on an infant. Work your swatch at least 5 inches square, block it, and measure the center 4 inches.
Abbreviations
Special Stitches
Shell Stitch (Shell)
Work 5 dc (double crochet) all into the same stitch or chain space. This creates one shell unit. In the shell lattice pattern, each shell sits inside the V shape of the shell below it, creating that beautiful diamond texture.
V-Stitch (V-st)
Work dc, ch 1, dc all into the same stitch or chain space.
Shell Lattice Pattern
This is the main stitch pattern used for the romper body and bonnet crown. Each horizontal repeat covers 4 stitches, which equals one shell and its surrounding chains. The pattern creates rows of shells that nestle into each other, forming a lattice effect.
Scallop Edging
Insert hook into designated stitch, pull up a loop, sc in same stitch, ch 2, 2 dc in same stitch, sl st into next stitch. This produces one scallop shell. Repeat across for a continuous scalloped border.
Crochet Bow (Optional)
Chain 12. Sc in 2nd ch from hook and in each ch across. (11 sc) Fasten off, leaving a 12 inch tail. Pinch the center of the strip tightly. Wrap the tail around the pinched center 4 times, pull tight, and use the tail to sew the bow to the shoulder strap. Weave in the end on the wrong side.
Pattern Notes Before You Begin
1. The romper front and back are worked identically in their body sections. The front bodice receives white bows at the straps during finishing.
2. The shell lattice pattern requires a stitch count that is a multiple of 4 plus 2 edge stitches. Always verify your count after the foundation row before proceeding.
3. Color changes: When switching from MC to CC or back, always complete the last yarn over pull through of the final stitch with the new color. Carry the unused color loosely along the wrong side for spans of 2 rows or fewer. For longer spans, fasten off and rejoin to avoid distortion.
4. The romper is worked flat until the side seams are joined. The bonnet is worked in joined rounds.
5. Turning chains: In the shell lattice pattern, the turning chain of 3 counts as the first dc of the row. In sc rows, the turning chain of 1 does NOT count as a stitch.
6. The crotch button placket is a narrow single crochet band worked after the front and back are seamed at the sides.
7. All stitch counts given in parentheses at the end of each row reflect the total number of working stitches in that row, not including the turning chain.
Instructions: Romper Front Panel
Section 1: Front Bodice (worked from top edge downward)
With MC, chain 42.
Foundation Row (WS): Sc in 2nd ch from hook and in each ch across. Turn. (41 sc)
Row 1 (RS): Ch 3, 2 dc in first sc (half shell), sk 1 sc, sc in next sc, sk 1 sc, (5 dc in next sc, sk 1 sc, sc in next sc, sk 1 sc) 9 times, 3 dc in last sc (half shell). Turn. (9 shells + 2 half shells + 10 sc)
Row 2 (WS): Ch 1, sc in first 3 dc (half shell), ch 2, sk sc, (sc in each of 5 dc of shell, ch 2, sk sc) 9 times, sc in last 3 dc of final half shell. Turn. (30 sc + 10 ch-2 sps)
Row 3 (RS): Ch 3, 2 dc in first sc, sk 2 sc, sc in ch-2 sp, sk 2 sc, (5 dc in center sc of 5 sc group, sk 2 sc, sc in ch-2 sp, sk 2 sc) 9 times, 3 dc in last sc. Turn. (9 shells + 2 half shells + 10 sc)
Rows 2 and 3 form your repeating 2 row pattern. Row 2 is always worked on the wrong side with all sc and ch-2 alignment spaces. Row 3 is always worked on the right side with shells.
Continue the 2 row repeat. Work Row 2 and Row 3 two more times (4 more rows total, Rows 4, 5, 6, 7), ending after a Row 3 (RS row).
Checkpoint: The bodice should now measure approximately 2.5 inches or 6.5 cm from the foundation edge.
Waistband
With CC (white), work across as follows:
Waistband Row 1 (WS): Attach CC with sl st at right edge. Ch 1, sc in each dc and sc across the top of the last shell row. Turn. (61 sc)
Waistband Row 2 (RS): Ch 1, sc in each sc across. Turn. (61 sc)
Waistband Row 3 (WS): Ch 1, sc in each sc across. Turn. (61 sc)
Fasten off CC. Rejoin MC.
Checkpoint: After the bodice and waistband, the front panel should measure approximately 3.5 inches or 9 cm from foundation edge to bottom of waistband. Width should measure approximately 10.25 inches or 26 cm.
Front Bubble Body
The bubble body widens slightly from the waistband to create the gathered bubble shape.
Rejoin MC on RS.
Body Foundation Row (RS): Working into the 61 sc of the final waistband row, ch 3, 2 dc in first sc, sk 1 sc, sc in next sc, sk 1 sc, (5 dc in next sc, sk 1 sc, sc in next sc, sk 1 sc) 14 times, 3 dc in last sc. Turn. (14 shells + 2 half shells + 15 sc)
Body Row 2 (WS, alignment row): Ch 1, sc in first 3 dc (half shell), ch 2, sk sc, (sc in each of 5 dc of shell, ch 2, sk sc) 14 times, sc in last 3 dc of final half shell. Turn. (45 sc + 15 ch-2 sps)
Body Row 3 (RS, shell row): Ch 3, 2 dc in first sc, sk 2 sc, sc in ch-2 sp, sk 2 sc, (5 dc in center sc of 5 sc group, sk 2 sc, sc in ch-2 sp, sk 2 sc) 14 times, 3 dc in last sc. Turn. (14 shells + 2 half shells + 15 sc)
Continue working Body Row 2 and Body Row 3 alternately for 8 more rows (4 more complete 2 row repeats), ending after a RS shell row.
Checkpoint: The bubble body should now measure approximately 5.5 inches or 14 cm from the waistband.
Leg Opening Shaping
The leg openings are created by stopping short of the full width on each side.
After the last full body shell row (RS), work a transition row:
Leg Shaping Setup Row (WS): Ch 1, sc in each dc and sc across the last RS row, converting the shell row to a flat sc row. Turn. (61 sc)
Leg Shaping Row 1 (RS): Sl st across first 10 sc. Ch 3, 2 dc in same sc as last sl st (half shell), sk 1 sc, sc in next sc, sk 1 sc, (5 dc in next sc, sk 1 sc, sc in next sc, sk 1 sc) 9 times, 3 dc in next sc (half shell). Leave last 10 sc unworked. Turn. (9 full shells + 2 half shells working across center 41 sc)
Leg Shaping Row 2 (WS): Ch 1, sc in first 3 dc (half shell), ch 2, sk sc, (sc in each of 5 dc of shell, ch 2, sk sc) 9 times, sc in last 3 dc of final half shell. Turn. (30 sc + 10 ch-2 sps)
Leg Shaping Row 3 (RS): Ch 3, 2 dc in first sc, sk 2 sc, sc in ch-2 sp, sk 2 sc, (5 dc in center sc of 5 sc group, sk 2 sc, sc in ch-2 sp, sk 2 sc) 9 times, 3 dc in last sc. Turn. (9 shells + 2 half shells)
Work 1 more alignment row (Leg Shaping Row 4, WS, same as Row 2 above). Turn.
Crotch Row (RS): Ch 1, sc across every sc and work 1 sc into each ch-2 sp. Turn. (40 sc)
Work 2 more rows of sc for crotch placket. (40 sc each row)
Fasten off MC. Leave a 12 inch tail for seaming.
Final Checkpoint: The front panel from foundation chain to bottom of crotch placket should measure approximately 12 inches or 30.5 cm.
Instructions: Romper Back Panel
The back panel is worked identically to the front panel through all sections. This includes the bodice, waistband, bubble body, leg shaping, and crotch placket.
The only differences are that the back bodice does not receive bow embellishments, and the crotch placket for the back will carry the button loops while the front carries the buttons. You may substitute sew on snaps if you prefer.
Work the back panel following all rows identically to the front panel. Fasten off, leaving a 12 inch tail.
Instructions: Shoulder Straps (Make 2)
With MC, chain 7.
Row 1: Sc in 2nd ch from hook and in each ch across. Turn. (6 sc)
Rows 2 through 26: Ch 1, sc in each sc across. Turn. (6 sc each row)
Fasten off, leaving a 12 inch tail for attachment.
Each strap should measure approximately 6.5 inches or 16.5 cm long.
Fitting tip: Strap length can be adjusted by adding or removing rows. Each 2 rows equals approximately 0.5 inch or 1.3 cm in length. Try the romper on the baby before permanently sewing straps to ensure correct placement and length.
Instructions: Bonnet
The bonnet is worked in joined rounds from the crown, then the brim is added.
Crown
With MC, make a magic ring (or chain 4 and join with sl st to form a ring).
Round 1: Ch 3 (counts as dc), 11 dc in ring, join with sl st to top of ch-3. (12 dc)
Round 2: Ch 3, dc in same st, 2 dc in each dc around, join with sl st to top of ch-3. (24 dc)
Round 3: Ch 3, dc in same st, dc in next dc, (2 dc in next dc, dc in next dc) around, join with sl st to top of ch-3. (36 dc)
Round 4: Ch 3, dc in same st, dc in next 2 dc, (2 dc in next dc, dc in next 2 dc) around, join with sl st to top of ch-3. (48 dc)
Round 5: Ch 3, dc in same st, dc in next 3 dc, (2 dc in next dc, dc in next 3 dc) around, join with sl st to top of ch-3. (60 dc)
Continue increasing by 12 dc each round until the crown measures approximately 5 inches or 12.5 cm in diameter.
Bonnet Body
Work even in dc for 6 rounds without increases. Join at the end of each round with sl st to top of ch-3.
Brim
With CC, work the scallop edging around the face opening of the bonnet. Insert hook, sc, ch 2, 2 dc in same st, sk 1 st, sl st in next st. Repeat around.
Tie Strings
With MC, chain 60. Sl st in 2nd ch from hook and in each ch across. Fasten off. Make 2. Attach one tie string to each side of the bonnet face opening.
Assembly and Finishing
Seaming the Romper
1. Place front and back panels with right sides together.
2. Using your tapestry needle and the long tails you left, whip stitch or mattress stitch the side seams from underarm to leg opening on both sides.
3. Seam the crotch placket partially, leaving the center open for button closure.
Attaching Straps
1. Position straps at the front bodice corners, approximately 1 inch from each side edge.
2. Sew securely using yarn tails or matching thread.
3. Cross straps at the back and attach to back bodice corners, or attach straight for adjustable button placement.
Scallop Edging
With CC, work scallop edging around both leg openings and across the top of the bodice front.
Adding Bows
Tie white satin ribbon into small bows and tack onto the shoulder straps at the front. Alternatively, use the crocheted bow instructions provided in the special stitches section.
Attaching Buttons
Sew 3 pearl buttons to the back crotch placket. Create button loops on the front placket using ch-3 loops worked during a final edging pass, or substitute snap fasteners.
Blocking
Wet block both pieces by soaking in lukewarm water for 15 minutes, gently squeezing out excess water, and pinning to finished dimensions on a blocking mat. Allow to dry completely before wearing.
Size Customization Tips
To size down (0 to 3 months): Reduce foundation chain by 4 stitches (one shell repeat). Work 2 fewer rows in the bubble body section.
To size up (6 to 12 months): Add 4 stitches to foundation chain (one shell repeat). Work 2 to 4 additional rows in the bubble body section. Add 4 rows to strap length.
Always check gauge and adjust as needed. Test fit on the intended baby or a similar sized doll before finishing.
Troubleshooting Common Issues
Shells not aligning: Count your stitches at the end of every row. The shell lattice pattern is unforgiving of stitch count errors, and a single missed stitch will throw off the entire pattern alignment.
Waistband puckering: Make sure you are working into every stitch when transitioning from shell rows to sc rows. The stitch count change is intentional and should lie flat after blocking.
Leg openings too tight: Block the finished romper aggressively, pinning the leg openings wider than you think necessary. Cotton yarn especially will relax with blocking.
Final Thoughts on the Lavender Dream Baby Romper Set Crochet Pattern
This crochet tutorial covers everything you need to create a stunning heirloom quality baby outfit. The step by step instructions break down what might seem like an intimidating project into completely manageable pieces. You have learned the shell lattice pattern, worked through shaping for a bubble silhouette, and constructed a matching bonnet.
The finished set makes an extraordinary gift for baby showers, christenings, or newborn photography sessions. The classic lavender and white color combination photographs beautifully, but you could easily substitute any soft color combination that suits your taste.
Take your time with this project. Enjoy the meditative rhythm of the shell stitches. And do not be afraid to rip back a few rows if something looks off. Every experienced crocheter has a pile of frogged yarn in their past.
Thank you so much for choosing this pattern for your next crochet project. I truly hope you love making this set as much as I loved designing it. If you complete your own Lavender Dream Baby Romper Set, please save this pattern to your Pinterest boards so you can find it again later. And I would absolutely love to see your finished pieces, so drop a comment below or tag me on social media with your photos. Happy crocheting!
You Might Also Like
- Sunset Ombre Daisy Granny Square Blanket Free Crochet Pattern
- Cream Lace Flutter Sleeve Baby Dress Free Crochet Pattern
- Ocean Blue Hooded Toddler Sweater Free Crochet Pattern
- Sage Green Mushroom Cottage Backpack Free Crochet Pattern
