Last fall, I found myself standing in my favorite yarn shop, completely mesmerized by a display of warm terracotta and burnt orange skeins. They reminded me of the view from my kitchen window during those perfect October evenings when the trees look like they are literally on fire with color. I bought way more than I needed, obviously, and then spent weeks wondering what to make. I wanted something cozy enough for those crisp morning coffee runs but pretty enough to wear when friends come over. Something that felt like wrapping myself in autumn itself. This cardigan is what happened when I finally stopped overthinking and just started crocheting.
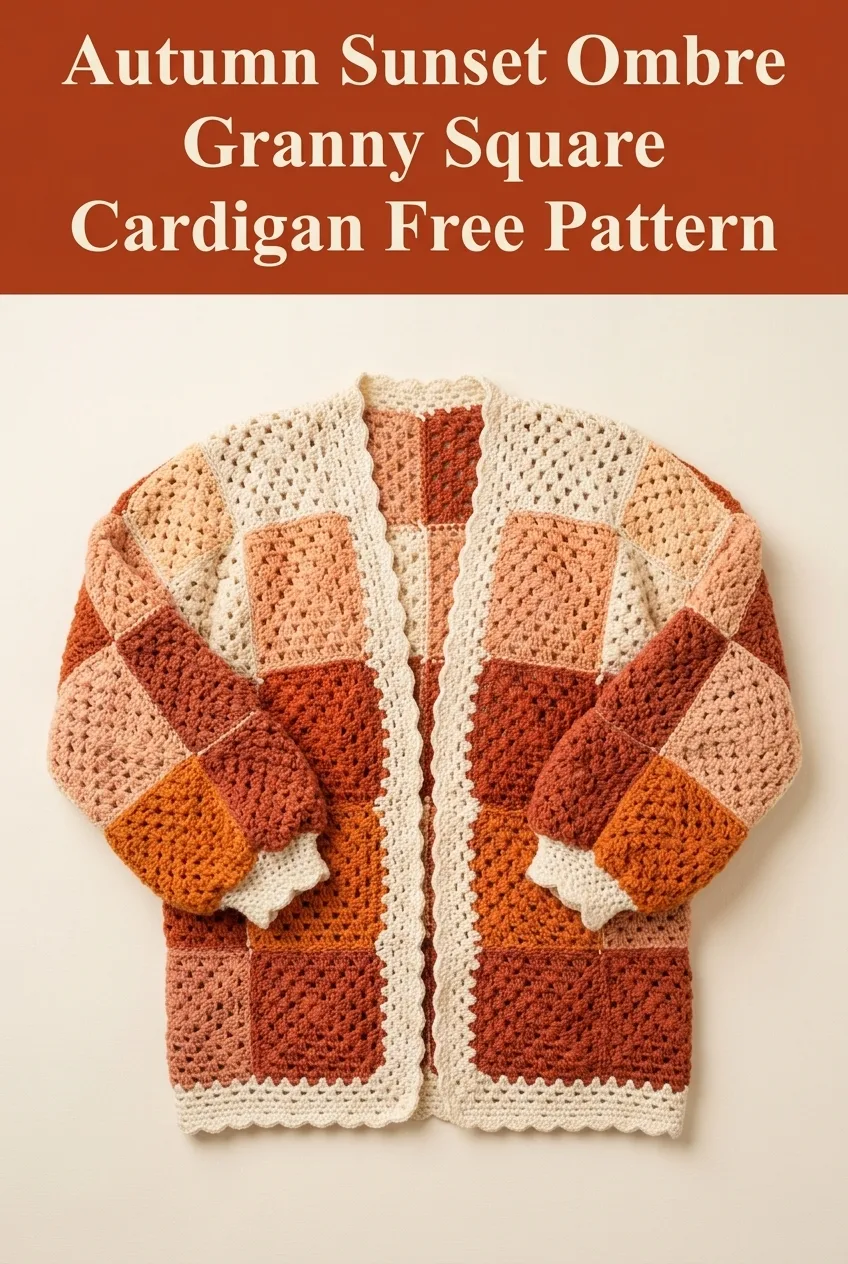
I am genuinely thrilled with how this autumn sunset ombre granny square cardigan pattern turned out. The gradient color placement creates this beautiful sunset effect that transitions from soft cream through peachy coral, warm rust, and deep burnt orange. And here is the best part: if you can make a basic granny square, you can absolutely make this cardigan. I promise.
Why You Will Love This Granny Square Cardigan Pattern
This crochet cardigan pattern combines classic granny square construction with thoughtful color placement to create a statement piece that looks far more complicated than it actually is. The open front design means no tricky buttonholes or closures to worry about. The oversized fit is forgiving and comfortable. And the modular construction lets you work on individual squares anywhere, anytime.
The granny square crochet technique is one of the most beginner friendly methods for creating garments because you work small, manageable pieces and then join them together. No wrestling with massive blanket-sized projects on your hook. No complicated shaping while you work. Just satisfying little squares that stack up quickly.
Skill Level
Intermediate beginner. If you have made granny squares before and feel comfortable joining pieces, you are ready for this project. If you have never made a granny square, I recommend practicing a few before diving in. The cardigan construction itself is straightforward once you understand the basic square.
Finished Measurements
This pattern creates a relaxed, oversized fit.
Shown size: Medium/Large
Finished bust: Approximately 48 inches with fronts overlapping slightly
Length: Approximately 26 inches from shoulder to hem
Sleeve length: Approximately 18 inches from shoulder seam to cuff
Materials Needed
Yarn:
I used a soft acrylic blend with good stitch definition. Look for yarn that is not too splitty since you will be working into chain spaces frequently.
Hook:
Notions:
Gauge
One completed granny square measures 6 inches by 6 inches after blocking.
Please check your gauge. If your squares are too small, go up a hook size. If they are too large, go down a hook size. Gauge matters for garment fit, so take the time to make a test square first.
Abbreviations and Stitch Definitions
Ch = Chain. Wrap yarn over hook, pull through loop on hook. This creates the foundation and spaces in your work.
Sl st = Slip stitch. Insert hook, yarn over, pull through both the stitch and the loop on your hook in one motion. Used for joining and moving across stitches without adding height.
Dc = Double crochet. Yarn over, insert hook into stitch, yarn over and pull up a loop (3 loops on hook), yarn over and pull through 2 loops (2 loops remain), yarn over and pull through remaining 2 loops. This is the main stitch used throughout.
3-dc cluster = Three double crochet stitches worked into the same stitch or space. This creates the classic granny square grouping.
Sp = Space. The gap created by chain stitches, where you will insert your hook for the next round.
Understanding the Construction
Before we start, let me explain how this cardigan comes together. You will make 32 individual granny squares in various colors. These squares are arranged in a specific layout to create the ombre gradient effect, then joined together to form the body and sleeves. Finally, you will add a simple border around the entire cardigan for a polished finish.
The color placement is what makes this pattern special. The lighter colors (cream and peach) sit at the top near the shoulders, transitioning through coral and rust in the middle, with the warmest burnt orange tones at the bottom and cuffs. Think of it like a sunset moving from light to dark.
Granny Square Pattern
Make 32 total. I will give you the color breakdown after the basic instructions.
Foundation: With your first color, ch 4. Sl st to first ch to form a ring.
Round 1: Ch 3 (counts as first dc throughout), 2 dc into ring, ch 2, *3 dc into ring, ch 2* three times. Sl st to top of beginning ch 3 to join. (4 clusters of 3 dc, 4 corner ch-2 spaces)
Round 2: Sl st across top of next 2 dc and into corner ch-2 sp. Ch 3, 2 dc in same sp, ch 1, *3 dc, ch 2, 3 dc* in next corner sp, ch 1. Repeat from * around, ending with 3 dc and ch 2 in first corner. Sl st to top of beginning ch 3. (8 clusters total, 4 corner spaces, 4 side spaces)
Round 3: Sl st to corner sp. Ch 3, 2 dc in same sp, ch 1, 3 dc in next ch-1 sp, ch 1, *3 dc, ch 2, 3 dc* in corner, ch 1, 3 dc in ch-1 sp, ch 1. Repeat from * around. Sl st to join. (12 clusters total)
Round 4: Continue the established pattern, working 3 dc clusters in each ch-1 space along the sides and *3 dc, ch 2, 3 dc* in each corner ch-2 space. Sl st to join. (16 clusters total)
Round 5: Repeat Round 4 pattern. Sl st to join. Fasten off. (20 clusters total)
Your finished square should measure approximately 6 inches. Block all squares before joining for best results.
Color Breakdown for Squares
This is where the magic happens. Follow this color guide to create the ombre effect.
Solid Color Squares (work all 5 rounds in one color):
Ombre Transition Squares (change colors between rounds):
When changing colors, fasten off the old color at the end of the round and join the new color in any corner space with a slip stitch before beginning the next round.
Layout and Assembly
Lay out your squares according to this arrangement before joining. This step is crucial for getting the gradient effect right.
Back Panel (4 squares wide by 4 squares tall):
Row 1 (top): Cream, Peach, Peach, Cream
Row 2: Peach/Cream transition, Coral, Coral, Peach/Cream transition
Row 3: Coral, Rust, Rust, Coral
Row 4 (bottom): Rust/Orange transition, Orange, Orange, Rust/Orange transition
Left Front Panel (2 squares wide by 4 squares tall):
Row 1 (top): Cream, Peach
Row 2: Coral, Coral
Row 3: Rust, Rust
Row 4 (bottom): Orange, Orange
Right Front Panel (mirror of left front):
Row 1 (top): Peach, Cream
Row 2: Coral, Coral
Row 3: Rust, Rust
Row 4 (bottom): Orange, Orange
Each Sleeve (2 squares wide by 3 squares tall):
Row 1 (top/shoulder): Peach, Peach
Row 2: Rust, Rust
Row 3 (cuff): Orange, Orange
Joining the Squares
I recommend using the flat slip stitch join method for a clean, slightly raised seam that adds texture.
Hold two squares with right sides facing. Working through both layers, insert hook through corner ch-2 space of both squares. Join yarn with sl st. Ch 1, sl st through next stitch on both squares. Continue slip stitching through corresponding stitches across the edge. Fasten off.
Join squares into rows first, then join rows together.
Assembly order:
1. Join back panel squares into 4 horizontal rows
2. Join the 4 back rows vertically
3. Join each front panel the same way
4. Join front panels to back at shoulder seams (top squares only)
5. Join front panels to back at side seams, leaving armhole openings
6. Join sleeve squares into tubes
7. Set sleeves into armholes
Border
The cream border unifies the entire piece and gives a polished finish.
With Color A, join yarn at bottom back corner of cardigan.
Round 1: Ch 1, sc evenly around entire outer edge of cardigan, working 3 sc in each corner. When you reach the neckline and front opening, continue up one front, around the back neck, and down the other front. Sl st to join. Do not turn.
Round 2: Ch 3, dc in each sc around, working 3 dc in corner stitches. Sl st to join.
Round 3: Ch 1, *sc in next st, skip 1 st, 5 dc in next st (shell made), skip 1 st*. Repeat from * around for a scalloped edge. Sl st to join. Fasten off.
Repeat border rounds around each sleeve cuff.
Finishing
Weave in all ends securely. I like to weave ends through the back of several stitches, then reverse direction for extra security.
Block the finished cardigan if needed. Lay flat, mist with water, and pin to measurements. Allow to dry completely.
Customization Tips
Want to make this cardigan your own? Here are some ideas.
Different colorway: Try blues and greens for an ocean vibe, or pinks and purples for a spring version. The gradient effect works with any color family.
Adjust the length: Add another row of squares to the body for a longer cardigan, or remove one row for a cropped look.
Add pockets: Stitch two additional squares to the lower front panels as patch pockets.
Change the border: A simple single crochet border works beautifully if you prefer a more minimal look.

Care Instructions
Hand wash in cool water with mild detergent, or machine wash on delicate in a mesh bag. Lay flat to dry to maintain shape. Do not hang wet, as the weight of the water can stretch the garment.
I hope you absolutely love making this autumn sunset ombre granny square cardigan as much as I loved designing it. The modular construction makes it perfect for working on during cozy evenings, and watching those gorgeous colors come together is so satisfying.
If you make this cardigan, I would love to see it! Tag me on Instagram or share a photo in our Facebook group. Your color choices always inspire me, and honestly, seeing your finished projects is one of my favorite parts of this whole thing.
Save this crochet cardigan pattern to your Pinterest boards so you can find it when you are ready to start, and please leave a comment below if you have any questions or just want to share your progress. I read every single one and love hearing from you. Happy crocheting, friend!
