Crocheted handbags look intimidating. I get it. All those color changes, the structured shape, the hardware, the handles that somehow need to stay put. But here’s the truth: if you can single crochet in a straight line, you can absolutely make this bag.
Get the Ad-Free PDF Pattern
You can find the free pattern below, or you can purchase the ad-free printable PDF from my shop.
Get the Printable PDF →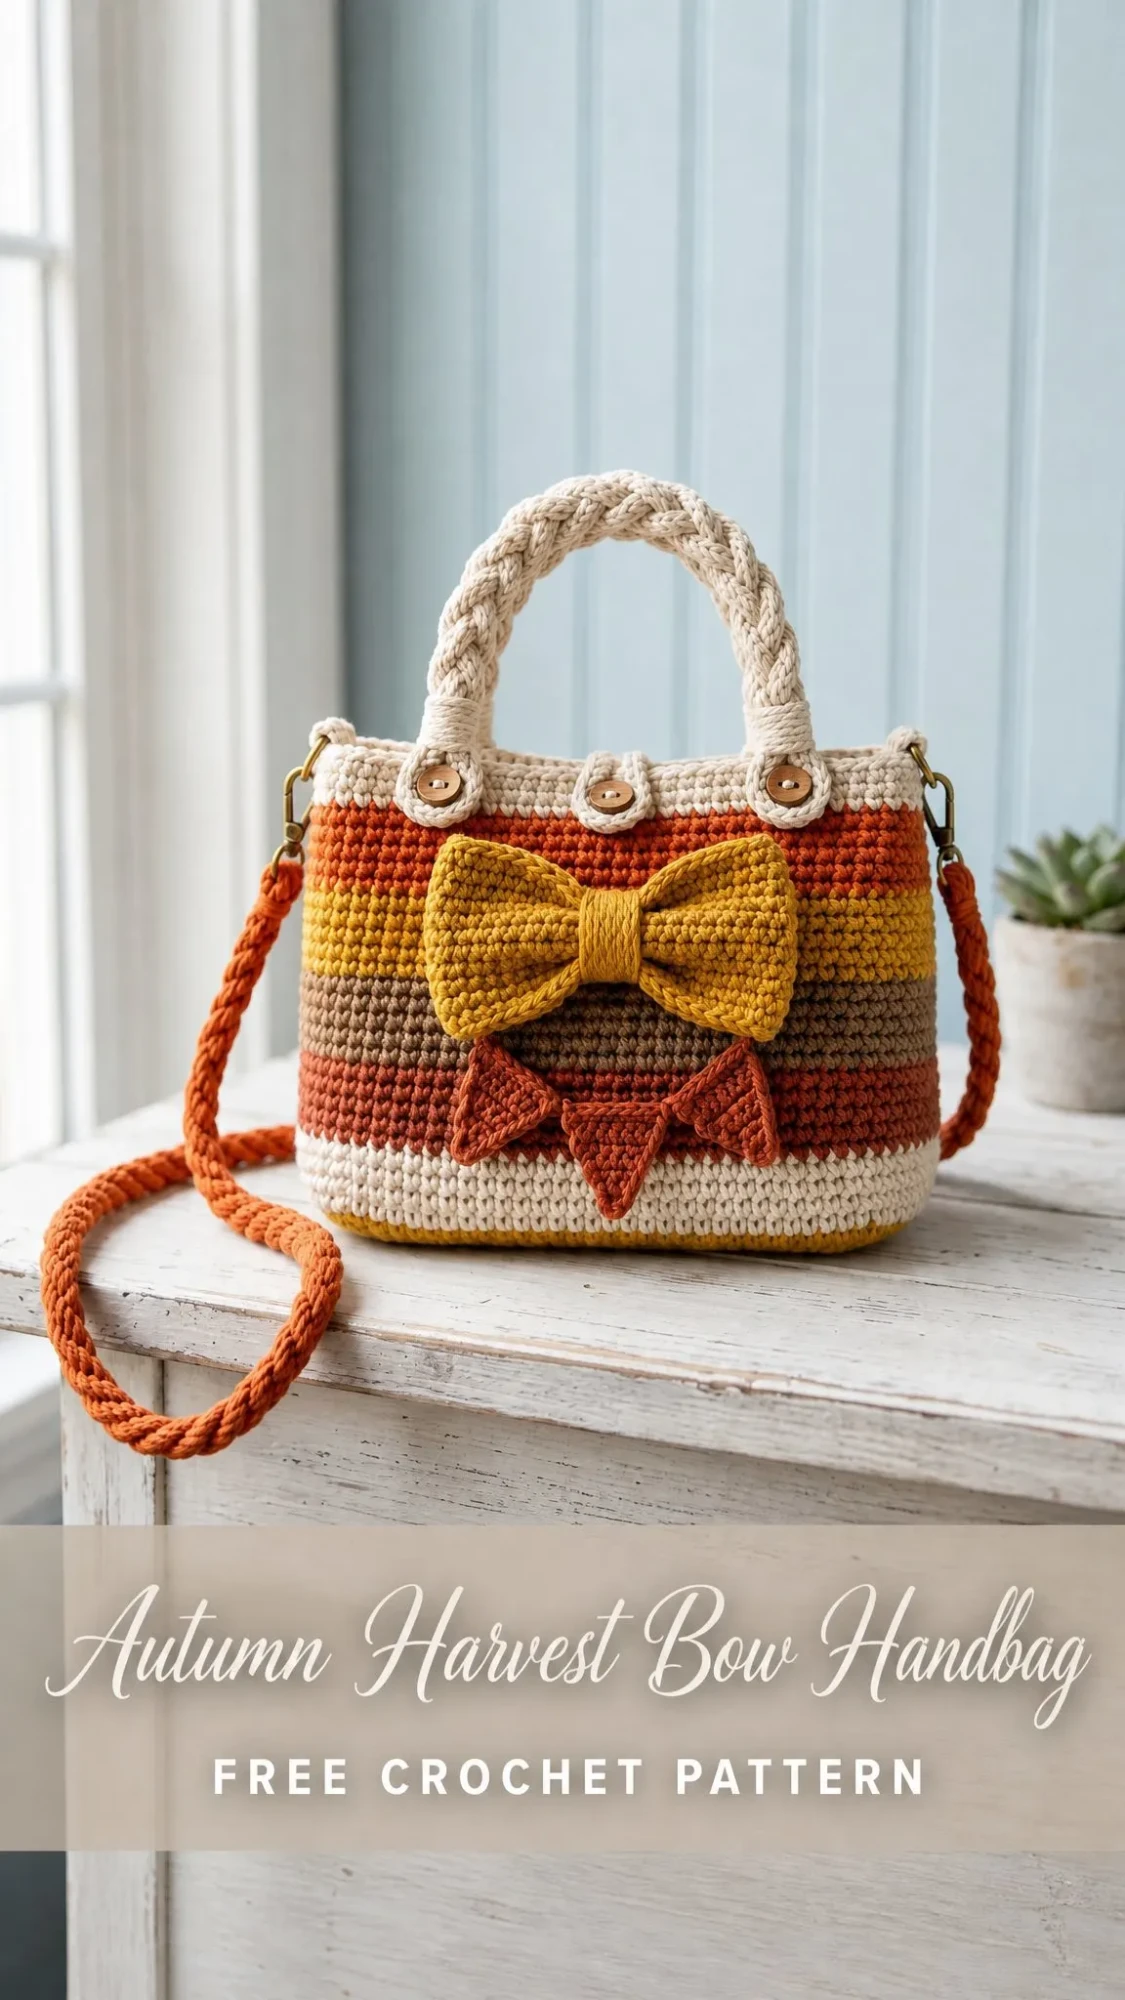
The Autumn Harvest Bow Handbag breaks down into simple pieces. A flat rectangle for the base. Rounds of single crochet for the body. A few small appliques. Some braiding. That’s genuinely it. No complicated shaping, no confusing decreases, no mystery stitches that require a YouTube deep dive at midnight.
Whether you’ve been crocheting for years or you’re an adventurous beginner ready to level up, this pattern meets you where you are. I’ll walk you through every step, define every abbreviation, and point out the spots where things might get tricky. By the end, you’ll have a gorgeous structured mini handbag with braided handles, warm harvest stripes, an oversized bow, and a removable shoulder strap. Let’s make something beautiful together.
About This Pattern
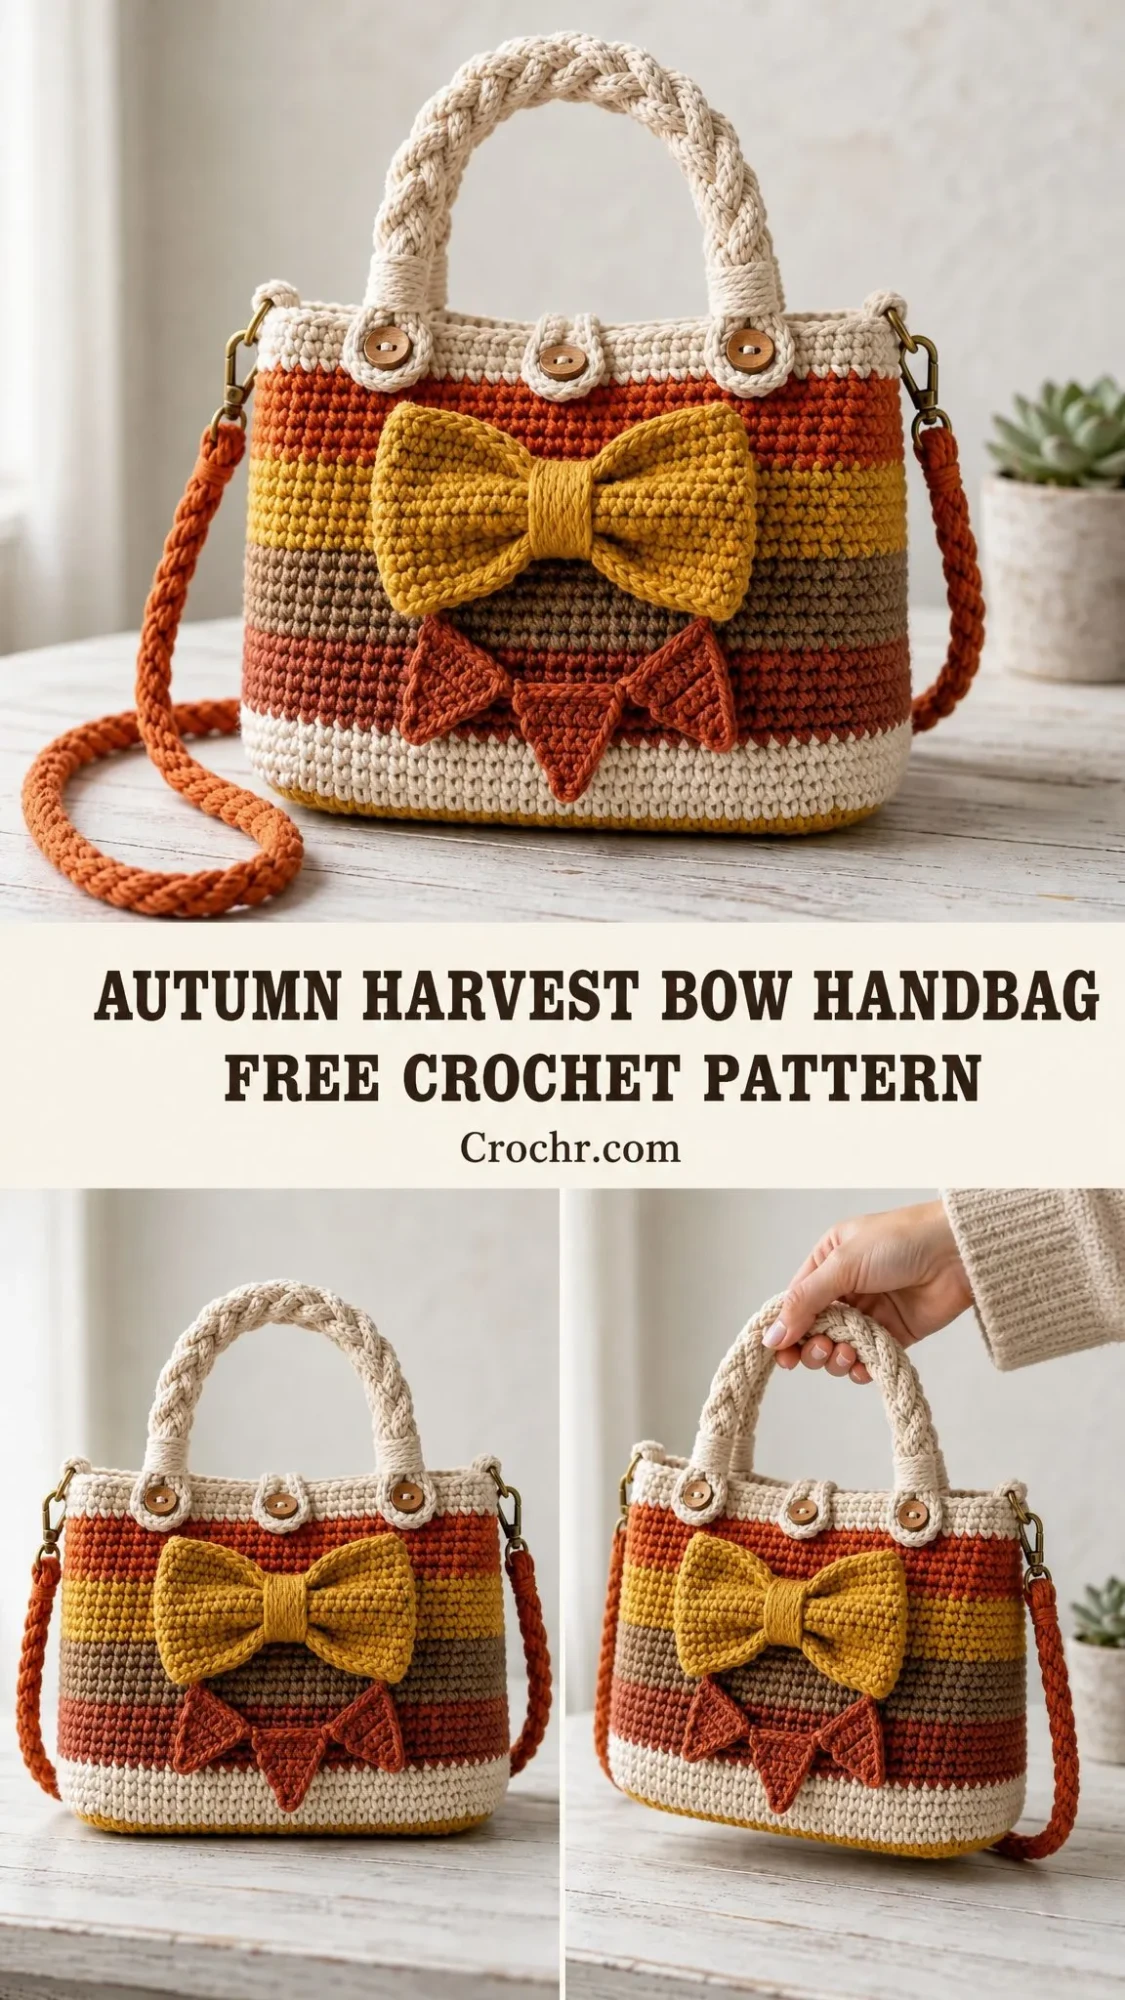
This structured mini handbag features everything I love about autumn: warm earthy tones, cozy textures, and a touch of whimsy with that oversized golden bow. The finished bag measures approximately 9 inches wide by 6.5 inches tall by 3 inches deep (23 x 16.5 x 7.5 cm), not including the handles or strap. It’s the perfect size for essentials like your phone, wallet, keys, and a lipstick or two.
The skill level sits at adventurous beginner to intermediate. You’ll work neat single crochet, pick up stitches around a base, change colors in the round, and attach simple appliques. Nothing scary, I promise. The estimated time to complete is 8 to 12 relaxed hours, which makes it a satisfying weekend project or a nice week-long evening endeavor.
Materials You’ll Need
Before you start, gather these supplies. Having everything ready makes the process so much smoother.
Yarn: Worsted weight cotton or cotton-blend yarn, approximately 410 yards (375 meters) total, divided as follows:
Recommended yarns: Lily Sugar’n Cream Solids, Paintbox Yarns Recycled Cotton Worsted, or Lion Brand 24/7 Cotton. Any #4 worsted weight cotton that gives you a firm fabric at gauge will work beautifully. If you prefer a softer acrylic blend, go down a hook size if the body feels floppy.
Hooks:
Notions:
Gauge
Getting gauge right matters for this project because you want the bag to hold its structured shape. Here’s what you’re aiming for:
Bag fabric: 16 single crochet stitches and 18 rounds equals 4 inches (10 cm), blocked.
Base check: 36 single crochet stitches should measure about 9 inches (23 cm). 12 rows should measure about 2.75 to 3 inches (7 to 7.5 cm).
Applique gauge is less critical, but use the smaller hook for crisp edges on the bow and pennants.
I strongly recommend making a small swatch before diving in. It only takes a few minutes and saves potential heartache later.
Abbreviations and Stitch Guide
Let me define everything you’ll encounter in this pattern. I’m using US crochet terms throughout. If you typically work in UK terms, remember that US single crochet equals UK double crochet.
Special Stitches
Standing sc: Make a slip knot on your hook, insert hook in the indicated stitch, yarn over and pull up a loop, yarn over and pull through both loops. This lets you join a new color without a chain.
Invisible join: Cut yarn, pull tail through last stitch, thread needle, insert under both loops of first stitch of round, then down through top of last stitch. This creates a seamless finish.
Crab stitch (reverse single crochet): Working left to right instead of right to left, insert hook in previous stitch, yarn over, pull up a loop, yarn over and pull through both loops. It creates a nice corded edge.
Surface slip stitch: Hold yarn on inside of work, insert hook from front to back, pull up a loop and pull it through loop on hook.
Pattern Notes
A few things to keep in mind as you work:
Work body rounds with the right side facing you. Join each round with a slip stitch to the first single crochet and chain 1. The turning chain does not count as a stitch.
Color changes: Change color on the final yarn over of the last single crochet before joining. This keeps your color transitions clean.
Left-handed crocheters: You can work the same instructions. Placement will be mirrored, so mark your front center and side points before attaching hardware.
Base Instructions
The base is worked flat in golden mustard yarn with your 4.5 mm hook.
Chain 37.
Row 1: Single crochet in 2nd chain from hook and in each chain across. Chain 1, turn. (36 sc)
Rows 2 through 12: Single crochet in each stitch across. Chain 1, turn after rows 2 through 11 only. Do not chain or turn after row 12. (36 sc)
Checkpoint: Your base should measure approximately 9 x 2.75 to 3 inches (23 x 7 to 7.5 cm). This is a good time to add optional plastic canvas cut slightly smaller than your base if you want extra structure.
Body Instructions
Now we’ll work joined rounds around the base, creating the bag walls. Each round has 96 single crochet stitches.
Setup Round: With cream yarn and right side facing, single crochet 36 across the long edge, single crochet 12 evenly down the short side edge, single crochet 36 across the foundation chain edge, single crochet 12 evenly up the remaining short side edge. Join with slip stitch to first single crochet. (96 sc)
Rounds 1 through 4 (cream): Chain 1, single crochet in each stitch around. Join. (96 sc)
Rounds 5 through 9 (rust): Chain 1, single crochet in each stitch around. Join. (96 sc)
Rounds 10 through 14 (taupe): Chain 1, single crochet in each stitch around. Join. (96 sc)
Rounds 15 through 19 (golden mustard): Chain 1, single crochet in each stitch around. Join. (96 sc)
Rounds 20 through 23 (burnt orange): Chain 1, single crochet in each stitch around. Join. (96 sc)
Rounds 24 through 27 (cream): Chain 1, single crochet in each stitch around. Join. (96 sc)
Checkpoint: Your body should measure approximately 6 inches (15 cm) tall from the base edge. Fold lightly at the side markers (after stitches 24 and 72) to form the rectangular silhouette.
Stripe order from bottom: cream, rust, taupe, mustard, burnt orange, cream.
Top Rim Instructions
Continue with cream yarn.
Round 28 (cream): Chain 1, single crochet in each stitch around. Join. (96 sc)
Round 29 (cream): Work crab stitch in each stitch around. Use an invisible join to finish. (96 crab stitches)
Optional lining note: If you’re adding a fabric lining, sew it in after the hardware is attached. Catch the lining just below round 28 so the rim remains clean and visible.
Handle Tabs (Make 4)
These tabs hold your braided handles in place with decorative buttons. Use cream yarn and your 4.5 mm hook.
Chain 9.
Row 1: Single crochet in 2nd chain from hook and in each chain across. Chain 1, turn. (8 sc)
Rows 2 through 5: Single crochet in each stitch across. Chain 1, turn. (8 sc)
Row 6 (buttonhole row): Single crochet 2, chain 4, skip 4 stitches, single crochet 2. Fasten off. (4 sc + ch-4 loop)
Placement: Fold each tab over the rim. Front tabs center over stitches 15 and 33. Back tabs center over stitches 63 and 81. Sew the lower edge to the inside of the bag, then place a button on the outside through the loop.
Closure Loop
At top center front, join cream yarn at stitch 24. Chain 10, slip stitch into the same stitch to form a loop, turn, work 12 single crochet around the chain loop, slip stitch into the rim. Fasten off.
Sew one button or install a magnetic snap on the inside back center to correspond with this loop.
Braided Handles (Make 2)
These chunky braided handles give the bag its luxe look. They’re easier than they appear.
Cut 9 strands of cream yarn, each 28 inches (71 cm) long. Knot one end securely. Divide into 3 groups of 3 strands each. Braid firmly until you reach 13 inches (33 cm). Knot the other end.
Wrap each raw end with cream yarn for about 1 inch (2.5 cm) to create a clean finished look.
Sew one handle to the front tabs and one to the back tabs, shaping each into a 4.5 to 5 inch (11.5 to 12.5 cm) arch above the rim.
Removable Shoulder Strap
Cut 12 strands of burnt orange yarn, each 88 inches (224 cm) long. Braid into a 38 to 40 inch (96.5 to 101.5 cm) strap.
Thread the ends through swivel clasps or D-rings, fold back 1 inch (2.5 cm), and wrap or sew securely.
Attach D-rings at the side markers: between stitches 48 and 49 on one side, and between stitches 96 and 1 on the other. Stitch through several layers for strength.
Large Bow (Golden Mustard)
This oversized bow is the star of the show. Use your 4.0 mm hook for crisp edges.
Bow Panel:
Chain 23.
Row 1: Single crochet in 2nd chain from hook and in each chain across. Chain 1, turn. (22 sc)
Rows 2 through 10: Single crochet in each stitch across. Fasten off after row 10. (22 sc)
Center Wrap:
Chain 7.
Row 1: Single crochet in 2nd chain from hook and in each chain across. Chain 1, turn. (6 sc)
Rows 2 through 10: Single crochet in each stitch across. Fasten off.
Assembly: Pinch the bow panel at the center to create the bow shape. Wrap the center strip around the pinch and sew securely on the back.
Rust Pennants (Make 3)
These little triangular flags add such a cute detail below the bow. Use your 4.0 mm hook and rust yarn.
Chain 2.
Row 1: 2 single crochet in 2nd chain from hook. Chain 1, turn. (2 sc)
Row 2: Increase in each stitch (work 2 sc in each st). Chain 1, turn. (4 sc)
Row 3: Increase, single crochet 2, increase. Chain 1, turn. (6 sc)
Row 4: Increase, single crochet 4, increase. Chain 1, turn. (8 sc)
Row 5: Single crochet in each stitch across. Fasten off. (8 sc)
Joining the pennants: Chain 9, slip stitch across the top of the first pennant, chain 4, slip stitch across the second pennant, chain 4, slip stitch across the third pennant, chain 9. Fasten off.
Applique Placement
Bow: Center across the front of the bag, spanning rounds 13 through 22. Sew with matching yarn, catching only the back loops of the applique stitches so the front stays smooth.
Pennants: Place the pennant strand below the bow across rounds 6 through 10, with the center pennant aligned to front center.
Finishing and Blocking
Weave in all ends on the inside of the bag. Take your time with this step.
Blocking: Steam lightly or wet block by shaping the base into a rectangle and pinning the top edge straight. Do not flatten the bow during blocking.
Lining: If using fabric lining, sew it in now.
Closure: Add the magnetic snap after blocking so it sits centered and level.
Final checkpoint: Your finished bag body should be approximately 9 inches wide, 6.5 inches tall, and 3 inches deep (23 x 16.5 x 7.5 cm).
Care Instructions
Spot clean first whenever possible.
For washable cotton, hand wash in cool water, press gently in a towel to remove excess water, reshape around a clean folded towel, and dry flat. Remove the shoulder strap before washing.
Important: Avoid hanging the wet bag, which can stretch the handles out of shape.
Troubleshooting Tips
Bag flares at the top? Your stitches may be loose. Go down a hook size for the rim rounds or add a lining for structure.
Body twists as you work? Keep the first stitch of each round marked and join neatly without accidentally adding extra stitches.
Bow curls up? Block the bow panel flat before pinching it into shape.
Strap stretches with use? Braid more tightly next time, add extra strands, or sew the braid to cotton webbing for heavy daily use.
Want a wider bag? Add 4 chains to your base width. This will add 8 stitches to your body setup round.
Final Thoughts on the Autumn Harvest Bow Handbag Crochet Pattern
I hope this pattern has shown you that a structured, professional-looking handbag is completely within your reach. The combination of simple stitches, cheerful autumn colors, and thoughtful details like the braided handles and oversized bow creates something truly special without requiring advanced skills.
This bag makes a wonderful gift for the stylish crocheter in your life, or honestly, just treat yourself. You deserve a handmade accessory that turns heads and sparks conversations.
Thank you so much for choosing this pattern! I would absolutely love to see your finished Autumn Harvest Bow Handbag. If you make one, please save this pattern to your Pinterest boards so you can find it again later. And I’d be thrilled if you left a comment below to share how your project turned out. Happy crocheting!
Want a Quick & Easy Printable Version?
Get a clean, beautifully formatted PDF of this pattern — easy to follow step by step, ready to print or save on any device. No scrolling, no distractions, just the pattern.
Get the Printable PDF →