
A handmade dress makes the sweetest gift for a little one, and this ocean-inspired sundress delivers on both style and practicality. The bodice features two spiral granny squares in swirling blues and greens, while the skirt flows into a classic chevron pattern that mimics gentle waves. Perfect for beach days, summer photos, or just keeping a toddler looking adorable.
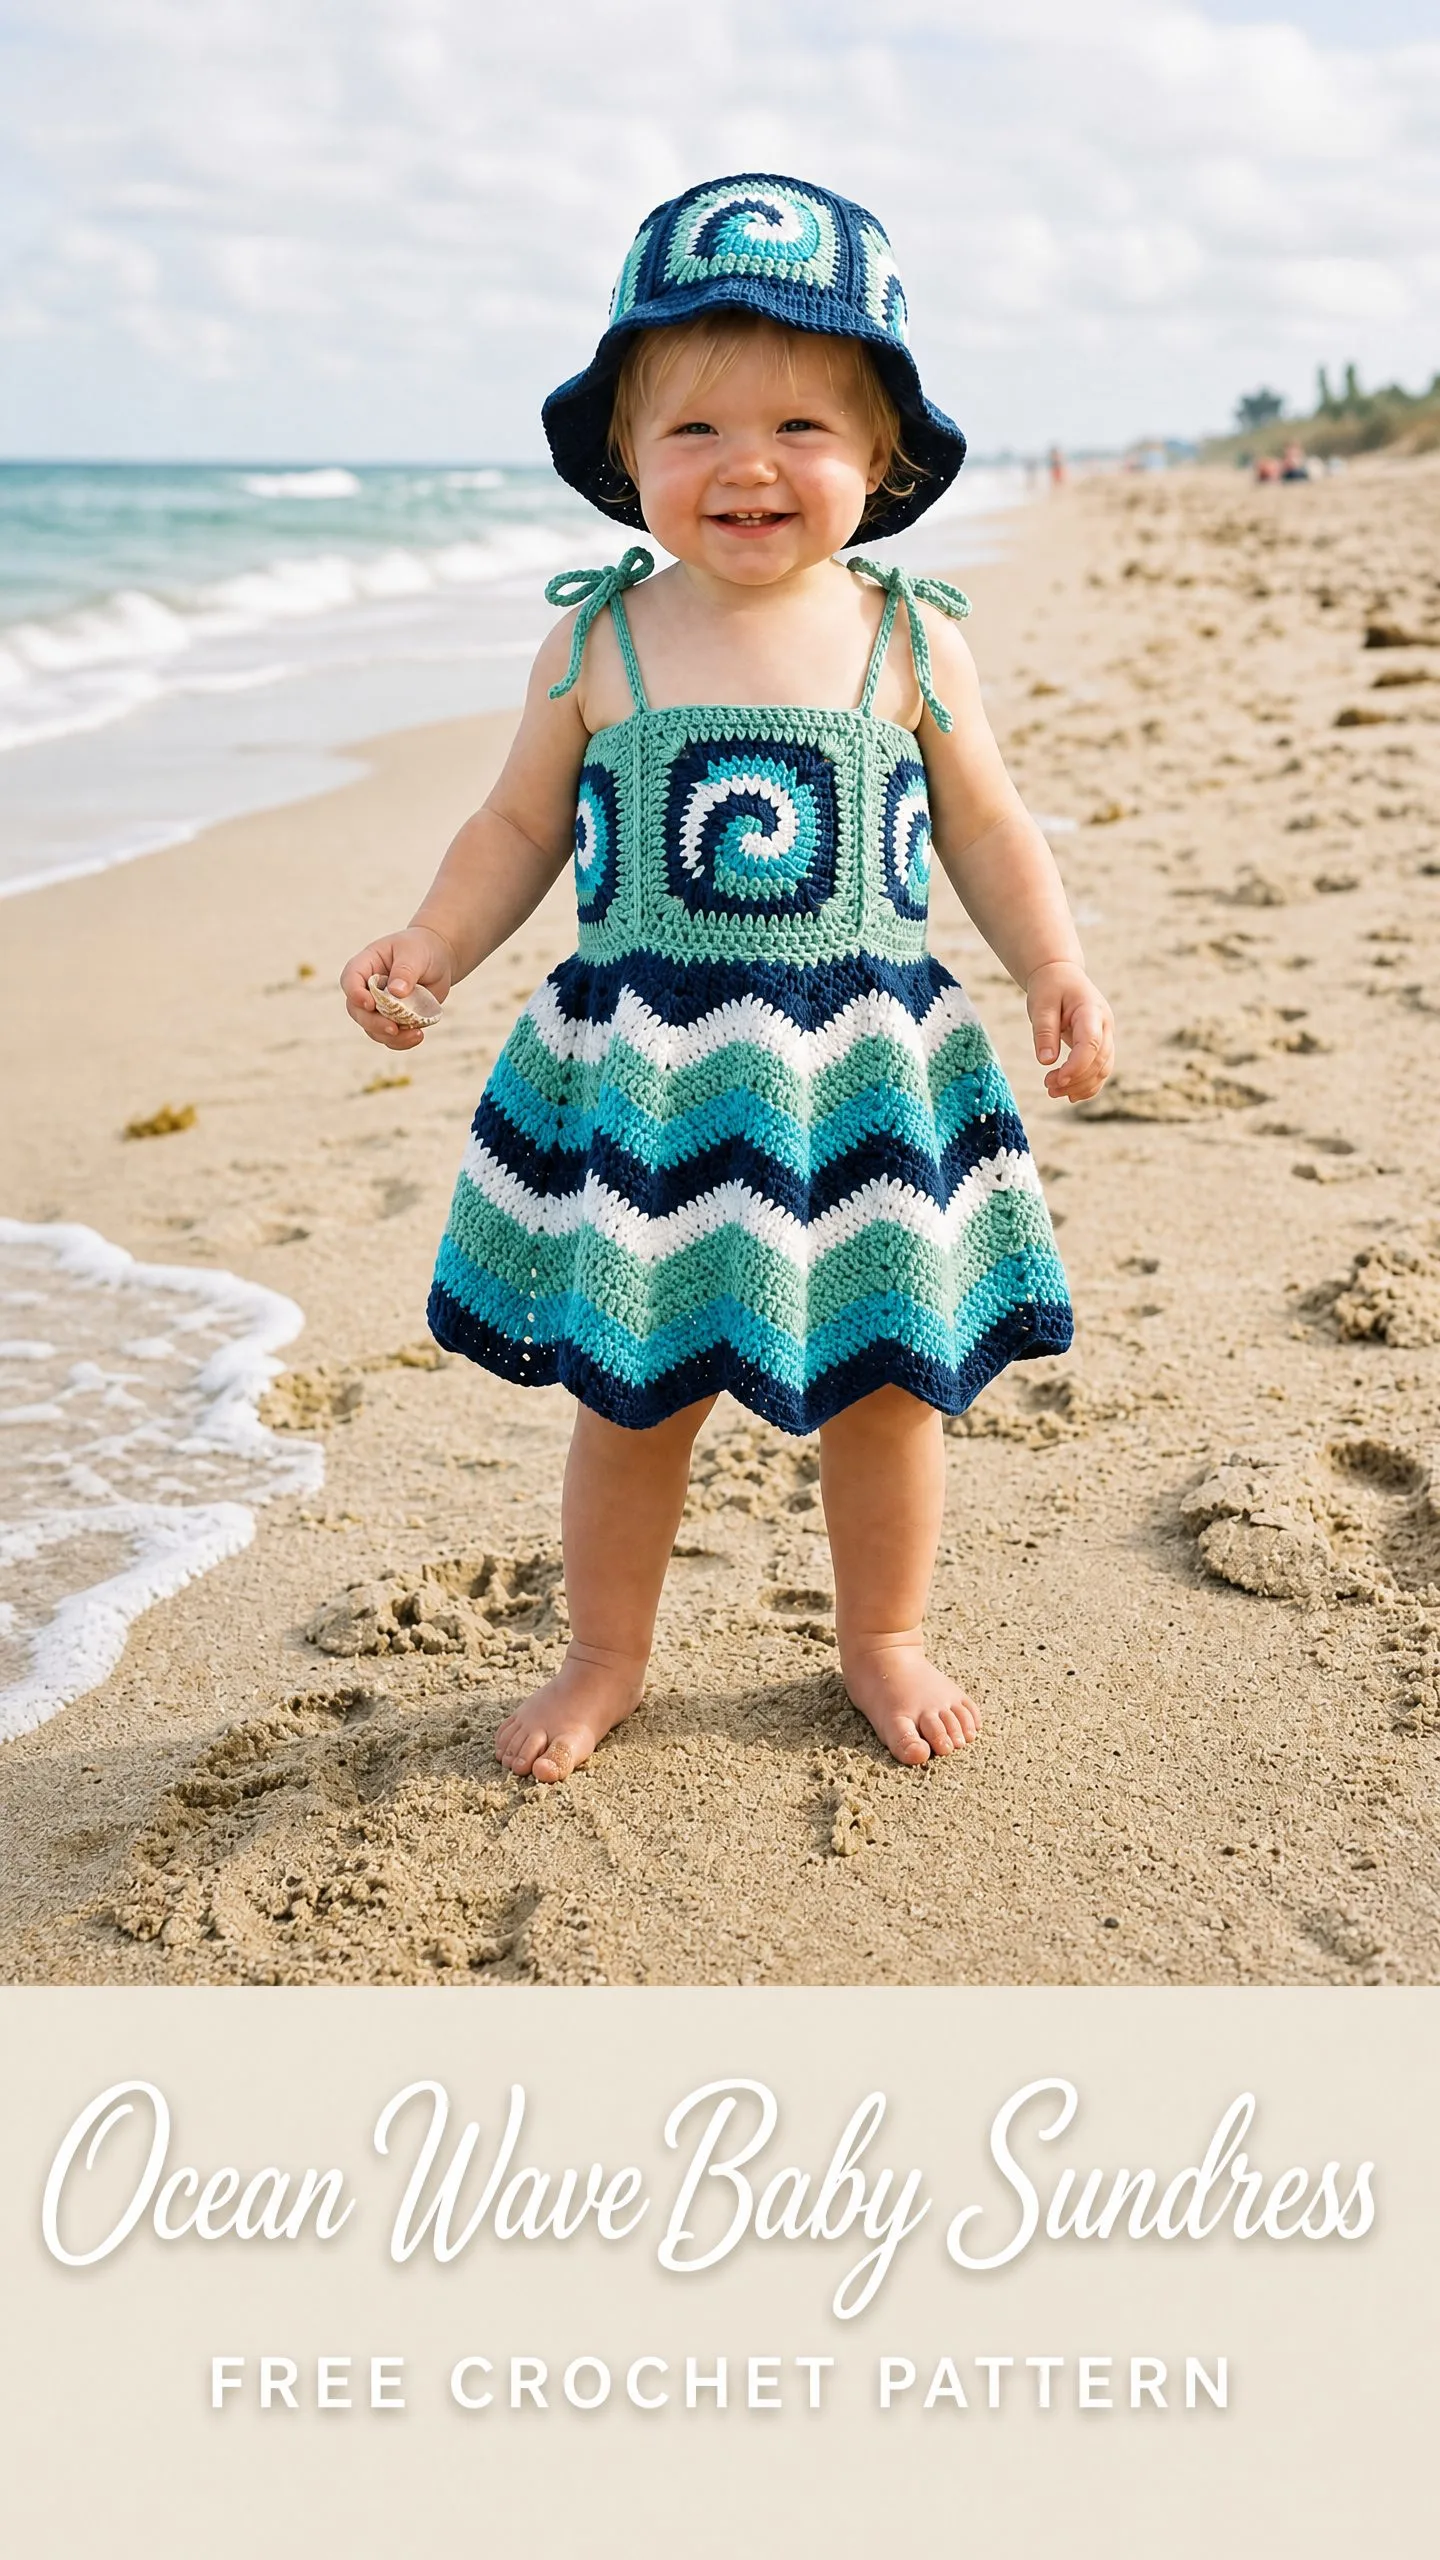
This pattern uses stitches you probably already know: double crochet (dc), single crochet (sc), and a few decreases. It fits toddlers 12 to 18 months and works up in about 10 to 14 hours. The finished dress makes an unforgettable baby shower gift or a special keepsake for your own little one.
I have included size customization tips so you can adjust for smaller or larger babies. The tie straps mean you can get a few extra months of wear as your toddler grows. Let me walk you through every step.
What Makes This Sundress Special
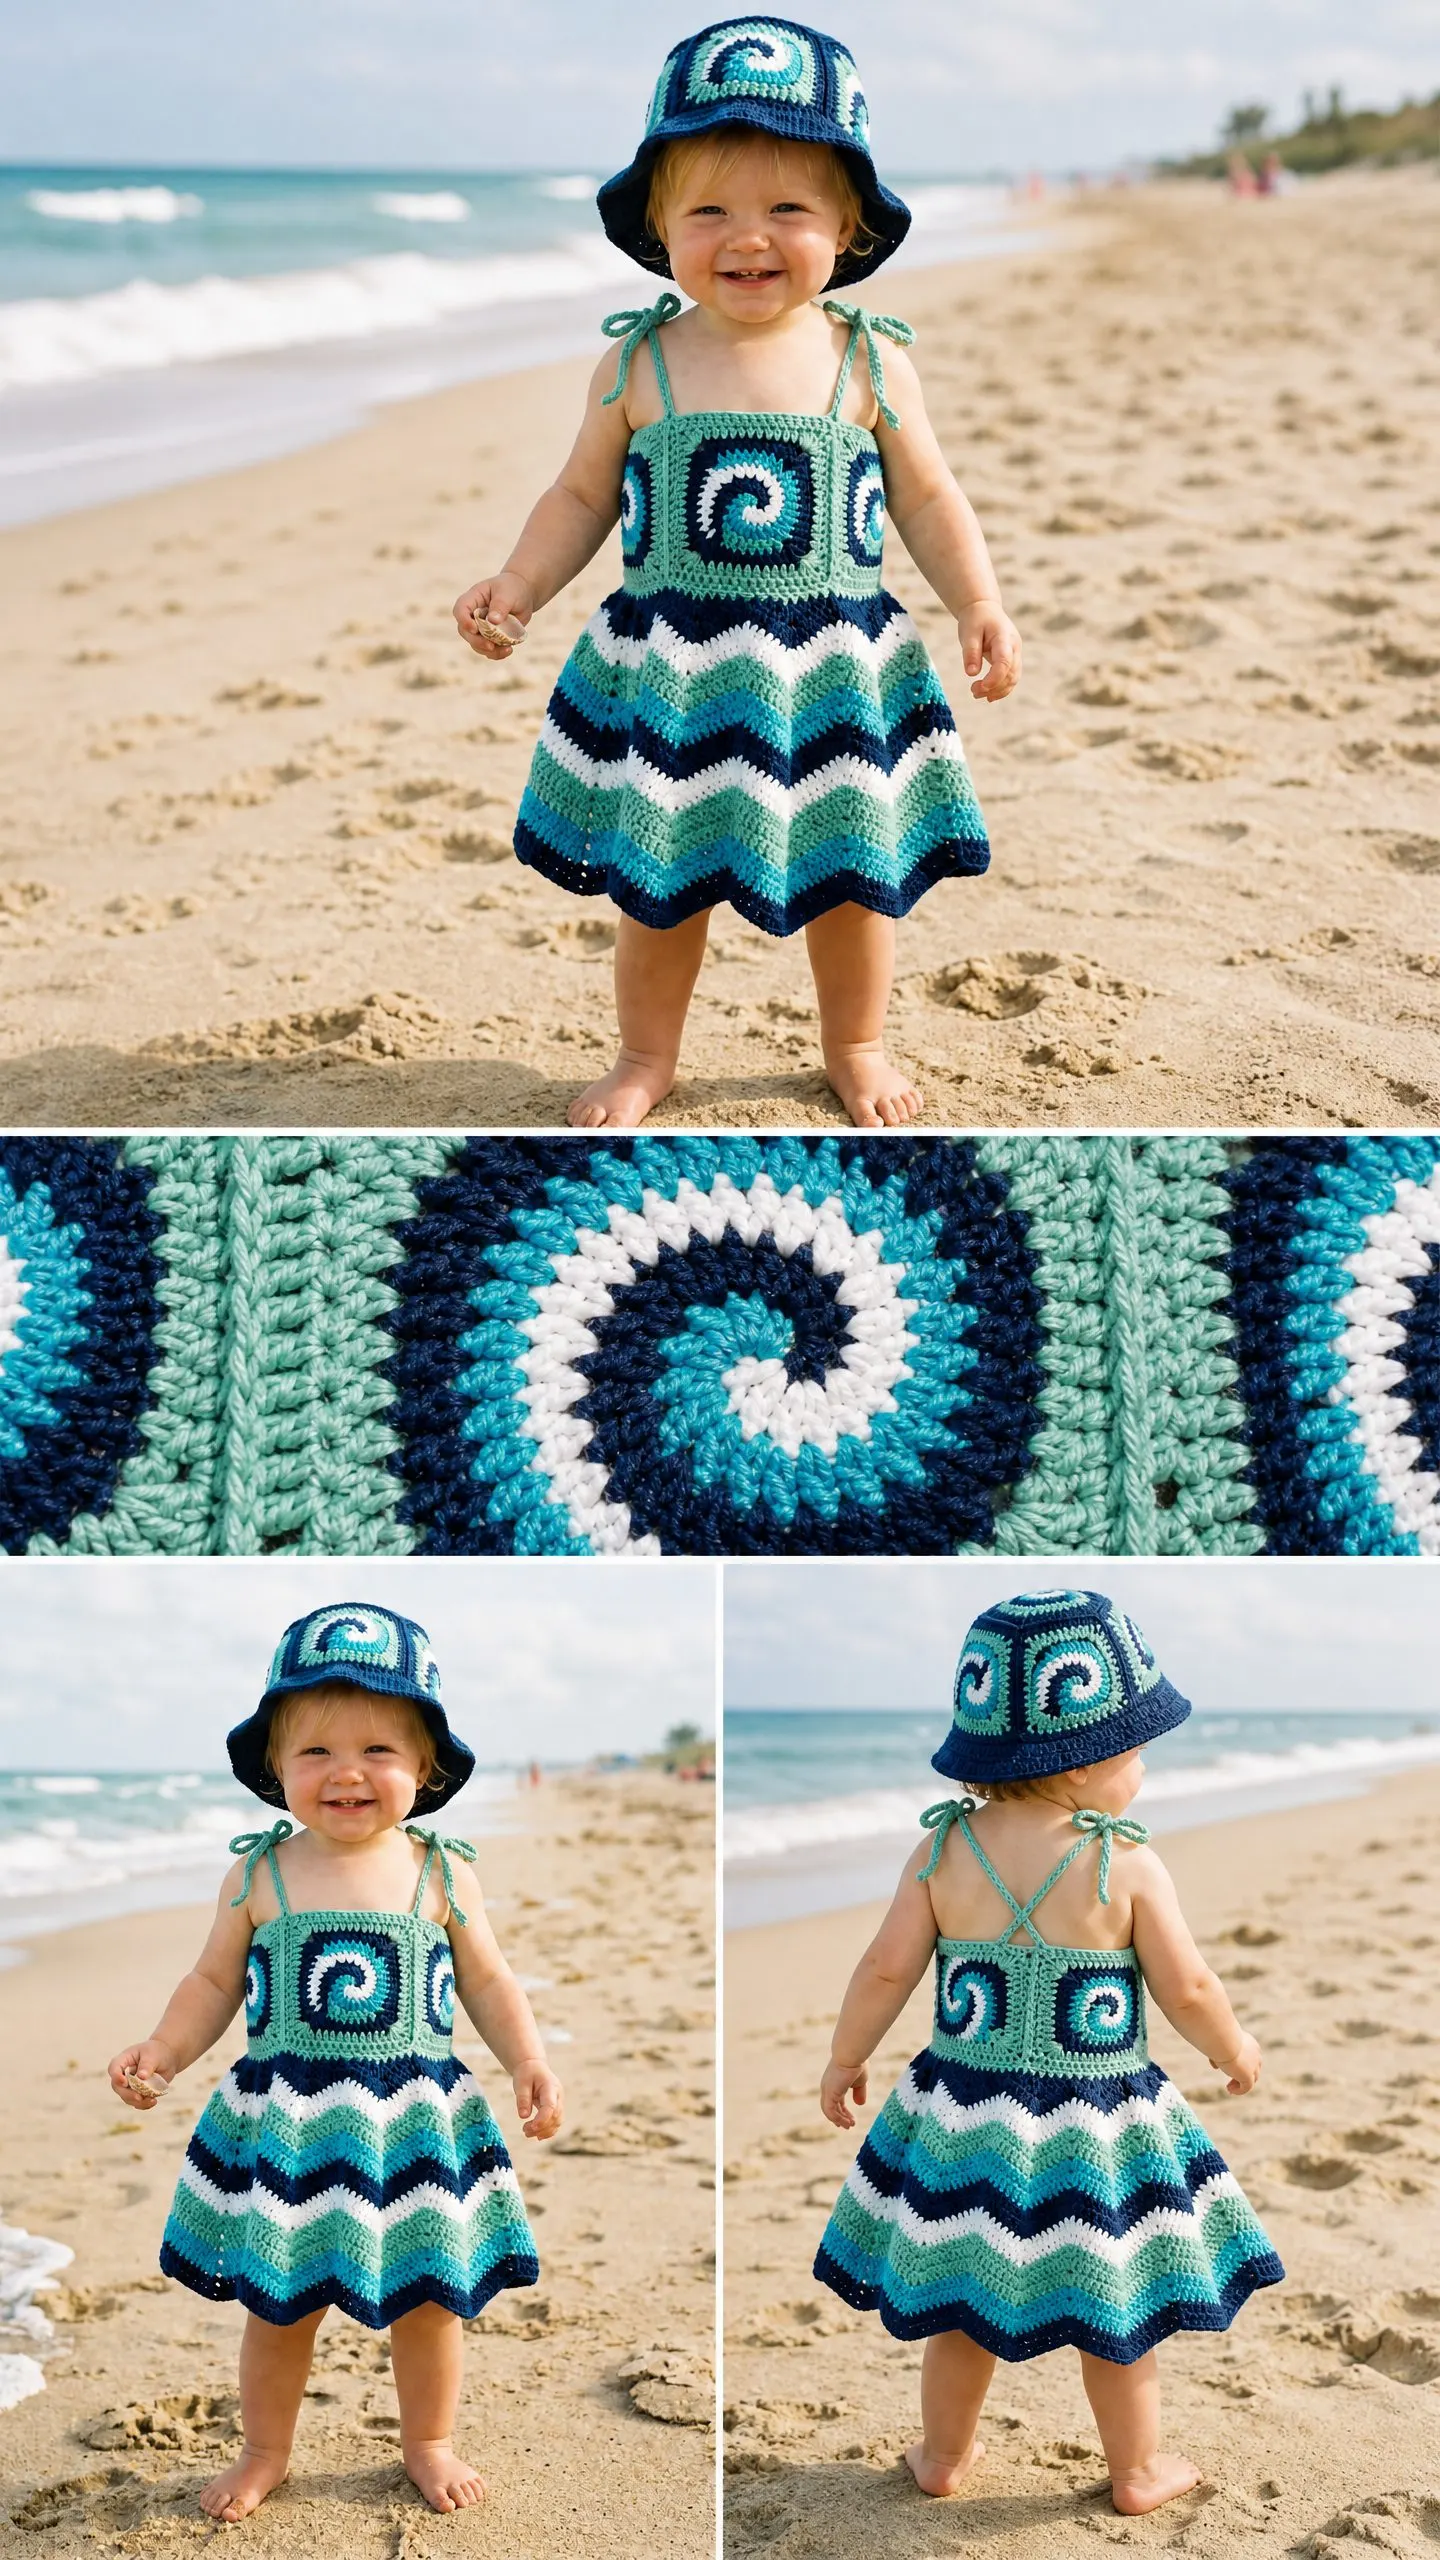
The Ocean Wave Baby Sundress combines two crochet techniques that create visual interest without overwhelming complexity. The bodice uses spiral granny squares, which means the rounds flow into each other without the obvious "seam" of traditional granny squares. This creates that beautiful swirl effect you see in the center of each square.
The skirt uses a chevron ripple stitch worked in the round. Chevron patterns create peaks and valleys that look just like ocean waves when worked in blues, greens, and white. The scalloped hem happens naturally from the stitch pattern, so no extra shaping required.
The whole dress is worked in five colors that blend from sage green through turquoise, ocean blue, navy, and white. You can substitute any colors you like, but I recommend sticking with this type of gradient for the best wave effect.
Skill Level
This pattern is intermediate level. You should be comfortable with:
If you have made a few projects and feel confident following written instructions with stitch counts, you can absolutely tackle this dress. First-time chevron or spiral granny square makers should add a few extra hours and maybe practice on a swatch first.
Finished Measurements
Fits: Toddler 12 to 18 months
Chest circumference: Approximately 20 inches (51 cm), with stretch to fit up to 21 inches (53 cm)
Total dress length: Approximately 13 inches (33 cm) from top of bodice to hem
Bodice height: Approximately 5.5 inches (14 cm)
Skirt length: Approximately 7.5 inches (19 cm)
Materials You Will Need
Yarn: Worsted weight (Category 4), smooth cotton or cotton blend
| Color | Name | Yardage Needed |
|---|---|---|
| A | Sage Green | 120 yards (110 meters) |
| B | Bright Turquoise | 100 yards (91 meters) |
| C | Ocean Blue | 80 yards (73 meters) |
| D | Navy | 110 yards (101 meters) |
| E | White | 60 yards (55 meters) |
Hook: US size G-6 / 4.0 mm
Additional tools:
Yarn Suggestions
Lion Brand 24/7 Cotton in Sage, Turquoise, Denim, Navy, and White works beautifully. This 100% mercerized cotton has excellent stitch definition and is machine washable. Each skein gives you 186 yards (170 meters).
Paintbox Yarns Simply DK can work at a slightly tight gauge on a 4.0 mm hook for firmness. Available in all required colors with 137 yards (125 meters) per skein.
Drops Paris Cotton is a budget-friendly option at 82 yards (75 meters) per skein in coordinating colors.
Avoid fuzzy or textured yarns. You want smooth yarn so the chevron waves and spiral centers show up clearly.
Gauge
16 stitches and 8 rows = 4 inches (10 cm) in half double crochet using a US G-6 / 4.0 mm hook
Chevron gauge: One full 12-stitch repeat (one peak and one valley) measures approximately 3 inches (7.6 cm) wide
Granny square: One completed spiral granny square measures approximately 4.5 inches (11.4 cm) square
Gauge matters for garments. Please make a swatch and adjust your hook size if needed before starting.
Abbreviations
Special Stitches Explained
Spiral Granny Square
This square is worked in continuous rounds without closing each round with a slip stitch. The spiral creates a smooth swirl from center outward, which is what gives the bodice its ocean whirlpool look.
Double Crochet Three Together (dc3tog)
This decrease forms the valleys in your chevron pattern. Here is how to work it:
1. Yarn over, insert hook in next stitch, yarn over, pull up a loop, yarn over, pull through 2 loops. You now have 2 loops on your hook.
2. Yarn over, insert hook in next stitch, yarn over, pull up a loop, yarn over, pull through 2 loops. You now have 3 loops on your hook.
3. Yarn over, insert hook in next stitch, yarn over, pull up a loop, yarn over, pull through 2 loops. You now have 4 loops on your hook.
4. Yarn over and pull through all 4 loops.
You have just turned 3 stitches into 1.
Three Double Crochet in One Stitch
This increase forms the peaks in your chevron pattern. Simply work 3 double crochets all into the same stitch. Easy as that.
Pattern Instructions
Section 1: Spiral Granny Square Bodice Motifs
Make two identical squares.
Round 1: Using Color D (Navy), make a magic ring. Ch 3 (counts as first dc), work 2 dc into ring, ch 2, (3 dc, ch 2) 3 times into ring. Join with sl st to top of beginning ch-3. (4 groups of 3 dc, 4 ch-2 corner spaces)
Round 2: Switch to Color B (Turquoise). Sl st into next 2 dc and into corner ch-2 sp. Ch 3, 2 dc in same sp, ch 1, 3 dc in same corner sp, ch 1. Moving to next side: 3 dc in next ch-2 sp, ch 1, 3 dc in same sp, ch 1. Repeat around all 4 corners. Join with sl st. (8 groups of 3 dc, 8 ch-1 sps)
Round 3: Switch to Color C (Ocean Blue). Sl st to corner ch-1 sp. Ch 3, 2 dc in same sp, ch 1. Work 3 dc in each ch-1 sp along side, ch 1 between each group, then 3 dc, ch 1, 3 dc in corner sp. Repeat around. Join with sl st. (12 groups of 3 dc)
Round 4: Switch to Color A (Sage Green). Work as Round 3, adding one more 3-dc group per side. Join with sl st. (16 groups of 3 dc)
Round 5 (edging): Switch to Color A. Sc evenly around entire square, working 3 sc in each corner. Join with sl st. Fasten off.
Each completed square should measure approximately 4.5 inches (11.4 cm) square.
Joining the Two Squares
Hold both squares with right sides facing outward, side by side. Align along one vertical edge. These become the center front seam of the bodice.
Using Color A and a tapestry needle, whipstitch the two squares together through the outer sc loops along the shared edge. Work from top to bottom. Pull stitches firmly but not so tight that the seam puckers. Fasten off and weave in ends.
Your joined bodice panel now measures approximately 9 inches (23 cm) wide and 4.5 inches (11.4 cm) tall.
Forming the Bodice Tube
To create the tube shape, join the left and right outer vertical edges of the joined panel together.
With RS facing and using Color A, whipstitch the left outer edge to the right outer edge in the same manner as the center seam.
Checkpoint: Your bodice should now be a seamless tube approximately 18 inches (46 cm) in circumference when open, and approximately 4.5 inches (11.4 cm) tall.
Bodice Upper Edging
With Color A and RS facing, join yarn at back seam along the top edge of the bodice tube.
Round 1: Ch 1, sc evenly around the top edge of the bodice, working 1 sc per stitch or per row end as needed to achieve 60 sc total. Pm at beginning of round. Join with sl st to first sc. (60 sc)
Round 2: Ch 1, sc in each st around. Join with sl st. (60 sc)
Fasten off Color A.
Bodice Lower Edging (Skirt Pickup Row)
This row establishes the stitch count for your chevron skirt.
With Color D (Navy) and RS facing, join yarn at back seam along the bottom edge of the bodice tube.
Round 1 (pickup): Ch 1, sc evenly around the bottom edge of the bodice, placing stitches to achieve exactly 96 sc. Place a stitch marker at beginning of round. Join with sl st to first sc. (96 sc)
Math check: 96 sc divided by 12-stitch chevron repeat = 8 full repeats. Perfect.
Do not fasten off. Continue directly into the skirt.
Checkpoint: Count carefully. You must have exactly 96 sc before proceeding.
Section 2: Chevron Skirt
The skirt is worked in continuous rounds downward from the pickup round. Do not turn. Use a stitch marker to track the beginning of each round.
The chevron pattern uses a 12-stitch repeat:
This maintains your stitch count at 96 throughout.
Color Sequence (2 rounds each):
Repeat this sequence once more for a total of 20 rounds.
Round 1 (Color D): Ch 2 (does not count as a stitch), dc in same st, dc in each of next 3 sts, dc3tog over next 3 sts, dc in each of next 4 sts, 3 dc in next st. Rep the bracketed section 7 more times. (96 dc)
Place markers at each peak (the center dc of each 3-dc group) to track alignment.
Round 2 (Color D): Ch 2, dc in same st, work chevron repeat as established across all 8 repeats. (96 dc)
Change to Color E (White).
Rounds 3-4 (Color E): Work chevron repeat as established. (96 dc each round)
Change to Color B (Turquoise).
Rounds 5-6 (Color B): Work chevron repeat as established. (96 dc each round)
Change to Color A (Sage Green).
Rounds 7-8 (Color A): Work chevron repeat as established. (96 dc each round)
Change to Color C (Ocean Blue).
Rounds 9-10 (Color C): Work chevron repeat as established. (96 dc each round)
Change to Color D (Navy).
Rounds 11-12 (Color D): Work chevron repeat as established. (96 dc each round)
Change to Color E (White).
Rounds 13-14 (Color E): Work chevron repeat as established. (96 dc each round)
Change to Color B (Turquoise).
Rounds 15-16 (Color B): Work chevron repeat as established. (96 dc each round)
Change to Color A (Sage Green).
Rounds 17-18 (Color A): Work chevron repeat as established. (96 dc each round)
Change to Color C (Ocean Blue).
Rounds 19-20 (Color C): Work chevron repeat as established. (96 dc each round)
Chevron Hem Edging
With Color D (Navy), join with sl st at beginning of Round 20.
Edging Round: Ch 1, sc in each dc around, working sc3tog at each valley and 3 sc at each peak to maintain chevron shape. Join with sl st to first sc. (96 sc)
Fasten off Color D. Weave in all ends.
Checkpoint: Your completed skirt should measure approximately 7 to 8 inches (18 to 20 cm) from pickup row to hem. The hem should have 8 visible peaks and 8 valleys.
Section 3: Tie Straps
The dress has four tie points: front-left, front-right, back-left, and back-right corners of the bodice. Each shoulder has two ties that fasten in a bow.
Front Left Strap:
With Color A (Sage Green), join yarn at the top-left corner of the bodice front.
Ch 50. Sl st back down the chain into each ch st from hook to base. This creates a firm rounded cord approximately 12 inches (30 cm) long.
Fasten off.
Repeat at the front-right corner, back-left corner, and back-right corner. (4 tie cords total)
The front-left cord ties to the back-left cord over the left shoulder. The front-right cord ties to the back-right cord over the right shoulder.
Optional: Work an additional chain of 50 at each shoulder point for a double-tie bow effect as shown in the photos. (8 tie cords total for fuller bows)
Section 4: Assembly and Finishing
1. If any granny square seams show slight gapping, run a length of Color A through the gap with a tapestry needle and pull gently to close.
2. Turn the dress inside out and weave in all remaining yarn ends. Knot each end twice before weaving to prevent unraveling.
3. Block the dress by soaking in cool water for 10 minutes. Gently press out water without wringing. Lay flat on a blocking mat. Pin the hem into a clean wave shape, encouraging peaks and valleys. Pin the bodice into a rectangular shape. Allow to dry completely (12 to 24 hours).
4. Once dry, remove pins. The dress should retain its blocked shape.
Size Customization Tips
To size up (18 to 24 months): Add one additional round to each granny square (one more 3-dc group per side). This adds approximately 1 inch to the bodice width. Increase the pickup round to 108 sc (9 chevron repeats of 12).
To size down (6 to 12 months): Work one fewer round on each granny square. Reduce the pickup row to 84 sc (7 chevron repeats of 12). Reduce skirt to 16 rounds total.
To lengthen the skirt: Add more rounds in the established color sequence. Each 2 rounds adds approximately 0.75 inch (2 cm) of length.
Care Instructions
Machine wash cold on gentle cycle, inside out. Lay flat to dry. Do not tumble dry, as heat can shrink cotton and distort the granny square bodice. Do not wring or twist. Store folded rather than hung to prevent stretching.
You Did It!
I hope you love making this little dress as much as I loved designing it. There is something so satisfying about watching those chevron waves build up round after round. The finished dress looks impressive, but now you know the techniques are totally manageable.
Thank you so much for choosing this pattern for your next project. If you make one, I would absolutely love to see it! Tag me on Instagram or share a photo in my Facebook group. Seeing your finished projects makes my whole week.
If this pattern is calling your name but you are not quite ready to start, go ahead and save it to your Pinterest boards so you can find it later. And please drop a comment below if you make one. I read every single comment and love hearing how your projects turn out!
You Might Also Like
- Charcoal Gray Modern Crochet Lace Boots Free Pattern
- Dusty Rose Diamond Lattice Vest Free Crochet Pattern
- Blush Pink Octopus Toilet Paper Cozy Free Crochet Pattern
- Sunny Yellow Ruffle Romper Free Crochet Pattern
