
Let me guess. You took one look at this dress and thought, "No way I could make that." The chevron hem, the sheer mesh waist, those dramatic bell sleeves? It looks like something straight off a boutique rack. Here is the truth: if you can single crochet and count to twelve, you can absolutely make this dress.
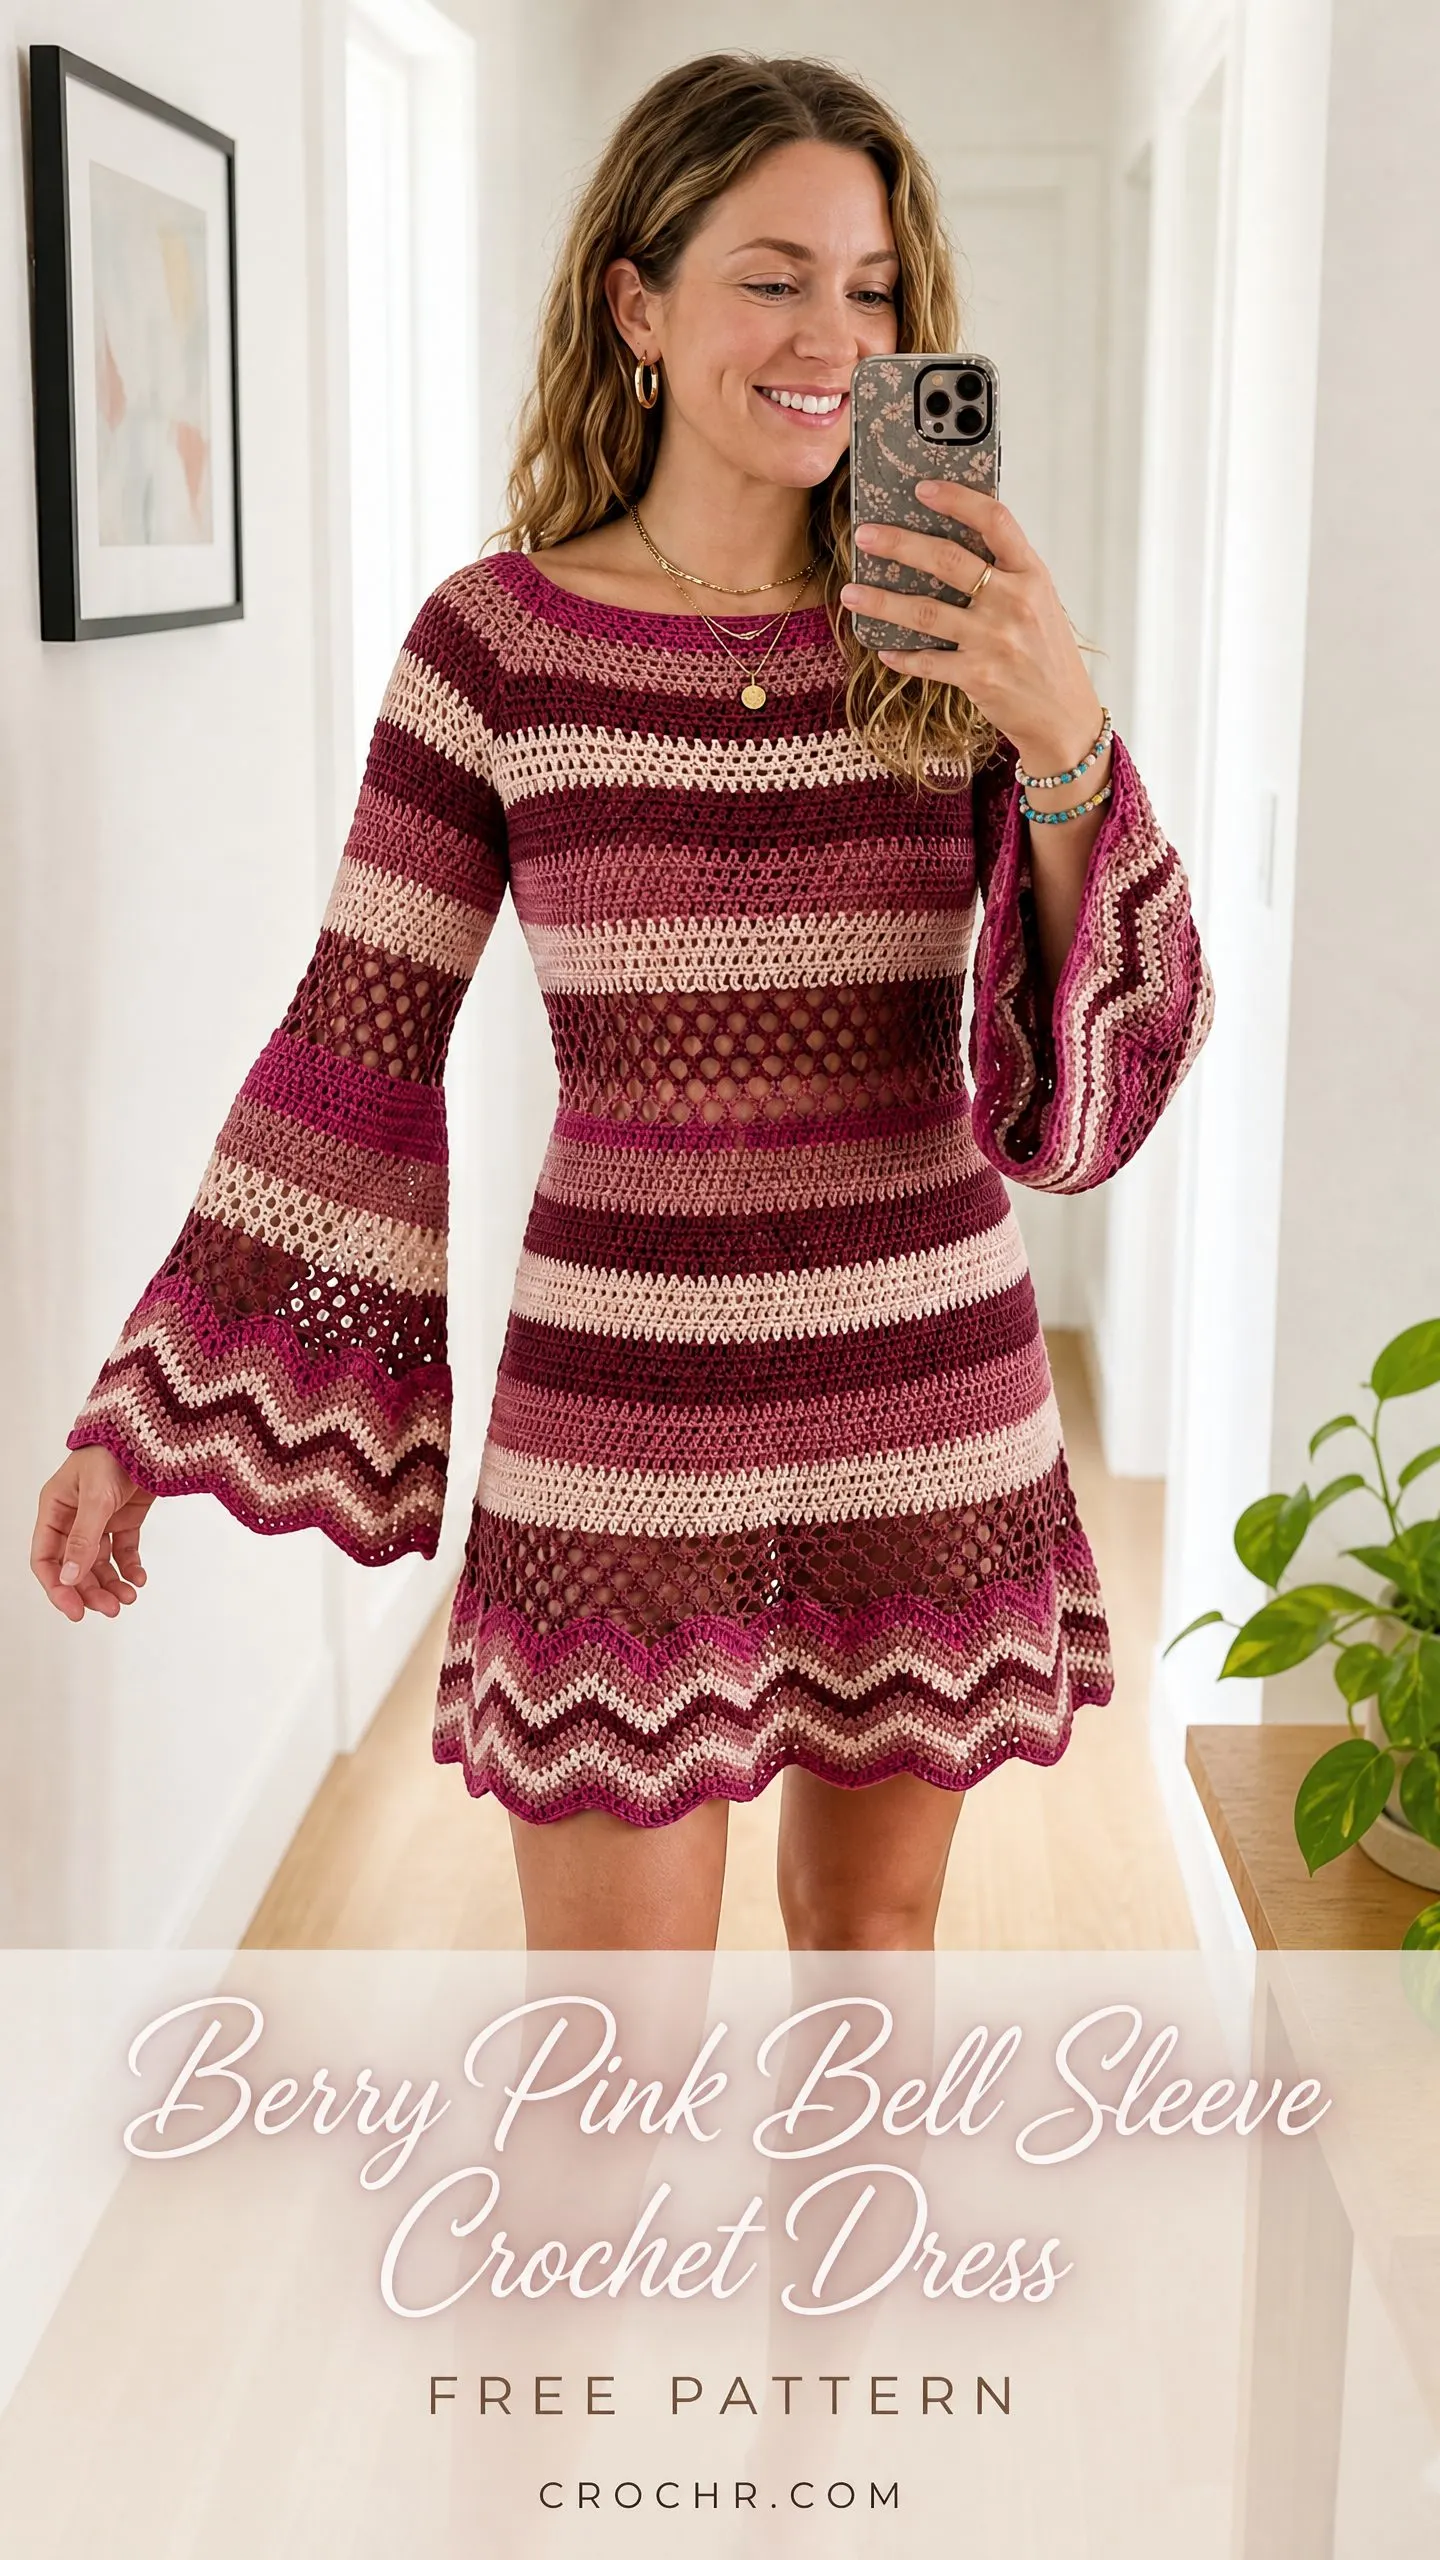
I am not going to pretend this is a weekend project. It is not. But every single technique in this pattern breaks down into simple, repeatable steps. The chevron is just increases and decreases in a rhythm. The mesh is chains and single crochets. The bell sleeves are worked in the round with no seaming.
Whether you are an intermediate crocheter ready to level up or an advanced maker looking for your next statement piece, this pattern meets you where you are. I will walk you through every stitch, every color change, every shaping detail. By the end, you will have a handmade dress that looks like it costs hundreds. Let me show you how it is done.
About This Berry Pink Bell Sleeve Crochet Dress Pattern
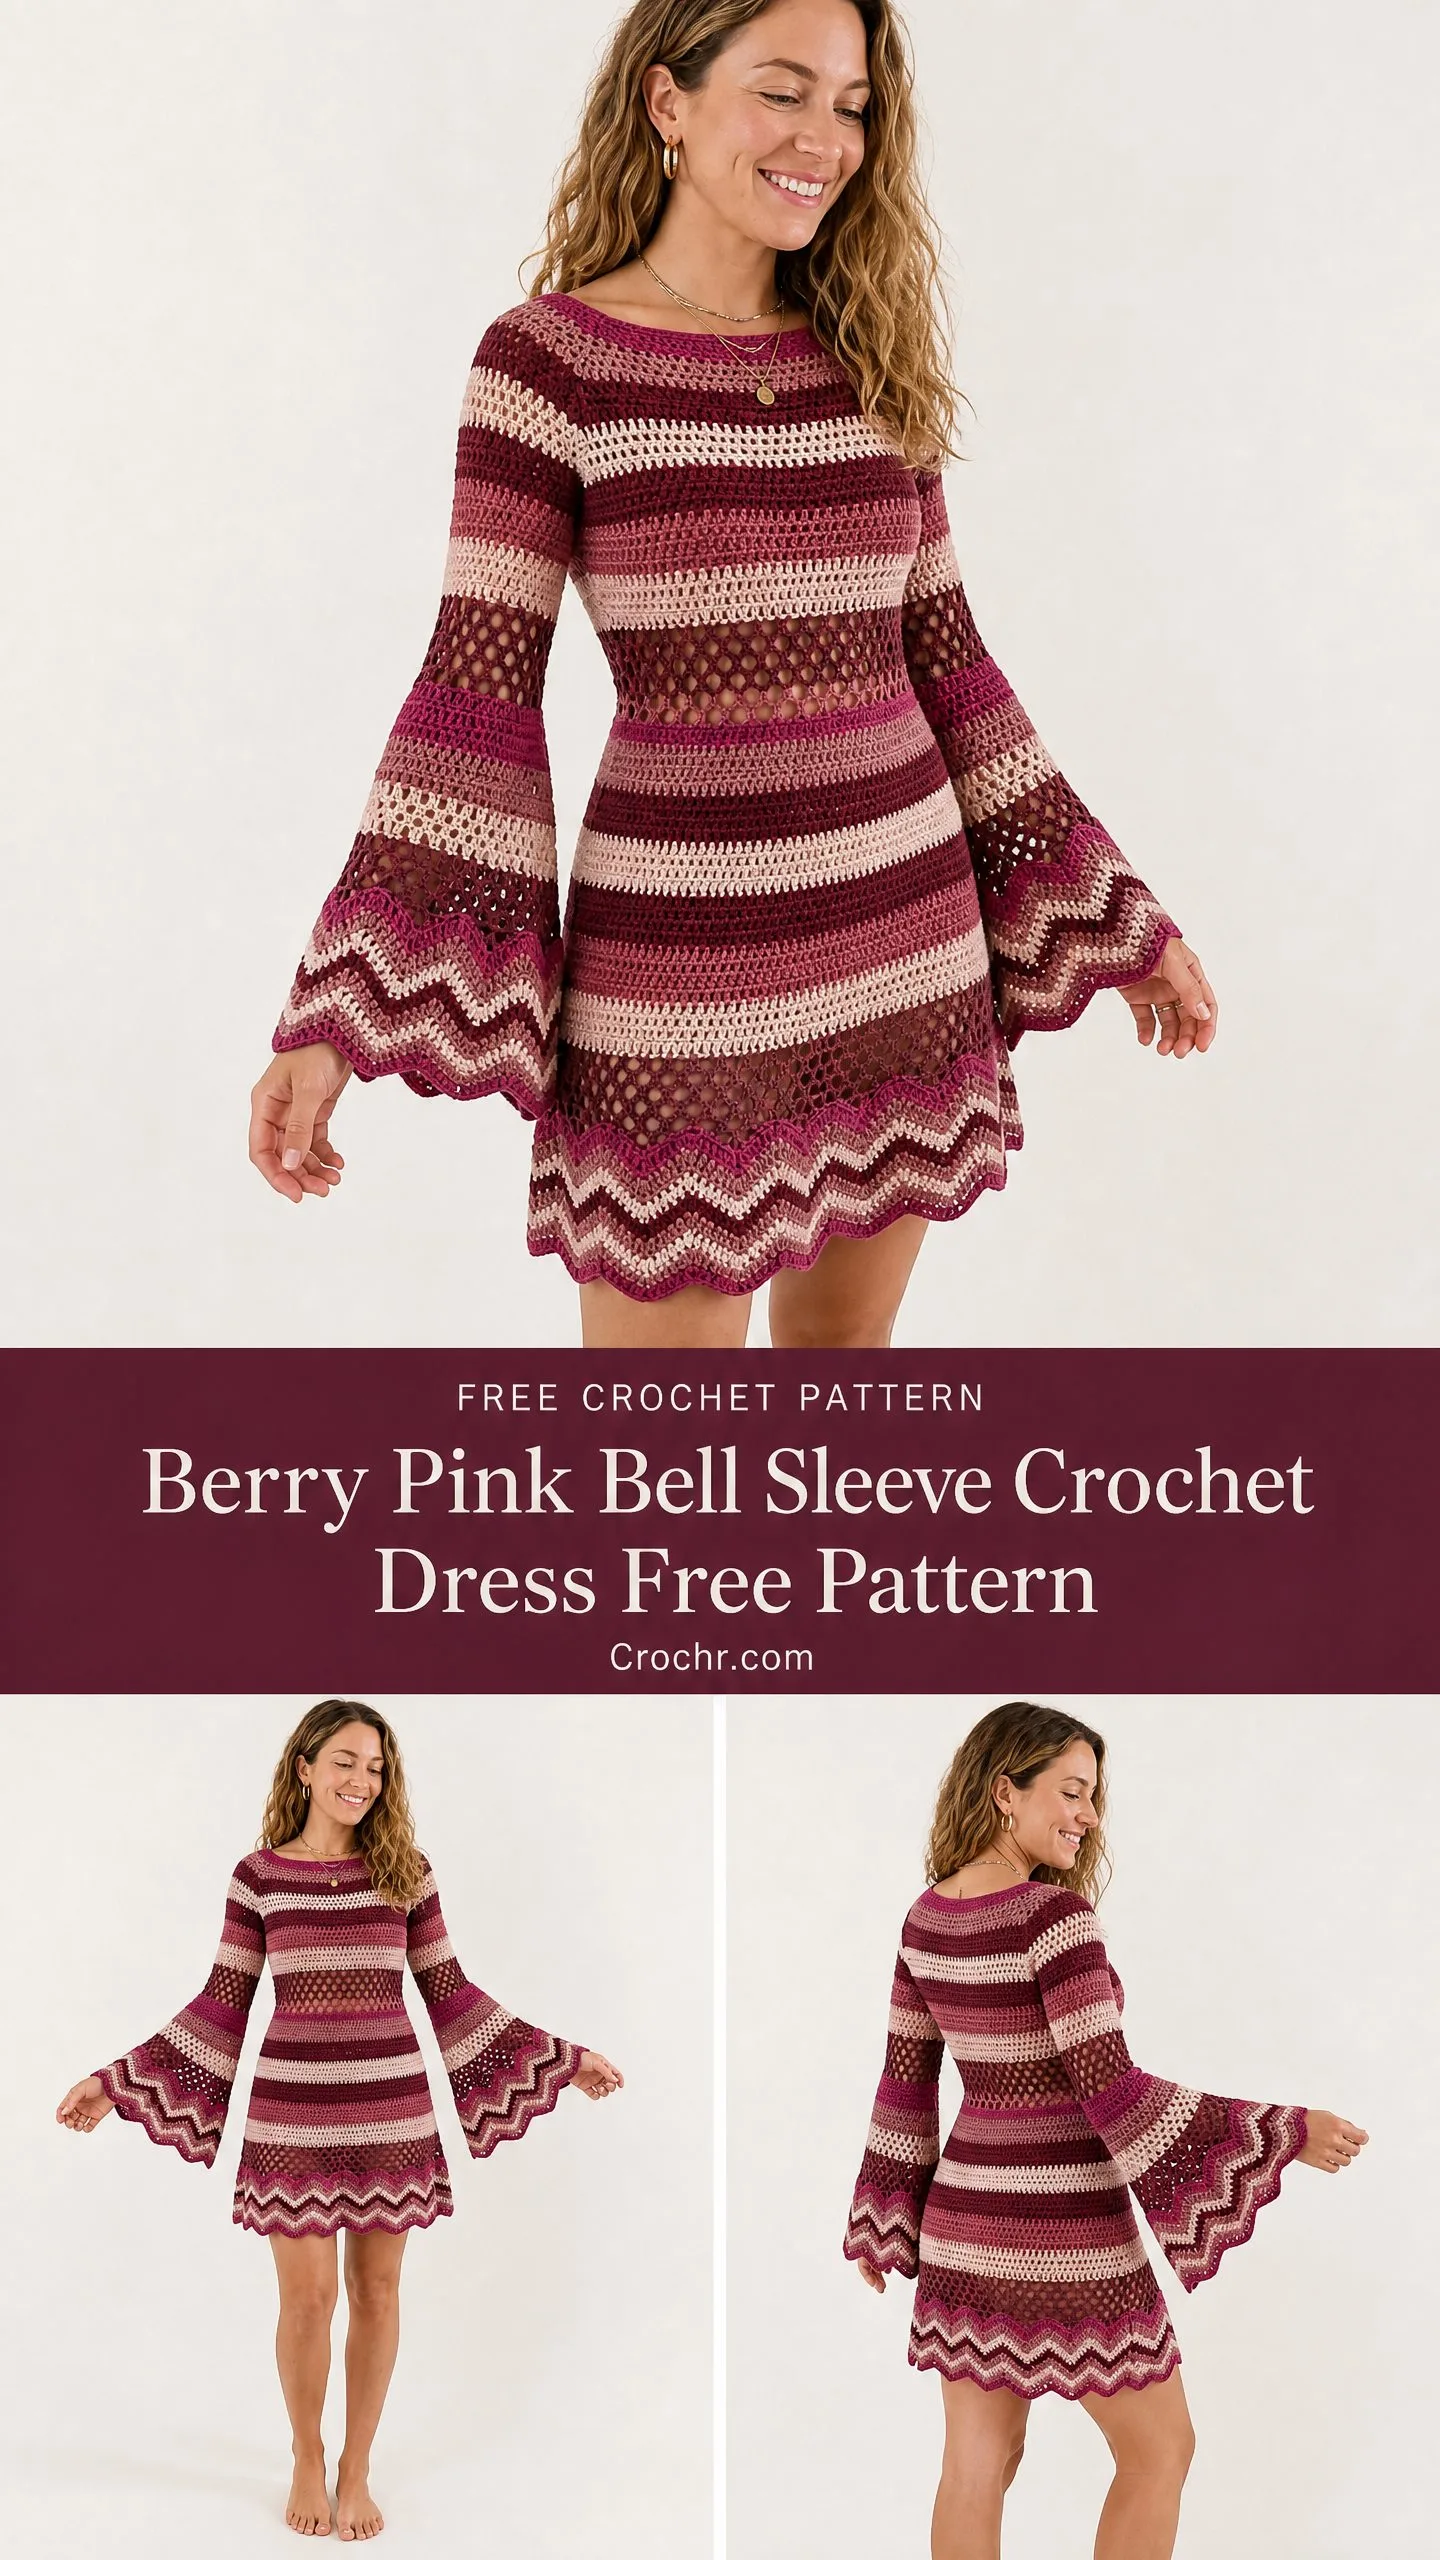
This boho inspired mini dress features everything I love about vintage crochet with a modern, body conscious fit. The construction is seamless and worked from the top down in the round. You will start at a wide boat neckline, shape the yoke with strategic increases, divide for the armholes, then continue down through a fitted bodice.
The magic happens at the waist, where an open mesh panel creates that gorgeous semi sheer effect you see in the photo. From there, you will increase back out for the hips before transitioning into the bold chevron ripple hem that gives this dress its signature look.
The bell sleeves are picked up at the armhole and worked downward. They taper slightly toward the elbow before flaring dramatically into that statement cuff, complete with matching chevron detail.
Skill Level: Intermediate to Advanced
Time Estimate: Approximately 40 to 60 hours depending on your experience and yarn choice
Finished Measurements
This pattern is written for size Small/Medium with the following finished dimensions:
The dress is designed with negative ease of 1 to 2 inches at the bust for a body hugging fit. The mesh waist panel stretches to accommodate your body comfortably.
Materials Needed for This Crochet Dress
Yarn
You will need approximately 1,400 yards / 1,280 meters total of DK weight yarn (CYCA 3), divided across four colors:
Yarn Suggestions
Lion Brand Pound of Love works beautifully for this project. It is DK weight, 100% acrylic, with 1,000 yards per skein. One skein per color gives you plenty to spare, and it blocks nicely with steam.
Paintbox Yarns Simply DK is another excellent choice if you are on a budget. The color saturation is fantastic, and the tight twist holds open stitch patterns well. Plan for about 3 balls per color.
For a luxury option, try Cascade 220 Superwash Sport. This 100% superwash merino drapes gorgeously and blocks to exact measurements. You will need approximately 3 skeins per color. Hand wash cold and lay flat to dry.
Important: Avoid fuzzy or highly textured yarns. They will obscure the beautiful open stitch and mesh patterns. Stick with smooth yarns for the best results.
Hook
US Size G-6 / 4.0 mm or the size needed to obtain gauge
Notions
Gauge
Getting gauge right is absolutely critical for this fitted garment. Even a small deviation across the full circumference will produce a dramatically different finished size. Please do not skip this step.
22 stitches and 24 rows = 4 inches / 10 cm in single crochet, worked in the round, with a 4.0 mm hook, blocked.
Ripple gauge: One full 12 stitch chevron repeat = approximately 2.18 inches / 5.5 cm wide
Mesh gauge: One mesh repeat (ch 2, skip 2, sc) over 6 stitches = approximately 1.1 inches / 2.8 cm
Work a gauge swatch in the round, block it, then measure before you begin the dress.
Abbreviations and Stitch Definitions
Before we dive in, let me define every abbreviation you will encounter. If you are newer to crochet patterns, bookmark this section.
Special Stitches You Will Learn
Stripe Mesh Stitch (SMS)
This creates the open honeycomb panel at the waist. It looks intricate but is surprisingly simple once you get the rhythm.
Round 1 (Color A): Ch 2 (does not count as st), sc in first st, ch 2, skip 2 sts, sc in next st. Repeat (ch 2, skip 2, sc) across to end. Join with sl st to first sc.
Round 2 (Color B): Ch 2, sc in first ch-2 sp, ch 2, sc in next ch-2 sp. Repeat across. Join with sl st to first sc.
Repeat Round 2 for pattern, changing colors as directed. Each ch-2 space counts as 2 stitches when calculating circumference.
Ripple Chevron Stitch (RCS)
This creates the gorgeous zigzag pattern at the hem and cuffs. It is worked over multiples of 12 stitches plus 1.
Round 1: Ch 1, sc in first st, sc in next 4 sts, 3 sc in next st (peak made), sc in next 4 sts, sc2tog over next 2 sts (valley made), sc2tog over following 2 sts (valley continues), sc in next 4 sts, 3 sc in next st (peak), sc in next 4 sts. Repeat from peak to peak across. End with sc in last st.
Each 12 stitch repeat contains one peak (3 sc in 1 st adds 2 sts) and one valley (2 sc2tog removes 2 sts), so your stitch count stays constant.
V-Stitch (V-st)
Work dc, ch 1, dc all into the same stitch or space. This adds texture and slight openness to the solid stripe sections.
Shell Border (SB)
This scallop edging finishes the hem and cuffs beautifully.
Round 1: Join yarn, ch 3 (counts as dc), 4 dc in same st (first shell made), skip 2 sts, sl st in next st, skip 2 sts. Repeat (5 dc shell in next st, skip 2, sl st, skip 2) across. Join to top of beg ch-3.
Important Pattern Notes
Read these before you start. They will save you confusion later.
1. The dress is worked top down in the round. The front and back are worked flat briefly to shape the boat neck, then joined.
2. Stripe sequence throughout: 2 rounds Color A, 2 rounds Color B, 2 rounds Color C, 2 rounds Color D. This 8 round sequence repeats for all solid and mesh stripe sections unless noted otherwise.
3. Carry unused yarns up the inside where possible. When the carried yarn spans more than 4 rounds, cut and rejoin to avoid puckering.
4. When changing colors, complete the last yarn over of the final stitch in the old color with the new color.
5. Ch 1 at the start of sc rounds does not count as a stitch. Ch 2 at the start of dc rounds does not count as a stitch unless specifically noted.
6. Right side always faces you when working in the round. Use a stitch marker to indicate the beginning of each round.
Step by Step Crochet Pattern Instructions
Section 1: Neckline and Yoke
The neckline is a wide, shallow boat neck. Begin with a foundation chain across the back neck.
Foundation Chain: Using Color A, ch 79. Join with sl st to form a ring, being careful not to twist. Place marker at join.
Round 1 (Yoke, Color A): Ch 1, sc in each ch around. Join. (78 sc)
Note: The foundation ch of 79 produces 78 working sc because the sl st join consumes the last chain.
Round 2 (Color A): Ch 1, sc in each st around. Join. (78 sc)
Round 3 (Color B): Ch 1, sc in first 8 sts, inc in next st, sc in next 20 sts, inc in next st, sc in next 18 sts, inc in next st, sc in next 20 sts, inc in next st, sc in last 10 sts. Join. (82 sc)
Round 4 (Color B): Ch 1, sc in each st around. Join. (82 sc)
Round 5 (Color C): Ch 1, sc in first 9 sts, inc in next st, sc in next 20 sts, inc in next st, sc in next 22 sts, inc in next st, sc in next 20 sts, inc in next st, sc in last 9 sts. Join. (86 sc)
Round 6 (Color C): Ch 1, sc in each st around. Join. (86 sc)
Round 7 (Color D): Ch 1, sc in first 9 sts, inc in next st, sc in next 22 sts, inc in next st, sc in next 22 sts, inc in next st, sc in next 22 sts, inc in next st, sc in last 9 sts. Join. (90 sc)
Round 8 (Color D): Ch 1, sc in each st around. Join. (90 sc)
Round 9 (Color A): Ch 1, sc in first 10 sts, inc in next st, sc in next 22 sts, inc in next st, sc in next 24 sts, inc in next st, sc in next 22 sts, inc in next st, sc in last 10 sts. Join. (94 sc)
Round 10 (Color A): Ch 1, sc in each st around. Join. (94 sc)
Round 11 (Color B): Ch 1, sc in first 10 sts, inc in next st, sc in next 24 sts, inc in next st, sc in next 24 sts, inc in next st, sc in next 24 sts, inc in next st, sc in last 10 sts. Join. (98 sc)
Round 12 (Color B): Ch 1, sc in each st around. Join. (98 sc)
Round 13 (Color C): Ch 1, sc in first 11 sts, inc in next st, sc in next 24 sts, inc in next st, sc in next 26 sts, inc in next st, sc in next 24 sts, inc in next st, sc in last 11 sts. Join. (102 sc)
Round 14 (Color C): Ch 1, sc in each st around. Join. (102 sc)
Round 15 (Color D): Ch 1, sc in first 11 sts, inc in next st, sc in next 26 sts, inc in next st, sc in next 26 sts, inc in next st, sc in next 26 sts, inc in next st, sc in last 11 sts. Join. (106 sc)
Round 16 (Color D): Ch 1, sc in each st around. Join. (106 sc)
Checkpoint: After Round 16, the yoke should measure approximately 2.7 inches / 6.8 cm from the beginning. Circumference should be approximately 19.3 inches / 49 cm.
Section 2: Armhole Division
Now you will divide for the front and back, creating armhole openings.
Divide the 106 stitches as follows:
Place markers after stitch 26, stitch 53, and stitch 79 to mark the raglan lines.
Row 17 (Front, Color A, worked flat): Turn. Ch 1, sc across 53 front sts. Turn. (53 sc)
Rows 18 through 24: Continue working flat on the front stitches, following the color sequence (2 rounds each of Colors A, B, C, D). Each row: Ch 1, sc across. Turn. (53 sc)
The front armhole section is now 8 rows, approximately 1.3 inches / 3.4 cm deep. Set front aside.
Rejoin Color A to the first of the 53 back stitches and work Rows 17 through 24 identically for the back.
Underarm Join: With RS of both pieces facing, rejoin Color A at one side. Ch 3 (creates underarm gap), sc across front 53 sts, ch 3 at other armhole, sc across back 53 sts. Join with sl st to first sc. (106 sc plus 2 ch-3 underarm spans)
Round 25 (Color A): Ch 1, sc in each of the 53 front sts, sc in each of the 3 ch at underarm, sc in each of the 53 back sts, sc in each of the 3 ch at underarm. Join. (112 sc)
Round 26 (Color A): Ch 1, sc in each st around. Join. (112 sc)
Checkpoint: After Round 26, your joined body tube should measure approximately 4.5 inches / 11.4 cm from the neckline.
Section 3: Upper Bodice Stripe Section
Continue in the round with alternating solid sc stripes and V-stitch stripes.
V-Stitch Round Instructions: Ch 2, skip first st, V-st in next st (dc, ch 1, dc in same st), skip next st, sc in next st. Repeat across. The stitch count remains the same because each 3 st group replaces 3 sts.
Rounds 27 to 28 (Color B): Ch 1, sc in each st around. Join. (112 sc) each round.
Round 29 (Color C, V-st round): Work V-stitch round across all 112 sts. This divides into 28 repeats. Join. (112 sts)
Round 30 (Color C): Ch 1, sc in each sc and in each ch-1 sp of V-sts, sc in each dc of V-sts. Join. (112 sc)
Rounds 31 to 32 (Color D): Ch 1, sc in each st around. Join. (112 sc) each round.
Round 33 (Color A, V-st round): Work V-stitch round. Join. (112 sts)
Round 34 (Color A): Ch 1, sc in each st around. Join. (112 sc)
Rounds 35 to 36 (Color B): Ch 1, sc in each st around. Join. (112 sc) each round.
Checkpoint: After Round 36, the bodice from the neckline should measure approximately 6 inches / 15 cm.
Section 4: Waist Shaping
The waist shaping decreases from 112 sts to 84 sts for the fitted waist.
Round 37 (Color C): Ch 1, sc in first 10 sts, sc2tog, (sc in next 10 sts, sc2tog) 7 times, sc in last 9 sts, sc2tog. Join. (104 sc)
Round 38 (Color C): Ch 1, sc in each st around. Join. (104 sc)
Round 39 (Color D): Ch 1, sc in first 9 sts, sc2tog, (sc in next 10 sts, sc2tog) 6 times, sc in next 9 sts, sc2tog, sc in last 8 sts, sc2tog. Join. (96 sc)
Round 40 (Color D): Ch 1, sc in each st around. Join. (96 sc)
Round 41 (Color A): Ch 1, (sc in next 10 sts, sc2tog) 8 times. Join. (88 sc)
Round 42 (Color A): Ch 1, sc in each st around. Join. (88 sc)
Round 43 (Color B): Ch 1, (sc in next 9 sts, sc2tog) 8 times. Join. (80 sc)
Round 44 (Color B): Ch 1, sc in each st around, inc in last 4 sts evenly. Join. (84 sc)
The 84 sts divide evenly for the mesh panel (84 / 3 = 28 repeats exactly).
Section 5: Mesh Waist Panel
Work the Stripe Mesh Stitch as defined earlier.
Round 45 (Color C, SMS Round 1): Ch 2, sc in first st, (ch 2, skip 2 sts, sc in next st) 27 times, ch 2, skip 2 sts. Join with sl st to first sc. (28 sc, 28 ch-2 sps = 84 st equivalents)
Round 46 (Color C, SMS Round 2): Ch 2, sc in first ch-2 sp, (ch 2, sc in next ch-2 sp) 27 times, ch 2. Join. (28 sc, 28 ch-2 sps)
Rounds 47 to 48 (Color D): Repeat Round 46.
Rounds 49 to 50 (Color A): Repeat Round 46.
Rounds 51 to 52 (Color B): Repeat Round 46.
Round 53 (Close mesh, Color C): Ch 1, sc in first sc, 2 sc in each ch-2 sp, sc in each sc around. Join. (84 sc)
Checkpoint: After Round 53, the waist mesh panel should measure approximately 1.6 inches / 4 cm tall.
Section 6: Hip Increases
Increase from 84 sts back out to 144 sts for the hip and skirt.
Round 54 (Color C): Ch 1, (sc in next 6 sts, inc in next st) 12 times. Join. (96 sc)
Round 55 (Color C): Ch 1, sc in each st around. Join. (96 sc)
Round 56 (Color D): Ch 1, (sc in next 7 sts, inc in next st) 12 times. Join. (108 sc)
Round 57 (Color D): Ch 1, sc in each st around. Join. (108 sc)
Round 58 (Color A): Ch 1, (sc in next 8 sts, inc in next st) 12 times. Join. (120 sc)
Round 59 (Color A): Ch 1, sc in each st around. Join. (120 sc)
Round 60 (Color B): Ch 1, (sc in next 9 sts, inc in next st) 12 times. Join. (132 sc)
Round 61 (Color B): Ch 1, sc in each st around. Join. (132 sc)
Round 62 (Color C): Ch 1, (sc in next 10 sts, inc in next st) 12 times. Join. (144 sc)
Rounds 63 to 65: Continue in pattern with sc rounds, following the color sequence. (144 sc) each round.
Checkpoint: After Round 65, hip circumference is approximately 26.2 inches / 66.5 cm unblocked, stretching to approximately 38 inches on the body.
Section 7: Skirt Body Stripes
Continue the stripe sequence with sc and V-stitch rounds to build skirt length. Work Rounds 66 through 120 following this pattern:
Maintain 144 sts throughout. The skirt body section adds approximately 8 inches / 20.3 cm of length.
Section 8: Chevron Skirt Hem
The chevron section uses the Ripple Chevron Stitch. Your 144 stitches divide into 12 full chevron repeats of 12 stitches each.
Round 121 (Color C): Work RCS setup round. Place marker at each of the 12 peak points. (144 sc)
Rounds 122 to 123 (Color C): Work RCS, aligning peaks and valleys. (144 sc) each round.
Rounds 124 to 126 (Color D): Work RCS. (144 sc) each round.
Rounds 127 to 129 (Color A): Work RCS. (144 sc) each round.
Rounds 130 to 132 (Color B): Work RCS. (144 sc) each round.
Rounds 133 to 135 (Color C): Work RCS. (144 sc) each round.
Rounds 136 to 138 (Color D): Work RCS. (144 sc) each round.
Continue the chevron pattern through Round 150 or until the dress reaches your desired length, ending with the Shell Border for a beautiful scalloped edge.
Section 9: Bell Sleeves
Pick up stitches around each armhole opening and work downward in the round. The sleeves taper slightly toward the elbow before flaring into the dramatic bell shape. Finish with chevron rounds and the shell border to match the skirt hem.
Finishing Your Crochet Dress
Weave in all ends securely using your yarn needle. Block the dress by laying it flat on a towel, spritzing with water, and gently shaping to measurements. For acrylic yarn, steam blocking works beautifully. Let dry completely before wearing.
Size Customization Tips
To adjust the size, add or subtract stitches in multiples of 12 at the hip and skirt sections to maintain the chevron pattern. For the bust and waist, adjust in multiples that work with your mesh and V-stitch repeats. Always swatch and calculate your desired measurements against your gauge before making changes.
You Did It!
I am so proud of you for tackling this project. This berry pink bell sleeve crochet dress is a true showstopper, and you made it with your own two hands. Every time you wear it, you will know exactly how much skill and dedication went into creating something this beautiful.
Thank you so much for choosing this pattern for your next crochet adventure. I truly hope you love making this dress as much as I loved designing it. If you create one, I would absolutely love to see it! Tag me on Instagram or share a photo in my Facebook group.
If this pattern is calling your name, go ahead and save it to your Pinterest boards so you can find it when you are ready to cast on. And please drop a comment below if you make this dress. I read every single one, and hearing about your finished projects makes my whole day!
You Might Also Like
- Sunset Ombre Granny Square Tote Free Crochet Pattern
- Dusty Rose Pink Drawstring Bucket Bag Free Crochet Pattern
- Ocean Blue Granny Square Pocket Shawl Free Crochet Pattern
- Desert Rose Geometric Tote Free Crochet Pattern
