
I’ve been on the hunt for the perfect baby shower gift pattern for months now, and this mint green frog romper set is my absolute favorite find. The matching pieces look so polished together, and that little frog face on the bib makes everyone smile.
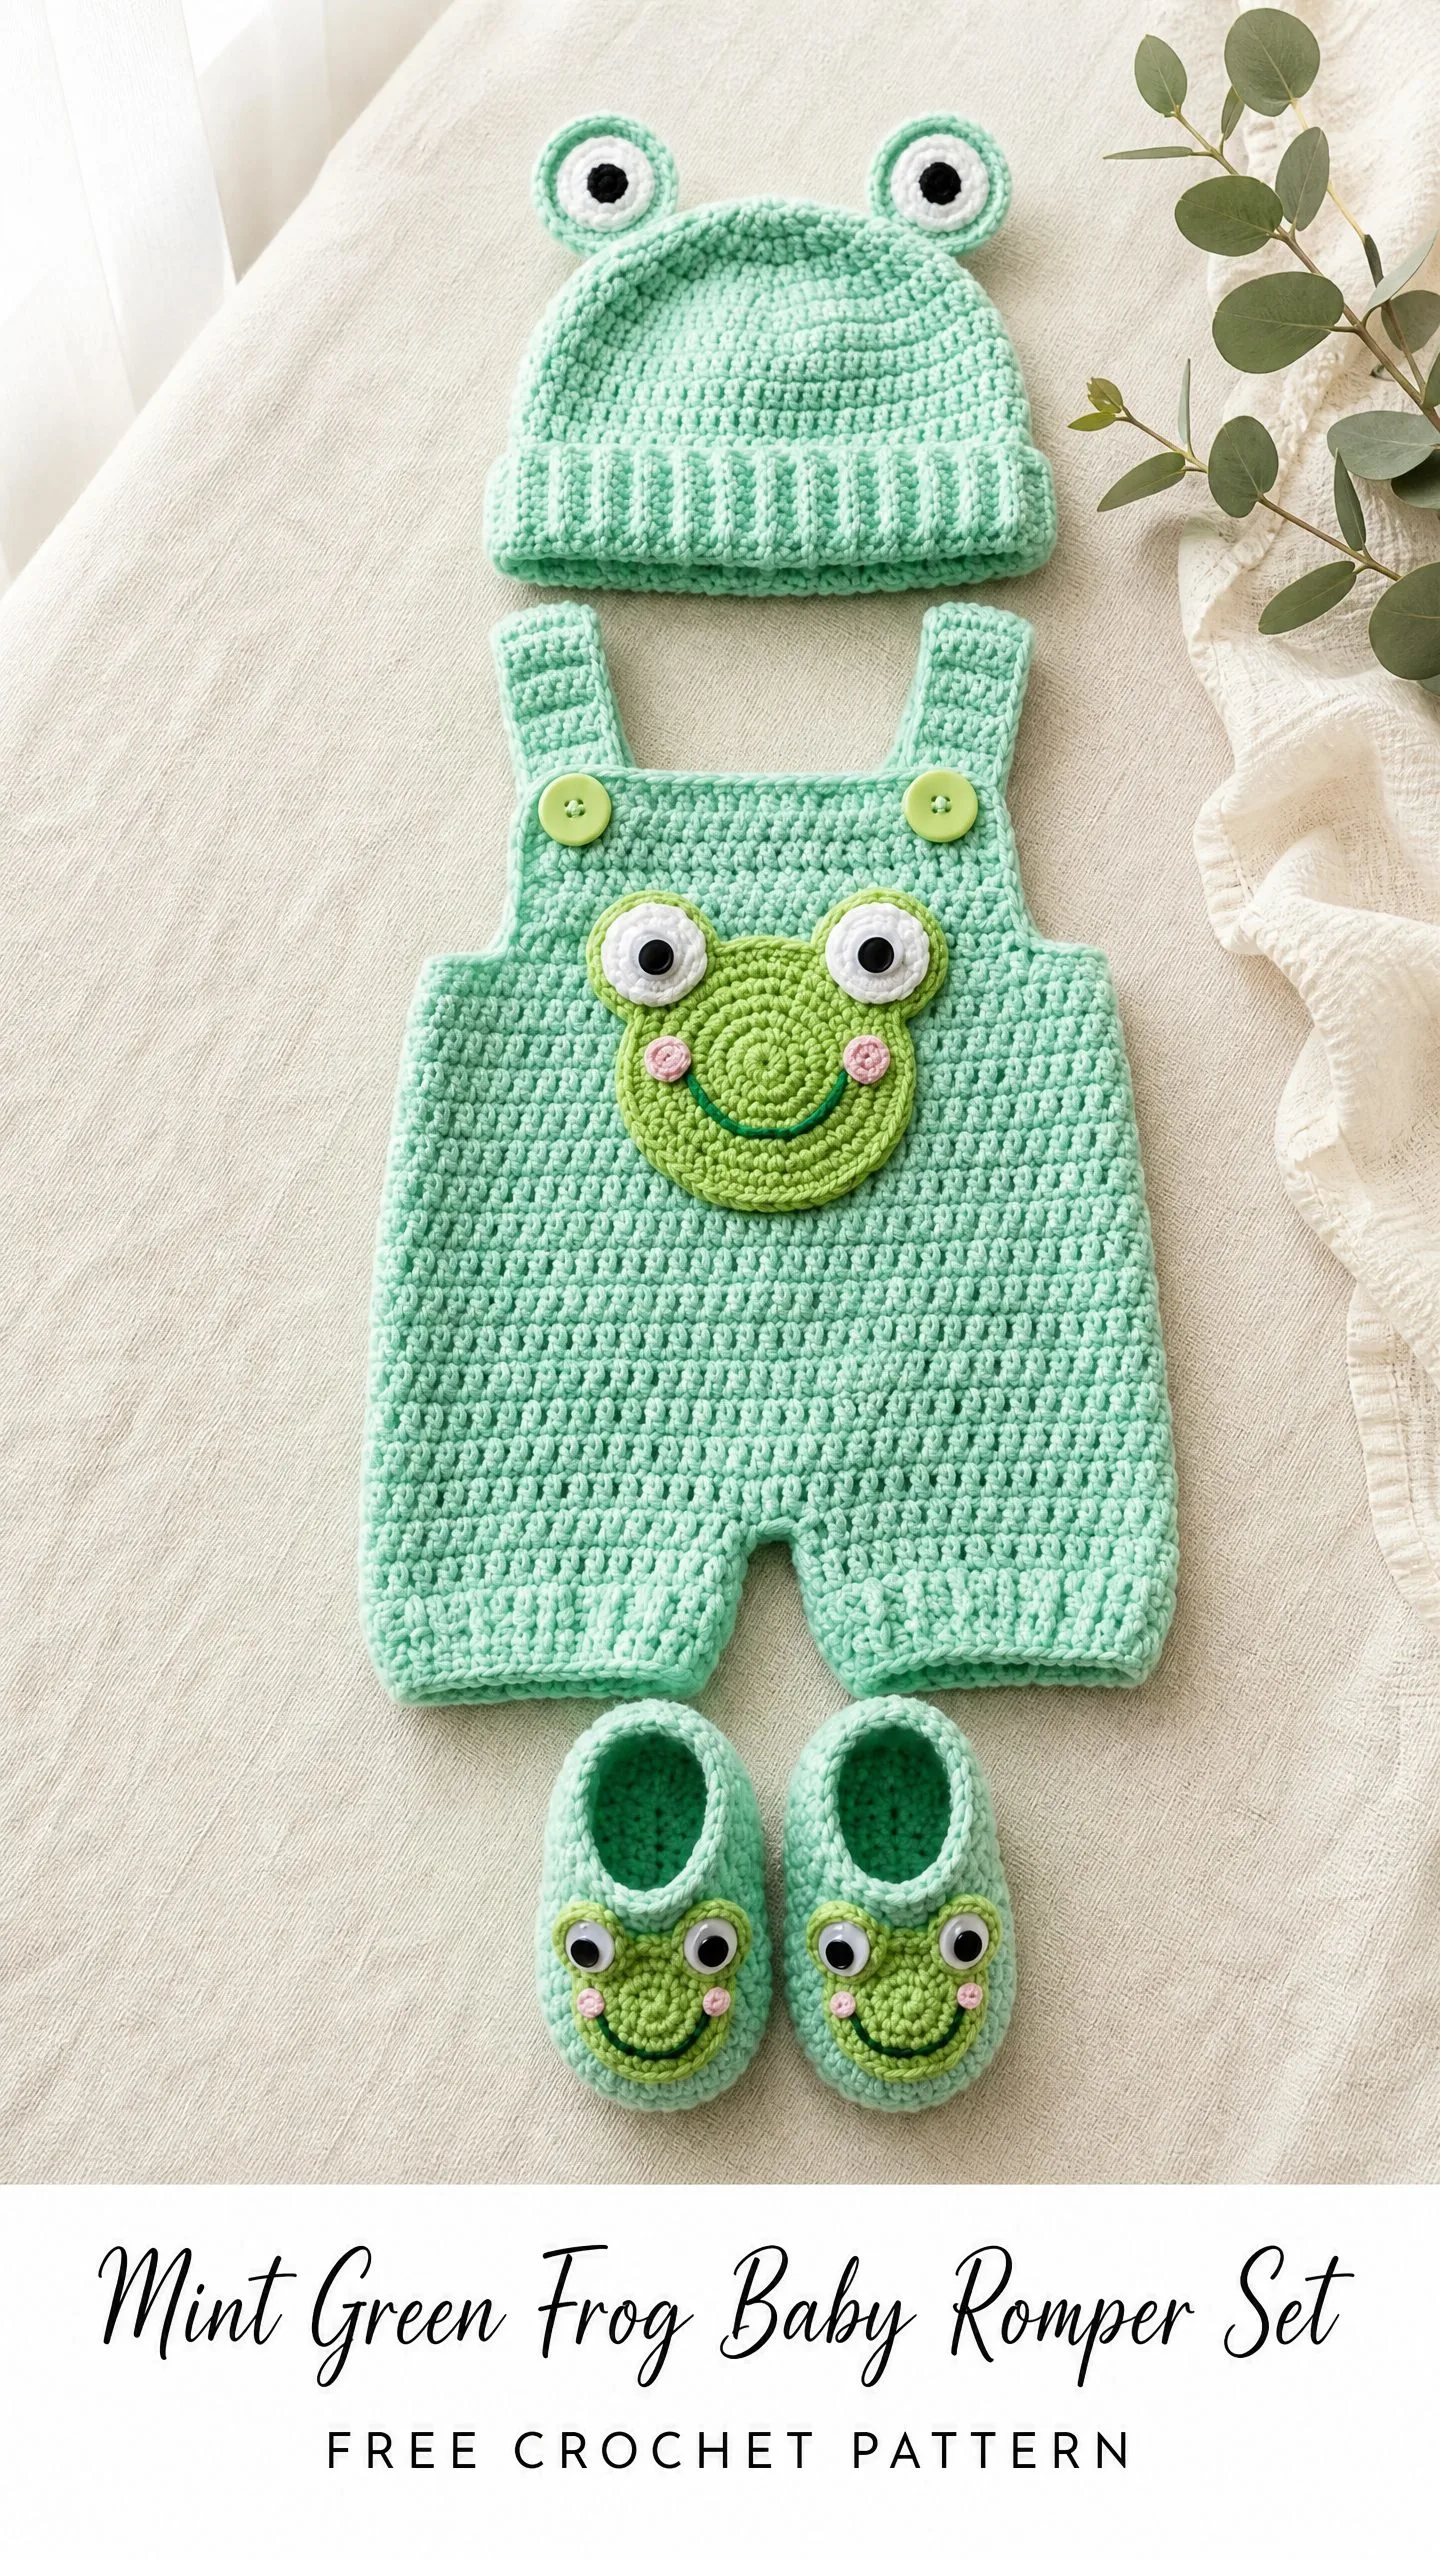
If you’re looking for a handmade gift that stands out from the pile of store bought onesies, this is the one. The set includes overalls style romper shorts, a ribbed brim beanie with frog eye toppers, and the cutest slip on booties with tiny frog faces.
I rounded up all my notes on this pattern and put together everything you need to make it yourself. Let’s dive in.
What You’re Making
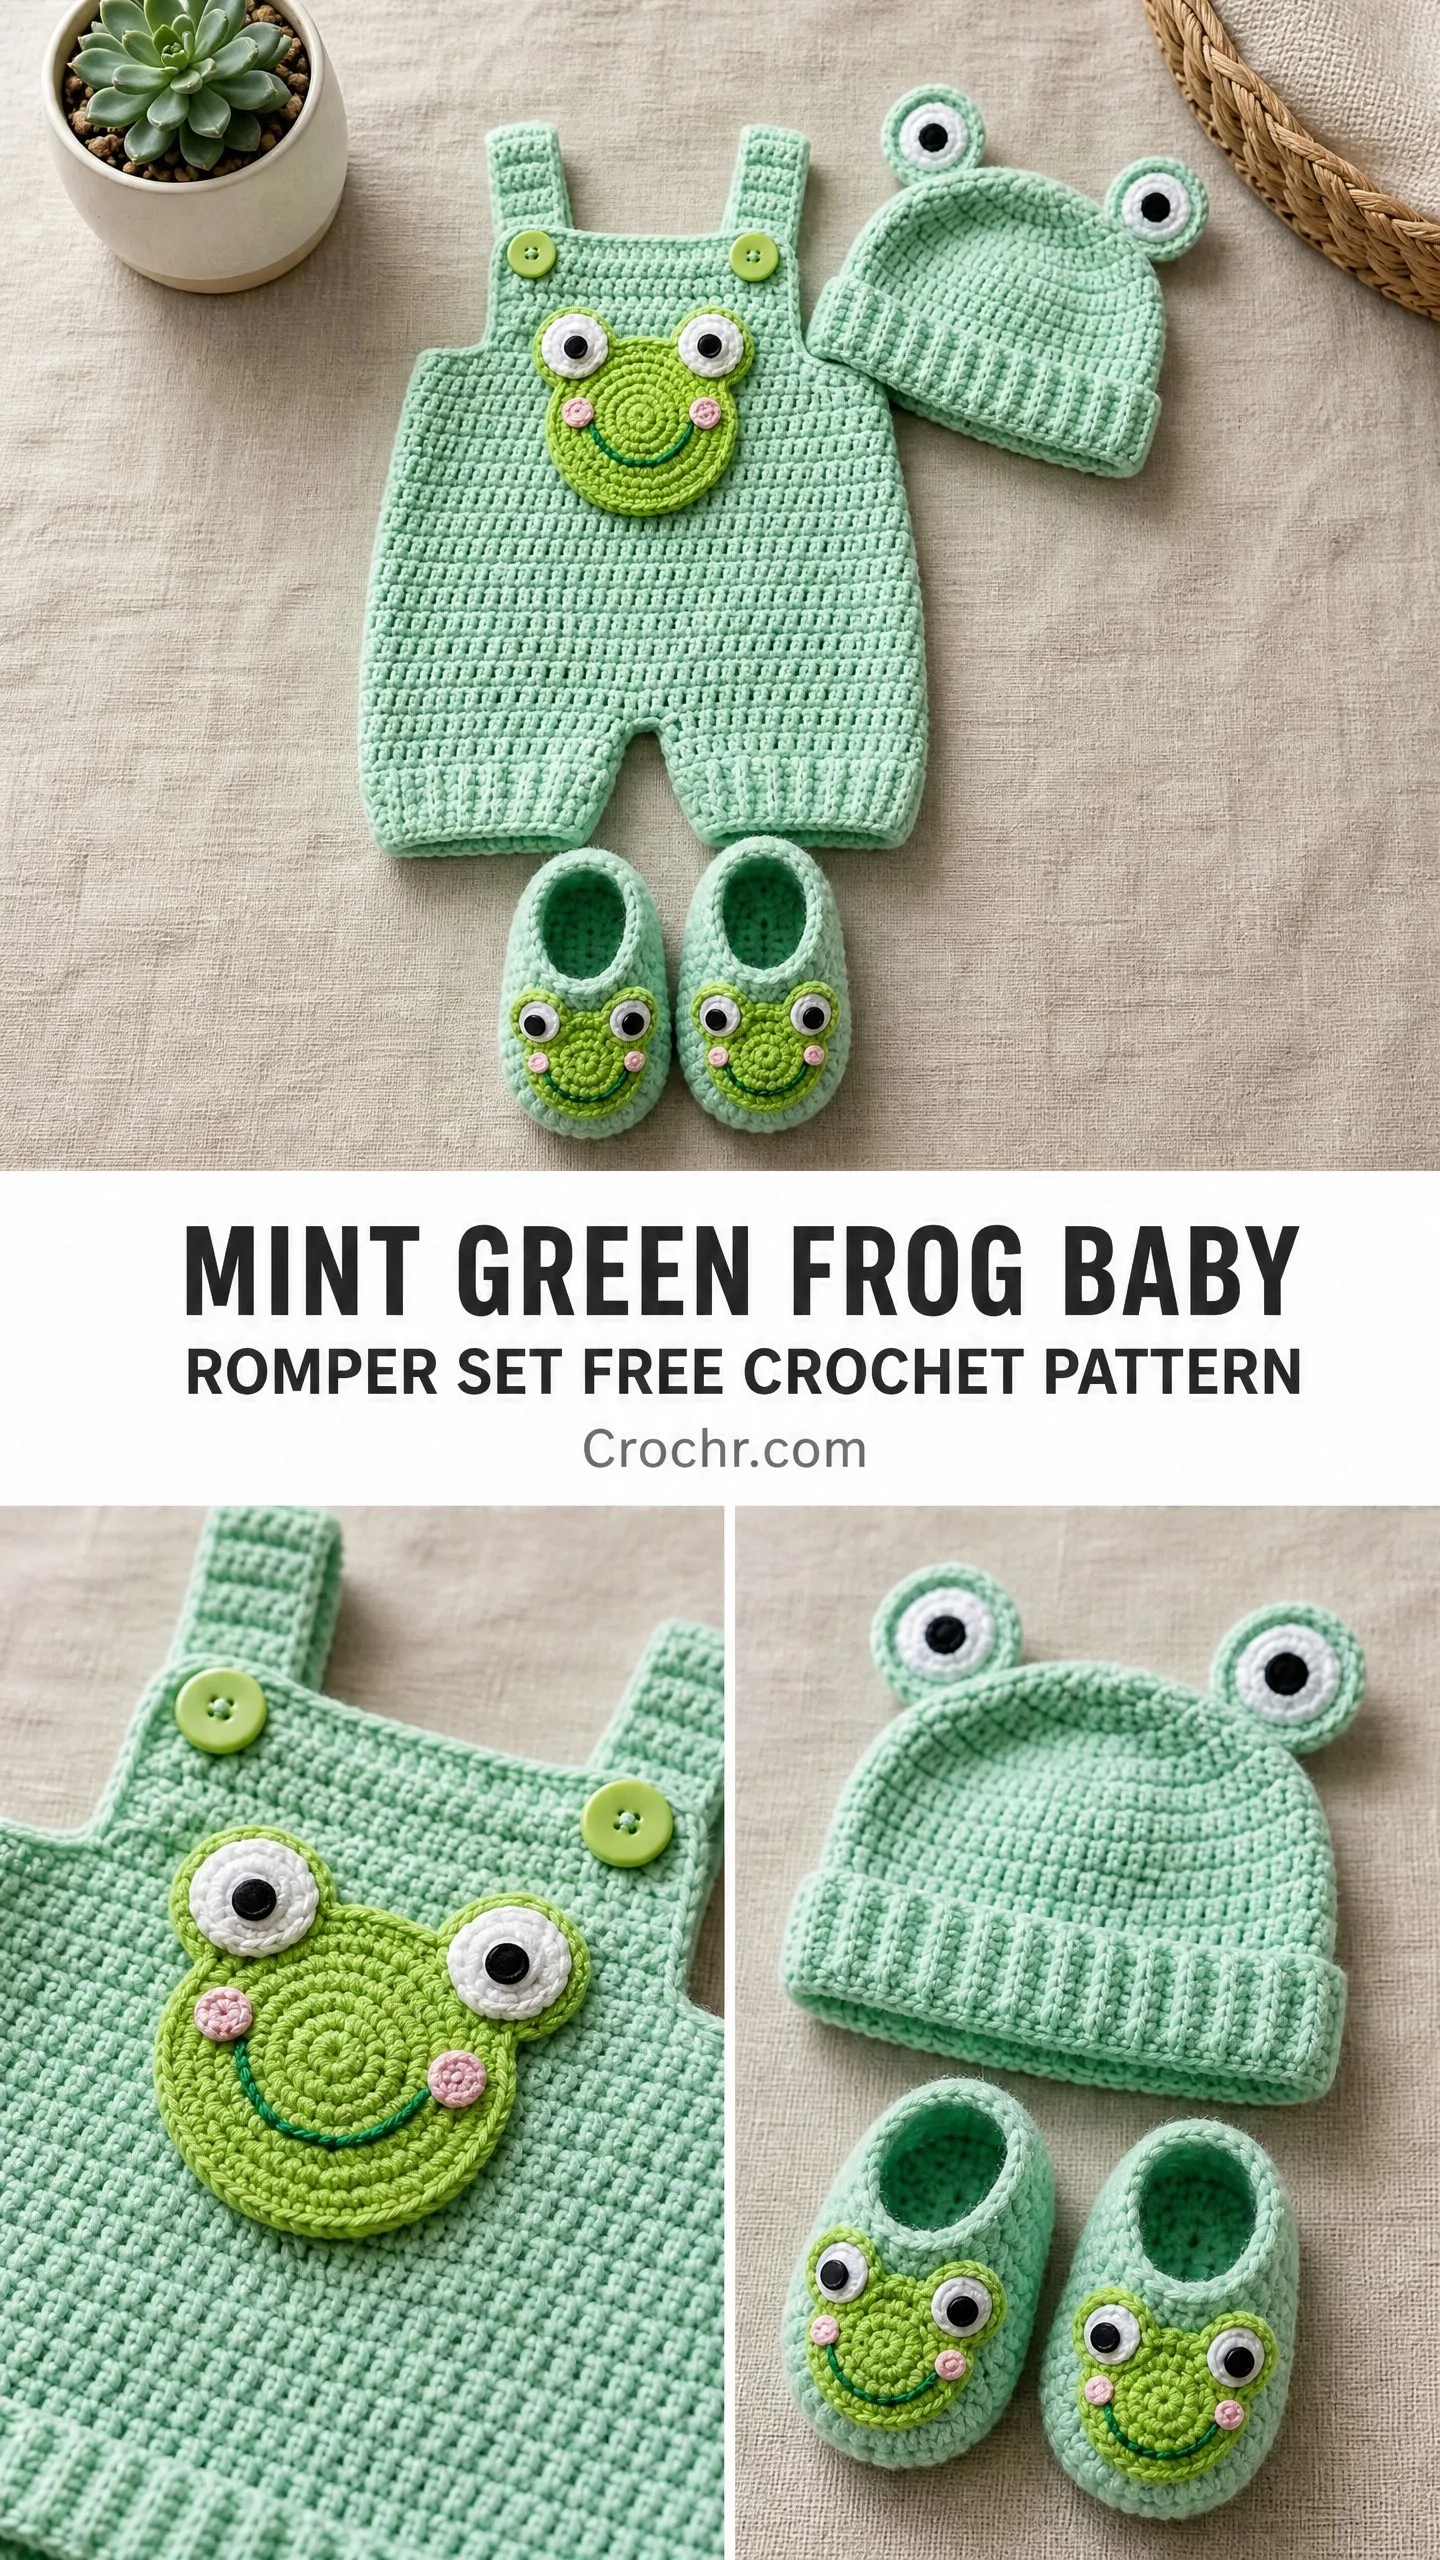
This three piece baby set features a romper with short legs, bib front, and button straps that cross over the shoulders. The matching beanie has a ribbed brim and two frog eye toppers perched on top. The booties complete the look with their own miniature frog face appliques.
The romper is worked flat in two leg panels, joined at the crotch, then worked in the round to the underarms. From there, you work the bib front and back separately before finishing with straps and buttons. The beanie is worked in the round from the crown down with a separately worked ribbed brim sewn on at the end. The booties are worked in the round from the sole up.
Skill level: Intermediate. You should be comfortable working in the round, working flat, joining pieces, and basic shaping with increases and decreases. The frog appliques require working in tight magic rings. Nothing complicated here, just lots of single crochet.
Time estimate: About 10 to 14 hours total. The romper takes 6 to 8 hours, the beanie 2 to 3 hours, and the booties 2 to 3 hours. The appliques add another 1 to 2 hours across all pieces.
Finished Measurements
This set is designed for 3 to 6 months.
Romper: Chest approximately 16 inches (40.5 cm), length from shoulder to crotch approximately 11 inches (28 cm), leg opening approximately 6 inches (15 cm) around.
Beanie: Circumference approximately 15 inches (38 cm), height approximately 6 inches (15 cm).
Booties: Foot length approximately 3.5 inches (9 cm), height approximately 2.5 inches (6.5 cm).
Size Adjustments
For newborn (0 to 3 months): Reduce starting chain for each leg panel by 4 stitches and work 2 fewer rounds on the body.
For 6 to 12 months: Increase starting chain for each leg panel by 4 stitches and work 3 additional rounds on the body before armhole shaping.
For the beanie, add or subtract 4 stitches from the crown expansion to adjust circumference by approximately 1 inch (2.5 cm).
For the booties, add or subtract 2 stitches from the sole foundation chain to adjust foot length by approximately 0.25 inches (0.5 cm) per stitch at this gauge.
Materials Needed
Yarn: Approximately 400 yards (365 m) of worsted weight yarn in mint green (MC), plus approximately 30 yards (27 m) of bright green (CC1) for applique details, and small amounts of white and black for eyes.
Hook: US size G-6 / 4.0 mm for the main pieces. US size F-5 / 3.75 mm optional for appliques to keep them firm.
Notions:
Yarn Suggestions
Lion Brand Vanna’s Choice in Mint: 100% acrylic, 170 yards per 3.5 oz skein. Machine washable, soft against baby skin, excellent stitch definition for appliques.
Red Heart Soft Yarn in Mint: 100% acrylic, 256 yards per 5 oz skein. Machine washable, budget friendly, easy to find at craft stores.
Paintbox Yarns Simply DK (held double): 100% acrylic, 137 yards per 1.76 oz skein. Held double gives worsted weight and provides a slightly lighter, drapier fabric ideal for warmer months.
Any worsted weight yarn (weight category 4) with a gauge of 16 sc x 18 rows = 4 inches (10 cm) will work. Choose machine washable fiber for baby items and avoid overly fuzzy yarns that obscure the single crochet texture.
Gauge
16 sc x 18 rows = 4 inches (10 cm) worked flat in single crochet with US G-6 / 4.0 mm hook.
16 sc x 18 rounds = 4 inches (10 cm) worked in the round in single crochet with US G-6 / 4.0 mm hook.
Gauge is critical for a well fitting garment. Make a swatch of at least 5 inches (12.5 cm) square and block before measuring. Adjust hook size as needed to match gauge.
Abbreviations
Here are all the terms you’ll see in this pattern:
Special Stitches Explained
Magic Ring (MR): Make a loop with the yarn so the tail end is behind the working yarn. Insert hook into the loop, yarn over and pull up a loop, yarn over and pull through to make first chain. Work the required stitches into the ring, then pull the tail end firmly to close the ring. This gives you a closed center with no hole.
Sc2tog (single crochet two together): Insert hook into next stitch, yarn over, pull up a loop (2 loops on hook). Insert hook into following stitch, yarn over, pull up a loop (3 loops on hook). Yarn over and pull through all 3 loops. One stitch decreased.
Pattern Notes Before You Begin
1. The romper body is worked primarily in the round after the legs are joined. Use stitch markers to track the beginning of each round.
2. When working in the round, do not join with a slip stitch unless specified. Use a continuous spiral and mark the beginning of each round with a stitch marker moved up each round.
3. When working flat, chain 1 and turn at the beginning of each row. The turning chain does NOT count as a stitch throughout this pattern.
4. All stitch counts appear in parentheses at the end of each row or round.
5. Before joining the legs, ensure both leg panels match in stitch count and length.
6. For infants under 3 months or for gift giving where age of recipient is unknown, embroider all eyes rather than using safety eyes or buttons.
Part 1: Romper Instructions
Section 1A: Right Leg Panel
With MC and G-6 hook, work in a continuous spiral.
Foundation: Work 24 sc into a magic ring. Do not join. Pm in first stitch to mark beginning of round. (24 sc)
Rnds 1 through 10: Sc in each st around. (24 sc)
Checkpoint: Right leg panel should measure approximately 2.5 inches (6.5 cm) tall from magic ring.
Fasten off, leaving a 12 inch (30 cm) tail for joining.
Note: Working into a magic ring creates the closed bottom hem of each leg opening. This gives a neat, clean circular edge at the bottom of each short leg.
Section 1B: Left Leg Panel
Work exactly as Right Leg Panel. Do not fasten off after Rnd 10. Leave loop on hook and set aside.
Section 1C: Joining Legs and Working Body
With left leg still on hook (loop live), hold right leg panel adjacent to left. You will join the two legs by working a chain bridge.
Join rnd: From left leg (loop on hook), ch 4. With RS facing, insert hook into any stitch on the right leg panel (mark this stitch). Sc into right leg and sc around the right leg for 24 sts, then sc across the 4 ch bridge stitches (4 sc), then sc around the left leg for 24 sts, then sc across the other side of the 4 ch bridge (4 sc). Pm at the point you began the right leg to mark beginning of body rounds. (56 sc)
Note: The ch-4 bridge becomes the inner crotch seam. Work into both loops of each chain stitch when working across the bridge.
Body Rnds 1 through 12: Sc in each st around. (56 sc)
Checkpoint: Body from crotch join should measure approximately 3 inches (7.5 cm). The total garment from leg bottom to current working edge should measure approximately 5.5 inches (14 cm).
Section 1D: Bib Front
The bib front is worked flat on 20 stitches centered at the front of the body. The remaining 36 stitches form the back and sides.
At the end of Body Rnd 12, sl st to next stitch. Count forward 10 stitches from the current position to find the center front. Count 10 stitches to the left of center and pm. Count 10 stitches to the right of center and pm. These 20 stitches are your bib stitches.
Join MC with a sl st to the right bib marker stitch. Ch 1.
Bib Rows 1 through 8: Ch 1, sc in each st across. Turn. (20 sc)
Checkpoint: Bib should measure approximately 1.75 inches (4.5 cm) from the body join row.
Now work the bib shoulder shaping to form the two straps.
Left Strap
Bib Row 9 (RS): Ch 1, sc in next 5 sts only. Turn. (5 sc)
Bib Rows 10 through 14: Ch 1, sc in each st across. Turn. (5 sc)
Fasten off, leaving a 15 inch (38 cm) tail for attaching to back.
Right Strap
Skip the center 10 sts of the bib top edge. Rejoin MC to the 16th stitch of the bib (counting from right side marker).
Bib Row 9 (RS): Ch 1, sc in next 5 sts. Turn. (5 sc)
Work Rows 10 through 14 as for Left Strap.
Fasten off, leaving a 15 inch (38 cm) tail.
Section 1E: Back Panel
Rejoin MC to the first stitch to the left of the left bib marker (the first stitch of the back section).
Back Rows 1 through 14: Ch 1, sc in next 36 sts. Turn. (36 sc)
Fasten off, leaving a tail for weaving in.
Checkpoint: The back panel should be the same height as the total front (bib rows 1 through 8 plus body below). The back top edge should be level with the top of the bib before straps begin.
Section 1F: Finishing the Romper Body
The straps cross from the front bib top corners over the shoulders and button to the back top edge.
Button placement: On the back top edge, mark two button positions on the left side (spaced to match the left strap) and two on the right side (spaced to match the right strap). The buttons are placed approximately 1 inch (2.5 cm) and 2.5 inches (6.5 cm) from each top corner of the back.
Sew one button at each of the four marked positions on the back top edge.
On each strap, work a button loop (small ch-3 loop reinforced with sl sts) at two positions along the length of the strap, spaced to match the buttons on the back.
Section 1G: Romper Border
With RS facing, join MC to any point along the leg opening edge of the right leg.
Rnd 1: Sc evenly around the leg opening. Sl st to first sc to join. (24 sc)
Rnd 2: Ch 1, sc in each st around. Sl st to join. (24 sc)
Fasten off. Repeat for left leg opening.
Work 1 round of sc evenly around the neckline/bib top edge between the two straps if desired for a clean finish.
Part 2: Frog Beanie Instructions
Section 2A: Crown
With MC and G-6 hook, make a magic ring.
Rnd 1: Work 6 sc into magic ring. Pull ring closed. Pm in first st. (6 sc)
Rnd 2: Work 2 sc in each st around. (12 sc)
Rnd 3: (Sc in next st, inc in next st) around. (18 sc)
Rnd 4: (Sc in next 2 sts, inc in next st) around. (24 sc)
Rnd 5: (Sc in next 3 sts, inc in next st) around. (30 sc)
Rnd 6: (Sc in next 4 sts, inc in next st) around. (36 sc)
Rnd 7: (Sc in next 5 sts, inc in next st) around. (42 sc)
Rnd 8: (Sc in next 6 sts, inc in next st) around. (48 sc)
Rnd 9: (Sc in next 7 sts, inc in next st) around. (54 sc)
Rnd 10: (Sc in next 8 sts, inc in next st) around. (60 sc)
Checkpoint: After Rnd 10, the crown circle should measure approximately 4.75 inches (12 cm) in diameter.
Section 2B: Body of Beanie
Rnds 11 through 20: Sc in each st around. (60 sc)
Checkpoint: After Rnd 20, beanie body should measure approximately 4.5 inches (11.5 cm) from crown to current edge.
Sl st to next st to neaten the edge. Fasten off.
Section 2C: Ribbed Brim
The ribbed brim is worked flat and seamed to create the look of a rolled ribbed edge.
Ch 7.
Brim Row 1: Sc in 2nd ch from hook and in each ch across. Turn. (6 sc)
Brim Rows 2 through 60: Ch 1, working in BLO only, sc in each st across. Turn. (6 sc each row)
After 60 rows, the brim strip should be long enough to go around the bottom edge of the beanie (approximately 15 inches / 38 cm). Sl st the two short ends of the brim together to form a ring. Sew the long edge of the brim strip to the bottom edge of the beanie using the yarn needle and MC, easing evenly around the opening.
Section 2D: Frog Eye Toppers for Beanie (make 2)
With MC and G-6 hook, make a magic ring.
Rnd 1: Work 6 sc into magic ring. Pull ring closed. (6 sc)
Rnd 2: Work 2 sc in each st around. (12 sc)
Rnd 3: (Sc in next st, inc in next st) around. (18 sc)
Rnd 4: Sc in each st around. (18 sc)
Sl st to close. Fasten off, leaving a tail for sewing.
Attach a small black felt circle or 10 mm safety eye to center of each eye topper. Sew eye toppers to the top of the beanie, positioned approximately 0.5 inches (1.25 cm) apart at the center top, angling slightly outward.
Part 3: Frog Booties (make 2)
Section 3A: Sole
With MC and G-6 hook, ch 9.
Rnd 1: Work 2 sc in 2nd ch from hook, sc in next 6 chs, work 4 sc in last ch (working around the chain now), sc in next 6 chs, work 2 sc in last ch (same as first ch). Join with sl st to first sc if desired, or continue in spiral with pm. (20 sc)
Rnd 2: Work 2 sc in next 2 sts, sc in next 6 sts, work 2 sc in next 4 sts, sc in next 6 sts, work 2 sc in next 2 sts. (28 sc)
Rnd 3: Sc in each st around. (28 sc)
Checkpoint: Sole should measure approximately 3.5 inches (9 cm) long and 1.5 inches (4 cm) wide.
Section 3B: Sides of Bootie
Rnd 4: Working in BLO only, sc in each st around. (28 sc)
Note: Working in BLO for this round creates a visible ridge that defines the edge of the sole.
Rnds 5 through 7: Sc in each st around (both loops). (28 sc)
Checkpoint: Sides of bootie should measure approximately 1 inch (2.5 cm) from the sole ridge.
Section 3C: Toe Shaping
Rnd 8: Sc in next 8 sts, (sc2tog) 6 times, sc in next 8 sts. (22 sc)
Rnd 9: Sc in next 7 sts, (sc2tog) 4 times, sc in next 7 sts. (18 sc)
Rnd 10: Sc in each st around. (18 sc)
Section 3D: Cuff
Rnds 11 through 12: Sc in each st around. (18 sc)
Sl st to next st. Fasten off, leaving a tail.
Part 4: Frog Face Applique for Romper Bib (make 1)
This large circular face in CC1 (bright green) gets sewn to the center of the romper bib.
With CC1 and F-5 hook (or G-6 for a slightly looser result), make a magic ring.
Rnd 1: Work 6 sc into magic ring. Pull ring closed. (6 sc)
Rnd 2: Work 2 sc in each st around. (12 sc)
Rnd 3: (Sc in next st, inc in next st) around. (18 sc)
Rnd 4: (Sc in next 2 sts, inc in next st) around. (24 sc)
Rnd 5: (Sc in next 3 sts, inc in next st) around. (30 sc)
Rnd 6: (Sc in next 4 sts, inc in next st) around. (36 sc)
Sl st to next st to close. Fasten off, leaving a long tail for sewing. This circle is approximately 3 inches (7.5 cm) across.
Frog Eyes for Bib Applique (make 2)
With white yarn and F-5 hook, make a magic ring.
Rnd 1: Work 6 sc into magic ring. (6 sc)
Rnd 2: Work 2 sc in each st around. (12 sc)
Sl st to close. Fasten off, leaving tail. Sew or glue a black 6 to 8 mm button, safety eye, or embroidered dot to center of each white circle.
Frog Smile: Using pink embroidery floss or pink yarn, embroider a curved smile across the lower portion of the green face circle. Add two small pink dots for nostrils above the smile line.
Assembly: Pin the green face circle to the center front of the romper bib (approximately centered between rows 3 and 7 of the bib). Sew around the edges using the tail and yarn needle. Sew the two white eye circles to the top edge of the green face circle, overlapping slightly. The eyes should peek above the top edge of the green circle.
Part 5: Frog Eye Ovals for Romper Bib (make 2)
These larger oval eye shapes sit on the bib above the main face applique for that goggle style look.
With MC and F-5 hook, ch 5.
Rnd 1: Work 2 sc in 2nd ch from hook, sc in next 2 chs, work 4 sc in last ch, sc in next 2 chs, work 2 sc in same ch as first 2 sc. (12 sc)
Rnd 2: Work 2 sc in next 2 sts, sc in next 2 sts, work 2 sc in next 4 sts, sc in next 2 sts, work 2 sc in next 2 sts. (20 sc)
Sl st to close. Fasten off, leaving a tail.
Cut or embroider a black pupil onto each oval. Sew the ovals to the bib above and slightly overlapping the top of the green face circle.
Part 6: Frog Face Appliques for Booties (make 2)
With CC1 and F-5 hook, make a magic ring.
Rnd 1: Work 6 sc into magic ring. (6 sc)
Rnd 2: Work 2 sc in each st around. (12 sc)
Rnd 3: (Sc in next st, inc in next st) around. (18 sc)
Sl st to close. Fasten off. This small circle is approximately 1.5 inches (4 cm) across.
Make 4 very small white circles for bootie eyes (same as bib eye circles but stop after Rnd 1 with 6 sc). Add black pupils. Sew one green circle to the front toe area of each bootie. Sew two white eye circles with pupils at the top of each green circle. Embroider a small pink smile on each.
Finishing and Blocking
Weave in all ends securely using a yarn needle, working ends into the backs of stitches in multiple directions.
Wet block all pieces by submerging in cool water, pressing out excess water in a towel (do not wring), and pinning flat to a blocking mat to the stated dimensions. Allow to dry completely before removing pins. Acrylic yarn benefits from steam blocking using a garment steamer held 1 inch (2.5 cm) from the surface. Do not press iron directly onto acrylic.
After blocking, sew all appliques in place. Attach buttons to back straps. Attach safety eyes securely if using, inserting the washer firmly from the inside.
Safety note: Check that all button and safety eye attachments are extremely secure before placing on an infant.
Care Instructions
If worked in 100% acrylic yarn: Machine wash cold on a gentle cycle, tumble dry low. Remove promptly from dryer to prevent pilling.
If worked in a wool or wool blend yarn: Hand wash in cool water with a wool wash, reshape and lay flat to dry. Do not wring.
Do not bleach. Do not dry clean. Store folded, not hung, to prevent stretching.
You Did It!
Thank you so much for choosing this pattern for your next project. I hope you love making this adorable frog set as much as I enjoyed putting together all the details for you. If you make one, I would absolutely love to see it! Tag me on Instagram or share a photo in my Facebook group.
If this pattern made you smile, save it to your Pinterest boards so you can find it again later. And please drop a comment below if you make one. I read every single one and it truly makes my day to see your finished projects hopping out into the world!
You Might Also Like
- Sage Green Boho Ruffle Crochet Top Free Pattern
- Sunset Orange Jellyfish Keychain Free Crochet Pattern
- Emerald Botanical Bracelet Free Crochet Pattern
- Sunset Ombre Butterfly Bloom Charm Free Crochet Pattern
