
When I sat down to design this little fox pinafore dress, I had three goals in mind. First, I wanted something that felt perfectly autumnal without being a costume. Second, I needed the construction to be approachable for intermediate crocheters who have mastered the basics and want to try something with multiple components. Third, and maybe most importantly, I wanted those adorable fox details that would make any baby photo absolutely irresistible.
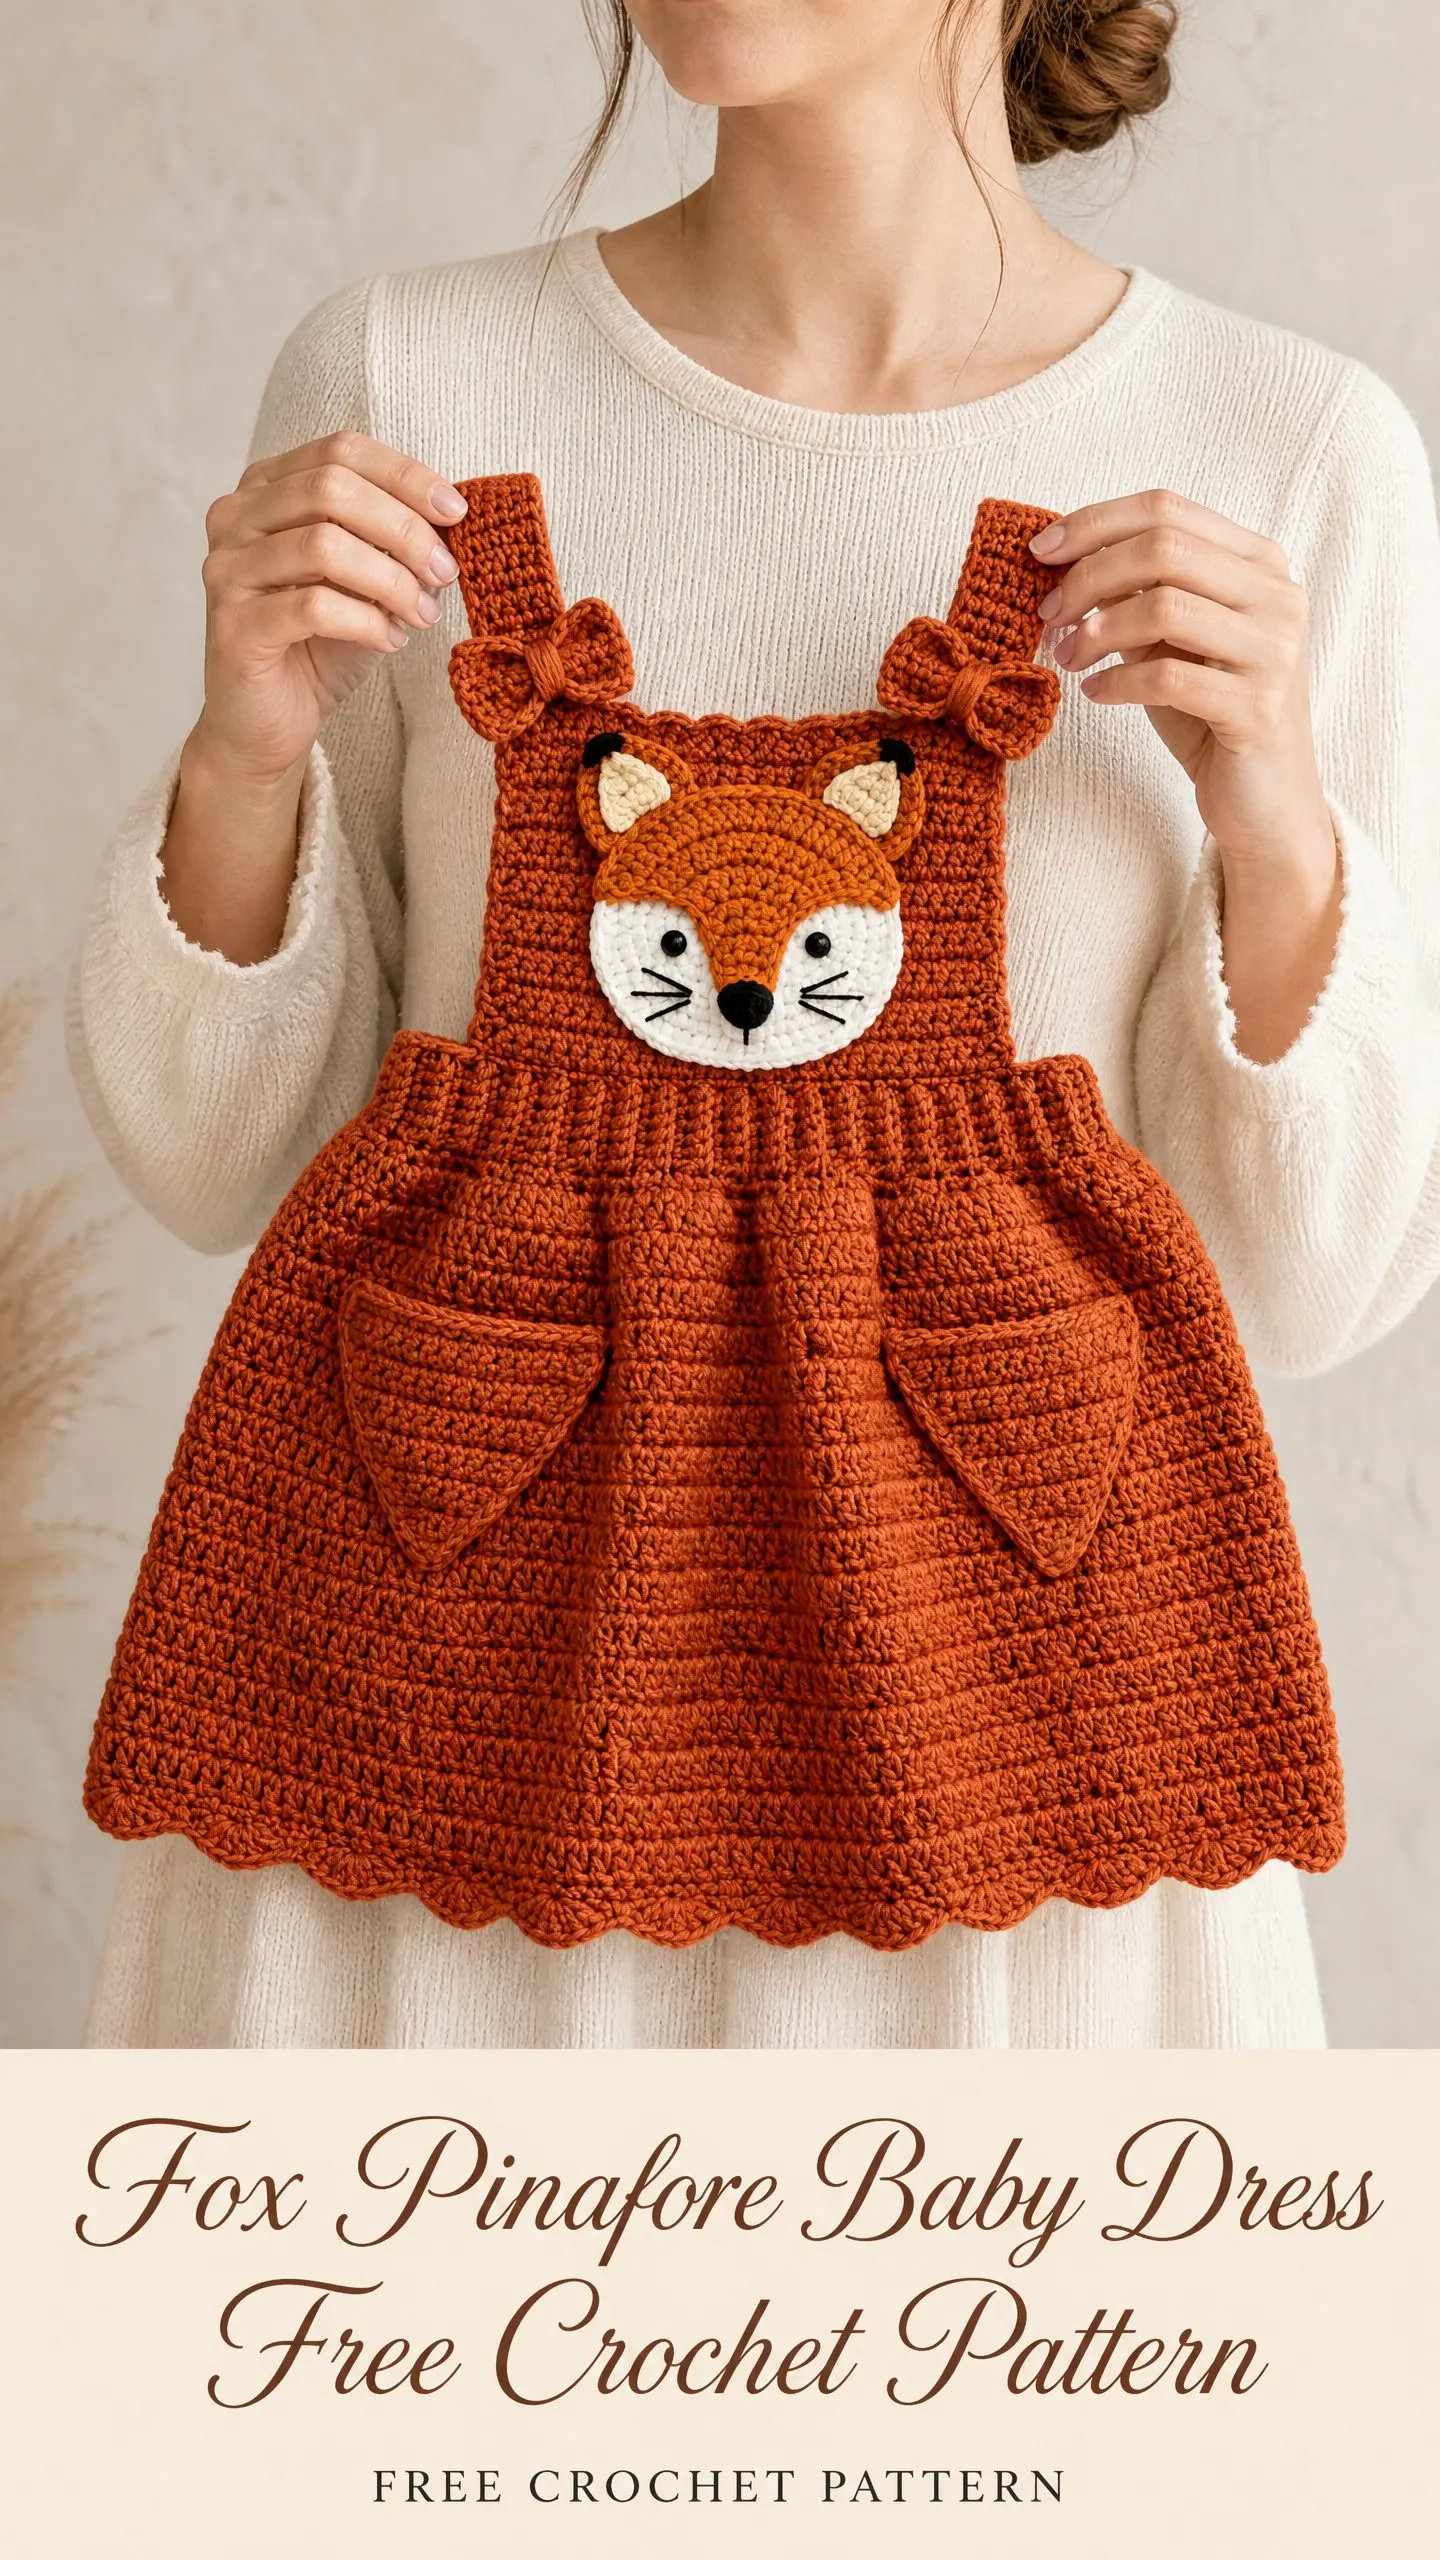
I spent weeks tweaking the proportions of that fox face, adjusting the placement of those sweet little ears, and getting the scalloped hem just right. The heart-shaped pockets were a late addition that I almost left out, but I am so glad I kept them. They add such a charming touch and give little hands somewhere to rest.
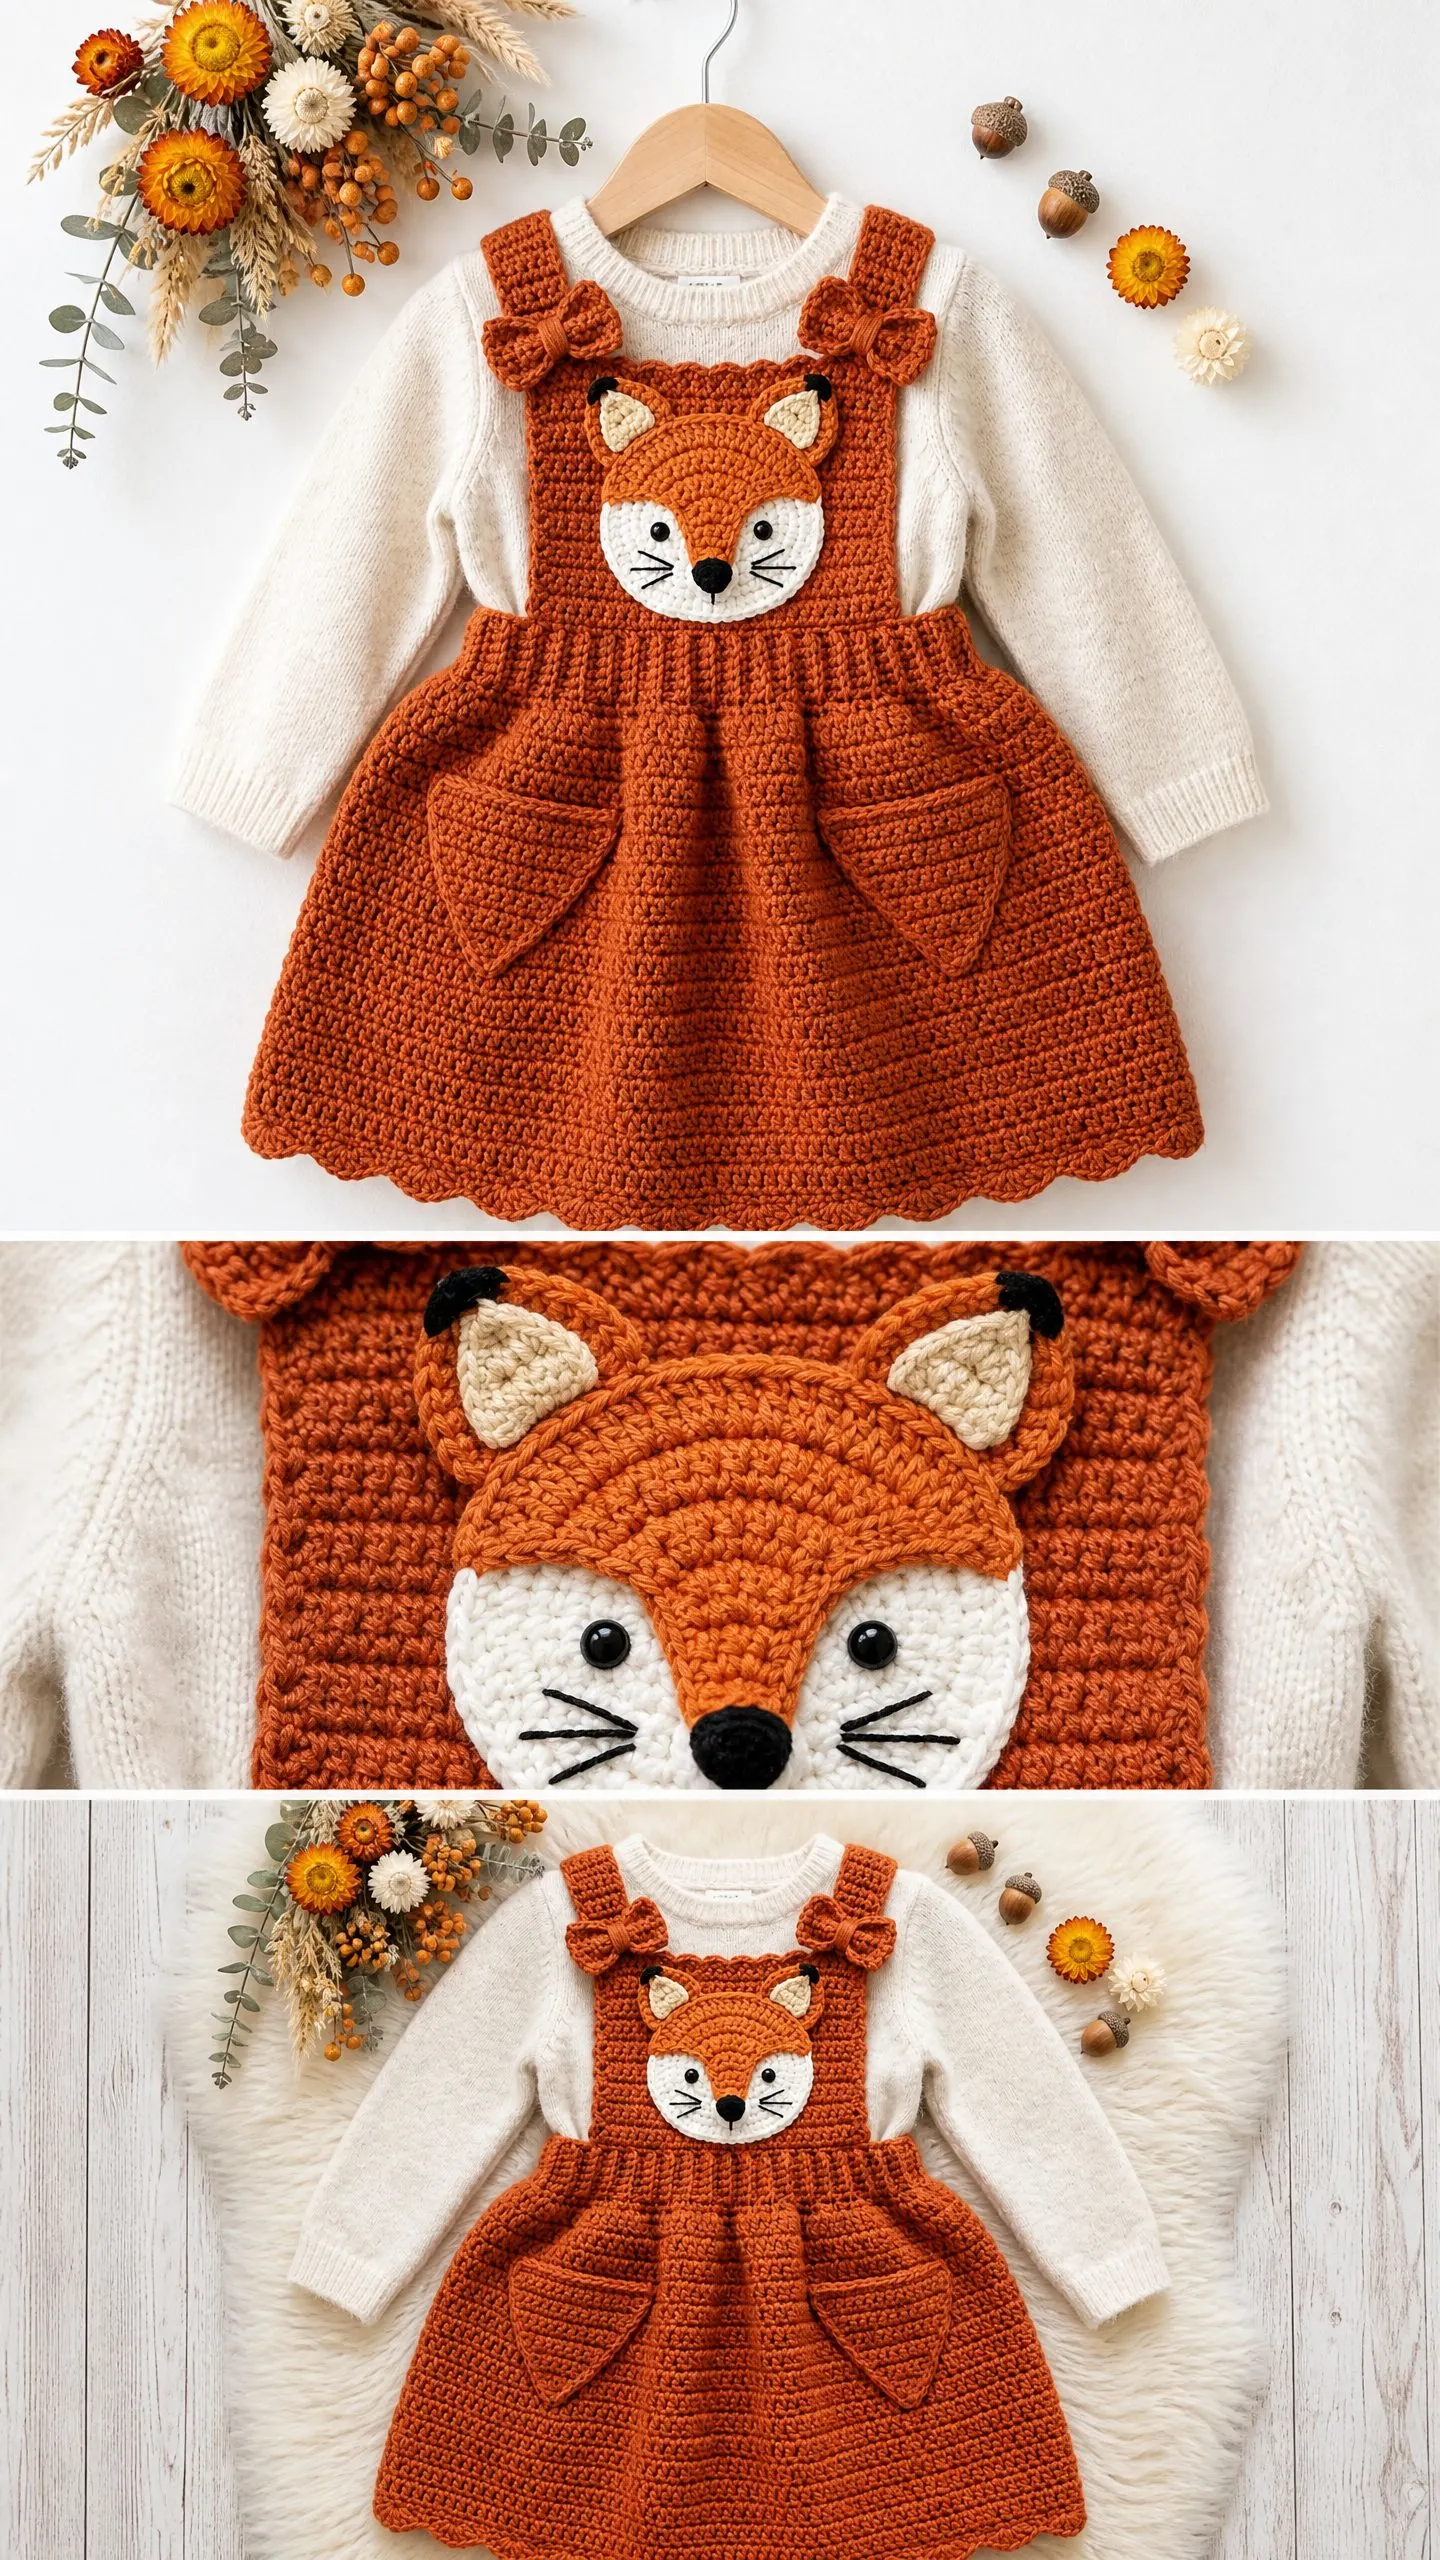
I am SO pleased with how this turned out. The rust orange color pops beautifully over a cream sweater, those tiny bows on the straps are the perfect finishing detail, and the whole thing comes together into an outfit that looks far more complicated than it actually is. Let me walk you through every single step.
About This Fox Pinafore Crochet Pattern
This crochet baby dress is designed as a complete overlay pinafore that layers over a long-sleeve onesie or sweater. The finished piece features a rust-orange crocheted skirt with wide shoulder straps, bow accents at each shoulder, two front heart-shaped patch pockets, a scalloped hem, and a dimensional fox face applique centered on the bib front.
The dress fastens at the back with two wooden buttons, making diaper changes much easier for tired parents. Trust me, they will thank you for this detail.
Skill Level: Intermediate
You should be comfortable working flat rows, making increases and decreases for shaping, seaming pieces together, picking up stitches, working small applique pieces in the round and flat, and doing basic surface embroidery for the fox features. Nothing here is overly complicated on its own. The challenge comes from managing multiple components and paying attention to placement during assembly.
Time Estimate: 14 to 20 hours total, excluding blocking time. The applique assembly and embroidery details take longer than you might expect, so budget extra time for those finishing touches.
Finished Measurements
This pattern is written for size 12 months.
Size customization tips are included at the end of this tutorial if you need to adjust for 6 months, 18 months, or 24 months / 2T.
Materials Needed
Yarn A (Main Color, Rust Orange): worsted weight, approximately 350 yards / 320 meters
Yarn B (Cream/Off-White): worsted weight, approximately 30 yards / 27 meters, for the fox face muzzle
Yarn C (White): small amount, approximately 5 yards / 4.5 meters, for inner ear and muzzle highlight
Hooks:
Notions:
Yarn Suggestions
Option 1: Lion Brand Pound of Love (worsted, 100% acrylic) in Terracotta or Burnt Orange and off-white. Excellent stitch definition, machine washable, widely available, and soft against baby skin.
Option 2: Paintbox Yarns Simply DK held double (treated as worsted) in Pillar Box Red toned down with Mustard for a hand-dyed effect, or their Worsted Cotton in Burnt Terracotta shade. Machine washable and durable.
Option 3: Cascade 220 Superwash (worsted, 100% superwash wool) in Ginger or Burnt Sienna. Excellent stitch definition and lovely drape for baby garments, machine washable on gentle cycle.
Whatever you choose, make sure it is machine washable. Baby items get messy. Avoid overly fuzzy or hairy yarns since stitch definition is important for the texture to read clearly, and the applique details must be visible.
Gauge
With J / 6.0 mm hook in single crochet (sc):
14 stitches and 16 rows = 4 inches / 10 cm
Gauge is critical for this garment. A difference of even one stitch per inch will change the finished chest measurement significantly on a small baby item. Work a 5 inch / 13 cm swatch, wash and block it, then measure the center 4 inches / 10 cm.
If your gauge is off, try going up a hook size if your stitches are too tight, or down a hook size if they are too loose.
Abbreviations Used in This Crochet Tutorial
Let me define every abbreviation before we begin. If you are new to pattern reading, bookmark this section.
Special Stitches and Components
Before diving into the main pattern, let me explain the special techniques you will use.
Scallop Stitch (for the hem edge)
This creates those beautiful wavy curves at the bottom of the dress.
Step 1: Slip stitch into the first stitch.
Step 2: Chain 3.
Step 3: Work 4 double crochets into the same stitch as the slip stitch (5 dc total in one stitch including the ch-3 which counts as the first dc, so work 4 dc into the same stitch after the ch-3).
Step 4: Skip 2 stitches.
Step 5: Slip stitch into the next stitch.
Step 6: Repeat steps 2 through 5 across the edge.
Each scallop uses 3 stitches from the foundation edge (1 anchor st, 2 skipped sts). Your stitch count must be a multiple of 3 for scallops to come out even.
Bow (make 2 for shoulder straps)
Step 1: With Yarn A and J hook, ch 11.
Step 2: Row 1: Sc in second ch from hook and in each ch across. (10 sc)
Step 3: Rows 2 through 6: Ch 1, turn, sc in each st across. (10 sc)
Step 4: Fasten off, leaving a long tail.
Step 5: Pinch the rectangle at the center and wrap the tail tightly around the center 6 to 8 times to cinch into a bow shape.
Step 6: Secure with several stitches and weave in ends. Set aside.
Heart Pocket (make 2)
These sweet pockets add such charm to the finished dress.
Step 1: With Yarn A and J hook, ch 2.
Step 2: Round 1 (RS): Work 6 sc in second ch from hook, do not join, work in a flat turning manner. (6 sc)
Step 3: Row 2: Ch 1, turn. Inc in first st, sc in next 2 sts, inc in next st, sc in next 2 sts. (8 sc)
Step 4: Row 3: Ch 1, turn. Inc in first st, sc in next 6 sts, inc in last st. (10 sc)
Step 5: Row 4: Ch 1, turn. Inc in first st, sc in next 8 sts, inc in last st. (12 sc)
Step 6: Row 5: Ch 1, turn. Inc in first st, sc in next 10 sts, inc in last st. (14 sc)
Step 7: Row 6: Ch 1, turn. Sc in each st across. (14 sc)
Step 8: Row 7: Ch 1, turn. Sc in each st across. (14 sc)
Step 9: Row 8: Ch 1, turn. Sc2tog, sc in next 10 sts, sc2tog. (12 sc)
Step 10: Row 9: Ch 1, turn. Sc2tog, sc in next 8 sts, sc2tog. (10 sc)
Step 11: Now divide for the two heart lobes. With RS facing, sc2tog across first 5 sts as follows: sc2tog, sc in next st, sc2tog. (3 sc on first lobe). Work 2 more rows of decreasing on these 3 sts: sc2tog, sc1 (2 sts), then sc2tog (1 st). Fasten off.
Step 12: Rejoin yarn to remaining 5 sts and repeat step 11 for second lobe.
Step 13: Block piece into a heart shape. Set aside for assembly later.
Pattern Notes Before You Begin
Read through these notes. They will save you confusion later.
1. The pinafore is worked as two flat panels (front and back), then seamed at the sides. The bib is an integrated extension of the skirt front, worked upward from the skirt.
2. All turning chains of 1 do NOT count as a stitch unless noted otherwise.
3. Right side is the knit-look face of the single crochet fabric. Mark RS with a stitch marker on Row 1 for reference.
4. The skirt is slightly A-line: it begins wider at the hem and decreases gently toward the waist.
5. The shoulder straps are worked separately and attached at the bib front corners, then button-looped at the back.
6. The pattern uses the J hook throughout for main pieces. Switch to the G hook for the fox applique to keep the fabric firm and non-holey.
7. Weave in all ends thoroughly before assembly. Baby items must be completely secure.
Step by Step Crochet Instructions
Now let us get into the actual construction. Take your time with each section.
Skirt Front Panel
The skirt front is worked flat from the hem up to the waist.
Foundation chain: With Yarn A and J hook, ch 37.
Row 1 (RS): Sc in second ch from hook and in each ch across. (36 sc)
Row 2 (WS): Ch 1, turn. Sc in each st across. (36 sc)
Row 3: Ch 1, turn. Sc in each st across. (36 sc)
Row 4: Ch 1, turn. Sc in each st across. (36 sc)
Row 5: Ch 1, turn. Sc2tog, sc in next 32 sts, sc2tog. (34 sc)
Row 6: Ch 1, turn. Sc in each st across. (34 sc)
Row 7: Ch 1, turn. Sc in each st across. (34 sc)
Row 8: Ch 1, turn. Sc in each st across. (34 sc)
Row 9: Ch 1, turn. Sc2tog, sc in next 30 sts, sc2tog. (32 sc)
Row 10: Ch 1, turn. Sc in each st across. (32 sc)
Row 11: Ch 1, turn. Sc in each st across. (32 sc)
Row 12: Ch 1, turn. Sc in each st across. (32 sc)
Row 13: Ch 1, turn. Sc2tog, sc in next 28 sts, sc2tog. (30 sc)
Row 14: Ch 1, turn. Sc in each st across. (30 sc)
Row 15: Ch 1, turn. Sc in each st across. (30 sc)
Row 16: Ch 1, turn. Sc in each st across. (30 sc)
Checkpoint: After Row 16, the skirt front panel should measure approximately 4 inches / 10 cm tall and 8.5 inches / 21.5 cm wide. This is the waist edge. The piece tapers from 36 sts at the hem to 30 sts at the waist.
Do not fasten off. Continue to the BIB section.
Bib Front
The bib is worked upward from the center of the waist edge of the skirt front.
Row 17: Ch 1, turn. Sc in each of the 30 sts across. (30 sc)
Row 18: Ch 1, turn. Sc2tog, sc in next 26 sts, sc2tog. (28 sc)
Row 19: Ch 1, turn. Sc2tog, sc in next 24 sts, sc2tog. (26 sc)
Row 20: Ch 1, turn. Sc in each st across. (26 sc)
Row 21: Ch 1, turn. Sc in each st across. (26 sc)
Row 22: Ch 1, turn. Sc in each st across. (26 sc)
Row 23: Ch 1, turn. Sc in each st across. (26 sc)
Row 24: Ch 1, turn. Sc in each st across. (26 sc)
Row 25: Ch 1, turn. Sc in each st across. (26 sc)
Row 26: Ch 1, turn. Sc in each st across. (26 sc)
Checkpoint: After Row 26, the bib section should measure approximately 4 inches / 10 cm tall. The full front panel (skirt plus bib) should measure approximately 8 inches / 20 cm tall total, and the bib should be approximately 7.5 inches / 19 cm wide.
Fasten off. Weave in ends. Set front panel aside.
Skirt Back Panel
The back panel mirrors the front skirt but omits the bib extension.
Foundation chain: With Yarn A and J hook, ch 37.
Row 1 (RS): Sc in second ch from hook and in each ch across. (36 sc)
Row 2: Ch 1, turn. Sc in each st across. (36 sc)
Row 3: Ch 1, turn. Sc in each st across. (36 sc)
Row 4: Ch 1, turn. Sc in each st across. (36 sc)
Row 5: Ch 1, turn. Sc2tog, sc in next 32 sts, sc2tog. (34 sc)
Row 6: Ch 1, turn. Sc in each st across. (34 sc)
Row 7: Ch 1, turn. Sc in each st across. (34 sc)
Row 8: Ch 1, turn. Sc in each st across. (34 sc)
Row 9: Ch 1, turn. Sc2tog, sc in next 30 sts, sc2tog. (32 sc)
Row 10: Ch 1, turn. Sc in each st across. (32 sc)
Row 11: Ch 1, turn. Sc in each st across. (32 sc)
Row 12: Ch 1, turn. Sc in each st across. (32 sc)
Row 13: Ch 1, turn. Sc2tog, sc in next 28 sts, sc2tog. (30 sc)
Row 14: Ch 1, turn. Sc in each st across. (30 sc)
Row 15: Ch 1, turn. Sc in each st across. (30 sc)
Row 16: Ch 1, turn. Sc in each st across. (30 sc)
Row 17 (top back border): Ch 1, turn. Sc in each st across. (30 sc)
Fasten off. Weave in ends.
Checkpoint: The back panel should match the front skirt panel in width and height (approximately 4 inches / 10 cm tall, 8.5 inches / 21.5 cm wide at hem, 8.5 inches / 21.5 cm wide at top).
Shoulder Straps (make 2)
Each strap is worked flat as a long narrow strip.
Foundation chain: With Yarn A and J hook, ch 7.
Row 1: Sc in second ch from hook and in each ch across. (6 sc)
Rows 2 through 36: Ch 1, turn. Sc in each st across. (6 sc per row)
After Row 36, the strap should measure approximately 9 inches / 23 cm long.
Row 37 (button loop row): Ch 1, turn. Sc in first 2 sts, ch 3, skip 2 sts, sc in last 2 sts. (4 sc + ch-3 loop)
Fasten off. Weave in ends on the button loop end. Leave a 12-inch / 30 cm tail at the starting end for sewing to the bib front.
Make 2 straps.
Assembly: Side Seaming
With RS facing out, align the front panel and back panel at the sides. Use Yarn A threaded on a yarn needle to whip stitch or mattress stitch the two side seams from the hem up to the top of the skirt panels (Row 16 on both pieces). Do not seam above the waist on the front (bib) or back. Leave the top open as armhole openings.
After seaming, turn right side out and try the dress on the recipient or a dress form to check fit before continuing.
Checkpoint: After seaming, the dress body should measure approximately 19 inches / 48 cm in circumference at the waist, and the armhole openings on each side should be approximately 3.5 inches / 9 cm tall.
Attaching Straps to Bib Front
With WS of strap to RS of bib front, position each strap at the top outer corners of the bib front (approximately 1 stitch in from each outer edge). Using the long starting tail, sew the strap firmly in place across the full 6-stitch width of the strap end. Work several passes to secure. Bows will cover the attachment point.
Cross the straps over the back and sew or pin them to check button placement. Mark button positions on the back top edge approximately 1.5 inches / 4 cm in from each outer back edge. Sew the two wooden buttons firmly to the back top edge at the marked positions. The button loops on each strap end fasten over these buttons to close the dress.
Scalloped Hem
The scalloped hem is worked along the bottom foundation chain edge of the assembled dress.
Setup: With RS facing, join Yarn A with a slip stitch to any stitch along the bottom edge. Work 1 round of sc evenly around the entire hem. You will have 36 sc along the front and 36 sc along the back for a total of 72 sc. At each side seam, work 1 sc into the seam itself. Total hem stitches: 72 sc. (72 sc)
Note: 72 is divisible by 3, confirming even scallop repeats (72 divided by 3 = 24 scallops total).
Scallop Round: Sl st into first st, (ch 3, work 4 dc into same st, skip 2 sts, sl st into next st) repeat around until all stitches are used. (24 scallops)
Fasten off. Weave in ends.
Bib Edging
With RS facing, join Yarn A at the lower right corner of the bib front. Work 1 row of sc evenly up the right side of the bib, across the top edge, and down the left side of the bib. Work approximately 1 sc per row along the sides, and 1 sc per stitch across the top. Fasten off. Weave in ends.
Fox Face Applique Instructions
Now for the fun part. The fox face consists of three main pieces: the main fox head, the muzzle, and two inner ears.
Fox Head (worked in the round)
Use Yarn A with G hook.
Magic ring or ch 2.
Round 1: Work 6 sc into the ring. Pull ring closed. Do not join; place marker to track rounds. (6 sc)
Round 2: Inc in each st around. (12 sc)
Round 3: (Sc in next st, inc in next st) repeat around. (18 sc)
Round 4: (Sc in next 2 sts, inc in next st) repeat around. (24 sc)
Round 5: (Sc in next 3 sts, inc in next st) repeat around. (30 sc)
Round 6: (Sc in next 4 sts, inc in next st) repeat around. (36 sc)
Round 7: Sc in each st around. (36 sc)
Round 8: Sc in each st around. (36 sc)
Round 9: Sc in each st around. (36 sc)
Join with sl st to next st. Fasten off, leaving a 20-inch / 51 cm tail for sewing to bib. Flatten the circle. The fox head circle should measure approximately 4 inches / 10 cm in diameter.
Fox Ears (make 2, worked flat)
Use Yarn A with G hook.
Foundation chain: Ch 2.
Row 1: Work 3 sc into second ch from hook. (3 sc)
Row 2: Ch 1, turn. Inc in first st, sc in next st, inc in last st. (5 sc)
Row 3: Ch 1, turn. Inc in first st, sc in next 3 sts, inc in last st. (7 sc)
Row 4: Ch 1, turn. Inc in first st, sc in next 5 sts, inc in last st. (9 sc)
Row 5: Ch 1, turn. Sc in each st across. (9 sc)
Fasten off, leaving a 12-inch / 30 cm tail for sewing. Make 2.
Inner Ear Accent (make 2, worked flat)
Use Yarn C or Yarn B with G hook.
Foundation chain: Ch 2.
Row 1: Work 3 sc into second ch from hook. (3 sc)
Row 2: Ch 1, turn. Inc in first st, sc in next st, inc in last st. (5 sc)
Row 3: Ch 1, turn. Sc in each st across. (5 sc)
Fasten off. Sew one inner ear piece centered onto each outer ear piece with whip stitch. Set ears aside.
Muzzle (worked in the round)
Use Yarn B with G hook.
Magic ring or ch 2.
Round 1: Work 6 sc into ring. Pull ring closed. (6 sc)
Round 2: Inc in each st around. (12 sc)
Round 3: (Sc in next st, inc in next st) repeat around. (18 sc)
Round 4: (Sc in next 2 sts, inc in next st) repeat around. (24 sc)
Join with sl st. Fasten off, leaving a 15-inch / 38 cm tail for sewing. The muzzle circle should measure approximately 2.5 inches / 6.5 cm in diameter.
Fox Face Assembly
Step 1: Position the fox head circle centered on the bib front, approximately 1 inch / 2.5 cm down from the top bib edge.
Step 2: Position the two ears at the top of the head circle, angled outward at approximately 45 degrees, tucking the straight base of each ear slightly behind the head circle edge.
Step 3: Pin ears in place and sew to the bib (not to the head circle) so they stand above the head.
Step 4: Sew the fox head circle to the bib front using the long tail and whip stitch around the entire circumference.
Step 5: Position the muzzle circle centered on the lower portion of the fox head circle, overlapping the head circle edge by approximately 0.5 inch / 1.5 cm at the bottom.
Step 6: Sew the muzzle to the head circle with whip stitch around the upper portion, leaving the bottom edge of the muzzle tacked to the bib as well.
Fox Face Embroidery
Using black embroidery floss (3 strands) or a small amount of black yarn:
Eyes: Work 2 small French knots or satin stitch dots, each approximately 0.25 inch / 6 mm in diameter, positioned symmetrically in the upper third of the fox head circle, approximately 1 inch / 2.5 cm apart.
Nose: Work a small triangular satin stitch nose at the center top of the muzzle circle, approximately 0.3 inch / 8 mm wide.
Whiskers: Using the surface slip stitch method or straight stitches, work 3 whisker lines radiating outward from each side of the muzzle. Each whisker should be approximately 1 inch / 2.5 cm long.
Final Assembly
Bow Assembly
Attach one bow to the top of each shoulder strap where it meets the bib front, covering the strap attachment seam. Sew in place firmly using the bow tail ends.
Heart Pockets Assembly
Block both heart pocket pieces into neat heart shapes. Pin each pocket to the front skirt panel, approximately 1.5 inches / 4 cm from each side seam, with the top of the pocket approximately 1 inch / 2.5 cm below the waist seam. Using Yarn A threaded on a yarn needle, whip stitch each pocket to the skirt front around the sides and bottom, leaving the top open. Work two stitches back over the starting point at each upper corner to reinforce the pocket opening.
Finishing and Blocking
Weave in all remaining ends, drawing each tail through at least 1 inch / 2.5 cm of stitches in multiple directions to prevent unraveling.
Wet blocking: Soak the finished dress in cool water with a small amount of wool wash or gentle detergent for 15 minutes. Gently squeeze out excess water (do not wring). Lay flat on a clean dry towel, roll the towel to absorb more water, then unroll and reshape the dress on a blocking mat. Pin the scalloped hem open so each scallop is spread and points downward in a clean curve. Pin the bib edges straight. Allow to dry completely before handling, approximately 12 to 24 hours depending on humidity.
If using 100% acrylic, steam blocking is an alternative: hover a steam iron 1 inch above the dress surface and steam each section, then pin and allow to cool and set fully before unpinning.
Care Instructions
Machine wash cold on the gentle cycle. Lay flat to dry. Do not tumble dry. Do not iron directly on the crochet fabric. Do not bleach. Store folded, not hung, to prevent stretching.
Size Customization Tips
To size down to 6 months: Begin the skirt front with ch 33 (32 sc) and reduce all decrease rows proportionally, removing 2 sts every 4 rows to reach 24 sts at the waist. Reduce bib to 24 sts and work 8 fewer rows on the skirt length. Reduce straps to 28 rows before the button loop row.
To size up to 18 months: Begin the skirt front with ch 41 (40 sc) and maintain all decrease rows the same, ending at 34 sts at the waist. Work 4 additional rows on the skirt before beginning waist decreases. Add 4 rows to straps.
To size up to 24 months / 2T: Begin with ch 45 (44 sc), end at 38 sts at waist, add 6 rows to skirt length, and add 8 rows to straps. Adjust scallop hem stitch count to the nearest multiple of 3.
General tip: For every additional 0.5 inch / 1.5 cm of finished width needed, add 2 stitches to the foundation chain. For every additional 0.5 inch / 1.5 cm of length needed, add 2 rows to the skirt section.
You Did It!
Thank you so much for trusting me with your time and yarn on this project. I know this fox pinafore dress has quite a few components, but I promise the end result is worth every stitch. That little fox face peeking out from the bib, those tiny bows perched on the shoulders, and those sweet heart pockets all come together into something truly special.
If you make this dress, I would absolutely love to see it. Tag me on Instagram or share your photos in our Facebook group. Nothing makes my day quite like seeing these patterns come to life in your hands.
Pin this fox pinafore baby dress crochet pattern to your Pinterest boards so you can find it when you are ready to start. And please drop a comment below if you give it a try. I read every single one and love hearing about your projects!
You Might Also Like
- Berry Pink Granny Square Purse Free Crochet Pattern
- Cozy Pumpkin Couple Amigurumi Free Crochet Pattern
- Blush and Grey Bow Purse Free Crochet Pattern
- Emerald Green Bobble Stitch Clutch Free Crochet Pattern
