
I set out to design a baby outfit that would make everyone smile the moment they saw it. I wanted something practical enough for everyday wear but adorable enough for those precious photo sessions we all treasure. The frog theme kept calling to me, and I knew I had to include that sweet little face on the bib plus a matching hat with bulging frog eyes.
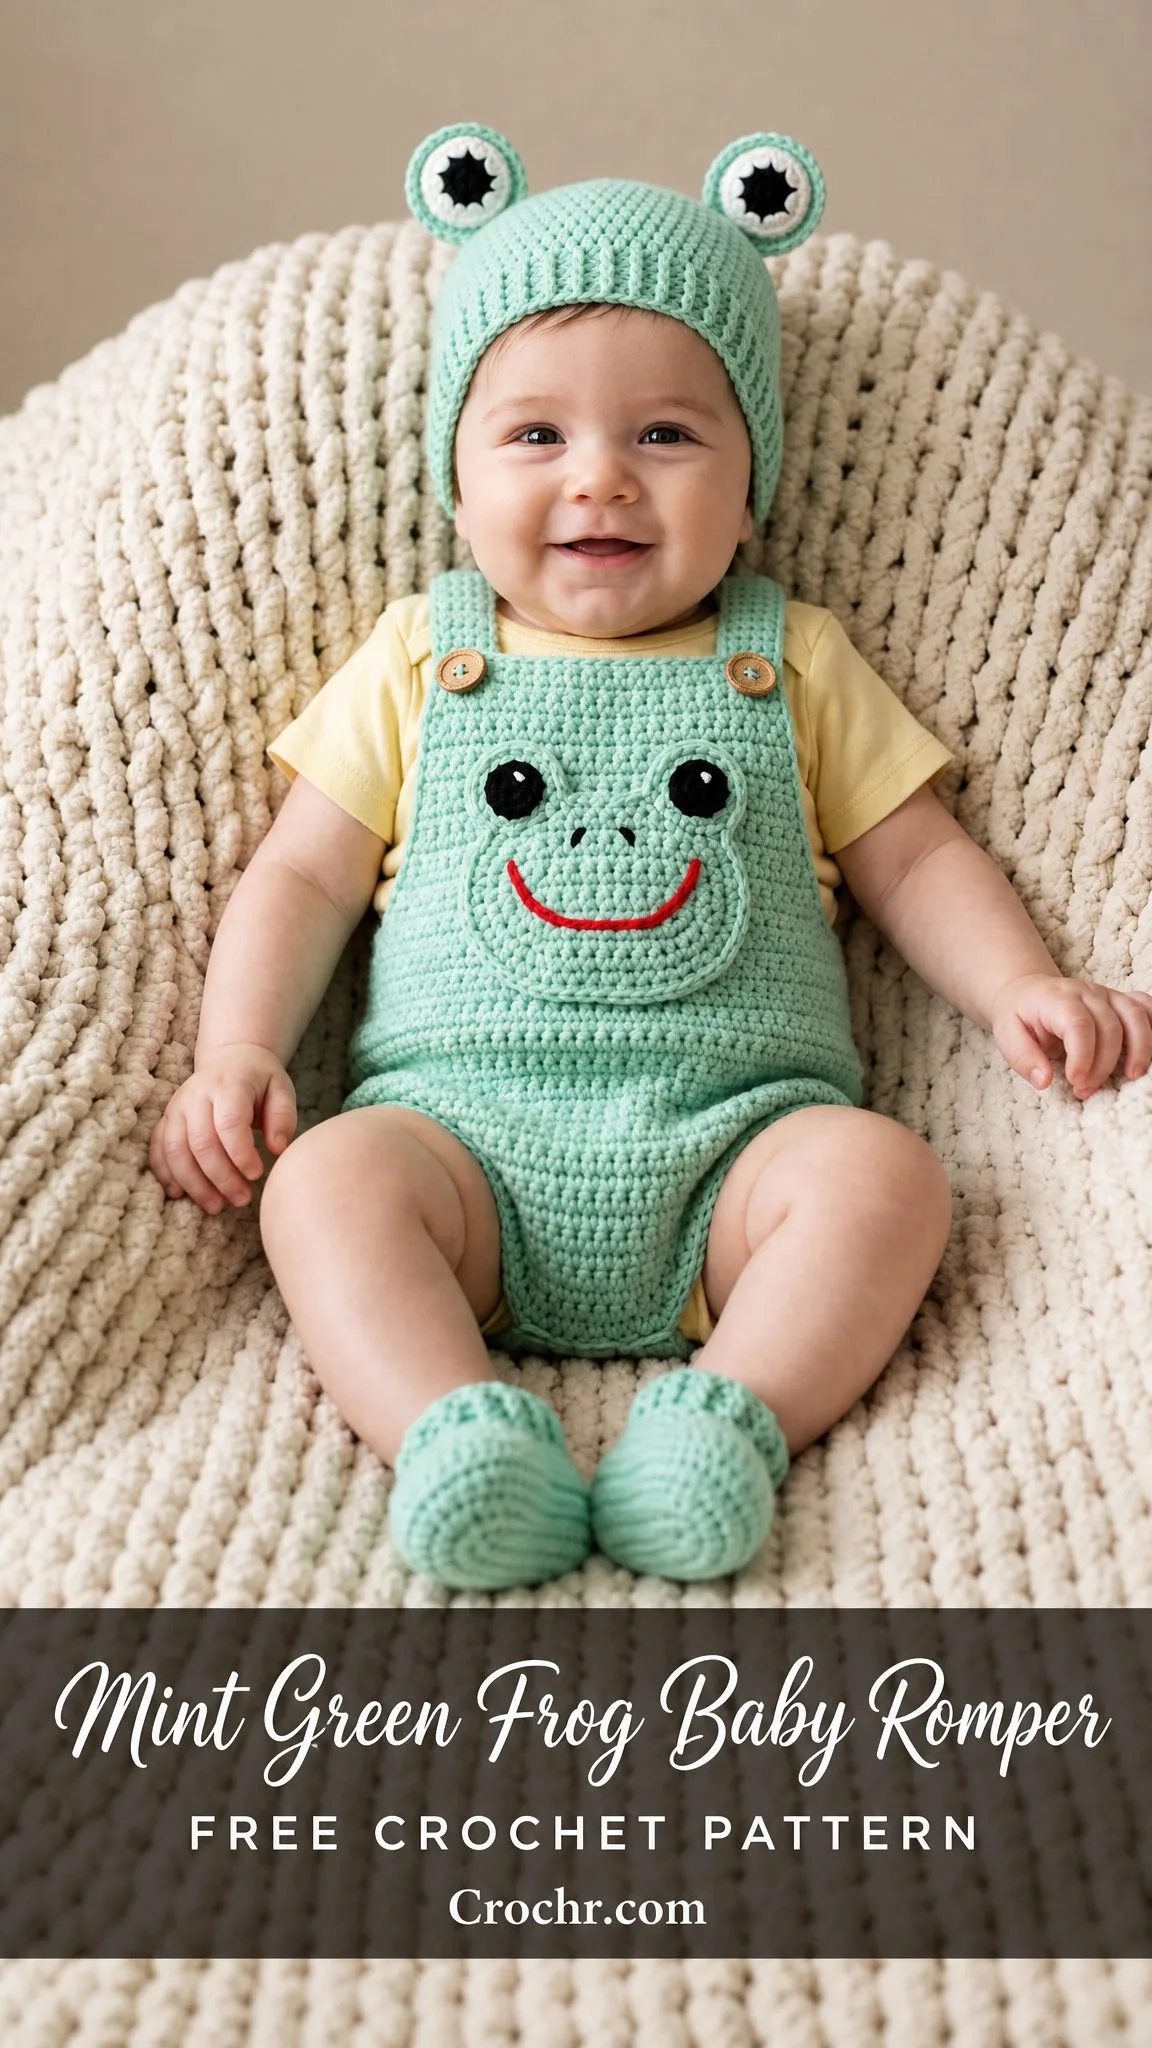
Working through the construction, I focused on keeping the stitches simple while still creating something that looks impressive. Single crochet throughout means even newer crocheters can tackle this project with confidence. The flat panel construction makes shaping straightforward, and the frog applique adds personality without complicated colorwork.
I am SO pleased with how this turned out! The mint green color is fresh and gender neutral, the wooden button closures add that handmade charm, and the matching hat with its little frog eye bumps on top just makes the whole set irresistible. Let me walk you through every step so you can make one too.
About This Crochet Pattern
This mint green frog baby romper crochet pattern creates a complete outfit perfect for babies around 3 to 6 months old. The set includes an overall-style romper with a frog face on the front bib, a matching beanie with dimensional frog eyes, and optional booties to complete the look.
The romper fits a baby with approximately 16 to 17 inch chest circumference. It measures about 10 inches wide and 11 inches long from the top of the strap to the bottom of the crotch. The hat measures approximately 14 inches in circumference.
Skill level: Intermediate. You will use only single crochet (sc) as your main stitch, which is the most basic crochet stitch where you insert your hook, pull up a loop, yarn over, and pull through both loops. However, this project involves flat panel construction, side seaming, increases and decreases for leg shaping, and creating a dimensional applique worked in the round.
Time estimate: Plan for 10 to 14 hours total. The romper body takes about 4 to 5 hours, the frog applique and embellishments need about 2 hours, the hat requires another 2 hours, and finishing plus assembly adds 1 to 2 more hours.
Materials You Will Need
Yarn: Worsted weight, 100% cotton or cotton blend works best for breathability and stitch definition. You will need approximately 350 yards of mint green for the main color. Keep a small amount of black yarn or embroidery floss on hand for the frog nostrils, plus a small amount of red yarn or embroidery floss for the smile.
Recommended yarn options:
Hooks:
Notions:
Gauge
Getting gauge right is critical for proper fit. With your G-6 hook and worsted weight cotton in single crochet:
18 stitches = 4 inches (10 cm)
20 rows = 4 inches (10 cm)
To make a gauge swatch, chain 22 and work single crochet in rows for 24 rows. Block lightly and measure the center 4 inches in both directions. Adjust your hook size up or down until your gauge matches.
Abbreviations
Special Techniques
Single Crochet Decrease (sc2tog): This is how you reduce your stitch count. Insert your hook into the next stitch and pull up a loop. Insert your hook into the following stitch and pull up another loop. You now have 3 loops on your hook. Yarn over and draw through all 3 loops at once. You have just turned 2 stitches into 1.
Magic Ring: This creates a tight, closed center when working in the round. Make a loop with your yarn, leaving a 6-inch tail. Insert your hook through the loop, pull up the working yarn, and chain 1 to secure. Work your stitches into the ring as directed, then pull the tail to close the ring tightly.
Pattern Notes Before You Begin
1. The romper body is worked in two flat panels (front and back) that get seamed at the sides.
2. Your turning chain of 1 at the beginning of each row counts as nothing. It is just for turning and is not counted as a stitch.
3. Stitch counts in parentheses at the end of each row show your total working stitches, not including the turning chain.
4. Safety eyes must be inserted and locked in place before stuffing or closing any openings. This is a critical safety step when making items for babies.
Step by Step Instructions
Romper Back Panel
The back panel is worked from the bottom edge (crotch) upward.
Foundation: Chain 47.
Row 1 (WS): Starting in second chain from hook, sc across. Turn. (46 sc)
Row 2 (RS): Ch 1, sc across. Turn. (46 sc)
Rows 3 through 6: Rep Row 2. (46 sc each row)
Now you will begin the leg shaping. The lower sides of each leg curve inward from the bottom.
Row 7 (Leg Shaping): Ch 1, sc2tog over first 2 sts, sc to last 2 sts, sc2tog. Turn. (44 sc)
Row 8: Ch 1, sc across. Turn. (44 sc)
Row 9: Ch 1, sc2tog over first 2 sts, sc to last 2 sts, sc2tog. Turn. (42 sc)
Row 10: Ch 1, sc across. Turn. (42 sc)
Row 11: Ch 1, sc2tog over first 2 sts, sc to last 2 sts, sc2tog. Turn. (40 sc)
Row 12: Ch 1, sc across. Turn. (40 sc)
Row 13: Ch 1, sc2tog over first 2 sts, sc to last 2 sts, sc2tog. Turn. (38 sc)
Row 14: Ch 1, sc across. Turn. (38 sc)
Checkpoint: After Row 14, the back panel should measure approximately 2.8 inches tall from the foundation chain and about 8.4 inches wide.
Now work straight for the torso section.
Rows 15 through 38: Ch 1, sc across. Turn. (38 sc each row)
Checkpoint: After Row 38, the back panel should measure approximately 7.6 inches tall from the foundation chain.
Right Back Strap
Row 39 (RS): Ch 1, sc across first 10 sts only. Leave remaining sts unworked. Turn. (10 sc)
Rows 40 through 54: Ch 1, sc across. Turn. (10 sc each row)
Row 55 (Buttonhole Row): Ch 1, sc 4, ch 2, sk 2, sc 4. Turn. (8 sc plus ch-2 sp)
Row 56: Ch 1, sc 4, 2 sc in ch-2 sp, sc 4. Turn. (10 sc)
Fasten off. Weave in ends.
Left Back Strap
With RS facing, skip the center 18 stitches of Row 38. Reattach yarn at stitch 29 (count from right edge).
Row 39 (RS): Ch 1, sc across last 10 sts. Turn. (10 sc)
Rows 40 through 54: Ch 1, sc across. Turn. (10 sc each row)
Row 55 (Buttonhole Row): Ch 1, sc 4, ch 2, sk 2, sc 4. Turn. (10 sts across)
Row 56: Ch 1, sc 4, 2 sc in ch-2 sp, sc 4. Turn. (10 sc)
Fasten off. Weave in ends.
Romper Front Panel
Work identically to the back panel through Row 38, then continue differently for the front bib.
Foundation: Chain 47.
Row 1 (WS): Starting in second chain from hook, sc across. Turn. (46 sc)
Row 2: Ch 1, sc across. Turn. (46 sc)
Rows 3 through 6: Rep Row 2. (46 sc each row)
Row 7: Ch 1, sc2tog, sc to last 2 sts, sc2tog. Turn. (44 sc)
Row 8: Ch 1, sc across. Turn. (44 sc)
Row 9: Ch 1, sc2tog, sc to last 2 sts, sc2tog. Turn. (42 sc)
Row 10: Ch 1, sc across. Turn. (42 sc)
Row 11: Ch 1, sc2tog, sc to last 2 sts, sc2tog. Turn. (40 sc)
Row 12: Ch 1, sc across. Turn. (40 sc)
Row 13: Ch 1, sc2tog, sc to last 2 sts, sc2tog. Turn. (38 sc)
Row 14: Ch 1, sc across. Turn. (38 sc)
Rows 15 through 38: Ch 1, sc across. Turn. (38 sc each row)
Now work the bib center as one wider unit.
Row 39: Ch 1, sc across all 38 sts. Turn. (38 sc)
Rows 40 through 53: Ch 1, sc across. Turn. (38 sc each row)
Right Front Strap
Row 54 (RS): Ch 1, sc across first 10 sts only. Turn. (10 sc)
Rows 55 through 57: Ch 1, sc across. Turn. (10 sc each row)
Fasten off. Weave in ends.
Left Front Strap
With RS facing, skip center 18 sts of Row 53. Reattach yarn at stitch 29.
Row 54: Ch 1, sc across last 10 sts. Turn. (10 sc)
Rows 55 through 57: Ch 1, sc across. Turn. (10 sc each row)
Fasten off. Weave in ends.
Frog Face Applique
With F-5 hook and MC, make a magic ring.
Rnd 1: Ch 1, 6 sc into ring. Pull ring closed. Do not join. Work in a continuous spiral. Place marker at beg of rnd. (6 sc)
Rnd 2: Inc in each st around. (12 sc)
Rnd 3: (Sc 1, inc) rep 6 times. (18 sc)
Rnd 4: (Sc 2, inc) rep 6 times. (24 sc)
Rnd 5: (Sc 3, inc) rep 6 times. (30 sc)
Rnd 6: (Sc 4, inc) rep 6 times. (36 sc)
Rnd 7: (Sc 5, inc) rep 6 times. (42 sc)
Rnd 8: Sc 5, inc, sc 5, inc, sc 5, inc, sc 5, inc, sc 10. (46 sc)
Sl st to next st to end round. Fasten off, leaving a 24-inch tail for sewing.
Before attaching: Insert and lock 12 mm safety eyes in the upper third of the applique, approximately 7 stitches apart. Embroider two small nostril dots with black yarn above the center. Embroider a curved smile with red yarn across the lower third.
Pin the completed frog face to the RS of the front bib, centered horizontally. Sew around the perimeter using a whip stitch.
Assembly
Side seams: With RS of front and back panels facing each other, whip stitch or mattress stitch from Row 14 upward to Row 38 on both sides. Leave the areas below Row 14 open for leg openings and above Row 38 open for armholes.
Leg opening border: With G-6 hook and MC, join yarn at one leg opening. Work one round of sc evenly around the entire opening. Repeat for the second leg. This prevents curling.
Button attachment: Cross the back straps over to the front bib strap tops. Mark button placement through the buttonholes. Sew one wooden button securely to each front strap top.
Frog Hat
With G-6 hook and MC, make a magic ring.
Rnd 1: Ch 1, 6 sc into ring. Pull closed. Place marker. (6 sc)
Rnd 2: Inc in each st around. (12 sc)
Rnd 3: (Sc 1, inc) rep 6 times. (18 sc)
Rnd 4: (Sc 2, inc) rep 6 times. (24 sc)
Rnd 5: (Sc 3, inc) rep 6 times. (30 sc)
Rnd 6: (Sc 4, inc) rep 6 times. (36 sc)
Rnd 7: (Sc 5, inc) rep 6 times. (42 sc)
Rnd 8: (Sc 6, inc) rep 6 times. (48 sc)
Rnd 9: (Sc 7, inc) rep 6 times. (54 sc)
Rnd 10: (Sc 8, inc) rep 6 times. (60 sc)
Rnd 11: (Sc 9, inc) rep 6 times. (66 sc)
Rnds 12 through 22: Sc around evenly. (66 sc each rnd)
Rnd 23 (Brim): Sc in BLO around. (66 sc)
Rnd 24: Sc around. (66 sc)
Sl st to join. Fasten off.
Hat Eye Bumps (Make 2)
With F-5 hook and MC, make a magic ring.
Rnd 1: 6 sc into ring. Pull closed. (6 sc)
Rnd 2: Inc in each st around. (12 sc)
Rnd 3: (Sc 1, inc) rep 6 times. (18 sc)
Rnd 4: Sc around. (18 sc)
Rnd 5: (Sc 1, dec) rep 6 times. (12 sc)
Insert and lock 15 mm safety eye in center. Stuff lightly with fiberfill.
Rnd 6: Dec 6 times around. (6 sc)
Sl st to join. Fasten off, leaving a 12-inch tail. Close the opening and sew to the top of the hat about 1 inch apart.
Finishing and Care
Weave in all ends securely. For cotton yarn, wet block by submerging in cool water, pressing out excess moisture, and pinning to finished dimensions. For acrylic yarn, steam block gently without touching the iron to the fabric.
Machine wash cold on a gentle cycle and lay flat to dry. Check buttons and safety eyes regularly for security.

Size Adjustments
For newborn (0 to 3 months): Use 41 chains instead of 47. Stop at Row 34 instead of Row 38 before strap shaping. Reduce hat to Rnd 9 (54 sc) before even rounds.
For 6 to 9 months: Use 53 chains instead of 47. Add 4 additional straight rows in the torso section. Increase hat to Rnd 12 (72 sc) before even rounds.
This little frog romper set makes my heart so happy, and I hope it brings joy to you and whichever lucky baby gets to wear it. If you found this crochet pattern helpful, save it to your Pinterest boards so you can find it easily when you are ready to start. And please, I would absolutely love to see your finished froggy creations, so drop a comment below or tag me on Instagram when you make yours!
You Might Also Like
- Sunset Coral Ruffle Dress Free Crochet Pattern
- Sunset Orange Chameleon Amigurumi Free Crochet Pattern
- Sunset Daisy Chain Dress Free Crochet Pattern
- Sunflower Garden Crochet Headpiece Free Crochet Pattern
