
I designed this pattern during a week-long beach trip three summers ago. My sketchbook was filled with wave drawings, and I kept trying to capture the way the ocean shifts from deep navy at the horizon to seafoam where it meets the sand. I called it the Ocean Wave Fairy Dress because my niece saw the first version and said it looked like something a sea fairy would wear.
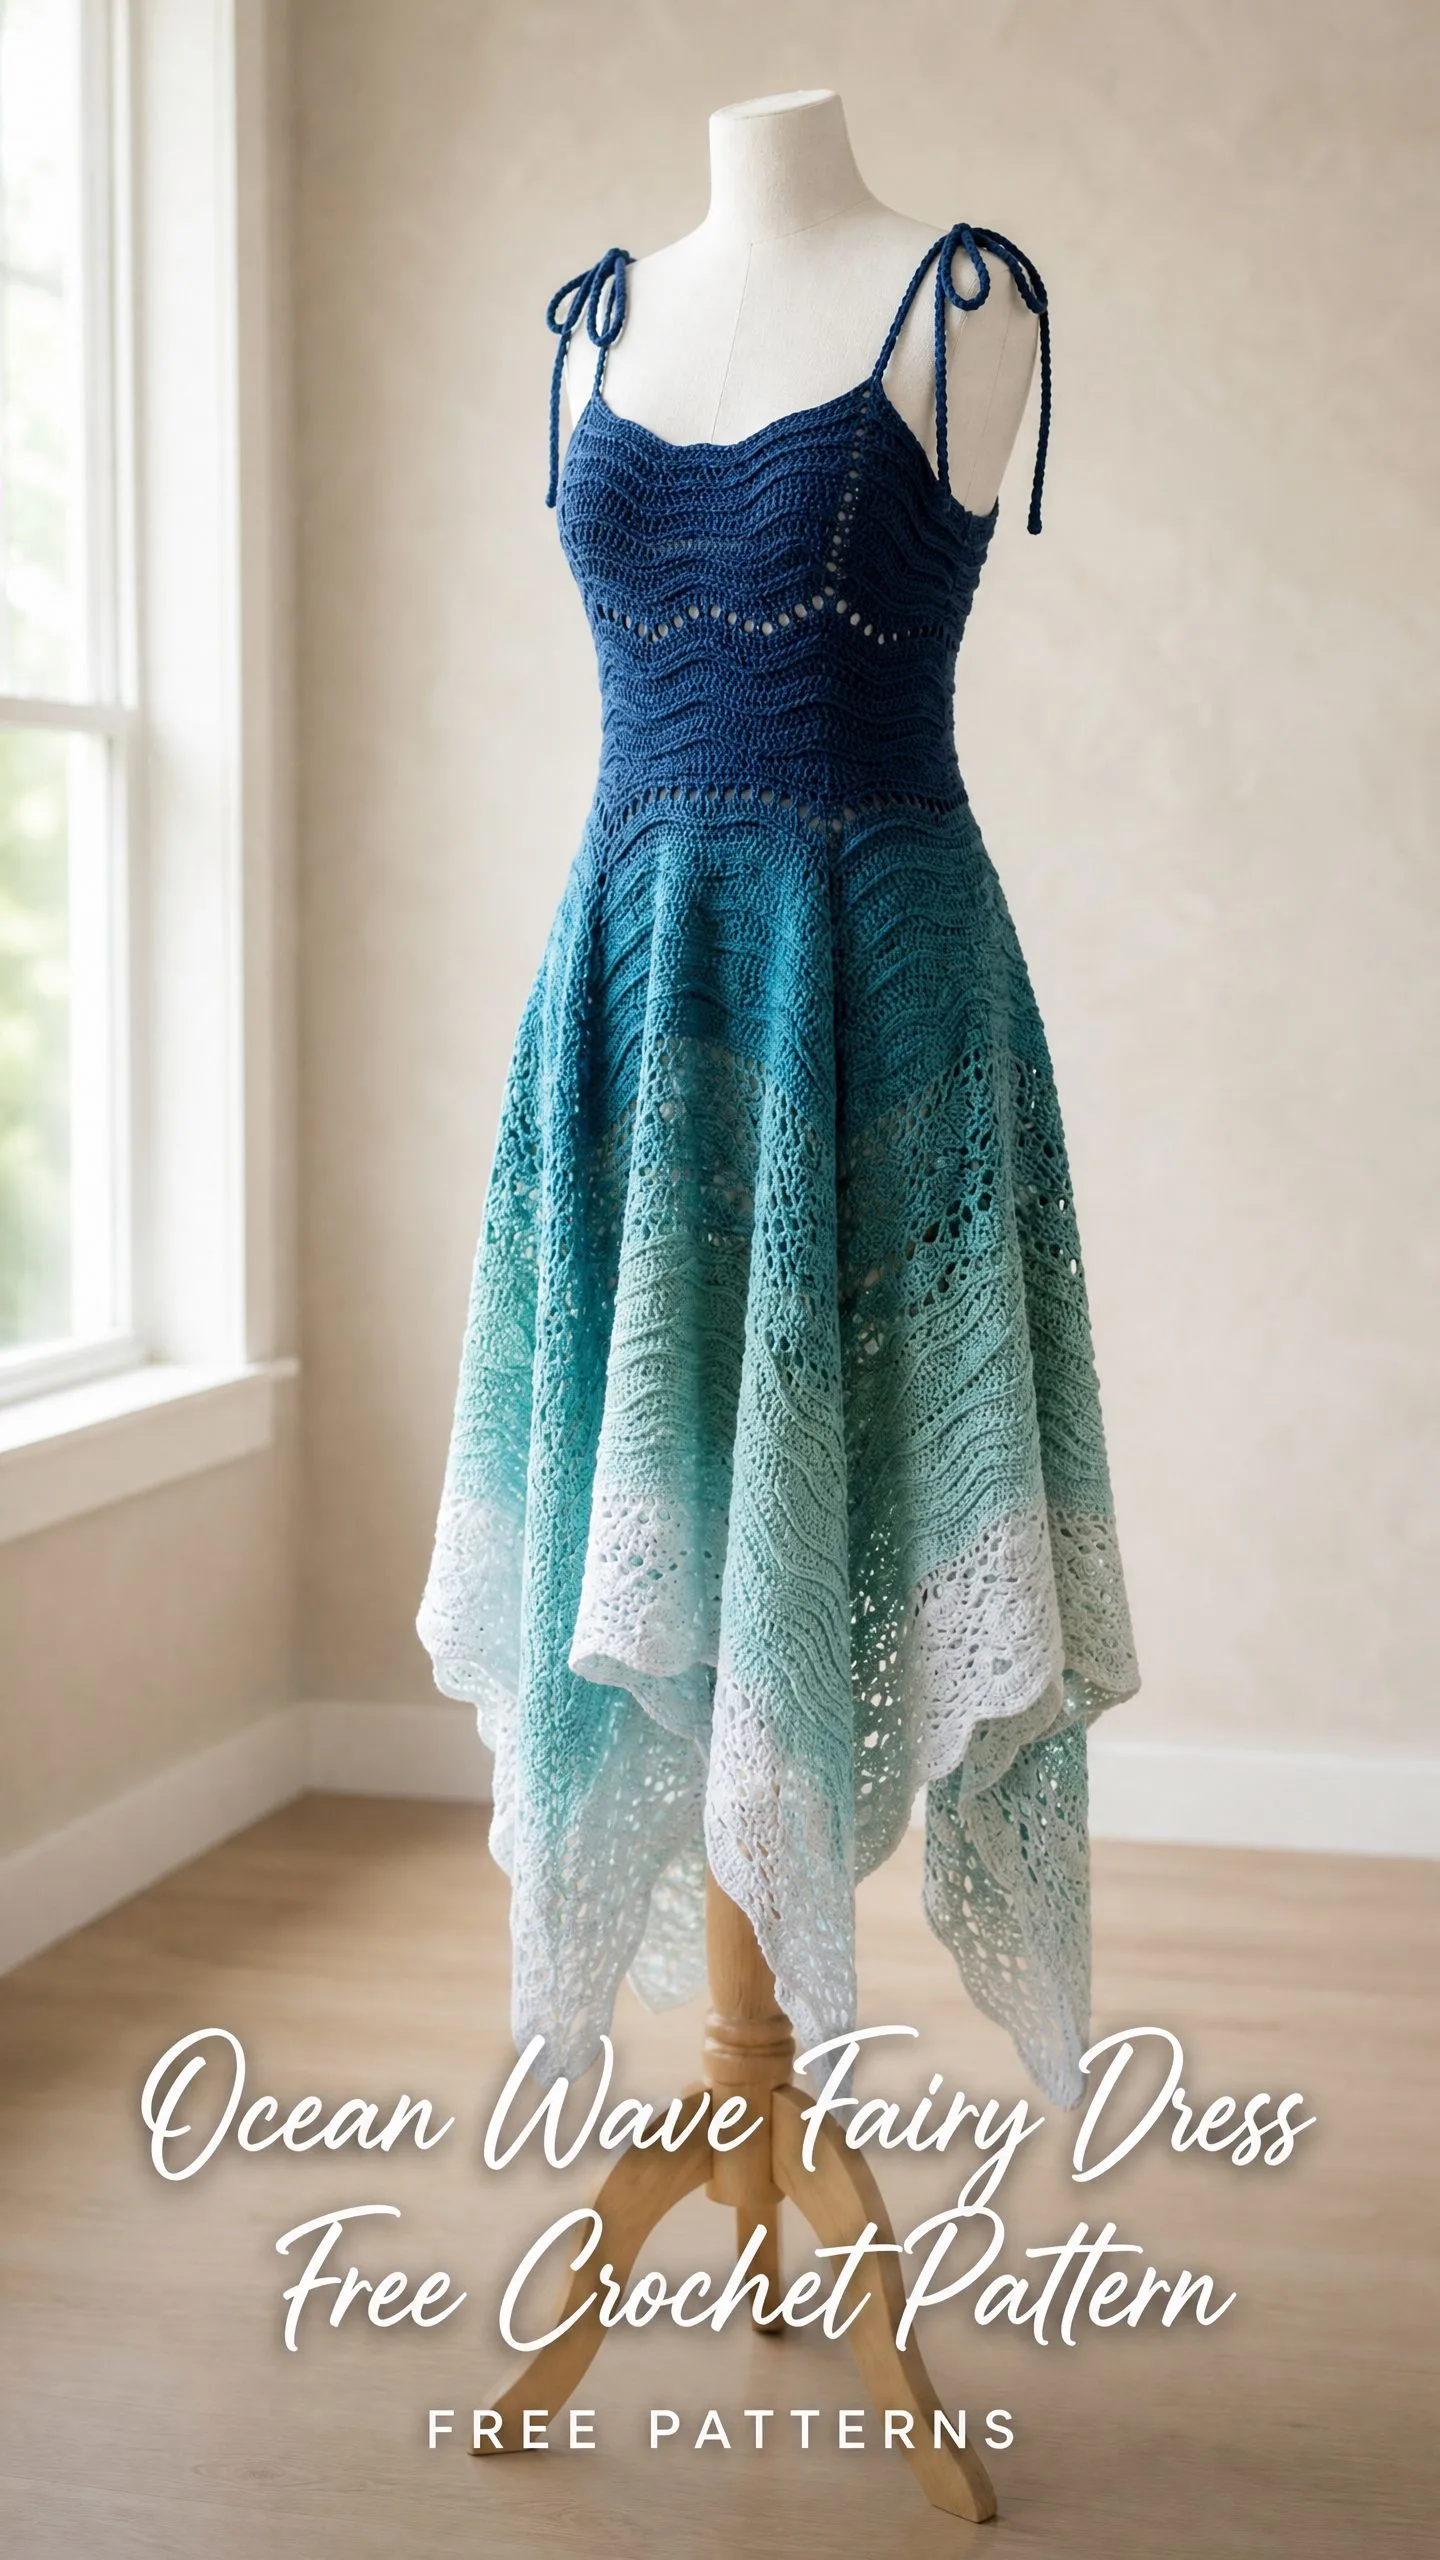
The ombre effect took me forever to get right. I went through four different color combinations before landing on the navy to off-white gradient you see here. The handkerchief hem was an accident, honestly. I was experimenting with panel shaping and realized the pointed edges looked like waves cresting and falling.
This is not a beginner project. I want to be upfront about that. But if you have made a few garments and feel comfortable with lace patterns, you can absolutely do this. The construction is logical once you understand it, and I will walk you through every single step.
About This Ocean Wave Fairy Dress Pattern
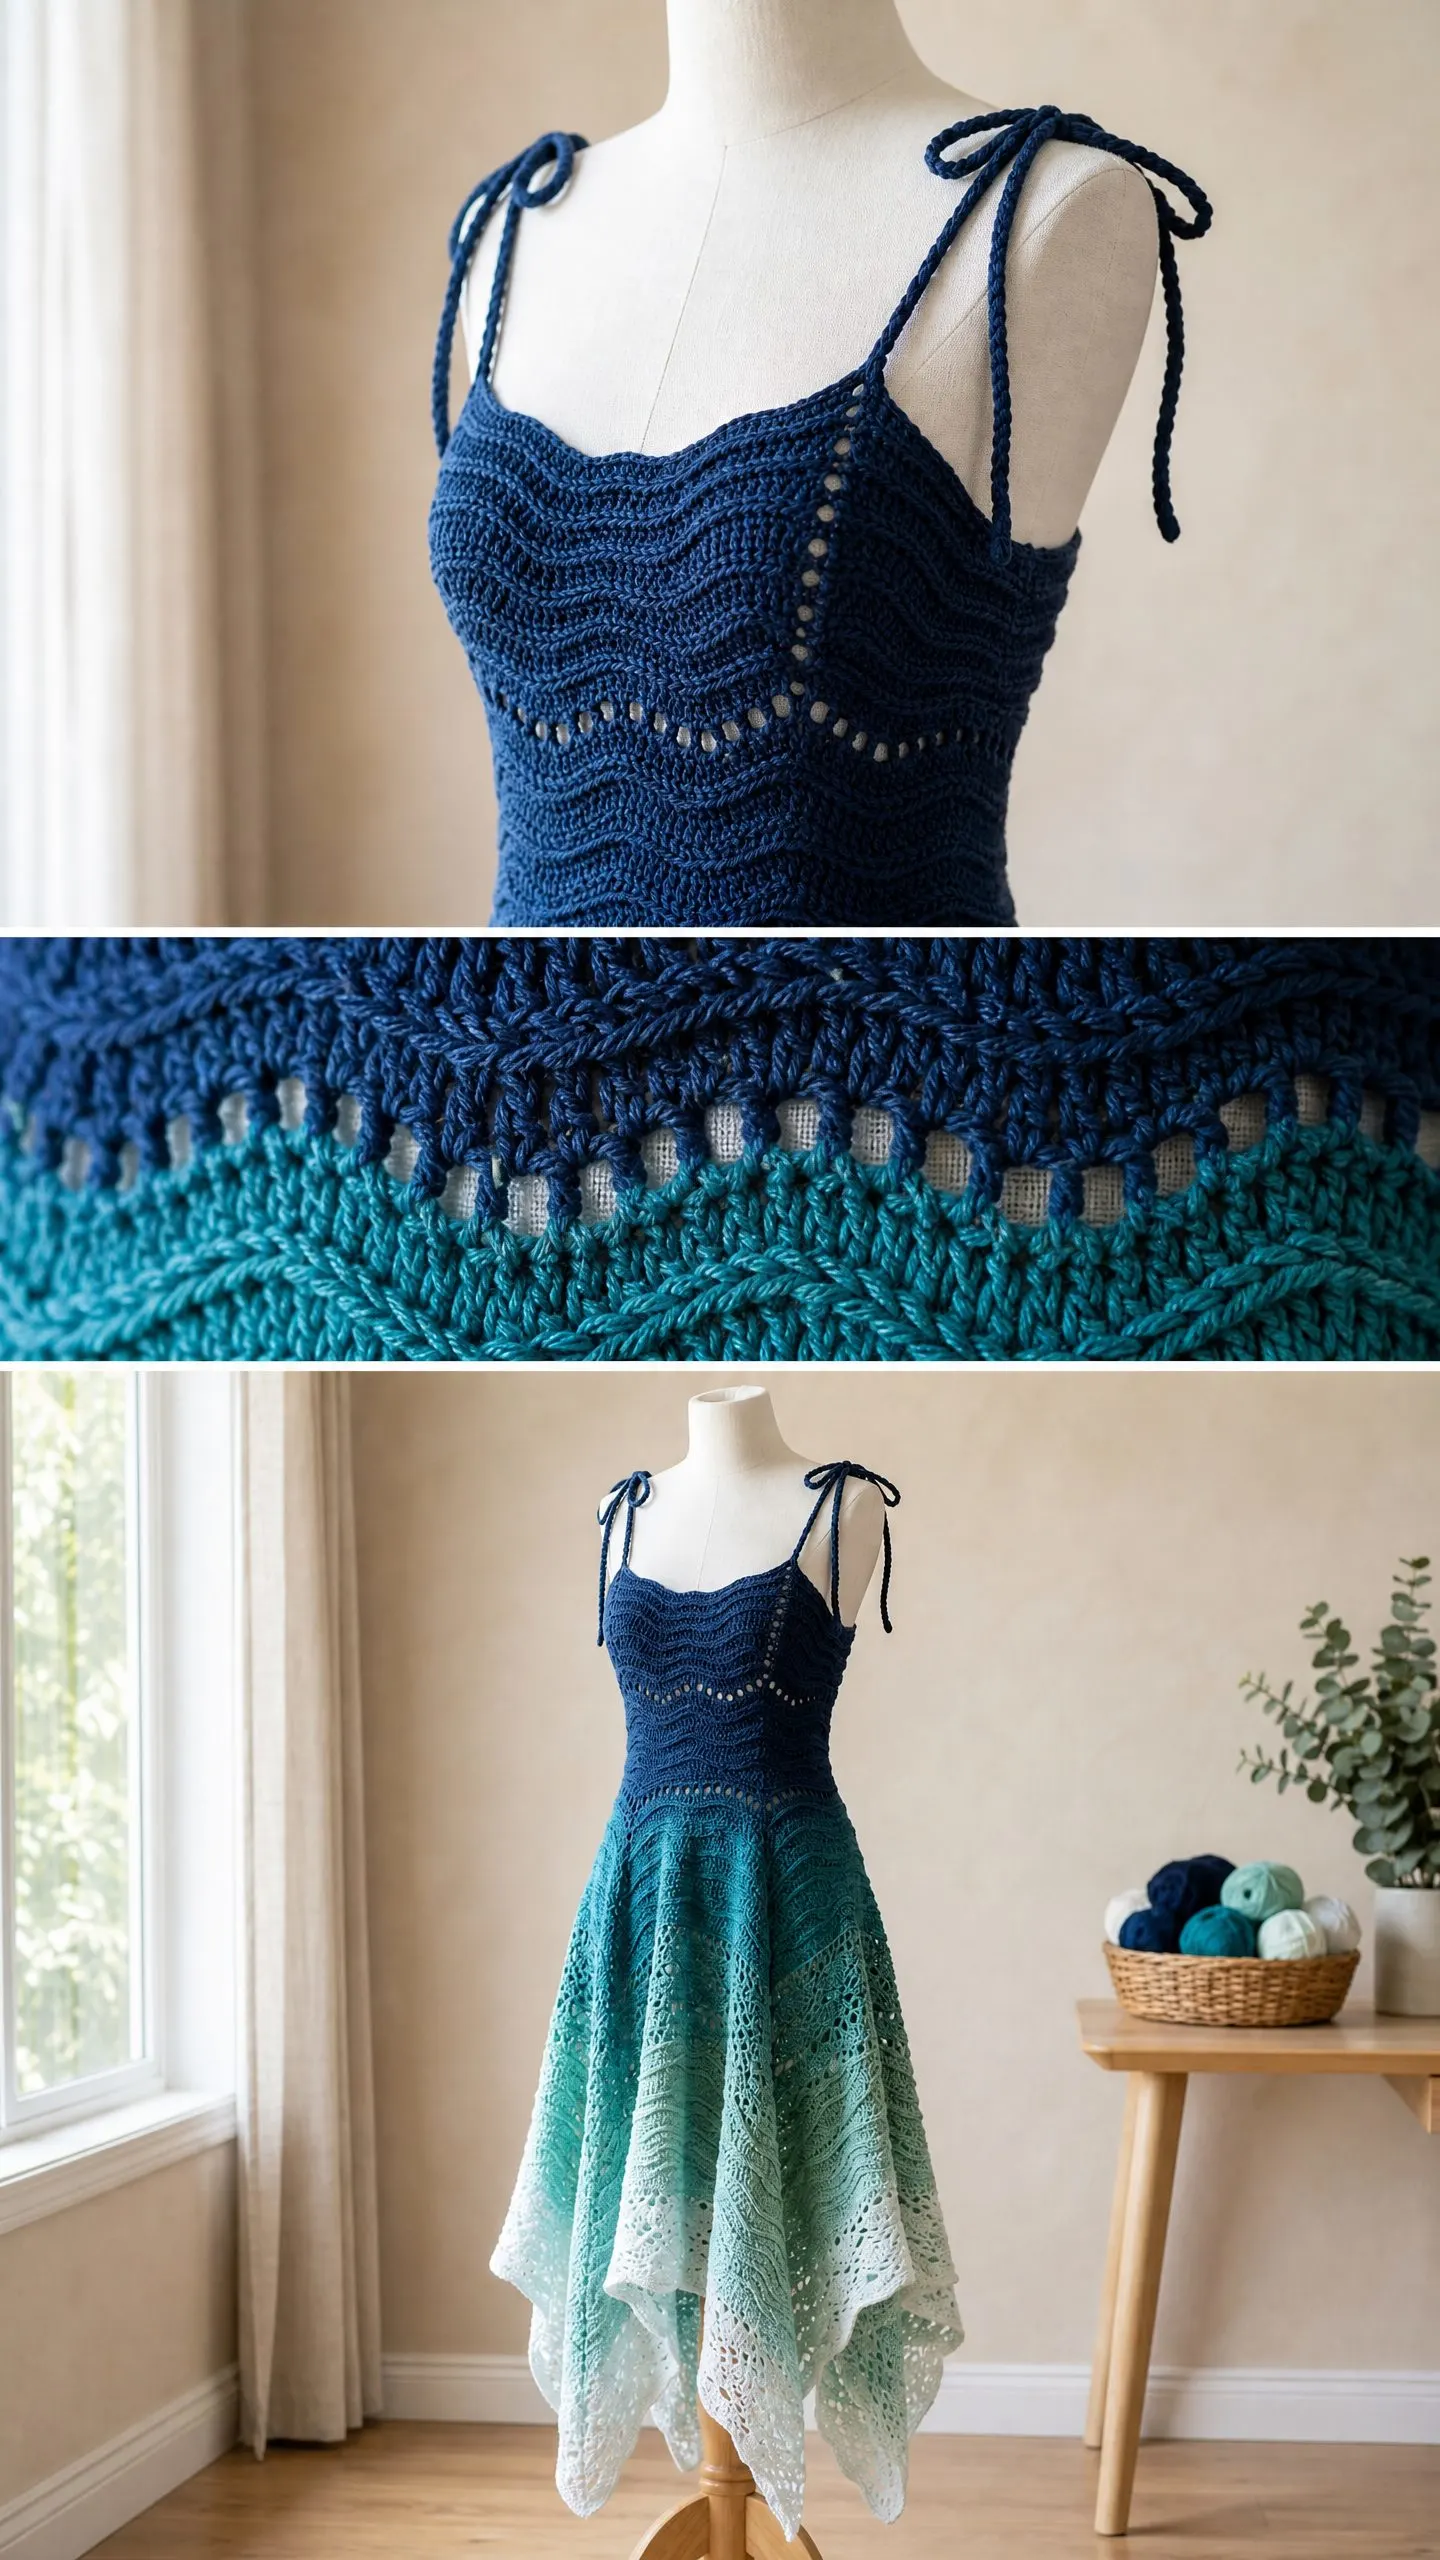
This midi-length fairy dress features a fitted bodice worked in a dense wave stitch from top to bottom. The skirt flares dramatically into an open lace wave pattern with a handkerchief hem. Eight panels create those signature pointed edges that flow and move when you walk.
The wave stitch creates textured horizontal ripples across the bodice. Think of it as a chevron pattern that stays flat instead of creating peaks. The lace wave stitch in the skirt uses clusters and shells to form an airy, open fabric that drapes beautifully.
You will work the bodice flat in two pieces, seam the sides, then work the skirt in the round. The handkerchief points are shaped by working each of the eight panels separately at the bottom. The whole thing comes together more smoothly than you might expect.
Skill Level
This pattern is rated advanced intermediate. You should be comfortable with:
If you are newer to garment making, I recommend completing several garment projects before attempting this one. The techniques are not impossibly difficult, but there are a lot of them happening at once.
Finished Measurements
This pattern is written for size Medium with modification notes for other sizes.
Time Estimate
Plan for approximately 60 to 80 hours depending on your working speed and yarn choice. Allow extra time for blocking, which is essential for opening up the lace skirt sections.
Materials Needed
Yarn
You will need approximately 1,800 to 2,200 yards / 1,645 to 2,012 meters total of DK weight yarn (CYCA #3), distributed across five colors:
Yarn Suggestions
Recommended: Paintbox Yarns Cotton DK. This is 100% cotton with 273 yards / 250 meters per 3.5 oz / 100 g skein. It has excellent stitch definition for the wave texture and holds the lace open beautifully after blocking. Machine washable and widely available in all the colors you need.
Alternative 1: Lion Brand 24/7 Cotton in DK weight. This is 100% mercerized cotton with 186 yards / 170 meters per 3.5 oz / 100 g skein. It has a slightly heavier hand that gives the skirt beautiful drape and the bodice a structured feel. Purchase one additional skein of each color to ensure you have enough yardage.
Alternative 2: Scheepjes Catona held double (two strands of lace weight held together). This creates a delicate halo while maintaining stitch definition. Make a gauge swatch before committing to this option.
Substitution note: Choose a smooth, non-textured yarn with good stitch definition. Avoid fuzzy or bouclé yarns. Cotton or cotton-blend yarns work best for drape and washability.
Tools
Gauge
Getting gauge right is critical for this garment. The bodice must be firm enough to support the skirt’s weight without stretching.
Bodice gauge (US size E-4 / 3.5 mm hook, Color A, wave stitch pattern):
18 stitches x 12 rows = 4 in x 4 in / 10 cm x 10 cm
Skirt gauge (US size F-5 / 3.75 mm hook, Colors B/C/D/E, lace wave pattern):
16 stitches x 8 rows = 4 in x 4 in / 10 cm x 10 cm (after blocking)
If your gauge is looser than stated, go down a hook size. If tighter, go up a hook size. Swatch in the wave stitch pattern, not in single crochet (sc).
Abbreviations and Stitch Definitions
ch: chain. Wrap yarn over hook, pull through loop on hook.
sl st: slip stitch. Insert hook, yarn over, pull through stitch and loop on hook in one motion.
sc: single crochet. Insert hook, yarn over, pull up loop (2 loops on hook), yarn over, pull through both loops.
hdc: half double crochet. Yarn over, insert hook, yarn over, pull up loop (3 loops on hook), yarn over, pull through all 3 loops.
dc: double crochet. Yarn over, insert hook, yarn over, pull up loop, yarn over, pull through 2 loops, yarn over, pull through remaining 2 loops.
tr: treble crochet (also called triple crochet). Yarn over twice, insert hook, yarn over, pull up loop, [yarn over, pull through 2 loops] 3 times.
sk: skip
st(s): stitch(es)
sp(s): space(s)
rep: repeat
RS: right side
WS: wrong side
pm: place marker
yo: yarn over
tog: together
ch-sp: chain space
t-ch: turning chain
sc2tog: single crochet 2 together (decrease). Insert hook in next stitch, yarn over, pull up loop. Insert hook in following stitch, yarn over, pull up loop. Yarn over, pull through all 3 loops.
dc2tog: double crochet 2 together (decrease). Work 2 partial double crochets, then yarn over and pull through all 3 loops.
dc5tog: double crochet 5 together. This creates the pointed valley in the lace wave pattern. Work 5 partial double crochets (each with 2 loops remaining), then yarn over and pull through all 6 loops on hook.
[ ]: work all instructions within brackets into the same stitch or space
( ): stitch count at end of row or round
**\…\:** repeat instructions between asterisks as directed
Special Stitches
Wave Stitch (Bodice Dense Wave)
This stitch creates the textured, closely-worked wave pattern visible on the bodice. It is worked over a multiple of 12 stitches plus 3.
Wave Row 1 (RS): Ch 1, turn. Sc in first st, sc in next 2 sts, \[2 sc in next st] twice, sc in next 3 sts, sk next 2 sts, sc in next 3 sts, [2 sc in next st] twice\. Repeat from \ to \ across. Sc in last 3 sts.
Wave Row 2 (WS): Ch 1, turn. Sc in each st across.
These two rows form the wave stitch repeat for the bodice. The total stitch count stays constant because every two increases are balanced by two skipped stitches within each 12-stitch repeat.
Shell Stitch (Skirt Lace Wave Peak)
Work [dc, ch 1, dc, ch 1, dc, ch 1, dc, ch 1, dc] all into the same stitch or chain space. This creates a 5-dc shell with ch-1 spaces between each dc.
Lace Wave Stitch (Skirt Pattern)
Worked over a multiple of 12 stitches. The pattern alternates between dc5tog valleys with ch-5 arches and shell stitches. The exact placement is written row by row in the skirt instructions.
Pattern Notes
Construction Order:
1. Front bodice panel worked flat from top edge downward
2. Back bodice panel worked flat from top edge downward
3. Straps worked as cord chains and sewn on
4. Side seams joined using sl st seam
5. Skirt worked in the round from waist edge downward
6. Handkerchief hem points shaped by working 8 panels separately
7. Finishing, weaving ends, blocking
Color Change Notes: All color changes happen between rows or rounds, not within a row. To change color cleanly, work the last stitch of the final row in the outgoing color until two loops remain on hook, then draw the new color through those two loops. Cut the outgoing color, leaving a 6-inch tail.
Ombre Color Sequence for Skirt:
Turning Chains: In the bodice wave stitch, ch 1 turns do not count as a stitch. In the skirt lace pattern, ch 3 turns count as the first dc.
Tension Note: Work the bodice slightly tighter than feels natural. The wave stitch bodice needs to support the weight of the skirt. Work the skirt lace loosely so blocking fully opens the lace.
Step by Step Instructions
Front Bodice Panel
The front bodice is worked flat in rows from the top (neckline edge) downward to the waist.
Foundation Chain: Using Color A and size E-4 / 3.5 mm hook, ch 75.
Foundation Row (WS): Sc in second ch from hook and in each ch across. (74 sc)
Your foundation row should measure approximately 16.5 in / 42 cm wide.
Row 1 (RS, Wave Row 1): Ch 1, turn. Sc in first st (edge st). \[2 sc in next st] twice, sc in next 3 sts, sk next 2 sts, sc in next 3 sts, [2 sc in next st] twice\. Repeat from \ to \ 5 more times across (6 repeats total). Sc in last st (edge st). (74 sc)
Row 2 (WS, Wave Row 2): Ch 1, turn. Sc in each st across. (74 sc)
Rows 3 through 14: Repeat Rows 1 and 2 six more times. (74 sc each row)
At this point the panel measures approximately 5 in / 12.7 cm from the foundation row.
Neckline Shaping (Rows 15 through 22)
The front neckline has a shallow sweetheart curve.
Row 15 (RS): Ch 1, turn. Sc in first 28 sts. Work Wave Row 1 pattern across center 18 sts. Sc in last 28 sts. (74 sc)
Row 16 (WS): Ch 1, turn. Sc2tog over first 2 sts, sc across to last 2 sts, sc2tog. (72 sc)
Row 17 (RS, Wave Row 1): Ch 1, turn. Sc in first st. Work wave repeat across next 60 sts (5 repeats of 12). Sc in last st. (72 sc)
Row 18 (WS, Wave Row 2): Ch 1, turn. Sc in each st across. (72 sc)
Rows 19 through 22: Repeat Rows 17 and 18 twice. (72 sc each row)
Your panel should measure approximately 8 in / 20.3 cm from the foundation row.
Waist Shaping (Rows 23 through 34)
Row 23 (RS): Ch 1, turn. Sc2tog, work wave repeat across next 60 sts (5 repeats), sc2tog. (70 sc)
Row 24 (WS): Ch 1, turn. Sc in each st across. (70 sc)
Row 25 (RS): Ch 1, turn. Sc2tog, sc in next st, work wave repeat across next 60 sts (5 repeats), sc in next st, sc2tog. (68 sc)
Row 26 (WS): Ch 1, turn. Sc in each st across. (68 sc)
Row 27 (RS): Ch 1, turn. Sc2tog, work wave repeat across next 60 sts (5 repeats), sc2tog. (66 sc)
Row 28 (WS): Ch 1, turn. Sc in each st across. (66 sc)
Row 29 (RS): Ch 1, turn. Sc in first 3 sts. \[2 sc in next st] twice, sc in next 3 sts, sk 2, sc in next 3 sts, [2 sc in next st] twice\. Repeat from \ to \ 4 more times (5 repeats). Sc in last 3 sts. (66 sc)
Row 30 (WS): Ch 1, turn. Sc in each st across. (66 sc)
Rows 31 through 34: Repeat Rows 29 and 30 twice. (66 sc each row)
Checkpoint: At Row 34 the front bodice should measure approximately 12 in / 30.5 cm tall and 14.7 in / 37.3 cm wide at the waist. Fasten off. Weave in ends on WS.
Back Bodice Panel
Work back bodice identically to front bodice through Row 14 (the first 14 rows with no neckline shaping). (74 sc)
The back neckline is straight with no sweetheart shaping.
Rows 15 through 22: Repeat Wave Rows 1 and 2 four times. (74 sc each row)
Row 23 (RS): Ch 1, turn. Sc2tog, work wave repeat across 60 sts (5 repeats), sc2tog. (72 sc)
Row 24 (WS): Ch 1, turn. Sc in each st. (72 sc)
Row 25 (RS): Ch 1, turn. Sc2tog, sc in next st, work wave repeat across 60 sts (5 repeats of 12), sc in next st, sc2tog. (70 sc)
Row 26 (WS): Ch 1, turn. Sc in each st across. (70 sc)
Row 27 (RS): Ch 1, turn. Sc2tog, work wave repeat across next 60 sts (5 repeats of 12), sc2tog. (68 sc)
Row 28 (WS): Ch 1, turn. Sc in each st across. (68 sc)
Row 29 (RS): Ch 1, turn. Sc2tog, sc in next 3 sts, work wave repeat across next 60 sts (5 repeats), sc in next st, sc2tog. (66 sc)
Row 30 (WS): Ch 1, turn. Sc in each st across. (66 sc)
Rows 31 through 34: Repeat Rows 29 and 30 twice. (66 sc each row)
Fasten off. Weave in ends on WS.
Checkpoint: Both bodice panels should measure the same. Lay them flat side by side to confirm before seaming.
Side Seams
Hold front and back panels with RS together. Using Color A and size E-4 hook, sl st seam along each side edge, beginning at the waist and working upward toward the underarm. Leave the top 4 in / 10 cm of each side open for armhole. This creates side seams of approximately 8 in / 20.3 cm.
Turn dress right side out. The bodice now forms a tube, open at top and bottom, with armhole openings at each side.
Total waist opening: 132 sts (66 front + 66 back).
Straps (Make 2)
Using Color A and size E-4 hook, ch 55.
Row 1: Sc in second ch from hook and each ch across. (54 sc)
Row 2: Ch 1, turn. Sc in each st across. (54 sc)
Rows 3 through 4: Repeat Row 2. (54 sc each row)
Fasten off, leaving a 12-inch tail for sewing.
Fold strap lengthwise and sl st the long edges together to form a cord approximately 0.5 in / 1.3 cm wide. Leave both short ends open.
Attachment: Position straps approximately 1.5 in / 3.8 cm in from each side of the front neckline edge and the corresponding back neckline edge. Pin in place. Try on for fit before sewing. Sew each strap end securely to the neckline edge with several passes, then knot and weave in end.
Neckline Edging
With RS facing, attach Color A to right side of neckline at the back. Using size E-4 hook:
Round 1: Ch 1, sc evenly around the entire neckline edge, working approximately 1 sc per row end and 1 sc per stitch across any horizontal edges. Join with sl st to first sc.
Round 2: Ch 1, sc in each st around. Join with sl st to first sc. Fasten off. Weave in end.
Armhole Edging
Work identically to neckline edging, working 1 round sc around each armhole opening. Fasten off. Weave in ends.
Skirt
The skirt is worked in the round from the waist edge downward. Begin with Color A.
Using Color A and size F-5 / 3.75 mm hook, attach yarn to the waist edge at the right side seam.
Skirt Set-Up Round: Ch 1. Sc in each stitch around the waist opening, picking up stitches from the last bodice row. Join with sl st to first sc. Place marker. (132 sc)
Increase Round 1: Ch 1. \Sc in next 3 sts, 2 sc in next st\. Repeat from \ to \ around. Join with sl st. (165 sc)
Increase Round 2: Ch 1. \Sc in next 4 sts, 2 sc in next st\. Repeat from \ to \ around. Join with sl st. (198 sc)
Increase Round 3: Ch 3 (counts as dc). Dc in each st around. Join with sl st to top of ch-3. (198 dc)
Increase Round 4: Ch 3. \Dc in next 5 sts, 2 dc in next st\. Repeat from \ to \ around. Join with sl st to top of ch-3. (231 dc)
Increase Round 5: Ch 3. \Dc in next 6 sts, 2 dc in next st\. Repeat from \ to \ around. Join with sl st to top of ch-3. (264 dc)
Trim Round (Round 6): Ch 3. Dc in each st around. Join with sl st to top of ch-3. (264 dc)
Decrease to Lace Multiple Round (Round 7): Ch 3. \Dc in next 10 sts, dc2tog\. Repeat from \ to \ around. Join with sl st to top of ch-3. (240 dc)
Stabilizing Round (Round 8): Ch 3. Dc in each st around. Join with sl st to top of ch-3. (240 dc)
Checkpoint: After Round 8, the waist-to-current-edge should measure approximately 3.5 in / 9 cm. Change to Color B after Round 8.
Lace Wave Skirt (Rounds 9 through 32)
The lace wave pattern is worked over 240 stitches in 20 repeats of 12 stitches each.
Round 9 (Color B, Lace Wave Round 1): Ch 5 (counts as dc + ch 2). \Dc5tog over next 5 dc, ch 5, [dc, ch 1, dc, ch 1, dc, ch 1, dc, ch 1, dc] in center of next st or arch, ch 5\. Repeat from \ to \ 19 more times. Join with sl st to 3rd ch of ch-5 start. (20 shells, 20 dc5tog valleys)
Round 10 (Color B, Lace Wave Round 2): Sl st into first ch-1 sp of first shell from previous round. Ch 3 (counts as dc). [Dc, ch 1, dc, ch 1, dc, ch 1, dc] in same sp and next 3 ch-1 sps of same shell. Ch 5. \Dc5tog: working 1 partial dc into the ch-5 arch before current shell, 1 partial dc into each of the 3 middle positions between current and next shell, and 1 partial dc into the ch-5 arch after, complete dc5tog. Ch 5. Work shell across the ch-1 sps and dc tops of next shell. Ch 5\. Repeat from \ to \ 18 more times. Dc5tog as described. Ch 5. Join with sl st to top of ch-3. (20 shells, 20 valleys)
Rounds 11 through 32: Continue repeating the lace wave pattern as established, alternating the placement of shells and valleys.
Color changes:
Checkpoint: After Round 32, the skirt should measure approximately 18 in / 45.7 cm from the waist.
Handkerchief Hem Points
The skirt is divided into 8 panels. Because 20 repeats cannot be perfectly divided into 8 equal panels, you will work:
This creates 4 longer and 4 shorter handkerchief points.
Main Handkerchief Point Panels (Make 4)
Each main panel covers 3 wave repeats. Work in Color E.
Panel Row 1 (RS): Attach Color E at the valley (dc5tog) that sits at the center of the panel’s starting edge. Ch 3 (counts as dc). Work across 3 complete wave repeats of lace pattern as established. Turn. (3 shells, 2 interior valleys, 2 edge half-valleys)
Panel Row 2 (WS): Ch 3, turn. Work lace wave pattern back across. Turn.
Panel Row 3 (RS): Ch 3, turn. Dc5tog incorporating first shell (merging the edge), work across remaining lace pattern, dc5tog incorporating last shell. Turn. (2 shells remain)
Panel Row 4 (WS): Ch 3, turn. Work lace wave across remaining 2 shells. Turn.
Panel Row 5 (RS): Ch 3, turn. Work lace wave across 2 shells, merging at each edge. Turn. (1 shell remains)
Panel Row 6 (WS): Ch 3, turn. Work across final shell. Turn.
Panel Row 7 (RS): Dc5tog across the final shell and remaining sts, drawing to a central point. (1 cluster at point)
Ch 3, sl st into top of dc5tog cluster to anchor. Fasten off.
Repeat for filler panels using 2 wave repeats, working fewer decrease rows to create the shorter points.
Finishing
Weave in all remaining ends. Block the dress thoroughly, paying special attention to the lace skirt sections. Pin each handkerchief point to open the lace fully. Allow to dry completely before wearing.
Final Thoughts on the Ocean Wave Fairy Dress Crochet Pattern
This crochet pattern is a labor of love. The construction teaches you so much about garment shaping, and the finished piece is genuinely stunning. The way the colors shift from that deep navy down through seafoam to cream captures something about the ocean that photographs do not quite do justice.
Take your time with this one. Work in good light. Count your stitches at the checkpoints. And trust the process.
Thank you so much for choosing this pattern. I hope you love making it as much as I loved designing it. If you finish your Ocean Wave Fairy Dress, I would absolutely love to see it. Tag me on Instagram or share it in our Facebook group. Seeing your finished projects is genuinely the best part of sharing patterns.
If you are excited to start this project, go ahead and save this pattern to your Pinterest boards so you can find it easily later. And if you make your own Ocean Wave Fairy Dress, please drop a comment below. I read every single one and love hearing about your yarn choices and any modifications you make along the way.
You Might Also Like
- Black Cat Halloween Tote Bag Free Crochet Pattern
- Cream Cable Knit Baby Onesie Set Free Crochet Pattern
- Sunset Orange Jellyfish Keychain Free Crochet Pattern
- Mint Green Shell Stitch Baby Dress Free Crochet Pattern
