
This is IT. This is the showstopper summer top you have been searching for. I am BEYOND excited to share this mandala halter pattern because it combines everything I love about crochet into one stunning wearable piece. We are talking intricate texture, gorgeous coastal colors, and that jaw-dropping wow factor that makes people stop and ask "wait, you MADE that?"
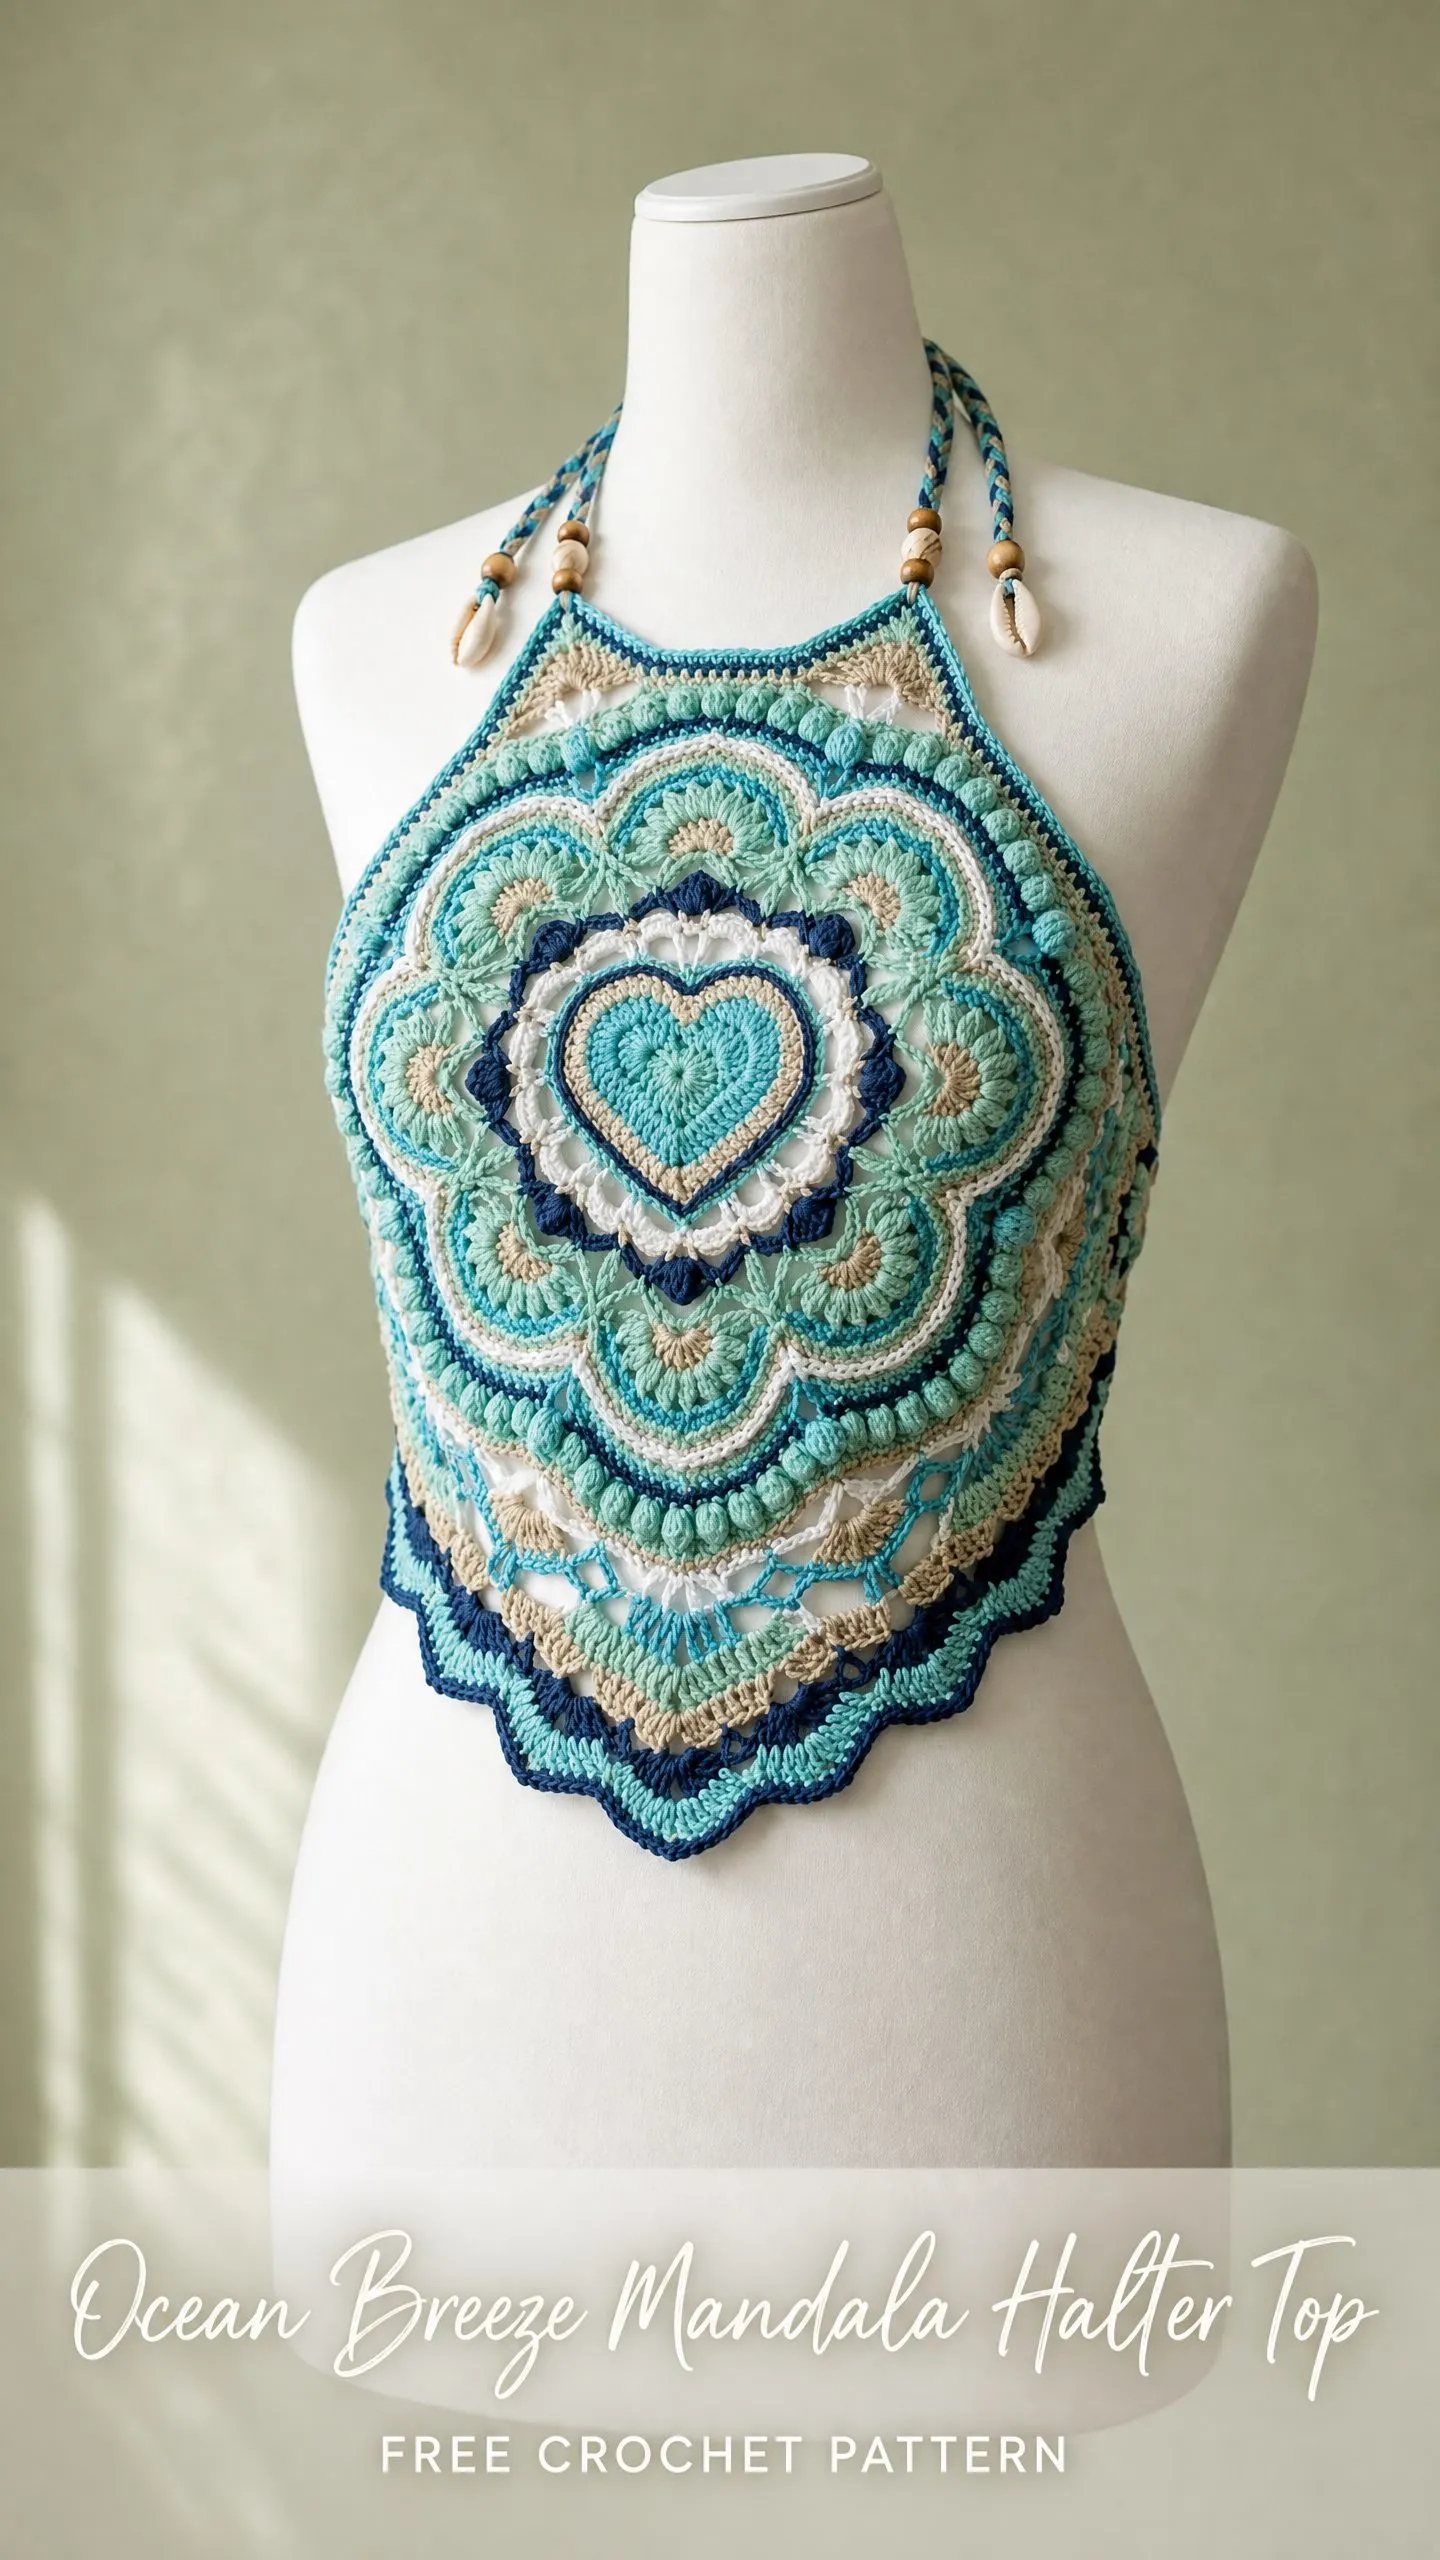
Now let me be honest with you. This is not a weekend project. You are looking at roughly 22 to 34 hours of work depending on your pace. But here is the thing. Every single one of those hours is satisfying because you watch this beautiful mandala grow round by round from a tiny center into a full bodice panel. The construction is genius. You work one large mandala in the round, shape the top edge flat, add ties, thread on some beads and cowrie shells, and suddenly you have a boho beach top that looks like it belongs in a high-end boutique.
If you have completed at least one mandala or granny-style project and one garment before, you absolutely have the skills for this. I will walk you through every round, every color change, and every finishing detail. Let us dive in.
What Makes This Crochet Halter Top Pattern Special
The entire front bodice is a single mandala worked from the center outward. No seaming multiple pieces together. No complicated shaping until the very end. You start with a magic ring and work outward through 24 rounds of bobbles, shells, puffs, and picots. The result is a layered textured medallion with a heart-shaped motif at the center and scalloped edges all around.
The back is completely open with adjustable ties at the neck and lower back. This means the fit is forgiving across multiple sizes. The colorway shifts through navy, white, sand, mint, aqua, and teal for that perfect ocean-inspired gradient. And those little wooden beads and cowrie shells on the ties? Chef’s kiss.
Skill Level
Advanced Intermediate. You should be comfortable working in the round, following multi-color patterns, and maintaining consistent tension on textured stitches like bobbles. The real challenge here is precise color changes every one to three rounds and transitioning cleanly from circular construction to flat shaping at the top edge.
Finished Measurements
One size fits bust 32 to 36 inches (81 to 91 cm)
Mandala diameter before shaping: approximately 14 inches (35.5 cm)
Finished bodice panel height: approximately 13 inches (33 cm) from neckline to lowest point
Finished bodice panel width at widest point: approximately 14 inches (35.5 cm)
Size customization tips appear at the end of this pattern.
Materials Needed for This Mandala Crochet Pattern
Yarn
DK weight (CYCA 3), 100 percent cotton or cotton-blend, approximately 1,200 yards (1,097 meters) total across all colors
Recommended Yarn Brands
Lion Brand 24/7 Cotton works beautifully for this project. It has excellent stitch definition, holds its shape after blocking, and comes in a wide range of blues and neutrals.
Paintbox Yarns Simply DK Cotton is a budget-friendly option with consistent ply and smooth texture. Color changes come out crisp and the yarn does not pill.
Drops Paris offers a slightly heavier feel within the DK range that adds pleasant drape. Great for warmer climates where breathability matters.
Substitution note: Choose a cotton or cotton-blend DK yarn with low stretch. Acrylic is not recommended because this garment requires wet blocking to open the lace sections and lay the mandala flat. Avoid fuzzy or halo yarns, which will obscure the stitch detail.
Hooks
Notions
Gauge
With E-4 (3.5 mm) hook and DK cotton, worked in the round in the mandala pattern:
5 inches (12.7 cm) = Rounds 1 through 8 of the mandala (first 8 rounds, measured flat after light blocking)
18 stitches = 4 inches (10 cm) in single crochet
14 rows = 4 inches (10 cm) in single crochet
Gauge is critical for this garment. The finished mandala diameter must reach approximately 14 inches (35.5 cm) before shaping begins. If your mandala measures smaller after Round 20, increase hook size by half a size. If it measures larger, decrease hook size.
Abbreviations
Let me break down every stitch abbreviation you will encounter. If you are newer to crochet patterns, bookmark this section.
Special Stitches for This Crochet Tutorial
These textured stitches create all the gorgeous dimension in your mandala. Take a moment to practice each one before starting if they are new to you.
Bobble (bo)
Yarn over, insert hook into indicated stitch or space, yarn over and pull up a loop, yarn over, pull through 2 loops. You now have one incomplete double crochet. Repeat this sequence 4 more times in the same stitch or space until you have 6 loops on the hook. Yarn over and pull through all 6 loops. One bobble complete. The bobble pops toward the right side of work.
Shell
Work 5 double crochet into the same stitch or space. One shell complete.
Large Shell
Work 7 double crochet into the same stitch or space. One large shell complete.
Picot
Chain 3, slip stitch into the first chain made. One picot complete. This creates a tiny decorative bump.
Puff Stitch
Yarn over, insert hook into indicated stitch, yarn over and pull up a loop to approximately half an inch height. Repeat 3 more times in the same stitch until you have 9 loops on hook. Yarn over and pull through all 9 loops. Chain 1 to close. One puff stitch complete.
3-dc Cluster
Yarn over, insert hook into stitch or space, yarn over and pull up a loop, yarn over, pull through 2 loops. Repeat twice more in the same stitch. Yarn over and pull through all 4 loops on hook. One 3-dc cluster complete.
Joining with Standing Single Crochet
Make a slip knot with new color. Insert hook into designated stitch. Yarn over and pull up a loop. Yarn over and pull through both loops. This counts as the first sc of the round and avoids a visible joining chain. This technique gives you clean color changes.
Pattern Notes Before You Begin
All rounds are worked on the right side unless stated otherwise. Do not turn between rounds unless specifically instructed. Join each round with a slip stitch to the first stitch of that round unless otherwise stated.
Color changes: When changing colors, complete the last yarn-over of the final stitch in the current round with the new color, then cut old color leaving a 6-inch tail. Weave ends as you go using the tapestry needle to reduce finishing time.
The mandala is worked entirely in the round from Round 1 through Round 24. Beginning at Round 25, the work transitions to flat rows worked back and forth to shape the straight neckline edge.
Bobbles always face the right side. If a bobble appears on a wrong-side row, work it with hook inserted from the wrong side so the bobble pops to the right side.
Blocking is essential. Do not skip blocking. The lace sections will not open properly without wet blocking.
All stitch counts appear in parentheses at the end of each round or row.
Step by Step Instructions for the Ocean Breeze Halter Top
The Mandala Center (Rounds 1 through 5)
Round 1 (Color A, Navy):
Make a magic ring. Chain 3 (counts as first dc). Work 11 dc into the ring. Pull ring closed. Join with sl st to top of beginning ch-3. (12 dc)
Round 2 (Color A, Navy):
Chain 3 (counts as first dc). Work 1 dc into the same stitch. Work 2 dc into each remaining stitch around. Join with sl st to top of ch-3. (24 dc)
Round 3 (Color B, White):
Join Color B with standing sc to any stitch. Chain 2. Work 1 sc into the next stitch. Chain 2. Rep (sc, ch 2) into each stitch around. Join with sl st to first sc. (24 sc, 24 ch-2 spaces)
Round 4 (Color G, Light Aqua):
Join Color G with sl st to any ch-2 space. Chain 3 (counts as first dc). Work 2 dc into same ch-2 space. Work 3 dc into each ch-2 space around. Join with sl st to top of ch-3. (72 dc)
Round 5 (Color C, Sand):
Join Color C with standing sc to any stitch. Work 1 sc into each stitch around. Join with sl st to first sc. (72 sc)
CHECKPOINT: After Round 5, the center medallion should measure approximately 2.5 inches (6.4 cm) in diameter. If it measures significantly more or less, adjust hook size now before continuing.
The Heart Motif Layer (Rounds 6 through 10)
Round 6 (Color E, Aqua):
Join Color E with sl st to any stitch. Chain 3 (counts as dc). Work 1 dc into next 2 stitches. Chain 2. Skip 1 stitch. Rep (dc in next 3 sts, ch 2, skip 1) around. Join with sl st to top of ch-3. (54 dc + 18 ch-2 spaces)
Round 7 (Color B, White):
Join Color B with standing sc to any ch-2 space. Chain 3. Work 1 sc into same ch-2 space. Work (1 sc, ch 3, 1 sc) into each ch-2 space around. Join with sl st to first sc. (36 sc, 18 ch-3 spaces)
Round 8 (Color G, Light Aqua):
Join Color G with sl st to any ch-3 space. Chain 3 (counts as dc). Work 4 dc into same ch-3 space (shell begun). Work shell (5 dc) into each ch-3 space around. Join with sl st to top of ch-3. (18 shells, 90 dc)
Round 9 (Color A, Navy):
Join Color A with standing sc to the 3rd (center) dc of any shell. Chain 3. Work 1 sc into center dc of next shell. Chain 3. Rep (sc in center dc of shell, ch 3) around. Join with sl st to first sc. (18 sc, 18 ch-3 spaces)
Round 10 (Color E, Aqua):
Join Color E with sl st to any ch-3 space. Into each ch-3 space work: 1 sc, 1 hdc, 3 dc, 1 hdc, 1 sc. Join with sl st to first sc. These are petal shapes forming the heart-like lobes of the mandala center. (18 petals, 126 stitches total)
CHECKPOINT: After Round 10, the piece should measure approximately 5 inches (12.7 cm) in diameter.
The Bobble and Lace Ring (Rounds 11 through 15)
Round 11 (Color F, Teal):
Join Color F with standing sc to center dc of any petal. Chain 4. Work bo (bobble) into 4th chain from hook. Chain 1. Work 1 sc into center dc of same petal. Chain 5. Skip to center dc of next petal. Rep (sc, ch 4, bo into 4th ch from hook, ch 1, sc, ch 5) around, ending last rep with ch 5. Join with sl st to first sc. (18 bobbles, 18 sc, 18 ch-5 spaces, 18 ch-1 spaces)
Round 12 (Color C, Sand):
Join Color C with standing sc to any ch-5 space. Work 4 more sc into same ch-5 space (5 sc per ch-5 space). Work 1 sc into the ch-1 space beside the bobble. Work 5 sc into the next ch-5 space. Continue around in this manner. Join with sl st to first sc. (108 sc)
Round 13 (Color B, White):
Join Color B with standing sc to any stitch. Work 1 sc BLO into each stitch around. Join with sl st to first sc. (108 sc)
Round 14 (Color D, Mint):
Join Color D with sl st to any stitch. Chain 4 (counts as tr). Work 1 tr into next stitch. Chain 2. Skip 2 stitches. Rep (tr in next 2 sts, ch 2, skip 2) around. Join with sl st to top of ch-4. (54 tr + 27 ch-2 spaces)
Round 15 (Color E, Aqua):
Join Color E with sl st to any ch-2 space. Work large shell (7 dc) into each ch-2 space around. Join with sl st to first dc. (27 large shells, 189 dc)
CHECKPOINT: After Round 15, the piece should measure approximately 8 inches (20.3 cm) in diameter.
The Outer Mandala Rings (Rounds 16 through 20)
Round 16 (Color A, Navy):
Join Color A with standing sc to center (4th) dc of any large shell. Chain 4. Work 1 sc into center dc of next shell. Chain 4. Rep (sc, ch 4) around. Join with sl st to first sc. (27 sc, 27 ch-4 spaces)
Round 17 (Color G, Light Aqua):
Join Color G with sl st to any ch-4 space. Into each ch-4 space work: 1 sc, 1 hdc, 3 dc, 1 hdc, 1 sc. Join with sl st to first sc. (27 petals, 189 stitches)
Round 18 (Color F, Teal):
Join Color F with standing sc to center dc of any petal. Work 2 sc into same center dc. Work 1 sc into next 3 stitches. Work 3 sc into center dc of next petal. Rep (sc, sc, sc into center dc, sc in next 3 sts) around. Join with sl st to first sc. Stitch count increases by 54. (243 sc)
Round 19 (Color C, Sand):
Join Color C with sl st to any stitch. Chain 3 (counts as dc). Work 1 dc into each stitch around. Join with sl st to top of ch-3. (243 dc)
Round 20 (Color H, Dark Turquoise):
Join Color H with standing sc to any stitch. Work 1 sc into next stitch. Chain 3. Skip 1 stitch. Rep (sc in next 2 sts, ch 3, skip 1) around. Join with sl st to first sc. (162 sc, 81 ch-3 spaces)
CHECKPOINT: After Round 20, the piece should measure approximately 11 inches (27.9 cm) in diameter.
The Puff Stitch Border (Rounds 21 through 24)
Round 21 (Color E, Aqua):
Join Color E with sl st to any ch-3 space. Work (puff stitch, ch 2) into each ch-3 space around. Join with sl st to first puff stitch. (81 puff stitches, 81 ch-2 spaces)
Round 22 (Color B, White):
Join Color B with standing sc to any ch-2 space. Work 2 sc into same ch-2 space. Work 3 sc into each ch-2 space around. Join with sl st to first sc. (243 sc)
Round 23 (Color D, Mint):
Join Color D with standing sc to any stitch. Work 1 sc BLO into each stitch around. Join with sl st to first sc. (243 sc)
Round 24 (Color H, Dark Turquoise):
Join Color H with sl st to any stitch. Chain 1. Work 1 sc into same stitch. Work 1 sc into next 2 stitches. Work picot. Skip 1 stitch. Rep (sc in next 3 sts, picot, skip 1) around. Join with sl st to first sc. This completes the lower decorative edging. (182 sc, 60 picots approximately, adjusting final repeat to close evenly)
CHECKPOINT: After Round 24, the mandala should measure approximately 14 inches (35.5 cm) in diameter, fully flat. This is the complete front bodice panel.
Shaping the Neckline Edge (Rows 25 through 28)
The mandala is circular. You must now identify the top arc, which spans approximately 90 stitches across the top third of the circle, and work back and forth across only those stitches to create the straight neckline band.
Count the total stitches around the outer edge of the finished mandala: 243 stitches (adjusted to 240 for ease of division). Place a stitch marker at the centermost stitch of the top arc and count 45 stitches to the left and 45 stitches to the right. These 90 stitches form the top neckline edge. Place markers at each end.
Row 25 (RS, Color H, Dark Turquoise):
Join Color H with standing sc to the right-hand marker stitch. Work 1 sc into each stitch across to the left-hand marker, ending with sc into the marker stitch. Turn. (90 sc)
Row 26 (WS, Color H):
Chain 1. Work 1 sc into each stitch across. Turn. (90 sc)
Row 27 (RS, Color A, Navy):
Chain 1. Work 1 sc into first stitch. Work dc2tog over next 2 stitches. Work 1 sc into each stitch to last 3 stitches. Work dc2tog. Work 1 sc into last stitch. Turn. (88 stitches)
Row 28 (WS, Color A, Navy):
Chain 1. Work 1 sc into each stitch across. Do not turn. Do not fasten off. (88 sc)
The Neckline Border and Neck Ties
Neckline Border (RS, Color H, Dark Turquoise):
With RS facing, work 1 sc evenly across the top edge of the 4 shaping rows (approximately 4 sc per row end, totaling approximately 16 sc across the short vertical sides, and 88 sc across the top). Join with sl st. Fasten off. (88 sc across top + side edging)
Left Neck Tie:
Join Color H at the top left corner of the neckline. Using 3 strands held together (or a tight chain cord method), make a chain of 60 stitches for the neck tie length. Work 1 sc back along chain to anchor it. Fasten off, leaving a long tail for attaching beads.
Right Neck Tie:
Join Color H at the top right corner of the neckline. Make a chain of 60 stitches. Work 1 sc back along chain. Fasten off.
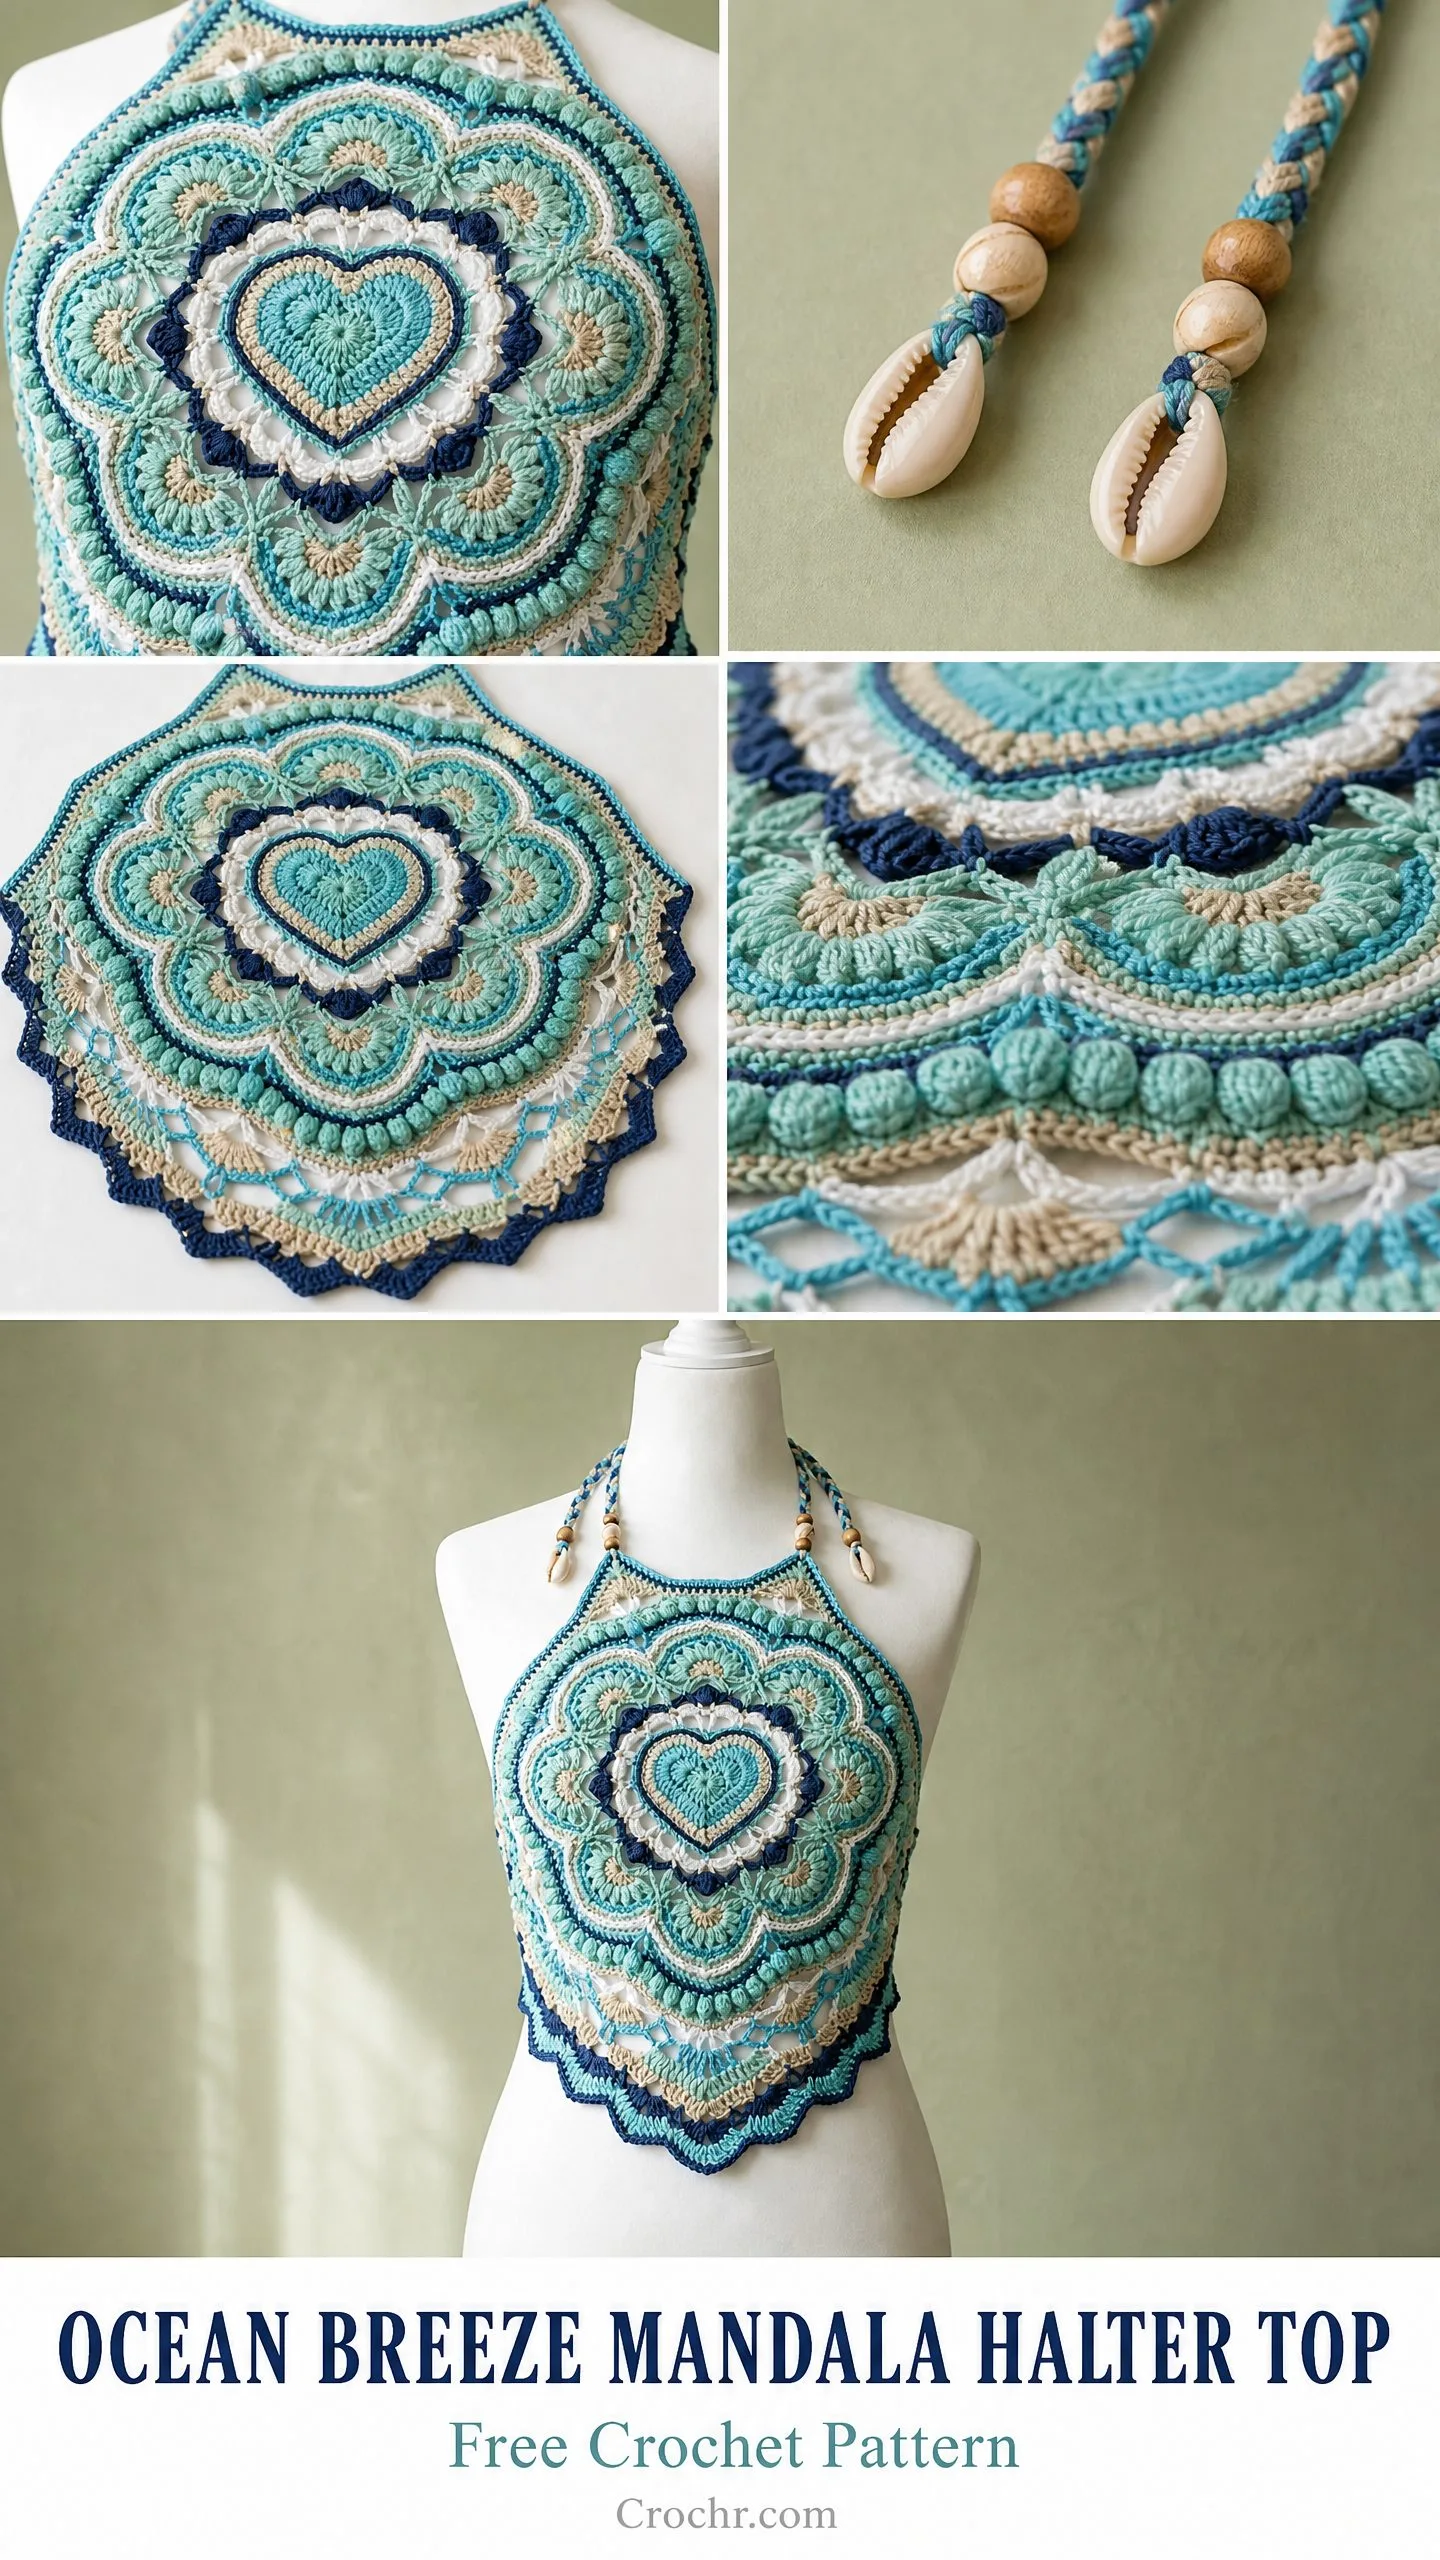
To braid the ties: Work each tie with 3 separate chains of 60 stitches each, then braid them together for a finished braided cord appearance matching the photographed top. Thread 2 to 3 wooden beads onto each braid and knot below each bead to secure. Attach 1 to 2 cowrie shells at the bead cluster on each tie using a slip stitch of yarn through the shell opening.
The Side Ties and Lower Back Ties
Side Left Tie:
Count 10 stitches down from the top left edge of the mandala along the outer edge. Join Color H. Make a chain of 50 stitches. Work 1 sc back along chain. Fasten off.
Side Right Tie:
Count 10 stitches down from the top right edge along the outer edge. Join Color H. Make a chain of 50 stitches. Work 1 sc back along chain. Fasten off.
Lower Back Left Tie:
At approximately the 7 o’clock position of the mandala outer edge (roughly 30 stitches up from the center bottom point, on the left side), join Color H. Make a chain of 60 stitches. Work 1 sc back along chain. Fasten off.
Lower Back Right Tie:
Mirror of lower back left tie, at approximately the 5 o’clock position. Join Color H. Make a chain of 60 stitches. Work 1 sc back along chain. Fasten off.
Thread 1 to 2 wooden beads onto each back tie and 1 cowrie shell per tie end, knotting to secure.
To wear: The neck ties cross behind the neck and tie at the nape. The side ties and lower back ties cross or tie at the lower back to anchor the bodice panel against the body.
Size Customization Tips
To make the top larger: Work additional rounds between Round 20 and Round 21, adding petal or shell rounds and increasing your stitch count proportionally. Each additional round at gauge adds approximately 0.5 to 0.75 inches (1.3 to 1.9 cm) to the diameter. For every 9 additional stitches you add to the outer circumference, you are adding approximately half a size.
To make the top smaller: Stop at Round 22 instead of completing Round 24 and begin neckline shaping from a 200-stitch perimeter instead of 243. Use 75 stitches instead of 90 for the neckline edge.
To add cup shaping: After completing the flat neckline rows, work 4 to 6 sc decrease rows at the center neckline only, decreasing 1 stitch at each end of the center 40 stitches every other row to create gentle cupping. This is optional and not required for the as-photographed flat mandala style.
Finishing and Blocking Your Mandala Halter Top
Weave in all yarn ends securely using the tapestry needle, threading tails through at least 1 inch of nearby stitches in multiple directions.
Wet block the mandala bodice panel: Fill a basin with cool water and a small amount of gentle soap. Submerge the piece and gently squeeze water through. Do not wring or twist. Roll in a clean towel to remove excess water. Lay flat on blocking mats. Pin the outer picot edge to the mat using blocking pins or wires, stretching the mandala to its full 14-inch (35.5 cm) diameter. Pin out each petal point individually. Allow to dry fully, which may take 24 to 48 hours depending on humidity. Once dry, remove pins. The lace sections will be open and the bobbles will be defined.
Thread all ties through beads and attach cowrie shells before final wear.
Care Instructions
Hand wash in cool water with a gentle detergent. Do not machine wash unless the yarn label specifically permits it. Lay flat to dry. Do not hang, as cotton will stretch under its own weight when wet. Do not iron directly. If pressing is needed, use a damp cloth between the iron and the garment and use low heat. Store flat or loosely rolled, not folded over a hanger.
Final Thoughts on This Crochet Halter Top Pattern
I truly hope you love making this Ocean Breeze Mandala Halter Top as much as I loved designing it. The layered texture, the coastal color palette, and those sweet boho embellishments all come together into something you will be so proud to wear. Take your time with the color changes. Trust the blocking process. And most importantly, enjoy watching that mandala grow in your hands.
Thank you so much for choosing this pattern. I would absolutely love to see your finished tops! Tag me on Instagram or share in our Facebook group so I can celebrate your beautiful work with you.
If this pattern spoke to you, go ahead and pin it to your crochet board on Pinterest so you can find it when you are ready to start. And please drop a comment below when you make yours. I read every single one and they truly make my day. Happy hooking, friend!
You Might Also Like
- Neon Lime Snake Plant Amigurumi Free Crochet Pattern
- Sunset Orange Daisy Zipper Bag Free Crochet Pattern
- Sage Green Boho Granny Square Dress Free Crochet Pattern
- Sunset Ombre Granny Square Bag Free Crochet Pattern
