
Last summer, my daughter spotted a vintage crocheted bag at a thrift store and fell completely in love with it. The price tag was ridiculous for something held together by hope and worn-out yarn, but I snapped a photo and told her I could make something better. That photo sat in my camera roll for months until I finally carved out time to design this purse, and honestly? I think I outdid myself.
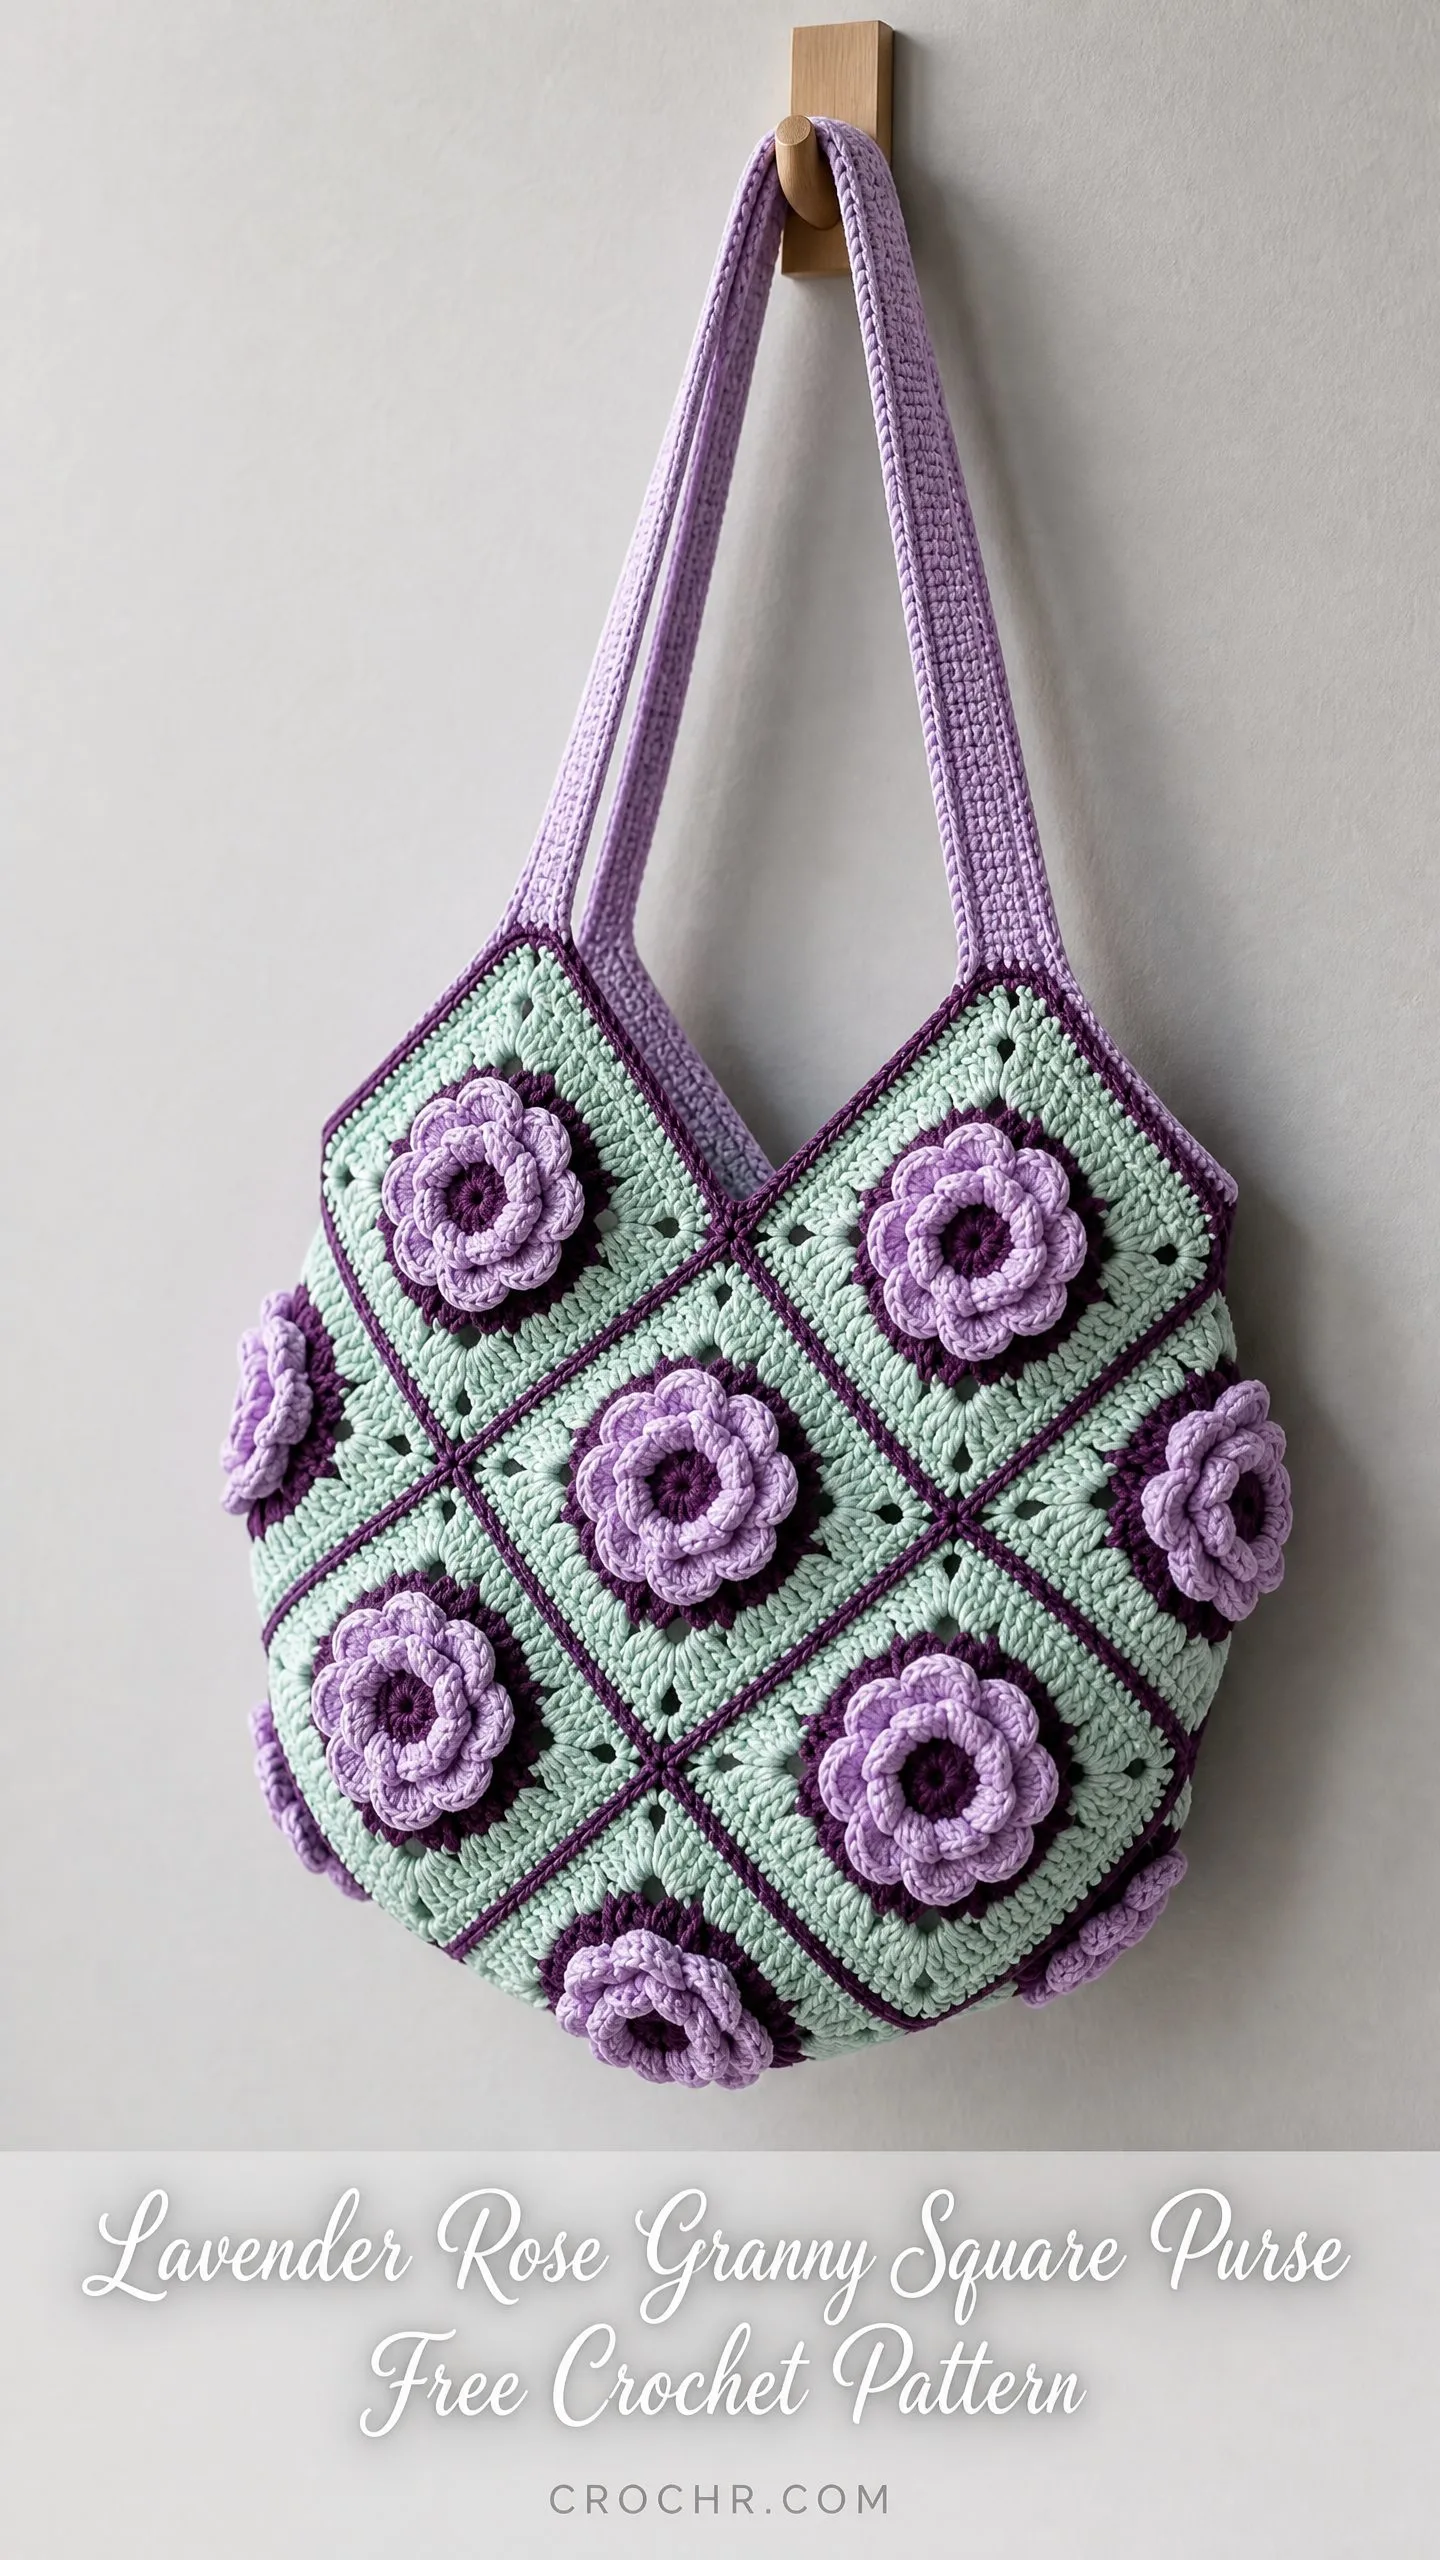
This Lavender Rose Granny Square Purse combines everything I adore about crochet. Dimensional flowers that actually look like roses. A granny square construction that feels nostalgic but looks fresh. And that diagonal grid arrangement that makes the whole thing feel more elevated than your typical tote. My daughter claimed the first one before I even wove in the ends.
The project looks intimidating with those raised 3D petals, but I promise the technique is more methodical than difficult. If you can work basic granny squares and follow a petal sequence, you can absolutely make this bag. Let me walk you through every single step.
What Makes This Crochet Pattern Special
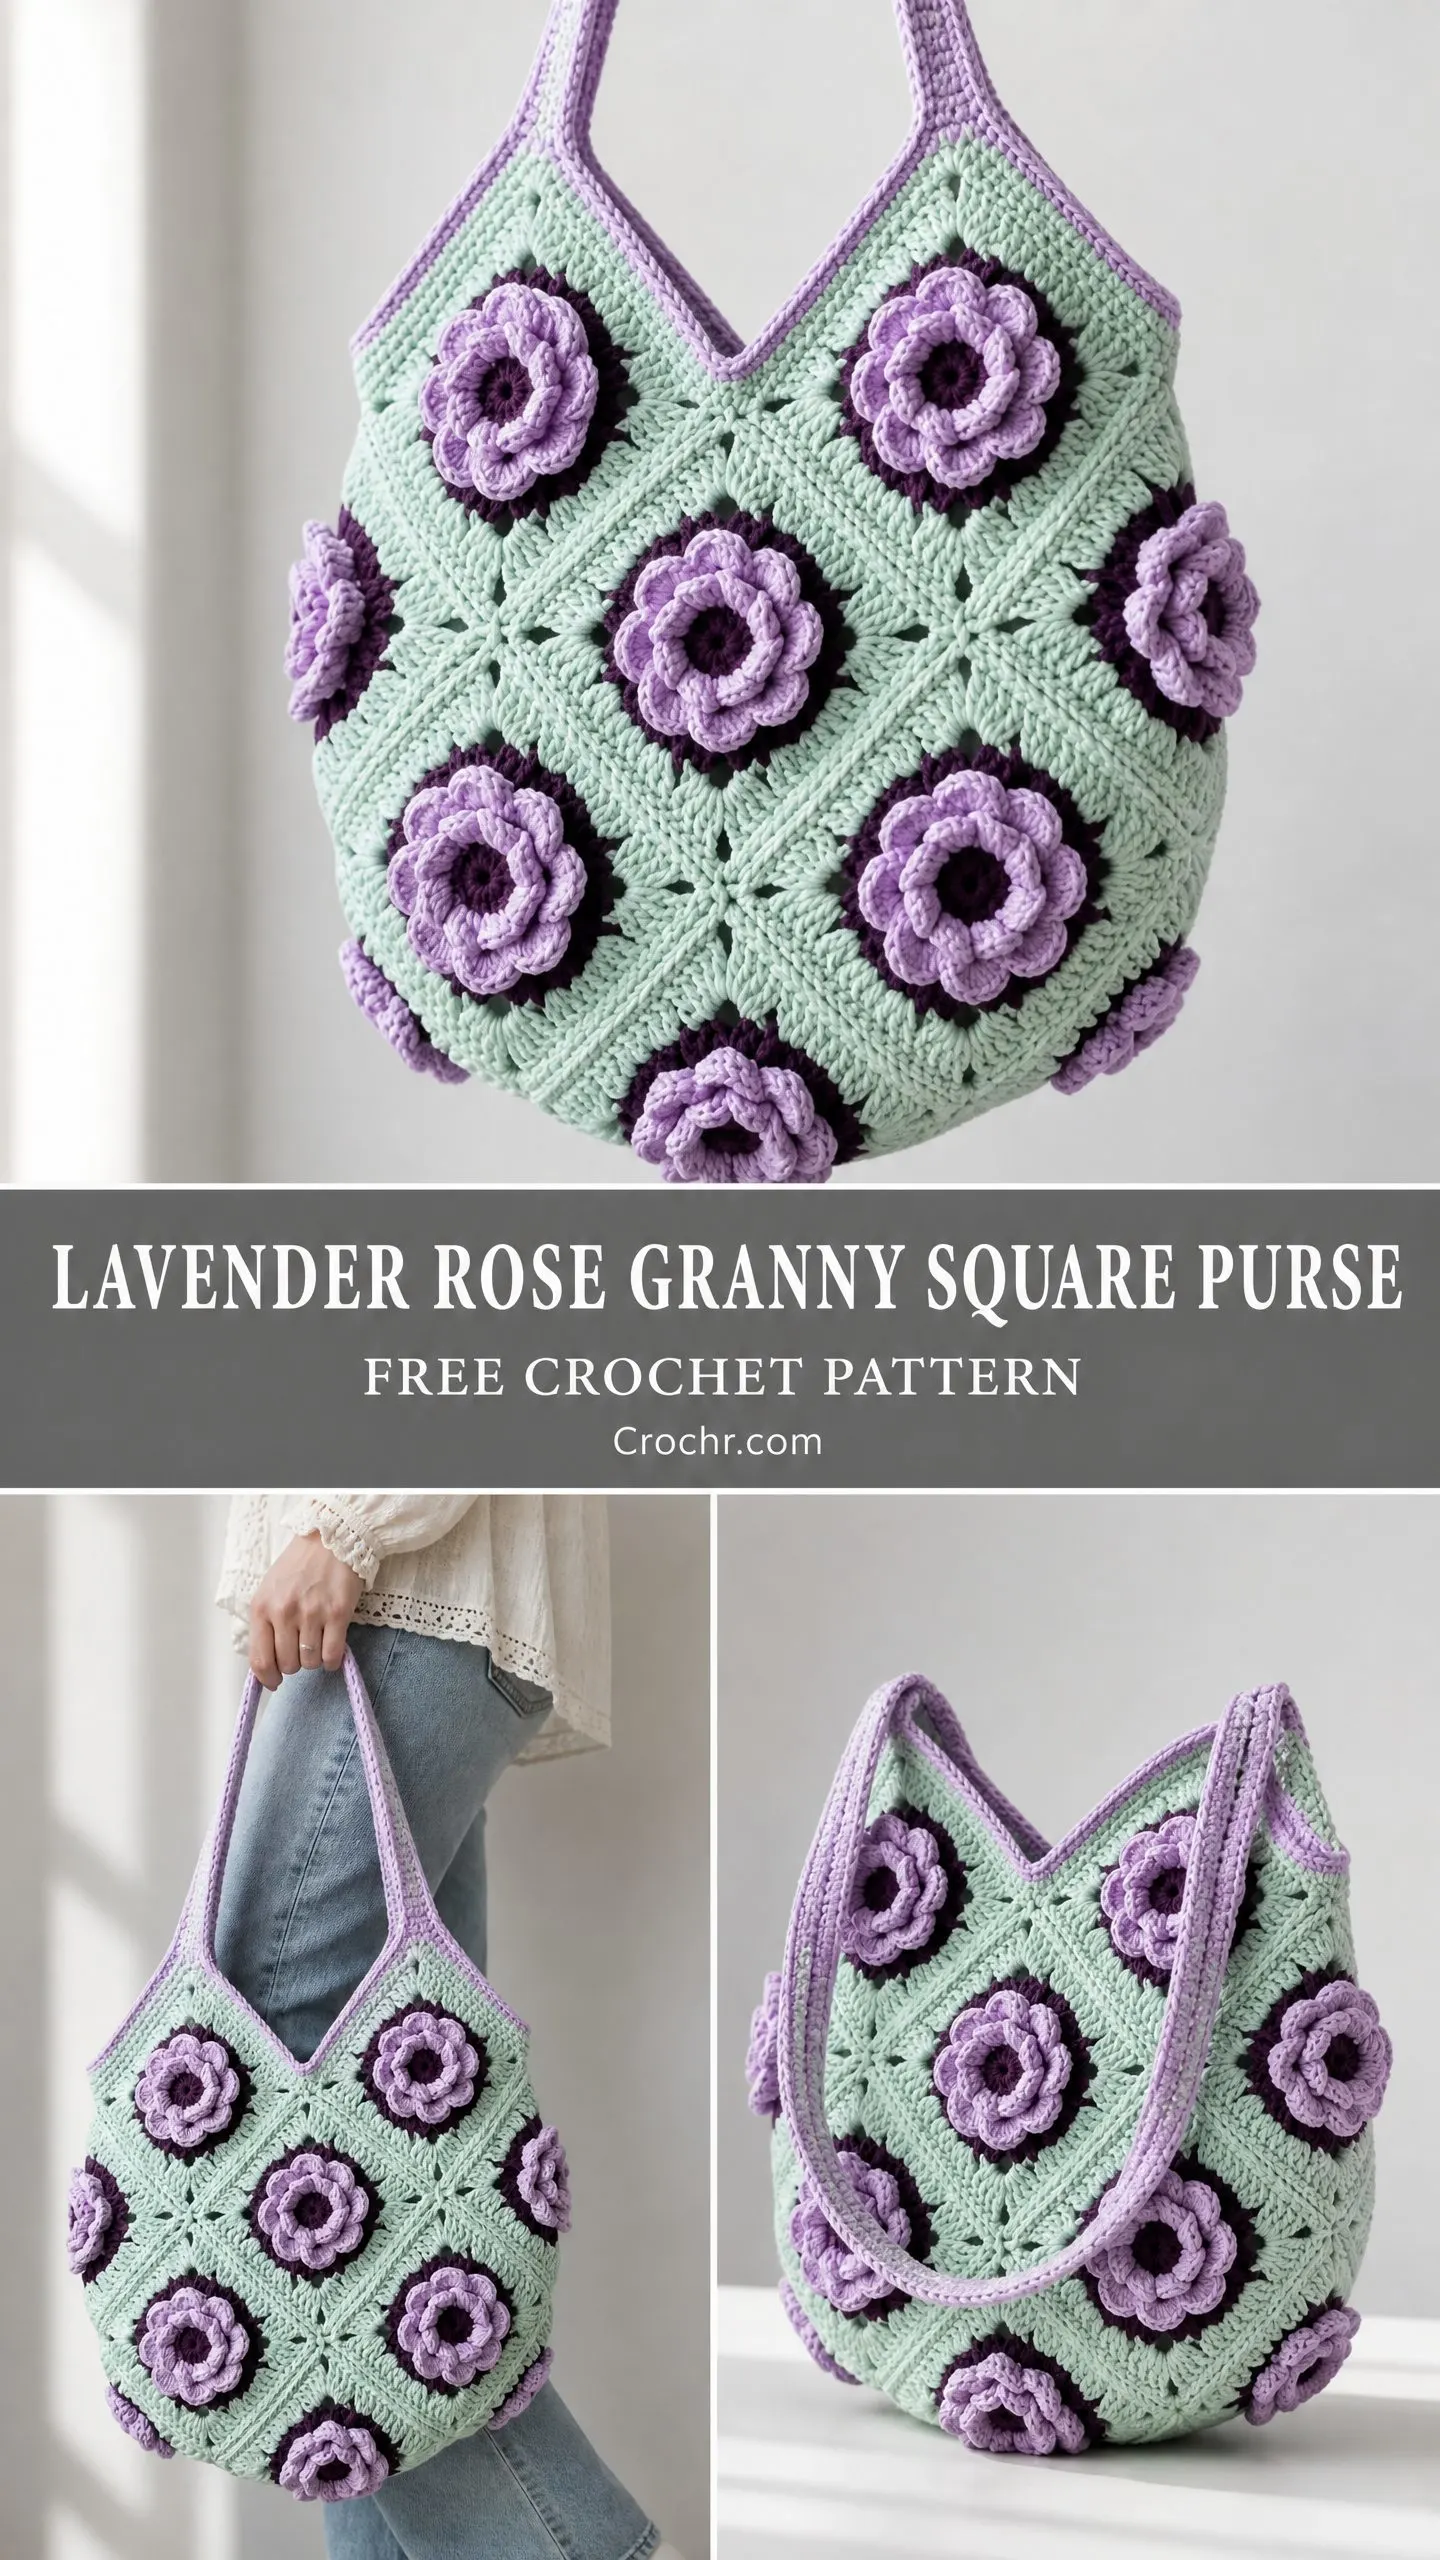
This structured tote-style purse is constructed from individual granny squares, each featuring a raised 3D rose motif worked in rounds. The squares are joined using a flat slip stitch join, then assembled into a shaped bag body. The bag has a rounded bottom formed by an octagonal arrangement of squares, flat front and back panels of nine squares each arranged three wide by three tall, and a long shoulder strap worked in single crochet.
The defining visual feature is the diagonal orientation. All squares are rotated 45 degrees and joined corner to corner, creating that distinctive diamond grid pattern. The opening forms a gentle V-shape at the top center of each panel, which gives the purse an elegant silhouette.
The finished piece is structured, not floppy. A medium-weight yarn worked at a slightly firm gauge creates the body this design needs.
Skill Level
This pattern is rated intermediate. You should be comfortable working in the round, reading granny square construction, joining motifs, and working 3D raised petal stitches. No complex shaping beyond the motif assembly is needed, but the 3D rose requires careful stitch placement and tension control.
If you have made granny squares before and feel confident following detailed round-by-round instructions, you are ready for this project.
Time Estimate
Plan for approximately 20 to 30 hours total for an experienced intermediate crocheter. Each granny square with rose takes approximately 45 to 60 minutes. With 20 squares total plus assembly and strap work, allow a full weekend or spread the project over several sessions.
I like to work on squares while watching TV, then save the assembly work for when I can focus fully.
Finished Size
The completed purse measures approximately 13 inches wide by 13 inches tall at the widest and tallest points, excluding the strap. That translates to about 33 cm by 33 cm for my metric friends.
Strap length is approximately 22 inches (56 cm) from the top edge of the bag to the top of the strap loop, giving a total drop of approximately 11 inches (28 cm) when worn.
Each individual granny square measures approximately 4 inches by 4 inches (10 cm by 10 cm) after blocking.
Materials Needed
Yarn
You will need worsted weight yarn in three colors:
Suggested Yarn Brands
Option 1: Lion Brand Vanna’s Choice (100% acrylic, 170 yards per 3.5 oz skein). This yarn has excellent stitch definition and a slight sheen that makes the 3D roses pop. It is machine washable and widely available. Select Mint for Color A, Dusty Lavender for Color B, and Purple for Color C.
Option 2: Paintbox Yarns Simply DK worked held double. This creates a worsted-weight equivalent with 100% acrylic fiber and an excellent color range. Held double gives a firmer fabric suitable for bag construction. Available in Spearmint, Dusty Lilac, and Violet.
Option 3: WeCrochet Brava Worsted (100% premium acrylic, 218 yards per 3.5 oz skein). Soft, durable, and color-fast. Excellent for structured bags. Select Alfalfa for Color A, Clarity for Color B, and Mulberry for Color C.
Substitution Note: Any smooth worsted weight yarn (approximately 200 yards per 3.5 oz skein, weight category 4) will work. Avoid fuzzy or textured yarns as they obscure the 3D rose detail. Cotton yarns can be used for a stiffer, more structured result but may require a slightly larger hook to achieve gauge.
Hook
US size G-6 (4.00 mm) crochet hook
Notions
Gauge
With US G-6 (4.00 mm) hook and worsted weight yarn, one completed granny square through Round 4 equals 4 inches by 4 inches (10 cm by 10 cm) after blocking.
To check gauge: complete one full granny square through Round 4. Block it flat. Measure corner to corner along a straight side. Adjust hook size up if your square is smaller than 4 inches, down if larger. Gauge is critical for the squares to join evenly and the bag to reach the stated dimensions.
Abbreviations (US Terms)
Special Stitches for This Crochet Tutorial
3D Rose Petal Cluster
This stitch creates one raised, dimensional petal. It is worked by inserting the hook into a specified chain space or stitch and working a sequence of stitches that naturally curl forward due to the stitch height variation.
Step 1: In the designated ch-sp or st, work 1 sc.
Step 2: In the same sp, work 1 hdc.
Step 3: In the same sp, work 3 dc.
Step 4: In the same sp, work 1 hdc.
Step 5: In the same sp, work 1 sc.
This creates one petal: (1 sc, 1 hdc, 3 dc, 1 hdc, 1 sc) all in one space. The petal will naturally fold forward toward the right side of the work. Do not worry if it looks odd at first. It will bloom beautifully once the surrounding rounds are complete.
Shell Stitch (for granny square corners)
Work 3 dc in the same corner ch-2 space. This creates the corner fan of the traditional granny square.
Flat Slip Stitch Join
Hold two squares with wrong sides together. Working through both layers simultaneously, insert hook through the back loops of corresponding edge stitches on each square. Slip stitch through both loops. Continue across all edge stitches. This creates a flat seam visible as a small raised ridge on the right side of the bag, which becomes part of the decorative grid effect.
Pattern Notes Before You Begin
Note 1: The bag uses 20 granny squares total. Nine for the front panel, nine for the back panel, and two for the side/base gusset squares positioned at each side seam to give the bag its slight dimensional depth.
Note 2: All squares are worked with the rose on the right side. The 3D rose is worked first as an inner motif in Rounds 1 through 2 using Colors C and B, then the granny square background rounds are worked in Colors C and A around the completed rose.
Note 3: All color changes are made at the last yarn over of the last stitch before the new color begins.
Note 4: The V-shaped opening at the top of the bag is created by the arrangement of the top row of squares. The two top-corner squares on each panel are tilted on the diagonal so their points meet in the center.
Note 5: Weave in ends as you go, or at minimum secure ends with a double knot before trimming to prevent unraveling inside the bag.
Step by Step Instructions: The 3D Rose Granny Square (Make 20)
The square is built in two stages. First, construct the 3D rose center. Second, work the granny square background rounds around the rose center.
Stage A: The 3D Rose Center
Using Color C and leaving a 6-inch starting tail, make a magic ring (MR).
Round 1 (Color C, RS):
Ch 1 (does not count as a stitch throughout). Work 8 sc into the MR. Pull ring closed. Sl st to first sc to join. (8 sc)
Round 2 (Color C):
Ch 3 (counts as first dc). Work 1 more dc in same st as join. Ch 2, sk next sc, 2 dc in next sc. Rep from * 2 more times. Ch 2. Sl st to top of beginning ch-3 to join. (4 groups of 2 dc, 4 ch-2 spaces)
Round 3 (Color B, first petal layer):
Sl st into first ch-2 sp. In each ch-2 sp, work one 3D Rose Petal Cluster: (1 sc, 1 hdc, 3 dc, 1 hdc, 1 sc). Work one petal cluster in each of the 4 ch-2 sps. Sl st to first sc of round to join. (4 petals complete)
Round 4 (Color C, back loops of Round 2):
Working behind the petals of Round 3, insert hook into the back loop of the first dc of Round 2 (the first dc of the first 2-dc group). Ch 3. Sl st into BLO of second dc of same 2-dc group. Ch 3, sl st into BLO of first dc of next 2-dc group. Ch 3, sl st into BLO of second dc of same 2-dc group. Rep from * 2 more times. Ch 3, sl st to base of beginning ch-3. (8 ch-3 arches formed behind the petals)
Round 5 (Color B, second petal layer):
In each ch-3 arch of Round 4, work one 3D Rose Petal Cluster: (1 sc, 1 hdc, 3 dc, 1 hdc, 1 sc). Work one petal cluster in each of the 8 ch-3 arches. Sl st to first sc of round to join. (8 petals complete)
The rose center is now complete. It has two layers of petals (4 inner, 8 outer) in Color B with a Color C structure. Set aside without fastening off.
Stage B: The Granny Square Background
The rose center is now treated as the center of a granny square. The background rounds build outward from a foundation that connects to the outer edge of the rose.
Round 6 (Color C, foundation connection round):
Working behind all petals (on the WS side of the rose), insert hook into the base of any outer petal from Round 5 (at the point where the petal cluster’s first sc connects to the ch-3 arch of Round 4). Ch 5. Insert hook into base of next outer petal (skipping one petal in between), ch 5. Rep from * 2 more times. Sl st to base of beginning ch-5 to join. (4 ch-5 arches, forming the foundation ring of the granny square)
You are working into every other petal base (positions 1, 3, 5, 7 of the 8 outer petals), creating 4 large arches that will become the 4 sides of the granny square foundation.
Round 7 (Color C, first granny square round):
Ch 3 (counts as first dc). In same ch-5 arch: work 2 more dc (total 3 dc in arch, this is first side cluster). Ch 2 (corner). Work 3 dc in same arch (second side cluster). Ch 1. In next ch-5 arch: work 3 dc, ch 2, 3 dc. Rep from * 2 more times. Ch 1. Sl st to top of beginning ch-3 to join. Fasten off Color C. (4 corner ch-2 sps, 4 ch-1 sps, 8 groups of 3 dc)
Round 8 (Color A, second granny square round):
Join Color A with sl st to any corner ch-2 sp. Ch 3 (counts as first dc). Work 2 more dc in same corner sp. Ch 2. Work 3 dc in same corner sp (corner complete). Ch 1. Work 3 dc in next ch-1 sp. Ch 1. In next corner ch-2 sp, work (3 dc, ch 2, 3 dc). Rep from * 2 more times. Ch 1. Work 3 dc in last ch-1 sp. Ch 1. Sl st to top of beginning ch-3 to join. Fasten off Color A. (4 corner ch-2 sps, 8 ch-1 sps, 12 groups of 3 dc)
Round 9 (Color C, border round):
Join Color C with sl st to any corner ch-2 sp. Ch 1 (does not count as sc). Work 2 sc in corner sp. Work 1 sc in each dc and 1 sc in each ch-1 sp across to next corner sp. Work 3 sc in corner ch-2 sp. Rep from * 2 more times. Work 1 sc in each dc and 1 sc in each ch-1 sp across to starting corner. Work 1 more sc in starting corner sp. Sl st to first sc to join.
Stitch count for Round 9: Each side has 3 dc + 1 ch-1 sp + 3 dc + 1 ch-1 sp + 3 dc = 11 sts across each side. 4 sides x 11 = 44, plus 4 corner sets of 3 sc = 12. Total: 56 sc around perimeter.
Fasten off Color C, leaving a long tail for joining if desired.
Make 20 squares total. Each finished square should measure 4 inches by 4 inches (10 cm x 10 cm) when lightly blocked flat.
Assembling the Bag Panels
Layout
Front panel: 9 squares arranged in a 3×3 grid, all oriented on the diagonal (rotated 45 degrees so each square sits point-up, point-down).
Back panel: 9 squares in identical layout.
Side/base squares: 2 squares, one sewn between the left side seam and one between the right side seam.
Joining the Front Panel
Use the Flat Slip Stitch Join. When squares are rotated 45 degrees and joined corner-to-corner, the joining happens through the sc stitches along the edges of Round 9. Each square edge has 13 sc along it from corner center to corner center.
Step 1: Join Square 1 (top-left) to Square 2 (top-center) along their shared edge. (13 sl sts)
Step 2: Join Square 2 (top-center) to Square 3 (top-right). (13 sl sts)
Step 3: Join Square 4 (middle-left) to Square 5 (middle-center). (13 sl sts)
Step 4: Join Square 5 to Square 6 (middle-right). (13 sl sts)
Step 5: Join Square 7 (bottom-left) to Square 8 (bottom-center). (13 sl sts)
Step 6: Join Square 8 to Square 9 (bottom-right). (13 sl sts)
Step 7: Join top row to middle row: Square 1 bottom edge to Square 4 top edge, Square 2 to Square 5, Square 3 to Square 6. (3 joins, each 13 sl sts)
Step 8: Join middle row to bottom row: Square 4 to Square 7, Square 5 to Square 8, Square 6 to Square 9. (3 joins, each 13 sl sts)
Repeat entire join sequence for the back panel using remaining 9 squares.
Checkpoint: Front and back panels should each measure approximately 12 inches wide by 12 inches tall after joining and blocking.
Joining Front and Back Panels
Place front panel and back panel with wrong sides together. The bag opening is at the top.
Step 1: Join bottom edge using Color A with Flat Slip Stitch Join along the entire bottom edge. (37 sl sts)
Step 2: Join left side edge from bottom-left corner up to top-left corner. (25 sl sts)
Step 3: Join right side edge identically. (25 sl sts)
Side gusset squares: Position one remaining square over the left side seam and one over the right side seam on the exterior of the bag. Sew or sl st each gusset square to the existing side seam, attaching edges to the adjacent front and back panels.
Outer Border
Using Color B and RS facing, join yarn to the top-right corner of the front panel.
Work 1 round of sc around the entire top opening of the bag, working 1 sc in each sc st around the V-shaped opening, placing 3 sc in the outer corner points and working a sl st at the inner V-point to pull the V snug.
Sl st to first sc to join. Fasten off Color B.
The Strap
The strap is worked flat as a long strip then folded and seamed.
Using Color A, ch 7.
Row 1: Sc in second ch from hook and in each ch across. Turn. (6 sc)
Row 2: Ch 1, sc in each sc across. Turn. (6 sc)
Repeat Row 2 until strap measures approximately 46 inches (117 cm) from starting chain.
Fasten off, leaving a long sewing tail.
Fold strap in half lengthwise (wrong sides together, so it becomes 3 sc wide and double-thick). Using yarn needle and Color A, whip stitch the long folded edge closed.
Strap border: Using Color B and RS facing, join to one end of strap. Work 1 row of sc along the top long edge of strap. Fasten off. Join Color B to opposite long edge. Work 1 row of sc along the bottom long edge. Fasten off.
Attaching the strap: Using the sewing tail and yarn needle, whip stitch each strap end firmly to the bag, working through multiple sc stitches of the bag border and back through the strap end at least 3 times for security.
Optional Magnetic Closure
Before assembling front and back panels, cut a small square of fabric approximately 2 inches by 2 inches. Attach one half of the magnetic snap to the fabric square following snap package instructions. Sew the fabric square to the interior of the front panel at the center-top V point, approximately 1 inch below the edge. Repeat for back panel with the corresponding snap half.
Finishing and Blocking
Step 1: Weave in all yarn ends using a yarn needle, running ends through the WS of the work in multiple directions to secure. Trim all tails close to the fabric.
Step 2: Wet blocking recommended for acrylic yarn. Lightly mist all squares and the assembled bag with water from a spray bottle. Gently stretch and pin each panel into shape on blocking mats. Allow to dry completely for 6 to 12 hours.
Step 3: The 3D rose petals should not be pressed flat. Work around the roses and allow them to retain their dimensional curl naturally.
Step 4: Optional stiffening. Lightly spray the interior of the assembled bag with a craft fabric stiffener spray. Allow to dry fully.
Step 5: Optional lining. Cut coordinating fabric to fit the interior. Sew a simple fabric pouch and hand-stitch the hemmed top edge to the interior of the bag’s top border.
Size Customization Tips
To make a larger bag: Add squares to each row and column. Each additional square adds approximately 4 inches to the width or height. A 4×4 arrangement of 16 squares per panel creates a bag approximately 16 inches wide by 16 inches tall.
To make a smaller bag: Use a 2×2 arrangement of 4 squares per panel for a small clutch-style bag approximately 8 inches wide by 8 inches tall.
To change overall scale without adding squares: Use a bulky weight yarn (weight 5) with a US size J-10 (6.00 mm) hook. This increases each square to approximately 5 to 6 inches.
Care Instructions
If worked in acrylic yarn, machine wash on a gentle cycle in cold water. Lay flat to dry. Do not tumble dry on high heat as this may distort the 3D petal structure. Do not iron.
Store the bag stuffed with tissue paper or a small pillow to help maintain the rounded shape when not in use.
You Did It!
Thank you so much for choosing this pattern for your next project. I truly hope you love making this Lavender Rose Granny Square Purse as much as I loved designing it. The moment you finish weaving in that last end and see all those dimensional roses coming together, you will feel so accomplished.
If you make this purse, I would absolutely love to see it! Tag me on Instagram or share a photo on Facebook. Seeing your finished projects genuinely makes my day.
If you want to come back to this Lavender Rose Granny Square Purse crochet pattern later, go ahead and pin it to your favorite Pinterest board. And please drop a comment below if you make one. I love hearing which color combinations you choose and how your roses turn out!
You Might Also Like
- Blush Pink Feminine Shell Bag Free Crochet Pattern
- Succulent Garden Crochet Bowl Free Crochet Pattern
- Mint Ocean Waves Doll Dress Free Crochet Pattern
- Sunset Glow Granny Square Tote Free Crochet Pattern
