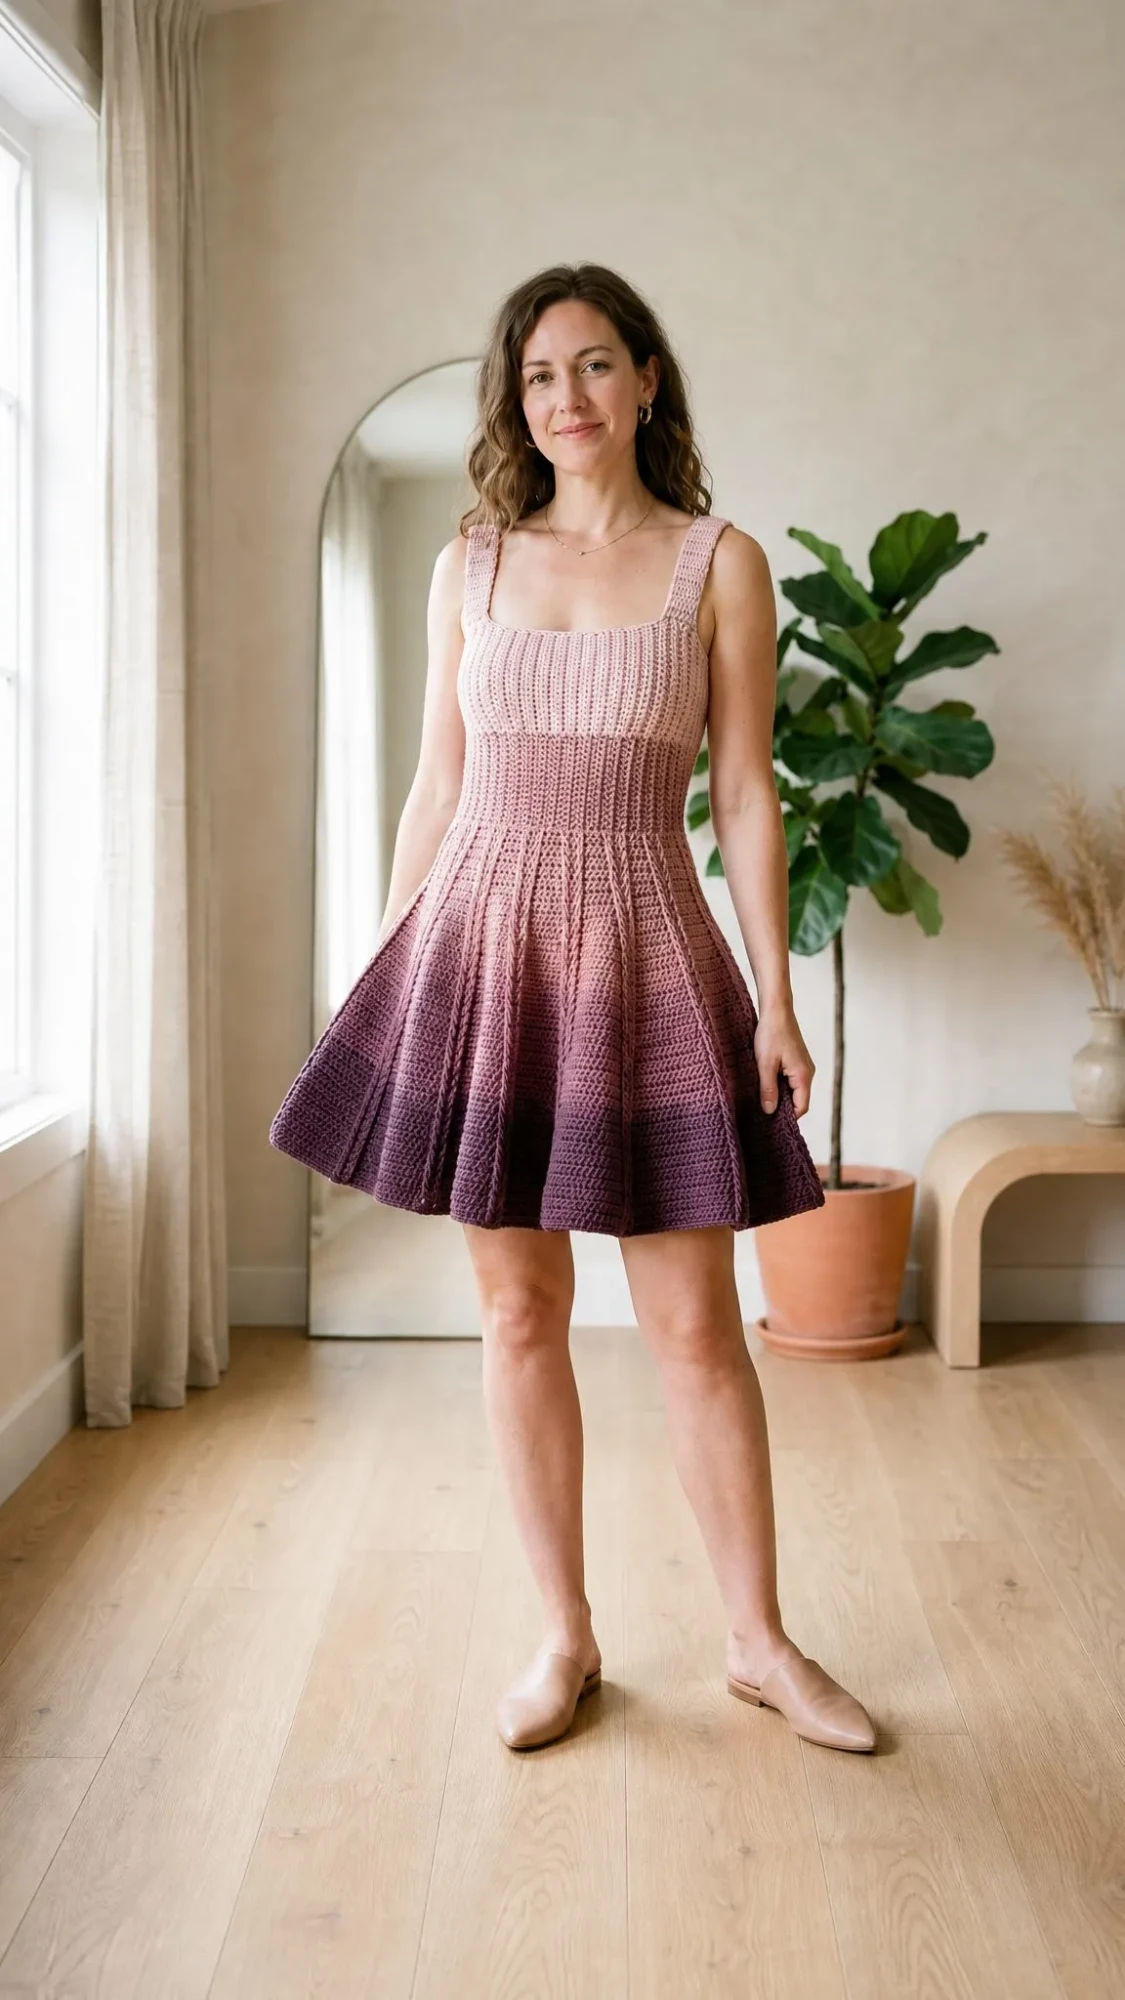
If you have been searching for a handmade dress that actually looks like something you would wear out of the house, this is the one. This fitted mini dress keeps you cool in warmer weather while making a serious style statement. The construction uses extended single crochet worked through the back loop only, which creates that gorgeous ribbed texture you see running from shoulder to hem. It works up as a single seamless piece from the top down, making it perfect for trying on as you go. Whether you are making this for yourself or as a standout gift for someone special, this crochet tutorial walks you through every single step.
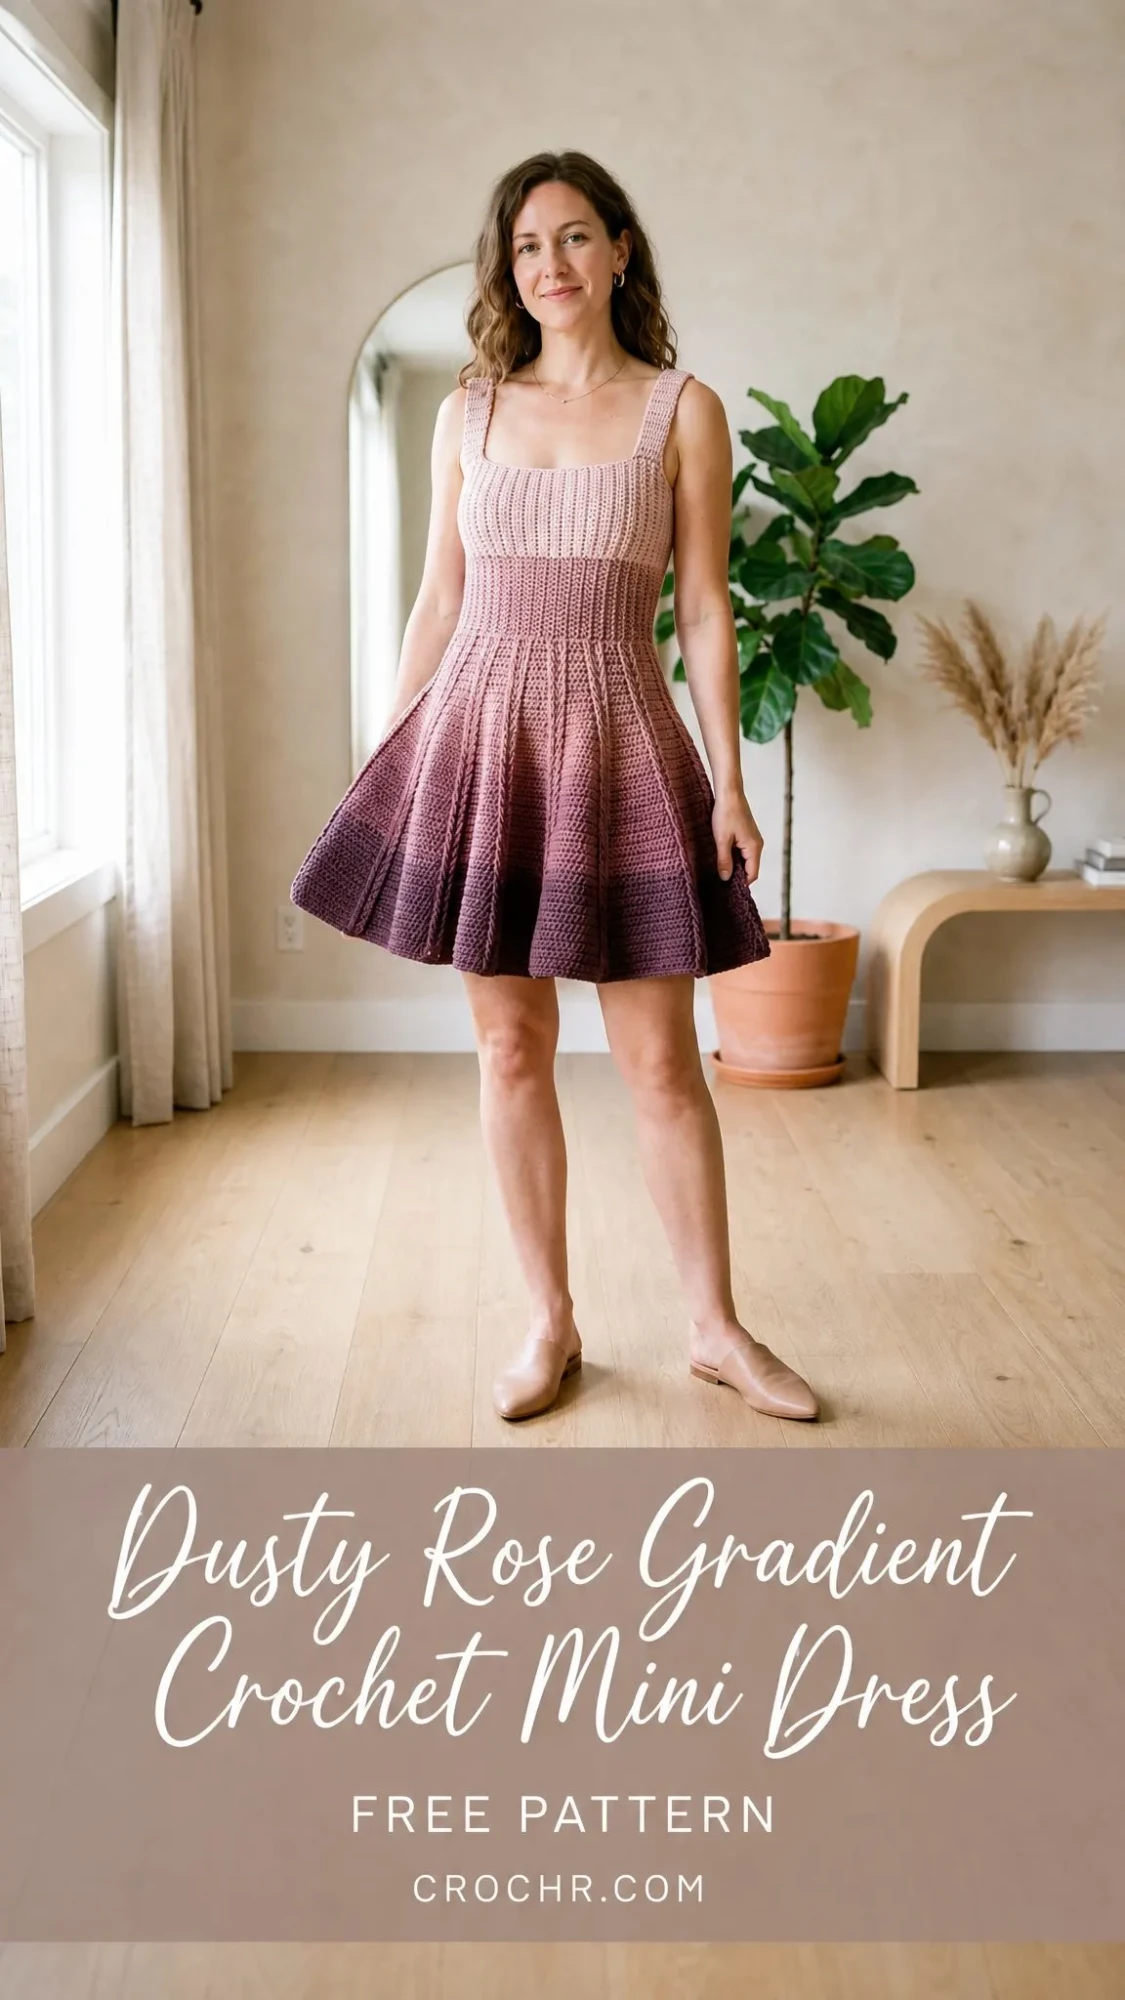
The gradient effect, moving from soft blush at the neckline to deep plum at the hem, happens naturally as you work. You can use a commercially dyed gradient yarn or blend two separate colors yourself. Either way, the result is a dress that looks far more complicated than it actually is.
This pattern is sized for Small through Extra Large, so there is something here for most body types. Let me walk you through everything you need to know to make your own.
About This Crochet Pattern
This mini dress features a square neckline with wide straps, a form fitting bodice, and a flared A-line skirt. The entire piece is worked in continuous rounds after joining the straps, which means no seams to sew up at the end. The ribbed texture comes from working every stitch through the back loop only. This technique creates horizontal ridges that not only look beautiful but also give the fabric natural stretch to hug your curves.
The skirt gets its lovely flare from eight evenly spaced increase panels. These run vertically from the waist to the hem, adding eight stitches every other round. The result is a smooth cone shape that swings when you walk.
Skill level: Intermediate. You should be comfortable working in continuous rounds, managing gauge over a longer project, and executing top down garment shaping. If you have completed at least two wearable crochet projects before, you can absolutely handle this one.
Estimated time: 30 to 50 hours depending on your experience level and how much Netflix you watch while crocheting.
Finished Measurements
This pattern is written for size Small, with Medium, Large, and Extra Large in parentheses.
Bust: 32 (36, 40, 44) inches / 81 (91, 102, 112) cm
Waist: 26 (30, 34, 38) inches / 66 (76, 86, 97) cm
Hip and skirt sweep at hem: 52 (58, 64, 70) inches / 132 (147, 163, 178) cm
Total length from shoulder to hem: 28 (29, 30, 31) inches / 71 (74, 76, 79) cm
Bodice length from shoulder to waist: 12 (12.5, 13, 13.5) inches / 30 (32, 33, 34) cm
Skirt length from waist to hem: 16 (16.5, 17, 17.5) inches / 41 (42, 43, 44) cm
Sizing note: This dress is designed with approximately 0 to 1 inch of ease at the bust. Choose your size based on your actual bust measurement. The rib texture has inherent stretch that allows the bodice to conform to your body.
Materials Needed
Yarn: Approximately 1,400 (1,600, 1,800, 2,000) yards / 1,280 (1,463, 1,646, 1,829) meters of DK weight yarn (CYCA #3). Look for a gradient or ombre yarn that transitions from pale blush to deep plum. A mercerized cotton or cotton acrylic blend works best for stitch definition and drape.
Yarn suggestions:
Hook: US size E-4 / 3.5 mm, or size needed to achieve gauge
Notions:
Gauge
22 extended single crochet stitches by 24 rows equals 4 inches / 10 cm, worked in back loop only in continuous rounds, blocked.
Gauge is essential for this garment. Even a half stitch difference per inch will significantly affect the bust measurement. Make a 6 inch swatch, wash and block it as you would the finished dress, then measure the center 4 inches before beginning. Adjust your hook size as needed.
Abbreviations
Special Stitches
Extended Single Crochet (esc)
This stitch is slightly taller than a standard single crochet and creates a denser fabric. It is the primary texture stitch for this entire dress.
Insert your hook into the indicated stitch. Yarn over and pull up a loop. You now have 2 loops on your hook. Yarn over and pull through 1 loop only. You still have 2 loops on your hook. Yarn over and pull through both remaining loops. One esc made.
Extended Single Crochet 2 Together (esc2tog)
Insert hook into next stitch, yarn over, pull up a loop, yarn over, pull through 1 loop. You have 2 loops on hook. Insert hook into the following stitch, yarn over, pull up a loop, yarn over, pull through 1 loop. You have 3 loops on hook. Yarn over and pull through all 3 loops. One decrease made.
Back Loop Only Extended Single Crochet (blo-esc)
Work esc as described above, but insert your hook into the back loop only of the indicated stitch. This creates the characteristic horizontal ribbed texture visible throughout the bodice and skirt.
Pattern Notes
1. The dress is constructed from the top down, beginning at the shoulder straps and working downward to the hem in continuous rounds. There are no seams in the body.
2. The straps are worked flat as individual strips, then joined to form the square neckline.
3. The bodice is worked in continuous rounds with no turning, always on the right side. Do not join at the end of each round unless specifically instructed. Use a stitch marker to mark the beginning of each round and move it up as you go.
4. All esc stitches throughout the pattern are worked in the back loop only unless otherwise stated.
5. If using two separate colors to create a gradient, begin introducing the darker color at the waistline and transition over approximately 40 rounds for a smooth ombre effect.
Step by Step Instructions
Strap 1 (Make 2)
The dress has two identical wide straps that form the square neckline. Each strap is worked flat, back and forth.
Foundation chain: Ch 19 (21, 23, 25).
Row 1 (RS): Starting in the 2nd ch from hook, esc across. Turn. (18, 20, 22, 24 esc)
Row 2: Ch 1, esc across in blo. Turn. (18, 20, 22, 24 esc)
Repeat Row 2 until strap measures 5 (5.5, 6, 6.5) inches / 13 (14, 15, 17) cm from the foundation chain. Do not fasten off. Set aside but do not cut yarn. Make a second strap and fasten off that one, leaving a long tail for seaming.
Joining the Straps and Forming the Bodice Foundation
This step joins both straps into a continuous round that becomes the top edge of the bodice.
With the first strap still attached to working yarn, position both straps parallel to each other with RS facing out. The long edges are the shoulder bearing edges. The short ends will become the front and back of the neckline.
Joining Rnd 1: Do not turn. Working along the short end of Strap 1, work 18 (20, 22, 24) esc evenly across the end. Continue across the long side of Strap 2 by picking up and working 18 (20, 22, 24) esc evenly along the strap’s short end. Work 18 (20, 22, 24) esc along the opposite short end of Strap 2. Work 18 (20, 22, 24) esc along the remaining short end of Strap 1 to close the round. Place marker to indicate beginning of round. Do not join. (72, 80, 88, 96 esc)
Checkpoint: At this point your joined piece should resemble a rectangle of ribbed fabric with 4 working edges. This will form the yoke and upper bodice.
Bodice
The bodice is worked in continuous rounds from the underarm down to the waist. All stitches are blo-esc. The bodice has no shaping increases or decreases.
Bodice Rnd 1 through Rnd 48 (52, 56, 60): Esc in blo around all sts. (72, 80, 88, 96 esc each round)
Continue until bodice measures approximately 12 (12.5, 13, 13.5) inches / 30 (32, 33, 34) cm from the shoulder joining round.
Checkpoint: After the bodice section, before beginning the skirt, your piece should measure approximately 12 (12.5, 13, 13.5) inches from shoulder to current working round. Your stitch count is 72 (80, 88, 96).
Waist Transition Round
Before beginning the skirt increases, work one setup round that places 8 evenly spaced increase markers.
Waist Rnd 1 (Increase Setup): Work esc in blo in first 8 (9, 10, 11) sts, pm. Repeat this sequence 7 more times until all 8 markers are placed and you have returned to the beginning of the round. Each segment between markers contains 9 (10, 11, 12) sts. (72, 80, 88, 96 esc)
Skirt
The skirt is shaped by working 1 increase at each of the 8 marked positions every other round. This adds 8 stitches every two rounds and creates 8 vertical flare panels.
Skirt Rnd 1 (Increase Round): (Esc in blo to 1 st before marker, inc in next st, sm) 8 times, esc in blo to end of rnd. (80, 88, 96, 104 esc)
Skirt Rnd 2 (Plain Round): Esc in blo around all sts. (80, 88, 96, 104 esc)
Continue alternating Increase Round and Plain Round throughout the skirt section.
Full skirt stitch progression:
After Increase Rnd 1: (80, 88, 96, 104)
After Increase Rnd 2: (88, 96, 104, 112)
After Increase Rnd 3: (96, 104, 112, 120)
After Increase Rnd 4: (104, 112, 120, 128)
After Increase Rnd 5: (112, 120, 128, 136)
After Increase Rnd 6: (120, 128, 136, 144)
After Increase Rnd 7: (128, 136, 144, 152)
After Increase Rnd 8: (136, 144, 152, 160)
After Increase Rnd 9: (144, 152, 160, 168)
After Increase Rnd 10: (152, 160, 168, 176)
After Increase Rnd 11: (160, 168, 176, 184)
After Increase Rnd 12: (168, 176, 184, 192)
After Increase Rnd 13: (176, 184, 192, 200)
After Increase Rnd 14: (184, 192, 200, 208)
After Increase Rnd 15: (192, 200, 208, 216)
After Increase Rnd 16: (200, 208, 216, 224)
After Increase Rnd 17: (208, 216, 224, 232)
After Increase Rnd 18: (216, 224, 232, 240)
After Increase Rnd 19: (224, 232, 240, 248)
After Increase Rnd 20: (232, 240, 248, 256)
After Increase Rnd 21: (240, 248, 256, 264)
After Increase Rnd 22: (248, 256, 264, 272)
After Increase Rnd 23: (256, 264, 272, 280)
After Increase Rnd 24: (264, 272, 280, 288)
Work a total of 24 (25, 26, 27) Increase Rounds, separated by 24 (25, 26, 27) Plain Rounds, for a total of 48 (50, 52, 54) skirt rounds. On the final increase round, the stitch count is 264 (280, 296, 312).
Checkpoint: At the end of the skirt, your stitch count should be 264 (280, 296, 312) stitches and the hem circumference should measure approximately 48 (51, 54, 57) inches.
Hem Finishing Round
Hem Rnd 1: Sl st in each st around. Fasten off and weave in end. (264, 280, 296, 312 sl sts)
Alternatively, for a more polished hem, work one round of sc in both loops around the final skirt round, then sl st to join and fasten off.
Neckline and Strap Edging
With RS facing and blush yarn, join yarn at any corner of the neckline opening.
Edging Rnd 1: Work 1 sc in each st and 1 sc in each row end around the entire neckline and strap perimeter. At each inner corner of the square neckline, work sc2tog to keep the corner crisp. At each outer corner of the strap, work 3 sc in the corner stitch to turn cleanly. Sl st to first sc to join. Fasten off and weave in end.
Size Customization Tips
To adjust bust circumference: Add or subtract 8 stitches per size to the foundation round. This changes the bust by approximately 1.5 inches. Always keep the stitch count divisible by 8.
To lengthen or shorten the bodice: Add or subtract 4 rounds per 0.5 inch of length desired.
To lengthen or shorten the skirt: Add or subtract pairs of increase and plain rounds. Each pair adds approximately 0.33 inch to the length.
To adjust strap width: Add or subtract 2 stitches from the strap foundation chain in even increments.
Finishing and Blocking
Blocking this dress is essential for achieving the smooth, draping fabric visible in the photographs.
Step 1: Weave in all yarn ends securely on the wrong side, working each end through at least 1 inch of stitches in two directions.
Step 2: Soak the entire dress in cool water with a small amount of wool wash for 20 minutes. Do not agitate. Gently press out excess water by rolling in a clean towel. Do not wring.
Step 3: Lay flat on blocking mats. Stretch the bodice to the correct measurements, pinning the side edges every 2 inches. Spread the skirt into a full circle, pinning the hem edge at regular intervals.
Step 4: Allow to dry completely before unpinning. This may take 24 to 48 hours.
Step 5: Once dry, lightly steam the strap edges and neckline if needed.
Care Instructions
Hand wash in cool water using gentle soap. Do not machine wash unless your specific yarn label states it is machine safe. Lay flat to dry after every wash. Do not hang wet or the dress will stretch at the shoulder straps. Store folded flat, not on a hanger.
You Did It!
Thank you so much for choosing this pattern for your next project. I truly hope you love making this dress as much as I loved designing it. There is something incredibly satisfying about wearing something you made with your own two hands, and this dress is guaranteed to turn heads.
If you make this dusty rose gradient crochet mini dress, I would absolutely love to see it. Tag me on Instagram or share a photo in our Facebook group. Seeing your finished projects is honestly the best part of my day.
Do not forget to save this crochet pattern to your Pinterest boards so you can find it easily when you are ready to cast on. And if you have any questions or just want to share your progress, drop a comment below. I read every single one and I am always here to help. Happy crocheting!
