I don’t know about you, but I have been searching for a crochet bag that looks expensive without the designer price tag. Something structured, sophisticated, and versatile enough to carry from brunch to evening drinks. This sage green braided beauty is exactly that. All the elegance of a boutique handbag with the handmade satisfaction we crave.
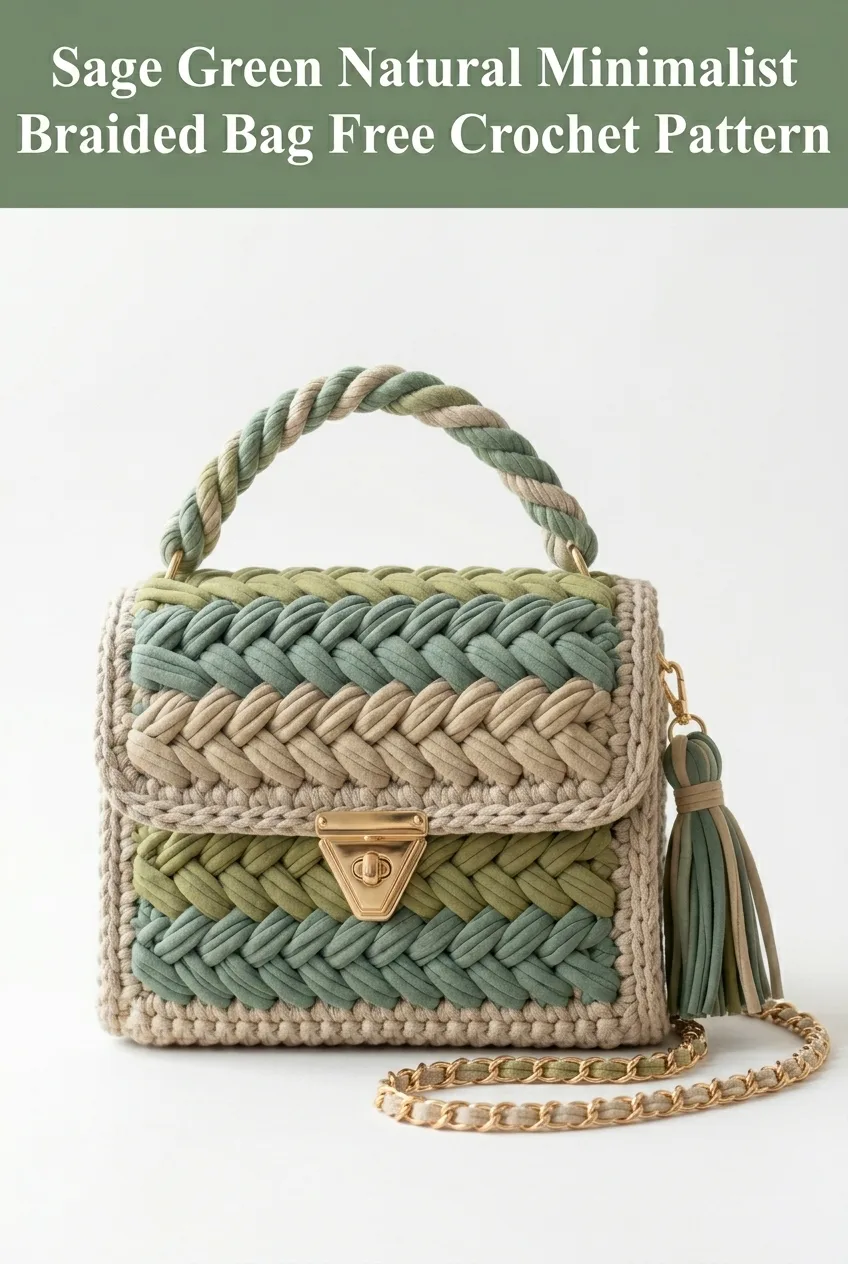
This minimalist braided bag combines thick, textured stitches with clean lines and professional hardware to create something truly stunning. The color palette of sage green, olive, and natural beige gives it an earthy, modern vibe that works with practically everything in your closet. Whether you are new to bag making or have crocheted dozens of accessories, this pattern walks you through every step to create a showstopper piece.
Why You Will Love This Crochet Bag Pattern
Let me tell you what makes this braided bag so special. The construction uses a technique that looks incredibly complex but is actually built on stitches you probably already know. The braided texture comes from working with multiple colors in a specific sequence, creating that gorgeous woven appearance without any actual weaving.
The structured shape holds its form beautifully thanks to the dense stitch work and a sturdy base. You are not going to end up with a floppy bag that loses its shape after one use. This one sits pretty on a shelf, stands upright on a table, and maintains that polished silhouette no matter how much you toss inside.
The finished bag measures approximately 8 inches wide, 6 inches tall, and 3 inches deep. The twisted handle adds another 5 inches of height, making it perfect for carrying by hand or tucking into the crook of your elbow.
Materials Needed for Your Braided Crochet Bag
Gathering your supplies before you start keeps the process smooth and enjoyable. Here is everything you need:
Yarn:
T-shirt yarn, sometimes called zpagetti or ribbon yarn, is a super bulky weight made from recycled jersey fabric strips. It creates that chunky, substantial texture you see in the photo. If you cannot find t-shirt yarn, chunky cotton cord or macramé rope works beautifully too.
Hook:
Hardware:
Additional Supplies:
Skill Level and Techniques
This pattern is intermediate level, but an adventurous beginner can absolutely tackle it. You should be comfortable with basic stitches and working in rows. The braided sections require attention to color changes, but I walk you through it step by step.
Stitches Used:
Single Crochet (sc): Insert hook into stitch, yarn over, pull up a loop (two loops on hook), yarn over, pull through both loops. This is your basic building block stitch.
Half Double Crochet (hdc): Yarn over, insert hook into stitch, yarn over, pull up a loop (three loops on hook), yarn over, pull through all three loops. Slightly taller than single crochet with a nice drape.
Slip Stitch (sl st): Insert hook into stitch, yarn over, pull through stitch and loop on hook in one motion. Used for joining and creating a tight edge.
Chain (ch): Yarn over, pull through loop on hook. Creates your foundation and turning chains.
Puff Stitch: This creates the raised, dimensional texture. Yarn over, insert hook, pull up a loop, yarn over, insert in same stitch, pull up another loop. Repeat one more time. Yarn over, pull through all seven loops on hook.
Step by Step Crochet Pattern Instructions
Making the Base
The base sets the foundation for your entire bag. We want it tight and sturdy.
Row 1: With beige yarn and 10mm hook, ch 21. Sc in second ch from hook and in each ch across. (20 sc)
Row 2: Ch 1, turn. Sc in each st across. (20 sc)
Rows 3 through 8: Repeat Row 2. (20 sc)
You should have a rectangular base measuring approximately 8 inches by 3 inches. The dense single crochet creates a firm foundation.
Do not fasten off. We continue directly into the sides.
Building the Sides
Now we work in continuous rounds around the base to build the walls.
Round 1: Ch 1, do not turn. Work 20 sc across the short end, 8 sc along the side edge (one in each row end), 20 sc across the other short end, 8 sc along the remaining side. Join with sl st to first sc. (56 sc)
Round 2: Ch 1, sc in each st around, working in back loops only. Join with sl st. (56 sc)
Working in the back loops creates a crisp edge where the base meets the sides. This little detail makes the bag look professionally constructed.
Rounds 3 through 5: Ch 1, sc in both loops of each st around. Join with sl st. (56 sc)
Creating the Braided Pattern Sections
Here is where the magic happens. The braided look comes from working puff stitches in alternating colors.
Color Sequence for Braided Rows:
Round 6 (Setup Round): With Color A, ch 2 (counts as first hdc), hdc in each st around. Join with sl st to top of ch 2. (56 hdc)
Round 7 (First Braided Round): Change to Color B. Ch 1, sc in first st. *Puff stitch in next st, sc in next st.* Repeat from * around. Join with sl st. (28 puff stitches, 28 sc)
Round 8: Change to Color C. Ch 1, sc in first st, sc in puff stitch, *puff stitch in next sc, sc in next puff stitch.* Repeat from * around. Join with sl st.
Round 9: Change to Color A. Repeat the offset pattern, placing puff stitches into the sc spaces from the previous round.
Rounds 10 through 15: Continue alternating colors (B, C, A, B, C, A) and offsetting puff stitches to create the woven braided effect.
The key is placing each puff stitch into a single crochet from the row below, not into another puff stitch. This offset creates the diagonal braided appearance.
Upper Section and Flap
Round 16: With beige, ch 1, sc in each st around. Join with sl st. (56 sc)
Round 17: Ch 1, sc in each st around. Join with sl st. (56 sc)
Now we create the flap by working back and forth on the back panel only.
Flap Row 1: Ch 1, turn. Working across the back 20 stitches only, sc in each st. (20 sc)
Flap Rows 2 through 8: Ch 1, turn. Sc in each st across. (20 sc)
Flap Row 9 (Decrease): Ch 1, turn. Sc2tog, sc across to last 2 sts, sc2tog. (18 sc)
Flap Row 10: Ch 1, turn. Sc in each st across. (18 sc)
Flap Row 11: Ch 1, turn. Sc2tog, sc across to last 2 sts, sc2tog. (16 sc)
Flap Rows 12 through 14: Repeat decrease pattern. (10 sc after Row 14)
Fasten off, leaving a long tail for weaving in.
Adding the Braided Detail to the Flap
The flap features the same braided technique on a smaller scale.
Working with right side facing, join Color A to the first row of the flap.
Flap Braided Section:
Work 3 rows of the braided puff stitch pattern (Rounds 7 through 9 technique) across the center of the flap. This adds dimension and ties the design together.
Edging the Entire Bag
A clean edge makes everything look polished.
With beige and the smaller 8mm hook, join yarn at the side seam.
Edging Round: Ch 1, sc evenly around the entire opening, including around the flap edge. Work 3 sc into each corner to keep it flat. Join with sl st. Fasten off.
Making the Twisted Handle
The twisted handle gives this bag its designer look.
For each strand (make 3, one in each color):
Ch 60. Sl st in second ch from hook and in each ch across. Fasten off, leaving 6 inch tails.
To twist:
Lay all three strands together, aligned at the ends. Secure one end (clip it or have someone hold it). Twist all three strands together tightly in one direction until they want to coil. Fold in half, letting the strands twist around each other naturally. Smooth and adjust as needed.
Attaching the handle:
Sew or use D-rings to attach the twisted handle to each side of the bag opening. Position the attachment points about 2 inches from the flap on each side.
Installing the Hardware
Turn Lock Clasp:
Mark the center of the flap and the center of the front panel where they meet. Following your clasp instructions, create small holes or slits for the prongs. Insert the clasp components and secure with the backing pieces.
If your yarn is very thick, you may need to carefully part the stitches rather than cutting. Work gently and test the placement before committing.
D-Rings for Handle:
Thread each end of the twisted handle through a D-ring before attaching to the bag. This creates a professional look and allows for easy handle replacement if needed.
Creating the Tassel
The tassel adds that finishing boutique touch.
Cut 20 strips of t-shirt yarn, each about 8 inches long. Fold the bundle in half. Use a separate strip to bind the top, creating the tassel head. Attach to the bag using a small ring or loop at the flap corner.
Finishing Touches and Tips
Adding Structure:
Cut a piece of cardboard or plastic canvas slightly smaller than your base. Slip it inside the bottom before adding a lining. This keeps the bag from sagging.
Lining Your Bag:
Cut two rectangles of cotton fabric slightly larger than your bag panels. Sew them together, leaving the top open. Insert into the bag and hand stitch around the opening. A lining protects your belongings and adds that professional interior feel.
Blocking:
T-shirt yarn does not require traditional blocking, but you can steam the finished bag lightly to even out stitches. Hold the steamer a few inches away and let the bag dry completely before use.
Customization Ideas for Your Braided Bag
This crochet tutorial gives you a foundation to make it your own.
Color Variations: Try navy, cream, and dusty rose for a romantic palette. Or go bold with black, white, and red for a graphic statement piece.
Size Adjustments: For a larger bag, add 10 chains to your foundation and 4 more rows to the base. Adjust the sides proportionally.
Strap Options: Replace the twisted handle with a gold chain for evening elegance. Or add a longer crossbody strap using the same twisted technique with more chains.
Hardware Swaps: Silver hardware creates a cooler, more modern vibe. Rose gold adds warmth. Choose based on your existing jewelry and accessories.
Troubleshooting Common Issues
Braided pattern not lining up?
Count your stitches after each round. You should always have 56 stitches around the body. The offset puff stitch pattern only works if your stitch count stays consistent.
Bag is too floppy?
Work with a smaller hook size. Dropping from 10mm to 9mm creates a tighter, sturdier fabric. Also ensure you are pulling your stitches snug, especially with t-shirt yarn which tends to stretch.
Colors pooling instead of braiding?
Make sure you are offsetting each row. The puff stitch should sit in the single crochet space from the row below, never directly on top of another puff stitch.
Flap too short or long?
Adjust the number of rows before you start decreasing. Add or remove 2 rows at a time until it covers the front properly.
Why Handmade Bags Make the Best Gifts
A handcrafted crochet bag tells someone you invested your time, creativity, and care into their gift. Unlike store bought accessories that thousands of others own, this braided bag is one of a kind.
Consider making this for birthdays, Mother’s Day, or holiday gifts. The elegant design appeals to fashion lovers who appreciate quality craftsmanship. You could even customize the colors to match someone’s style or favorite outfit.
I really hope you enjoy making this sage green minimalist braided bag as much as I enjoyed designing it. If you give this pattern a try, please save it to your Pinterest boards so you can find it easily later. And I would absolutely love to see your finished bags, so drop a comment below or tag me when you share your creation. Happy crocheting, friend!
