Last summer, I was scrolling through vacation photos and spotted the cutest platform sandals on a stranger at a beach resort. I spent three weeks hunting for them online with zero luck. Then it hit me. Why not just make my own? I grabbed my hooks, raided my cotton stash, and after way too many late nights and a few frogging sessions, I finally cracked the code on these beauties. Now I get to share them with you, and honestly, I am thrilled with how they turned out.
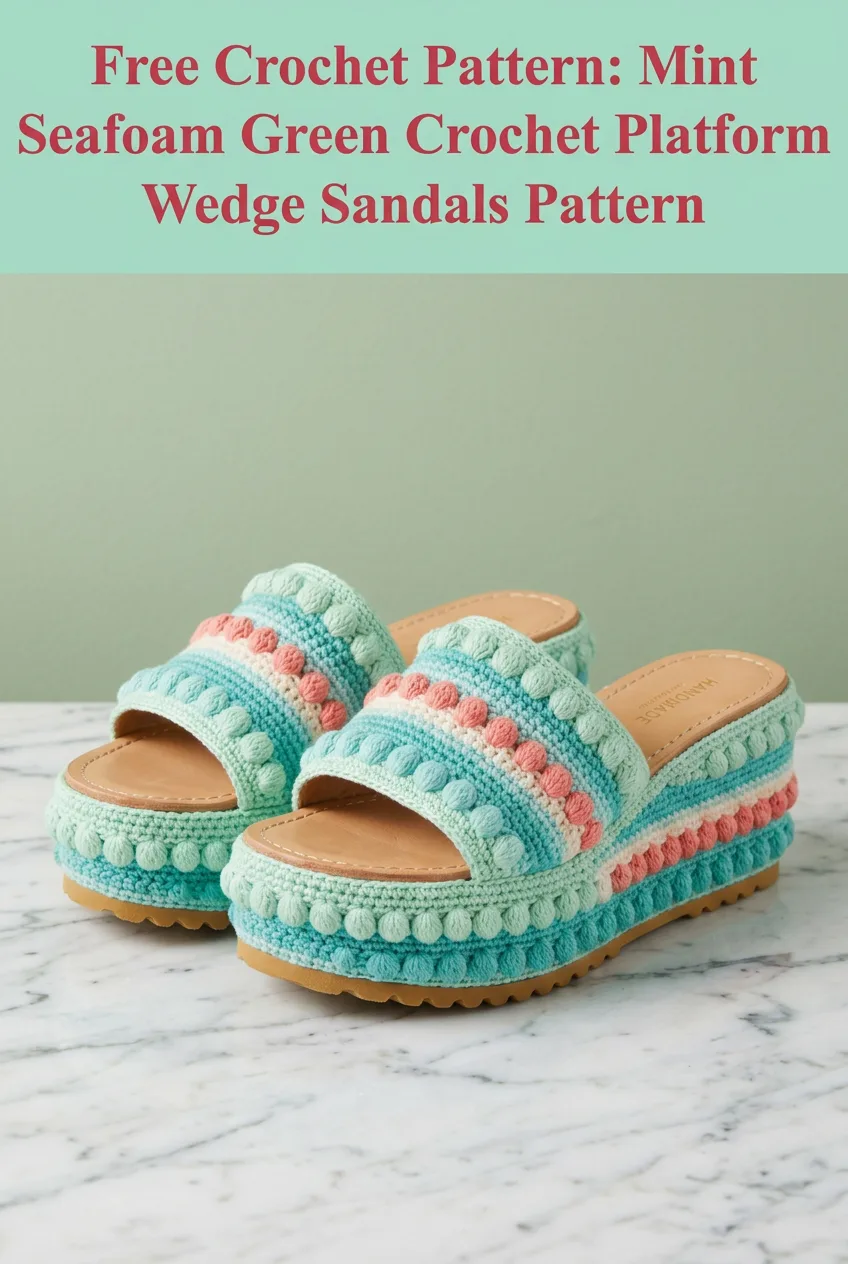
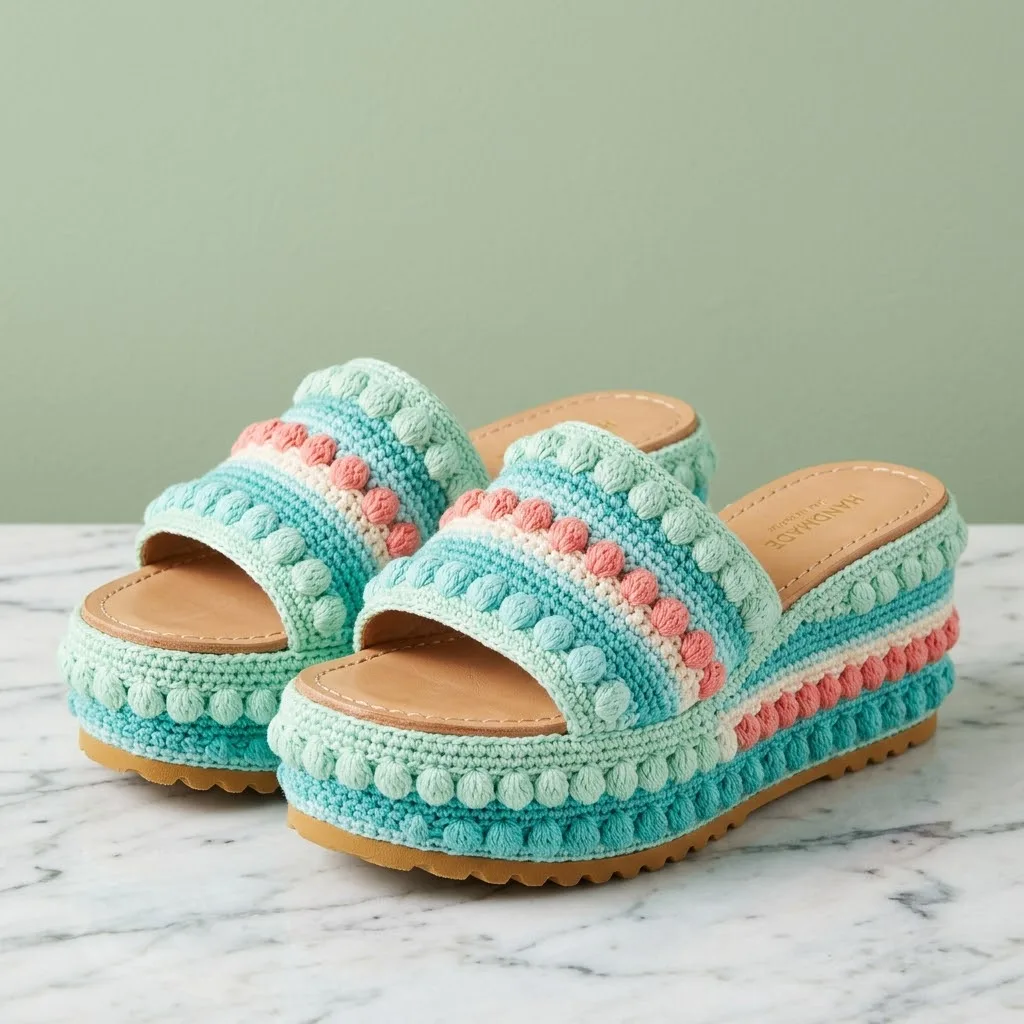
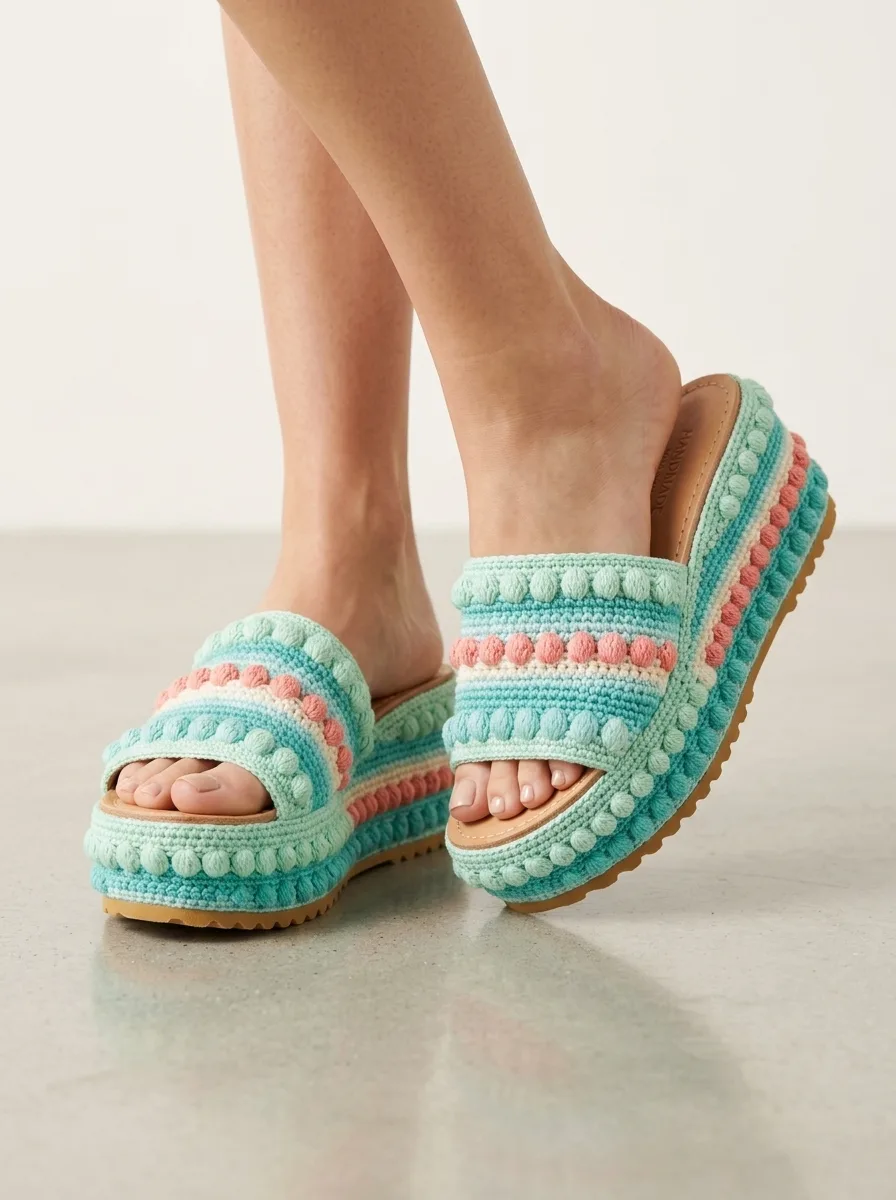
These crochet platform wedge sandals combine textured bobble stitches with clean colorwork stripes in the dreamiest mint and coral palette. They look like something straight out of a designer boutique, but you can make them yourself with basic crochet skills and a little patience. The construction might seem intimidating at first glance, but I promise we will break it down step by step.
Why You Will Love This Crochet Platform Sandals Pattern
This crochet sandals pattern delivers serious wow factor without requiring advanced skills. The bobble stitches create that gorgeous dimensional texture you see in the photos, and they are much easier than they look. If you can single crochet and double crochet, you can absolutely make bobbles.
Perfect for summer styling. These platform wedge sandals pair beautifully with sundresses, linen pants, or your favorite cutoff shorts.
A true conversation starter. Every time you wear them, someone will ask where you got them. The answer? You made them yourself.
Customizable colors. While I used mint seafoam green with coral and cream accents, you can adapt this pattern to match any wardrobe.
Materials Needed for Your Crochet Platform Sandals
Before we dive into the pattern, let us gather everything you need. Having all materials ready makes the process so much smoother.
Yarn
Main Color (MC): Approximately 150 grams of DK weight cotton yarn in mint or seafoam green
Contrast Color 1 (CC1): Approximately 50 grams of DK weight cotton yarn in coral or salmon pink
Contrast Color 2 (CC2): Approximately 30 grams of DK weight cotton yarn in cream or off-white
Contrast Color 3 (CC3): Approximately 40 grams of DK weight cotton yarn in light aqua or pale teal
Cotton yarn works best for this project because it holds its shape, provides durability for footwear, and feels cool against your skin in warm weather. I recommend a tightly spun cotton with minimal stretch.
Tools and Supplies
Gauge
18 stitches and 20 rows = 4 inches in single crochet with 3.5mm hook
Gauge matters here because you want the strap to fit snugly over your foot without being too tight. Take time to check your gauge before starting.
Skill Level
Intermediate. You should be comfortable with basic stitches and willing to learn bobble stitches if they are new to you. The colorwork involves simple stripe changes, nothing complicated.
Abbreviations and Stitch Definitions
Let me define every stitch before we begin. If you are newer to crochet, read through this section carefully.
ch = chain: Yarn over, pull through loop on hook. This creates the foundation for most crochet work.
sl st = slip stitch: Insert hook into stitch, yarn over, pull through both loops on hook. Used primarily for joining.
sc = single crochet: Insert hook into stitch, yarn over and pull up a loop (2 loops on hook), yarn over and pull through both loops.
dc = double crochet: Yarn over, insert hook into stitch, yarn over and pull up a loop (3 loops on hook), yarn over and pull through 2 loops, yarn over and pull through remaining 2 loops.
bobble = bobble stitch: Work 5 double crochets into the same stitch but leave the last loop of each dc on your hook. You will have 6 loops total. Yarn over and pull through all 6 loops at once. This creates a puffy, three-dimensional bump that gives these sandals their signature texture.
inc = increase: Work 2 stitches into the same stitch.
sk = skip: Pass over the indicated stitch without working into it.
Understanding the Construction
These sandals consist of two main crocheted components that attach to a pre-made platform sole:
1. The Strap Band: A wide rectangular band with bobble texture and stripes that goes across the top of your foot
2. The Platform Cover: A crocheted edging that wraps around the platform sole, featuring bobble embellishments
Both pieces attach directly to the platform base through pre-punched holes. Think of it like sewing the crochet pieces onto the sole.
Size Adjustments
This pattern fits a US Women’s size 7 to 8 platform base. For different sizes:
Smaller sizes (5 to 6): Reduce the starting chain by 4 stitches and work 2 fewer rows on the strap.
Larger sizes (9 to 10): Increase the starting chain by 4 stitches and work 2 additional rows on the strap.
Always measure your platform base and adjust accordingly. The strap should wrap comfortably across the widest part of your foot with slight stretch.
Crochet Pattern Instructions
Part 1: The Strap Band (Make 2)
This is the main decorative piece that goes across your foot. We will work it flat in rows, then shape it slightly.
Foundation Row with MC:
Ch 46.
Row 1 (RS): Sc in 2nd ch from hook and in each ch across. (45 sts)
Row 2: Ch 1, turn. Sc in each st across. (45 sts)
Row 3: Ch 1, turn. Sc in each st across. (45 sts)
Row 4 (Bobble Row with CC3): Change to CC3 at the end of Row 3. Ch 1, turn. Sc in first st, *bobble in next st, sc in next st* repeat across to last st, sc in last st. (45 sts, 22 bobbles)
A quick note on bobbles. They naturally want to pop to the wrong side of your work. Make sure you push them through to the right side as you make them so they show on the front of the strap.
Row 5: Ch 1, turn. Sc in each st across, working into the top of each bobble. (45 sts)
Row 6: Change to MC. Ch 1, turn. Sc in each st across. (45 sts)
Row 7: Ch 1, turn. Sc in each st across. (45 sts)
Row 8 (Stripe Row with CC2): Change to CC2. Ch 1, turn. Sc in each st across. (45 sts)
Row 9 (Bobble Row with CC1): Change to CC1. Ch 1, turn. Sc in first st, *bobble in next st, sc in next st* repeat across to last st, sc in last st. (45 sts, 22 bobbles)
Row 10: Ch 1, turn. Sc in each st across. (45 sts)
Row 11: Change to CC2. Ch 1, turn. Sc in each st across. (45 sts)
Row 12: Change to MC. Ch 1, turn. Sc in each st across. (45 sts)
Row 13: Ch 1, turn. Sc in each st across. (45 sts)
Row 14 (Bobble Row with CC3): Change to CC3. Ch 1, turn. Sc in first st, *bobble in next st, sc in next st* repeat across to last st, sc in last st. (45 sts, 22 bobbles)
Row 15: Ch 1, turn. Sc in each st across. (45 sts)
Rows 16 to 18: Change to MC. Ch 1, turn. Sc in each st across. (45 sts)
Border Round: Do not turn. Working around the entire rectangle, sc evenly down the short edge, across the foundation chain, up the other short edge, and across the top. Sl st to first sc to join. Fasten off.
Part 2: The Platform Edge Cover (Make 2)
This piece wraps around the foam or rubber platform and gets stitched through the pre-punched holes. You will work directly into the holes around the platform.
Round 1: Join MC to any hole on the platform edge with a sl st. Ch 1, work 2 sc into each hole around the entire platform. Sl st to first sc to join.
The number of stitches will depend on your specific platform base. Most platforms have between 40 and 60 holes around the perimeter.
Round 2: Ch 1, sc in each st around. Sl st to join. (Count your stitches and note the total)
Round 3: Ch 1, sc in each st around. Sl st to join.
Round 4 (Bobble Round with MC): Ch 1, sc in first st, *bobble in next st, sc in next 2 sts* repeat around, adjusting the final few stitches as needed to end the round cleanly. Sl st to join.
If your stitch count does not divide evenly by 3, simply add an extra sc between the final bobbles. Nobody will notice, I promise.
Round 5: Ch 1, sc in each st around. Sl st to join. Fasten off.
Part 3: Assembly
Now comes the satisfying part. Putting it all together.
Step 1: Position your strap band across the front of the platform, centered over where your toes will go. The band should curve naturally when placed.
Step 2: Using your tapestry needle and matching yarn, whipstitch the bottom edge of the strap to the platform cover where they meet. Work from the inside so your stitches stay hidden.
Step 3: Secure both ends of the strap to the sides of the platform by stitching through the platform holes and the edge of the strap band.
Step 4: For extra durability, apply a thin line of fabric glue along the inside where the strap meets the platform. Let dry completely before wearing.
Step 5: Repeat the entire assembly process for the second sandal.
Tips for Success
Tension matters. Keep your tension consistent throughout, especially on the bobble rows. Loose bobbles look floppy, and tight bobbles bunch up.
Color changes. When switching colors, carry your yarn loosely along the side edges. This prevents puckering and makes weaving in ends easier.
Blocking helps. Give your strap bands a light steam block before assembly. This evens out your stitches and helps the piece lay flat.
Try them on. Before final stitching, pin the straps in place and try on the sandals. Adjust placement if the strap feels too tight or too loose across your foot.
Care Instructions
Because these sandals use a cotton yarn, they hold up well to gentle hand washing. Use cool water and mild soap. Reshape while damp and air dry away from direct sunlight. Avoid machine washing, which can distort the platform attachment.
For spot cleaning, a damp cloth works perfectly for small marks or dust.
Styling Your Handmade Platform Sandals
The mint and coral color combination works beautifully with white, navy, coral, and neutral tones. These sandals elevate a simple linen dress or add a playful touch to cropped jeans.
Because you made them yourself, you can create multiple pairs in different colorways. Consider making a neutral version in cream and tan, or go bold with hot pink and orange for maximum summer vibes.
Final Thoughts on This Crochet Platform Wedge Sandals Pattern
Creating your own crochet platform wedge sandals feels incredibly rewarding. You end up with a truly unique accessory that nobody else has, and you get to practice bobble stitches and colorwork along the way. This step by step crochet tutorial gives you everything you need to make a stunning pair of sandals that look professionally made.
Do not rush the assembly portion. Taking your time with the finishing details makes all the difference between handmade sandals that look homemade versus handmade sandals that look designer.
I hope you enjoy making these as much as I enjoyed designing them. The first time you slip them on and head out the door, you will feel like an absolute crochet rock star.
If you love this pattern, save it to your Pinterest boards so you can find it easily when you are ready to start. And please, I would absolutely love to see your finished sandals. Drop a comment below and tell me what colors you chose, or share a photo of your completed pair. Happy crocheting, friend!
