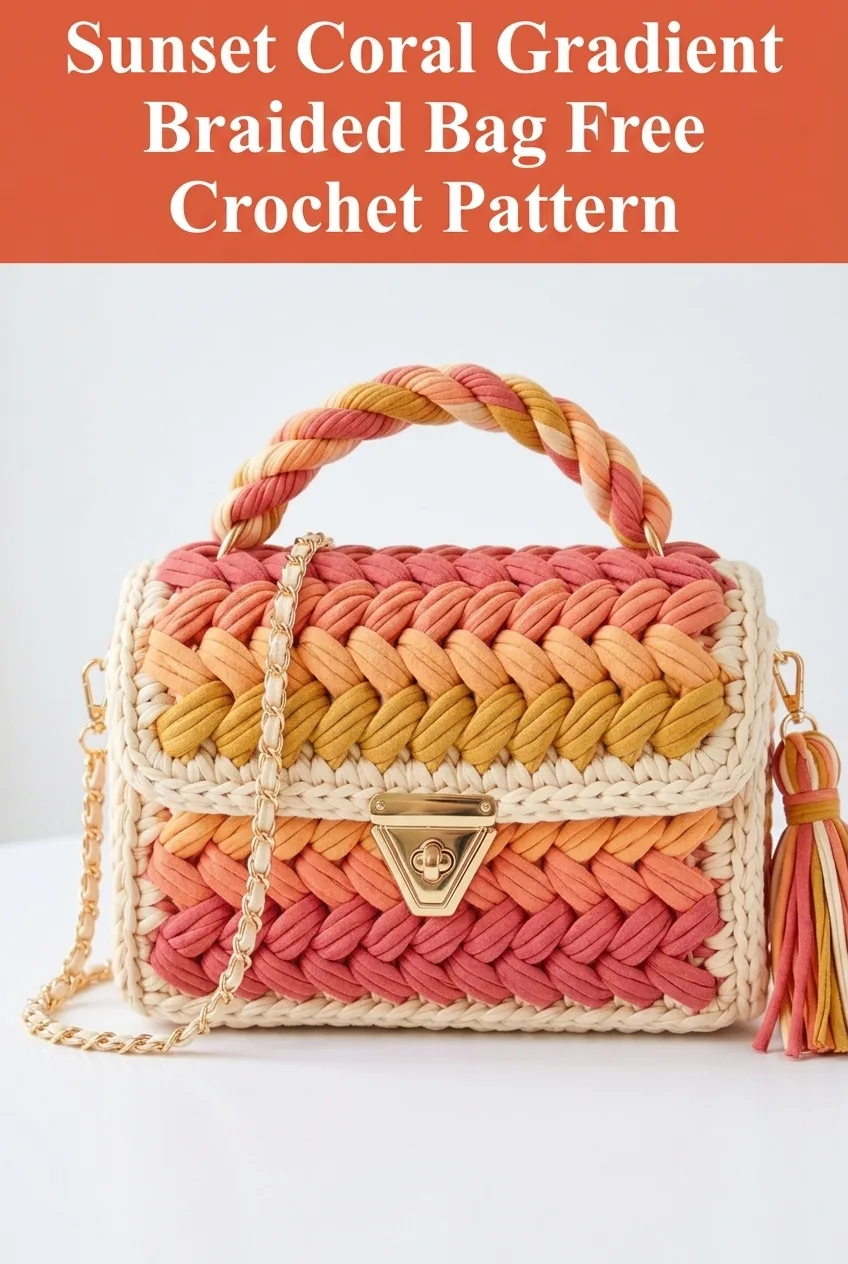
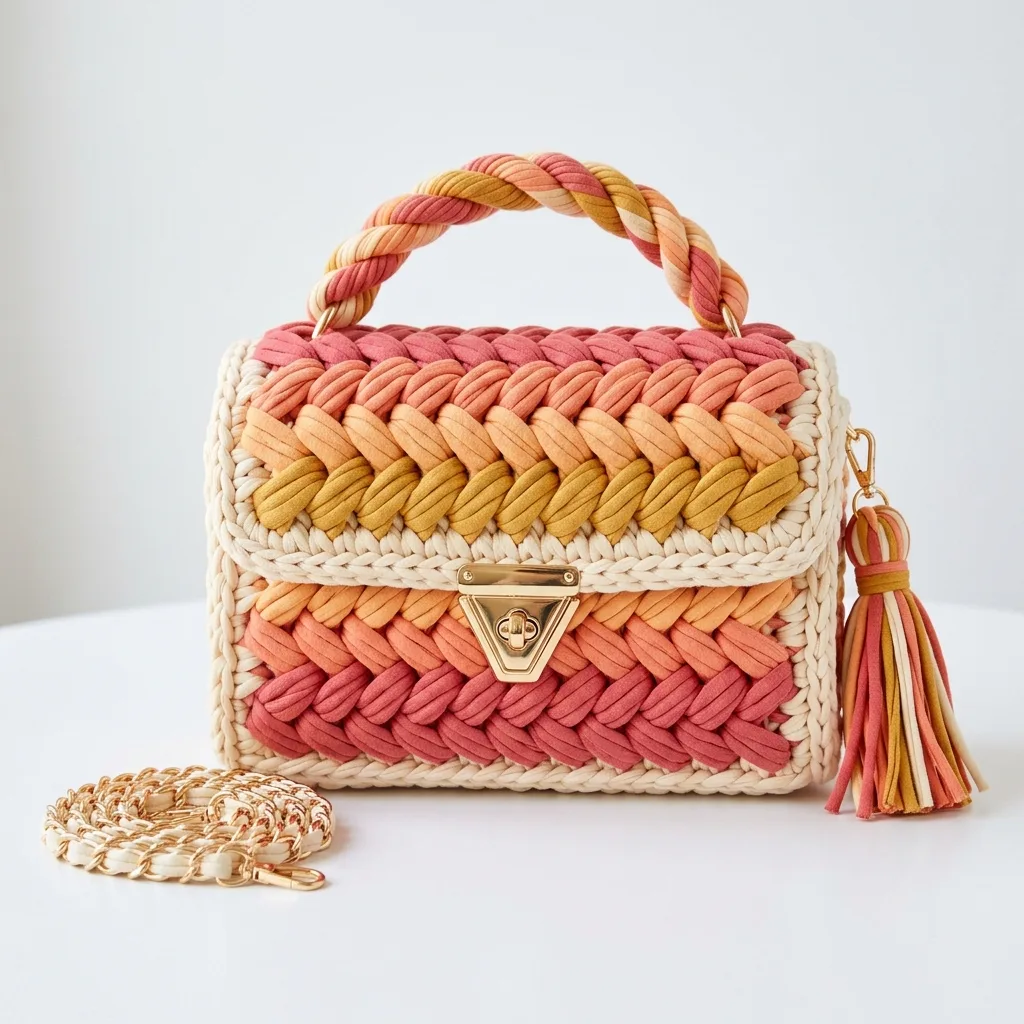
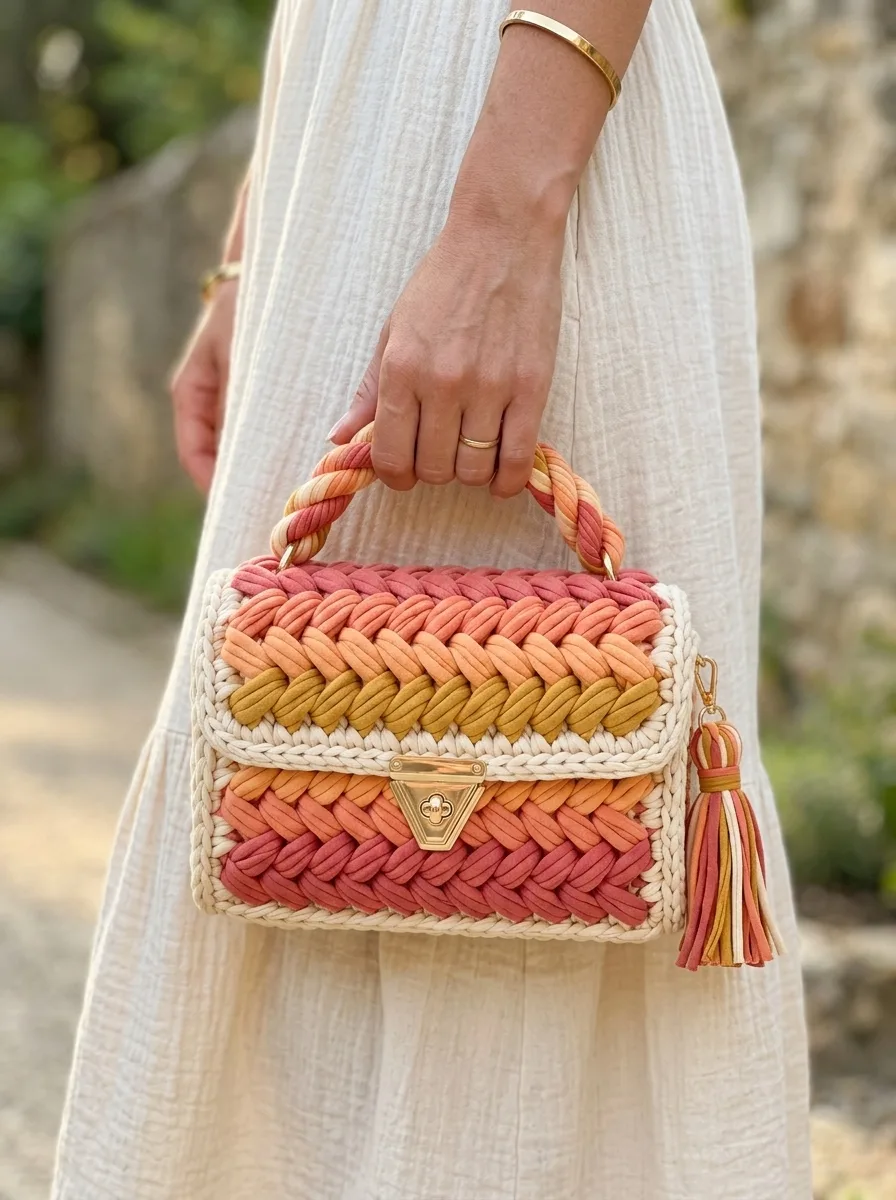
I’ve been looking for the perfect structured bag pattern that combines modern hardware with handmade charm, and this one is my absolute favourite. The gradient colour flow from dusty rose through coral to golden mustard creates that sunset effect I can never resist. This is the bag I reach for when I want something that looks designer but feels uniquely mine.
This crochet tutorial walks you through every step of creating a stunning box-style handbag with braided texture, a twisted rope handle, and professional finishing details. Whether you’re new to t-shirt yarn or you’ve been crocheting bags for years, you’ll find everything you need right here.
About This Crochet Pattern
This Sunset Coral Gradient Braided Bag uses t-shirt yarn (also called trapillo or ribbon yarn) to create bold, chunky stitches that work up quickly. The finished bag measures approximately 8 inches wide by 6 inches tall by 3 inches deep, giving you a structured rectangular silhouette perfect for everyday essentials.
The star of this design is the puff stitch combined with a herringbone-style braided technique. Don’t let that intimidate you. If you can yarn over and pull through loops, you can absolutely make this bag. I’ll walk you through each section slowly.
The construction method is straightforward. You’ll crochet a rectangular base, build up the sides in rounds, create a matching flap, add the twisted handle, and finish with hardware. The gradient effect happens naturally as you change colours row by row.
Skill Level
Intermediate beginner to intermediate. You should feel comfortable with basic crochet stitches and working in joined rounds. The puff stitch technique may be new to you, and that’s perfectly fine. I’ll explain it thoroughly below.
Materials Needed
Yarn:
Popular t-shirt yarn brands include Hoooked Zpagetti, Lily Sugar’n Cream T-shirt yarn, or Bobilon. Any chunky ribbon-style yarn with similar weight will work beautifully.
Hook:
Notions:
Optional but Recommended:
Gauge
Gauge is flexible with t-shirt yarn because the material varies between brands. Work a small swatch of 10 single crochet stitches across 5 rows. Your swatch should measure approximately 4 inches by 3 inches. If your stitches are much larger, go down a hook size. If they’re tighter and smaller, go up a hook size.
Don’t stress too much about exact gauge here. This bag is forgiving, and slight size variations won’t affect the finished look.
Abbreviations and Stitch Definitions
Let me define every stitch before we begin. You can refer back to this section anytime.
Ch = Chain. Yarn over, pull through the loop on your hook. This creates the foundation and adds height.
Sl st = Slip stitch. Insert hook into stitch, yarn over, pull through both the stitch and the loop on your hook. Used for joining and invisible movement.
Sc = Single crochet. Insert hook into stitch, yarn over and pull up a loop (2 loops on hook), yarn over and pull through both loops. One of the most basic stitches.
Hdc = Half double crochet. Yarn over, insert hook into stitch, yarn over and pull up a loop (3 loops on hook), yarn over and pull through all 3 loops. Slightly taller than single crochet.
Puff st = Puff stitch. (Yarn over, insert hook into stitch, yarn over and pull up a loop) 3 times in the same stitch (7 loops on hook), yarn over and pull through all 7 loops, chain 1 to secure. This creates the raised, braided texture you see on the bag front.
Inc = Increase. Work 2 stitches into the same stitch.
BLO = Back loop only. Insert your hook under just the back loop of the stitch instead of both loops.
Step by Step Crochet Pattern
The Base
The base creates the rectangular bottom of your bag. We’ll work this flat in rows using Colour A (cream).
Row 1: Ch 17. Sc in 2nd ch from hook and in each ch across. (16 sc)
Row 2: Ch 1, turn. Sc in each st across. (16 sc)
Rows 3 through 8: Repeat Row 2. (16 sc per row)
At the end of Row 8, do not fasten off. We’ll continue directly into the sides.
Your base should measure approximately 8 inches by 3 inches. If it’s significantly different, check your tension and adjust as needed.
Building the Sides
Now we transition to working in joined rounds around the entire base. This builds up the walls of the bag.
Round 1 (Setup Round with Colour A):
Ch 1, do not turn. Work 2 sc in the corner stitch. Continue sc evenly along the short edge (approximately 6 sc), work 2 sc in the corner. Sc across the long foundation chain edge (16 sc), work 2 sc in the corner. Sc along the next short edge (6 sc), work 2 sc in the corner. Sc across the remaining long edge to meet your starting point. Sl st to join. (Approximately 52 sc)
Count your stitches and place a marker at the beginning of the round.
Round 2: Ch 1. Working in BLO only, sc in each st around. Sl st to join. (52 sc)
Working in BLO creates a crisp edge at the base, helping your bag stand upright.
Rounds 3 and 4: Ch 1. Sc in each st around through both loops. Sl st to join. (52 sc)
The Gradient Braided Section
This is where the magic happens. We’ll work puff stitches in colour blocks, changing colours every round or two to create the gradient flow.
Round 5 (Begin Colour B, dusty rose):
Join Colour B. Ch 2 (counts as first part of puff). Work puff st in same st. *Skip 1 st, work puff st in next st.* Repeat around, adjusting as needed to end evenly. Sl st to join top of ch-2.
The skipped stitches and puff stitches create that distinctive braided, herringbone look. Your stitch count will reduce slightly. Don’t worry. The puffiness compensates for the reduced count.
Round 6: Continue with Colour B. Ch 2. Work puff st in each space between puff stitches from the previous round. Sl st to join.
Round 7 (Change to Colour C, soft coral):
Join Colour C. Repeat Round 6 pattern. Work puff stitches in the spaces between previous puffs.
Round 8: Continue with Colour C. Repeat puff stitch pattern.
Round 9 (Change to Colour D, light orange):
Join Colour D. Repeat puff stitch pattern.
Round 10 (Change to Colour E, golden mustard):
Join Colour E. Repeat puff stitch pattern.
Round 11: Switch back to Colour A (cream). Ch 1. Sc in each puff stitch and space around, working evenly to create a smooth edge for the flap section. Sl st to join. (Approximately 40 to 45 sc)
Fasten off and weave in ends neatly.
The Front Panel
The front of the bag features the same gradient pattern but in a slightly different arrangement for visual interest.
Looking at your bag, identify the front panel (one of the long sides). You’ll work the front separately if desired, or the gradient rounds above have already created your front panel effect.
For this design, the front panel gradient flows upward from coral to rose, creating contrast with the flap which flows downward from rose to mustard.
The Flap
The flap covers the top opening and holds the clasp hardware.
Row 1: With Colour A (cream), join yarn at the back panel top edge. Ch 1. Sc across the back panel only, approximately 16 to 18 stitches. Turn.
Row 2: Ch 1. Sc in each st across. Turn. (16 to 18 sc)
Row 3 (Begin Colour B):
Join Colour B. Ch 2. Work puff stitch pattern across. Turn.
Row 4: Continue puff stitch pattern with Colour B. Turn.
Row 5 (Change to Colour C):
Join Colour C. Continue puff stitch pattern. Turn.
Row 6 (Change to Colour D):
Join Colour D. Continue puff stitch pattern. Turn.
Row 7 (Change to Colour E):
Join Colour E. Continue puff stitch pattern. Turn.
Row 8 (Border with Colour A):
Join Colour A. Ch 1. Sc evenly around all edges of the flap, working 3 sc in each corner to create smooth edges. Sl st to join.
Fasten off and weave in all ends.
The Twisted Rope Handle
This handle uses all gradient colours twisted together for that gorgeous multicoloured rope effect.
Step 1: Cut 6 strands of t-shirt yarn, each approximately 40 inches long. Use 1 or 2 strands of each gradient colour (B through E).
Step 2: Gather all strands and tie a knot at one end. Secure this end to something stable, like a doorknob or the back of a chair.
Step 3: Hold the other end and begin twisting all strands together clockwise. Keep twisting until the yarn feels tight and wants to kink back on itself.
Step 4: Carefully fold the twisted rope in half, allowing the two halves to wrap around each other naturally. This creates the beautiful twisted rope effect.
Step 5: Knot both ends to secure.
Step 6: Thread each end through a D-ring, then fold the end back and secure by wrapping with matching yarn or stitching tightly.
Attaching Hardware
The Clasp:
Position the twist-lock clasp centered on the flap and body of the bag. Mark the screw or prong positions with a stitch marker.
For the bag body, insert the bottom portion of the clasp. If your clasp has prongs, push them through the crochet fabric and bend flat on the inside. If it has screws, you may need to create reinforced holes.
For the flap, attach the top turning portion of the clasp in the same manner.
Test the alignment before securing permanently.
The D-Rings:
Using Colour A yarn, create small tabs by chaining 6, then single crocheting back along the chain. Fold each tab through a D-ring and stitch to the top corners of the bag body where the handle will attach.
The Chain Strap (Optional):
Clip the lobster clasps of your chain strap onto the D-rings for crossbody wear.
The Tassel
The matching tassel adds a beautiful finishing touch.
Step 1: Cut 15 to 20 strands of t-shirt yarn, approximately 6 inches long. Use a mix of all gradient colours.
Step 2: Cut one additional strand about 8 inches long for tying.
Step 3: Lay all short strands flat and place the long strand across the center. Tie the long strand tightly around the bundle.
Step 4: Fold the bundle in half at the tie point.
Step 5: Cut another 6-inch strand. Wrap it around the folded bundle about 1 inch below the fold, creating the tassel head. Secure with a knot and tuck the ends inside.
Step 6: Attach the tassel to the bag zipper pull, D-ring, or clasp using the original tie strands.
Finishing and Care
Weave in all remaining yarn tails using your tapestry needle. For a more polished interior, cut plastic canvas to fit the base and tack it in place, or line the entire interior with fabric using fabric glue or hand stitching.
T-shirt yarn bags can be spot cleaned with mild soap and cool water. Lay flat to dry, reshaping while damp.
Tips for Success
If this is your first time working with t-shirt yarn, here are a few things I wish someone had told me.
T-shirt yarn has a right side and wrong side. The right side shows smooth, even fabric. The wrong side shows the rolled edges. Try to keep the right side facing out as you work.
Your tension will likely loosen as you get comfortable with the bulky yarn. That’s normal. Just try to stay consistent.
The puff stitches eat yarn quickly. Make sure you have enough before starting.
If your clasp feels wobbly, add a small piece of interfacing or felt behind it on the inside for reinforcement.
The gradient effect is very forgiving. If your colour changes don’t look exactly like the photo, that’s part of the handmade charm.
Make It Your Own
This Sunset Coral Gradient Braided Bag pattern adapts beautifully to different colour stories. Try ocean blues and teals for a coastal vibe, or deep burgundies and plums for autumn. Neutrals like cream, tan, and chocolate create an elegant everyday bag. Let your stash inspire you.
You can also adjust the size by adding or removing rows at the base and additional rounds at the sides. Just remember that larger bags may need stiffer bases and stronger hardware.
I really hope you love making this bag as much as I loved designing it. If you give it a try, please save this pattern to your Pinterest boards so you can find it easily when you’re ready to start. And I would absolutely love to see your finished bags, so drop a comment below or tag me on Instagram with your creation. Happy crocheting!
