
Crocheting a fitted dress sounds intimidating, right? All those measurements, the shaping, making sure it actually fits a human body. Here’s the truth: this Sky Blue Eyelet Lace Dress breaks down into simple flat panels that you stitch together at the end. No working in the round for the main body. No complicated bust darts. Just four main pieces, two short sleeves, and seams.
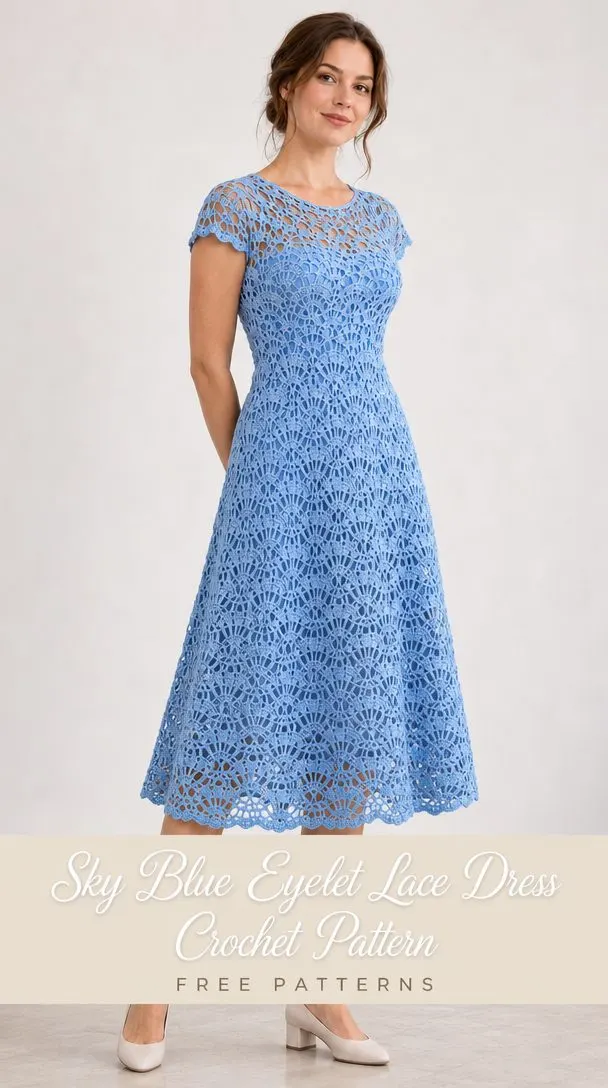
The shell lace stitch pattern looks intricate in photos, but it’s really just a two-row repeat. Once you get the rhythm of Shell A and Shell B, your hands will memorize the motions. The hardest part is probably installing the side zipper, and even that becomes straightforward with basting first.
Whether you’re an intermediate crocheter ready to level up or an adventurous beginner who wants a challenge, this pattern meets you where you are. The instructions include checkpoint moments so you can try on the basted dress before committing to final seams. No surprises at the end.
About This Design
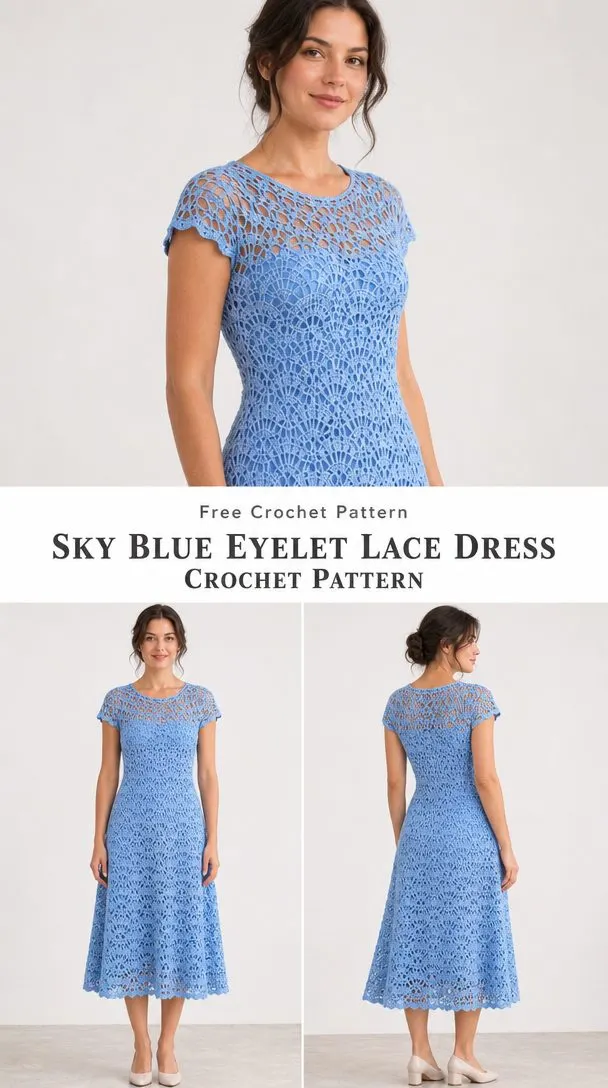
This A-line midi dress features an airy eyelet mesh created by alternating shell rows. The fitted bodice works from waist to shoulders, while the skirt flows from waist to hem with gentle increases for that classic flared silhouette. Cap sleeves add a feminine touch without overwhelming the delicate lacework.
The design calls for an opaque slip underneath, which means the openwork shows off beautifully without compromising coverage. The sky blue cotton creates a fresh, summery feel that works for garden parties, beach weddings, or any occasion where you want to feel special.
A back keyhole opening with a hook-and-eye closure keeps the neckline secure, while a side zipper makes getting dressed easy. These thoughtful details elevate the finished garment from a crochet project to a true wardrobe piece.
Skill Level
Intermediate. You should be comfortable with basic stitches (chain, single crochet, double crochet), increasing and decreasing, and reading a pattern with multiple sizes. Some sewing skills help for the zipper installation.
Finished Measurements
This pattern comes in three sizes. Choose your size based on both bust and waist measurements for the best fit.
Size Small:
- Body bust to fit: 78 to 80 cm (30.7 to 31.5 inches)
- Finished bust: 82 cm (32.3 inches)
- Finished waist: 73 cm (28.7 inches)
- Finished hem: 109 cm (42.9 inches)
Size Medium:
- Body bust to fit: 87 to 89 cm (34.3 to 35 inches)
- Finished bust: 91 cm (35.8 inches)
- Finished waist: 82 cm (32.3 inches)
- Finished hem: 118 cm (46.5 inches)
Size Large:
- Body bust to fit: 96 to 98 cm (37.8 to 38.6 inches)
- Finished bust: 100 cm (39.4 inches)
- Finished waist: 91 cm (35.8 inches)
- Finished hem: 127 cm (50 inches)
Shoulder-to-hem length is approximately 99 cm (39 inches) before trim for all sizes. Check the skirt against your hips, roughly 18 to 22 cm below the waist. The pattern recommends basting and trying on before final seaming.
Materials Needed
Yarn:
- Color A: Sky blue smooth sport weight cotton or cotton-linen blend
- Size S: 1075 yards (983 meters)
- Size M: 1200 yards (1097 meters)
- Size L: 1350 yards (1234 meters)
Buy from one dye lot. These amounts include a swatching allowance and are estimates.
Hook:
- 3.5 mm (US E/4) or size needed for gauge
Additional Supplies:
- Opaque slip in a matching tone
- Stitch markers
- Tapestry needle
- Tape measure
- Rustproof pins
- Matching thread
- Small sew-on hook-and-eye for upper back opening
- 25 cm (10 inch) lightweight nylon coil zipper for left side seam
- Blocking mat and pins
Gauge
18 stitches and 8 rows equal 10 cm by 10 cm (4 by 4 inches), measured after washing and drying flat.
To check gauge: Chain 28, work 26 double crochet (dc), then work at least 12 rows. Measure the shell ground rows and four complete two-row repeats inside the edges, using the fabric you plan to wear.
After the first dc row, alternate Shell A and Shell B. Each repeat should measure about 4.4 cm (1.75 inches) wide and 2.5 cm (1 inch) tall. Count 8 foundation positions per repeat.
Change hook size if needed. Hang the dry swatch for 30 minutes and remeasure before choosing a skirt length. Keep the published stitch counts and add or subtract straight rows for length.
Abbreviations and Special Stitches
- ch = chain
- dc = double crochet (yarn over, insert hook, pull up loop, yarn over, pull through 2 loops, yarn over, pull through remaining 2 loops)
- hdc = half double crochet
- sc = single crochet
- sl st = slip stitch
- st(s) = stitch(es)
- sp = space
- RS = right side
- WS = wrong side
dc2tog (double crochet two together): Begin a dc in each of the next two stitches, keeping the final loop of each on the hook. Yarn over and draw through all three loops. This decreases by one stitch.
Fan: Work 3 dc in one stitch. The center dc is stitch 2 of the fan.
Shell A: Creates the openwork. Dc in first st, then repeat [ch 2, skip 3 sts, fan in next st, ch 2, skip 3 sts, sc in next st] across. Dc in last st.
Shell B: Restores the eight base positions per repeat. Dc in first edge st. Working in the direction you encounter them, make 3 dc in each ch-2 sp, 1 dc in the center dc of each fan, and 1 dc in each sc. Dc in last edge st.
Pattern Notes
All size counts are written as S / M / L throughout the pattern. Work flat and turn each row. Chain 2 at the start of dc rows and chain 1 at the start of sc rows. Turning chains and slip joins never count as stitches. The first body row is RS. At row starts, work the first stitch in the first available stitch unless a shaping instruction says otherwise.
For 8 evenly spaced increases: Divide the old stitch count into eight consecutive groups, with group sizes differing by at most one. Work 2 dc in the last stitch of each group and 1 dc in the remaining stitches.
Construction Overview
This dress is built in sections: front bodice, back bodice, front skirt, back skirt, and two sleeves. You work each piece flat, then join them together.
- Work the front and back bodice from waist to shoulders
- Work the front and back skirt from waist to hem
- Make the sleeves
- Join shoulder seams
- Join side seams (leaving opening for zipper on left)
- Join waist seams
- Set in sleeves
- Add edgings and closures
Instructions
Front and Back Bodice
Make two panels alike through Row 24. Mark the right side and the waist edge of each panel. Use Color A.
Row 1: Ch (68 / 76 / 84). Dc in third ch from hook and across. (66 / 74 / 82) sts
Row 2: Increase 8 evenly. (74 / 82 / 90) dc
Rows 3 through 14: Alternate Shell A and Shell B six times. (74 / 82 / 90) dc after Row 14
Row 15: With RS facing, join yarn in the fifth stitch. Work across, leaving the last four stitches unworked. Fasten the previous row end before joining. (66 / 74 / 82) sts
Rows 16 through 23: Work Shell A and Shell B four times over the new width. After Row 23. (66 / 74 / 82) dc
Row 24: Dc across. (66 / 74 / 82) dc
Front Shoulders
Row 25: Work the first (22 / 24 / 26) sts and leave the rest unworked. With RS facing, rejoin for the second shoulder and work the last (22 / 24 / 26) sts. Leave the center (22 / 26 / 30) sts open.
Work each shoulder independently. Keep the armhole edge straight. At the neck edge, leave the necessary stitches unworked at the end of an inward row, or sl st over those stitches before the turning chain at the start of an outward row.
Front Shoulder Stitch Counts:
| Row | Size S | Size M | Size L |
|---|---|---|---|
| 26 | 19 | 21 | 23 |
| 27 | 17 | 19 | 21 |
| 28 | 16 | 18 | 20 |
| 29 | 16 | 18 | 20 |
| 30 | 16 | 18 | 20 |
Fasten off each shoulder after Row 30.
Back Shoulders and Keyhole
Rows 25 through 28: Work each half separately over (33 / 37 / 41) sts per row. At Row 25 rejoin at the center for the second half. Leave the center edges unjoined to form the opening.
Rows 29 through 30: With RS facing, rejoin at the first of the outermost (16 / 18 / 20) sts of each half and work only that width for two rows. Leave the inner stitches unworked. Fasten off. (16 / 18 / 20) sts per shoulder
At the end of an armhole or neck shaping row, place a marker in the last worked stitch. Use these markers to line up the seams.
Front and Back Skirt
Make two panels. Mark RS and the top edge before beginning the second panel. Use Color A. Work increases on both panels.
Row 1: Ch (68 / 76 / 84). Dc in third ch from hook and across. (66 / 74 / 82) sts
Rows 2 through 49: Work Shell A on even rows and Shell B on odd rows. On the four increase rows, first make the normal Shell B stitches, adding one extra dc at each of eight selected placements.
For each increase row, count the base Shell B dc as if there were no increases. Divide that baseline count into eight consecutive groups of nearly equal size. Work an extra dc in the same sp or st as the final baseline dc of each group.
Skirt Increase Row Stitch Counts:
| Increase Row | Size S | Size M | Size L |
|---|---|---|---|
| 5 | 74 | 82 | 90 |
| 7 | 82 | 90 | 98 |
| 27 | 90 | 98 | 106 |
| 47 | 98 | 106 | 114 |
Final Row 49: Shell B without increases. (98 / 106 / 114) dc
For a longer skirt, add complete Shell A/B pairs after the final increase. For a shorter skirt, remove full pairs, keeping the increase rows evenly spaced.
Before seaming, each skirt panel should measure about 61 cm (24 inches) from waist to hem and end with (98 / 106 / 114) sts.
Sleeves
Make two. The first row forms the sleeve top. Work toward the cuff and keep the center of the top edge marked for the shoulder seam.
Row 1: Ch (76 / 84 / 92). Dc in third ch from hook and across. (74 / 82 / 90) sts
Rows 2 through 5: Alternate Shell A on even rows and Shell B on odd rows. (74 / 82 / 90) dc after the last Shell B
Row 6: Dc across, replacing each of 8 evenly spaced nonoverlapping pairs with dc2tog. (66 / 74 / 82) sts
Space the pairs by splitting the available stitches into eight groups of nearly equal size and working dc2tog over the last two stitches of each group.
Pin the sleeve top into the basted armhole before attaching. Match the marked center to the shoulder. Adjust the sleeve foundation if your fabric needs more ease. Goal length: 8 cm (3.1 inches).
Assembly
Seams
You will need Color A, tapestry needle, and 3.5 mm (US E/4) hook for optional slip-stitch joins.
Join 1: With RS together, whipstitch each front shoulder to the corresponding back shoulder. (16 / 18 / 20) joined pairs each
Join 2: On the right side of the dress, seam all 49 skirt row pairs and 14 bodice row pairs. On the left, leave the first 9 skirt rows and first 10 bodice rows from the waist open for the zipper. 40 skirt row pairs and 4 bodice row pairs seamed on the left
Join 3: Join skirt and bodice waist edges RS together. At the zipper opening, secure the seam ends separately. (132 / 148 / 164) joined waist pairs
Join 4: Close each sleeve side seam from its cuff to its top. 6 row pairs per sleeve
Join 5: Match each sleeve seam to the underarm and the marked top center to the shoulder. Distribute the stitches around the opening. (74 / 82 / 90) sleeve positions per armhole
Checkpoint: Waist stitches match one for one. Side seams are even and the neckline opens at center back. Try on over your intended underlayer.
Side Zipper
You will need a 25 cm (10 inch) nylon coil zipper, matching thread, and a sewing needle.
Baste 1: Align the zipper teeth between the two open edges. Match the waist seam on both sides. Tip the zipper tape toward the WS and baste it in position. 2 lines of basting
Seam 2: Backstitch the tape to each edge without catching the teeth. Anchor the tape ends, remove basting, and close the zipper. 2 permanent lines of stitching
Checkpoint: The zipper runs smoothly and the waist seam aligns across both sides. If your closed zipper length differs from the opening, adjust the end of the left skirt seam before sewing.
Edgings and Details
Neckline and Back Opening
You will need Color A, 3.5 mm (US E/4) hook, hook-and-eye, and matching thread.
Row 1: Start at the upper edge of one side of the back opening. Sc evenly along the back neck, across both shoulder joins and around the front neck to the opposite side of the opening. (84 / 92 / 100) sc
Row 2: Turn. Sl st loosely in each sc. Same count as Row 1
Closure: Sew one hook and one eye, opposite each other at the top of the back opening. 2 hardware pieces
Checkpoint: Opening edges meet without overlapping and the neck lies flat. Adjust the pickup density evenly before fastening off if needed.
Hem and Cuffs
You will need Color A, 3.5 mm (US E/4) hook, and a marker for the join.
Round 1: Join at a side seam and work one sc per hem stitch. (196 / 212 / 228) sc
Round 2: Repeat [sl st, skip 1, 5 dc in next st, skip 1] around, then join. (49 / 53 / 57) scallops
Cuff Round 1: Pick up 1 sc in each cuff stitch and join. (66 / 74 / 82) sc per sleeve
Cuff Round 2: Work the same 4-st repeat as the hem. Use the final 2 stitches to slip stitch back to the join. (16 / 18 / 20) scallops per cuff
Checkpoint: Edging lies flat without a drawstring effect. If it curls or cups, redo it with a slightly larger hook.
Finishing
Ends and Blocking
Weave every tail back and forth through matching stitches. Tuck hook-and-eye sewing ends on the WS.
Wash or wet-block as directed on the yarn label. Roll in a towel, ease to the published measurements, and dry completely flat.
Final Checkpoint: Check bust, waist, hem, shoulder-to-hem length, and that both sleeves or armhole edges are even. Make any seam adjustments after drying.
Care Instructions
Follow the yarn label for best results. For washable cotton blends, wash gently in cool water and dry flat. Store folded to help keep the skirt from growing over time.
Keep detachable hardware away from young children and pets. Inspect the closure and any decorative tacks before each wear. Wear a matching opaque slip, and check the coverage and stretch in daylight before heading out.
Tips for Success
Take your time with gauge. This dress requires accurate gauge for proper fit. The hanging test is especially important since cotton can stretch.
Mark everything. Use stitch markers liberally to track RS, waist edges, shoulder placement, and center points on sleeves.
Baste before you commit. The pattern specifically recommends basting and trying on before final seaming. Take this advice seriously.
Don’t fear the zipper. Basting first makes zipper installation much easier. Take small stitches and check alignment frequently.
Block each piece before assembly. This makes seaming easier and helps you catch any sizing issues early.
Thank you so much for choosing this pattern for your next project. A handmade crocheted dress is truly a labor of love, and the finished result will be absolutely stunning. If you make this Sky Blue Eyelet Lace Dress, I would love to see your version! Share your photos on Instagram or Facebook and tag your work so fellow crafters can admire your beautiful creation.
Save this Sky Blue Eyelet Lace Dress pattern to your Pinterest boards so you can find it whenever you’re ready to start. And if you make one, please drop a comment below. I’d love to hear which size you chose and how the construction went for you!
You Might Also Like
- Woodland Fox Ear Baby Beanie Free Crochet Pattern
- Lavender Garden Toddler Outfit Free Crochet Pattern
- Fox Pinafore Baby Dress Free Crochet Pattern
- Coastal Blue Wave Stitch Bodysuit Free Pattern