
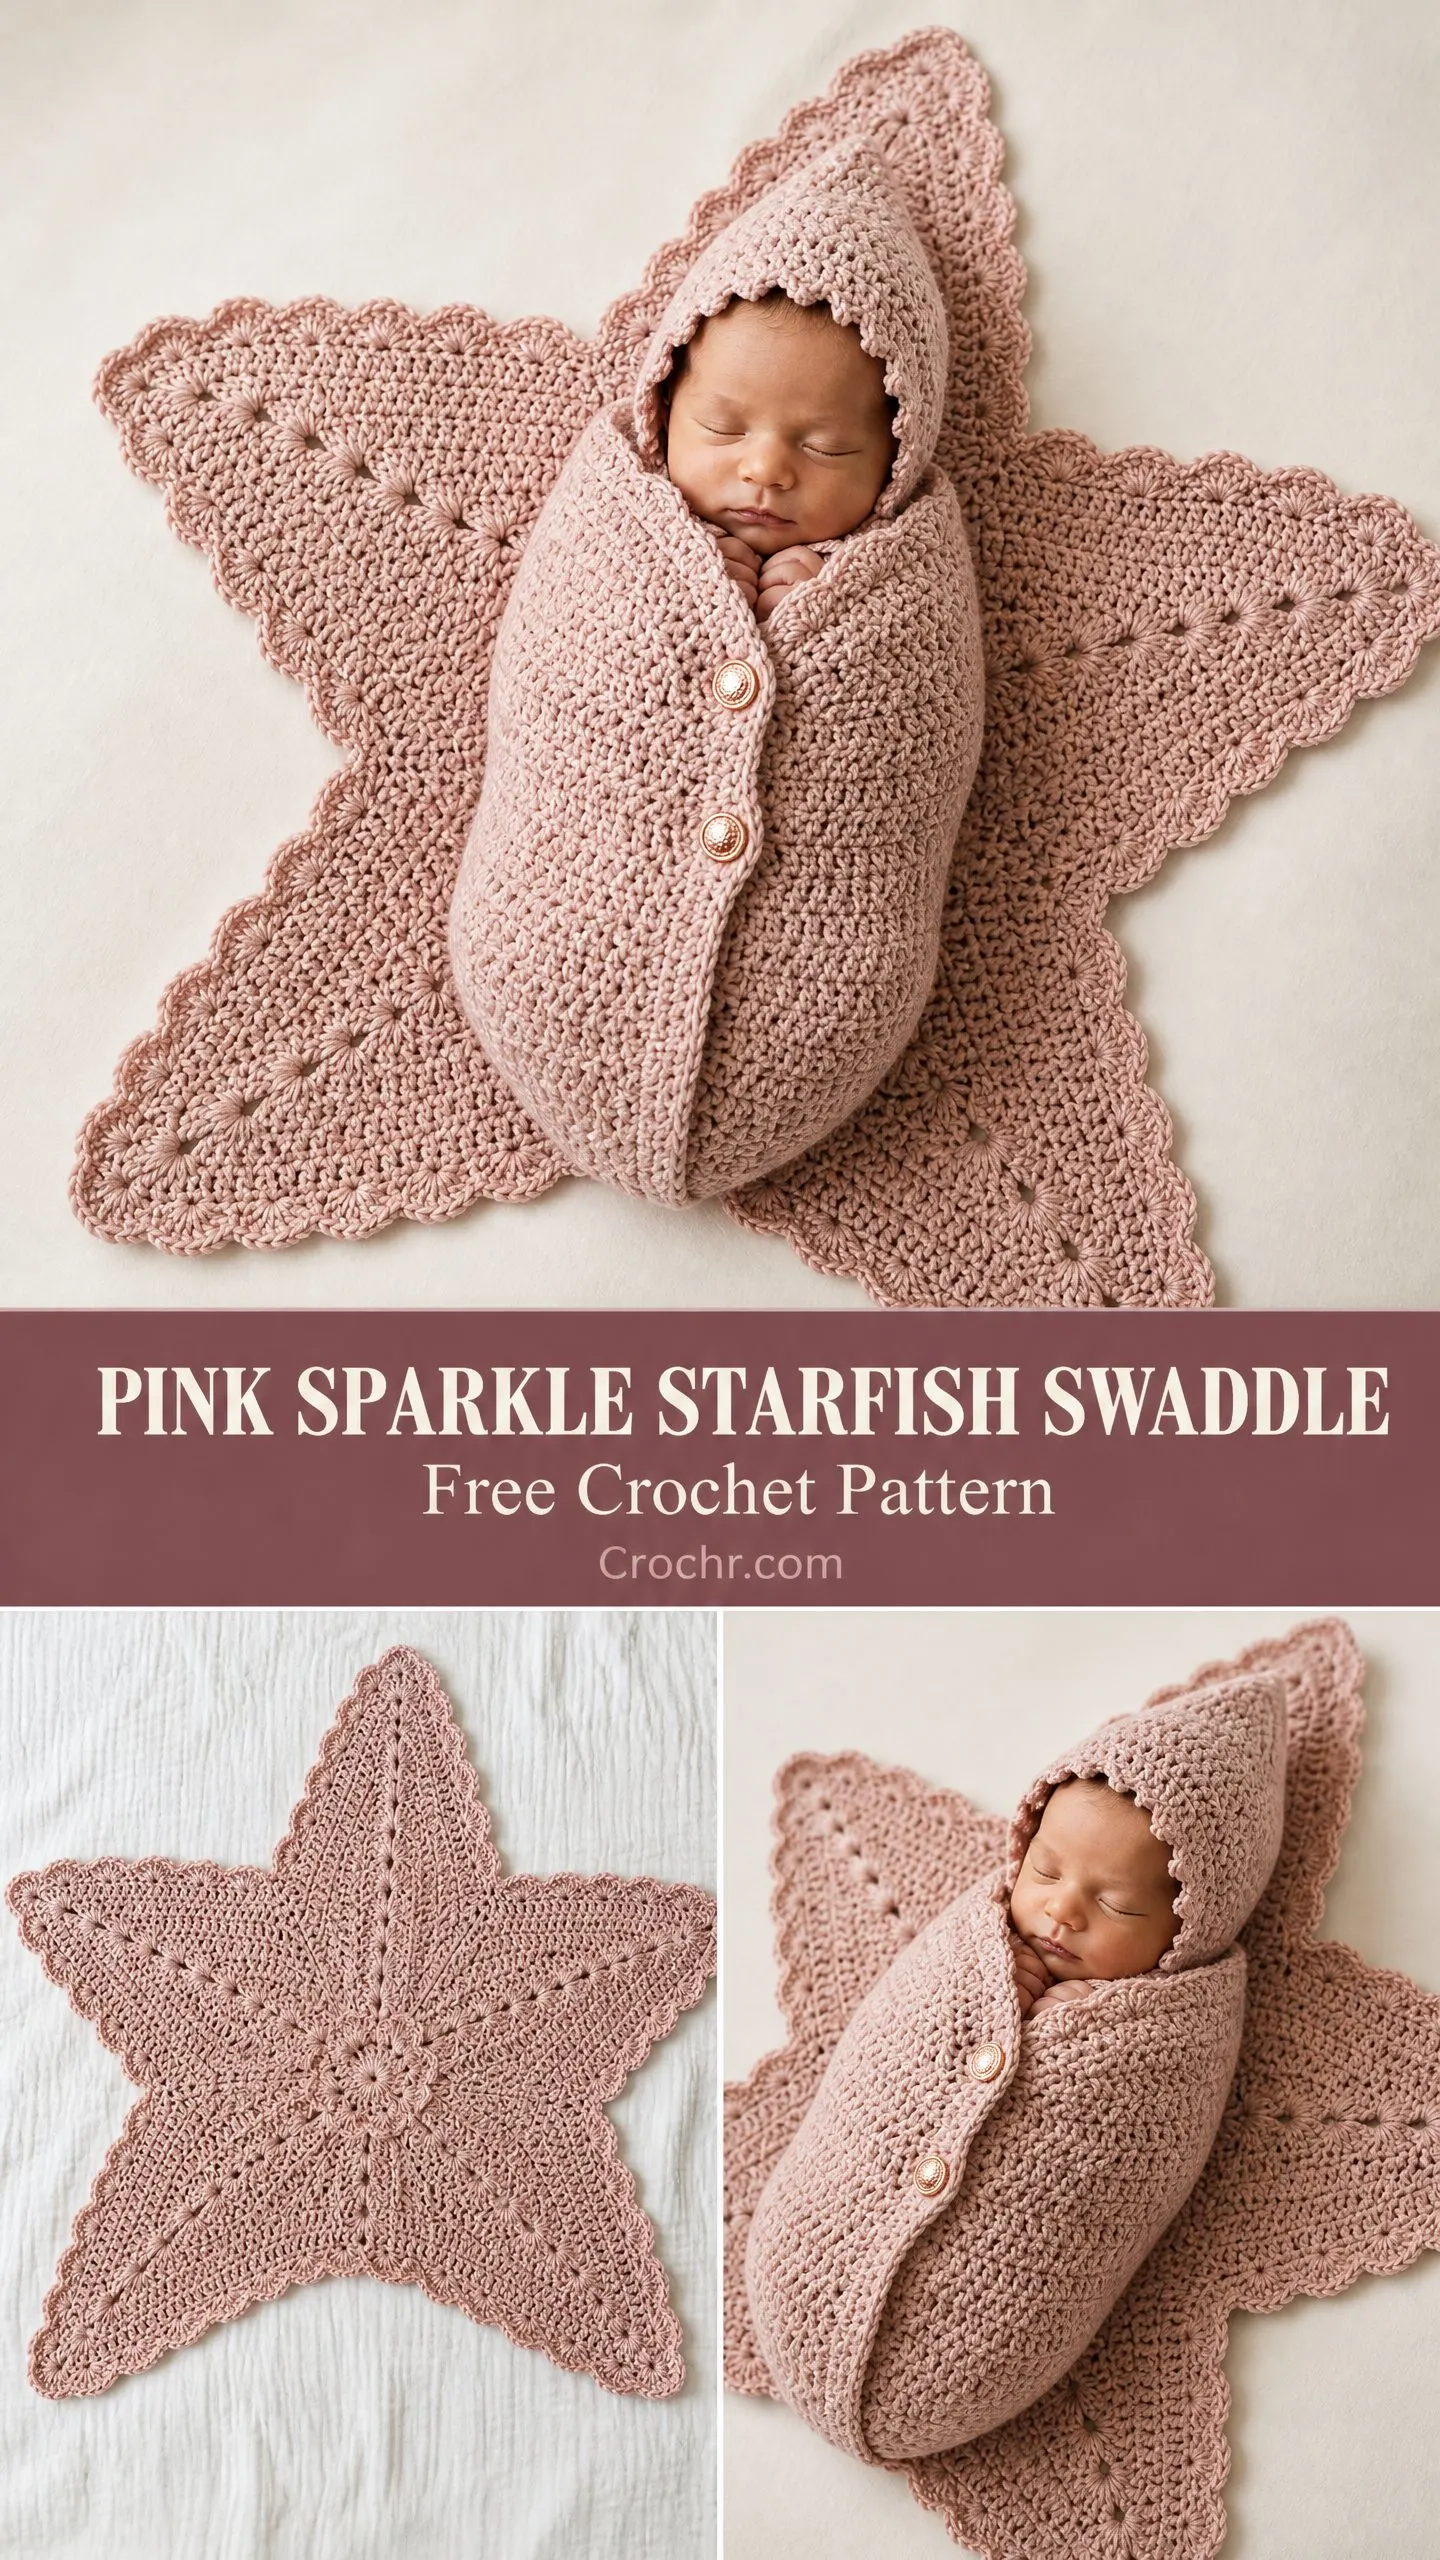
If you need a show-stopping newborn photo prop that actually keeps baby cozy, this starfish swaddle set is the answer. The design uses basic double crochet and simple increases to create a star-shaped blanket base, a snug cocoon pod with button closure, and a matching pointed bonnet. It works up in worsted weight yarn with a 6.0 mm hook, making it a satisfying project for confident beginners or intermediate crocheters.
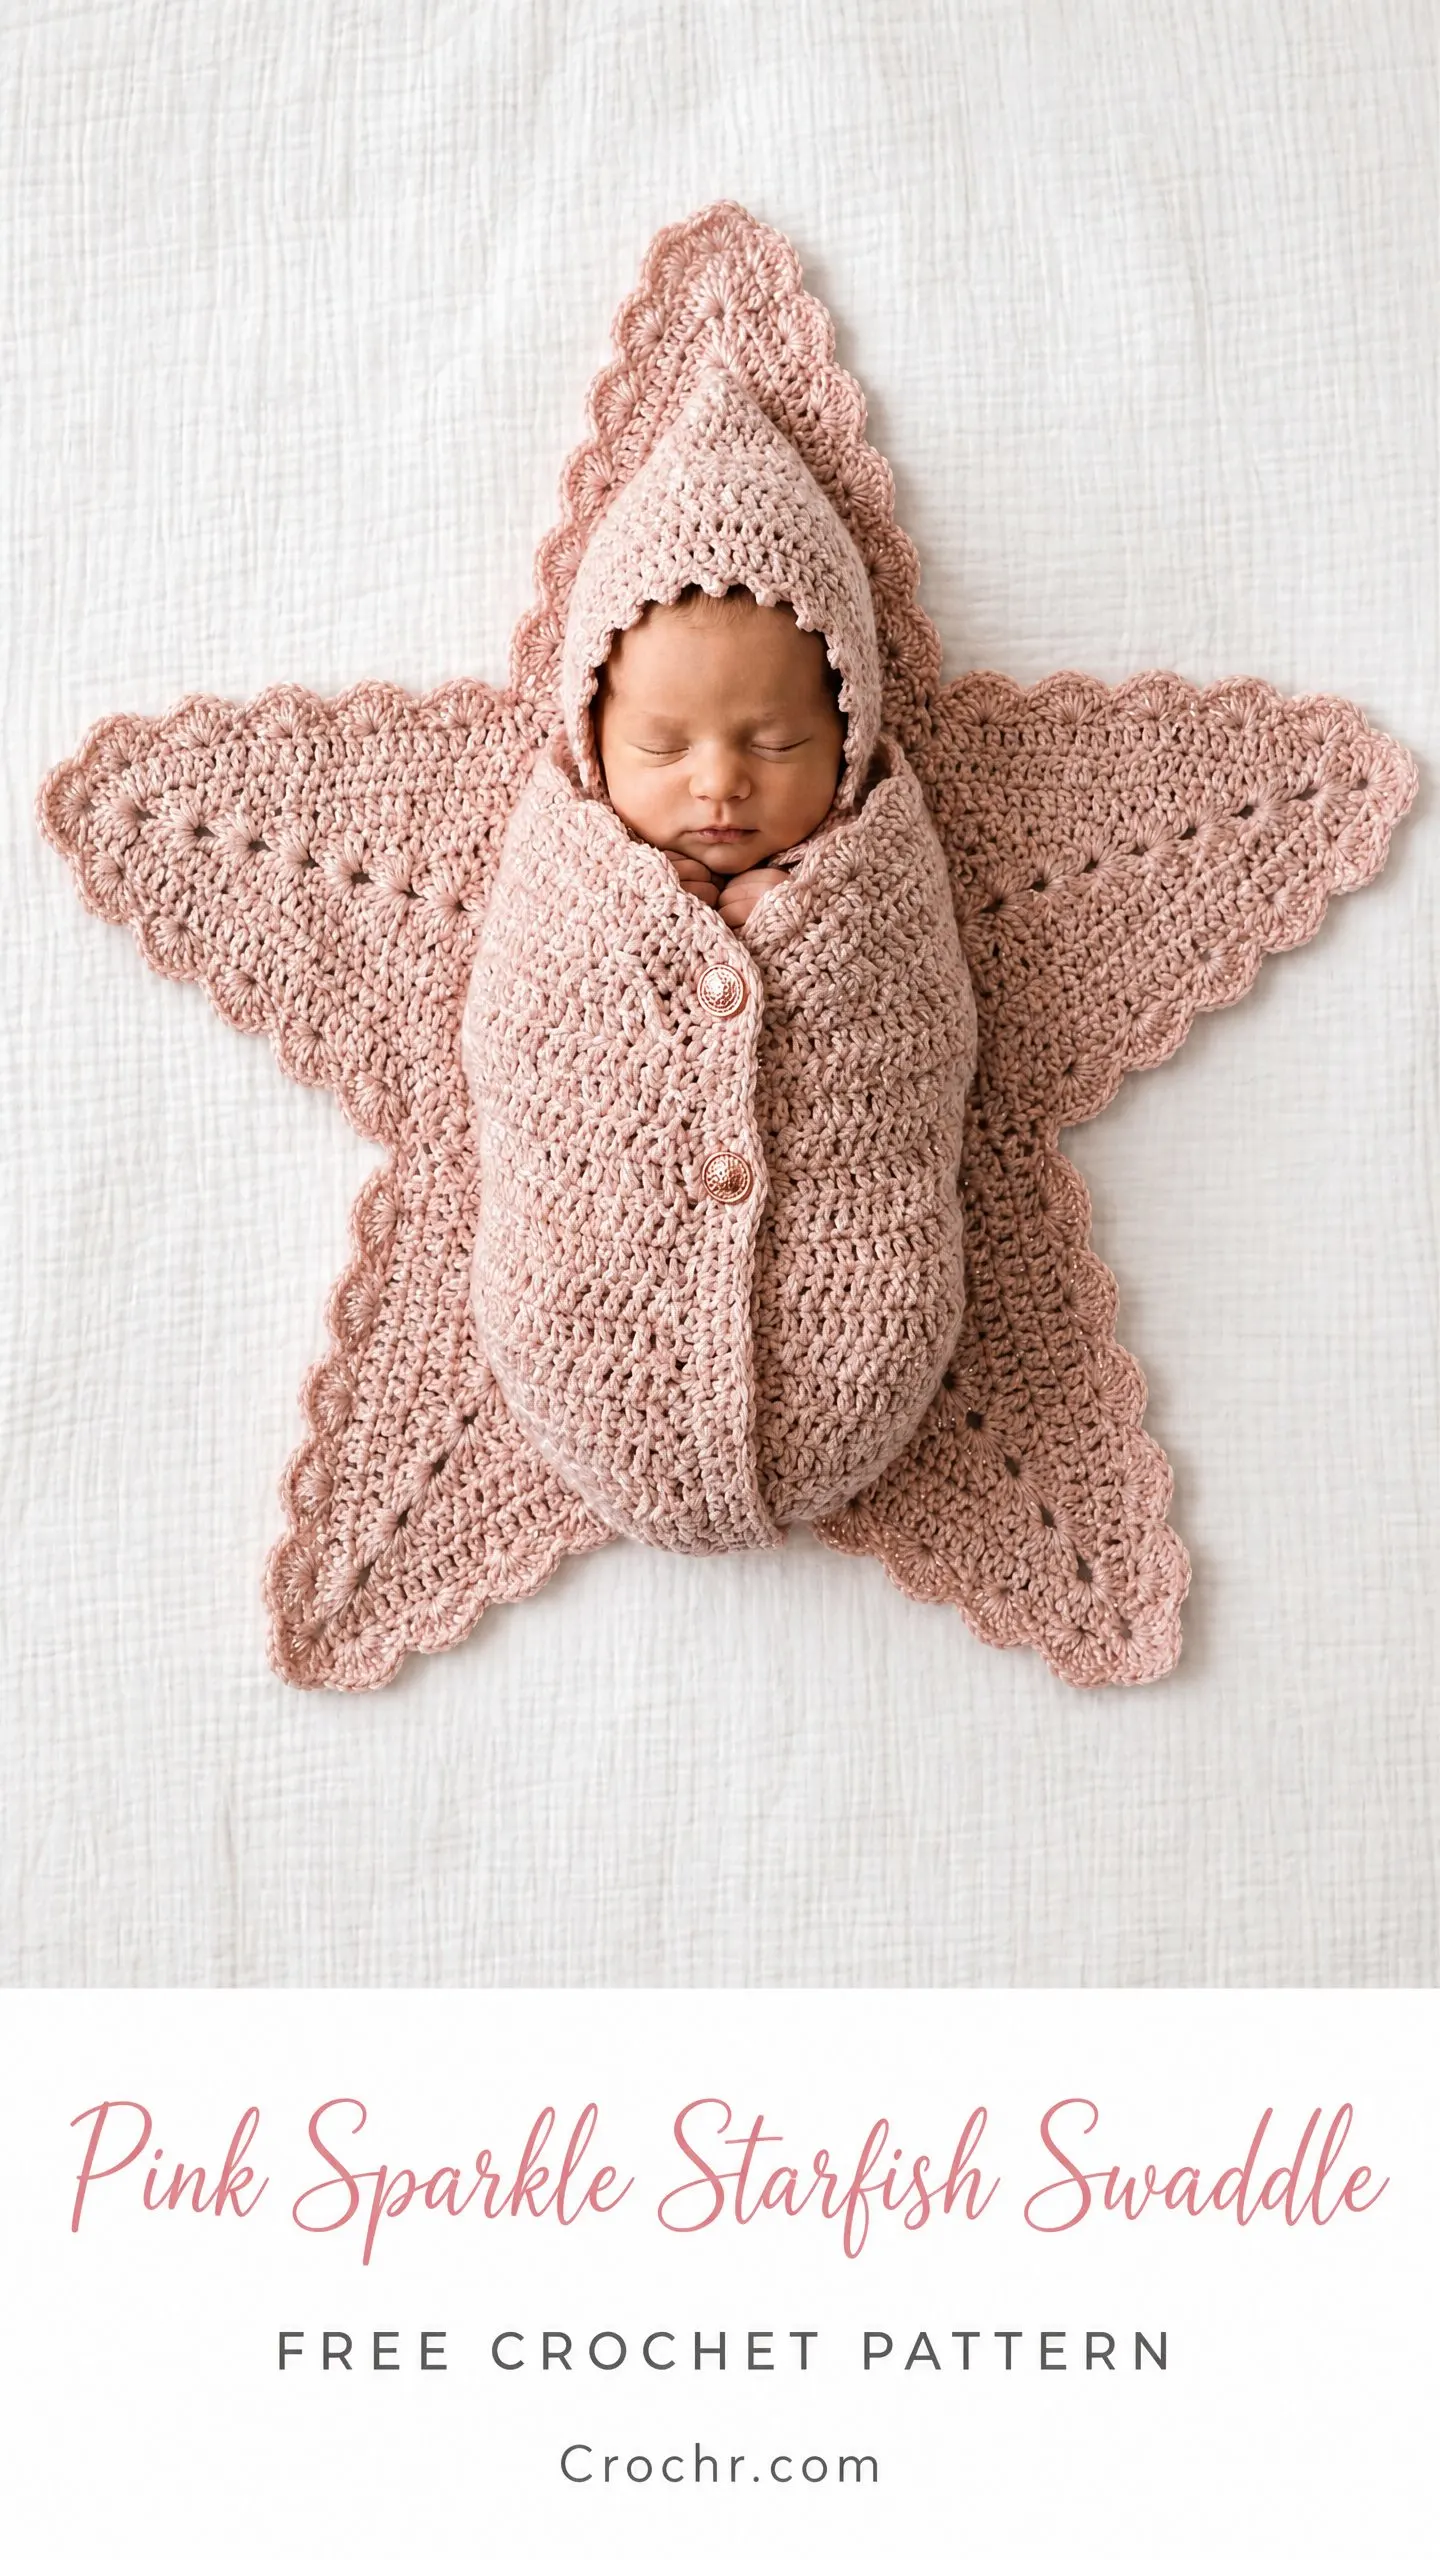
This set makes an unforgettable baby shower gift. The three pieces work together beautifully but can also stand alone. I love that the cocoon actually functions as a real swaddle while looking absolutely adorable for photos.
Whether you are welcoming a new little one into your family or creating something special for a friend, this pattern delivers practical warmth wrapped in whimsical charm. Let me walk you through every step.
About This Starfish Swaddle Crochet Pattern
This crochet tutorial creates a complete three-piece newborn set. The star-shaped base measures approximately 24 inches from point to point. The cocoon pod fits snugly around a newborn at 16 inches tall and 12 inches wide when buttoned. The bonnet fits a 12 to 14 inch head circumference, perfect for most newborns.
The construction is straightforward once you understand the approach. The star base is worked in joined rounds from a magic ring at the center, growing outward with increases at five marked tip stitches to create the starfish shape. The cocoon is worked flat in rows and seamed. The bonnet is worked from the face edge upward with decreases toward a pointed tip.
All three pieces share the same dusty rose color and scallop edging for a cohesive look that photographs beautifully.
Skill Level
This pattern is rated Advanced Beginner to Intermediate. You should be comfortable with working into a magic ring, increasing in rounds, and basic shaping. If you have completed two or three projects like hats or bags, you will manage all three pieces confidently.
The star base is the most complex piece because it requires tracking five tip stitches with markers and moving them up each round. Take your time and count carefully. The cocoon and bonnet are much simpler.
Time Estimate
Plan for approximately 12 to 18 hours total to complete all three pieces.
This is not a weekend project, but it is absolutely worth the time investment.
Materials Needed
Yarn: Worsted weight (weight 4), approximately 900 to 1100 yards total in dusty rose or antique mauve. Here is the breakdown:
Hook: US size J-10 (6.0 mm) for all three pieces
Notions:
Yarn Suggestions
Lion Brand Heartland (100% acrylic, 251 yards per 142 g skein) in colorway Acadia or Grand Canyon. You will need 4 skeins. This yarn is widely available, machine washable, and has a soft matte finish.
Paintbox Yarns Simply DK held double (100% acrylic, 137 yards per 50 g skein) in colorway Dusty Rose. Holding two strands together creates a worsted-weight equivalent with a slightly fuzzy halo. You will need approximately 8 skeins.
Scheepjes Stone Washed (78% cotton, 22% acrylic, 142 yards per 50 g skein) in colorway Pink Quartzite. This semi-cotton option gives the piece a slight drape and natural texture. You will need approximately 8 skeins.
Substitution note: Any smooth worsted weight yarn that meets gauge will work. Avoid fuzzy or heavily textured yarns as they will obscure the lace openwork on the star rays. Always swatch before starting.
Gauge
With US J-10 (6.0 mm) hook:
Gauge is important for this project. The star base must be large enough to surround a newborn comfortably and the cocoon must fit snugly. Adjust hook size as needed to meet gauge before beginning.
Abbreviations and Stitch Definitions
beg = beginning
ch = chain (wrap yarn over hook and pull through loop on hook to create a foundation or space)
ch-sp = chain space (the gap created by a chain in a previous row)
dc = double crochet (yarn over, insert hook, pull up loop, yarn over and pull through 2 loops twice)
dc2tog = double crochet two together, a decrease that combines two stitches into one
hdc = half double crochet
MR = magic ring (adjustable starting ring that can be pulled closed)
pm = place marker
rep = repeat
rnd = round
RS = right side
sc = single crochet (insert hook, pull up loop, yarn over and pull through both loops)
sk = skip
sl st = slip stitch (insert hook, yarn over, pull through stitch and loop on hook in one motion)
sp = space
st(s) = stitch(es)
WS = wrong side
yo = yarn over
Special Stitches
3-Double Crochet Cluster (3-dc cl)
Yarn over, insert hook into indicated stitch or space, yarn over and pull up a loop, yarn over and pull through two loops (two loops remain on hook). Yarn over, insert hook into same stitch or space, yarn over and pull up a loop, yarn over and pull through two loops (three loops remain on hook). Yarn over, insert hook into same stitch or space, yarn over and pull up a loop, yarn over and pull through two loops (four loops remain on hook). Yarn over and pull through all four loops on hook. One 3-dc cl made.
5-Double Crochet Shell (5-dc shell)
Work 5 dc into the same stitch or space. One 5-dc shell made.
Scallop Edge
Slip stitch into first stitch, chain 1. Into same stitch work 1 sc. Skip 1 stitch. Into next stitch work 5 dc. Skip 1 stitch. Into next stitch work 1 sc. Repeat from the skip-5dc-skip-sc sequence across or around as directed. This creates the decorative scalloped border seen along all edges.
Pattern Notes Before You Begin
1. The star base is worked in joined rounds from the center outward. Do not turn between rounds unless specifically instructed.
2. The star has five points. Each point is created by a designated tip stitch group that is increased at each round. Stitch markers are placed at the five tip stitches after Round 4 and moved up each round.
3. The cocoon pod is worked flat in rows starting from the bottom (foot end). The sides are seamed and the top is left open for the baby’s head and hands.
4. The bonnet is worked in rows from the face edge upward, then decreased toward a pointed tip. The brim edge receives the scallop edging.
5. All three pieces receive the same scallop edging as the final step before joining/assembly.
6. Turning chains are noted at the start of each row. The turning chain-3 counts as one dc throughout.
7. All pieces are blocked before assembly.
8. The stitch count in parentheses at the end of each row or round reflects the total working stitches.
9. The buttons are sewn on after blocking and final assembly.
Step by Step Crochet Pattern Instructions
PIECE 1: STAR BASE
The star base begins at the center with a magic ring and grows outward through increases and ray-shaping to create five symmetrical points. The piece is entirely flat (does not cup).
Round 1: Start with MR. Chain 3 (counts as first dc). Work 9 dc into MR. Sl st to top of beginning ch-3 to join. Pull MR closed. (10 dc)
Round 2: Chain 3 (counts as dc). Work 1 dc into same stitch as join. Work 2 dc into each remaining stitch around. Sl st to top of beginning ch-3 to join. (20 dc)
Round 3: Chain 3 (counts as dc). Work 1 dc into same stitch as join. Work 1 dc into next stitch. (2 dc into next stitch, 1 dc into next stitch) repeat around. Sl st to join. (30 dc)
Round 4: Chain 3 (counts as dc). Work 1 dc into same stitch as join. Work 1 dc into each of next 4 stitches. (2 dc into next stitch, 1 dc into each of next 4 stitches) repeat around 4 more times. Sl st to join. (36 dc)
Marking the Tips: Place a stitch marker into the first stitch of the round just completed (the stitch with the join), then count and mark every 7th stitch. You will have 5 marked stitches total. These 5 marked stitches are your tip stitches. Move markers up each round.
Round 5: Chain 3. Work 2 dc into marked tip stitch (first marked stitch, the stitch where you joined). Work 1 dc in each stitch until you reach the next marked tip stitch. Work 3 dc into marked tip stitch (1 dc already present plus 2 additional = 3 dc into tip). Continue in this manner: 1 dc across to next tip, 3 dc into tip, repeat for all five tip stitches. Sl st to join. (46 dc)
Round 6: Chain 3. Work 2 dc into tip stitch (first marker). 1 dc across to next tip. 3 dc into tip. Repeat for all five tips. Sl st to join. (56 dc)
Round 7: Chain 3. Work 2 dc into tip stitch. 1 dc across to next tip. 3 dc into tip. Repeat for all five tips. Sl st to join. (66 dc)
Round 8: Chain 3. Work 1 dc into each stitch to tip. 3 dc into tip stitch. Continue around all five tips in this manner. 1 dc into each remaining stitch. Sl st to join. (76 dc)
Round 9: Chain 3. 1 dc across to tip. 3 dc into tip. Repeat around. Sl st to join. (86 dc)
Round 10: Chain 3. 1 dc across to tip. 3 dc into tip. Repeat around. Sl st to join. (96 dc)
Checkpoint: After Round 10, lay the piece flat. Measure from the center to one point tip. It should be approximately 6 inches (15 cm). Measure the widest span across two opposite points. It should be approximately 12 inches (30.5 cm) at this stage. If your measurements are off, adjust by going up or down one hook size.
Round 11: Chain 4 (counts as dc plus ch-1). Skip next stitch. (1 dc into next stitch, ch 1, skip 1 stitch) repeat to 2 stitches before tip. 1 dc into stitch before tip. Ch 1. Into tip stitch work (1 dc, ch 1, 1 dc, ch 1, 1 dc) for a triple point increase. Ch 1. Continue (1 dc, ch 1, skip 1) pattern across to next tip and repeat. Sl st into 3rd chain of beginning ch-4. (55 dc with ch-1 spaces)
Round 12: Sl st into first ch-1 sp. Chain 3 (counts as dc). 1 dc into each ch-1 sp and each dc across to tip cluster. Into the center dc of the triple tip cluster work 3 dc. Continue 1 dc into each dc and ch-1 sp across to next tip. Repeat around all five tips. Sl st to join. (116 dc)
Round 13: Chain 3. 1 dc across to tip. 3 dc into tip. Repeat around. Sl st to join. (126 dc)
Round 14: Chain 4. Skip 1. (1 dc, ch 1, skip 1) across to 2 sts before tip. 1 dc. Ch 1. Into tip work (1 dc, ch 1, 1 dc, ch 1, 1 dc). Ch 1. Continue (dc, ch 1, skip 1) to next tip. Repeat around. Sl st to 3rd ch of ch-4. (68 dc with ch-1 spaces)
Round 15: Sl st into first ch-1 sp. Chain 3. 1 dc into each ch-1 sp and each dc across to tip center. 3 dc into center dc of tip cluster. Repeat around. Sl st to join. (136 dc)
Round 16: Chain 3. 1 dc across to tip. 3 dc into tip. Repeat all five tips. Sl st to join. (146 dc)
Round 17: Chain 3. 1 dc across to tip. 3 dc into tip. Repeat. Sl st to join. (156 dc)
Checkpoint: After Round 17, the star should measure approximately 18 to 19 inches across the widest span and each ray should measure approximately 9 inches from center to tip. Place the piece on a flat surface and confirm it lies flat with no cupping.
Round 18: Chain 4 (counts as dc, ch 1). Skip 1. (1 dc, ch 1, skip 1) across to 2 sts before tip. 1 dc. Ch 1. Into tip work (1 dc, ch 1, 1 dc, ch 1, 1 dc). Ch 1. Continue pattern to next tip. Repeat around. Sl st into 3rd ch of ch-4. (79 dc with ch-1 spaces)
Round 19: Sl st into first ch-1 sp. Chain 3. 1 dc into each ch-1 sp and dc across to tip center dc. 3 dc into tip. Continue around. Sl st to join. (166 dc)
Round 20: Chain 3. 1 dc across to tip. 3 dc into tip. Repeat. Sl st to join. (176 dc)
Round 21: Chain 3. 1 dc across to tip. 3 dc into tip. Repeat. Sl st to join. (186 dc)
Round 22 (Final lace round before edging): Chain 4. Skip 1. (1 dc, ch 1, skip 1) to 2 sts before tip. 1 dc. Ch 1. Into tip work (1 dc, ch 1, 1 dc, ch 1, 1 dc). Ch 1. Continue around. Sl st to 3rd ch of ch-4. (94 dc with ch-1 spaces)
Round 23: Sl st into first ch-1 sp. Chain 3. 1 dc into each sp and dc to tip center. 3 dc into tip. Continue around. Sl st to join. (196 dc)
Round 24: Chain 3. 1 dc across to tip. 3 dc into tip. Repeat around all five. Sl st to join. (206 dc)
Do not fasten off. Proceed directly to the Star Base Scallop Edging.
Star Base Scallop Edging
The scallop edging requires a stitch count divisible by 4. Round 24 has 206 dc. Work an adjustment round as follows:
Adjustment Round: Chain 1, do not turn. Work 1 sc into same stitch as join. Work 1 sc into each dc around, except at each of the five tip stitches work 3 sc into the tip. At the five indentation valleys between rays, work sc2tog to decrease 1 stitch. Work to achieve a final count of 208 sc by adding one extra sc at two of the five tips. Sl st to first sc. (208 sc)
Scallop Round: Chain 1. 1 sc into first stitch. Skip 1 stitch. 5 dc into next stitch. Skip 1 stitch. 1 sc into next stitch. Repeat (skip 1, 5 dc into next st, skip 1, 1 sc into next st) around. Sl st to first sc. Fasten off. Weave in all ends on star base. Block. (52 scallop repeats)
PIECE 2: COCOON POD
The cocoon is worked flat in rows from the bottom up. It starts narrow at the foot and widens slightly for the hip area, then narrows again at the top for the snug neck opening.
Foundation Chain: Chain 45. (44 working stitches)
Row 1 (RS): Skip first ch from hook. 1 sc into each ch across. Ch 1, turn. (44 sc)
Rows 2 through 6: 1 sc into each sc across. Ch 1, turn. (44 sc)
Row 7 (increase row): 1 sc into first sc. 2 sc into next sc (increase). 1 sc across to last 2 sc. 2 sc into next sc (increase). 1 sc into last sc. Ch 1, turn. (46 sc)
Rows 8 through 10: 1 sc into each sc across. Ch 1, turn. (46 sc)
Row 11 (increase row): 1 sc into first. Inc. 1 sc across to last 2. Inc. 1 sc into last. Ch 1, turn. (48 sc)
Rows 12 through 14: 1 sc each across. Ch 1, turn. (48 sc)
Row 15 (increase row): Inc in first. 1 sc across to last. Inc in last. Ch 1, turn. (50 sc)
Rows 16 through 20: 1 sc each across. Ch 1, turn. (50 sc)
Checkpoint: After Row 20, the cocoon piece should measure approximately 5 inches tall. Width should be approximately 14 inches.
Row 21: Switch to dc for body texture. Chain 3 (counts as dc), turn. 1 dc into each sc across. Ch 3, turn. (50 dc)
Rows 22 through 30: 1 dc into each dc across. Ch 3, turn. (50 dc)
Row 31 (decrease row): Chain 3, turn. Dc2tog over first 2 sts. 1 dc across to last 3 sts. Dc2tog. 1 dc in last st. Ch 3, turn. (48 dc)
Rows 32 through 34: 1 dc each across. Ch 3, turn. (48 dc)
Row 35 (decrease row): Ch 3, turn. Dc2tog. 1 dc across to last 3. Dc2tog. 1 dc. Ch 3, turn. (46 dc)
Rows 36 through 38: 1 dc each across. Ch 3, turn. (46 dc)
Row 39 (decrease row): Ch 3, turn. Dc2tog. 1 dc across to last 3. Dc2tog. 1 dc. Ch 3, turn. (44 dc)
Rows 40 through 42: 1 dc each across. Ch 3, turn. (44 dc)
Row 43 (decrease row): Ch 3, turn. Dc2tog. 1 dc across to last 3. Dc2tog. 1 dc. Ch 3, turn. (42 dc)
Rows 44 through 46: 1 dc each across. Ch 3, turn. (42 dc)
Checkpoint: After Row 46, the cocoon body should measure approximately 11 inches tall from the foundation chain. Width should be approximately 12 inches.
Row 47 (neck shaping decrease): Ch 3, turn. Dc2tog. 1 dc across to last 3. Dc2tog. 1 dc. Ch 3, turn. (40 dc)
Row 48: 1 dc each across. Ch 3, turn. (40 dc)
Row 49 (decrease): Ch 3, turn. Dc2tog. 1 dc across to last 3. Dc2tog. 1 dc. Ch 3, turn. (38 dc)
Row 50: 1 dc each across. Ch 3, turn. (38 dc)
Row 51 (decrease): Ch 3, turn. Dc2tog. 1 dc across to last 3. Dc2tog. 1 dc. Ch 3, turn. (36 dc)
Row 52: 1 dc each across. Fasten off. (36 dc)
The cocoon body piece is now complete. It measures approximately 16 inches tall and 10 inches wide at the top opening.
Cocoon Assembly
Fold the cocoon piece in half widthwise, RS together. Seam the bottom edge closed using a whipstitch or slip stitch seam through both thicknesses. Seam the two side edges together from the bottom, leaving the top 5 inches open on each side for arm/hand clearance. Turn RS out.
The opening at the top creates a wrapped look. The front edges overlap at center front by approximately 1.5 inches. The right front panel sits on top and has buttonholes. The left front panel sits below and has buttons.
Cocoon Front Panel Edging and Buttonholes
Attach yarn at the bottom right edge of the right front opening. Work 1 sc into each row end up the right front edge to the top. Fasten off. You should have approximately 40 to 44 sc along this edge.
Reattach yarn at the top of the left front edge. Work 1 sc down to the bottom. (Same count as right edge.)
For the right front panel, work a second edging row:
Reattach yarn at the bottom of the right front edge. Chain 1. Work 1 sc into each sc to the first button placement, approximately 4 sc up from bottom. Ch 3 (buttonhole), skip 3 sc. 1 sc into each sc to next button placement, approximately 8 sc above the first buttonhole. Ch 3 (buttonhole), skip 3 sc. 1 sc to next placement if using 3 buttons, approximately 8 sc above second buttonhole. Ch 3, skip 3. 1 sc to top of edge. Fasten off.
Work the sc edging on the left front panel plain without buttonholes.
Cocoon Scallop Edging
Work the scallop edging around the top opening of the cocoon. Attach yarn at the back seam of the top opening. Work sc evenly around the top edge to create a count divisible by 4. Approximate count: 72 sc around the full top opening. Sl st to join.
Scallop Round: Ch 1. 1 sc. Skip 1. 5 dc into next. Skip 1. 1 sc. Rep around. Sl st to first sc. Fasten off. (18 scallop repeats)
PIECE 3: BONNET
The bonnet is worked flat in rows starting at the face opening edge and worked upward toward the pointed crown.
Foundation Chain: Chain 49. (48 working stitches)
Row 1 (RS): Ch 3 (counts as dc), turn. 1 dc into 4th ch from hook and each ch across. Ch 3, turn. (48 dc)
Rows 2 through 4: 1 dc into each dc across. Ch 3, turn. (48 dc)
Row 5 (decrease row): Ch 3, turn. Dc2tog. 1 dc across to last 3. Dc2tog. 1 dc. Ch 3, turn. (46 dc)
Rows 6 through 8: 1 dc across. Ch 3, turn. (46 dc)
Row 9 (decrease): Ch 3, turn. Dc2tog. 1 dc to last 3. Dc2tog. 1 dc. Ch 3, turn. (44 dc)
Rows 10 through 12: 1 dc across. Ch 3, turn. (44 dc)
Row 13 (decrease): Ch 3, turn. Dc2tog. 1 dc to last 3. Dc2tog. 1 dc. Ch 3, turn. (42 dc)
Rows 14 through 16: 1 dc across. Ch 3, turn. (42 dc)
Row 17 (decrease): Ch 3, turn. Dc2tog. 1 dc to last 3. Dc2tog. 1 dc. Ch 3, turn. (40 dc)
Rows 18 through 20: 1 dc across. Ch 3, turn. (40 dc)
Continue decreasing 2 stitches every other row:
Row 21: Decrease to (38 dc)
Row 23: Decrease to (36 dc)
Row 25: Decrease to (34 dc)
Row 27: Decrease to (32 dc)
Row 29: Decrease to (30 dc)
Row 31: Decrease to (28 dc)
Row 33: Decrease to (26 dc)
Row 35: Decrease to (24 dc)
Row 37: Decrease to (22 dc)
Row 39: Decrease to (20 dc)
Row 41: Decrease to (18 dc)
Row 43: Decrease to (16 dc)
Row 45: Decrease to (14 dc)
Row 47: Decrease to (12 dc)
Row 49: Decrease to (10 dc)
Row 51: Decrease to (8 dc)
Row 53: Decrease to (6 dc)
Row 55: Dc2tog, dc2tog, dc2tog. (3 dc)
Row 56: Dc2tog, dc2tog. (2 dc)
Row 57: Dc2tog. (1 dc) Fasten off, leaving a long tail.
Thread the tail onto a yarn needle and weave through the remaining stitch, pulling to secure the tip point. Knot firmly.
Bonnet Assembly
Fold the bonnet piece in half so that the straight edges at the back (the starting foundation chain edge) meet. Seam the back edge together from the point tip downward approximately 4.5 inches, leaving the bottom open for the face opening.
Bonnet Face Edge Scallop Edging
Pick up stitches along the face opening edge. Starting at the back seam, work 1 sc into each foundation chain stitch and each row end around the face opening. Aim for a total of 48 sc around the face opening. Adjust to nearest multiple of 4.
Scallop Round: Ch 1. (1 sc, skip 1, 5 dc into next, skip 1) around. Sl st to first sc. Fasten off. (12 scallop repeats)
Final Assembly
1. Block all three pieces before assembly using your blocking mats and rust-proof pins.
2. Lay the star base flat with the right side facing up.
3. Position the cocoon in the center of the star, with the top opening aligned so the baby’s head will rest at one of the star points.
4. The bonnet sits on the baby’s head with the pointed tip echoing the star points.
5. Sew buttons onto the left front panel of the cocoon, aligned with the buttonholes on the right panel.
6. Weave in any remaining ends.
Tips for Success
Count your stitches at the end of every round on the star base. Missing even one increase at a tip will throw off the symmetry.
Use locking stitch markers rather than split ring markers. They are easier to move up each round.
Block generously. The star base especially benefits from wet blocking. Pin each point out firmly and let it dry completely.
Test your buttonholes before sewing on the buttons. Make sure the buttons slide through easily but do not pop open on their own.
You Did It!
This starfish swaddle set is one of those patterns that looks incredibly impressive but is really just patient repetition of simple stitches. Once you get into the rhythm of the tip increases, the star grows quickly. And the cocoon and bonnet are wonderfully straightforward after all that counting.
I hope you love making this as much as I loved designing it. These sets make the most treasured gifts for new parents, and the photos are always absolutely magical.
If you found this crochet pattern helpful, save it to your Pinterest boards so you can find it again later. And please leave a comment below if you make one. I would love to see your finished starfish swaddle!
You Might Also Like
- Sage Green Natural Minimalist Braided Bag Free Crochet Pattern
- Mint Green Baby Poncho Free Crochet Pattern
- Black Cat Halloween Tote Bag Free Crochet Pattern
- Blueberry Baby Hat and Pants Set Free Crochet Pattern
