
Last summer, my niece announced she wanted to be a marine biologist. She spent every weekend watching ocean documentaries and filling notebooks with sketches of dolphins and jellyfish. When her birthday rolled around, I knew a store-bought gift wouldn’t cut it.
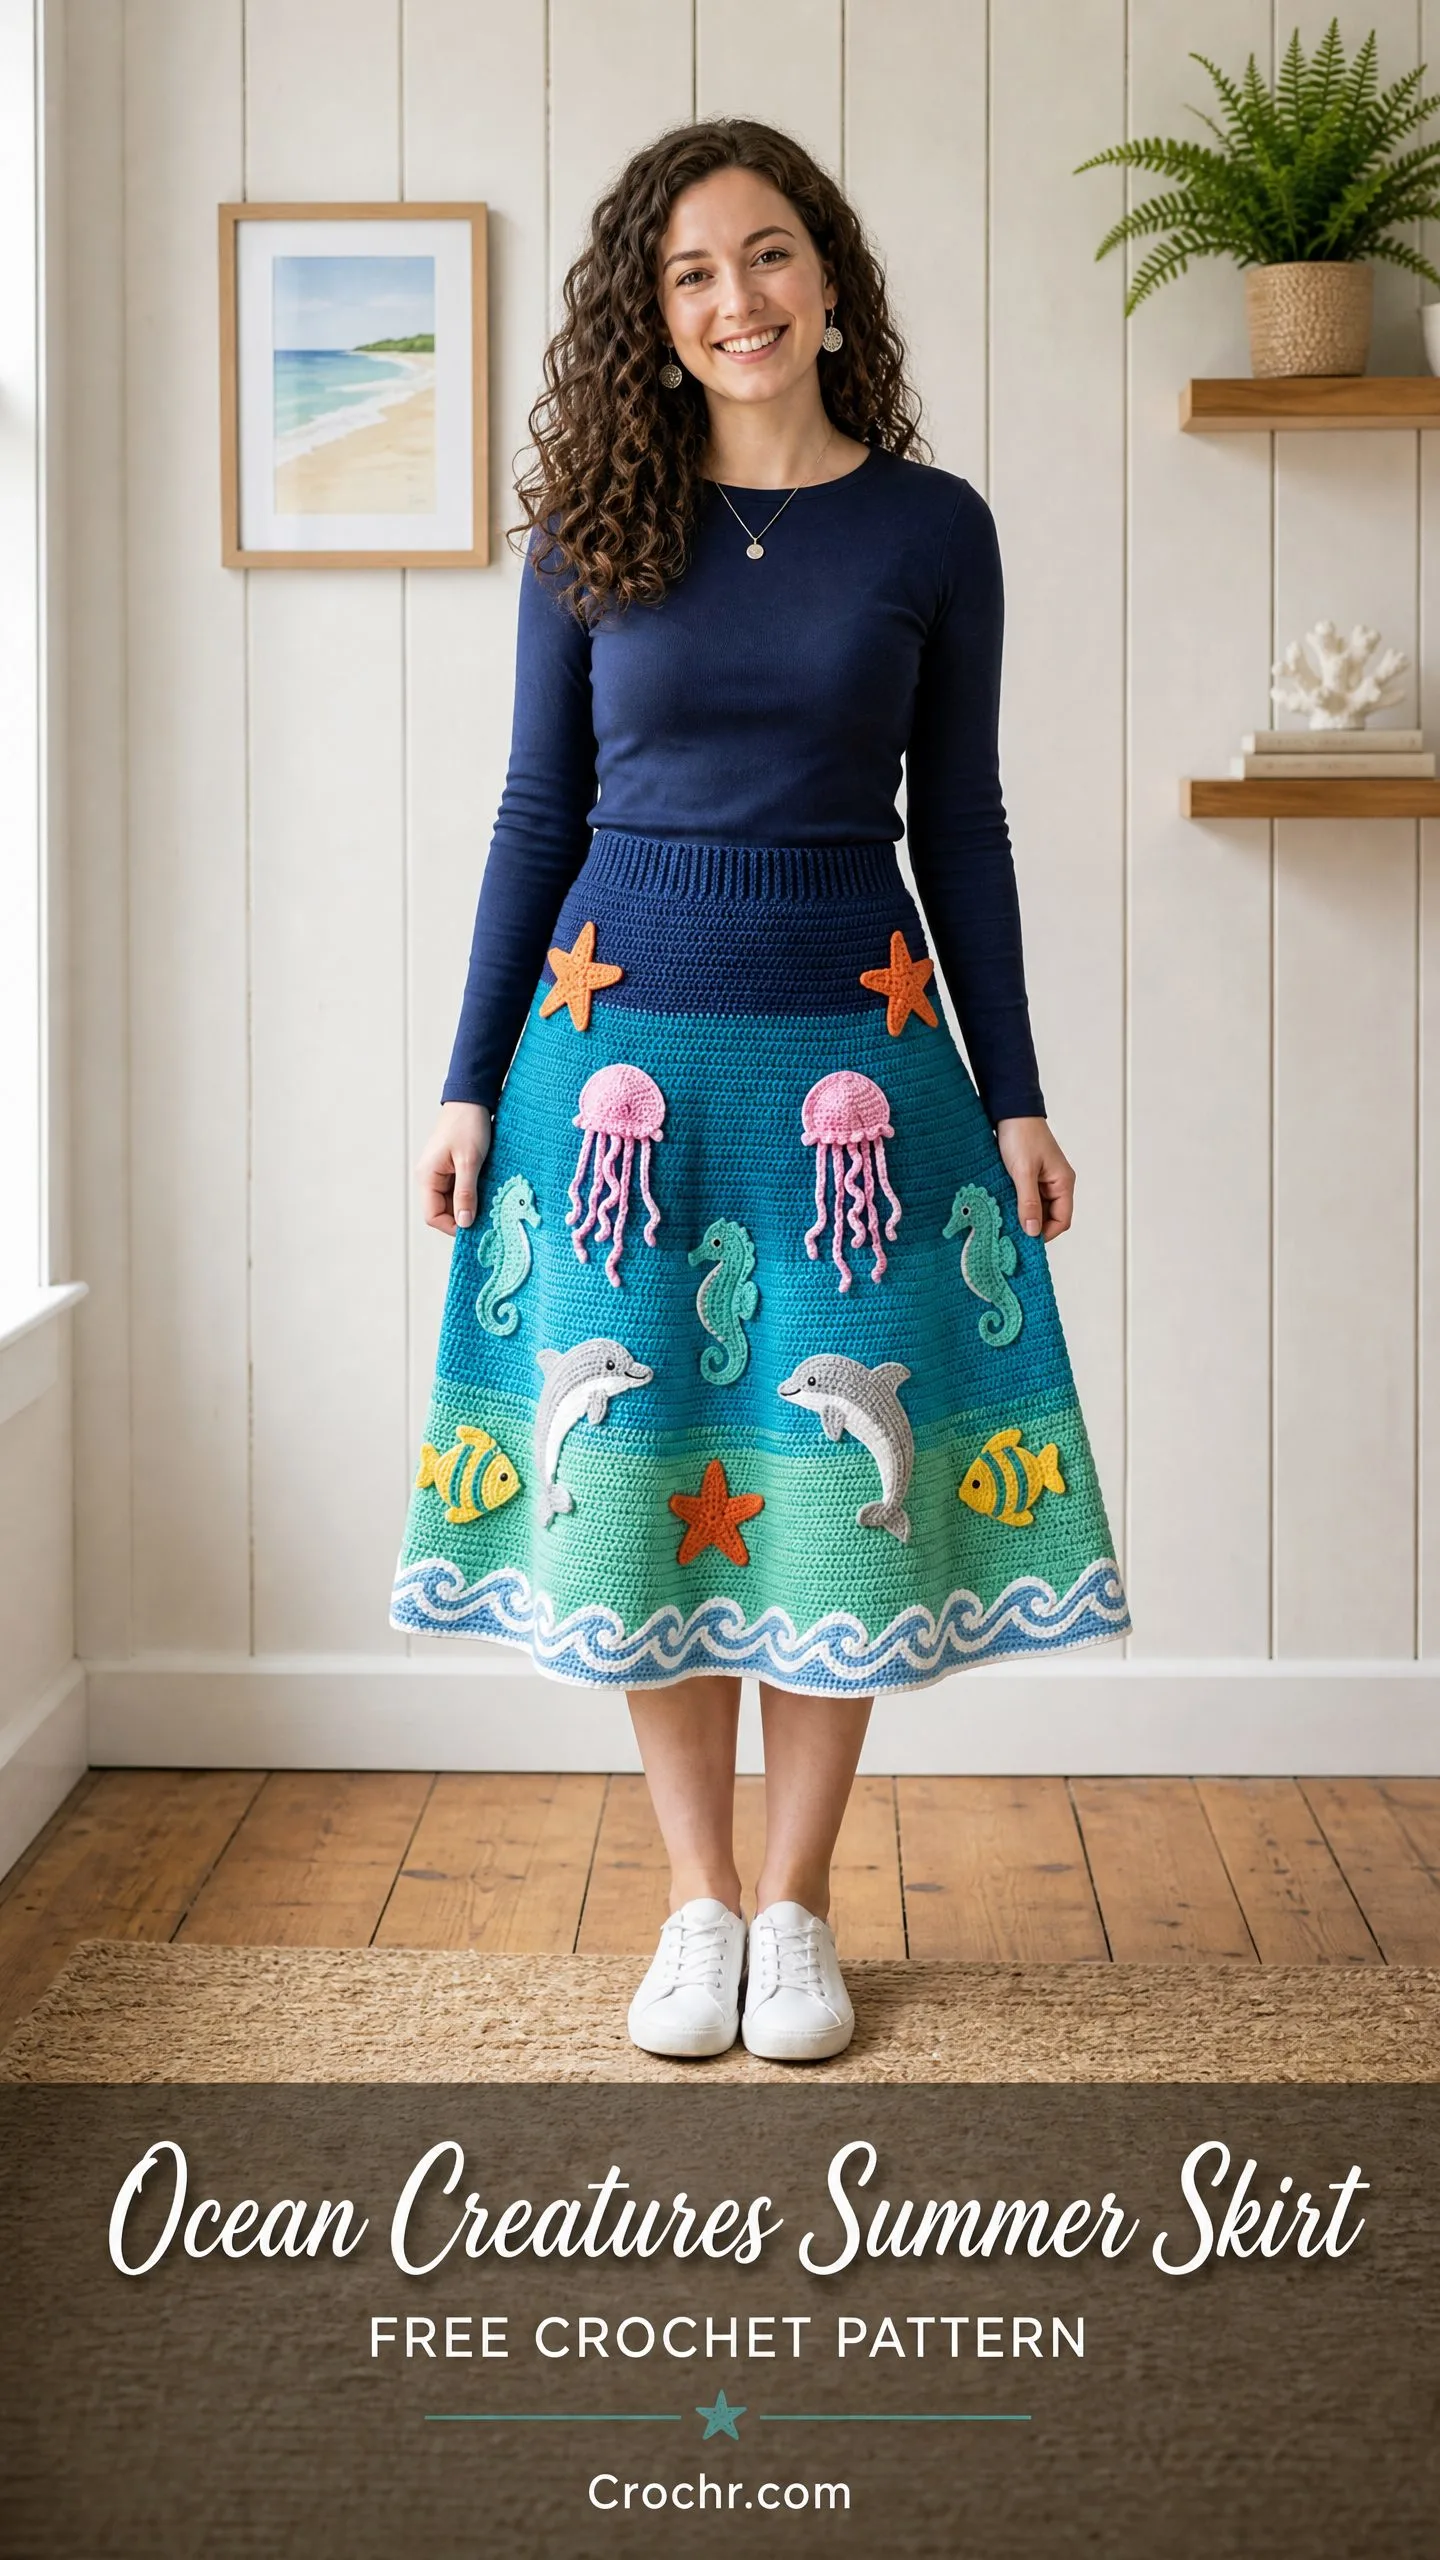
I wanted to make her something she’d actually wear. Something that captured all those creatures she loved without looking like a costume. That’s how this skirt came to be. An A-line midi with a gradient that looks like you’re peering down into the ocean, complete with all her favorite sea creatures swimming across it.
She wore it to her birthday dinner, to the aquarium the next week, and approximately forty-seven other times before school started. If you’ve got someone in your life who loves the ocean, or if you just want to wear your own little underwater world, this is the project for you.
About This Ocean Creatures Crochet Pattern
This A-line midi skirt features a navy ribbed waistband worked flat and seamed, followed by a seamless circular body worked in continuous rounds from the waist down. The magic happens in the color transitions. You’ll move through four ombre shades, starting with deep teal at the top and flowing through medium teal and aqua down to pale mint at the hem. The effect looks like ocean depth, with lighter water near the surface.
The hem gets finished with a decorative wave border in white and pale blue. Then comes the fun part. You’ll crochet dimensional applique motifs separately and sew them onto the finished skirt. Starfish, jellyfish, seahorses, dolphins, and tropical fish all find their places on your personal underwater scene.
Skill Level: Intermediate to Advanced
The skirt body itself uses straightforward single crochet (sc) in the round, which beginners can handle. But this project asks more of you. You’ll need confident color management across four gradient colors, the ability to maintain even tension over hundreds of rounds, gauge discipline across a large garment, and comfort constructing seven distinct types of dimensional applique motifs. If you’ve made garments before and worked with applique, you’ll do great.
Time Estimate: The skirt body alone takes approximately 30 to 40 hours at average pace. Each applique motif needs 30 to 90 minutes depending on complexity. Total project time including all motifs, finishing, and blocking runs about 50 to 65 hours.
Finished Measurements
The default size fits a 32 to 34 inch (81 to 86 cm) hip circumference.
Size Customization Tips
Don’t worry if the default size isn’t quite right. Here’s how to adjust:
For waist size: Change the number of stitches in the waistband foundation chain in multiples of 2. Each 2 stitches equals approximately 0.5 inch (1.3 cm) of waistband circumference. Adjust the pickup round accordingly.
For hip width: The skirt body begins at 208 sc and flares to 312 sc over 22 inches. To size up, add increases in multiples of 8 to keep the repeat structure even. Each 8-stitch addition adds approximately 3 inches (7.6 cm) to the final circumference.
For length: Add or subtract rounds in any of the four color sections. Each round adds approximately 0.25 inch (0.6 cm) of length.
For a shorter knee-length skirt: Work 16 inches of skirt body instead of 22, completing all color transitions proportionally earlier.
Materials Needed
Yarn (DK weight, light 3):
For motifs you’ll also need small amounts of:
Hook: US Size D/3 (3.25 mm) for all parts
Additional Supplies:
Yarn Suggestions
Option 1: Paintbox Yarns Simply DK. 100 percent acrylic, 137 yards (125 m) per 50 g ball. Excellent stitch definition, wide color range, machine washable. Colors: Midnight Blue (Yarn A), Spearmint Green (approximate Yarn D/E), Kingfisher Blue (approximate Yarn B/C).
Option 2: Lion Brand Pound of Love. 100 percent acrylic, 1020 yards (933 m) per 16 oz skein. Budget-friendly, soft, machine washable.
Option 3: Paintbox Yarns Cotton DK. 100 percent cotton, 137 yards (125 m) per 50 g ball. Ideal for a summer skirt with natural breathability and excellent drape. Note that cotton has no memory, so the waistband will benefit from elastic reinforcement.
Substitution note: Use any DK weight yarn that achieves the stated gauge. Avoid yarns with excessive halo or texture, as the applique detail will be obscured.
Gauge
22 sc x 26 rows = 4 inches x 4 inches (10 cm x 10 cm) worked in single crochet in the round with a US D/3 (3.25 mm) hook, after blocking.
Gauge is critical for this garment. Even a half-stitch difference per inch will significantly alter the final hip circumference and skirt length. Make a gauge swatch of at least 6 inches x 6 inches, block it, and measure the center 4 inches before proceeding. Adjust hook size as needed.
Abbreviations
Special Stitches
Reverse Single Crochet (rev sc), also called crab stitch:
Do not turn work. Insert hook into the stitch to the RIGHT (opposite of normal direction), yo, draw up a loop, yo, draw through both loops on hook. This creates a twisted, corded edging used on the wave border.
Picot:
Ch 3, sl st into the first of those 3 chains. Creates a small decorative loop. Used on jellyfish tentacles and starfish points.
Bobble (3-dc bobble):
Yo, insert hook into stitch, yo, draw up a loop, yo, draw through 2 loops (2 loops remain on hook). Repeat this sequence 2 more times into the same stitch, each time leaving the last loop on hook, until 4 loops are on hook. Yo, draw through all 4 loops. Used for fish eye and seahorse texture accents.
Magic Ring:
Form a loop with yarn, insert hook through loop, yo, draw up a loop, ch 1 to secure. Work stitches into the center of the ring. Pull tail to close. Used to begin all circular motifs.
Pattern Notes
1. The skirt body is worked in continuous rounds (no joining, no turning). Use a locking stitch marker to mark the first stitch of each round and move it up as you go.
2. The waistband is worked flat in rows (ribbing direction runs perpendicular to the pickup edge) and then seamed. The ribbing is picked up along the long edge of the waistband rectangle to create the pickup round for the skirt body.
3. Color changes happen by dropping the old color at the end of the last stitch (after drawing through the final two loops) and picking up the new color. Carry unused colors loosely on the wrong side for up to 3 rounds.
4. The skirt flares from 208 sc at the waist pickup round to 312 sc at the beginning of the wave border, adding 104 stitches over approximately 88 rounds. Increase rounds are distributed evenly throughout.
5. All applique motifs are crocheted separately, lightly stuffed with fiberfill if desired, and sewn onto the finished blocked skirt.
6. Right side of the skirt body is the outside of the fabric. When working in continuous rounds, the right side always faces you.
7. The waistband ribbing is worked in BLO to create the stretchy rib texture.
8. Stitch counts are given in parentheses at the end of every round or row.
Step by Step Crochet Pattern Instructions
Waistband
The waistband is a ribbed rectangle worked flat, then seamed at the short ends, and then stitches are picked up along the long top edge to begin the skirt body.
With Yarn A and hook US D/3 (3.25 mm), ch 20.
Row 1 (RS): Sc in 2nd ch from hook and in each ch across. Turn. (19 sc)
Row 2: Ch 1, sc in BLO of each st across. Turn. (19 sc)
Repeat Row 2 until piece measures 26 inches (66 cm) from beginning, ending with a WS row. This will be approximately 144 rows total, but measure rather than count rows. The 19-stitch width creates a waistband approximately 3 inches (7.5 cm) deep.
Fasten off, leaving a 12-inch (30.5 cm) tail for seaming.
Fold the waistband so the short ends meet. Using the tail and a tapestry needle, whipstitch or mattress stitch the short ends together to form a tube. The seam will sit at the center back of the skirt.
Checkpoint: Your waistband tube should measure 26 inches (66 cm) around and 3 inches (7.5 cm) tall. The ribbing should stretch comfortably to 32 inches (81 cm).
Skirt Body: Pickup Round
Hold the waistband with the RS facing out and the long open edge (the edge that has individual rib row ends, not the chain edge) at the top.
The chain-start edge will become the top of the waistband. The open ribbed edge will be picked up to begin the skirt.
With Yarn A, insert hook into the first row end on the long lower edge of the waistband.
Pickup Round: Work 208 sc evenly spaced around the entire lower edge of the waistband, picking up one stitch per row end. You have 144 row ends so you will need to pick up 1 stitch in some rows and skip others to reach exactly 208 stitches. A simple way to achieve this: every 9th row, work 2 sc into that row end instead of 1. Place a stitch marker in the first stitch. Do not join. Work in continuous rounds. (208 sc)
Skirt Body Section 1: Yarn B, Deep Teal, Rounds 1 to 22
Change to Yarn B at the end of the pickup round by drawing Yarn B through the last 2 loops of the final stitch. Do not cut Yarn A yet; carry it on the wrong side for 2 rounds then cut it.
Rnds 1-7: Sc in each st around. (208 sc)
Rnd 8 (Increase Round 1): (Sc 25, inc) x 8. (216 sc)
Rnds 9-15: Sc in each st around. (216 sc)
Rnd 16 (Increase Round 2): (Sc 26, inc) x 8. (224 sc)
Rnds 17-22: Sc in each st around. (224 sc)
Checkpoint after Section 1: Piece should measure approximately 8.5 inches (21.5 cm) from the top of the waistband. Stitch count: 224 sc.
Skirt Body Section 2: Yarn C, Medium Teal, Rounds 23 to 44
Change to Yarn C at the end of Rnd 22. Cut Yarn B.
Rnd 23: Sc in each st around. (224 sc)
Rnd 24 (Increase Round 3): (Sc 27, inc) x 8. (232 sc)
Rnds 25-31: Sc in each st around. (232 sc)
Rnd 32 (Increase Round 4): (Sc 28, inc) x 8. (240 sc)
Rnds 33-39: Sc in each st around. (240 sc)
Rnd 40 (Increase Round 5): (Sc 29, inc) x 8. (248 sc)
Rnds 41-44: Sc in each st around. (248 sc)
Checkpoint after Section 2: Piece should measure approximately 14 inches (35.5 cm) from the top of the waistband. Stitch count: 248 sc.
Skirt Body Section 3: Yarn D, Aqua, Rounds 45 to 66
Change to Yarn D at the end of Rnd 44. Cut Yarn C.
Rnds 45-47: Sc in each st around. (248 sc)
Rnd 48 (Increase Round 6): (Sc 30, inc) x 8. (256 sc)
Rnds 49-55: Sc in each st around. (256 sc)
Rnd 56 (Increase Round 7): (Sc 31, inc) x 8. (264 sc)
Rnds 57-63: Sc in each st around. (264 sc)
Rnd 64 (Increase Round 8): (Sc 32, inc) x 8. (272 sc)
Rnds 65-66: Sc in each st around. (272 sc)
Checkpoint after Section 3: Piece should measure approximately 19.5 inches (49.5 cm) from the top of the waistband. Stitch count: 272 sc.
Skirt Body Section 4: Yarn E, Pale Mint, Rounds 67 to 107
Change to Yarn E at the end of Rnd 66. Cut Yarn D.
Rnds 67-71: Sc in each st around. (272 sc)
Rnd 72 (Increase Round 9): (Sc 33, inc) x 8. (280 sc)
Rnds 73-79: Sc in each st around. (280 sc)
Rnd 80 (Increase Round 10): (Sc 34, inc) x 8. (288 sc)
Rnds 81-87: Sc in each st around. (288 sc)
Rnd 88 (Increase Round 11): (Sc 35, inc) x 8. (296 sc)
Rnds 89-95: Sc in each st around. (296 sc)
Rnd 96 (Increase Round 12): (Sc 36, inc) x 8. (304 sc)
Rnds 97-103: Sc in each st around. (304 sc)
Rnd 104 (Increase Round 13, final increase): (Sc 37, inc) x 8. (312 sc)
Rnds 105-107: Sc in each st around. (312 sc)
Checkpoint before border: Piece should measure approximately 25 inches (63.5 cm) from the top of the waistband. Stitch count: 312 sc.
Wave Border
The wave border is worked over 5 rounds using Yarn E (pale mint), Yarn F (white), and Yarn G (pale blue). The border requires a stitch count divisible by 12. Current count is 312 (312 / 12 = 26). Perfect.
Before beginning the border, join the round with a sl st into the first stitch of Rnd 107. From this point, the border is worked in joined rounds with turning chains.
Wave Border Round 1 (Yarn E):
Ch 1. Sc in each st around. Join with sl st to first sc. (312 sc)
Wave Border Round 2 (Yarn F, white):
Join Yarn F with sl st into any st. Ch 1. Work the following wave pattern: (sc in next 2 sts, hdc in next 2 sts, dc in next 2 sts, hdc in next 2 sts, sc in next 2 sts, sl st in next 2 sts) x 26. Join with sl st to first sc. (312 sts)
Wave Border Round 3 (Yarn G, pale blue):
Join Yarn G. Ch 1. Working into the tops of the stitches from Round 2, work the wave pattern offset by 6 stitches to create the layered wave look. This creates the beautiful dimensional wave effect you see in the finished skirt.
Continue following the wave pattern for Rounds 4 and 5, alternating colors as desired to complete the border.
Fasten off and weave in all ends.
Applique Motifs
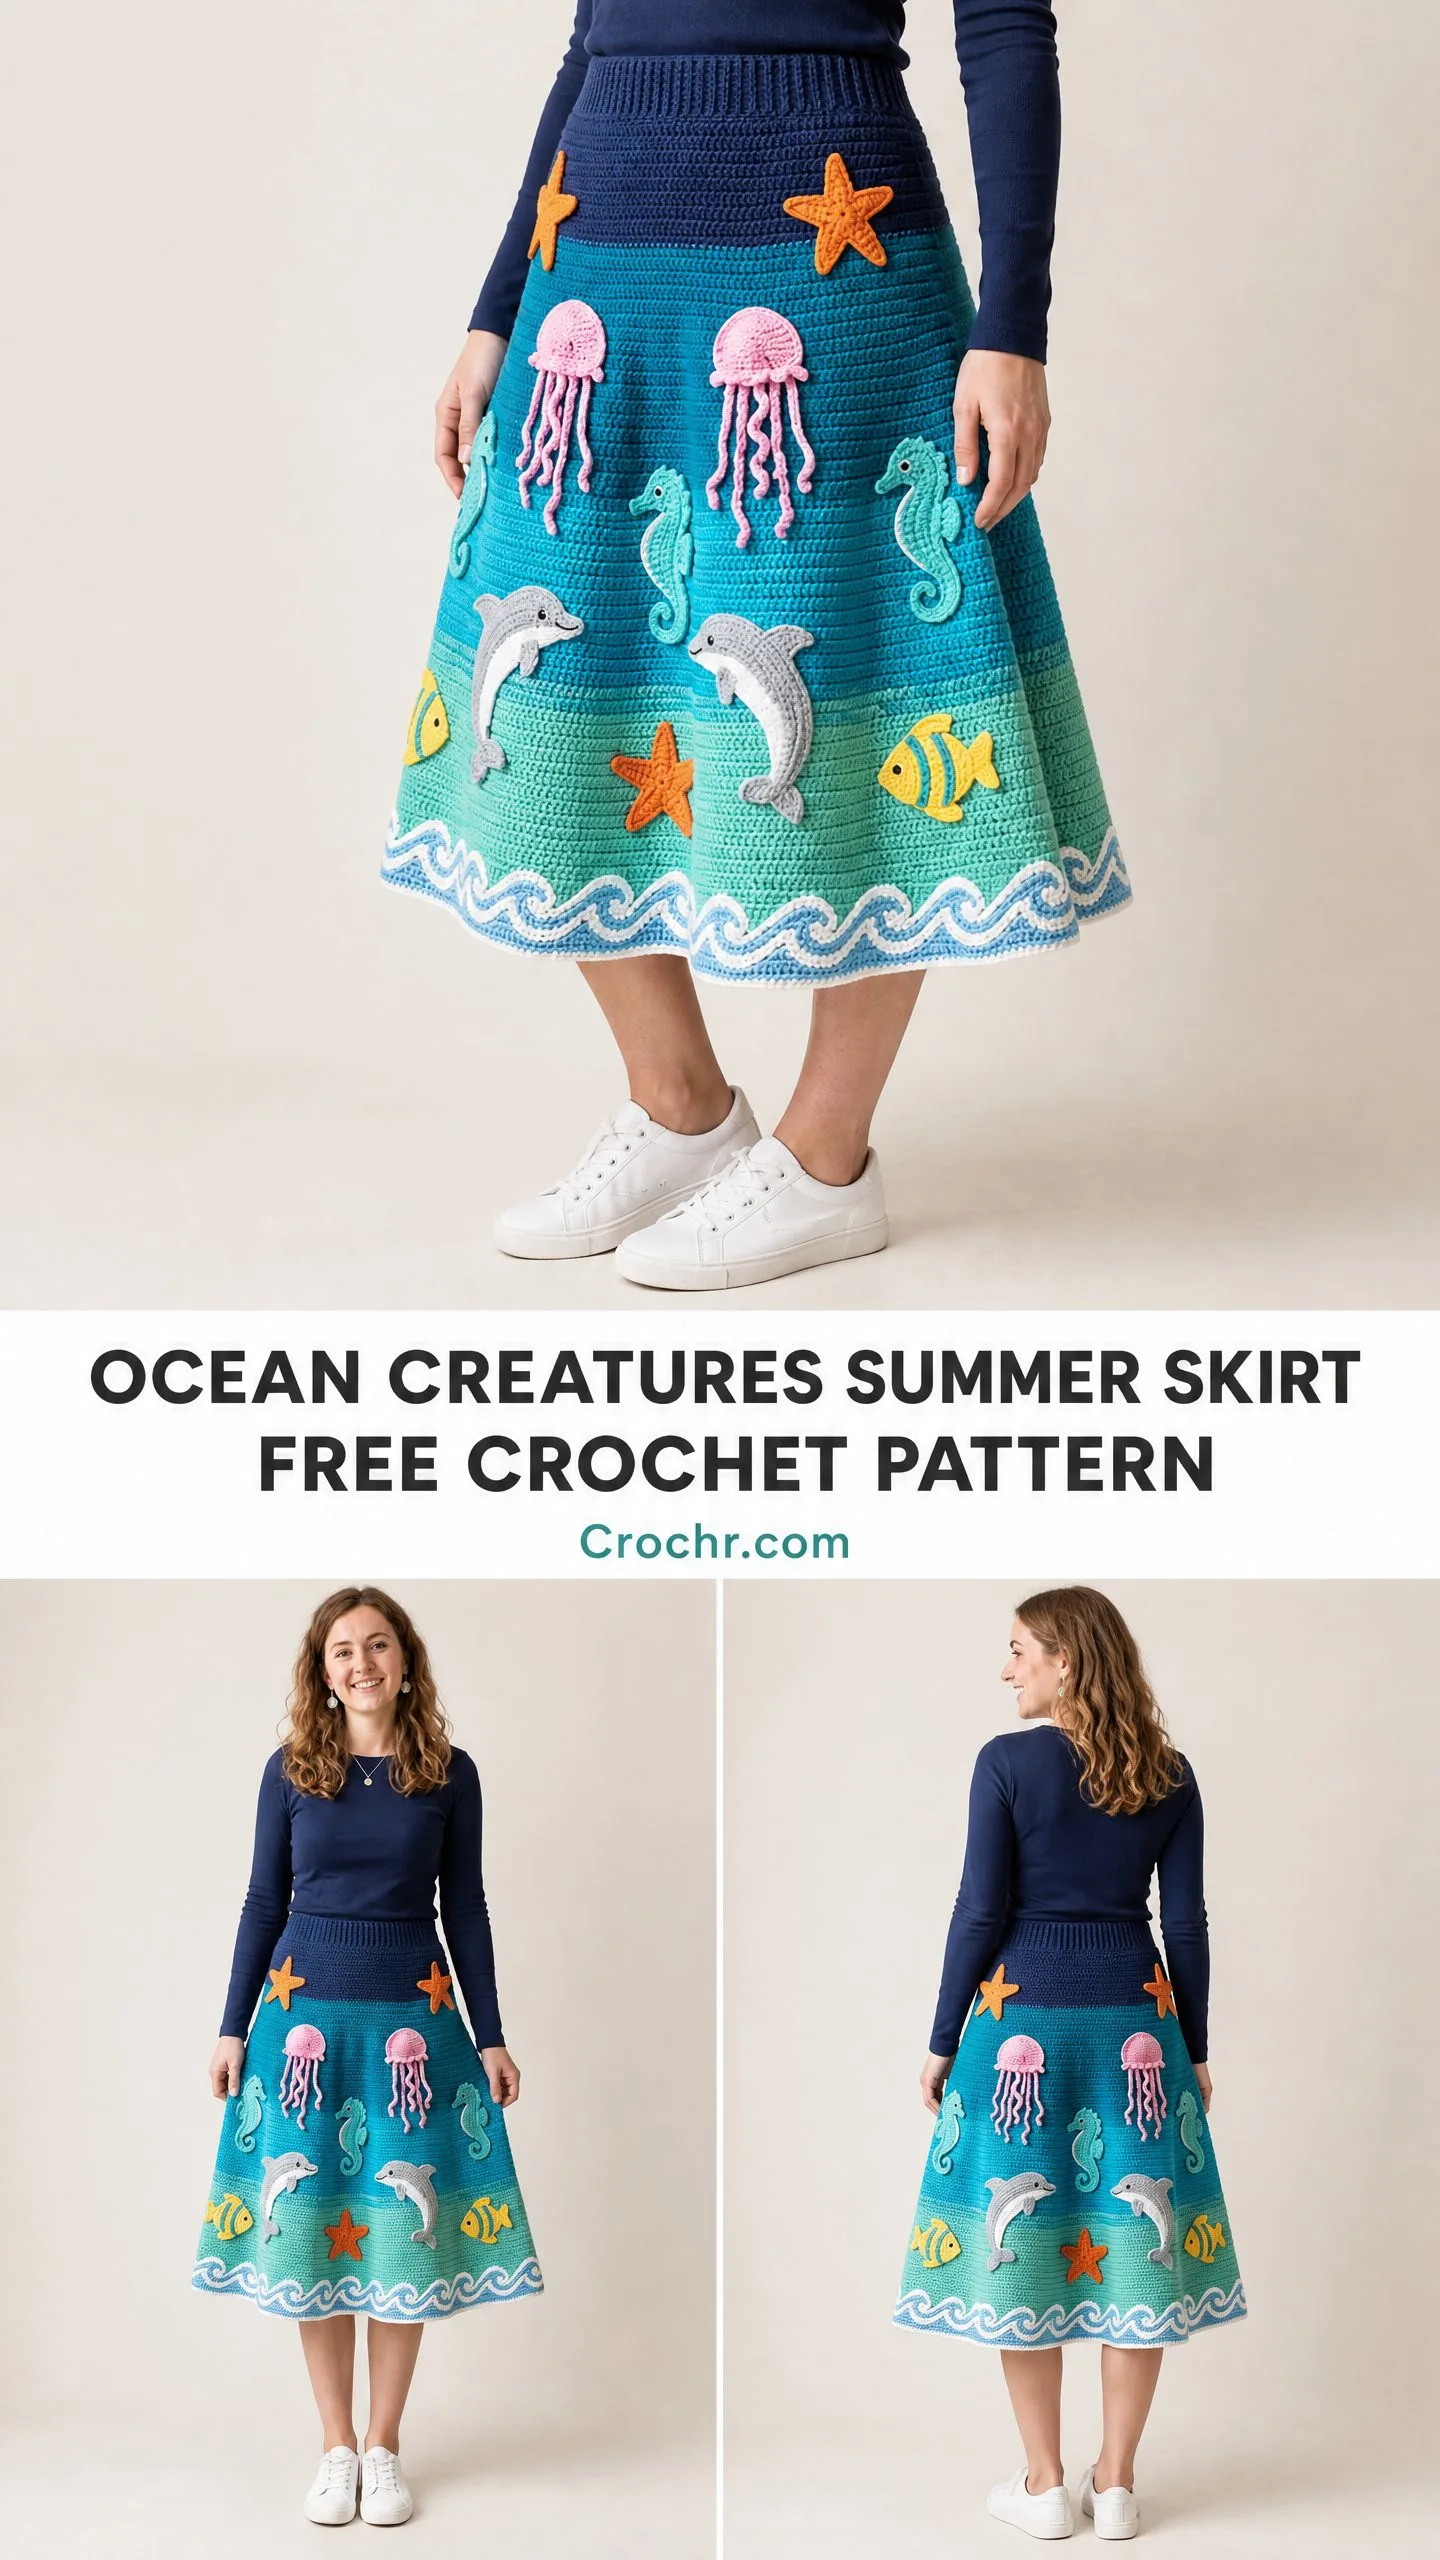
The ocean creatures are what make this skirt truly special. Each motif is crocheted separately using the magic ring technique, then sewn onto the blocked skirt. Refer to the images for placement guidance, distributing the creatures evenly around the skirt.
You’ll create:
Lightly stuff each motif with a small amount of fiberfill if desired for extra dimension. Use a tapestry needle and matching yarn to sew them securely onto the finished skirt.
Finishing
Block your completed skirt before attaching the appliques. Lay it flat on a blocking mat and pin it to the finished measurements. Allow to dry completely.
Once blocked, arrange your appliques on the skirt according to your preference. The photo shows creatures distributed across all four color sections, with starfish near the waistband, jellyfish and seahorses in the middle sections, and dolphins and fish swimming near the hem above the waves.
If you’re adding elastic to the waistband, cut a 1-inch wide piece to your waist measurement and sew it into the inside of the waistband for extra support and security.
Weave in all remaining ends and give your finished skirt a final press if needed.
Tips for Success
Keep your tension consistent. Over hundreds of rounds, even small variations add up. If you notice your work getting tighter or looser, take a break and return with fresh hands.
Mark your increase rounds. Place a contrasting color stitch marker at the beginning of each increase round. This makes it easier to track your progress and catch mistakes early.
Try on as you go. After completing each color section, slip the skirt on over your hips (carefully!) to check the fit. It’s much easier to adjust early than to frog dozens of rounds.
Block before attaching appliques. This ensures your skirt reaches its final dimensions and the appliques sit properly.
I hope you love making this ocean creatures summer skirt as much as I loved designing it. There’s something deeply satisfying about watching those color transitions develop round by round, and the moment you start pinning those little sea creatures in place is pure magic.
If you make this crochet pattern, I’d absolutely love to see it! Tag me on Instagram or share a photo in my Facebook group. Your makes always brighten my day.
Save this pattern to your Pinterest boards so you can find it when you’re ready to start. And please drop a comment below if you have any questions or when you finish your skirt. I can’t wait to hear how it turns out for you!
You Might Also Like
- Black Cat Halloween Tote Bag Free Crochet Pattern
- Dusty Rose Boho Romper Free Crochet Pattern
- Sunset Ombre Crochet Two-Piece Fringe Set Pattern
- Sage Garden Granny Square Maxi Dress Free Crochet Pattern
